Overland Tech and Travel
Advice from the world's
most experienced overlanders
tests, reviews, opinion, and more
Compact versatility: The roller carabiner
For years I’ve repurposed climbing gear, both my no-longer-used stuff and new equipment, for travel duty—especially for load-control purposes. For example, quick-draw slings are perfect for temporary attachment points on roof racks, trailers, and truck beds, from which I can create a criss-cross web of rope perfectly suited to the load. By threading the rope through carabiners attached to the slings I can tension the system simply by pulling on one end. Since slings and carabiners generally have an MBS (minimum breaking strength) north of 20 Kn or 4,500 pounds, they’re capable of safely securing virtually any load.
The same equipment can be used for hanging food out of bear reach, hoisting tarps or awnings or portable shower stalls—dozens of uses. You can rig the stoutest clothesline on the planet. And of course, if necessary, carabiners and slings comprise part of a rescue system to retrieve persons stranded on a cliff or in fast-moving water.
Recently I discovered the roller carabiner, available from Petzl as well as the Welsh company DMM, among others. At first glance it looks like an ordinary carabiner, until you notice the roller incorporated in one end, which transforms the carabiner into an ultra-compact pulley. Suddenly all the tasks that involve tightening or tensioning a rope laced through carabiners become nearly effortless.
In fact, given the strength and force-multiplication characteristics of the roller carabiner, I could envision using it in certain vehicle-recovery situations, for example—using the correct rope—as rigging to stabilize a vehicle tipping hazardously, while a winch recovery is arranged. The roller carabiner certainly won’t substitute for a proper, full-size pulley block or other heavy-duty pulley, but given the compactness and light weight having a few in the kit might prove extremely useful.
The best spout for the NATO jerry can
Most readers here are aware of my strong preference—some might say worship—for the NATO-style steel fuel container over the various plastic alternatives. (Please read this and this.) If asked to justify my choice in five seconds or less, I’d just point to this photo of a friend’s British MOD (Ministry of Defense) can, marked with its date of manufacture—1966—and still perfectly usable. Do you think any plastic fuel containers will still be usable in 60 years? Nope—they’ll all be taking up landfill space.
One of the many advantages of the genuine NATO can is how quickly it decants, thanks largely to an effective breather tube that siphons air into the can as fuel or water pours out. But that advantage can be completely negated by using the wrong spout.
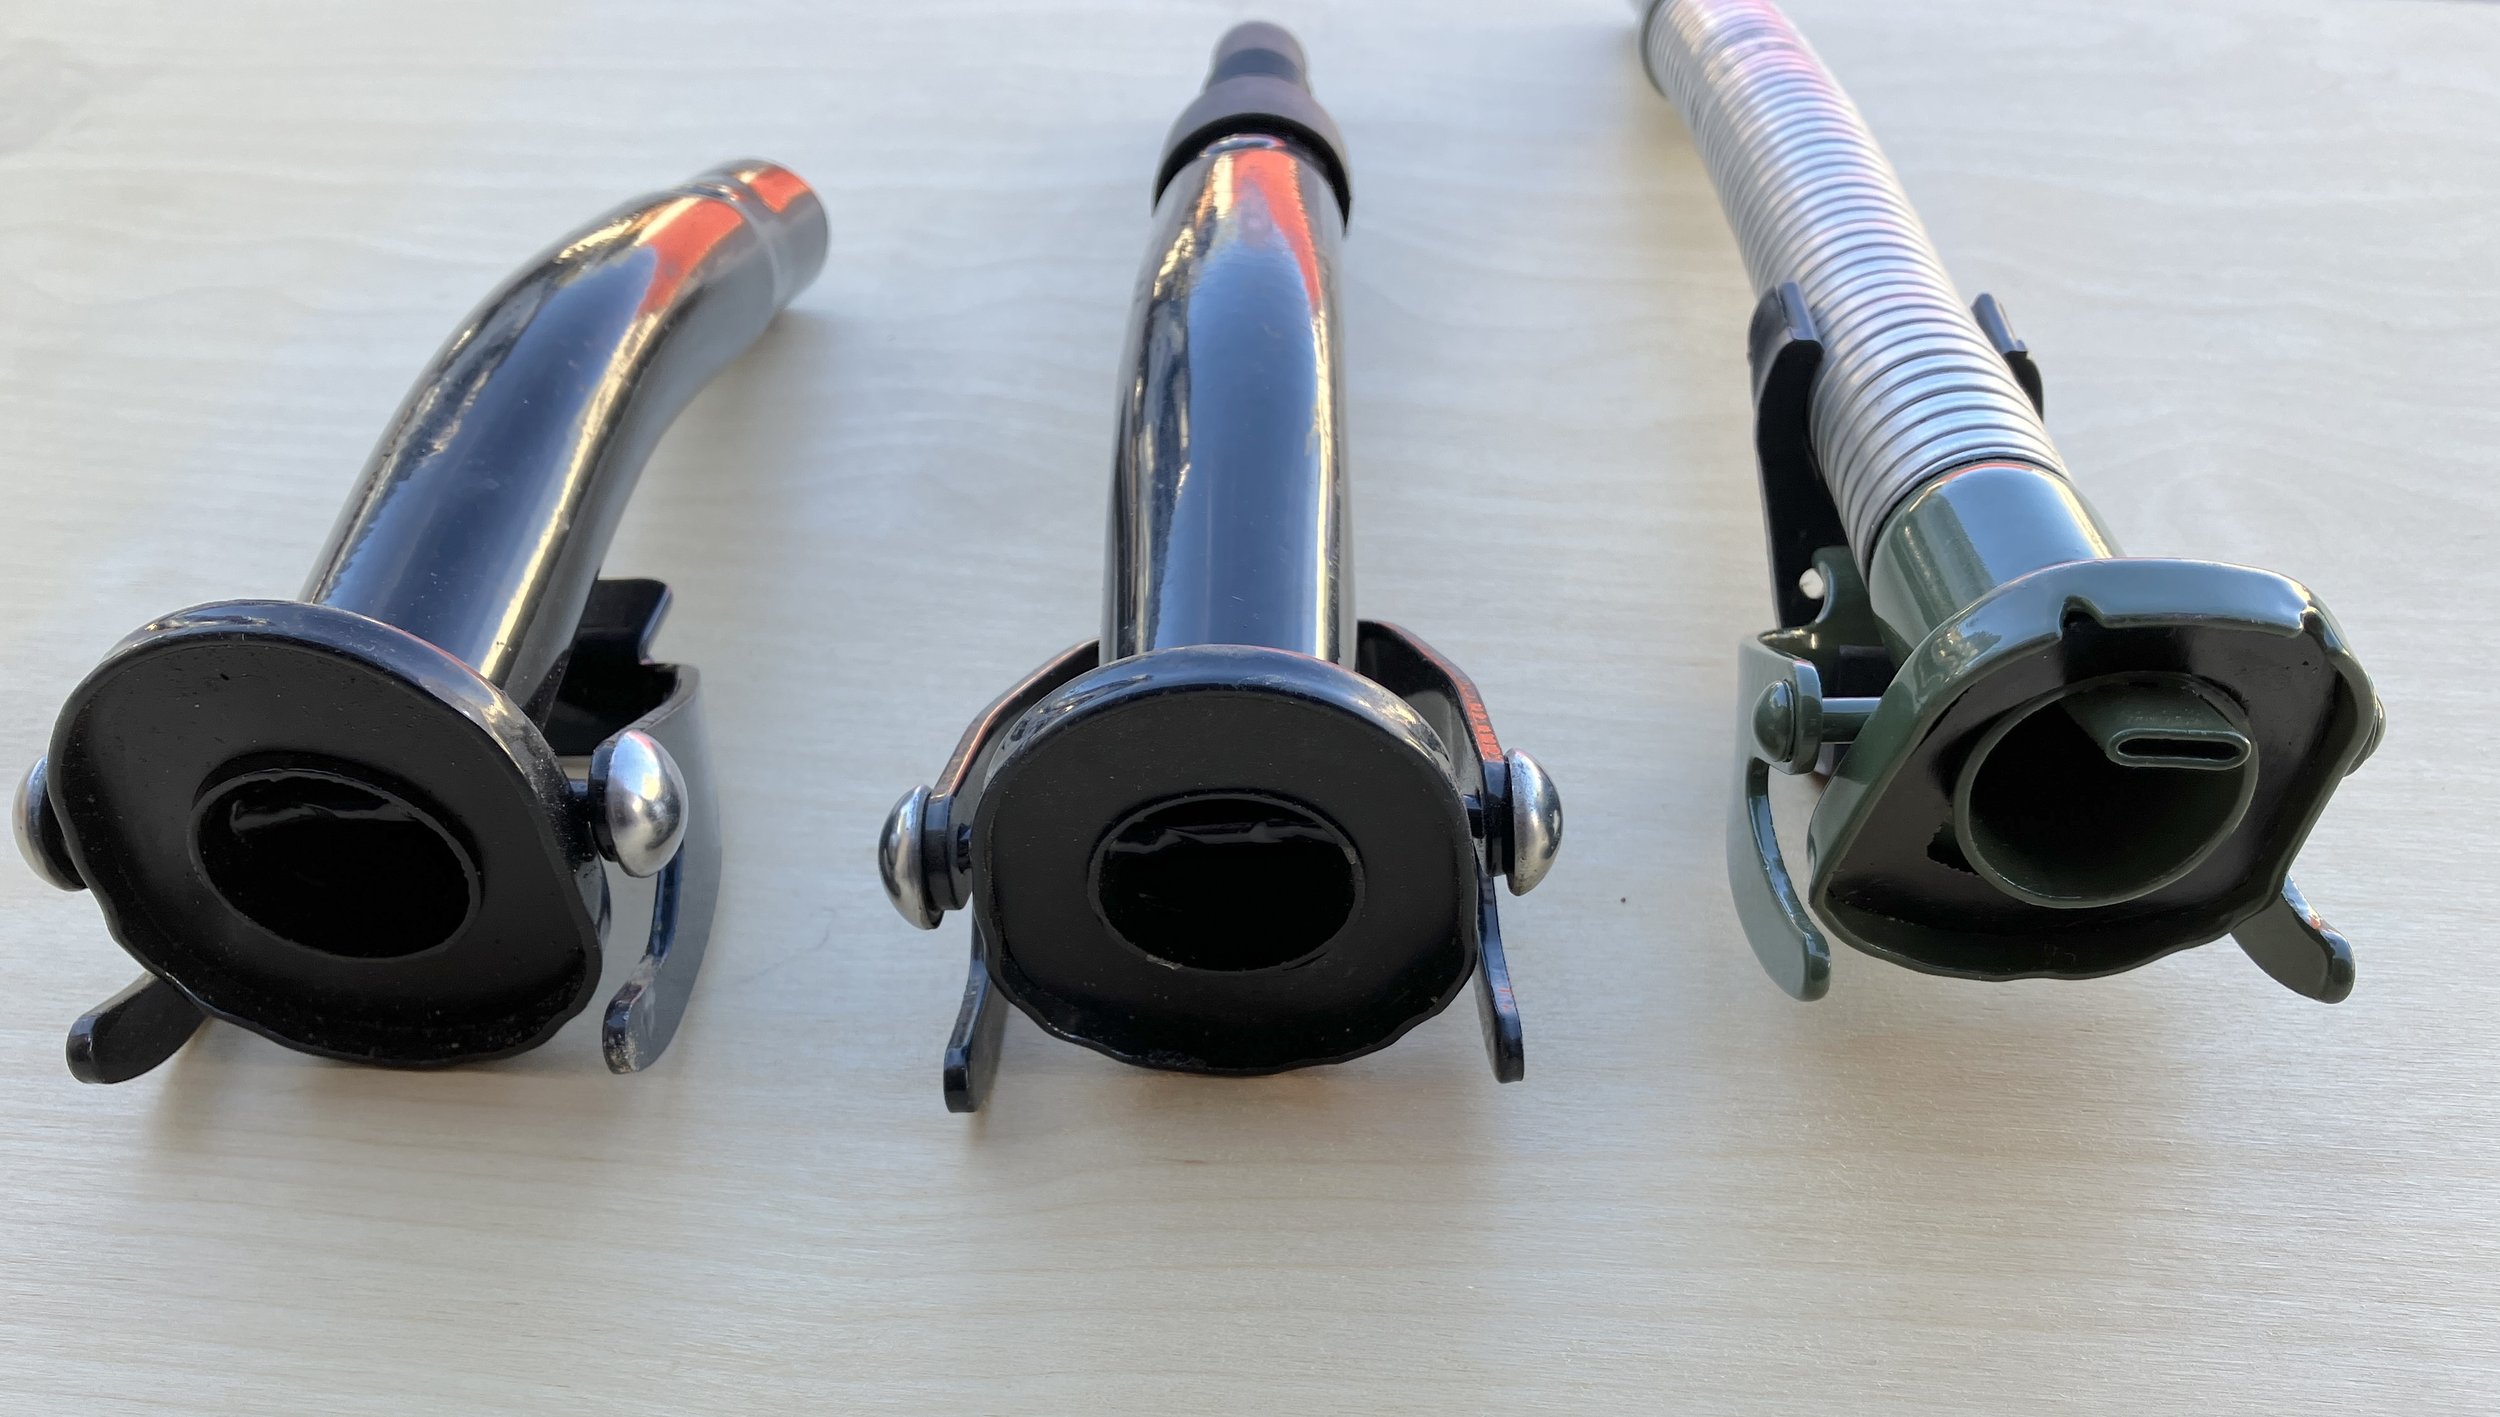
Look at the three spouts shown here—two generic units on top (identical except for the flexible unleaded-friendly extension on one) along with a proper Valpro-made spout.
Notice in the photo below that only the Valpro/NATO spout incorporates the correct breather tube and high-position air intake. The generic units make do with a simple punched hole near the end of the nozzle. (Furthermore, in this sample, the spout on the left wouldn’t even cam closed tightly enough to prevent seepage around the gasket.)
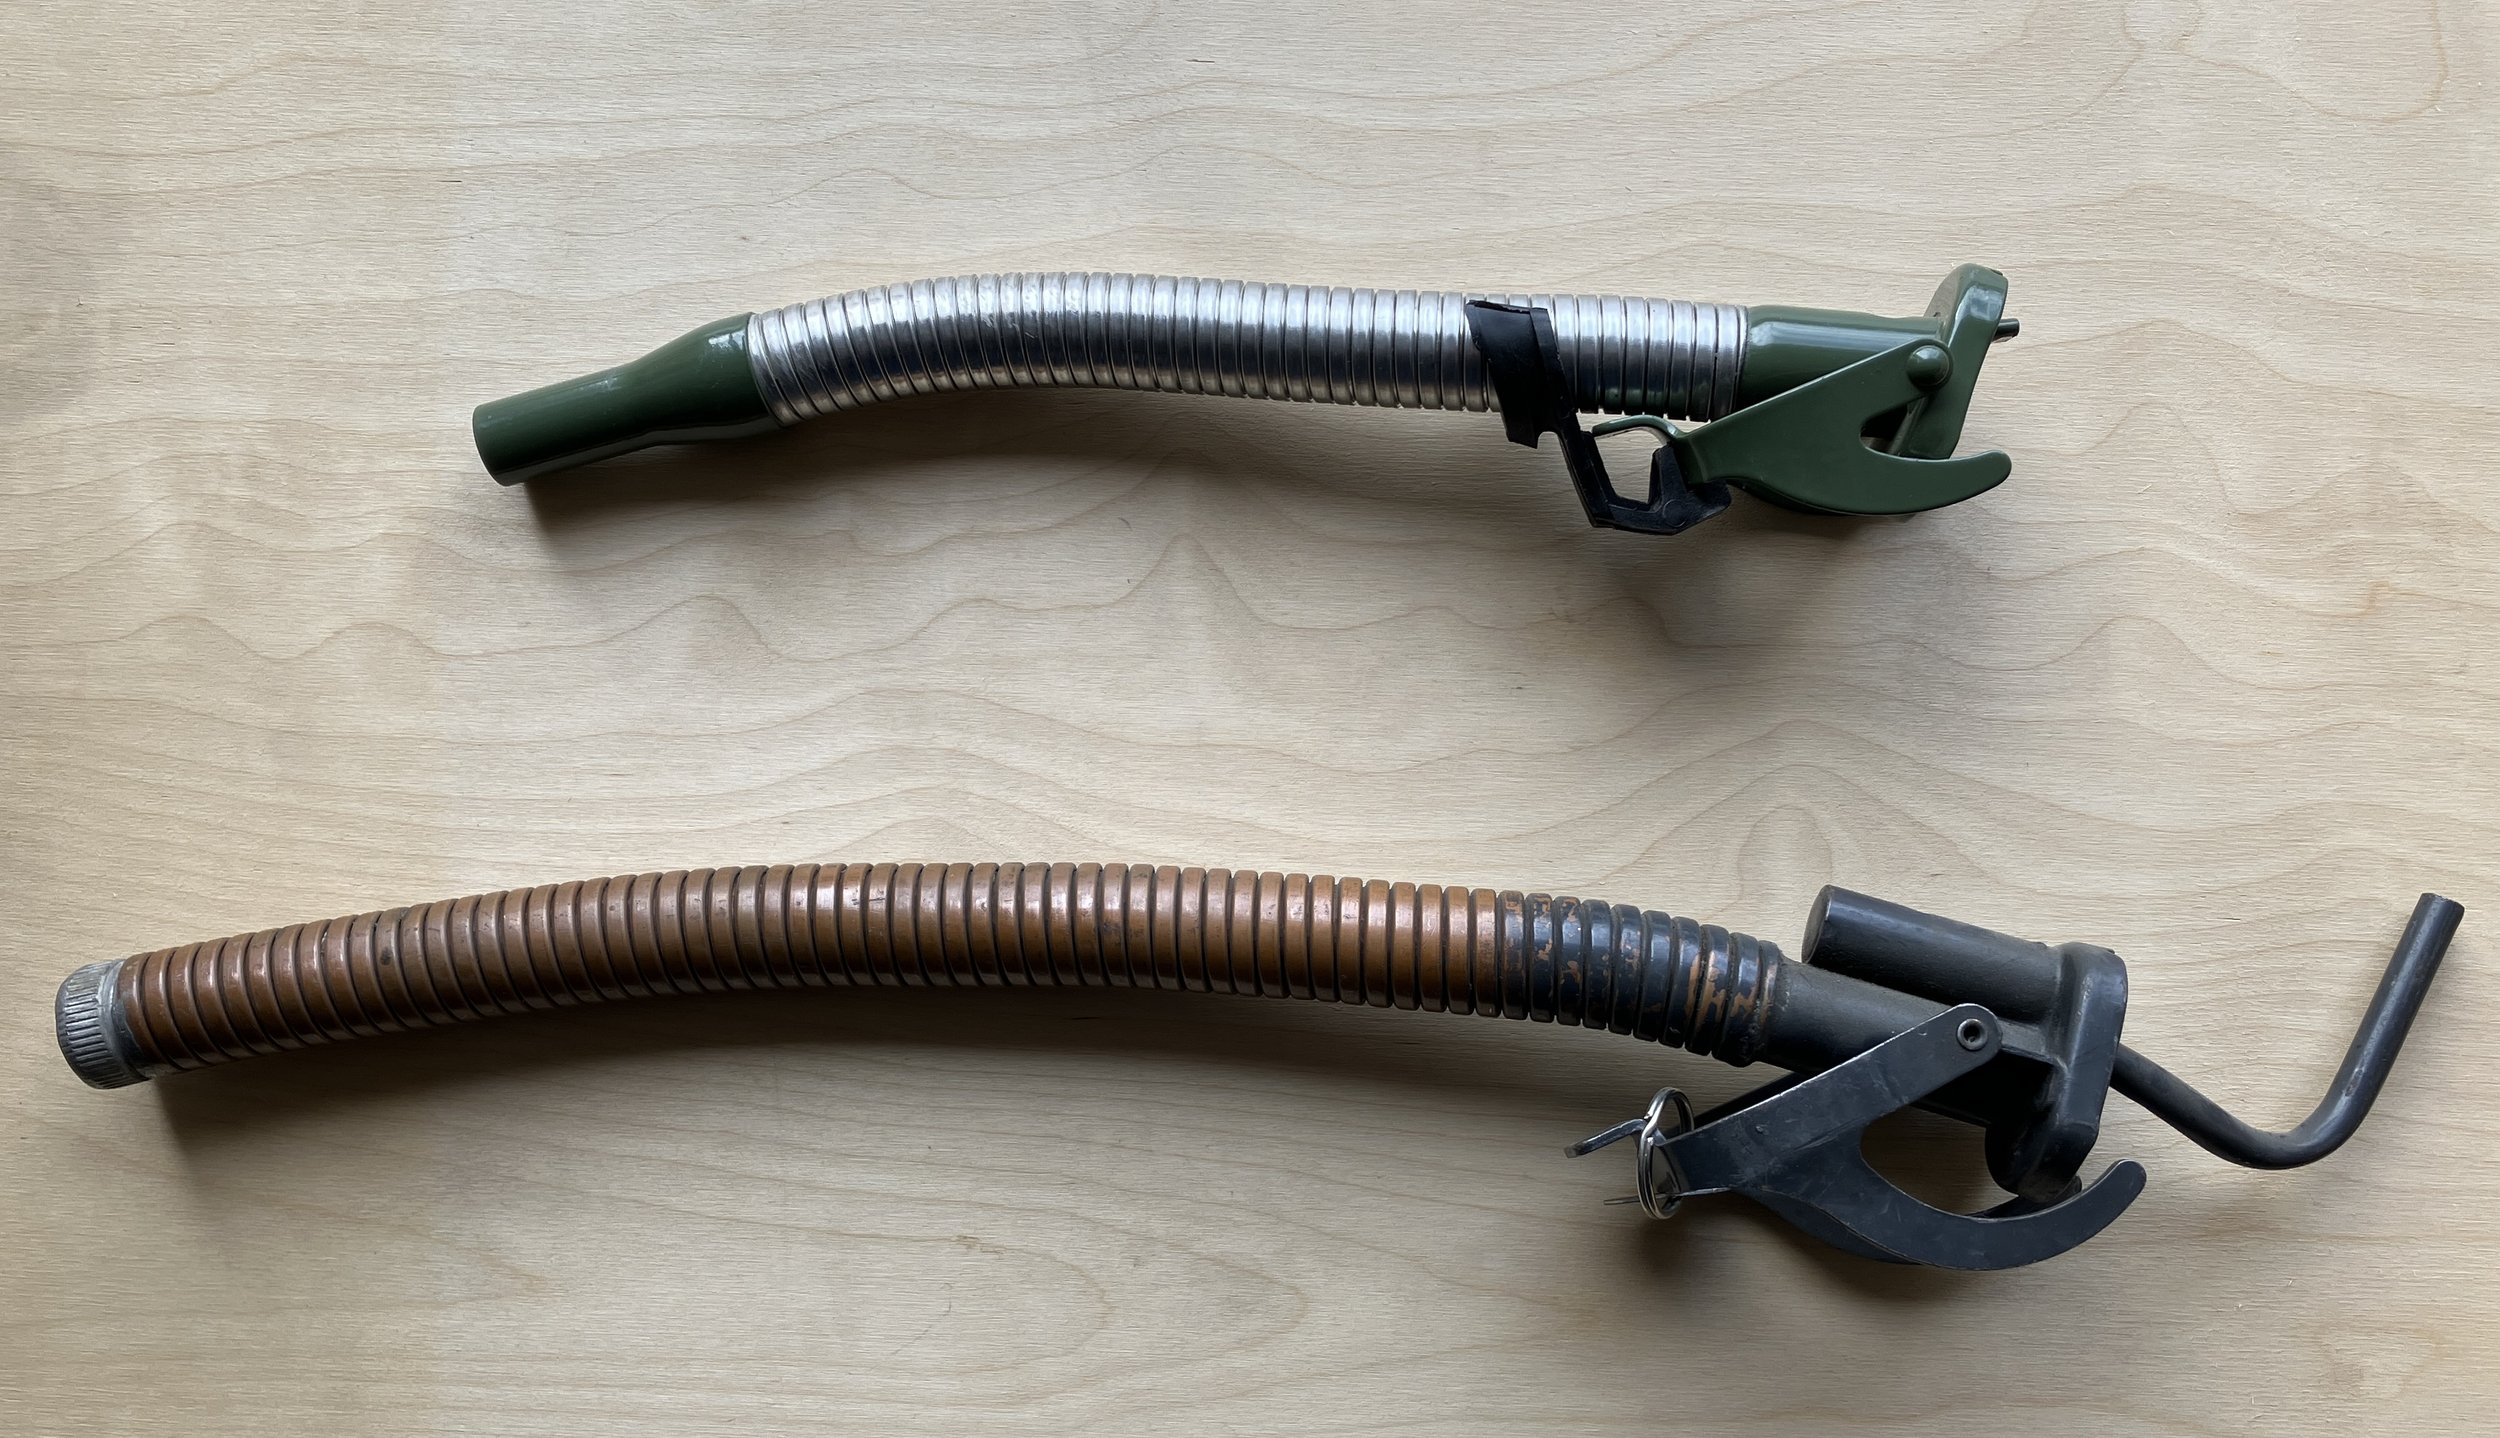
The Valpro includes an excellent, all-metal flexible nozzle with an unleaded-filler-compatible tip. Its cam secures perfectly, and the included rubber clip secures the cam from rattling when stored.
Wavian makes an excellent spout as well, functionally identical to the Valpro, although I’m not fond of the flexible plastic end piece. Chalk that to personal preference.
Wavian also produces a push-to-pour “safety” spout if your local laws require one.
There is, however, another spout—one that some consider the Holy Grail of NATO can spouts. It was made for the Swiss Army, and incorporates a significantly extended breather tube and a larger intake plenum. Legend has it these will empty a full 20-liter jerry can in under 20 seconds. Here’s one with the Valpro spout. The Swiss unit is significantly bulkier, and the nozzle—solid copper to reduce the risk of sparking—is too large for the standard unleaded fuel tank filler, although I know of people who have hacked them to fit.
I decided to put them all to the test.
I started with the Valpro, which along with the Wavian is the high-quality standard. I timed how long it took to empty a full 20-liter water can into another can. In 52 seconds, accompanied by enthusiastic gurgling as the breather kept air flowing into the interior, the can was empty—a commendable performance.
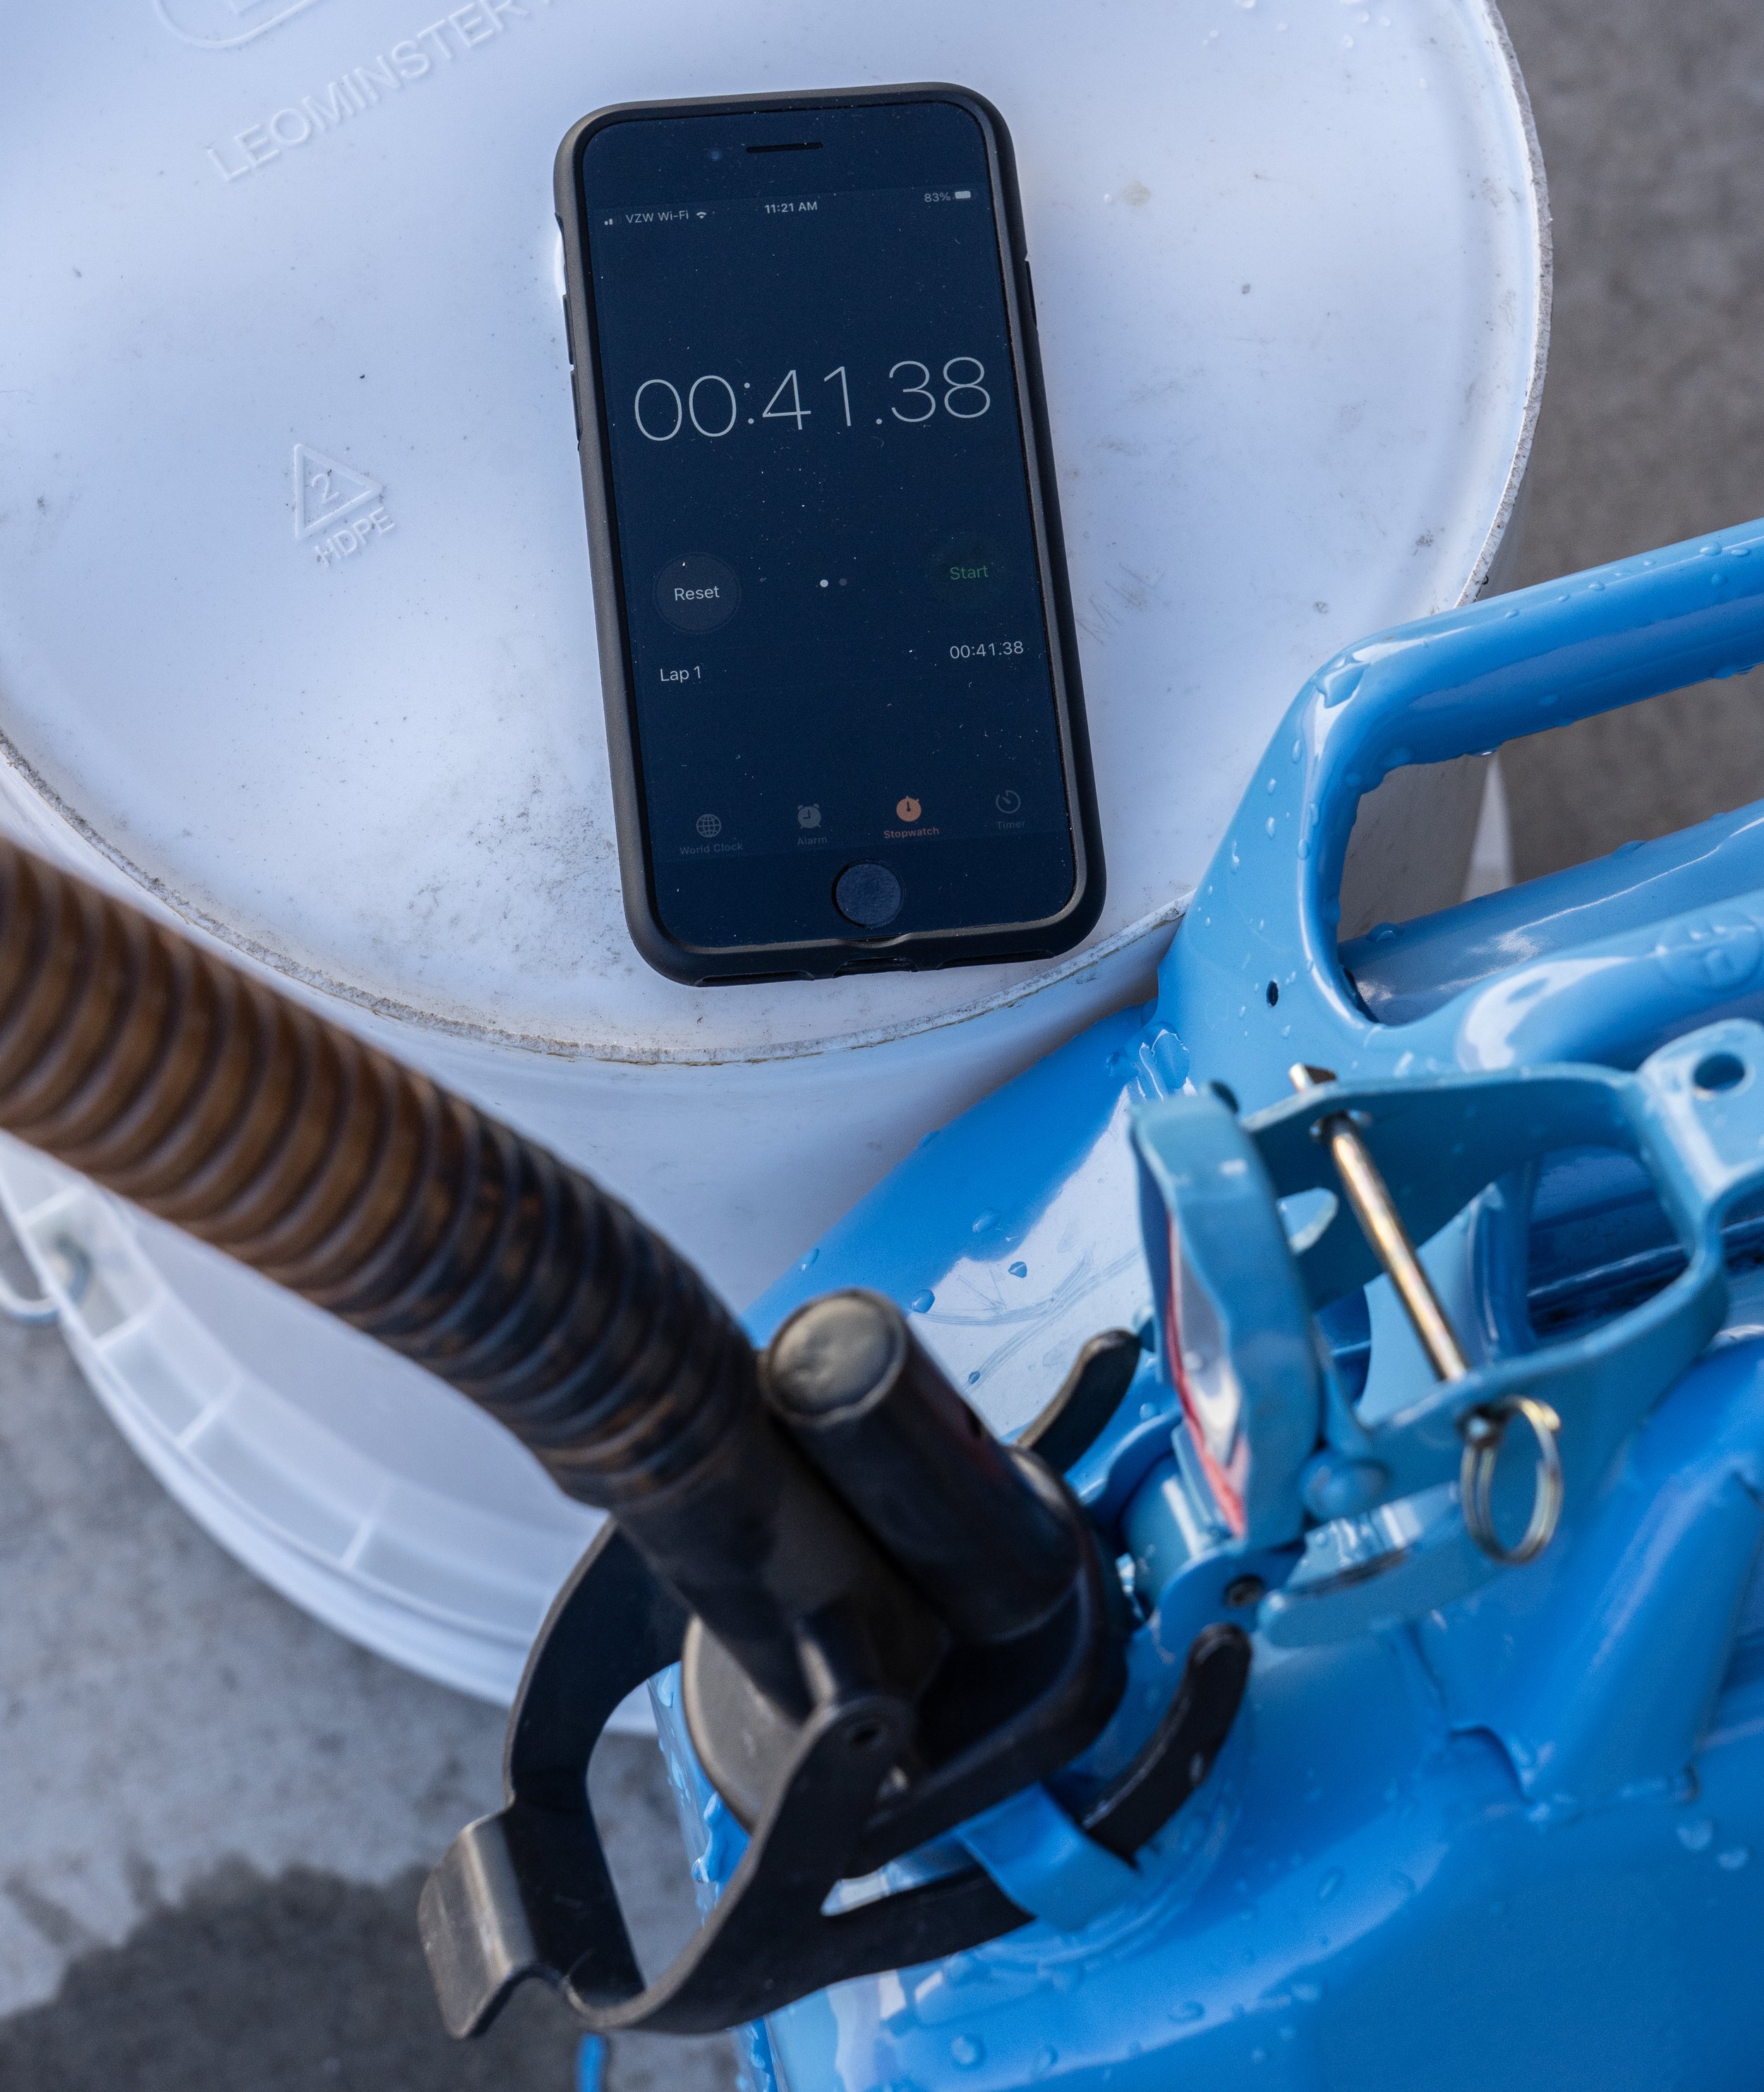
Next up was the Swiss Army unit. Its breather seemed to aerate even better, and indeed emptied the can in 41 seconds. Neither the Valpro or the Swiss spout leaked a drop of water through the breather. A second test with each produced results within two seconds of the first.
The Swiss Army spout was definitely the fastest.
And the generic unit? I only tested the one with the flexible spout, since they were otherwise identical aside from the fact that the second one leaked. I tipped up the can and water began flowing, accompanied by an anemic slurping noise from its punched breather—along with steady spatters of water. Had I been decanting fuel instead of water it would have made a significant mess.
As to time: The last drop of water trickled into the second container five minutes and six seconds after I started.
Seriously?
Let’s parse those results. The generic spouts are around $9 on Amazon; the Valpro is $37 or so. The Wavian, with its simpler nozzle, is around $27. No contest there, unless you like the idea of holding up a 40-pound fuel container for five minutes while it slooooowly loses weight.
As to the Swiss spout; while it was about 20 percent faster than the Valpro, the difference between 52 seconds and 41 is not huge in the real world, and demolishes the legend of sub-20-second dump rates. Note, too, that the Swiss spout had the advantage—at least for decanting—of the larger, non-lead-free-friendly nozzle, although I did leave in the (very useful) fine mesh filter in the end, which might have slowed the rate a bit.
Given that the Swiss spout is a genuine unicorn, only appearing for sale now and then through surplus outlets at $60-$75, I think the Valpro (or Wavian) spout is the clear winner on balance of speed and cost.
Now I’ll sit back and wait for the smirky comments from early Land Rover and G-Wagen owners, whose vehicles incorporated cunning extendable filler necks that rendered the use of a spout completely unnecessary. (Looking at you, T.S.)
A thought occurred to test the dump rate of a—shudder—Scepter can. I do own a couple of Scepter cans (which I think are fine for water if miserable for fuel), so I might obtain a spout for one and try it. I’d even test a Blitz can if someone will loan me theirs; I’m not spending money on one.
Pelican Air 1535: The best carry-on for adventurers?
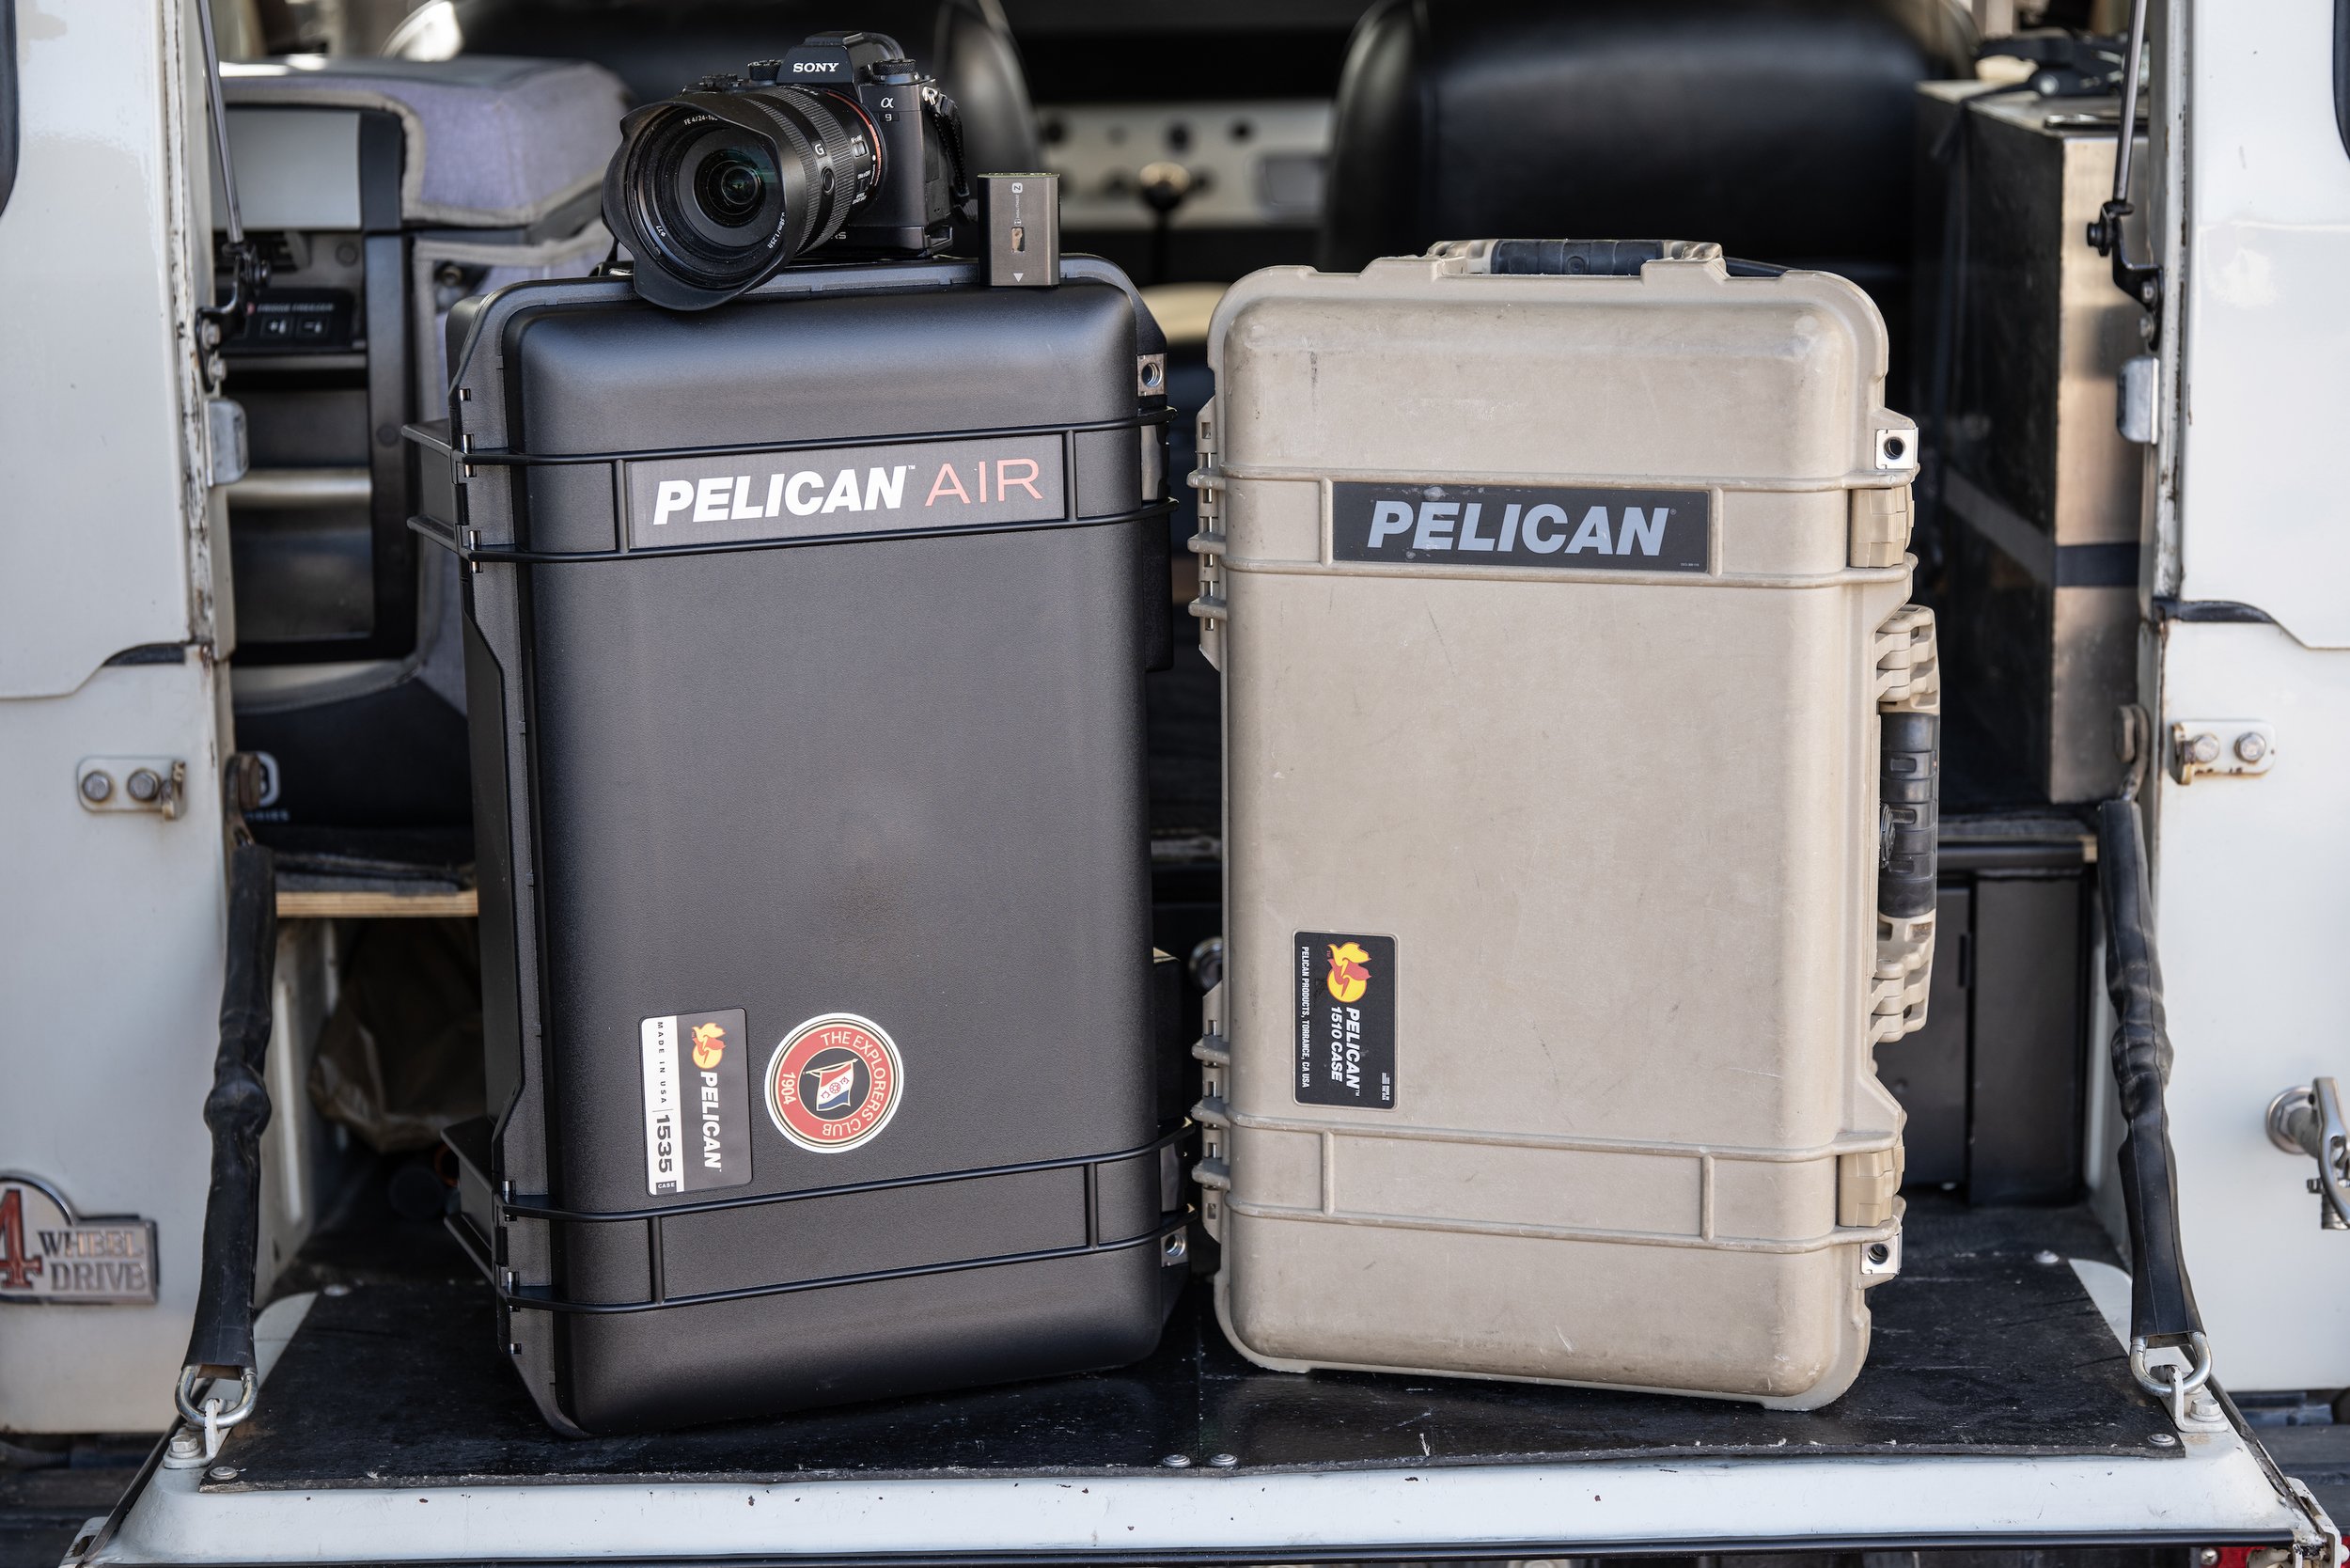
Left and right: same weight.
Does anyone else reading this think there should be a law that commercial airliners be built with overhead storage space actually equivalent to the number of seats?
Until there is such a rule—and, to be fair, until airlines start cracking down on passengers who heave on board bulging suitcases laughably larger than the little trial box next to the gate desk—the struggle to snag overhead space during boarding will continue to resemble trench warfare. And if, like me, your carry-on holds such critical equipment as cameras (plus associated lithium batteries), lenses, and binoculars, you do not want to be forced at the last minute to have it stuffed (“Free of charge!” as they always say, gee thanks) in the cargo hold. That’s why you have a carry-on.
If you are lucky or quick or vicious enough to successfully place your bag in the overhead bin, you know you cannot expect that any care will be given to it by subsequent aspirants to the space. It needs to be as crush-resistant as a bathyscaphe (ooh . . . too soon?).
Twenty five years ago I bought my first Pelican case, a 1500 with a padded camera-organizer interior made by Lowe Alpine systems, and used it on my first assignment to Africa. On one game drive in Zambia it was on the back seat of an open Land Rover, and while I was in the front seat and the vehicle was moving at a good pace down a track, another passenger tried to move it and wound up tipping it over the back just as I turned and watched in helpless horror. The (fortunately closed and latched) case cartwheeled end over end for about 20 feet before coming to rest in a pile of elephant dung. It, and the cameras inside, emerged unscathed, and I’ve been a Pelican disciple ever since.
Thus, several years ago I settled on a 1510 Protector as my carry-on—actual, legal, carry-on size. It was, like all Pelican cases in the line, completely water- and dust-proof, and laughed off the efforts of fellow passengers to abuse it. It rolled on two wheels with an extendable handle (I hate the “walk-the-dog”-style four-wheeled cases, which render their owners nearly two humans wide on a crowded concourse), it was lockable, and, set upright, served nicely as a perch at airport gates equipped with fewer seats than the aircraft parked outside (don’t get me started on that one). It served me flawlessly on many flights to several continents.
The only problem with the 1510, at least for flying, was weight. It scaled at exactly 12 pounds empty, thus contributing significantly to its total load. Given the recent habit of some carriers—looking at you, New Zealand Air—to limit (and check) carry-on weights, this was an additional drawback.
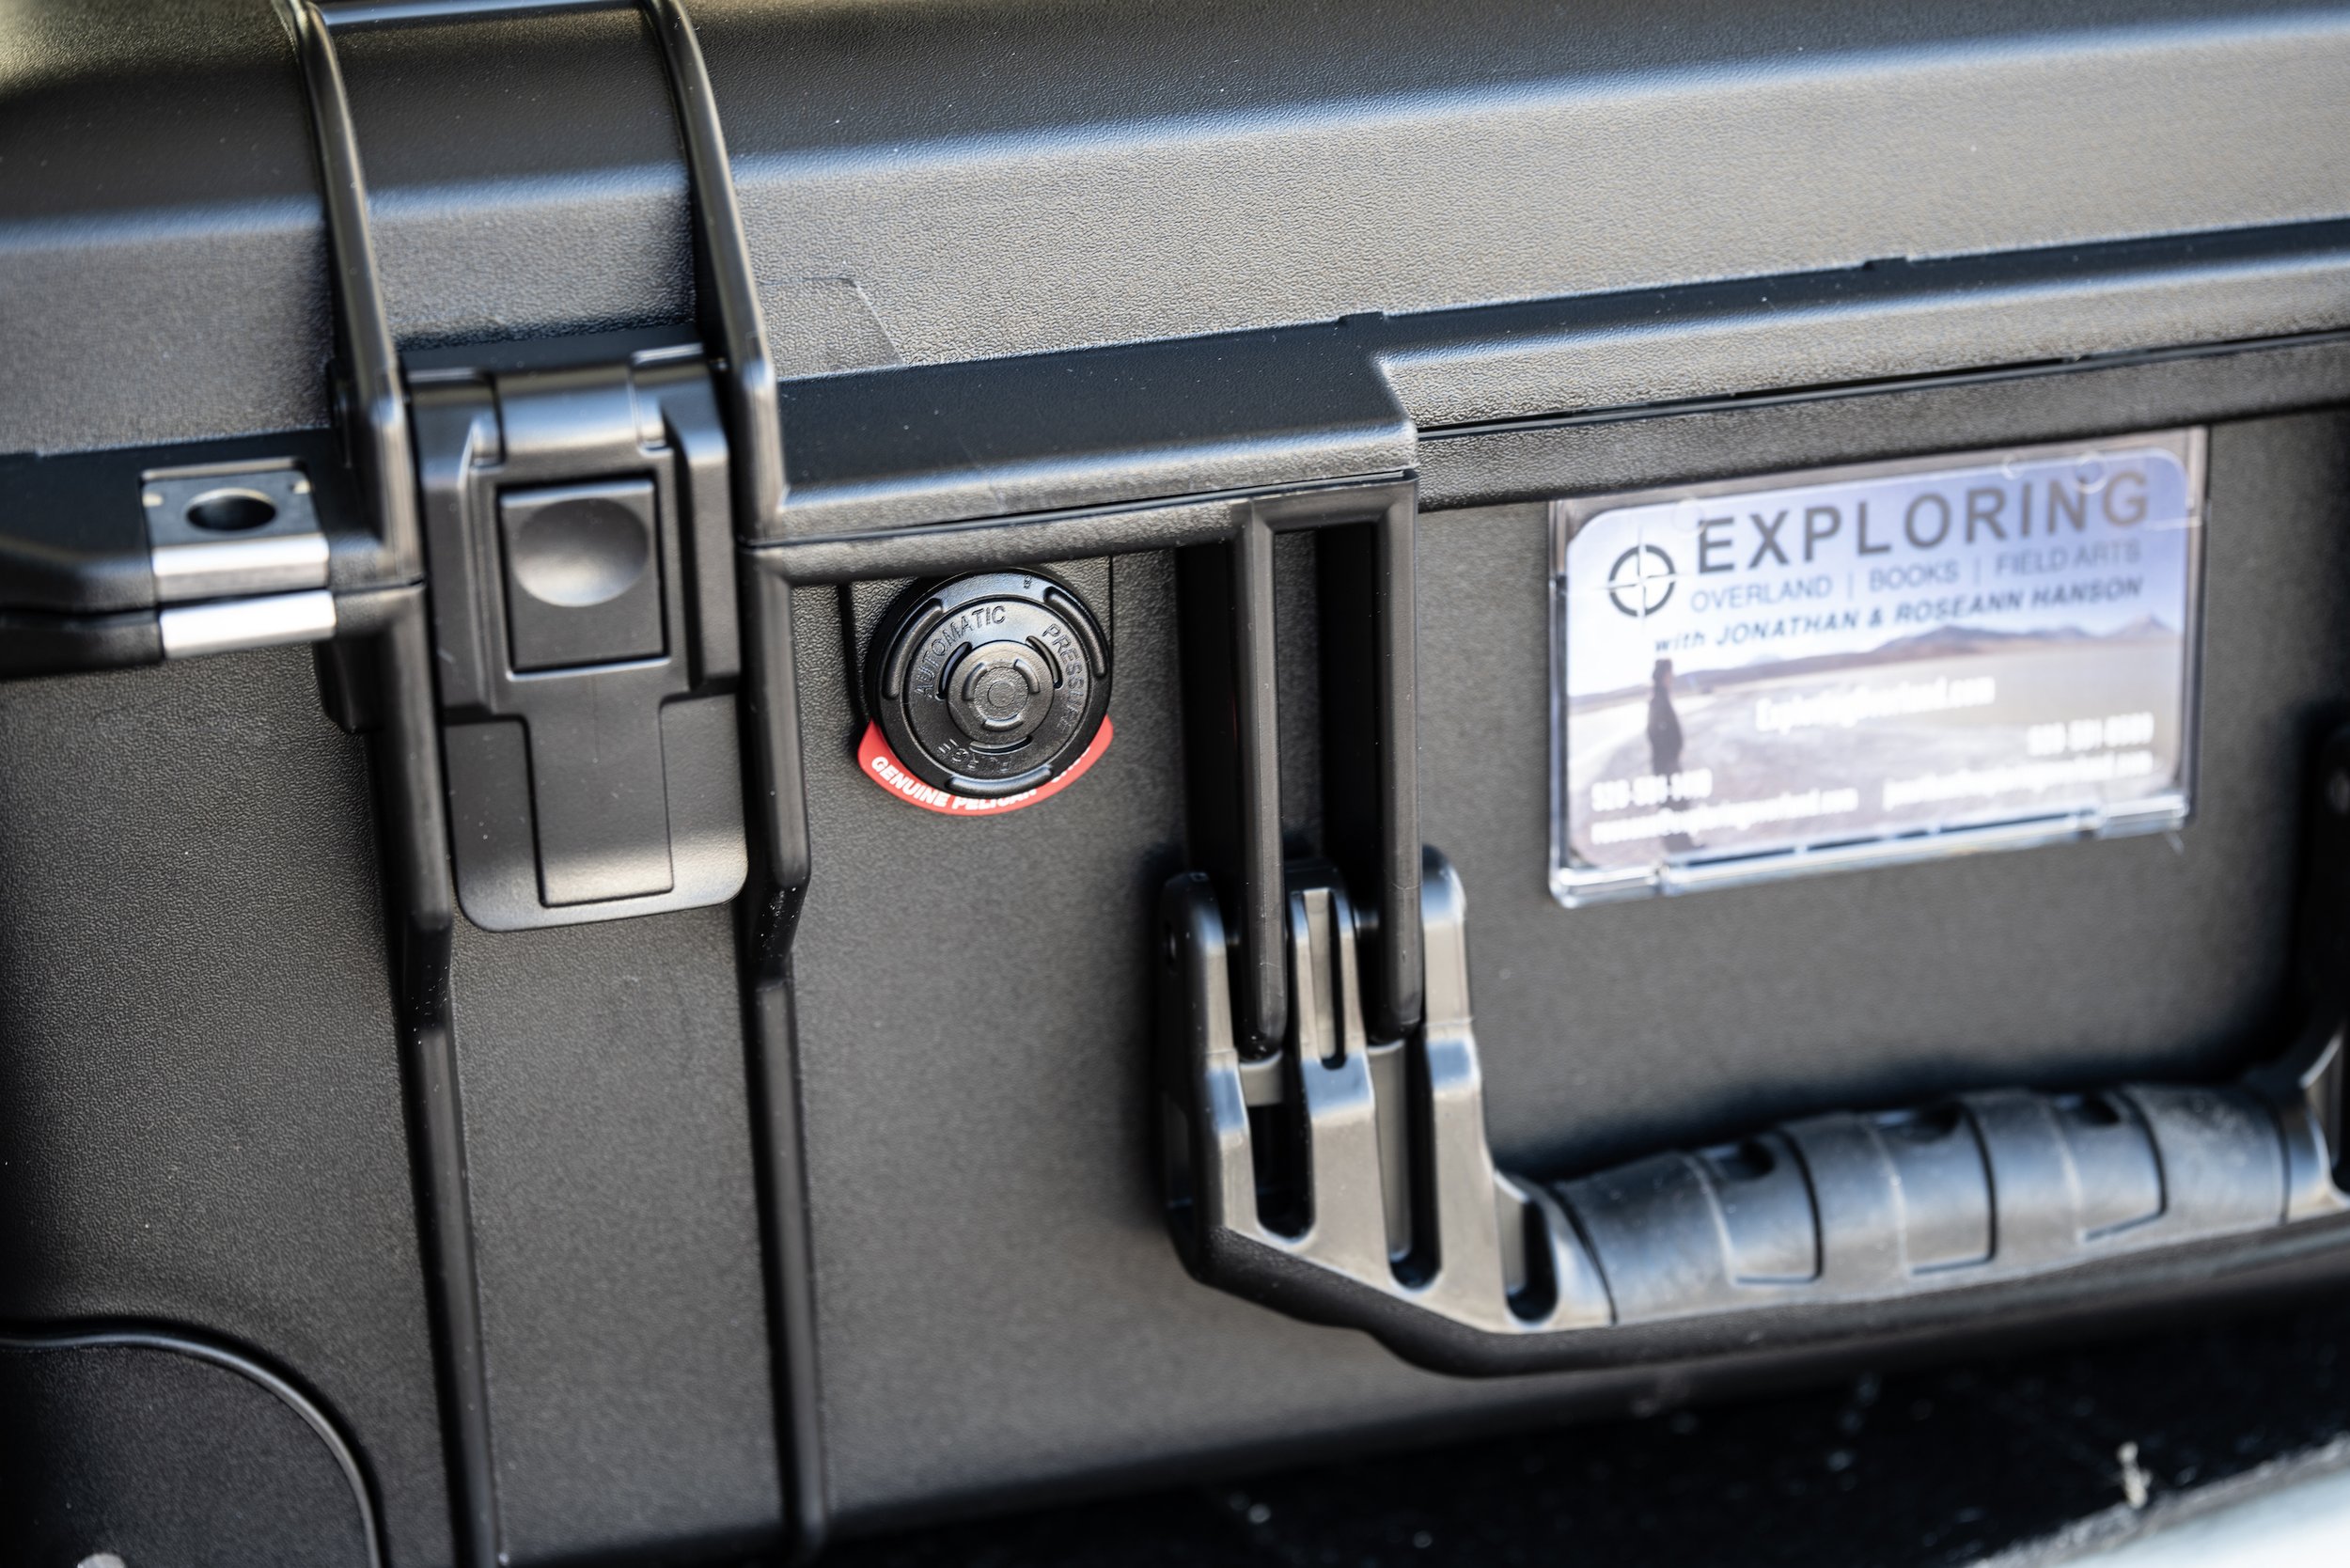
A few years ago Roseann bought one of the then-new Pelican Air cases, a 1535, virtually identical in dimensions to the 1510 but a full three and a quarter pounds lighter. Pelican says it’s made from “HPX” polymer, which is up to 40 percent lighter than their regular material. I admit to being skeptical that the Air could hold up, but Roseann’s proved—at least for the purposes of air travel—every bit the equal of the 1510. Crush-proof, sit-on-able (although I wouldn’t stand on the lid as I do with the 1510). It still incorporates stainless-steel padlock protectors and a pressure-equalization valve, and is IP-67 and MIL-SPEC certified. The wheels roll on stainless-steel bearings, as in the heavier case.
I wondered what that three-pound, four-ounce weight reduction represented in terms of contents, and discovered that my Sony A9, mounted with a 24-105 zoom, weighs three pounds two ounces. So call it the camera, lens, and an extra battery. That’s an impressive savings. We’re now a two-1535 family.
One of the things I like most about Pelican is that they constantly look for ways to improve. The newer 1535, for example, has the effortless push-pull latch system, which Roseann’s does not, and also a center handle on the vertical top of the case, for more versatile handling. Finally, there’s a nifty business-card holder/ID case only accessible with the lid open.
Perhaps my sole, niggling reservation is the plastic issue. However—remember my original 1500? It’s still perfectly functional and used regularly, and is likely to last at least another quarter century. At least that sets it apart from single-use plastic bags and water bottles. Here’s hoping Pelican eventually develops a completely recyclable polymer.
That aside, the Pelican Air 1535 comes highly recommended.
Reinforced padlock eyes, effortless push-pull latches, pressure-compensation valve, and sturdy business/ID card holder.
Pelican is here.
Essential overland kit? The Suri sustainable sonic toothbrush.
Okay, okay. I know oral hygiene is on the “lite” side of subjects for an overlanding column, but bear with me.
For years and years I resisted electric toothbrushes. My only experience with them was an early model that did nothing but wiggle back and forth, which I felt perfectly capable of doing on my own. But a few years back, a friend gave me a modern unit (he had got two on a deal), and I realized that the newer technology really did seem to clean better than a manual brush (several independent studies bear this out). I was more or less sold.
Why more or less? I still didn’t like all the extra plastic and electrics, and to my horror, when the battery died on that first one I discovered it wasn’t replaceable. A kit on Amazon promised a fix, but after disassembling the unit and trying some extremely precise de- and re-soldering, I gave up. The hygiene angle kept me a customer, but reluctantly.
The other issue involved taking the thing camping. The electric brush was bulky, and of course was yet another item that needed recharging off an inverter. And I was reluctant to use the thing when we were camped too near others, expecting snickering.
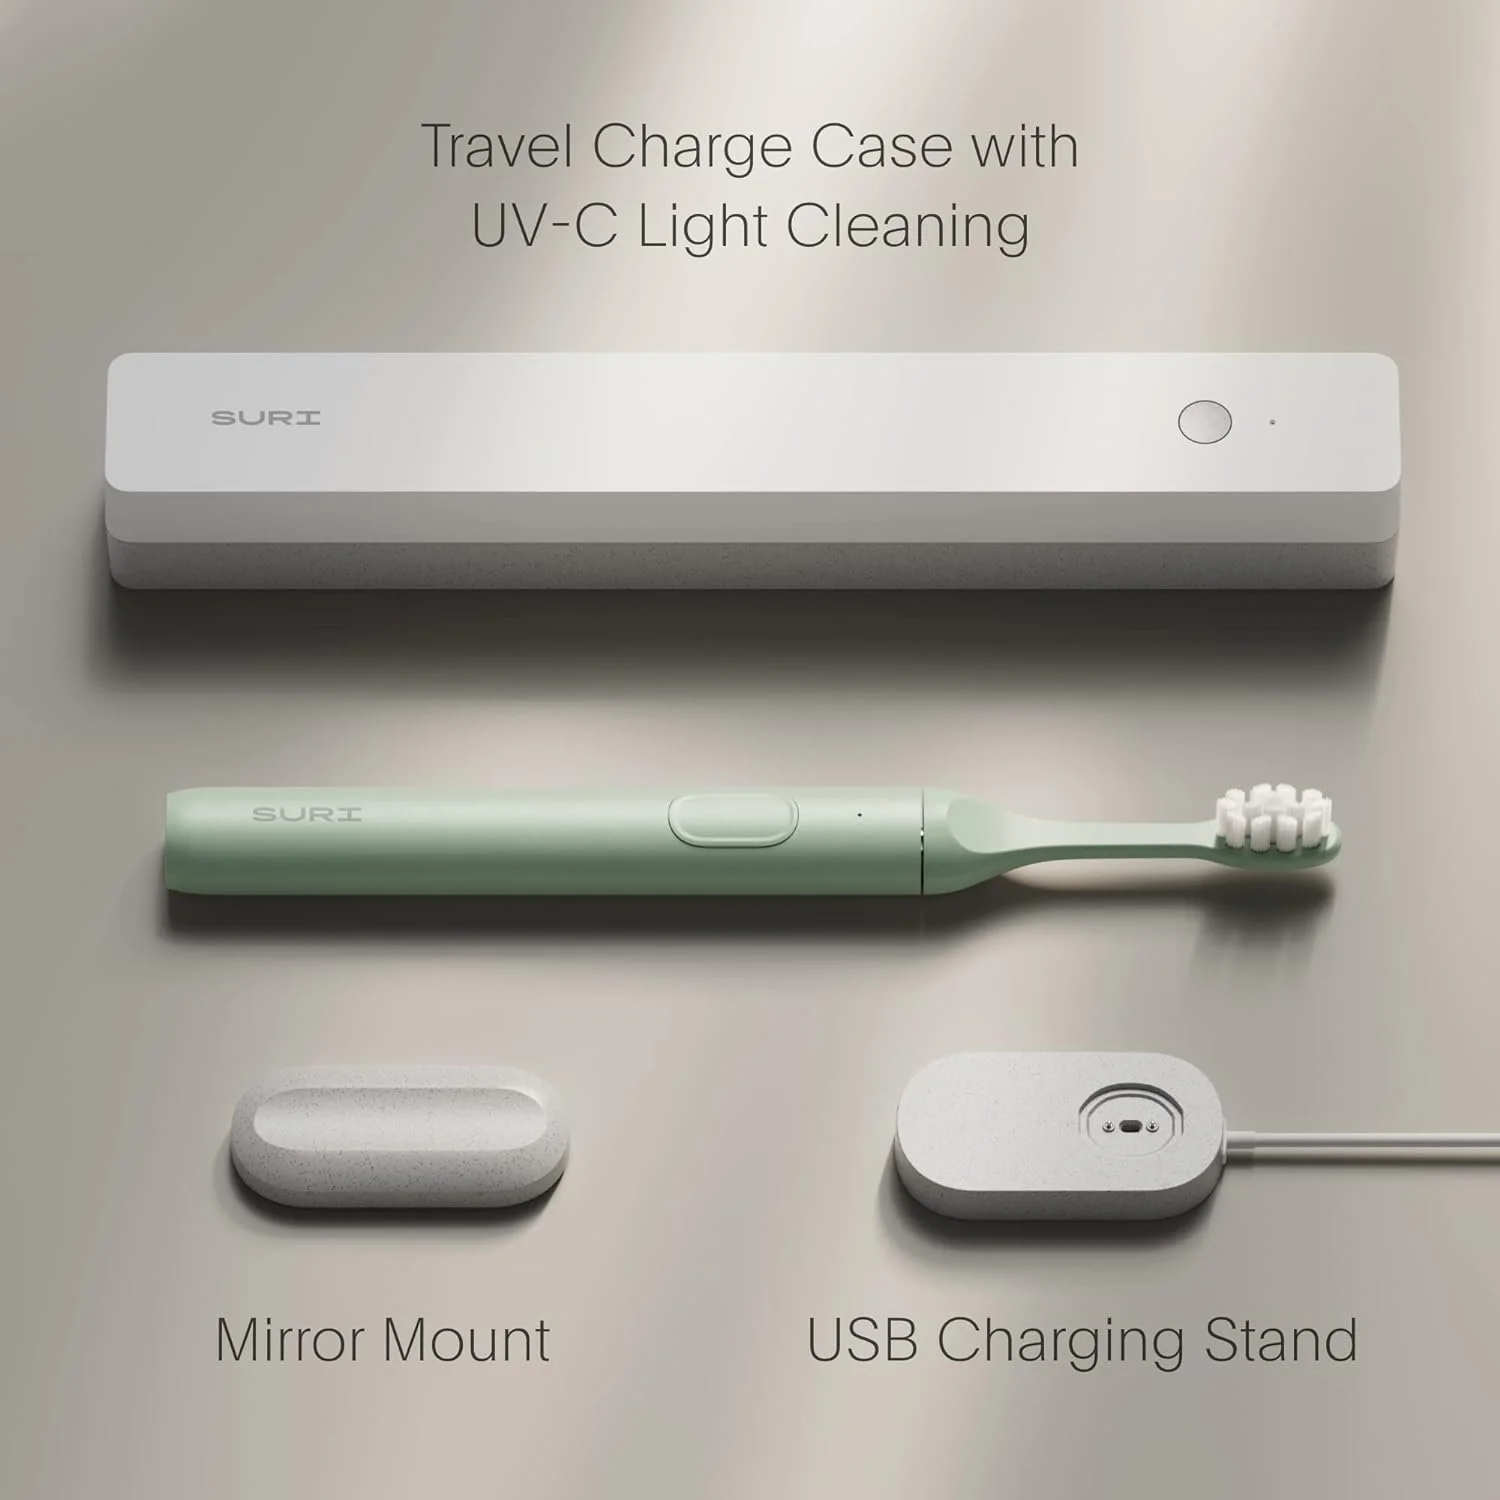
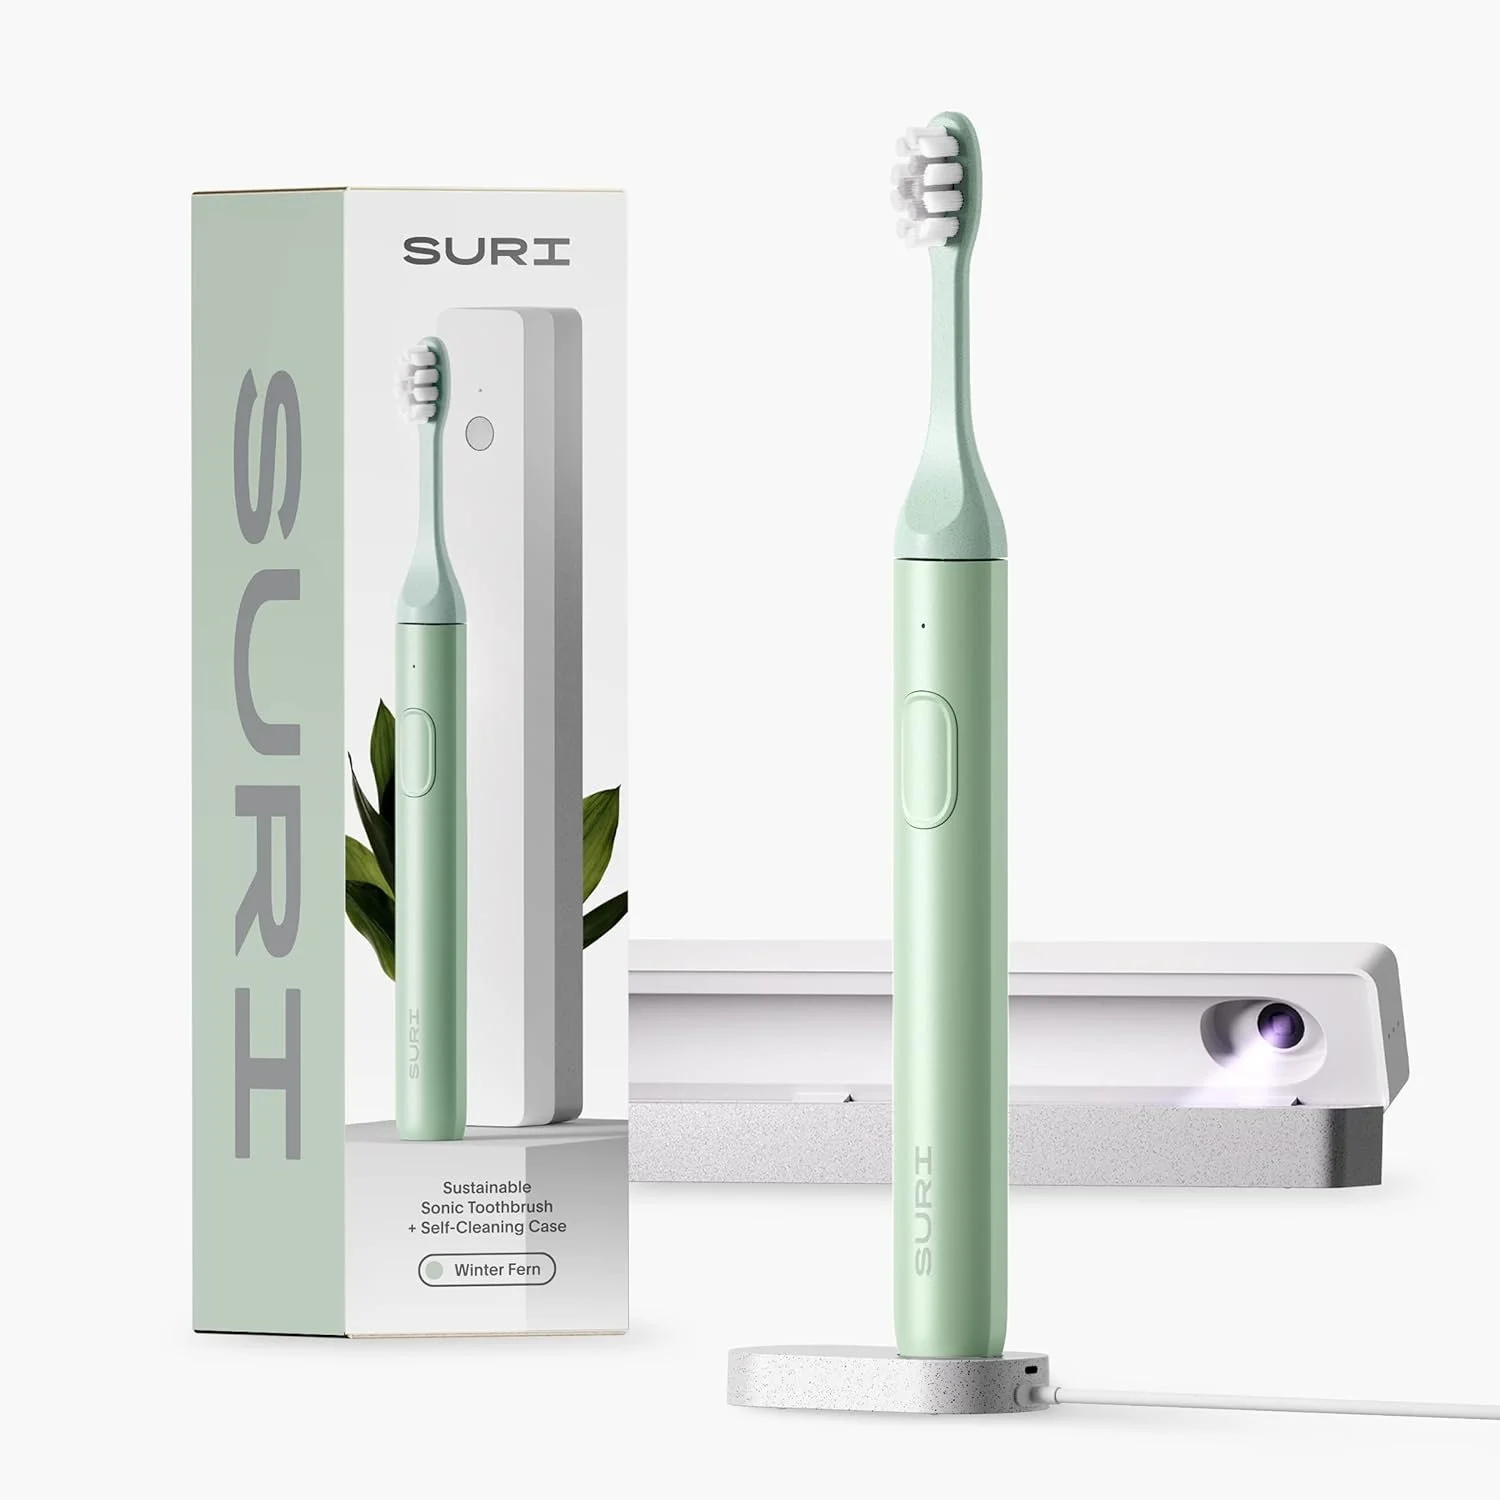
That’s changed with, of all things, a link on Instagram, a pitch for a “sustainable sonic toothbrush” called Suri. The website showed an extremely compact brush with an aluminum body, and, more importantly, a factory-replaceable battery. How about those disposable brush heads, of which, the company says, over four billion are discarded worldwide each year? The Suri’s plant-based plastic heads are not only recyclable, the company includes a postage-paid envelope to send them back (suggesting that you save up three or four at a time to save them shipping costs). Finally, the Suri’s recharger is tiny, and uses a USB connector, making recharging much, much easier on the road.
Done. Ordered.
I wondered if the Suri’s compact design would mean its smaller motor wouldn’t clean as well as our regular brush, but to my (our) surprise found it at least as good if not better. I’d originally thought it might be just a traveling brush (it claims a 40-day battery life; if it’s half that I’d still be impressed), but it’s taken over as our main unit. I’m planning to buy another for our place in Fairbanks. (The unit comes with a clever stick-on magnetic holder that adheres to the inside of your medicine cabinet.)
So there you have it: my slavish endorsement of . . . a toothbrush. I’m happy to support a company that seems genuinely to be trying to reduce its impact on the planet.
Suri is here.
Artificial rain gutters from Lkonwee
I needed to mount our Yakima rack to the fiberglass A.R.E. shell on our Alaska Tundra, and since our Yakima towers have standard rain-gutter clamps, I needed artificial rain gutters. After some searching, I decided on a set from the oddly named Lkonwee on Amazon. They weren't cheap at $52, but after installing them, I'm convinced I actually got an excellent buy.
The brackets can be mounted vertically on the side of the shell, or horizontally on the roof. I chose side mounting to keep the overall height of truck and boats as low as possible.
The brackets came with full-size backing plates for strength, and were nicely powder-coated, with matching black-anodized hardware. The square-shouldered carriage bolts fit through square holes in the brackets, meaning installation is a one-person job since you don't need anyone on the the outside holding a wrench on the head of the bolt. It also makes for a much cleaner appearance.
The gaskets, too, were excellent, with a double ring around the bolt holes and a nice raised perimeter.
The gutter itself is deep and secure, and two small raised bits on the bottom would help prevent the rack sliding if you got hit by a big gust of wind or had to panic brake. Well-recommended.
One installation note: Our shell is lined with an ozite-type material, which wasn't completely glued down where I drilled the first hole, with the result that it bunched up and twisted around the drill bit, leaving a fat wrinkle no matter what I did to push it back into shape. For the remainder of the holes I was careful to barely drill through the fiberglass, then poke a hole in the carpet with an awl.
Lkonwee brackets are on Amazon here.
Traction board recovery: Go slow and get it right the first time
I teach a simple rule for retrieving a vehicle bogged in sand: The slowest recovery is usually the fastest, because it works right the first time.
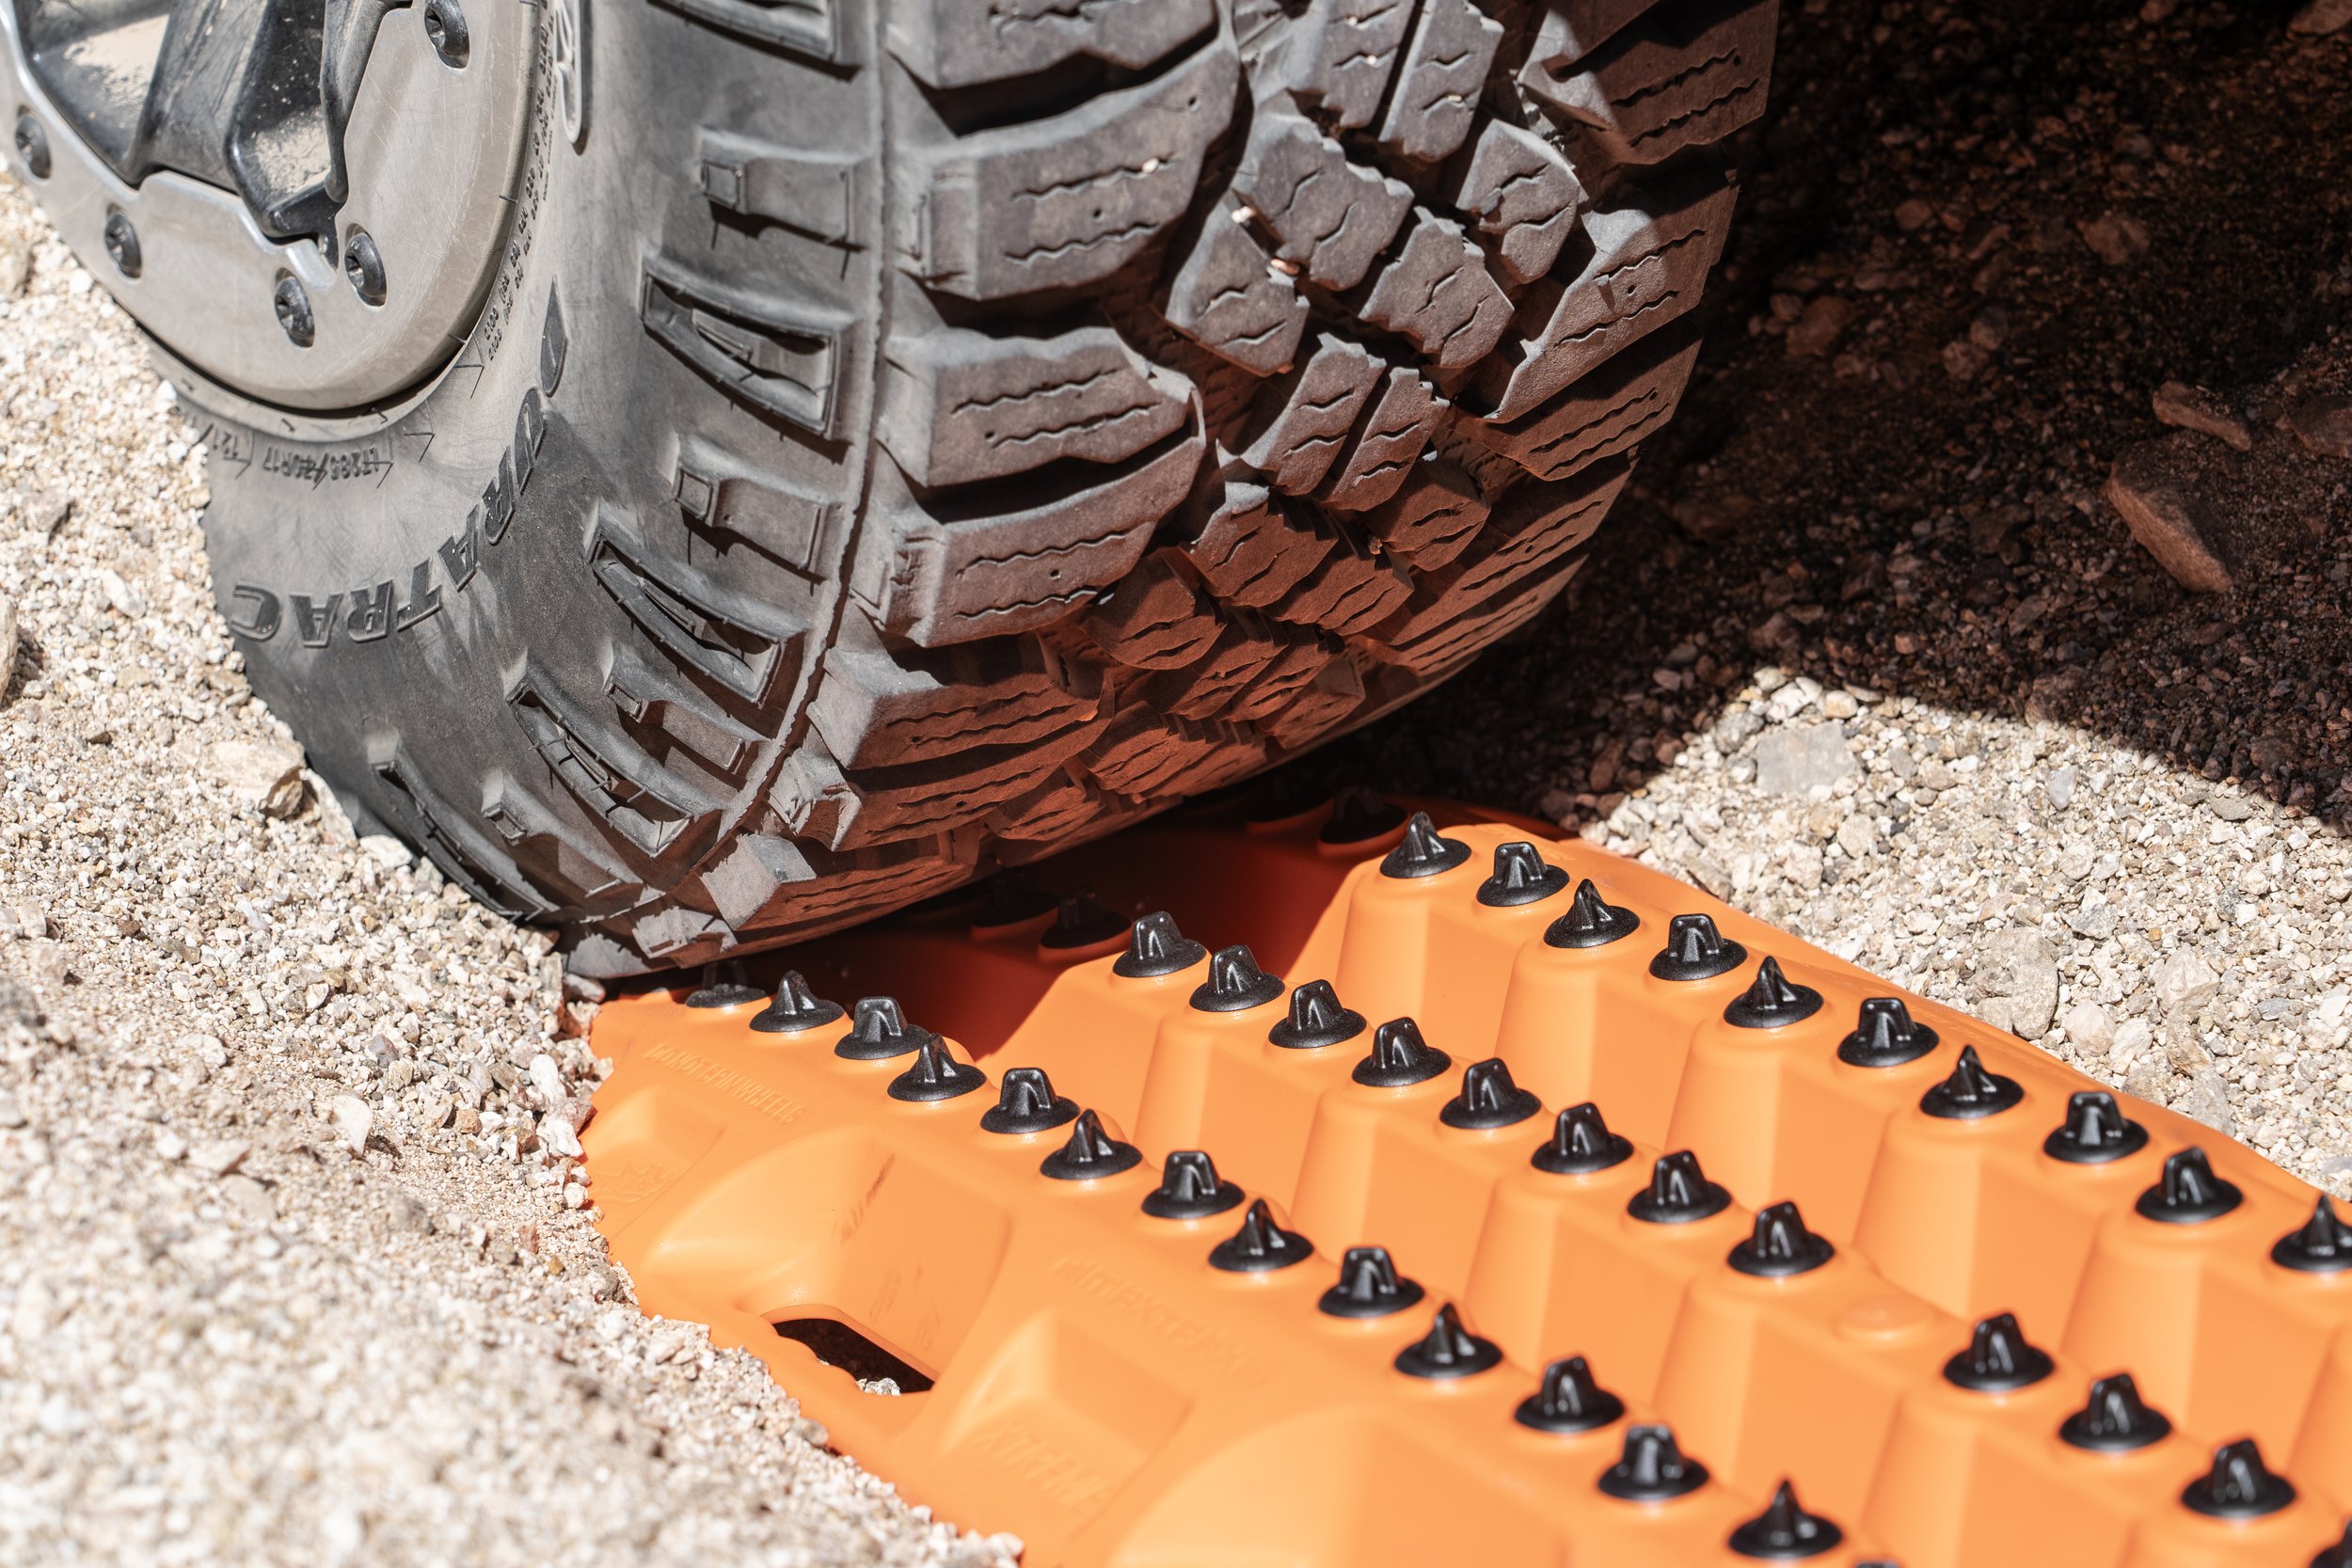
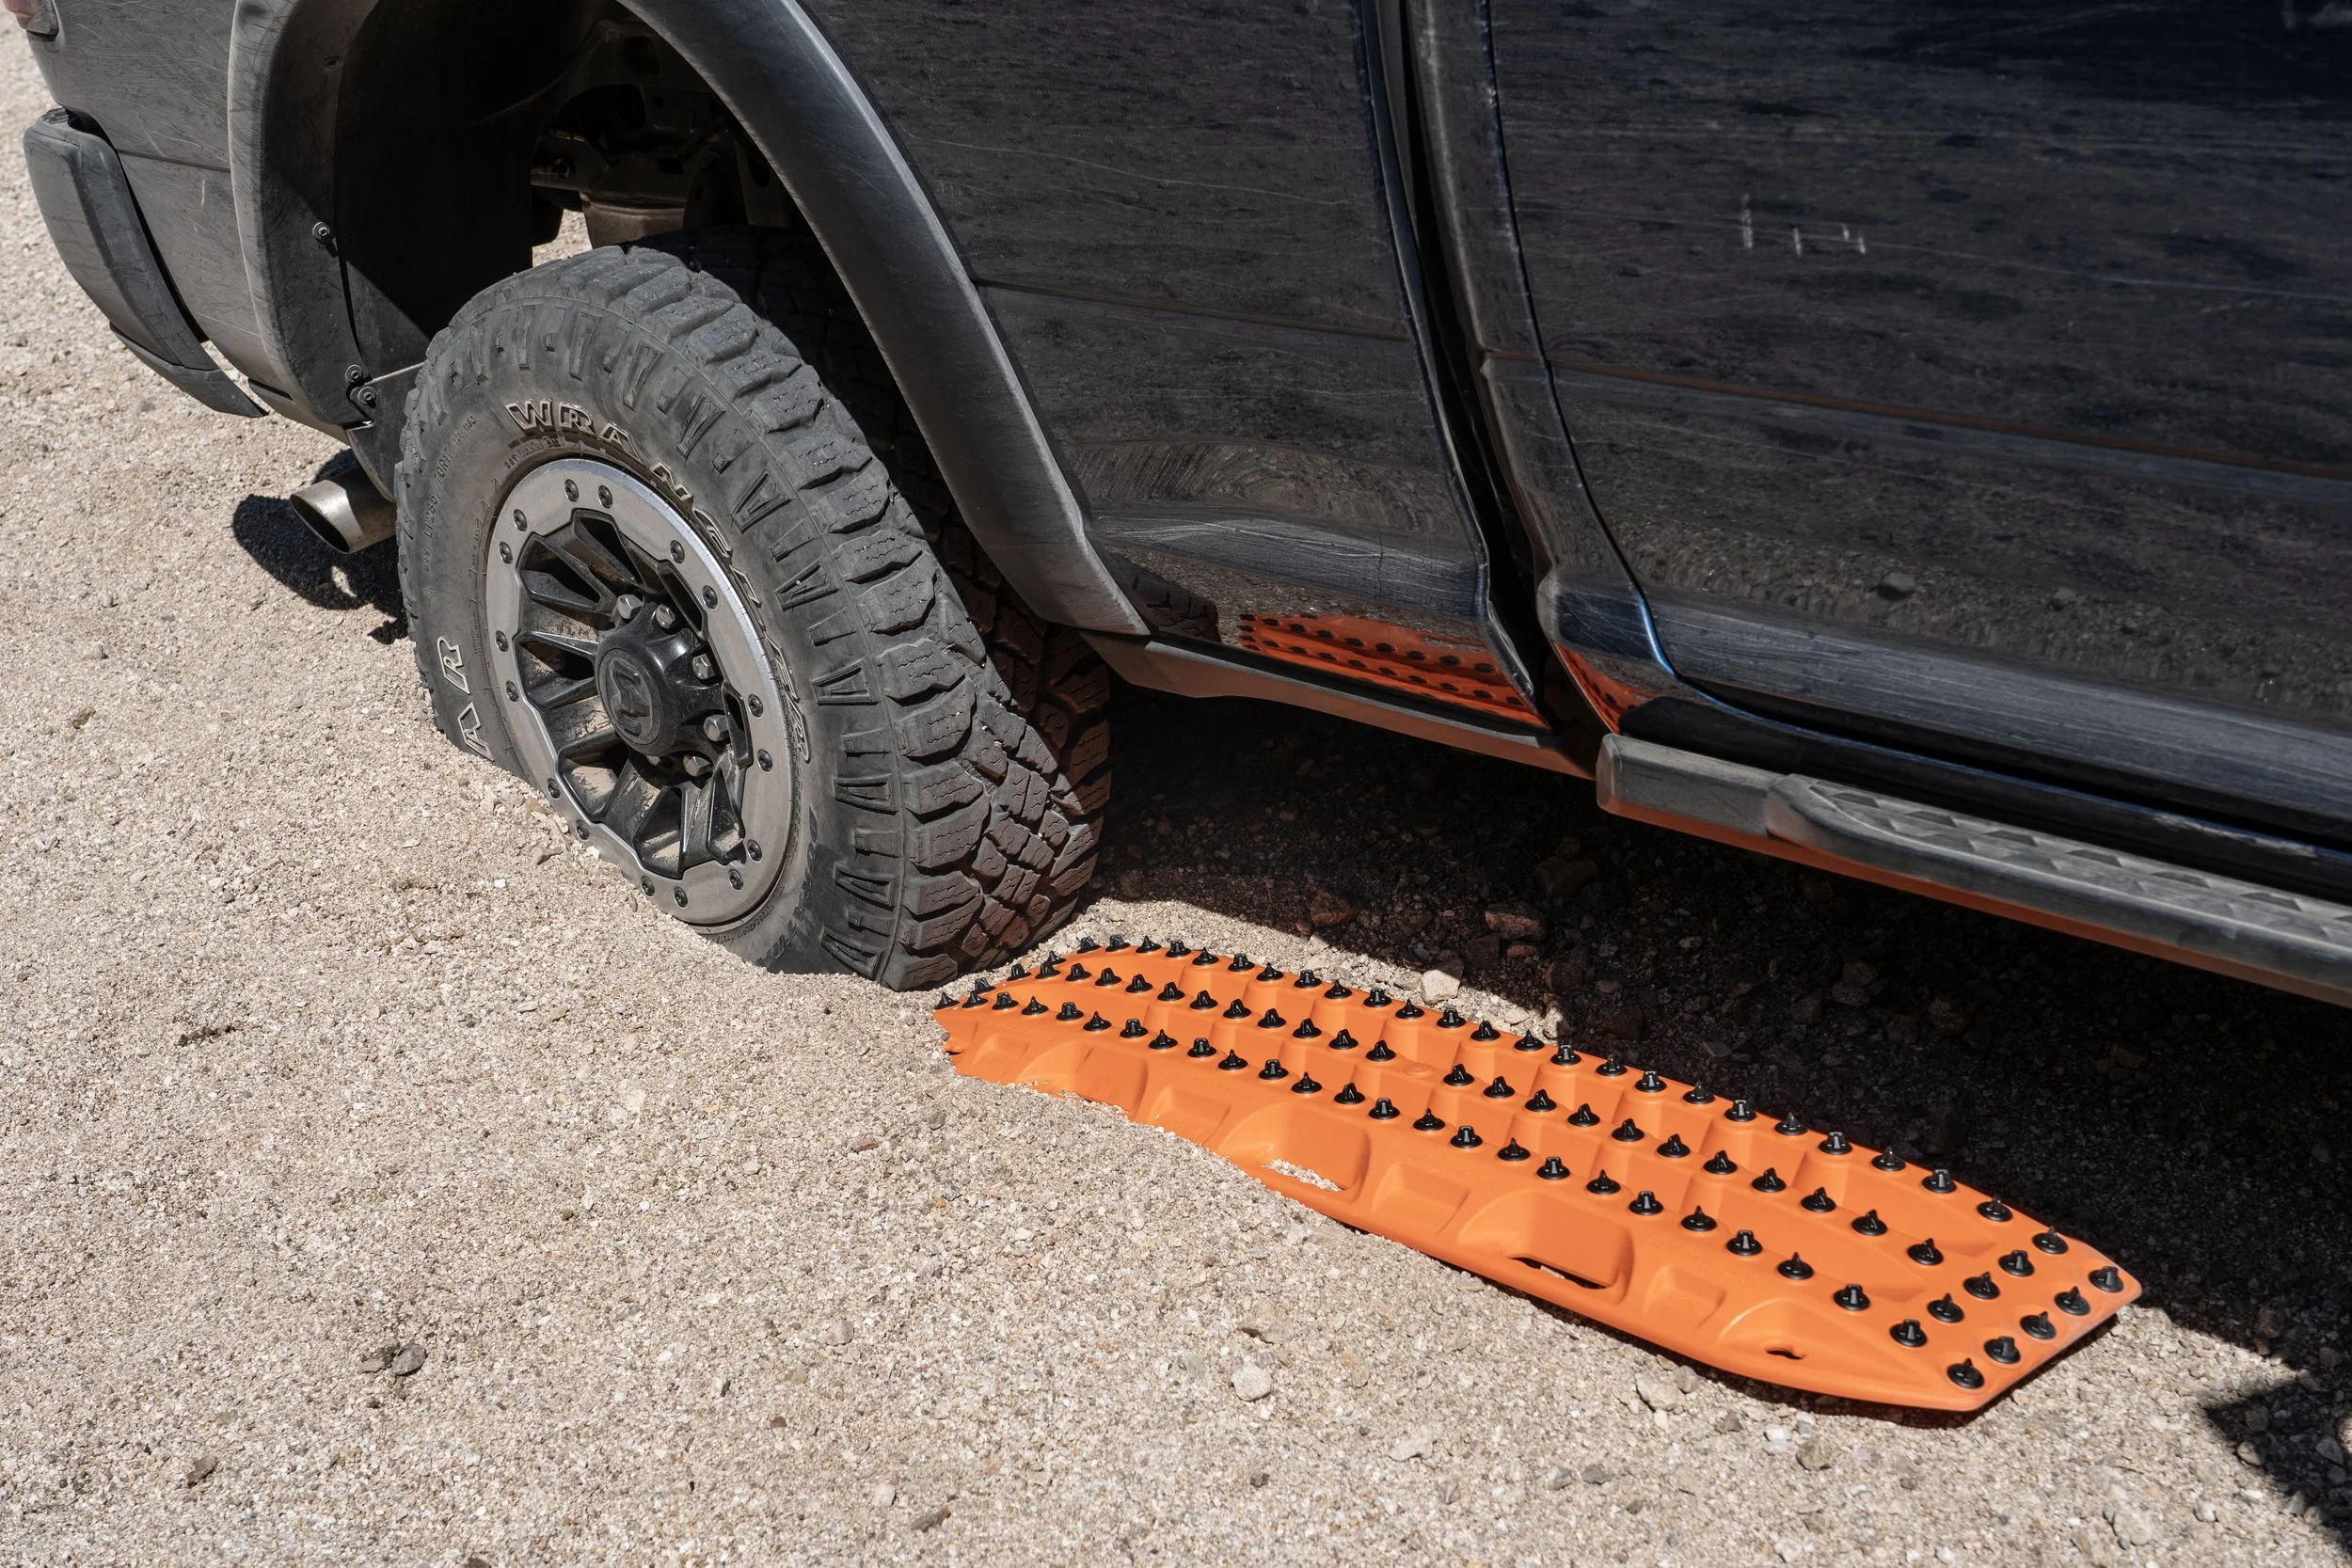
Time after time I watch people mildly bogged in sand get out the MaxTrax (or whatever traction boards they have), dig a peremptory trench in front of the sunken tires, cram the board in, and give it the beans, which results in nothing but the tires digging in deeper because they aren’t actually in contact with the board. Or, worse, the tire will be barely on the edge, and the spinning tread will fail to catch but will melt off the first row of spikes on the board, even alloy versions. The vehicle is now stuck worse than before and the expensive traction boards are damaged.
This won’t work.
The tire is not in contact with the board. It will only sink farther.
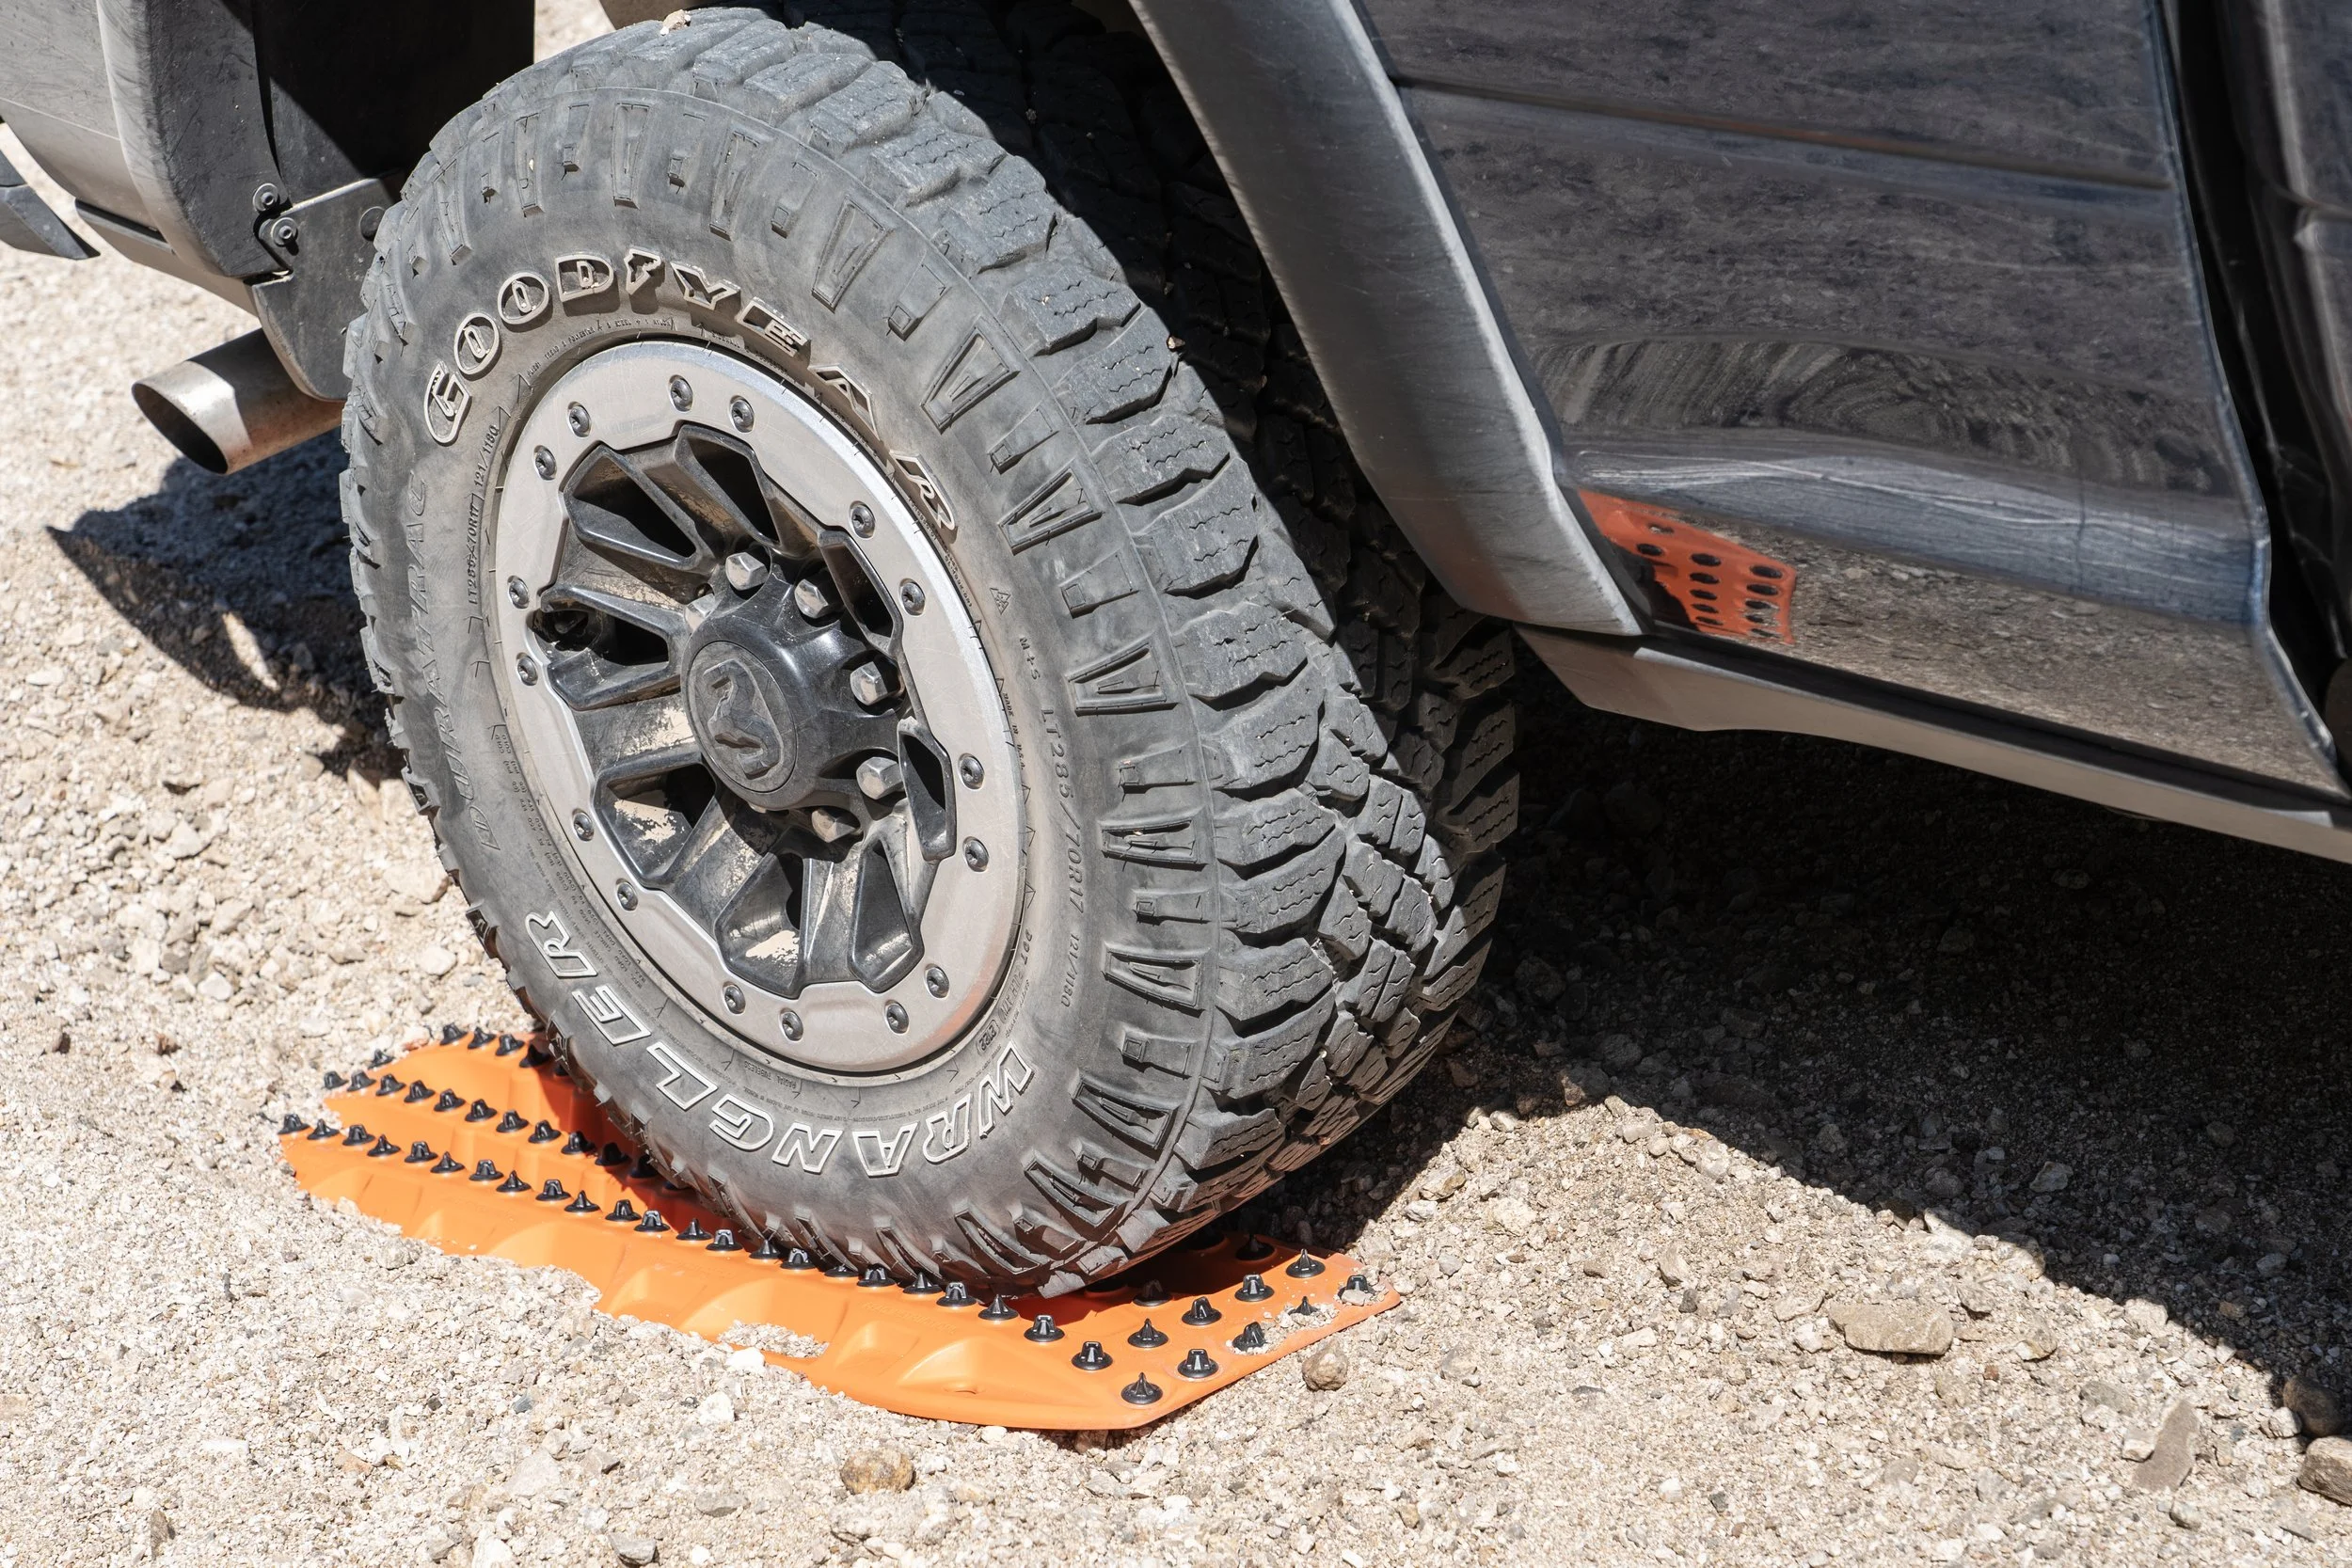
Don’t do it that way. Take the time to fully dig out in front of the tire, enough so the traction board makes full contact. If possible you want the trench dug out so far that the tire wants to roll down onto the board. And make sure the trench has the gentlest possible slope. Don’t do what one poor fellow I watched did and scoop out all the sand into a nice little mound in front of the trench, right where the tire needed to go.
This will work. Board in firm contact with the tire, and a gentle ramp to climb.
If you’re solo and need to keep moving once you’re free, don’t forget to put the shovel back in the vehicle, and leash the traction boards to your rear bumper so they’ll follow you like obedient dogs until it’s safe to stop.
Americans always seem to be embarrassed by getting stuck, when in fact it’s a normal part of exploration. Adopt the attitude of my British friends, who use the mildest bogging as an excuse to take a break and brew some tea.
Knipex parallel-jaw pliers
Despite their occasional usefulness—in some cases serving a purpose no other tool can fill—pliers get little respect in the automotive tool world. Possibly the only tool more scorned is the adjustable (or “monkey”) wrench with its sloppy fit on almost any fastener.
Pliers can at least grip properly; their main drawback is the tendency of the teeth to scar the flats of nuts and bolts, and to slip and subsequently round off fasteners if not gripped tightly enough to risk that scarring.
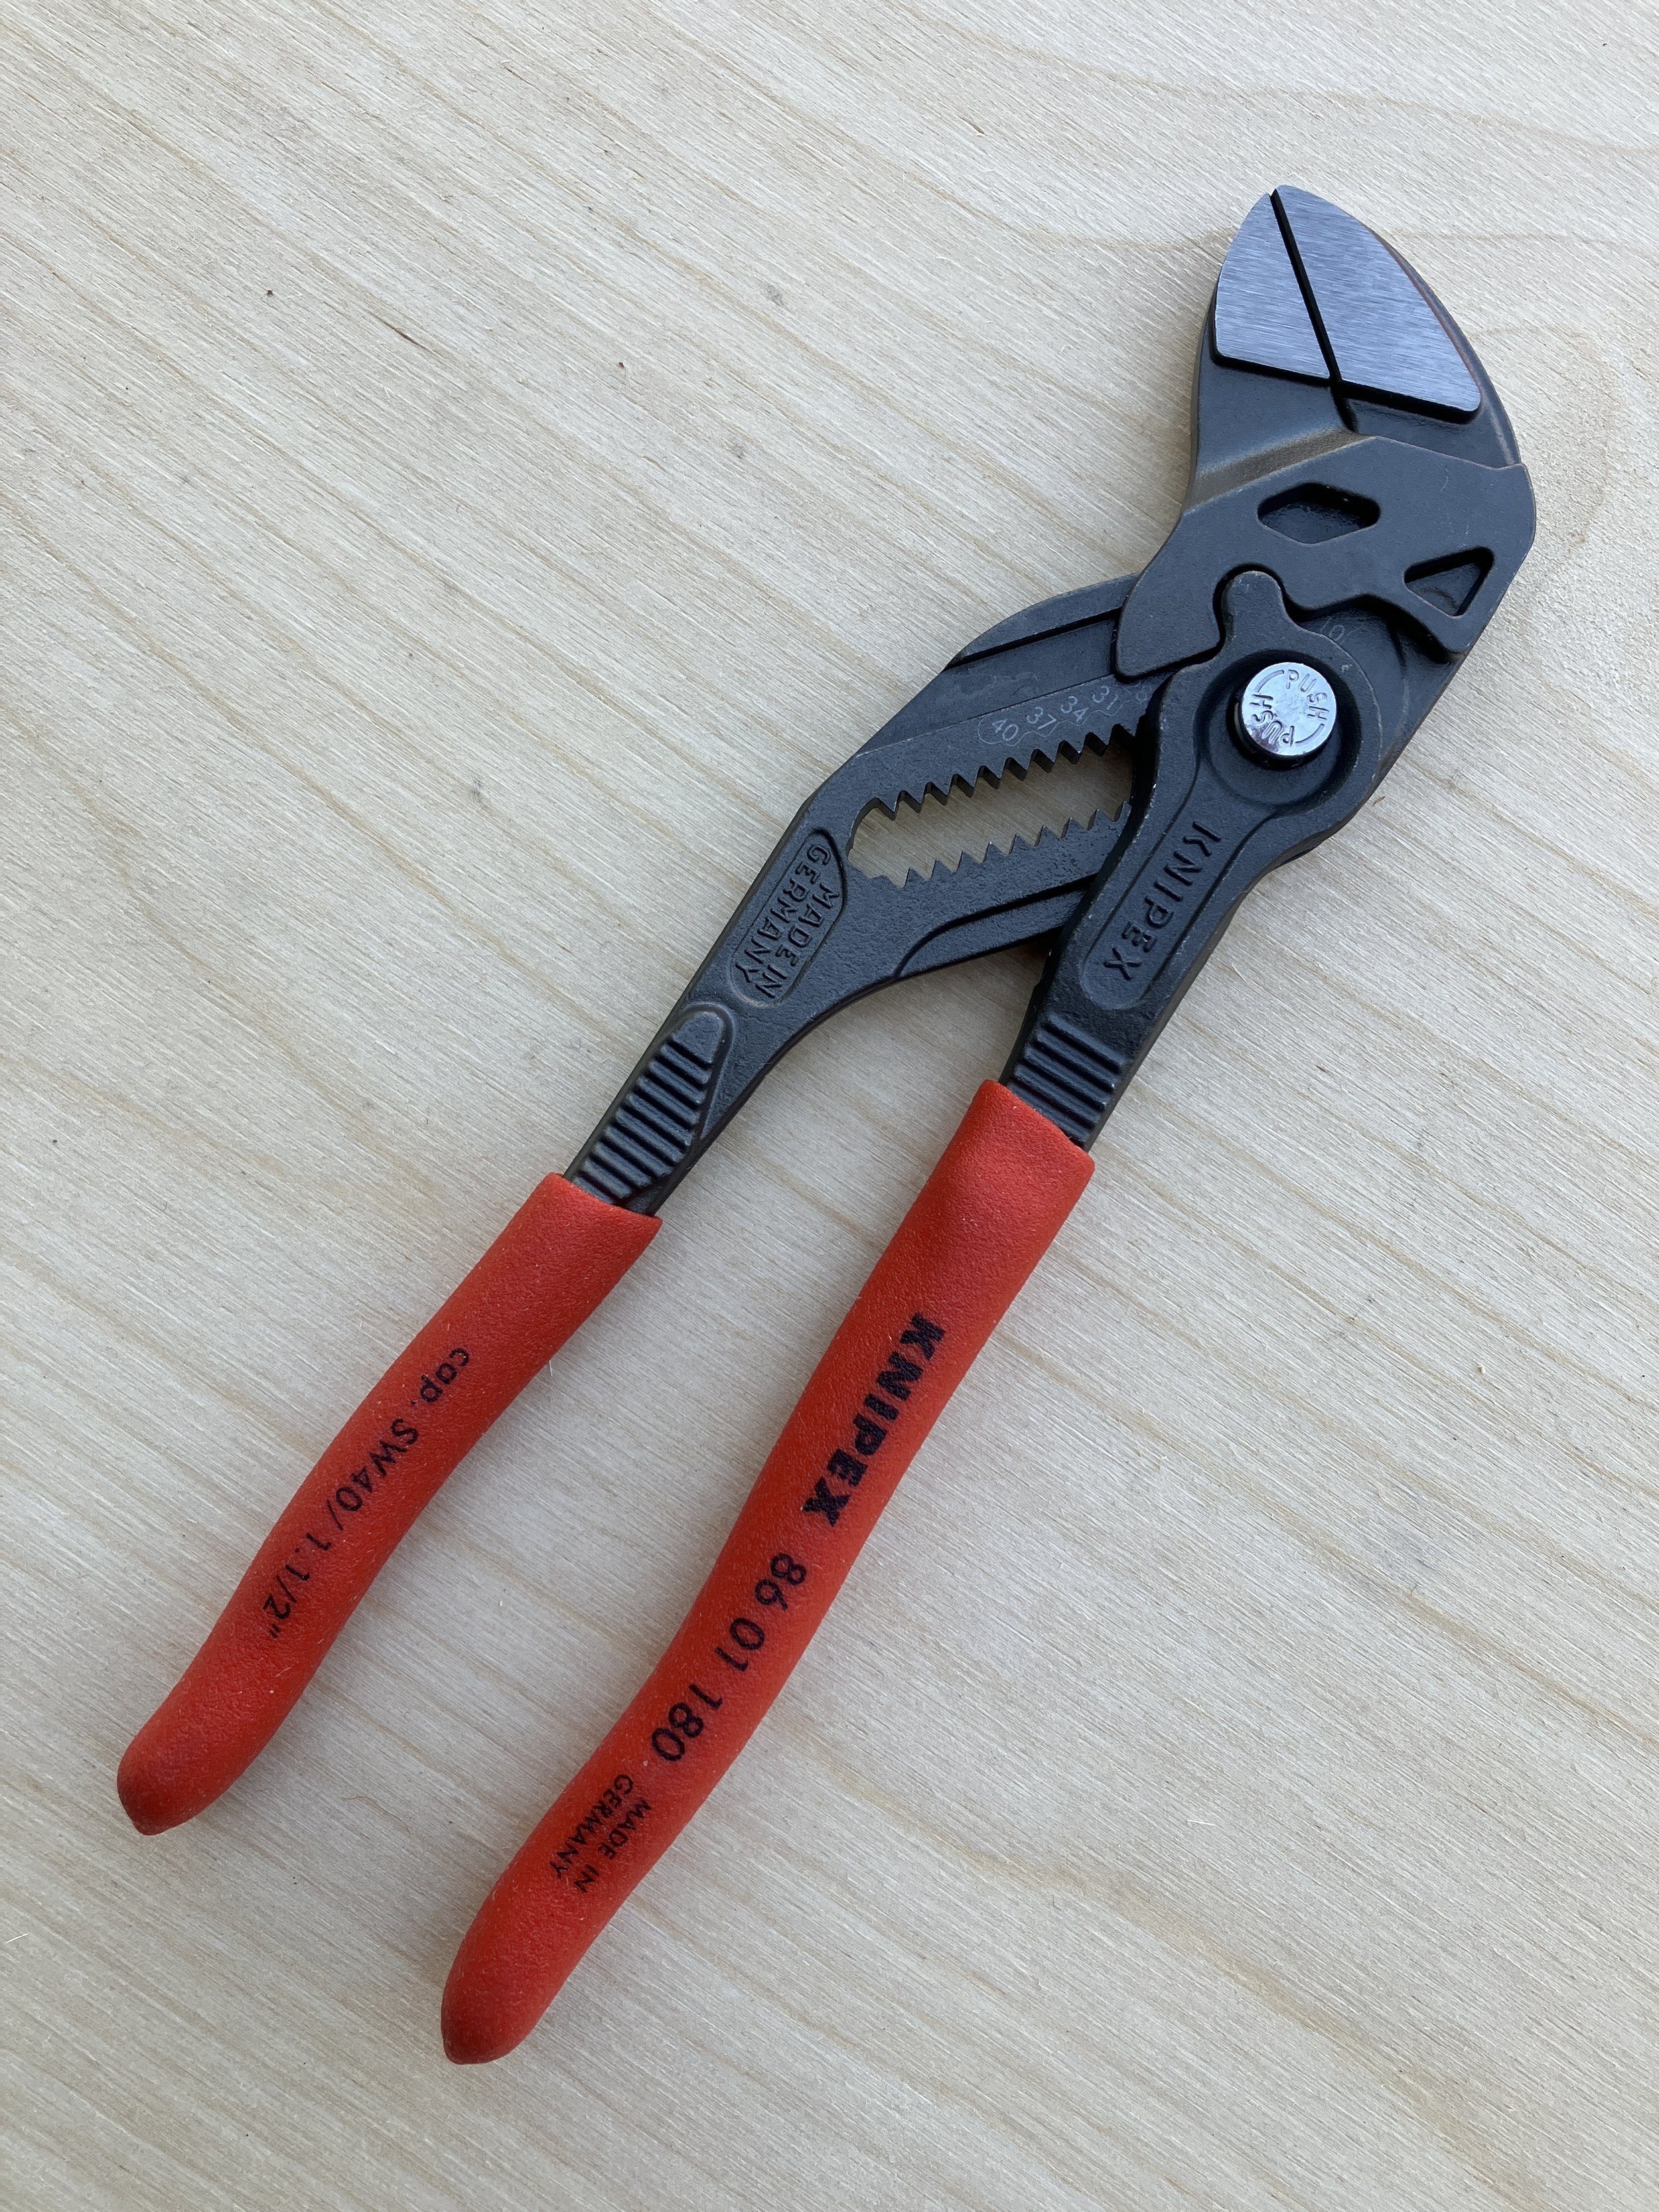
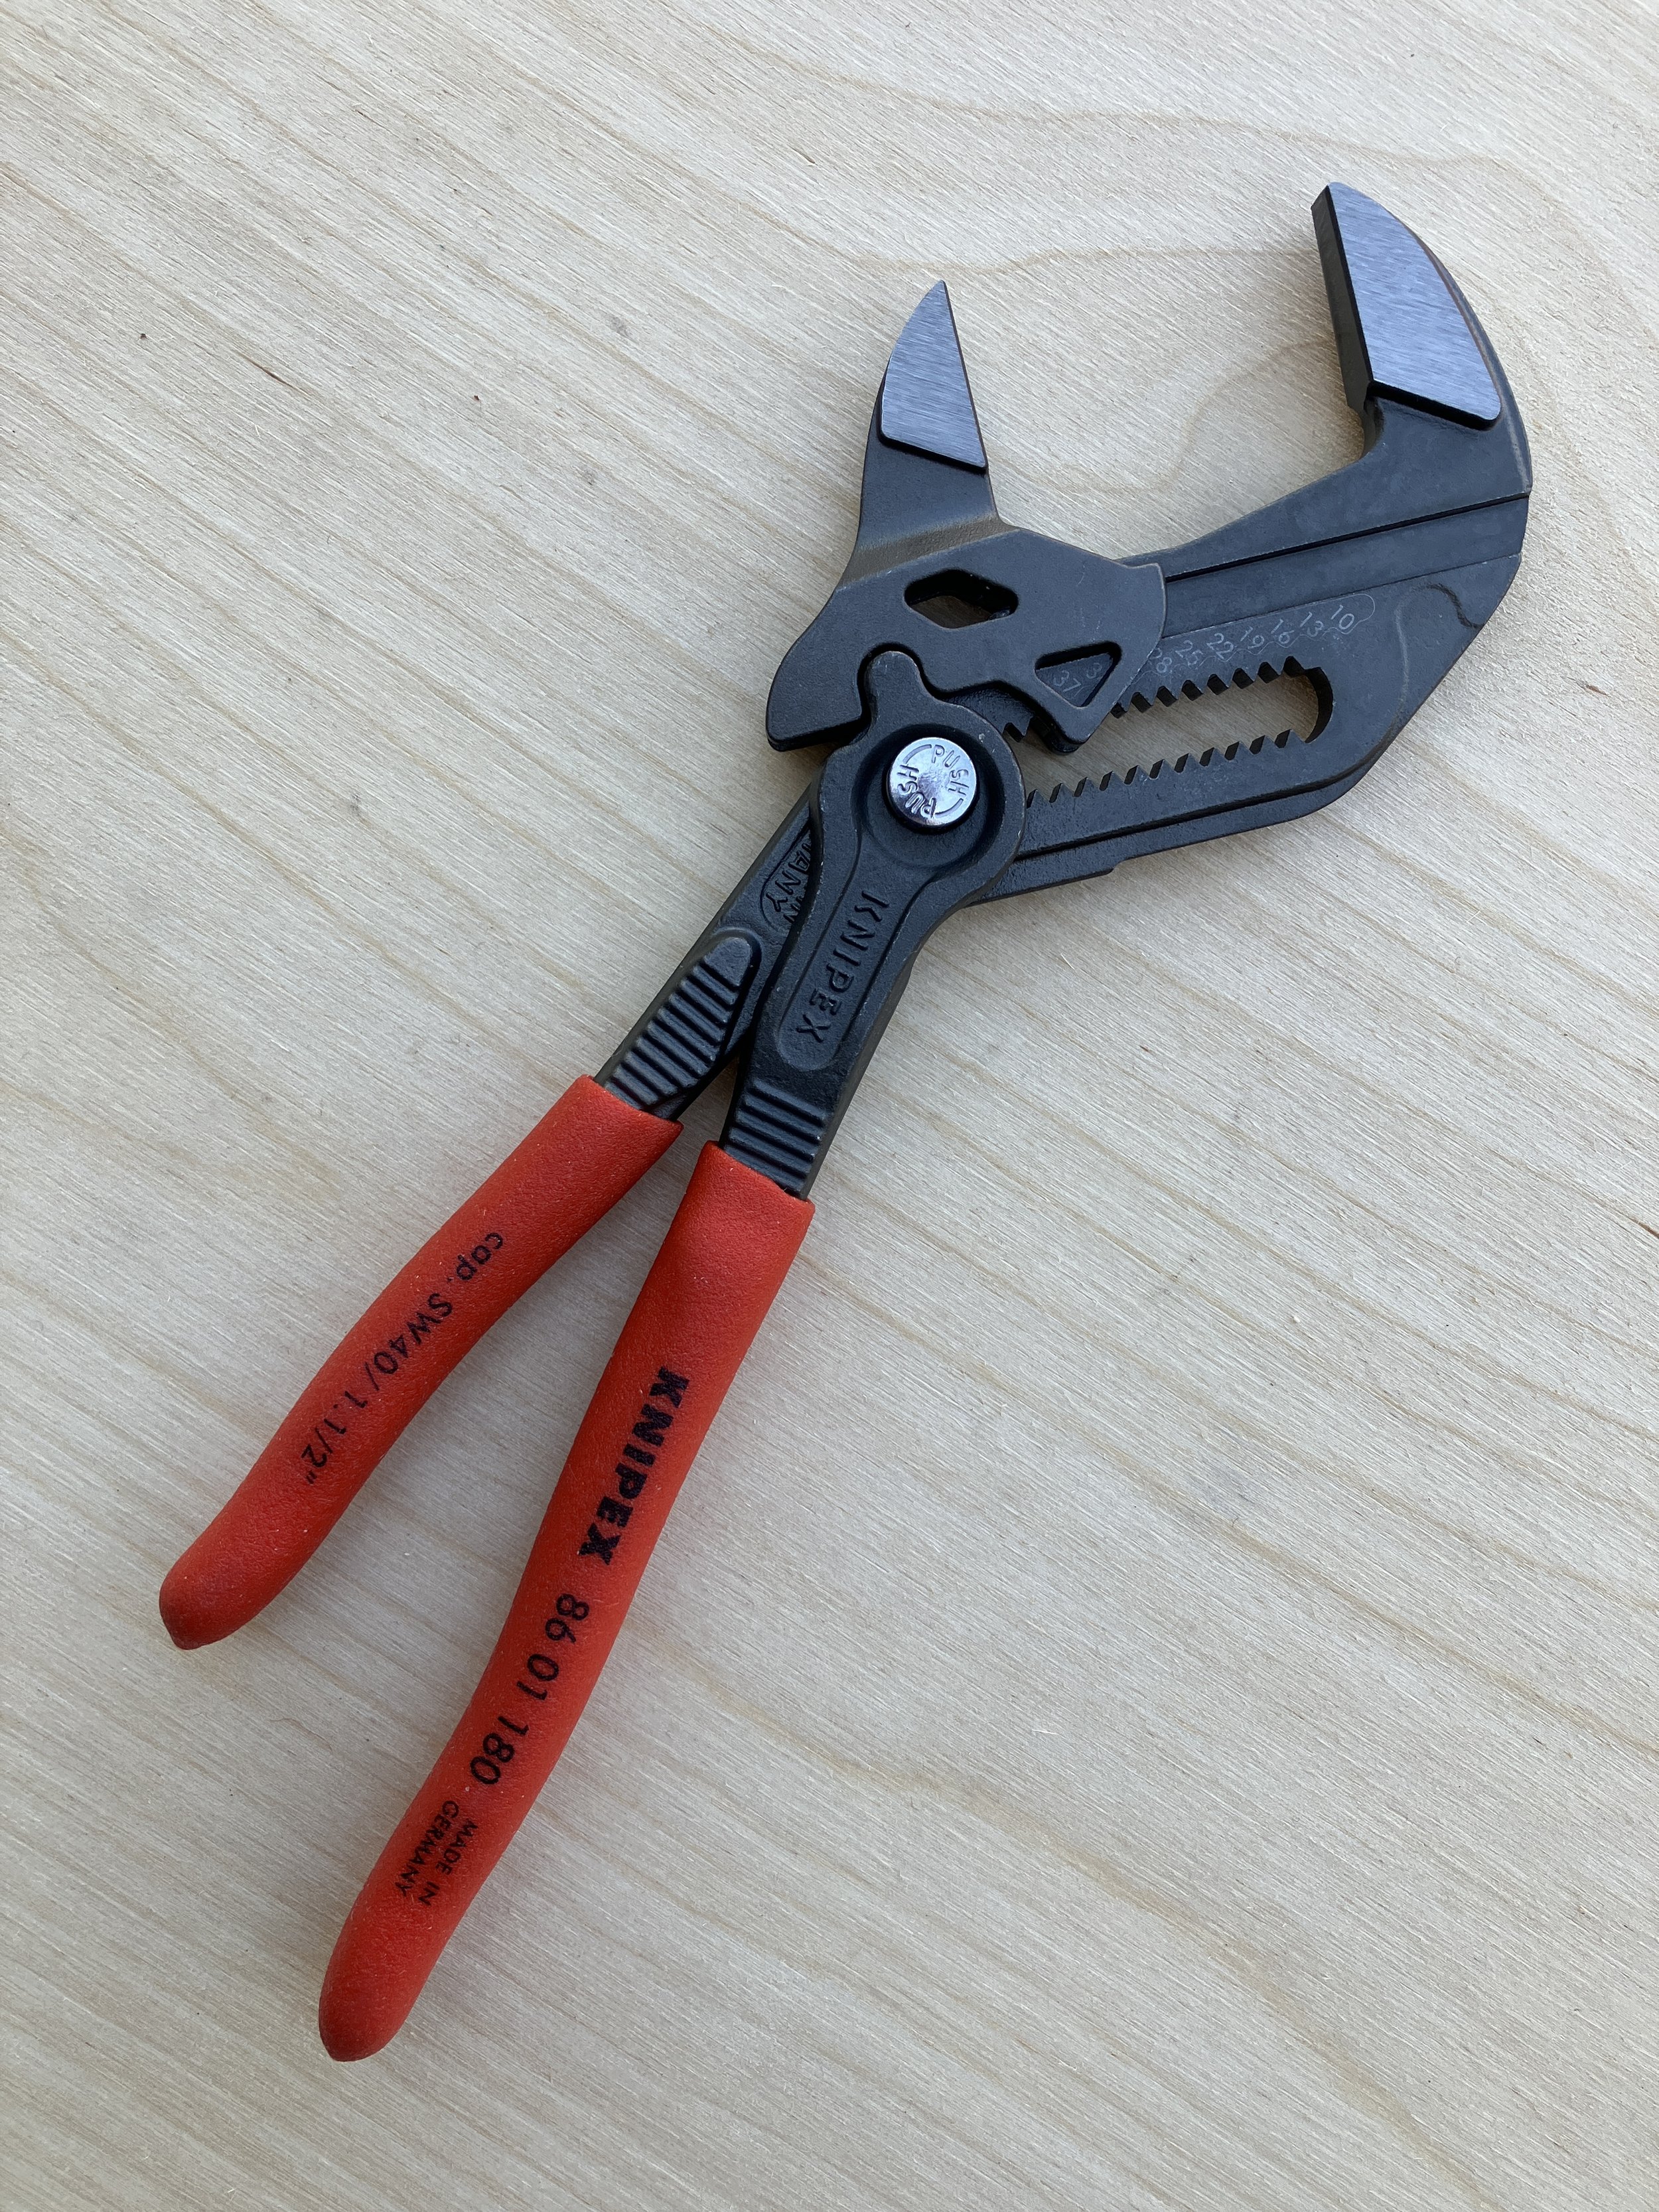
Enter the Knipex parallel-jaw pliers, or as the company refers to them, pliers wrench.
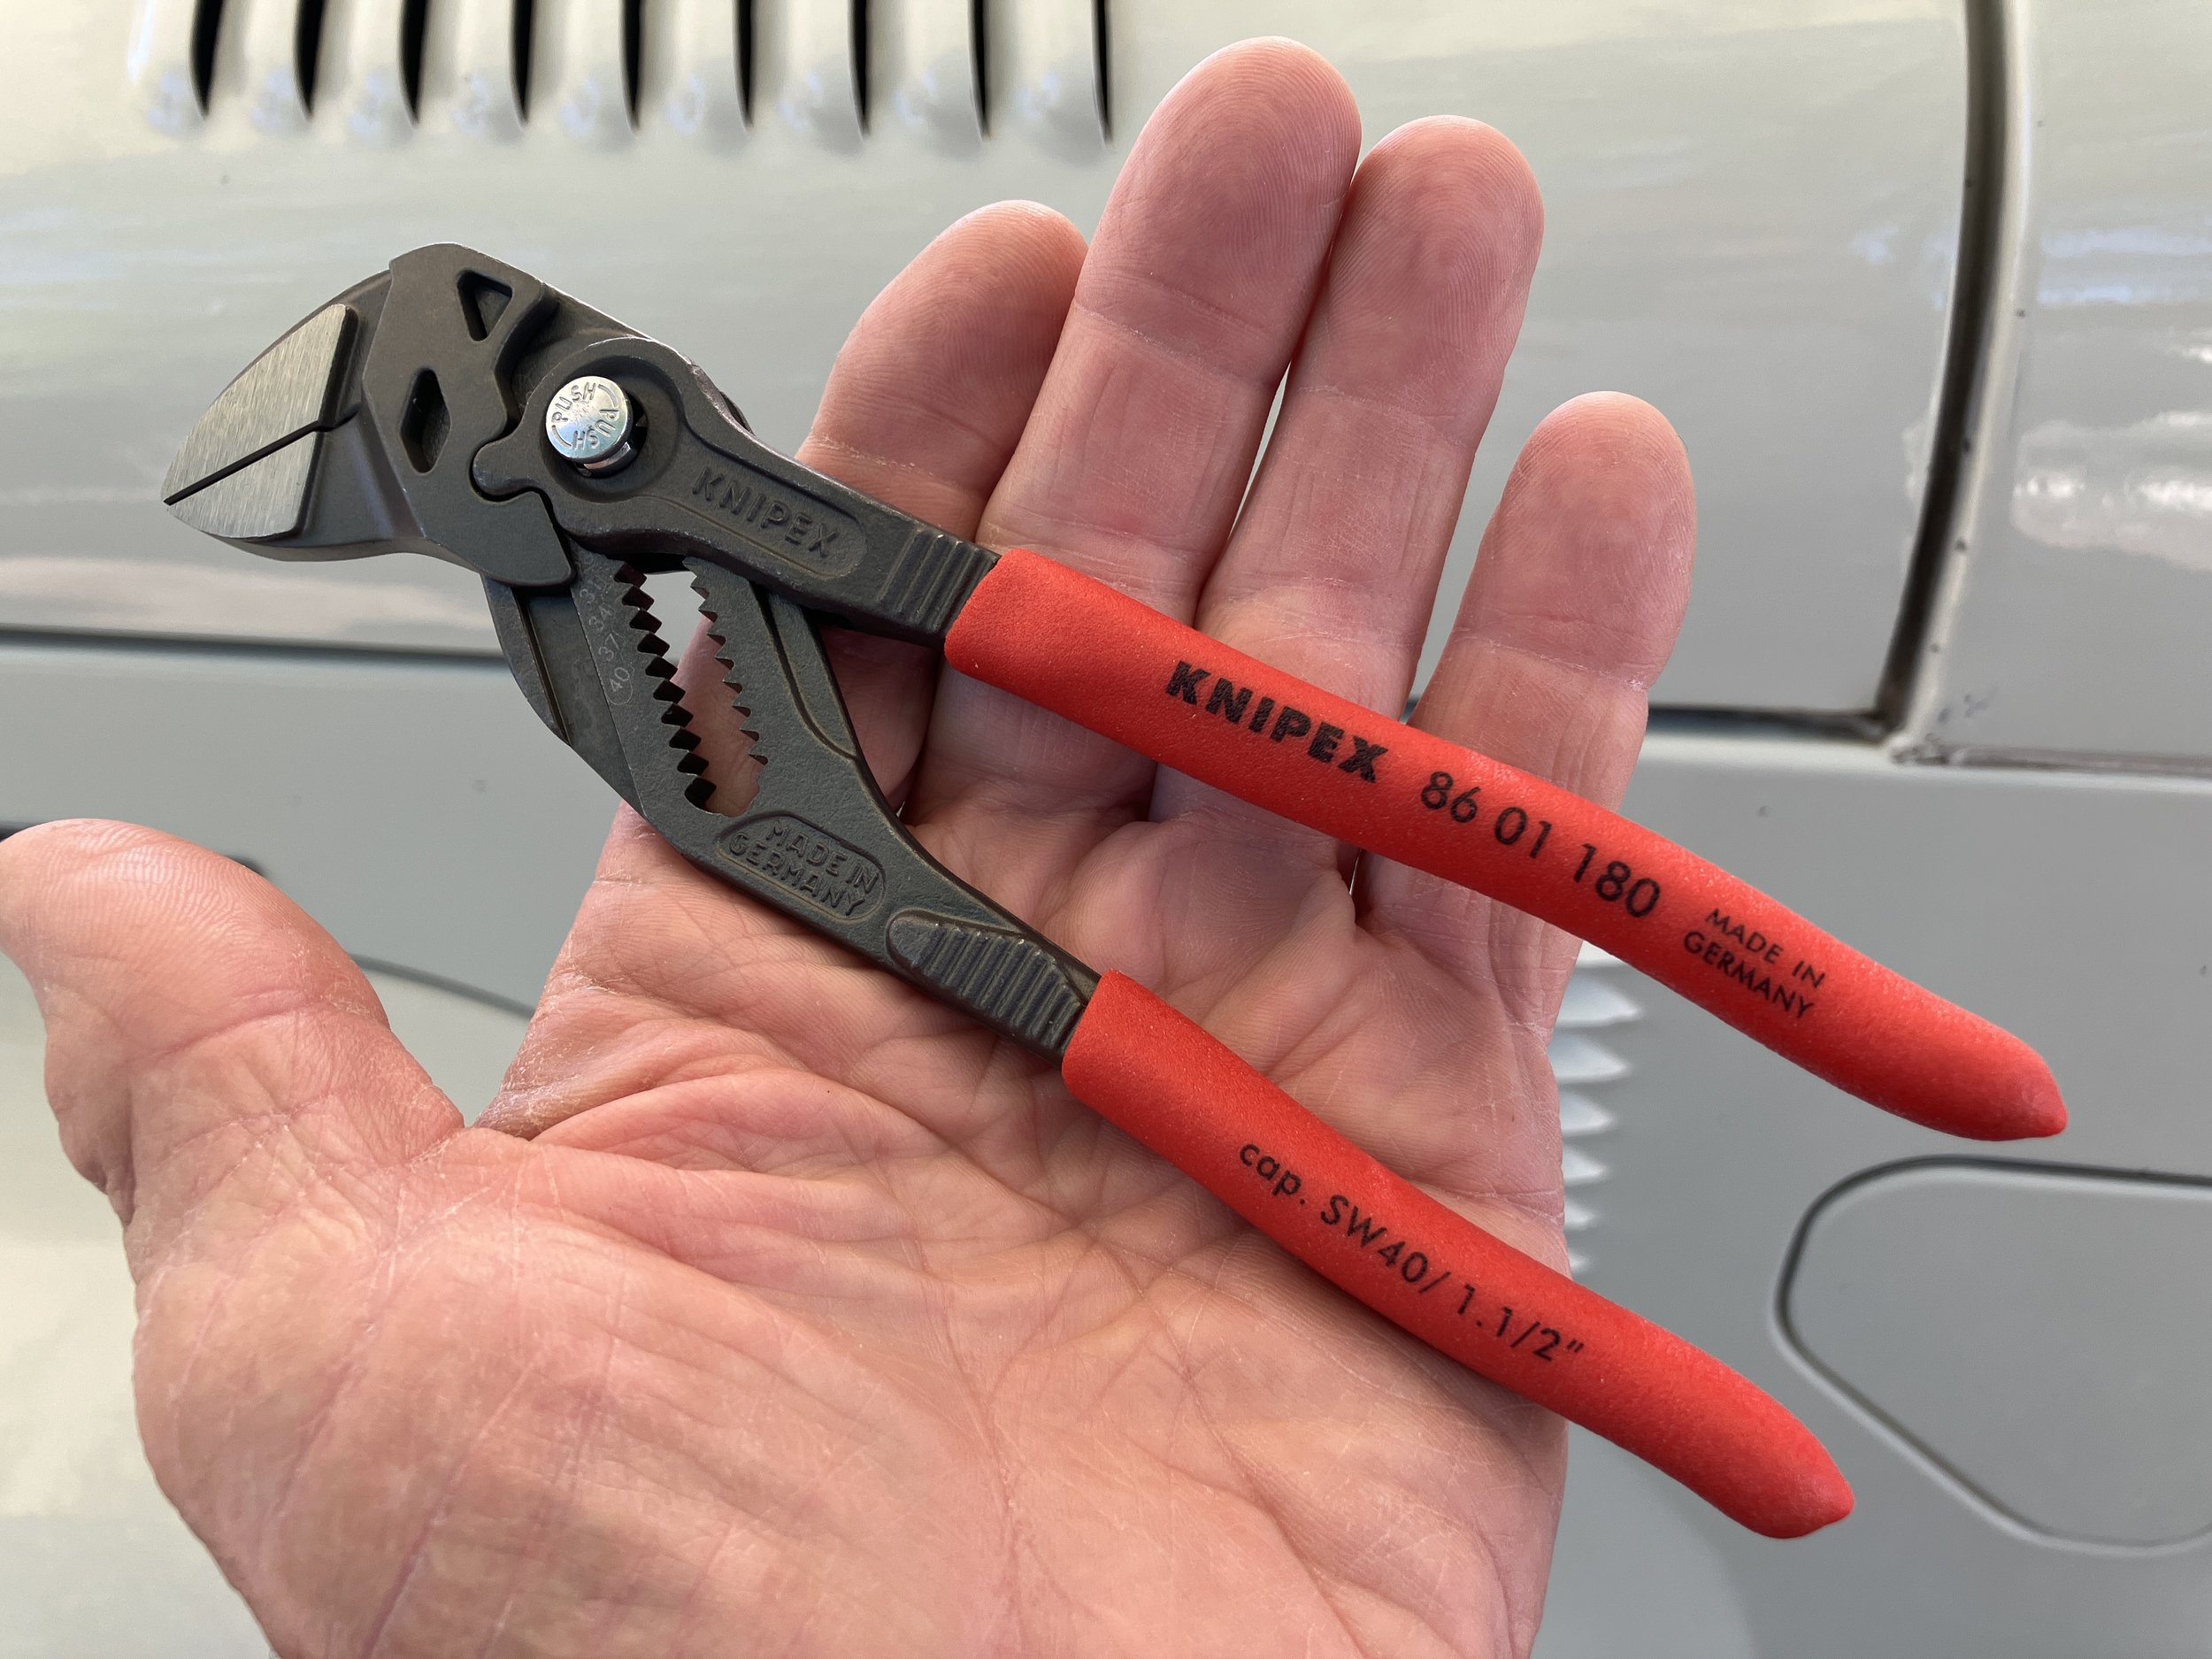
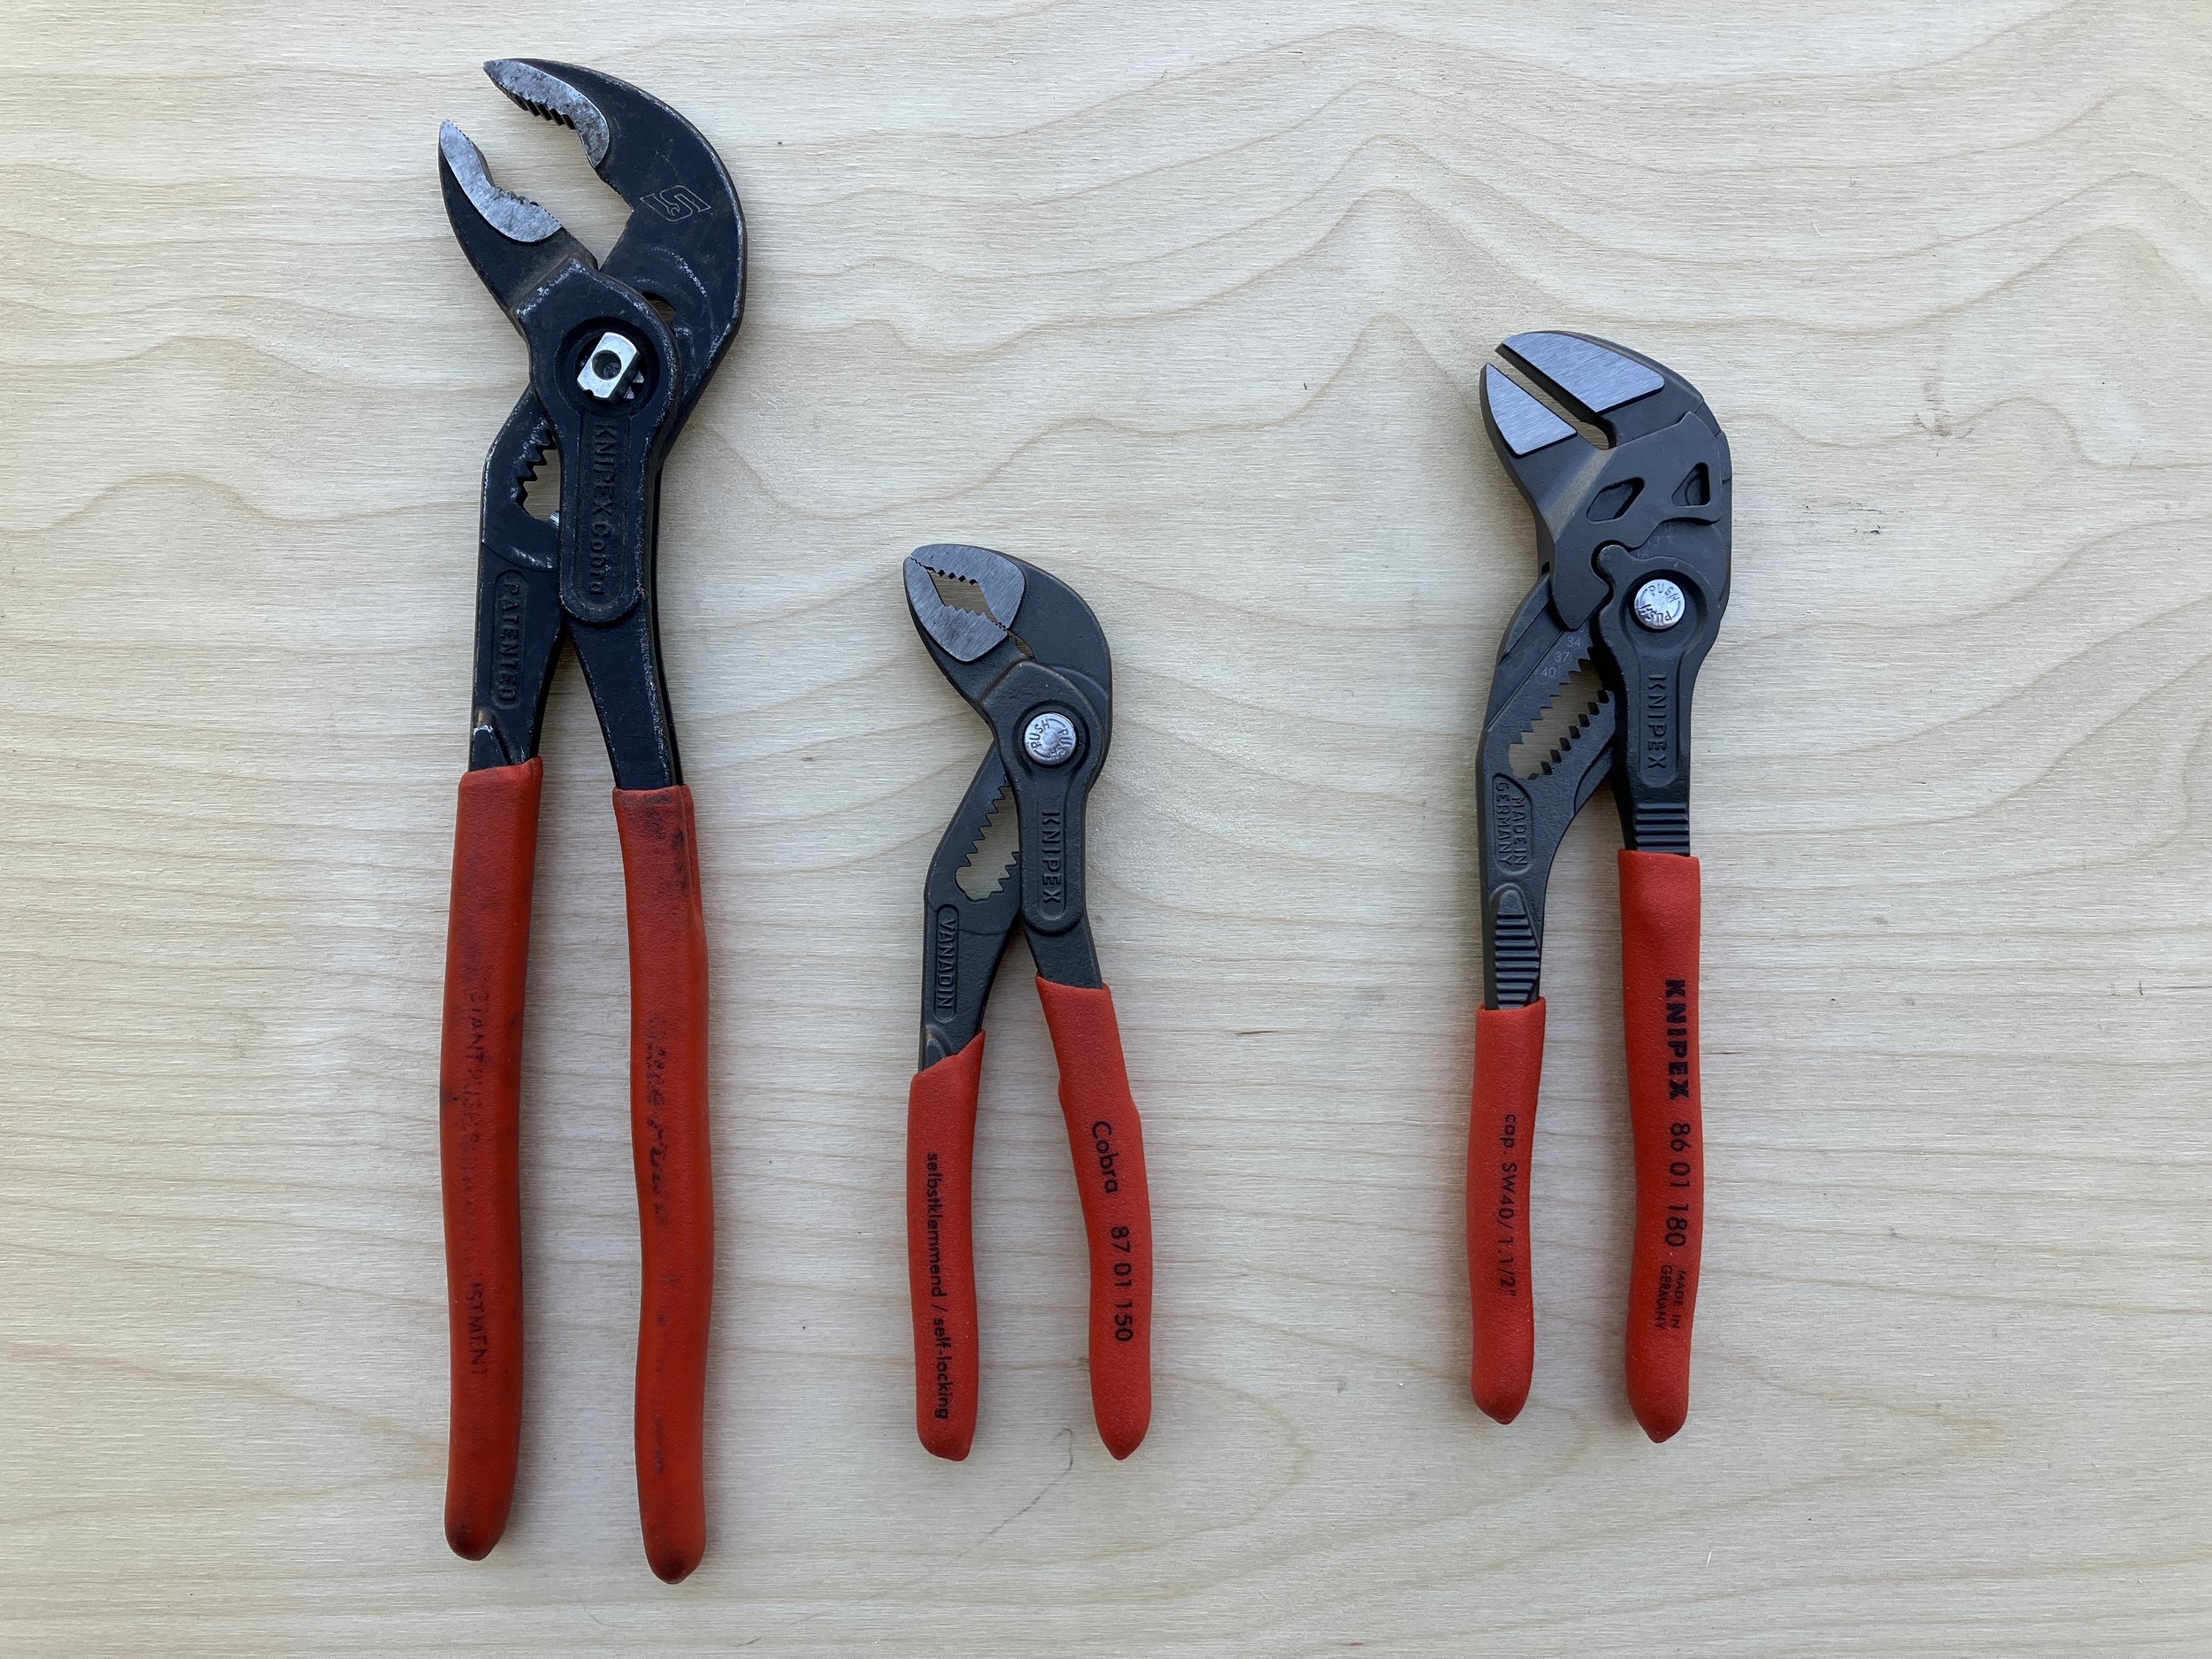
The lower jaw of the Knipex PJ pliers (my nickname) does not pivot about a central axle; instead it moves straight up and down in a track, and is adjusted with a separate handle on a pivot. The coarse adjustment is accomplished by sliding the handle up or down a toothed track, and the overall range is impressive: The compact 180mm model shown here can adjust its grasp from zero—i.e. gripping a piece of paper or sheet metal—up to a full 1 1/2 inches or 40mm. That means a pair of these could, in a pinch, substitute for a full ratchet/socket and wrench set from 3 or 4mm all the way up to 24mm or so (beyond that their leverage might be insufficient). Add the 250mm model for even more versatility.
One advantage of using the PJ pliers to, say, hold a nut while one unscrews a bolt from it, is that you actually grip the nut, which you cannot do with a standard wrench. This would be extremely useful in tight spaces were dropping the nut might mean a five-minute search in the bowels of the engine compartment—or the mud underneath. Likewise, when trying to thread a nut onto a bolt in a tight space you can retain a firm grip on it. Like all Knipex (pronounced “kineepex,” incidentally) pliers, due to the superior steel used the jaws are quite narrow, further enhancing their usefulness.
Disadvantages? The lack of teeth renders the PJ pliers useless at gripping round things—axles, the shaft of a bolt, etc.—which is why I also carry the company’s excellent standard sliding-jaw pliers. A very useful addition to a home or field tool kit.
Knipex is here.
The Guzzle H2O Stream: One purifier to rule them all?
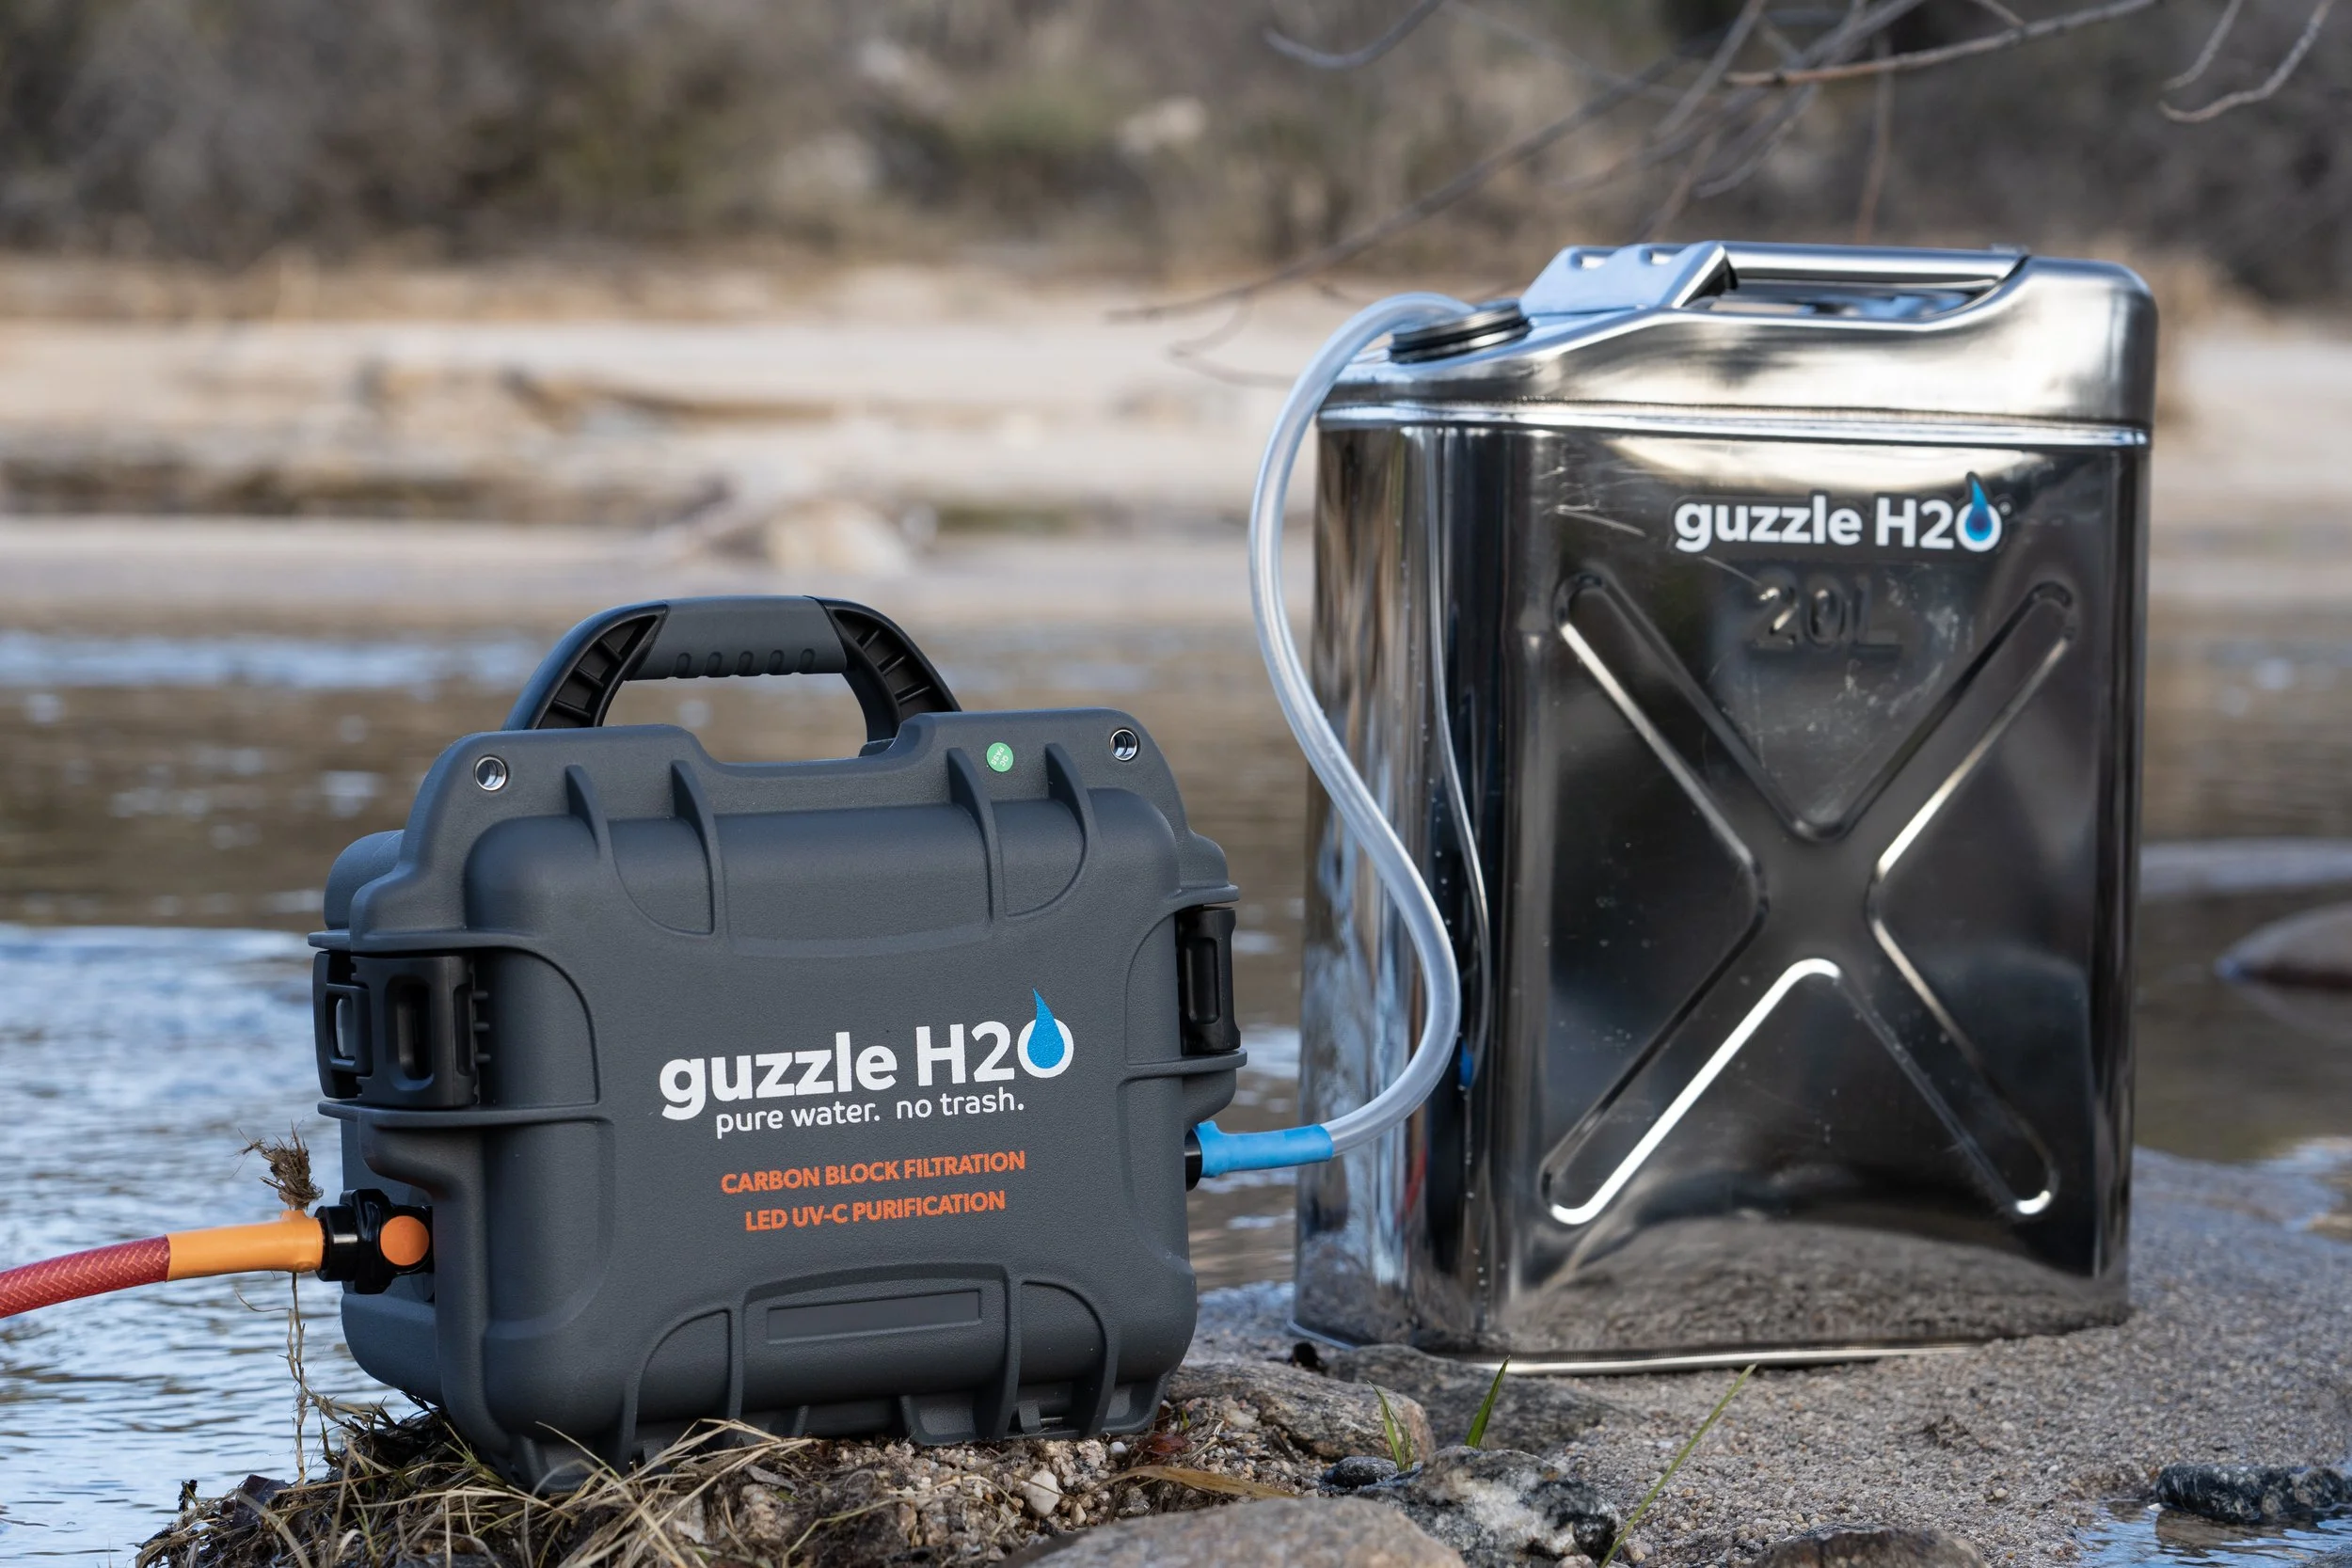
All-in-one, fast purification. (The nifty stainless-steel jerry can is optional.)
Like it or not, the days are long gone when we could go a-wandering, knapsack on our back, and dip our Sierra Club cup into any lake or stream we came to. (And to be frank, the Sierra Club cup was a really lousy design anyway.)
Depending on which studies and statistics you believe, anywhere from 60 to 80 percent of the surface water—lakes and streams—in the U.S. is significantly contaminated with something not good for you, from E. coli to mercury. There are probably a few creeks at 12,000-feet-plus in the Rockies that are still as pure as God intended them, but everywhere else you’d be wise to ensure the water you use from natural sources has been purified, or at least filtered.
What’s the difference? In general, a filter is designed to remove such waterborne pathogens as protozoa (e.g., Giardia and Cryptosporidium) and bacteria (e.g., Salmonella and E. coli). A purifier will kill these organisms as well as viruses. Until recently, consumer-grade water filters could not block the passage of viruses, which average just .02 microns in diameter compared to the relatively huge size of bacteria (.2 to 1 micron) and protozoa (2 to 50 microns). The historically accepted methods for killing viruses included exposure to UV light, treatment with iodine, and boiling. Today several companies produce filters capable of blocking viruses, so the distinction has become somewhat blurred.
Do you need a purifier? At this time, for travel in North America, probably not, as viral contamination of surface water is relatively rare here (potential exceptions include, for example, lakeshores with heavy human activity). However, if your plans include exploration of developing-world countries, it’s definitely worth considering, as viral pathogens such as hepatitis A and E, norovirus, adenovirus, and enteroviruses, among others, might be present. And, after all, there’s no such thing as water that’s too pure.
There are dozens of filters on the market—including those capable of blocking viruses—suitable for backpackers and canoeists, who might need no more than a gallon or two per day. The MSR Guardian Purifier (the pump version) is one such. For overland travelers who have bulk water tanks in their vehicles, and who use that water for washing dishes and perhaps showering, and who thus might go through three, four, or more gallons per day per person, the work and time involved in hand-pumping a liter or two per minute would get old really fast.
One leisurely but effective solution is MSR’s Guardian Gravity purifier, which comprises a gravity-fed filter capable of eliminating viruses (NSF P248 standard), fed by a 10-liter hanging bag. The system produces only about a half-liter per minute (and it must be cleared of silt and debris in advance), but if you’re in camp for a few hours you can easily produce 20 or 30 liters of pure water. Of course you need to set a timer or keep an eye on the unit to know when to refill, and topping it up more frequently helps push water through the filter (slightly) more quickly. But otherwise it’s completely passive.
Want something faster than that? I’ve recently been using what might be the best high-output water-purification system I’ve ever tried.
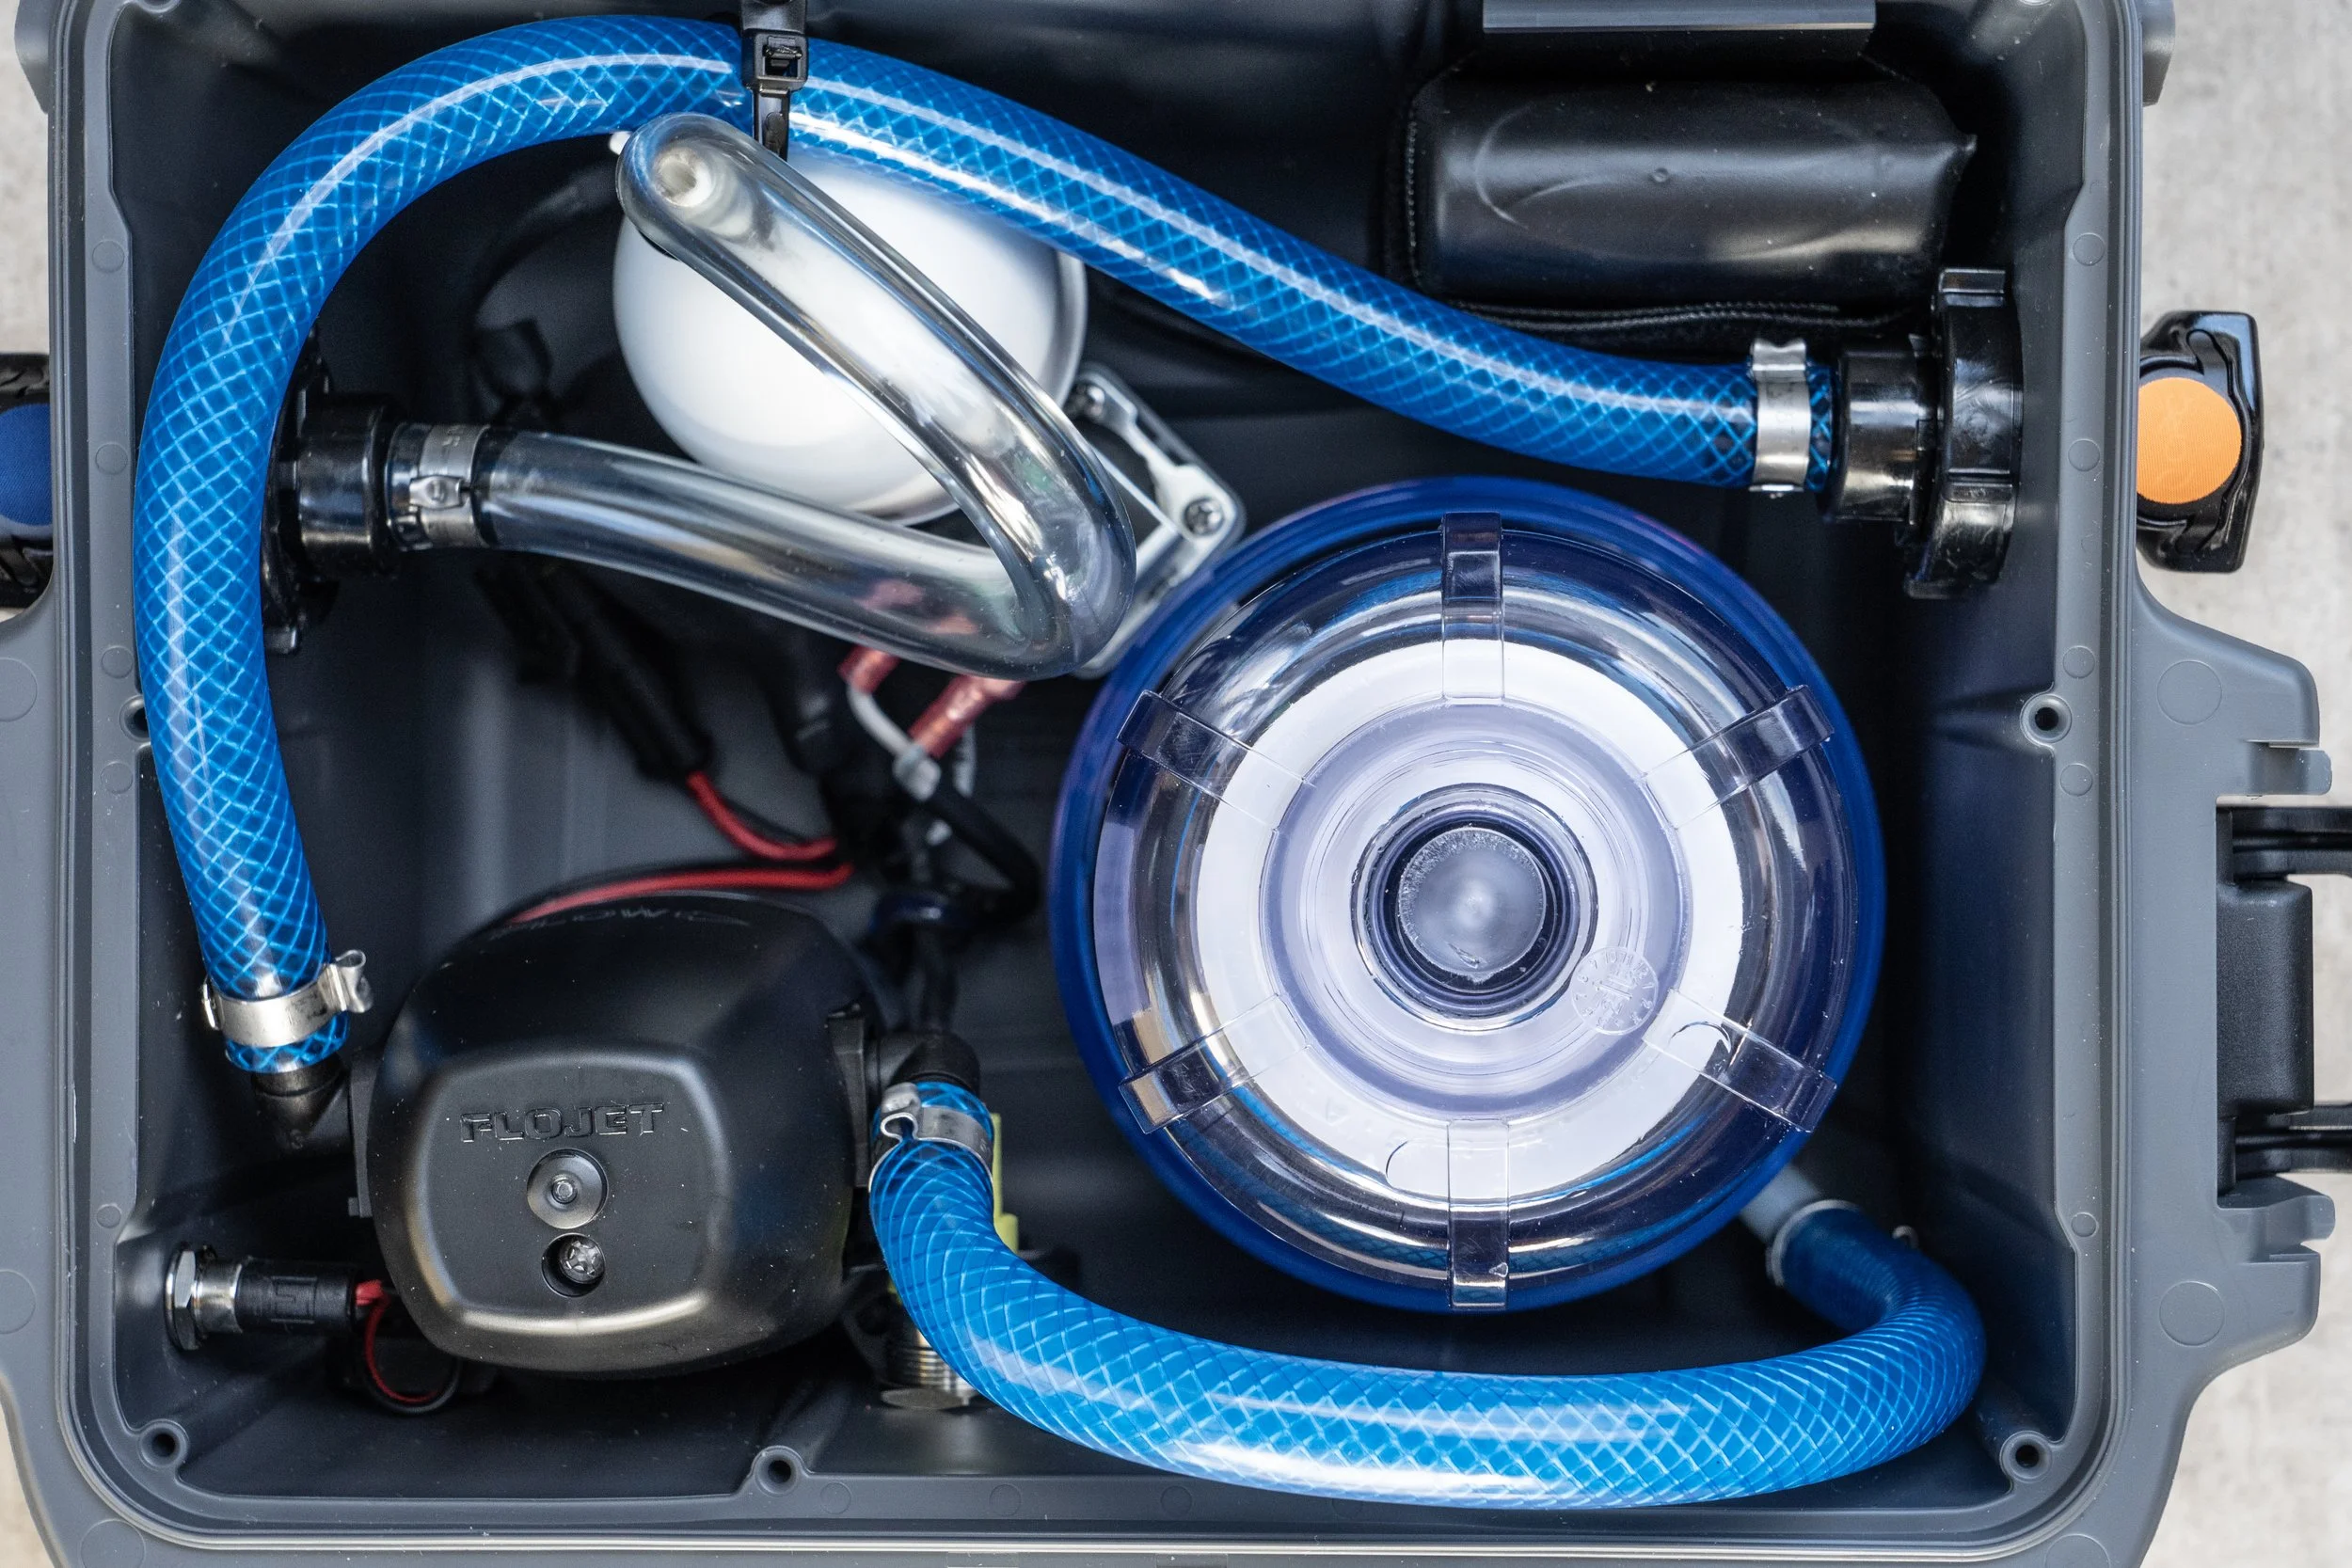
The Stream from Guzzle H20 (Okay, I would have picked a different company name) comprises, in a compact Pelican-like case about ten by twelve by eight inches, a primary, easily replaced .5-micron carbon-block filter, a 12V pump powered by an LiFePO4 battery, and a transparent capsule incorporating an LED UV-C light source. The carbon-block filter removes chlorine taste and odor, and reduces or eliminates NSF 41 contaminants, VOCs (volatile organic compounds) lead, and mercury. The UV-C light inactivates protozoa, bacteria, and viruses with 99.99-percent efficiency, according to third-party testing. And the Stream produces an astounding .75 gallons per minute in pumping mode, or 1.1 gpm with a pressurized source such as a municipal tap. The LiFePO4 power source will process 32 gallons on a single charge in pumping mode.
What this means is that the Stream could completely refill our Land Cruiser Troop Carrier’s 29-gallon tankage (24-gallon chassis tank plus jerry can) with purified water on a single charge and in about 38 minutes—significantly less if sourced from a municipal tap. No other system I know of comes close.
Using the Stream couldn’t be simpler. The inlet hose plugs into a quick disconnect fitting on one side of the case; the outlet hose into a similar fitting on the other side. The inlet is color-coded red (in fact the entire hose is red); the outlet blue to avoid confusion. Stick the 1-micron pre-filter of the inlet hose into the source, hold the outlet hose over your container, and hit the switch. You’ll be surprised at the rate of flow—the thing fills a standard water glass in a few seconds.
I opted for the “Overland bundle,” which includes an extra carbon-block filter and a 30-foot outlet hose, so you don’t have to park right next to a source if you have built-in tanks in your vehicle. I also got the significantly larger “Guide” prefilter to clear up the murkiest swamp water.
With this setup I would have felt completely comfortable exploiting natural or municipal water sources anywhere I have traveled on any continent. I was impressed with the thought behind the system, the quality of the components and assembly, and the speed—and taste—of the output.
As you might imagine, the Stream is a significant investment. The standard model is $1,195; the Overland bundle is $1,288, and the Guide prefilter is $65. However, given that safe drinking water is arguably the number one concern on any trip, you might consider it a bargain. I do.
Hint: When using “Search,” if nothing comes up, reload the page, this usually works. Also, our “Comment” button is on strike thanks to Squarespace, which is proving to be difficult to use! Please email me with comments!
Overland Tech & Travel brings you in-depth overland equipment tests, reviews, news, travel tips, & stories from the best overlanding experts on the planet. Follow or subscribe (below) to keep up to date.
Have a question for Jonathan? Send him an email [click here].
SUBSCRIBE
CLICK HERE to subscribe to Jonathan’s email list; we send once or twice a month, usually Sunday morning for your weekend reading pleasure.
Overland Tech and Travel is curated by Jonathan Hanson, co-founder and former co-owner of the Overland Expo. Jonathan segued from a misspent youth almost directly into a misspent adulthood, cleverly sidestepping any chance of a normal career track or a secure retirement by becoming a freelance writer, working for Outside, National Geographic Adventure, and nearly two dozen other publications. He co-founded Overland Journal in 2007 and was its executive editor until 2011, when he left and sold his shares in the company. His travels encompass explorations on land and sea on six continents, by foot, bicycle, sea kayak, motorcycle, and four-wheel-drive vehicle. He has published a dozen books, several with his wife, Roseann Hanson, gaining several obscure non-cash awards along the way, and is the co-author of the fourth edition of Tom Sheppard's overlanding bible, the Vehicle-dependent Expedition Guide.


