
Overland Tech and Travel
Advice from the world's
most experienced overlanders
tests, reviews, opinion, and more
What is it?


More soon . . .
Since Craig recognized the mystery product as a Sunrocket, a solar kettle/thermos, here's the rest of the story.
The Sunrocket is manufactured by Sun Cooking, an Australian company that also makes a solar oven. Lest you dismiss solar ovens as a street-fair curiosity suitable for roasting hot dogs one at a time, know that Roseann uses a solar oven (from a U.S. company) to produce probably 25 percent of the meals at our off-the-grid home in the desert, summer and winter. Those meals have included roast chicken, stews, biscuits, even cakes and cookies, all produced with zero fossil fuel and zero carbon emissions. So I was intrigued by the idea of a solar kettle, the counterpart to my venerable volcano kettle that boils water in a couple of minutes using a twig fire oxygenated by a vortex effect.
The Sunrocket (made in China) comprises a central tube of doubled, evacuated glass with a high silicon content for thermal stability and strength, side reflectors of polished aluminum, and a plastic body, with a metal handle that doubles as a lock for the reflectors and a prop to orient the tube toward the sun. A vent in the screw-in lid releases steam when the contents boil and acts as a safety valve. The capacity is listed at a half liter (17 ounces); however, the instructions say to leave a bit of air space at the top, leaving actual capacity at a bit under a pint. This would be enough for two cups of tea, or one large cup of coffee using a pour-through filter. (Curiously, while the website calls it a Sunrocket, as does the box it comes in, the embossing on the actual product says SunKettle, which I like better anyway and plan to use as the generic reference.)
I filled this one and set it in the sun on a balmy (70ºF) afternoon. An hour later the water inside was at 160ºF. Okay, so it's no volcano kettle—however, that temperature and dwell time would have been enough to safely purify water from a suspect source. And of course I was free to ignore the kettle and start writing this piece. The center tube was cool to the touch—fascinating how easily heat can get in and yet not out. Thirty minutes later the water was at a near-boiling 200º—plenty hot enough for coffee or tea. And given the vacuum insulation, the contents will stay hot for hours.
 The sun kettle, deployed.
Conclusion? While it's not exactly compact (the box, in which I'd be sure to carry it for protection, is 4.5 by 18 inches), or fast, the effortless and completely green nature of the Sunrocket makes it a nifty device for camping. I'll continue to use my volcano kettle for morning coffee (which I want right now), but the Sunrocket will have water hot for elevensies. And it would be excellent for leaving in the sun to heat water for washing—or purifying—while you do other things.
Sun Cooking is HERE. The Sunrocket ($67 including shipping) is available in the U.S. HERE.
The 2015 F150 should have been the 2014 Tundra
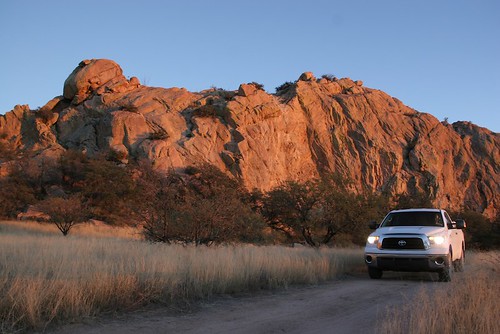 The 2008 Tundra . . . shrug.
I’ve been about as loyal a Toyota fan as one could imagine for a long, long time. My first car was a 1971 Corolla with the nifty little overachiever 1600cc hemi-head engine. The car was chosen, to be honest, as much to annoy my stepfather (who still referred to people from the islands as “Nips”) as for any practical reason. The fact that that second-hand car proved spectacularly reliable in contrast to the new Ford Pinto station wagon my mother had at the time just made it so much sweeter. With suspension from the infant Toyota Racing Development and a set of Weber carbs, my Corolla embarrassed many a BMW 2002 and Z-car on Mt. Lemmon Highway.
In 1978 I bought the ’73 FJ40 that is still with me 300,000 miles later. Nuff said. And there has been a succession of Toyota pickups culminating in the 2012 Tacoma Roseann and I now have. All have been as reliable as the Corolla. The 2000 Tacoma we had under our first Four Wheel Camper required no repairs in 160,000 miles. Zero. So I’ve come to expect, and have enjoyed, utter dependability from the company’s products.
Innovation? Lately, not so much—at least if we’re discussing full-size trucks.
I remember the buzz surrounding the announcement of Toyota’s first “full-size” truck, the T-100, in 1993. When it finally arrived, officials at Ford and GM must have breathed a sigh of relief, if they didn’t laugh out loud—it wasn’t full-sized, and the base engine was . . . a four-cylinder? While the T100 proved as reliable as other Toyotas, and acceptably powerful with the optional V6, it was clearly a false start. So in 1999, its successor was announced with much fanfare and a proper full-size-truck name: the Tundra, as big as all outdoors.
Except, of course, it wasn’t. Yes, it was bigger than the T100, the four-cylinder was gone in favor of a base V6 and an optional proper V8, but the Tundra remained firmly in the unofficial mid-sized truck category. Again it was a workhorse—I know owners with 300,000-mile examples that have never been touched—but it did nothing to directly challenge American hegemony in the big-truck market.
Cue 2007. The second generation Tundra arrived, and . . . it was big. At last Toyota had a genuine full-sized truck, positioned to compete head-on with the best from Ford, GM, and Chrysler. Three hundred eighty horsepower, a 10,000-pound tow rating, available eight-foot bed. Watch out, Big Three.
Or not. I had a chance to review a four-wheel-drive standard-cab Tundra with the 5.7-liter V8 in 2008. There was no denying its impressive size—far too large for my tastes unless I’d also had my dream sailboat to tow with it. But it stood shoulder to shoulder with American trucks, and had the paper specs to compete.
In looking at the window sticker for features, I noticed the chassis described as a “Triple-Tech Frame,” which I assumed was a reference to an updated version of Toyota’s typical fully boxed chassis construction. I peered under the bed, and did a double take. There was no boxing at all under the bed, and only token bits under the front. This was a cheap open C-channel frame that would have looked right at home under a ’73 Ford pickup—the ones you see with side chrome strips about three inches apart where the cab meets the bed. As my English friends would say, I was gobsmacked. For years I’d been preaching the superiority of Toyota’s chassis construction, and here they’d abandoned it for 50-year-old technology and a fancy name. (My impressions were confirmed by THIS alarming video. Just watch it.)
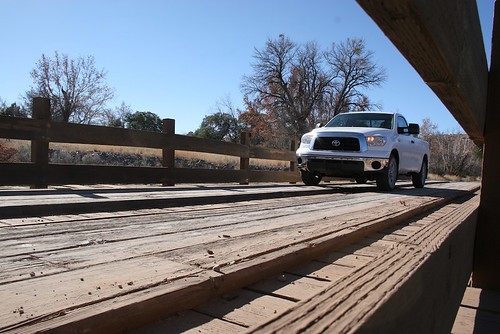
I spent a week with the truck, and . . . it worked just fine. The power was impressive, ride and handling were decent, the interior was okay, if short of the perfect ergonomics I associated with the company (perhaps because I just felt like a Hobbit perched on the seat). Ground clearance was comically inadequate; front air dam contact was inevitable on any but the mildest trail.
When I turned in the keys, I found that my overall reaction to this, Toyota’s broadside at the best-selling vehicles in the United States, its weapon to muscle in on the most iconic American object there is, the pickup truck, was . . . a shrug of the shoulders. There was nothing—simply nothing—I could see that would convince a loyal owner of an American truck to switch brands. No breakthroughs in technology, power, comfort, or economy. If Toyota expected to gain any market share at all except from a relative few owners of small Toyota pickups who found themselves needing a larger one, I predicted failure. Indeed, by 2012 Toyota’s share of the full-size truck market was stuck in the mud at around six percent. (Meanwhile the Tacoma commands well over 50 percent of the compact truck market in the U.S., outselling its nearest competitor by two to one.)
In the last couple of years there has been an avalanche of news about redesigned full-size trucks, with stunning advancements in technology. RAM introduced a sophisticated coil-spring rear suspension and announced a new turbodiesel engine that should catapult fuel economy figures into the high 20s. And Ford has completely rewritten the full-size-truck rule book with its 2015 F150, which will incorporate extensive use of aluminum, including the cab and bed. Incidentally, the chassis of that F150 is not only fully boxed, the crossmembers extend all the way through the boxed side rails and are welded on both sides. Now that’s the way to build a truck frame.
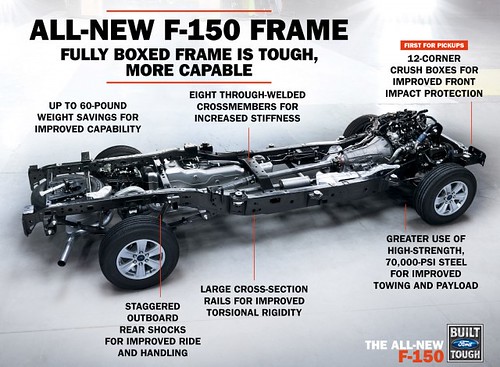
Along the way, I got a news item regarding the redesigned 2014 Tundra. Would this be the one? I clicked on the item, and found that the 2014 Tundra had indeed been thoroughly worked over, end to end.
Or rather, end and end: It had a new grille. And “TUNDRA” is now embossed on the tailgate, in letters as big as all outdoors.
In between? Pretty much zip.
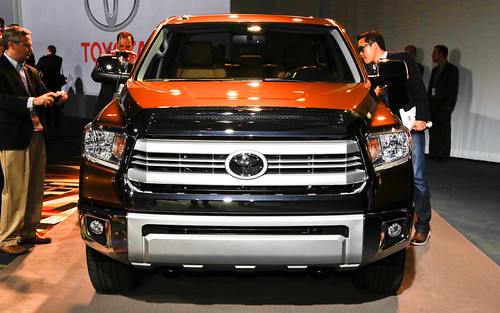 Thanks, Toyota.
There’s a crude colloquial expression I could use here to urge Toyota to either get serious with the Tundra or abandon the segment altogether, but I’ll refrain. Nevertheless, I think the company needs to do one or the other.
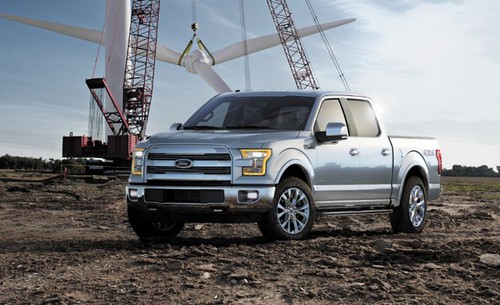 What it should have been.
Hmm . . . HERE is an intriguing bit of news, courtesy my friend Bill Lee. A five-liter turbodiesel option would solve half my problem with the Tundra. A decent chassis would solve the other half . . .
Shock absorbers: gas-charged, or . . . ?
Look at reviews of shock absorbers for four-wheel-drive vehicles in U.S. magazines, and you’ll probably find just two types listed and described:
- Mono-tube, high-pressure gas-charged
- Twin-tube, low-pressure gas-charged
All modern automotive shock absorbers—dampers if you prefer the more technically accurate term (or dashpots if you like to flummox people in casual conversation)—use oil to retard the oscillations of the vehicle’s springs as they deflect over bumps or depressions, in turns, or when braking or accelerating. As the piston of the shock absorber moves up and down, it displaces oil through valves that restrict how much and how quickly the oil can move, thus attenuating the movement of the spring. Without shock absorbers, the vehicle—especially one equipped with coil or torsion-bar springs, which have very little internal friction—would pogo wildly after hitting a bump or depression, roll dangerously in turns, and nose-dive under braking. Manufacturers vary the valving to suit the vehicle and the application, to adequately control these movements. The valving is inevitably a compromise between ride comfort and control.
So far, so simple. However, the situation changes when you start working a shock hard—say, on a long washboarded road at speed (where the shock piston’s travel, or amplitude, is low but its velocity high), or on a slow rocky section where velocity is low but amplitude high because you’re using all the suspension’s travel. Under these conditions, the shocks can fade—that is, suffer a loss in damping capability so that control is reduced.
First, the harder a shock is worked, the more it heats up, reducing the viscosity of the oil. This allows it to move through the valves more rapidly, reducing effectiveness. An equally important factor is cavitation. When the shock’s piston moves rapidly, it creates a very high pressure zone in front of it and a very low pressure zone behind it. If that low pressure zone drops below what’s called the vapor pressure of the oil, the oil instantly boils—even if it is not hot (remember, water boils in a vacuum even at absolute zero). The boiling creates thousands of micro-sized vapor cavities or voids—and, unlike the oil itself, those voids can be compressed as the shock rebounds, reducing the effective viscosity of the oil and likewise reducing its damping effectiveness. Additionally, as the shock rebounds and the voids collapse, they create microscopic bursts of pressure that can erode seals and the edges of valve shims. The vapor pressure of oil increases with temperature; thus, so does cavitation, exacerbating the heat effect on fade. (You can see exaggerated cavitation in action in a short video HERE.) Finally, in certain shock designs, air or nitrogen gas in the shock can mix with the oil, drastically reducing its effective viscosity with a resultant loss in performance. If your shocks fade badly enough it can severely compromise safe handling of the vehicle, not to mention ruining the ride comfort and potentially damaging other suspension components or the vehicle itself.
Manufacturers try to prevent or reduce cavitation and fade in several ways. Keeping the temperature of the shock oil low is the obvious first goal. Higher-viscosity oil is more resistant to cavitation due to its lower initial vapor pressure, but there’s a practical limit there.
A nearly universal “fix” for cavitation is to pressurize the shock—usually with nitrogen, which is non-corrosive and resists aeration with the oil better than air. A pressurized shock resists the expansion that is the result of cavitation, helping to force the oil to stay in its proper state.
The de Carbon monotube shock, named after its inventor and developed commercially by Bilstein, does this within a single tube that functions as both the outer body of the shock and the cylinder of the piston. The nitrogen is separated from the oil by a second, floating (or dividing) piston.
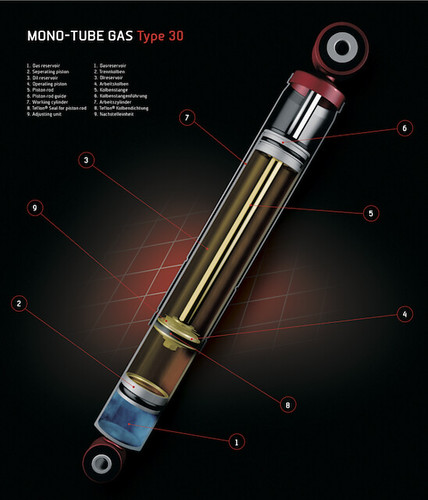 Monotube shock. 1. Gas reservoir 2. Floating piston 3. Oil reservoir 4. Operating piston 5. Piston rod 6. Piston-rod guide 7. Working cylinder 8. Teflon seal for piston rod 9. Adjusting unit
The monotube shock has several advantages, especially in terms of heat dissipation, as the single wall readily radiates to the passing air stream. Since the nitrogen is physically separated from the oil, aeration is eliminated. On the other hand, the high initial pressure of the de Carbon design (often over 300 psi) seems to heat up more quickly to begin with, and that same pressure puts constant stress on the vital piston-rod seal, even when the vehicle is parked. For a given length, a monotube shock will have less travel than a twin-tube shock, since it has to leave room for that gas chamber (this is one reason some such shocks are built with remote reservoirs that incorporate the floating piston and the gas charge). For a four-wheel-drive vehicle, though—especially one that might be employed on long journeys far from resupply—perhaps the biggest disadvantage is the vulnerability of that single tube. One dent from a flung rock will render the shock worthless (although it would take a significant smack, and many drivers put tens of thousands of miles on monotube shocks with no issues).
The twin-tube shock more or less reverses these plusses and minuses. The outer tube can withstand significant dents with no ill effects, since the space between inner and outer tubes is simply an oil and gas reservoir—which also allows longer travel than a monotube shock. That double wall inhibits heat dissipation, although the cylinder can be made thinner. Most twin-tube shocks employ a low-pressure charge of nitrogen in the top of the secondary tube, with no separation from the oil—which is why twin-tube shocks can only be mounted one way, and why a new twin-tube shock should ideally be stood upright and cycled fully several times to properly locate the gas. (Some twin-tube shocks employ a bag of gas, keeping it separated from the oil.) A large majority of original equipment shocks, and many aftermarket designs, use the low-pressure, nitrogen-charged twin-tube design.
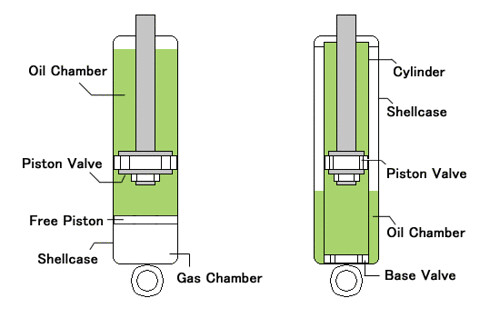 Monotube on the left; twin-tube on the right
But is there another way?
Perhaps the finest shock absorbers I ever had on my FJ40 Land Cruiser were from Koni, the legendary Dutch maker far better known (at the time) for equipping Porsches and BMWs than four-wheel-drive vehicles. I found them at significant expense because I’d had Konis on a street-racer Toyota Corolla and was amazed at how they transformed its handling. The Konis were bereft of any gas charge at all—they relied solely on a hefty volume of oil and sophisticated valving for their effectiveness, and worked sublimely in any situation I threw them at, whether low-speed rock crawling or high-speed Mexican washboard. I only regretfully replaced them when I decided to lift the Land Cruiser’s suspension so I could fit taller tires; Koni had no application for the new setup.
Fast forward 20 years. Roseann and I were scheduled to drive a 3,500-kilometer loop through Tanzania and Kenya, in a Land Rover Defender 110 loaned to us by Paul and Erika Sweet of Shaw Safaris in Arusha. The Shaw Defenders are comprehensively equipped for self-sufficient overland travel, as you can see here:
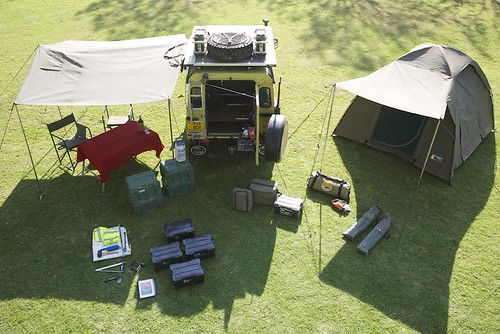
I never had a chance to put “our” 110 on a commercial scale, but I’d be stunned if it wasn’t banging hard on Land Rover’s suggested GVWR, if not significantly over. As Paul and I were going over the vehicle prior to our departure, I looked underneath at the suspension he’d installed. There were mighty coil springs from TJM—and four massive Koni shock absorbers, in the company’s signature red. The Heavy Track Raid, Paul told me, was Koni’s entry in the heavy-duty expedition suspension market, and he’d chosen them after less-than-stellar experience with several other brands.
Our second day on that trip was a 300-kilometer slog to Dodoma on a road cheerfully marked in main-highway-red on the Tanzanian map. It turned out to be a sadly degraded track that involved hours driving at ten or 20 kph, with the suspension cycling fully over ridges and warthog-sized potholes, the 110 rolling side to side like an overloaded tramp freighter in a squall. The road would then duplicitously smooth out until we were tempted to accelerate to a glorious 40 kph—at which point a hidden hole would slam the vehicle nearly to its bump stops.
I say “nearly” because throughout the 12-hour day the Land Rover’s suspension soaked up everything we threw at it with aplomb, maintaining composure whether hammering over corrugations or probing the limits of travel through craters. Several times during the day I crawled under the vehicle and gingerly felt those fat red shocks; at no time were they more than warm to the touch—give it 120-130 degrees at a guess. An astonishing performance—which was repeated virtually every day for the next two weeks as we explored the hinterlands of both countries, far off normal tourist tracks.
Back home I researched the Heavy Track Raids—discovering, much to my annoyance, that they’re unavailable in the U.S. except for certain models of the Mercedes G-Wagen—and found that, just as with my original Konis except to a far greater degree, the Raid relies on a massive volume of oil to control temperatures, rather than combining a lower volume of oil with nitrogen. The fatter shock body also promotes cooling: Since the area of a cylinder increases as a function of the square of the radius, a small increase in diameter results in a big increase in the surface that can radiate heat, even in a twin-tube shock such as the Raid. Further investigation showed the Raid shocks to be widely respected in Australia, where epic cross-country journeys are the norm. Mick Hutton, of Beadell Tours, has kept an exhaustive and convincing record of the performance of Koni Raids on their Land Rovers (HERE).
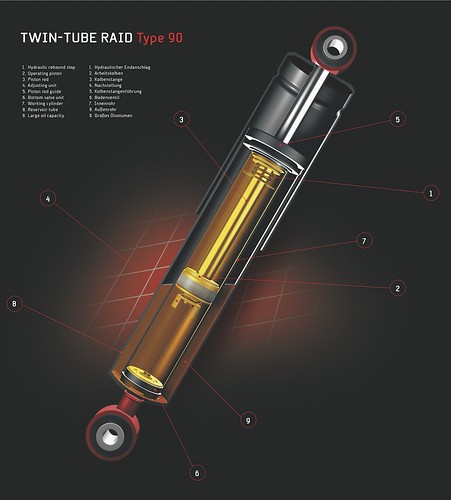 The Koni Heavy Track Raid. 1. Hydraulic rebound stop 2. Operating piston 3. Piston Rod 4. Adjusting unit 5. Piston rod guide 6. Bottom valve unit 7. Working cylinder 8. Reservoir tube 9. Large oil capacity
All right—enough torturing myself about unobtanium shocks. An alternative had been under my nose for some time: Boss, the Australian company that makes the heavy-duty air bags I installed on the JATAC, also makes a line of all-oil twin-tube shock absorbers—with a twist. Rather than filling the top of the secondary tube with pressurized air or nitrogen, the tube is completely filled with oil except for a thick sheet of heavy-duty closed-cell foam that wraps loosely around the inner tube. According to Boss, this accomplishes several things:
- The oil volume is maximized for increased resistance to overheating.
- The chance of aeration is completely eliminated, since no gas is ever in contact with oil as it is with most twin-tube shocks.
- Cavitation is reduced because the closed-cell foam provides, in essence, spring pressure against any expansion, collapsing and expanding as needed.
- The shock can be mounted in any position.
Several of these attributes are irrefutable as advantages. More oil is better, period. Keeping gas, whether air or nitrogen, completely separated from the oil is also better.
As to whether the foam-cell is superior to gas pressure in limiting cavitation . . . it depends on with whom you’re talking. The Australian manufacturers who produce both types position the foam-cell shocks above their gas shocks for heavy-duty use, and charge more for them. The Aussie magazine 4WD Action recently ran a comprehensive shock test, in which a foam-cell model, the Tough Dog (made in the same factory as the Boss shocks) came out on top of a stellar field—including the standard Koni Heavy Track.
On the other hand, a suspension engineer with whom I corresponded stated flatly, “There’s no way a foam-cell shock can control cavitation as well as a monotube shock pressurized to 250 psi or more.”
Whichever design has the edge in attenuating cavitation, one feature intrinsic to foam-cell shocks is indisputably advantageous: Since the shock is under no pressure at rest, the piston-rod seal is not constantly being stressed. That can’t help but enhance durability. A side benefit is that the shock is much easier to install—you can adjust the length by hand when offering it up to the mounts. I’ve had to use a bottle jack to compress some high-pressure monotube shocks when fitting them.
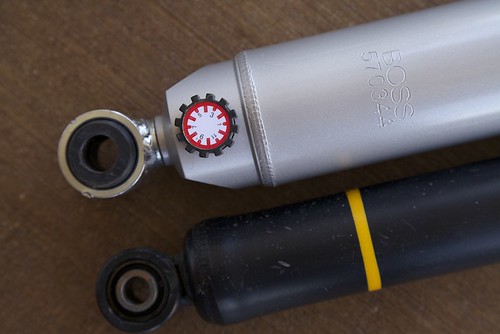
The Boss shocks incorporate one more excellent feature: 12-step adjustability, via a dial at the base of the shock. This mechanism—essentially an auxiliary bypass valve with a variable orifice—is shared with a few other excellent trail shocks such as the Rancho RS9000XL. It allows the user to tune the compression damping to suit the load and his preferences, and will also compensate for inevitable wear.
Reece Tasker at Boss Global in Canada arranged to ship a set of shocks to fit our Tacoma. It was impossible not to be impressed by the massive 21mm shafts and 60mm tubes of the Boss shocks. The stock Toyota (Tokico) shocks’ shafts are just 12.5mm in diameter, and look more suitable for supporting a hatchback’s rear window by comparison. The Boss shocks came with rubber boots to protect the shaft; I understand a change to a rigid plastic sleeve is underway (as is a switch to a Viton shaft seal).
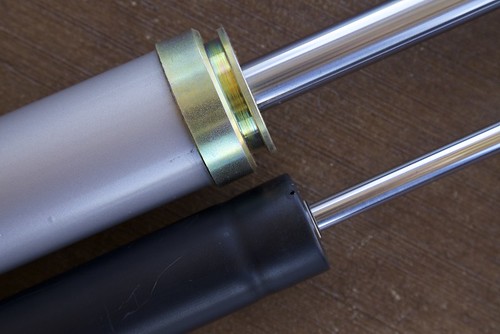 Boss on top; stock Toyota below
I should note that the shocks were not quite a bolt-in proposition. First, the company does not supply bushings for the oversized lower eye on the front shocks. I had to press out the stock bushings from the OEM Toyota shocks, and press them into the Boss eyelets with a bit of locking compound. Since our OEM shocks had less than 15,000 miles on them there was no issue with wear, but if you were replacing older shocks you’d need new bushings. Simple, right? Except that Toyota does not list those bushings separately for our year Tacoma, only the complete shock. I’ve yet to find an aftermarket alternative. Also, the Boss-supplied lower bushings (rubber with a metal sleeve) for the rear shocks were about a tenth of an inch too wide; I took them down a bit with a belt sender. Finally, at full droop the Toyota’s front anti-roll bar contacted the stout aluminum spring base of the Boss cartridge. I could have left it, or ground off a wedge of the spring base with no harm; instead, I installed a set of Icon relocation plates, which move the bar slightly down and forward, eliminating the interference. (Bilstein makes a similar kit; both bolt on with no drilling.) Perhaps once Boss becomes more established in the North American market, these issues will be solved; in the meantime, it was little trouble to address them.
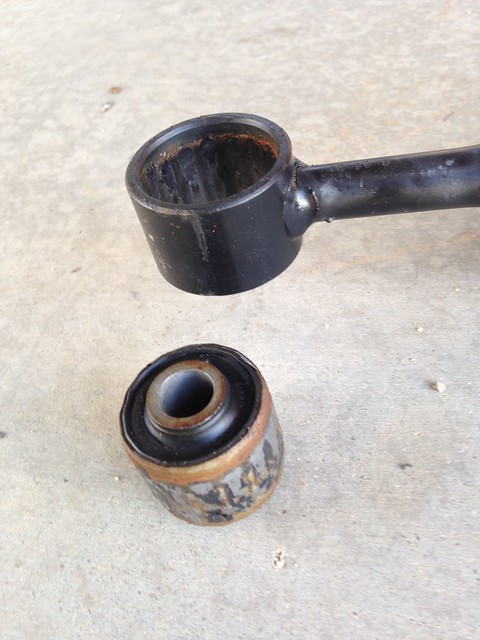 Pressing out the stock lower front bushing
The front Boss units are threaded to adjust ride height—which I left at the stock setting—and utilize the stock Toyota springs. I installed the springs into the new cartridges using my “widowmaker” Craftsman spring compressors—two threaded rods with cast hooks to grab the spring coils. A Snap-on impact wrench speeded up the task of cranking down the compressors (especially after I forgot to install the rubber boot on the first unit and had to disassemble it again). Done properly there’s scant risk to this method; however, if you have access to a proper wall-mounted spring compressor, I recommend it.
Once everything was buttoned up, I set the adjusters at a very modest three up front and five in the rear, and went for a drive along our rough approach road and a couple of nearby trails. The improvement in ride quality was immediately apparent, although no doubt that was partly due to the fact that the front springs previously installed had been 20 percent stiffer than the stock units, which are already on the firm side. High-frequency vibration and small-impact harshness was also noticeably reduced—and that was in part due to the standard rubber bushings in the Boss shocks. Our previous shocks employed Heim joints on the lower attachments. Heim joints, which are all-metal, are wonderful for precise handling and ultra-sharp steering response, but that isn’t a priority in a pickup carrying a camper.
With a few miles on the truck, I decided roll could be reduced a bit, and bumped up the rear shock by one and the front by two. That corrected the issue, and the truck is riding and handling in a fashion I consider close to ideal now. When we add the prototype aluminum front winch bumper we’re working on right now with Pronghorn Overland Gear, and install a winch, it will be easy to adjust the front shocks to suit, and also to bump up the ride height fractionally if necessary.
Based on the last week of driving, I’m optimistic the Boss shocks will prove an excellent match for the JATAC. Expect an update in a few months.
Boss Global is HERE. The Canadian link is HERE. Or you can talk to a live person at 604-799-1869.
While the commentary contains a couple of inaccuracies, the video HERE offers an inside look at foam-cell shock technology.
Brown paper packages . . .
. . . tied up with string. This is how your purchase from the Adventure Tool Company arrives. Stylish—and more importantly, it speaks of pride in the contents.

It's no secret I'm a fan of tool rolls for traveling tool kits. They're easy to organize, they don't rattle—a side benefit is that tools stay in better shape if they're not banging around in a box—and they can be stuffed next to other gear without damaging it. Whether you use them on their own, or as sub-organizers inside a larger case, as I often do, they contribute to a smooth work flow when maintenance or repairs are needed in the field.
Happily, high-quality tool rolls seem to be experiencing something of a renaissance. Off Road Trail Tools, after a short hiatus, is back making (in the U.S.) excellent heavy-duty nylon tool rolls in a couple of configurations (here). Bucket Boss makes a couple of decent models, and you can occasionally find others on the web from various companies.
But my favorite tool roll remains the Land Cruiser factory kit I profiled here, made from a stout oiled canvas that fills the air with a heady scent whenever it's opened, reminding me of the surplus military rucksack I first backpacked with, my Barbour jackets, the Australian duster Roseann wears horseback riding. All, you'll note, products of legendary reputation for durability and legendary style.
So when the package from the Adventure Tool Company wafted the same aroma past my nose, I expected good things. And I was not disappointed.

Paul and Amy Carrill started the Adventure Tool Company just two years ago, in Nederland, Colorado, where all their as-yet nascent range of products is produced. They sent me a sample of their ShopRoll tool roll, which is the standard-bearer of a line that so far also includes pouches, a tow-strap throw bag, an intriguing wool camp blanket, and a nifty oiled canvas tarp perfect for protecting the fender of a car you're working on or placing underneath it to lie on.
The ShopRoll is superbly well-made of 12-ounce oiled canvas, with straight stiching and bound edges. Opened up, it's generously sized, as you can see here with a 24mm wrench for scale:

The top flap functions as a place to lay out tools out of the dirt. It's also zippered and forms a huge flattish compartment—into which, I'm told, that canvas tarp folds perfectly. Brilliant. A larger zippered pocket is on the left, and three small flapped pockets on the right. Thirteen variously sized slots take up the center section. Last cunning (and thoughtful) touch - look inside the top flap and you find this:

. . . a tiny pocket with a "busted knuckle" band-aid kit.
So, what does it hold? I got out my Pelican 1550 cased tool kit, which if you've been following along on past posts you'll know is . . . comprehensively . . . equipped. With little trouble, I transferred the following to the ATC roll:

- Wrenches from 8 to 24mm
- 3/8ths ratchet, two extensions
- Shallow sockets from 10 to 24mm, deep sockets from 10 to 15mm
- Three screwdrivers plus an interchangeable bit driver
- A steel and a brass drift and a cold chisel
- Channel-lock pliers
- Vise-grip pliers
- Needle-nose pliers
- Side cutters
- Wire stripper/cutter
- Box knife
- Tin snips
- Hemostat
- Flashlight
- Two hammers
- Hacksaw
I could have stuffed in a bit more, but the ShopRoll took all this easily and rolled tidily. If I were attempting to construct a full kit with the ATC rolls I'd add at least one more, but with the selection I fit in this one I'd feel confident tackling many repairs and maintenance items.
This is a fine piece of gear, and well worth its premium $90 price. I'd like to see ATC add other configurations, especially a dedicated wrench roll with enough slots to actually take a full set of wrenches, unlike virtually every other wrench roll on the market. (That's at least 17 slots, Paul and Amy! Call me and we'll talk . . .) In the meantime, I'd like to add one of those nifty tarps to this kit, then give it some work in the field.

Paul and Amy will be at the 2014 Overland Expo in Flagstaff, Arizona, May 16-18. And I am delighted to announce that they will be producing our custom flapped musette shoulder bags, which everyone who signs up for an Overland Experience package will receive. They'll be our best bags yet.
If you can't wait, the Adventure Tool Company website is here.
Update: ATC has released a very nice motorcycle tool roll:

. . . which would also be useful as a specialty-tool roll to augment the larger one.
Shipping a motorcycle to South America

Reader Matt Caggiano posted this question:
I'm trying to find a reasonable price to air freight my KLR650 from Phoenix AZ to Buenos Aires, Argentina. I was hoping you may have some contacts that can help. I have a Sabbatical from work that starts at the end of February. My plan is to ship my motorcycle to Buenos Aires and then ride home. If I do it right, I'll end the trip at the expo :-)
Thanks so much for any info you can provide!
We surveyed several of our most well-traveled motorcycle correspondents and came up with some possibilities for Matt.
From Alison DeLapp, who's ridden from the U.S. to Ushuaia (alisonswanderland.com):
Javier with Dakar Motos in Buenos Aires is the best, when arranging shipping from BA. Maybe he can help arrange things in reverse for Matt. Dakar Motos
From Ken and Carol Duval (twice around the world on their R80 G/S and still going!):
Greetings from Valle de Bravo, Mexico. We have not used this route but can recommend the shipping section of the Horizons Unlimited site for help: Shipping.
To find a shipping agent we usually just use Yellow Pages or the Internet. Another more direct approach is to ask the airline you intend to fly on if they take cargo like a crated motorcycle. A Dangerous Goods Declaration is required, and the smaller the crate the less you pay, since they charge by volumetric weight. It's always nice to arrive with your bike on the same plane. We have enjoyed this experience a couple of times and it sure takes the stress out of running around a new city trying to get things done.
Ben Slavin, of Motorcycle Mexico, seconded Alison's suggestion about Dakar Motos, and added:
The other option is to buy a bike in Argentina. There are tons of people finishing their trip in Argentina, lots looking to sell their bikes. This thread on ADVrider has bikes for sale in Latin America.
And finally, from Carla King (carlaking.com):
UShip, a crowdsourcing site that reaches professional transport companies and people with pickups, suggests prices and lists your offer in an auction. I was looking to transport a bike I kinda wanted in Texas, but I didn't end up buying it. Still, I had a few good responses, including one individual who regularly traveled between Texas and California in his pickup. He had a great reputation according to reviews on the UShip site. He'd transported motorcycles and boats and boxes of stuff for people, the price was right, and our communication was professional and straightforward. The site had been recommended to me by a friend who has used it, and I liked the experience and would use it again.
23,000-mile review: Klim Latitude jacket and pants
 Pockets galore! (on the Altiplano in Peru)
As a female motorcyclist, choosing a viable suit for long-term riding is met with limited options. Despite the growing industry for women’s gear, what was available in October of 2012 did not equate to the durability and versatility of men’s gear. I looked at comparable manufacturers such as Rev-it and Alpinestars (I rode a KLR, so the BMW brand was not even considered), but neither of those held up to what I wanted out of a suit I was going to live in for six months. So, while preparing for a motorcycle journey from Los Angeles, California to Ushuaia, Tierra del Fuego, I decided on Klim’s Men’s Latitude jacket and pants.
In my initial review after six days of test riding around California before I left, my response was, “Yay! Klim is so great!” But just like any new relationship, I was excited at the potential of what could be, not scrutinizing what I had in front of me. So now, 15-months and more than 23,000 miles later, it’s time to break down the long-term, grime-covered, down and dirty results...
 Latitude 0 (at the Equator in Ecuador)
Continue reading full article here.
Installing an ARB diff lock, part 2
We're back from Silver City, New Mexico, where Bill Lee of Bill's Toy Shop installed an ARB locking differential in the rear of the JATAC (see below for part 1). We've created a 13-minute video detailing the installation and a bit of trail testing afterwards. Watch an ASE Master Technician at work, then see how the increased traction works in the real world - from underneath the truck. Watch it here, or click on the video title for the full HD version on Vimeo.
Installing an ARB diff lock, part 1
 Once you've installed better tires, the number one modification you can do to a four-wheel-drive vehicle to improve traction is to add a differential locker. Lacking traction control or lockers, a four-wheel-drive vehicle is actually only a two-wheel-drive vehicle: In any situation in which one rear tire and one front tire lose traction, the mechanics of an open axle differential mean all the engine's power will be directed to the tires with no grip. Ironic but inevitable. Traction control, which uses the vehicle's anti-lock braking system to apply braking pressure to a spinning wheel, redirects power to the opposite wheel effectively. However, traction-control systems are reactive—they only start working once wheelspin is detected. A manual locker not only distributes torque equally to both tires (which traction control does not), it can also be used proactively, when the driver sees a difficult spot ahead. With just one differential locked, you have increased your available traction by fifty percent. Install a diff lock on a two-wheel-drive vehicle and you've doubled your traction. (See also the comments section on this post.)
Our 2012 Tacoma lacks traction control, and we did not get the TRD package, which includes a manual-locking rear differential. So we planned from the start to add one, and the ARB was a natural choice.
Designed by an Australian engineer and four-wheel-drive enthusiast named Tony Roberts, the Roberts Differential was purchased by ARB in 1987. Originally made for the Toyota Land Cruiser, there are now over 100 applications in the ARB catalog. Needless to say it's been well-proven in the field.
The ARB requires an air source to operate, and ARB offers three compressors, from a basic model only suited for that purpose, to a twin-piston design capable of providing a large volume of air. We got the mid-range, single-piston, heavy-duty compressor, which can also inflate tires.
Since I'm a rank rookie on setting up differentials, we plan to have our master mechanic, Bill Lee of Bill's Toy Shop in Silver City, New Mexico, do that job with my assistance (meaning I'll take photos). Besides Roseann's nephew, Jake Beggy, Bill is the only other person we trust implicitly with our vehicles. In the meantime, I installed the compressor and operating switches, and ran the air line to the back axle.
 I had to cut off the clip securing the wiring loom (just left of the bracket) to make room for the compressor's air filter.
There was exactly one spot in the engine bay of the Tacoma where the compressor would fit. Fortunately it was nearly ideal, and did not impede access to other components. I could have used self-tapping screws to secure its mounting bracket to the sheet metal there, and in all probability they would have been adequate. But I confess to a prejudice against those things—I wanted stainless-steel bolts and nuts. That meant undoing part of the plastic inner fender molding so I could worm one arm up inside the fender to blindly fit and hold a wrench to the nuts once I'd drilled the holes. Two hours of blasphemy and bruising ensued, but eventually it was accomplished.
 The compressor in place, with the quick-release fitting for a tire-inflation hose on top. The black box to its right is the relay. I deemed a self-tapping screw sufficient for that.
The compressor's wiring loom comes in two parts, so there is minimal wiring to push through the firewall. Just four male wiring tabs needed to be pushed through a rubber grommet sealing off the truck's main wiring loom where it passes through to the cab. I taped the tabs to a fat nail normally used as a tent peg, and poked that through the rubber, which seemed to close up satisfactorily around the hole.


With those wires connected to the inside wiring loom, the next task was to mount the switches for the compressor and locker. This can be accomplished easily with the small auxiliary switch panel offered by ARB, which simply screws to the bottom of the dash, but I wanted something that looked a bit cleaner. Two blank switch holes on the left side of the dash offered themselves, and—after some judicious work with a Dremel (would it kill manufacturers to make these holes a universal size?), and some upside-down winkling to get the wires up there—the result was satisfactory.
Next stop: Silver City.

Hint: When using “Search,” if nothing comes up, reload the page, this usually works. Also, our “Comment” button is on strike thanks to Squarespace, which is proving to be difficult to use! Please email me with comments!
Overland Tech & Travel brings you in-depth overland equipment tests, reviews, news, travel tips, & stories from the best overlanding experts on the planet. Follow or subscribe (below) to keep up to date.
Have a question for Jonathan? Send him an email [click here].
SUBSCRIBE
CLICK HERE to subscribe to Jonathan’s email list; we send once or twice a month, usually Sunday morning for your weekend reading pleasure.
Overland Tech and Travel is curated by Jonathan Hanson, co-founder and former co-owner of the Overland Expo. Jonathan segued from a misspent youth almost directly into a misspent adulthood, cleverly sidestepping any chance of a normal career track or a secure retirement by becoming a freelance writer, working for Outside, National Geographic Adventure, and nearly two dozen other publications. He co-founded Overland Journal in 2007 and was its executive editor until 2011, when he left and sold his shares in the company. His travels encompass explorations on land and sea on six continents, by foot, bicycle, sea kayak, motorcycle, and four-wheel-drive vehicle. He has published a dozen books, several with his wife, Roseann Hanson, gaining several obscure non-cash awards along the way, and is the co-author of the fourth edition of Tom Sheppard's overlanding bible, the Vehicle-dependent Expedition Guide.


