
Overland Tech and Travel
Advice from the world's
most experienced overlanders
tests, reviews, opinion, and more
Airing down—and up—the pro way
One of the most frequent questions people ask me is, “What’s the the best thing I can do to improve my vehicle’s off-pavement performance?” Many of them seem distinctly disappointed when I answer, “Air down your tires.” I’m sure they’re hoping I’ll facilitate some expensive and impressive modification—diff locks, external-bypass shocks, three-piece titanium wheels, something that would justify putting a stylish brand sticker in a window. But the fact is that nothing is easier to do or more effective at providing several instant benefits than reducing your normal street tire pressures to suit the immediate conditions. I’ll repeat: Nothing.
First, lower pressure increases traction by increasing the contact area of the tire and allowing it to better deform around obstacles and grip them. Flotation in sand is enormously enhanced with the longer footprint provided by lower pressure (not so much greater width as many suppose).
But the advantages don’t end there. Lowering pressure alleviates stress on the vehicle by effectively reducing the spring rate—the tires flex enough to absorb impacts that would otherwise have to be dealt with by the springs and shocks. That translates to much greater comfort for the driver and passengers.
Finally, the above characteristics contribute to reduced impact on the trail. We saw first-hand evidence of this on a recent crossing of the Simpson Desert in Australia, via the Madigan Line—so-called after Dr. Cecil Madigan, who led the first scientific expedition across the area in 1939. The Madigan Line cuts directly across the huge field of parallel sand dunes that characterizes this part of the Simpson—1,130 sand dunes to be more or less precise. The dunes themselves are stabilized and well-vegetated, but the bare track still needs to ascend and descend each dune, and despite the very sparse traffic on this route the final approaches and crests are often cratered with “hoon holes,” where those who disdain airing down—or even engaging four wheel drive—have left huge divots from futilely spinning tires or frantic, lunging ascents.
Graham and I actually aired down our Land Cruisers prior to hitting the dunes, on the stretch leading to the old Andado Station, a fine track but well-known for its long stretches of corrugations (or washboard as we refer to them in the U.S.). I reduced our pressure from 40 psi, which we’d run on the paved Stuart Highway to Alice Springs, down to 32, and Graham did likewise (he’d found his tubed tires on split rims at a harsh 50 psi). It took much of the sting out of the sharp undulations and eliminated the skip-fishtailing that can occur with higher pressures. (An Australian writer described those corrugations as “brutal.” All I can say is he needs to see the corrugations on the seven-mile dirt track to our house in Arizona. Or those on the road from Namanga to Amboseli. But that’s another story.)
Once in the dunes, we further reduced pressure to around 22 psi. This is well above the 14 we might run in very soft sand, but it worked perfectly on the combination of flat, compacted inter-dune track and the chewed-up ascents and descents. We even summited the famous Big Red dune outside Birdsville with no drama.
Once past Birdsville, on the high-speed gravel Birdsville Developmental Road, we re-inflated—and that’s where the catch is for many people who grasp the concept of airing down, appreciate its advantages, but rarely if ever do it.
Why? Because a lot of those people carry a compressor that cost them as much as a couple of pizzas and is about as effective at actually adding air to a tire, despite the “150 PSI!” claims on the box. A single 45-minute session laboriously moving four tires from 25 psi to, say, 28, while their $29.95 compressor buzzes and vibrates in circles like an enraged chihuahua, and that’s it. The thing gets tossed in the bottom of the tools, to be used in the event of an actual flat, if at all. The same people likely used the point of their Swiss Army knife to depress the valve to deflate each tire, another laborious procedure. It’s little wonder they inflate the tires on their new truck to 40 psi and never budge from that.
We knew better. And we were, after all, in Australia, home of some of the best expedition equipment manufacturers on the planet. In Sydney we had picked up a pair of ARB E-Z deflators, and two ARB portable Twin compressor kits (CKMTP12). The single-cylinder ARB High Output compressor on our Tacoma has been working perfectly for several years operating a locker and inflating tires, so I was eager to compare the more powerful Twin in field use.
Airing down takes less than a minute per tire with the E-Z deflator, which unscrews and captures the tire’s valve core, allowing a much greater volume of air to exit the valve stem, and gives you precise control with its sliding actuator. The only faster way I know to air down four tires is with a full set of the superb set-and-forget CB Developments Mil-Spec automatic deflators—but that full set will cost you $400, versus $40 for the ARB unit. An E-Z choice, if you will.
Regarding portable 12V compressors, as with so many other products it’s been my experience that you get what you pay for. The $30 units that plug into a cigarette lighter simply won’t cut it for field use. I know people who’ve been happy with the ubiquitous Masterflow MT50 and its variations, which are available for less than $100; these clip directly to the battery, meaning they can draw more amperage, but they are still achingly slow, and I can recall at least three failures related to me by users. Simply put, if you’re going to go the pro route for airing down (and repairing) tires, you need a pro-level compressor. You do not want to get caught after a section of soft sand with all your tires at 14 psi, no way to inflate them, and 30 miles of rocks ahead. (Especially when it's been six days since you've seen another human.)
Ignore the psi rating—virtually any pump will produce more than enough theoretical pressure. It’s the cfm (cubic feet per minute) rating and duty cycle you need to evaluate. The cfm is self-explanatory. Duty cycle refers to how long the unit can run before it needs to shut down and cool off. A 25-percent duty cycle means the pump can run for 15 minutes out of an hour. It’s easy to see the relationship: A high cfm rating means little if the duty cycle is poor, and a 100-percent duty cycle means little if the cfm rating is below standard. Furthermore, some compressors display an impressive cfm rating at zero psi, but will fall off significantly with higher pressures. Look for factory specs that list both.
The Australian-built ARB Twin boasts a 100-percent duty cycle, produces 6.16 cfm at zero psi and an impressive 4.68 cfm at 29 psi. How does this relate to the real world? Back on the Birdsville Developmental Road to air up, I hooked up the Twin’s leads to our Land Cruiser’s battery, flipped the rocker switch, connected the chuck to the first tire (still at 22 psi), settled back on my heels to wait a couple minutes, and, er, what? The tire seemed to rise awfully quickly. I disconnected and checked the pressure: 42 psi. I was only aiming for 38 . . .
I bled a bit out and moved to the other three tires. I didn’t set a watch to any of them, but it certainly took no more than a minute per tire to reinflate from 22 psi to 38. That rivals my benchmark for powerful compressors, the Extreme Outback ExtremeAir Magnum. And the ARB doesn't have a single "Extreme" in its name.
As a reliable and durable tool for remote use it would be hard to imagine a better configuration than the ARB Twin, given the extensive redundancy: Two all-ball-bearing motors, two cylinders, two inline fuses, and internal thermal protection for each motor. Twin air filters are washable sintered bronze, not paper. It’s highly moisture and dust resistant (the cooling fan is actually sealed to IP55 specs); the cylinder bores are hard anodized and the piston seals are Teflon-impregnated carbon fiber. In addition, the portable kit incorporates a four-liter aluminum air tank, which enables the system to run most air tools (it’s regulated to 150 psi). For the distinctly premium price, I wish the kit came with the ARB inflator that incorporates a dial gauge, rather than the simple clip-on chuck that is standard. But the waterproof case is strong, and the organizer pockets keep hoses and accessories neat—an underappreciated feature on expeditions where entropy nudges things toward clutter. The battery clamps are sturdy, the inline fuses easy to access if necessary, and there's a solidly mounted quick-release fitting for the air line next to the (lighted) power switch. You’ll know you’re dealing with a substantial piece of equipment when you pick it up—the whole package weighs 33 pounds, about as much as a Hi-Lift jack. The compressor alone weighs 19.4.
If you prefer a built-in compressor (I normally do, but we haven’t yet decided on the final configuration in the Troopy), the air filters of the Twin can be relocated, rendering the entire unit submersible. ARB was not messing around when they designed this compressor.
The Twin is a significant investment ($830 for the kit; $520 for the compressor alone). But consider these two facts: 1) As stressed above, varying your tires’ pressures to suit conditions will do more than anything else to enhance your vehicle’s off-pavement prowess, your comfort, and the condition of the trail, and 2) Tire failure is by a significant margin the number one reason for breakdowns in the bush. With a high-quality compressor such as the ARB Twin you have both scenarios covered with professional-level ease.
A singularly excellent product

I won't get any free gear out of this, because I'm afraid I don't think as highly in general of The North Face products as I did 20 years ago, but their Base Camp duffel is outstanding.
We stuffed one with all our ancillary gear on the way to Australia. Multiple handles facilitated grabbing easily whether it was on an airport luggage carousel or deep in the recess of our vehicle's cargo compartment. The 1000-denier laminated nylon material is tough and easy to clean, and a D-shaped main zipper makes loading easy as well. Shoulder straps—which are actually contoured—meant I could sling it over my shoulder and leave two hands free for other luggage. And compression straps kept everything in its place. The giant TNF label ensures everyone in the airport knows you're on your way to do something ADVENTUROUS.
I'm something of a duffel-bag snob (or connoisseur if you prefer), but I'll put the Base Camp right up with my top two duffels, the B.A.D. (Best American Duffel) and the classic standby Filson. One of our Filson duffels has been to Africa a total of nine or ten times; we'll see how the TNF compares in a few years.
The first rule of bush driving . . .

. . . no matter if it's in Africa, South America, or Australia, is, you never, ever drive at night.
The second rule is, you always wind up driving at night. It's happened to us more than we care to admit, both through our own misjudgment or rushed scheduling and through circumstances we couldn't control (those bandits in Loliondo come to mind . . .).
We just experienced the, er, former situation on our way from Port Augusta, on the southern coast of Australia, to Alice Springs, in the Northern Territory. The Stuart Highway is a good, fast (110 kph) road, but driving it in the daytime reveals the extent of the Kangaroo Karnage that goes on at night, when they are most active. And we had three hours of at-the-limit full-dark driving to do to get where we "needed" to go. It was a nerve-wracking drive with the ever-present risk of a large marsupial bounding across in front of us, and I especially don't imagine one wants to hit a kangaroo at the apogee of a jump.
Fortunately we had installed a pair of ARB Intensity AR21 LED driving lamps prior to the journey.
In the past I'd been wary of LED driving lamps, having tried too many that exhibited annoying color fringing or too-high color temperature, or spotty pattern. Not these—they displayed zero fringing, and the pattern, despite being the "spot" version, created a perfectly even flood of daylight far down the road and well onto the verge. This was not the typical UV scattering that fools one into thinking an LED light pattern is better than it is; it was genuine illumination, and my blood pressure stayed 20 points lower than it would have been without them. (The only downside, which is true with any driving lamp, is that when you flick them off for oncoming traffic it appears your vehicle's standard headlamps are now powered by votive candles.)
The Intensity AR21 lamps are without doubt the best driving lamps I've used, eclipsing previous benchmarks such as the 130-watt IPFs on my FJ40, and even the legendary rally standard from decades ago, the Cibié Super Oscar. And the icing on the cake, of course, is that LEDs draw far less power than halogen lamps or even HIDs. I'll be installing them (or the even larger and brighter Intensity AR32s) on every 4x4 vehicle we own.
I'm tempted to say screw the aesthetics and bolt a set on the 911 . . .
Your very own Troopy? (Or Hilux, or . . .)

What is the best expedition vehicle in the world?
Of course there isn’t one.
“Best” as applied to an expedition vehicle means different things to different people, and can vary even then in different situations with different logistical requirements. And any vehicle one might name out of “the usual suspects” will have strengths that might suit one situation along with weaknesses that might not suit the same situation. The Jeep Wrangler Rubicon Unlimited, for example, combines unmatched technical-terrain performance with a poorly laid-out and small cargo area and low GVWR. The venerable (and no longer made) Land Rover Defender 110 combines an excellent layout and capacity for cargo, an economical turbodiesel engine, and all-coil-spring ride comfort with outdated and cramped driver and passenger accommodations and a history of bipolar build quality. The Mercedes G-Wagen (the diesel-powered world-market version) combines mightily overengineered running gear, excellent traction, and a high GVWR with a fearsomely high price and potentially overcomplex electronics.
Then there’s the 70-series Land Cruiser Troop Carrier, or Troopy as it’s known. Arguably the most primitive of the bunch—the only one still riding on leaf rear springs—its reputation hinges more than anything else on unmatched reliability and durability. Tens of thousands of them have shrugged off tens of millions of miles of abuse from safari guides and non-government agencies, hammering on faithfully regardless. Years ago Roseann and I, through the auspices of a crooked fixer, led a safari in remotest Tanzania in a wreck of an early (all-leaf-spring) example. It had layers of flaked tan repaint on it; the ancient 103-horsepower 2H diesel engine wheezed and blew Vesuvius-sized clouds of smoke; there were no seals left on any opening and bulldust choked the interior to the point of actually reducing visibility for the driver; the alternator died during a night drive out of potential bandit country in Loliondo and we had to light our way with a flashlight. We loathed that vehicle by the end of the trip—yet it just kept running the entire time, and for all I know still is. Many thousands of miles in much nicer examples have reinforced our admiration for the Troopy—especially those powered by the later (post-1990) 1HZ naturally-aspirated six-cylinder diesel. This has proved such a dependable workhorse that it is still in production 25 years later despite the advent of the much more sophisticated and powerful twin-turbo V8 diesel. The 1HZ is reserved for markets such as Africa where power is less desirable than simplicity.

But reliability isn’t the only strength of the Troopy. Open the 60/40 split rear door and you are greeted with a cargo bay large enough to return echoes. It is literally cavernous, and the Troopy’s GVWR rating matches it. You could stash enough actual troops and armaments back here to engineer a coup d’état (and it’s probably been done . . .). For mere safari duty there’s room for all the gear you could possibly need for an extended stay away from supplies. And speaking of capacity, many if not most Troopies are equipped from the factory with dual fuel tanks totalling an astounding 47 gallons.
The driver and passenger seating area is spacious and visibility all around is commanding. Seating is comfortable if you get the individual buckets, not quite so good for the passenger with the split bucket/bench. Power-assisted steering and brakes make driving the beast easier than it would seem, and once loaded with guerrillas, AK47s, and RPG-7s the ride is really not bad at all. Finally, a comprehensive selection of bits to augment the strengths and correct the weaknesses of the Troopy is available from high-quality suppliers such as ARB and Old Man Emu.

For those of us in the U.S. there was just one problem: The 70-series Troopy was never imported here, nor was any Toyota with the 1HZ engine. However, notice the date the engine was introduced—1990. That puts Troopies (and the companion pickup configuration) equipped with the 1HZ inside the envelope of the 25-year exemption for importing vehicles to this country.
This was uppermost in our minds as we recently began planning a trip to Australia, where the 70-series Troopy is practially the official national vehicle for any travel off tarmac. Looking at ads on such sites as Gumtree brought up a good selection of vehicles, although many of them had obviously seen a lot of miles in the bush. Also, somewhat counterintuitively given Australia’s huge inland desert, rust is an issue—about 99.9 percent of the country’s population lives along the coast, and beach driving and saltwater fishing are popular pastimes. Prices for early 90’s Troopies ranged from around $5,000 (AUS) for dodgy runners up to $25,000 for pristine examples. Given the current favorable exchange rate (1$ AUS = $.75 US) this left a fair number of possibilities.
With some diligence and luck we found an extremely clean, low-mileage, one-owner 1993 model listed for sale at a dealer in Darwin, and after a few emails back and forth to confirm details, it was ours.

Given its slightly later manufacture date, we’ll have to wait a couple years to import it, but we have plans for the interim . . .
Meanwhile our friends Graham Jackson (director of training for the Overland Expo) and his wife, Connie, searched for and found their own Troopy, with higher miles than ours but equipped with dual locking differentials and a drawer system. Both vehicles are now on their way to the Expedition Centre in Sydney, where owner Daniel will be installing a few modifications before we arrive. Then we are off to the Simpson Desert for a solid shakedown run.
If you’re interested in importing a vehicle directly to the U.S. and having most of the work done for you, look at AustoUSA.com. Phil Newell there is experienced in the entire export/import process. Of course Troopies are not the only potentials for one’s own version of the “best” expedition vehicle. There are plenty of Hiluxes, Prados, and Land Rovers available as well, including many that were purchased by visitors, fully kitted with roof tents, fridges, etc., taken on a trip, and then ut up for sale when the owners returned home. This opens the possibility of landing in Australia and picking up a fully prepared vehicle for your own journey for about what it would cost to rent one from the many outfitters there. The AustoUSA site lists all the costs to have a vehicle delivered to the U.S., including shipping, customs, etc. There is literally a “click to purchase” button.
Tempted?
Origami camping
I’ve written before about Montague folding bicycles (here). We’ve had one for seven years now and, while it’s far from the most highly specced mountain bike you can buy for the price, its ability to fold into a compact package, yet ride like a “normal” rigid-framed bike is unparalleled.
There was just one problem—we only had one of them. And the effortless way it fit behind the front seats of our 2012 Tacoma Extracab made us think that two of them might actually be able to ride there.
Theory confirmed. We recently bought an example of the current Montague Paratrooper Pro, which boasts several improvements over our original. Most notable is a clever rear rack that pivots completely under the rear wheel to serve as a stand when folding or even working on the bike (although it’s not really stable enough to be a parking stand). The Pro also now has fenders, a very worthwhile addition, and a rear disc brake instead of the cantilevers of the old model. This is a questionable asset; I’ve noted before that I’ve yet to use a mechanical disc brake that works as well as a good cantilever. This one is no exception, but it’s what buyers expect.
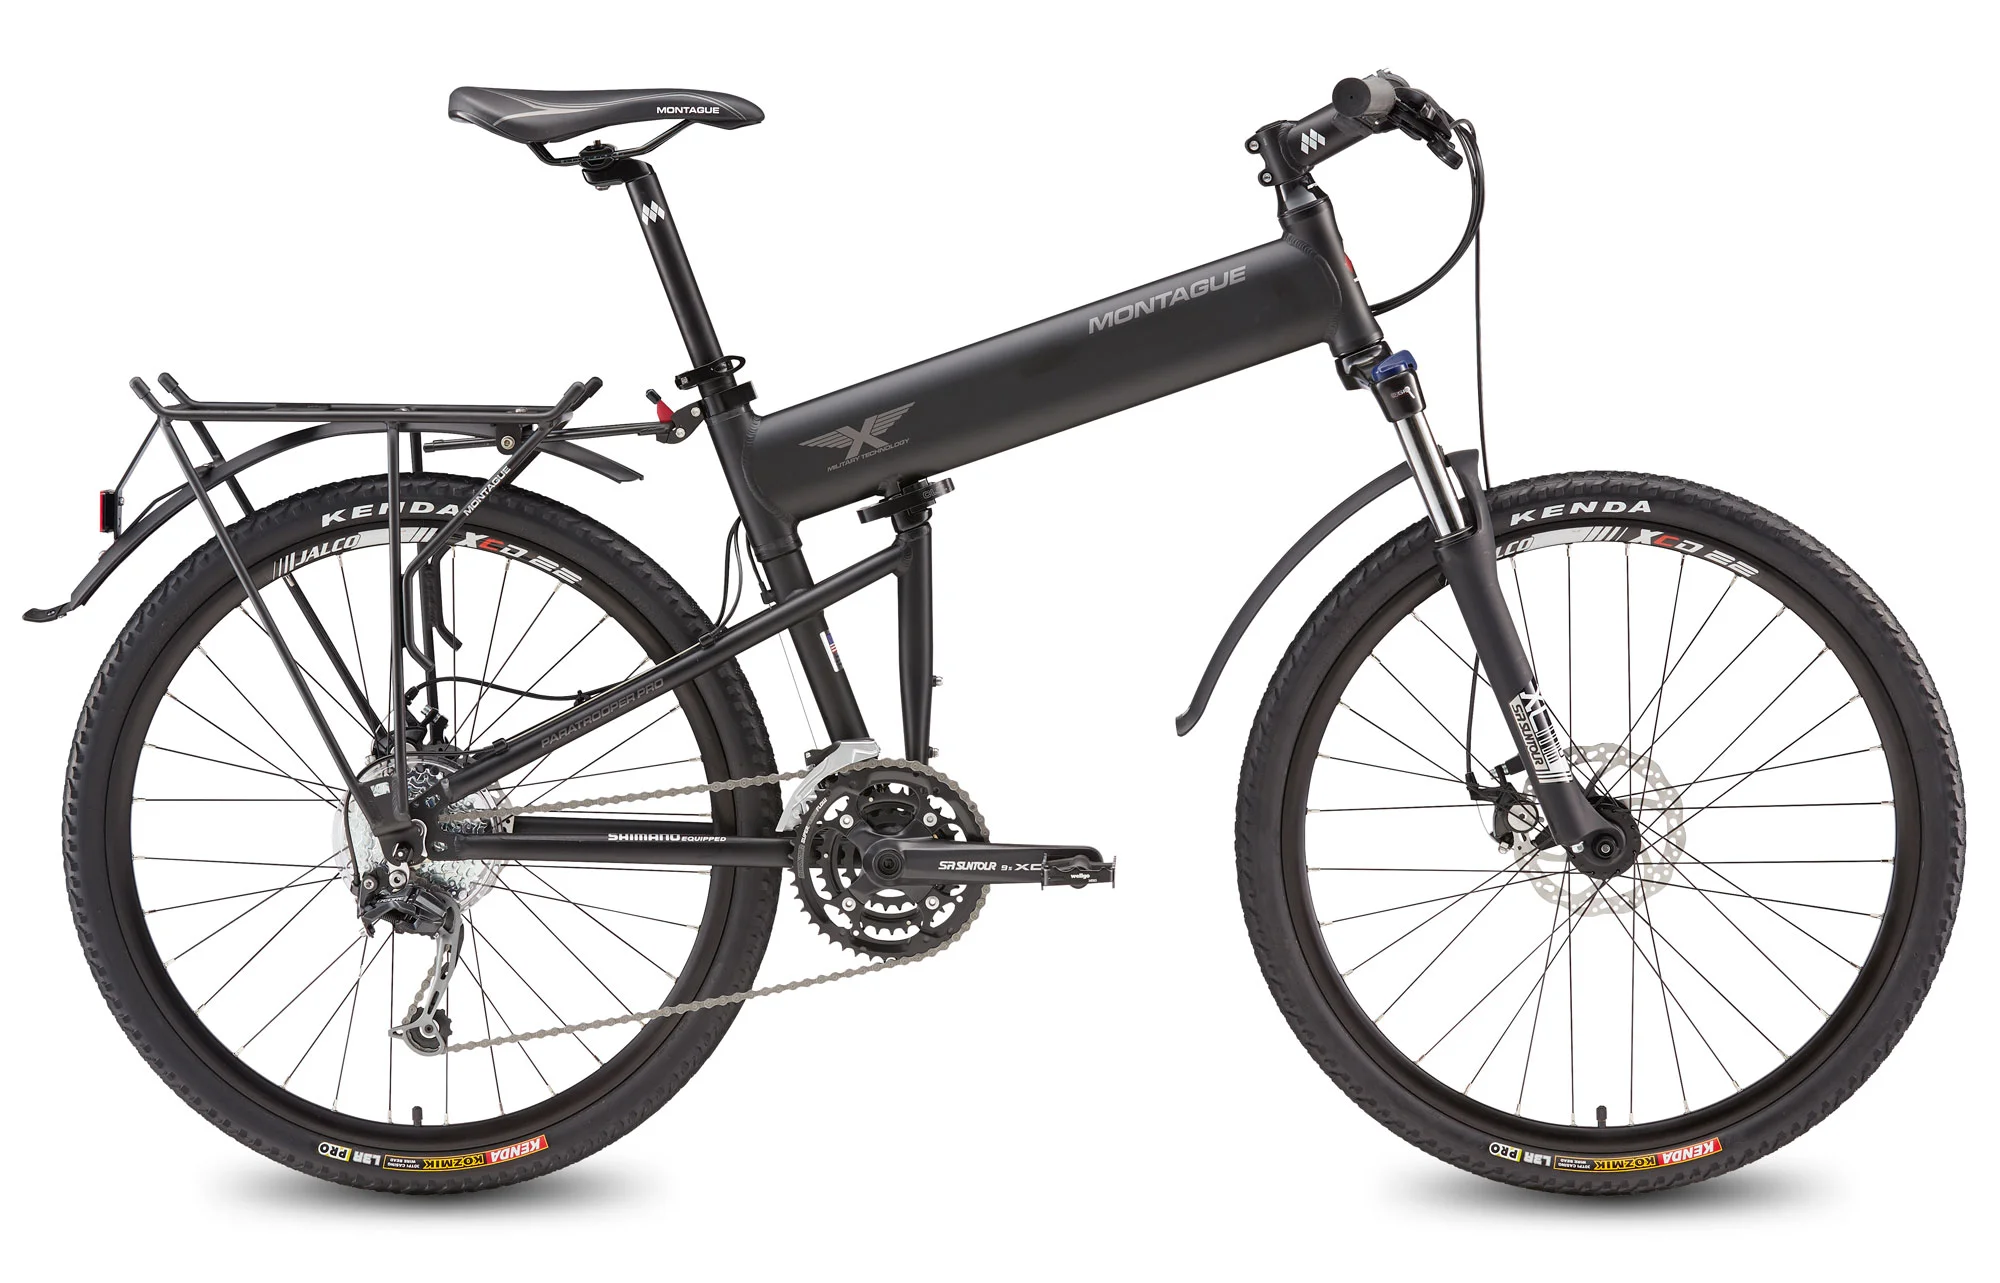
And both bikes snuggle securely into the Extracab space behind us—noting, please, that we are both in the 5’7” to 5’9” range heightwise, so I cannot guarantee that you six-footers will have the same luck. We put the front wheels into a case inside the Four Wheel Camper, which makes the process much easier.
Now we have two bicycles that ride securely inside the truck, no intrusive (and expensive) hitch mount needed, vastly reduced danger of theft, and no worrying about reduced departure angle or dust-coated bikes after 20 miles of dirt road.
Along with our pop-top Four Wheel Camper, and our recently acquired Klepper folding kayak, we've assembled quite the origami recreational kit.
A challenge to winch bumper manufacturers
Once upon a time, adding a winch to an overland vehicle was easy. Series 2 and 3 Land Rovers, 40-Series Land Cruisers, and Jeeps were built with chassis rails that extended a good foot in front of the radiator, fronted by a solid steel bumper. To mount a winch you basically plopped it there, bolted it down, and hooked up either a PTO driveshaft or wiring. Done. Even the bulky Warn 8274 on my FJ40 was an easy installation.
It’s different these days. With scant few exceptions, those protruding steel bumpers have been sacrificed in the (commendable) search for aerodynamics—i.e. fuel economy—and safety, via computer-designed crush zones and air bags. Give me a choice of being in the 40 or our Tacoma in a head-on collision and there’s no doubt which I’d choose.
But if you want to install a winch on these new vehicles, you need to replace the 10-pound body-colored plastic facade that looks like a bumper with a dedicated steel or aluminum structure properly connected to the chassis of the truck, and capable of absorbing several tons of force. Thankfully, numerous companies have risen to the challenge, especially for the more popular models of pickup and SUV.
However—I seem to be noticing a trend in aftermarket winch bumpers that is vaguely unsettling: a trend toward fashion over function. That 8274 on my FJ40 is right out in the open—I can see it operating, I can watch to make sure the line is spooling correctly, and if it isn’t I can stop the procedure and fix it. One of the requirements to pass the winching section in the N.P.T.C. Certificate of Competence in 4WD is, “Ensure the winch components are in suitable condition.” Another is, “Ensure the winch is free from obstruction and the line is spooled properly.” Both are easy to confirm with that 8274.
With an increasing number of modern winch bumpers, either is virtually impossible. The only view of either the winch or the drum and line is a peek through the fairlead. A tiny hole gives you access to the engagement lever. Recently I was respooling line on a student’s winch and had to have him shine a flashlight through the fairlead while I crouched in front of it and peered inside so I could ensure the line was going in correctly. Had there been a bad snarl we would literally have had to remove the bumper to fix it.
Anther vital winch-bumper component is either shrinking or going away altogether—recovery points capable of and suitable for attaching a shackle. Properly, a shackle eye should be nearly as thick as the width of the jaw on a shackle, to prevent twisting and off-angle stresses. Lately I’m seeing them much narrower—or simply missing, so that there is no provided way to rig a double-line pull from your winch to an anchor point and back to your bumper, or to safely secure a friend’s winch line to your vehicle.
Several months ago I spoke to a rep from a major bumper manufacturer (I’m not going to name names in this piece because I’m not discussing quality, which is uniformly high in this segment; I’m discussing choices made by the manufacturer and consumer). The rep said that recovery points had been eliminated on his company’s bumpers due to airbag compatibility issues. I’m . . . not sure about this. It’s my understanding that airbags are triggered by accelerometers, which detect deceleration consistent with that of a collision severe enough to warrant deployment, and then send a trigger signal to the device. Often these accelerometers are positioned in the cab of the vehicle, nowhere near the bumper. In any case, if you make a bumper capable of withstanding several tons of pull provided by the winch mounted on it without affecting airbag deployment, I can’t understand why adding recovery points capable of withstanding several tons of pull would suddenly compromise the system. (Note that I did not say it can’t be so; I simply said I don’t understand how it could be so.)
One source I spoke to told me that the only thing separating airbag-compliant winch bumpers from non-airbag-compliant winch bumpers is that the maker of the latter did not spend the huge amount of money necessary to actually conduct crash tests to prove unequivocally that the vehicle’s airbag will still deploy with the bumper mounted. In researching various crash reports I have yet to come across a case in which it was proven that an aftermarket bumper prevented an airbag from deploying (if anyone reading this has such documentation I’d be grateful to hear about it).
The only potential effect of a winch bumper on airbag deployment that I know of is the risk of triggering in a collision that occurs at a lower speed than that at which the accelerometer would normally trigger the device. Some vehicles are built with crush cans behind the stock bumper, designed to absorb the energy in a minor collision without setting off the airbag. An aftermarket bumper that eliminated these crush cans and tied directly to the frame could potentially fool the carefully calibrated sensors into “thinking” that the crash was worse than it actually was. This would certainly be an alarming (and probably expensive) surprise, but one unlikely to cause serious injury.
I’d like to see—within the boundaries of passenger protection in a collision, of course—a return to winch bumpers that optimize access and safety for the winch operator. Winching is an activity fraught with potential risks at the best of times; deliberately making it difficult or impossible to ensure the winch is operating correctly is a big mistake. At the very least, a bumper should be equipped with a removable access port that allows full-width access to the drum and line. And the bumper needs to be equipped with proper recovery points that will adequately support a shackle—either that or the manufacturer could offer separate, frame-mounted recovery points.
There’s nothing wrong with fashion, as long as it does not compromise function. The best functional designs make their own fashion—what can be better looking than something that works perfectly?
New Safe Jack universal base plate . . . and a sale
I’ve written several times before about Safe Jack’s unique products. Read here and here about the expanded base plates they invented for the Hi-Lift jack and bottle jacks, which transform the nature of both kinds of lifting tools.
Previously you had to choose which base you wanted. Now Richard Bogert of Safe Jack has introduced a universal base that accepts either a Hi-Lift base, or a clip-in plate on which almost any standard bottle jack can be clamped. So during a recovery situation in soft substrate, when you need the extra flotation for your Hi-Lift (or the clever and rock-solid guy-wire stabilizing system), you’ve got it, and when you shortly thereafter need to jack up one wheel for a tire repair, you can just snap in a bottle jack to the same base. Nice.
Safe Jack will be at Overland Expo WEST with show specials. If you won’t be there, don’t feel bad: Richard will be running a “Gear up for Overland Expo” web special through May 20th. The website is here, and the promo code is GEARUP2016.
Battery welding done right

The magic of battery welding has been known to field mechanics for years now, and one of the most popular classes at the Overland Expo is the hands-on introduction to the skill, taught by experts such as welding wizard Tim Scully. Briefly, by combining several standard automotive batteries in series—that is, positive terminal to negative terminal, in a chain—you create in effect one large 24V (with two batteries) or 36V (three batteries) cell, and this produces enough power to weld a lot of things that can be prone to breaking on vehicles used in rugged conditions: shock and spring mounts, motor mounts, ancillary brackets, roof racks—the list is endless, and full of items that can bring a trip to a sudden halt.
Until now, most impromptu battery welding has been jury rigged with standard jumper cables. While this works, it is far from ideal. Jumper-cable wire is cheap stuff designed for a few second’s starting duty at a time; its coarse strands are inefficient at conducting the power produced by series-connected batteries. And the toothed clamps, although adequate for attaching to battery terminals, are poor for gripping slender welding rods. In addition, you need a way to connect the batteries to each other, which either requires another set (or two) of jumper cables, or yet more jury rigging with your existing battery leads.
All that just ended, thanks to the Trail Weld kit, developed by Tim Scully himself. Tim evaluated the compromises that go into the normal battery-welding setup, and fixed them all.
- The cables are now fine-strand, four-gauge Temco welding wire, with 360-degree crimps on all fittings. A 12-foot length on positive and negative leads allows you to put a safe distance between the batteries and sparks. The flexible cable makes controlling the clamp and rod much easier.
- The positive lead ends in a proper welding-rod clamp, and the negative lead ends in a dedicated ground clamp.
- Two short leads of Temco wire make quick work of connecting batteries, and reduce voltage loss.
- All battery connections are high-quality terminal clamps, greatly enhancing conductivity and thus efficiency.
- All connections are color-coded with heat-shrink wrap.
- A selection of correctly sized welding rods is included in a plastic protective case.
- A pair of self-powered auto-darkening goggles is also included.
- Available containers range from a simple bag to a .50-caliber ammo can to a Pelican Case.
The complete system is so efficient that Tim reports two batteries are sufficient to weld material that requires three if using jumper cables. As he told me, “If you are using three batteries you’d better be welding at least quarter-inch-thick stock.” Since an increasing number of overland vehicles these days are equipped with two batteries, that means you can be completely self-sufficient for field-welding repairs.
For welding amateurs such as myself, the auto-darkening goggles make all the difference when welding with rod, as there’s no pre-positioning the rod at the correct gap and then fumbling with a standard goggle or, worse, a jury-rigged square of welding glass taped to a cardboard face shield, as I’ve always carried. (Of course you’ll still want face, arm, and hand protection.)
For more information, visit the Trail Weld site, here. At the upcoming Overland Expo WEST, Trail Weld kits will be on display during the welding classes, and available for purchase at the 7P booth. Highly recommended.
Hint: When using “Search,” if nothing comes up, reload the page, this usually works. Also, our “Comment” button is on strike thanks to Squarespace, which is proving to be difficult to use! Please email me with comments!
Overland Tech & Travel brings you in-depth overland equipment tests, reviews, news, travel tips, & stories from the best overlanding experts on the planet. Follow or subscribe (below) to keep up to date.
Have a question for Jonathan? Send him an email [click here].
SUBSCRIBE
CLICK HERE to subscribe to Jonathan’s email list; we send once or twice a month, usually Sunday morning for your weekend reading pleasure.


Overland Tech and Travel is curated by Jonathan Hanson, co-founder and former co-owner of the Overland Expo. Jonathan segued from a misspent youth almost directly into a misspent adulthood, cleverly sidestepping any chance of a normal career track or a secure retirement by becoming a freelance writer, working for Outside, National Geographic Adventure, and nearly two dozen other publications. He co-founded Overland Journal in 2007 and was its executive editor until 2011, when he left and sold his shares in the company. His travels encompass explorations on land and sea on six continents, by foot, bicycle, sea kayak, motorcycle, and four-wheel-drive vehicle. He has published a dozen books, several with his wife, Roseann Hanson, gaining several obscure non-cash awards along the way, and is the co-author of the fourth edition of Tom Sheppard's overlanding bible, the Vehicle-dependent Expedition Guide.