
Overland Tech and Travel
Advice from the world's
most experienced overlanders
tests, reviews, opinion, and more
Most epic Snoverland Expo recovery?
It would be difficult to pick just one, after the record-breaking snow and rainfall at the 2015 Overland Expo WEST show at mormon Lake, Arizona. The NAU 4X4 Club cheerfully coordinated uncountable extractions from the camping area, and at one point constructed a daisy chain of several trucks to pull out a motorhome. There was Wolf’s stupendous deuce-and-a-half, pulling out another motorhome all by itself. Ross Blair used his supercharged Tacoma to recover a trailer and several vehicles. And who knows how many unnamed people simply pitched in with a winch or tow strap to tug someone out of the gloop.
On the other side of the venue, a different drama was unfolding, as the massive semi truck and trailer from host sponsor BFGoodrich ended up parked in a low spot that slowly became a quagmire during the Saturday snow and rainfall, despite the cinders laid down beforehand. On Sunday afternoon it was going nowhere.
A large tow truck was arranged, but the mud proved too sticky even with that pulling. We needed recovery mats. A bunch of MaxTrax appeared (as they always seem to do in these situations), but not quite enough to fully float all the tires necessary on an 18-wheeler.
Meanwhile, in the nearby Camel Trophy area, we had just freed an LR4 that was stranded in a level patch of completely frictionless mud, using a pair of Crux Off Road’s new aluminum bridging ladders. Wedged under the Land Rover’s rear tires, they provided both lift and traction.
Jeremy Plantinga, the designer and fabricator, was pleased with how they had performed all weekend being used and abused by Duncan, Andy, and friends. Now Nick nudged Jeremy and pointed to the BFG semi.
“Oh, no,” said Jeremy. Plastic mats such as the MaxTrax can deform under a heavy load in resilient mud, but the whole point of a bridging ladder is to be rigid enough to support a vehicle over an empty span. The Crux ladders are rated for 7,000 pounds—we were looking at a truck that probably weighed ten times that.
“C’mon, Jeremy,” Nick taunted. “Let’s just see what happens.” Finally, reluctantly, Jeremy agreed, and Nick grabbed both ladders and ran, cackling demonically, to the semi. We wedged them under the rear wheels of the truck’s carriage, and gave the tow truck driver and the semi driver the thumb’s up. Slowly, ponderously, the truck began to move. The Crux ladders disappeared inch by inch under the wheels and were crushed into the mud. The semi rolled free, and we pried the ladders out of the mud, to find them . . . intact.
It was amazing. A couple of center supports had bent downward, and the ladders wound up ever so slightly twisted, but they could have been instantly put back into service. The side rails were perfectly straight. We jokingly suggested to Jeremy that he should add a decimal point to his weight rating.
Inflate tires with your Micro-start
I make no secret of my continually renewed admiration for Antigravity Batteries’ Micro-Start XP-1 and XP-10 battery pack/jump-start kits. The half-dozen or so of them scattered among the Overland Expo training team have been used and abused beyond reason, and they continue to function. We’ve started everything from motorcycles to 460-cubic-inch gasoline engines to turbodiesels. We’ve hooked three in series and produced excellent field welds (much to the horror of company president Scott Schafer). We make sure one is in any vehicle we’re driving.
Motorcyclists have begun carrying the smaller XP-3 and XP-5 Mini, freeing them as well from the tyranny of jumper cables or the need for a good Samaritan if caught with a discharged battery. Now Antigravity has come up with a cunning little air compressor, about the size of a sandwich, that can either be powered from a Micro-Start battery or plugged into a standard cigarette lighter socket.
I expected it to perform as well as the company’s other products, and it did: A quick test on Roseann’s R80 G/S took the front Continental 90/90-21 tire from 8 PSI to 35 PSI in two minutes flat, and the compressor didn’t even get warm doing so. The inflation hose is only about three inches long, so the pump simply hangs off its screw-on chuck. A dedicated 18-inch cord connects it to a Micro-Start power source (I used our XP-1); the ten-foot cigarette-lighter cord is long enough to reach into a vehicle or to another motorcycle.
Of course, since this is a Micro-Start product, there's by now a certain assumption we'll abuse it. So I left the compressor hooked up to the power pack and connected it to a 235/85 16 BFG AT KO2 on our Tacoma. Ambient temperature was 95ºF. The tire was at 20 PSI; 16 minutes and 30 seconds later it had reached its nominal 40 PSI, and the compressor, while quite warm to the touch, was still buzzing away happily. The power pack still showed three of five status lights. So, while I certainly wouldn't use this as a primary compressor for a four-wheeled vehicle, in a pinch it would suffice.
What more can I say, except I hope the manufacturer edits the features list on the box. The tire inflator is yet another excellent offering from Antigravity Batteries. And at $25 it is a bargain.
A more storage-friendly sand mat
The one big problem with proper, rigid sand mats is their size. Storing them inside the vehicle is a pain due both to bulk and their ability to damage nearby gear or luggage. Outside storage demands either a roof rack, a rear tire-carrier rack, or some other specialized arrangement.
So I was intrigued to stumble upon the Traction Jack, a two-piece sand mat only 25 inches long when folded. A pair fits inside a box about a foot wide by six inches deep.
The Traction Jack is stoutly built—in fact a pair weighs a substantial 28 pounds (compared to just 18 for a pair of MaxTrax). They are rated to 1,900 pounds per tire each, which easily handles most overland vehicles; a special-order version molded from high-strength nylon boasts a 4,500 pound per tire rating, which is up in fully loaded Unimog territory.
Obviously, the hinged Traction Jack will be of absolutely no value for bridging, even compared to the relatively flexible MaxTrax, which bridges surprisingly well when doubled. On the other hand, the two-piece construction of the Traction Jack should virtually eliminate kick-up into the vehicle's bodywork as you drive on or off it.
The company cautions against wheel spin when driving a tire onto the mat, as excess heat can melt the poly composite nubs that provide grip. I'm not sure how one would completely eliminate wheel spin when buried in sand; I expect a little extra pre-recovery shovel work would help—which is a good idea anyway. Fortunately the company's excellent guarantee grants one free replacement of a damaged section, and a discount on further replacements. By then one would hope to have learned the proper technique. It seems to me larger nubs would reduce the issue and provide more traction as well, but I need to test these in the field to be sure.
Even folded, the Traction Jack is thinner than a MaxTrax.
Besides ease of storage, another advantage to the Traction Jack is price: At $180 per pair (black), they undercut the MaxTrax by $120.
Competition in the sand mat/bridging ladder market seems to be heating up. The excellent MaxTrax has in a short time become a (slavishly copied) standard by which other one-piece sand mats are judged. I think the Traction Jack will provide a viable alternative for some people, giving up some versatility (bridging) in exchange for convenient storage options.
The Traction Jack website is here. I'll have a pair with me at the Overland Expo. Come by the BFG booth where the sand pit tire demo area is. I'll try to keep them there.
A more Affordable aluminum bridging ladder
One of the most basic and effective tools for self-recovery in sand, mud, or snow is what we generically call the sand ladder or sand mat. For decades these typically comprised a cut-down section of WWII surplus PSP (Perforated Steel Planking, also called Marsden matting), originally designed to be linked together to build impromptu runways on boggy ground. Shoved edge on against a tire buried in sand, PSP provides a ramp on which the vehicle can gain traction and climb (especially when combined with some judicious pre-shoveling). PSP is effective but heavy, thus the popularity of a modern version—PAP—made from aluminum.
Semi-rigid material such as PSP and PAP works well to provide flotation and traction in soft substrates, but is not stiff enough to be used to bridge a deep ditch, or to function as a ramp to surmount a vertical ledge, unless doubled—in which case the normal complement of two allows only one wheel to be supported. Sahara explorer Tom Sheppard surmounted this problem decades ago by simply ordering a pair of custom-made ladder sections such as one would use at home, but with extra-deep side rails and rungs spaced just 15cm apart. Each section was sturdy enough to provide bridging support for one side of a loaded Land Rover—and with some connecting pieces also served as a convenient framework for kitchen furniture.
Today, plastic sand mats such as the excellent Max Trax offer a lightweight (18 pounds per pair) alternative to traditional versions; however, the Max Trax is still insufficiently rigid to be used as a bridging ladder unless doubled. The connoisseur’s choice for combined traction and bridging duty has for some time been the excellent Mantec bridging ladder (known as a bridgy by the abbreviating Brits), a beautifully trussed and welded structure of aluminum more than strong enough to support a fully laden expedition vehicle. But the Mantec ladders currently run about $650 per pair when you can find them this side of the Pond, and their bulk and weight—42 pounds for the two of them—is a handicap, too.
However, a significantly more affordable ($349) aluminum bridging ladder is on the horizon, thanks to Jeremy Plantinga of the newly formed Crux Offroad. Jeremy contacted me a year ago and showed me a few prototype designs before finalizing a design and shipping me this set—which comes disassembled via UPS, saving yet a bit more in shipping costs (a flat $30 to the lower 48).
The main structure of the Crux ladder comprises two 48-inch-long U-shaped side channels and two W-shaped cross treads, with a brace at each end and a total of 12 aluminum grip spikes that extend beneath the rails. The ladder is designed so the tire contacts the cross treads only after passing the ends of the side channels, to reduce the chance of kick-up. The instructions say assembly takes about an hour; I did the first one in 25 minutes and the second in 20. The side channels can be assembled with the U either in or out, depending on the width of your tires—with the U facing in the ladders appear more than wide enough for either the 235/85x16 ATs on our Tacoma or the 255/85x16s on the FJ40. The modular design means it will be easy for the company to tweak dimensions for different applications.
Mantec on the left, Crux on the right
In a quick visual comparison the Crux ladder lacks the monolithic support of the Mantec. It's obvious the Crux will offer less flotation in very soft sand, mud, or snow; on the other hand its open cross treads should significantly enhance traction and reduce kick-out when climbing. At 34 pounds per pair the Crux ladders are 20 percent lighter than the Mantecs (although they are also 20 percent shorter). Last year on the Continental Divide, when an FJ Cruiser pulling a trailer got stalled on some uphill ice, a pair of Max Trax we deployed simply zipped right under the tires when power was applied; the plastic offered no purchase against the ice. I’m willing to bet the grip spikes on the Crux ladders will do better in the same situation. For bridging, Jeremy rates the Crux ladders at 2,000 pounds each, which, given the insight I’ve had into his failure testing, seems appropriately conservative, and more than enough to support most full-size pickups, or a Land Cruiser or Jeep Wrangler Unlimited. Jeremy has plans to develop accessories such as table or bench tops and legs, which would enhance their versatility.
I’m looking forward to field-testing the Crux ladders, and expect they’ll perform well. If you’re intrigued too, they will be debuting and available at the Overland Expo in Mormon Lake next month. I plan to hand over my set to the Camel Trophy blokes to see what they can come up with for on-site testing.
The company's nascent website is here.
Update: I've had a little time to play with them. Supporting the front wheels of a Defender 110 in the middle of the span, the Crux ladders showed essentially zero deflection. Impressive . . .
Another update: The Crux ladders nest securely, located by the traction spikes. When joined, the adjacent handle holes make it easy to carry both ladders with one hand.
The Microstart XP-10
Since I first reviewed the Micro-Start XP-1 kit (here), it has done nothing but continue to impress me. Besides seriously abusing it by setting up an in-the-field welding system using two additional units wired in series, I’ve started a giant 460-cubic-inch V8, and have demonstrated it numerous times. Yet it recharges quickly and holds its capacity for months with little loss. When asked about it I tend to gush uncharacteristically.
The only “failure” I experienced occurred when I tried to jump-start our old Mercedes 300D turbodiesel. The combination of amperage-hungry glow plugs and an 18:1 compression ratio finally defeated the XP-1—it groaned silently to a halt before the engine could catch. I put “failure” in quotes because that was expressly beyond the manufacturer’s design parameters and thus could hardly be considered the unit’s fault. (Antigravity Batteries also lists 400 cubic inches as the upper limit for starting gasoline engines, but I comfortably exceeded that.)
Recently the company sent me a new, larger unit called the XP-10. Still almost unbelievably lightweight (17 ounces compared to the XP-1’s 15), it’s claimed to be fully turbodiesel capable.
And indeed it proved so on the chilly 50-degree morning I tried it, first disconnecting the 300D’s battery cables, then hooking up the Micro-Start’s clamps. I turned the key, the glow-plug lamp came on and then went off, indicating readiness—and a farther turn of the key resulted in an immediate five-cylinder diesel rattle.
It’s difficult to overstate how significantly the Micro-Start changes the safety dynamics of backcountry travel, particularly for solo travelers. In the past you either relied on a single battery for both starting and ancillaries, perhaps in conjunction with a low-voltage cutout, and basically prayed not to have a problem, or you went to the expense, complexity, and weight of a dual-battery system. With a Micro-Start along it’s like having a second (or third) starting battery in your coat pocket. Even if you rely on a single-battery system and it dies completely, once you jump with the Micro-Start the unit can be recharged via a cigarette lighter outlet while the vehicle is running, and be ready to work again in a couple hours. (In fact it can normally accomplish four or five starts in a row with no recharging at all if the engine is in good tune.) That should get you back safely and easily from the most remote stranding.
Jeez, I’m gushing again. Just get one.
Antigravity Batteries is here.
Line Luddites
The automotive world has seen dozens of advances in technology that have added to the cost of each vehicle, but which are so clearly superior that it made little sense to retain the old technology as a cheaper option. No modern carmaker would think of offering front drum brakes instead of discs to save a buyer some money, and no sane buyer would request them. The same goes for carburetors versus fuel injection, bias-ply tires versus radials, lap belts versus air bags—the list goes on.
Yet again and again on overland forum threads discussing winches and winching, a few people persist in recommending steel cable over synthetic rope—and not solely on the basis of cost. One recent commenter actually made the claim: “Steel line is more forgiving than synthetic for the inexperienced off-roader.”
I try to be as diplomatic as possible on such threads. However, whether or not it’s smart, many of those “inexperienced off-roaders” look to forums for advice, and telling them they’re better off using steel winch line brings to mind those old-timers who used to claim things like, “You’re better off not wearing a seat belt because you might be trapped if there’s a fire.” (Presumably this is the fire that breaks out after your head-on collision.)
I’ll be considerate of steel winch cable and grant that it has a couple of advantages. It is considerably cheaper than its synthetic equivalent—in fact, these days if you buy a winch with no cable already installed it should be easy to pick up a steel cable for nothing at all from someone who has switched to synthetic (I have a couple lying around myself somewhere*). Steel cable is also more resistant to being cut when tensioned over a sharp object such as a rock or a poorly fabricated bumper opening, and it is more resistant to internal abrasion damage if frequently immersed in mud or grit (and not subsequently cleaned).
And . . . that’s about it. On virtually every other count, especially the critical question of safety for the winch operator and his assistant, synthetic line is far, far superior. In fact, most competitive four-wheel-drive events have simply outlawed steel winch cable.
Why is synthetic safer? Three reasons: low stretch, low mass, and linear recoil.
Both SK-75 Dyneema—the standard for high-quality synthetic winch lines—and steel cable stretch less than one percent under load. However, a Dyneema line weighs about one-seventh what an equivalent steel line does, so the stored energy released during a break is far, far lower. (100 feet of 5/16ths-inch steel cable = 18 pounds. Equivalent synthetic = 2.7 pounds.) Additionally, the twisted construction of steel cable means that as it breaks (a process that actually takes several microseconds as individual strands snap) it experiences a violent untwisting motion, which can cause it to flail wildly as it recoils. The 12-strand woven construction of Dyneema obviates this. Finally, of course, the sharp frayed end of a broken steel cable can do a lot more damage than the end of a pliable length of Dyneema.
Twelve-strand SK-75 Dyneema—strong, easy-handling, and safe.
I once watched a synthetic winch line part from about 15 feet away. The vehicle involved was being winched up a short but steep and rocky slope as part of a trials competition, so the system was under full tension. It appeared the line was cut over a rock on the crest of the slope because there was no protective sheath over the line, and the operators neglected to lay down a protective mat. Whatever the cause, the result was utterly lacking in drama; there was barely even any sound discernable over the ambient noise. A soft pop, and the two ends simply sprang about five feet apart and fell limply to the ground. (Note here, however, that this lack of drama will occur only if there is no stretch or extra mass anywhere in the system. If you attach a synthetic line to a steel extension cable, you’ve introduced much more potential kinetic energy.)
It’s worth mentioning here that if your steel winch cable does break and manages to not delimb any bystanders, you’re pretty much dead in the water. You've lost whatever length of line is attached to your thimble or hook—five feet if you're lucky, 50 if you're not. You can use wire rope clips to repair the end, but you'll lose up to 20 percent of the rope's original strength—worrying if you've just broken it. If a synthetic line breaks, it can be respliced in the field to virtually full strength and put back in use (in fact you can knot it for a quick repair, although the strength will be reduced). And synthetic line doesn’t develop those nasty single-strand steel burrs, which can punch through a glove.
Other effects of the weight difference are not to be dismissed lightly. The extra mass of that steel cable is all the way out at the end of the vehicle, where its effect on handling and stress on the suspension is magnified. Just pulling 75 feet of synthetic line uphill to an anchor is a joy compared to the same task with a steel cable**.
Respooling (or spooling for the first time) a nicely limp synthetic line is infinitely easier than doing the same with steel, which has a powerful tendency to twist and coil back on itself. Laying down winch line evenly and tightly is critical to subsequent smooth operation, to avoid tensioned line diving down through gaps in the lower layers. Duncan Barbour, ex-manager of the British Camel Trophy team, reports that the biggest drawback he sees with synthetic line is the tendency to not spool it under sufficient tension—its ease of handling can actually encourage improper technique. A new line should be spooled by pulling another vehicle up a slight incline, not by simply leaning back on the line as you feed it in. (Incidentally, there are a few videos floating around suggesting crossing the line over itself as you spool it, rather than laying it on in even, tight layers. Don't believe them.)
Much has been written and said about the temperature sensitivity of Dyneema. Indeed, when heated to around 175 degrees Fahrenheit, it begins to lose tensile strength. However, interestingly, once cooled it actually regains full strength. Not until heated beyond the critical point of around 275 degrees do you suddenly find yourself with a irretrievable blob of molten plastic. That lower mark—possibly even the higher one—can be an issue if your planetary-gear winch has a brake inside the drum. If so, you should freespool when pulling line rather than powering out, and use caution when reversing a vehicle down a slope, to avoid prolonged braking. (Thor Jonsson at Viking Off Road once had a fellow return a broken Dyneema line and demand a refund. Interrogation revealed that the guy had lowered a half-dozen of his buddies’ trucks in succession down a steep ravine using an internally braked winch—and also that the winch itself had burned out.) Many planetary-gear winches now come with external brakes, which eliminate the problem. It’s also not an issue with the spur-drive Warn 8274 or the worm-drive Superwinch Husky. If you already own a winch with an internal brake, you can buy a sheath that will help protect the inside wrap of the line.
Many modern winches, such as the excellent Warn 9.5xp, incorporate brakes outside the drum and will not overheat synthetic line.
Steel-cable Luddites like to frown and speak darkly about the chemical sensitivity of synthetic winch line. I can’t remember the last time I spilled hydrochloric acid on my winch, or dragged line through a pool of trichloroethylene, but this chart (courtesy Marlow Ropes) should ease your mind (HMPE refers to High Molecular-weight PolyEthylene, which is what Dyneema is):
What else? Sun exposure worries some; in fact, Dyneema is extremely resistant to UV degradation. If you park your vehicle in the open in Arizona and fret about it, get a winch cover. And yes—you should periodically maintain your Dyneema line. If you frequently winch in abrasive conditions—sand, mud—it pays to occasionally wash it in a bucket of mild detergent, sqeezing apart the braid to flush out debris (some people simply powerwash it at a commercial car wash, although this is not recommended).
Strands are easy to push apart to flush out debris when washing.
In use, make sure you avoid running the tensioned line over sharp objects. This requires envisioning the entire pull you’re going to make, not just the initial layout—angles change, and a rock safely out of the way when you begin might not be partway through. If you can’t avoid running the line over an edge, use the section of sheathing supplied on most Dyneema lines to protect it—and add a floor mat or something else as well if possible. Avoid standing on the line, as it grinds in abrasives. If you switch from steel line to Dyneema, make sure your fairlead, whether hawse or roller, has no burrs or rough spots (there’s absolutely no reason not to use a roller fairlead with synthetic line, spurious anecdotes to the contrary). The same goes for the winch’s drum and your pulley blocks. As with any line, the radius of a roller, hawse opening, or pulley should if possible be six times the radius of the rope. Avoid, for example, low-profile hawse fairleads that create a tight bend radius on side pulls.
Roller fairleads work perfectly with synthetic winch lines, as long as they're not burred from prior use with steel cable.
If you’ve winched with steel cable and switch to Dyneema, you’ll be amazed at the reduction in effort. If you start out with Dyneema and then have to use a winch equipped with steel cable, you’ll feel like you’ve been transported back to 1960—which you have. It’s time to move winching into the 21st century.
*If, God forbid, you decide on this approach, make damn sure your free steel cable is sized appropriately. You don’t want to spool a line off someone’s ATV winch onto your Warn M12000.
**Depending on whom you’re asking, you might be told that “cable” or “line” or “rope” is the only proper term for the stuff a winch pulls with. Look up definitions for each and it’s clear that any will do. I like to mix them up in the same paragraph so as to annoy everyone at least once.
The ins and outs of airing down
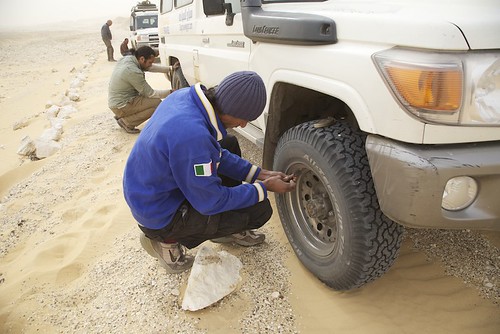
Airing down in Egypt
My early four-wheel-drive experience was strictly trial and error, heavy on the error. A friend owned a beat-up mid-60s FJ40 shod with skinny Armstrong True Tracs and equipped with a Ramsey winch wrapped with a rusty steel cable. We took that thing everywhere, including trails around southern Arizona that I’d later learn were rated 4+ and even 5 on the vehicle-based system. When we got stuck or couldn’t drive up some ledge, which was frequently, we’d simply unspool the winch cable, wrap it around a big rock and hook it to itself (I know, I know), and pull ourselves out. The rocker panels on that poor 40 eventually got battered into gentle arcs (call it a “redneck body lift”). But we had fun and learned a lot—enough that when I got my own, much nicer, FJ40 I was able to keep its rocker panels the way the ARACO body plant meant them to be.
This do-it-yourself approach explains why I came late to the concept of airing down tires on off-pavement trails and four-wheel-drive routes—I simply didn’t hear about it until well into the 1990s, when I began subscribing to magazines that included articles by expedition travelers such as Tom Sheppard. It never would have occurred to me on my own that deliberately letting air out of one’s tires could be a good thing.
Now, of course, the benefits are well-known to anyone who has read anything about overland travel: Reducing tire pressure to suit the conditions allows the tire to more effectively mold itself to the terrain. That increases traction, which reduces wheel spin. That in turn reduces trail damage as well as stress on the vehicle’s drivetrain and wear on the tire itself. In soft sand the enlarged footprint (which comes mostly from lengthening of the tire carcass, rather than widening) provides hugely increased flotation. It’s basically a win-win-win technique, as long as one is circumspect about mixed terrain: You might choose 14 psi for soft sand unless that sand is interspersed with sharp rocks likely to puncture a sidewall (as we encountered in Egypt with the dreaded kharafish—razor-edged lumps of limestone). Airing down even enhances ride comfort on rough roads, as it allows the tire to conform to small obstacles rather than bouncing over them.
If the benefits of airing down are so well-known, why don’t more people practice it? It boils down to two issues: sheer laziness, and lack of proper equipment. And the former is often caused by the latter. If you have to deflate each tire one at a time using the awl on your Swiss Army knife or the button on the back of a tire gauge, and if re-inflation is a 45-minute process tackled with a $29.95 compressor (“with flashlight!”) better suited to blowing up volleyballs, you’re just not likely to do it unless you actually get stuck first.
Since tire failure—whether a simple puncture, losing a bead, or damaging a sidewall—is still the number one cause of vehicle breakdowns, a high-quality compressor should be part of your kit anyway. In fact, after the most basic upgrades on any 4WD vehicle—tires, for example—a proper compressor comes near the top on my list. Maybe even before a fridge.
With a good compressor to handle re-inflation, your next goal is to avoid prolonged genuflecting in front of each tire, letting air hiss out slowly though the valve. There is a dirt-cheap way to accomplish this: Buy a valve-core removal tool. Although it seems drastic, removing the valve core is the absolute quickest way to deflate a tire, yet it’s not so quick as to be difficult to control. Your pressure gauge will still work, and you just need to be ready to reinsert the valve core when the pressure gets close to your target.
The big problem with this technique—besides the fact that it’s a manual, one-at-a-time procedure—is that the tire pressure will do its best to wrest the tiny valve core out of your grasp just as you’re removing (or reinserting) it, and send it flying ten feet over your shoulder. By the time you find it (assuming you can), you’ve got a flat tire.
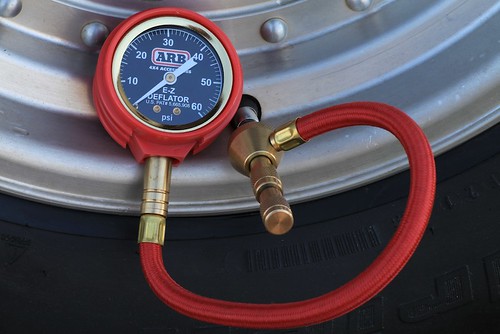
A safer and more stylish approach to the VCR technique can be had with the ARB E-Z Deflator. This tool comprises an elegantly complex brass fitting with a hose and gauge. The fitting screws on to the valve stem, and a separate knob then unscrews the valve core but contains it securely within the mechanism. Pulling back on the collar attached to the air hose and gauge then allows air to escape with a satisfying whoosh. Push back in to stop the flow and check the pressure. It appears to be just as fast as the riskier method—I deflated a 235/85 R16 BFG All-Terrain (my reference tire for the entire test) from 40 psi to 18 in 33 seconds flat.
However fast it is, the ARB still requires full operator attention—which brings us to automatic deflators. While not as quick individually as valve-core removal, you can be doing other things, such as chatting to your friends, getting a snack, or checking the vehicle, while the tool does its work, and if you have multiple deflators the total process can be quicker than the fastest one-at-a-time technique. In fact, with two of the types of deflator reviewed here, you can drive off while they’re attached and working, thus reducing the time stopped to a couple minutes, and pretty much eliminating your last excuse not to do so.
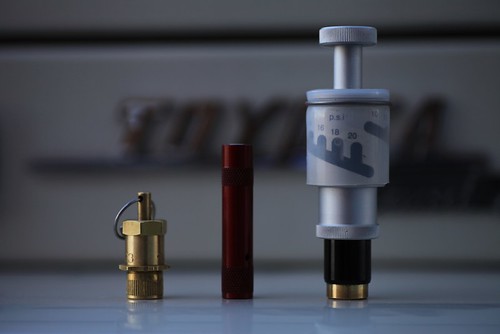
Left to right: Staun II, Trailhead, and CB Developments automatic deflators
The mechanics of an automatic tire deflator are deceptively simple. Essentially the device comprises a plunger with a seal, and a spring calibrated to compress at a certain psi to allow air to flow past the seal and out of the tire. By using a screw-in cap as a base for the spring, its tension can be altered to allow multiple settings in one deflator. The engineering feat is to produce a device that will do this accurately and repeatably over a broad range of pressure.
Coyote Enterprises Staun II $80 (set of four)
Staun is the grandfather of deflators, designed in Australia in 1998. I had one of the early sets, and while they were convenient, I found the target pressure to vary by as much as two or three psi—potentially critical if you’re airing down to the low teens (below one bar) in soft sand. Go too low unintentionally and apply too much welly or steering lock and you can pop the tire bead off the rim. So I was curious to see if the newer style would be more accurate.
The second-generation Staun (made in the U.S., and covered by a lifetime warranty) benefits from a number of modifications. The claimed range is now an astonishing 3 to 50 psi—the original Stauns needed three part numbers to cover this span. Two sets of springs are included to adjust the limits. Also, there is a manual start ring, which among other things allows you to initiate deflation if there is insufficient pressure difference to trigger it otherwise—say, if your tires are at 21 psi and the Stauns are set to 18, or if you want to bump the pressure back down after airing down on a cold morning and driving until the tires warm up (they regain a bit of pressure when hot). The new Stauns also take only two or three turns to lock onto the valve stem. Finally, the maker now sanctions driving off with the Stauns in place and letting them work en route.
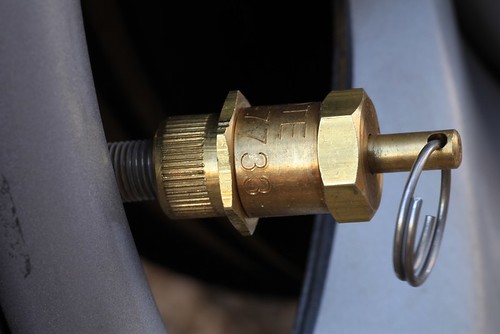
Made of solid and confidence-inspiring brass, the Stauns come with a clear set of calibrating instructions. First, manually deflate a tire to the nominal pressure at which you want to set the Stauns. Turn the hex locking nut and the top of the deflator all the way down (clockwise). Now screw the deflator on the tire until it’s snug, and slowly turn the top of the deflator counterclockwise until air is released. Immediately turn it back clockwise until the air just stops, then turn the lock nut up until it locks the body in place. That’s it. If you prefer different pressures on the front and rear of the vehicle, you can set two to each, and file a notch in the edge of one pair to identify them.
I used 18 psi as my target—it’s a good rough-trail pressure for my FJ40 and many similar-sized vehicles. If you’re quick you can calibrate all four deflators on the reference tire without adding air, but I bumped it back up with the compressor after two (the 235/85s don’t have a lot of volume). With the tire reinflated to 40 psi, I screwed on one of the Stauns and clicked a stopwatch. Three minutes and 19 seconds later, the device snapped closed, and my calibrated gauge confirmed that the shutoff pressure was dead on 18 psi. Reinflating to various pressures and trying the remaining three produced nearly identical results: None was more than a half pound off. Furthermore, with the manual-start ring I found I could initiate deflation even when the tire pressure was only two or three psi higher than the set pressure.
You can estimate a new setting on the Stauns in the field by loosening the lock ring and turning the cap. One turn either direction (clockwise to increase, counterclockwise to decrease) equals “three to four” psi according to the instructions. Mine seemed to do about three per turn, but it’s definitely a rough guide.
Given its accuracy and additional features, the Staun II is clearly a worthy upgrade to the original.
Trailhead $75 (set of four)
Trailhead (originally Oasis) deflators pioneered the “drive-away” function, which made stopping to air down a two-minute procedure. While the Stauns now offer the same capability, I have to admit I was hesitant to do so given their relatively weighty brass construction. Not so with the Trailheads—each slim anodized-aluminum unit weighs barely ten grams, compare to 25 for a Staun.
The procedure for calibrating the Trailhead deflator is a contrast as well. Using the included 5/32 hex key, you unscrew the internal cap until it is perfectly flush with the body. This represents the lower end of the range (5 psi on my 5 to 20 psi model; a 15 to 40 model is also available). From there, each full turn back in supposedly represents an increase of 1.5 psi. To get to my target of 18, I counted up—6.5, 8, 9.5, etc.—until I got to 17, and then added about two-thirds of a turn to estimate 18. I screwed on the deflator and hit the stopwatch, and it shut off just two minutes and 19 seconds later. However, when I checked the pressure in the tire it was at 20 psi. I gave the cap a full turn back out and tried again. This time, after two minutes and 31 seconds, it was within a half pound of 18. I tried the same procedure with the other three units, and each one stopped around two pounds short of the target pressure. So setting the Trailheads precisely required more fiddling. Once finished, however, they remained accurate.
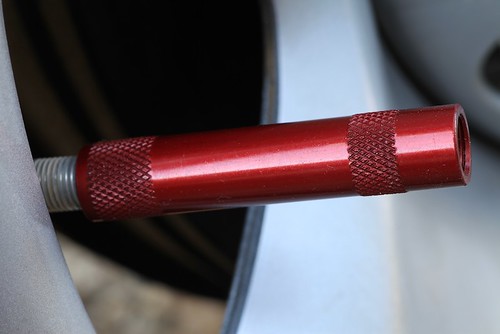
The Trailhead deflators have no manual start function, and the instructions caution that initial tire pressure must be roughly twice the set pressure for them to self-initiate. I found that a bit pessimistic—mine would all initiate at 32 psi when set to 18. But trying again at 30 produced only silence. So if you drive a vehicle that takes that 30 psi on the road, you’ll have to air down to 16 or below for the Trailhead deflators to work.
The Trailheads can be bought in mixed colors —aluminum, red, or blue—making it easy to identify when you set them up differently for front and rear tires. They are made in the U.S. and come in a pouch with instructions, the hex key, a tire gauge, and a handy tire deflation guide.
CB Developments Mil-Spec Tyre Deflation Valve $100 (each)
Compared to the lengthy calibration sequence necessary to set up the Staun and Trailhead products, the procedure for CB deflators couldn’t be more different: There isn’t one. Push and turn the knurled knob so the pin indexes with the target psi on the body of the deflator, and screw the assembly on your valve stem. That’s it. No need to deflate a reference tire, and no need to use math and a wrench if you want to change settings for differing conditions (or different vehicles) in the field—just turn the knob to the new target. I set one of the CB deflators to 18 psi, screwed it on my 40-psi test tire, and just two minutes and 22 seconds later it was finished, beating out both the Staun and, by a slim margin, the Trailhead. Furthermore, every setting I tried, all the way down to 10 psi, was within a half pound of my calibrated gauge. And the deflator would initiate with as little as two pounds of difference between the tire’s pressure and the target. An excellent performance.
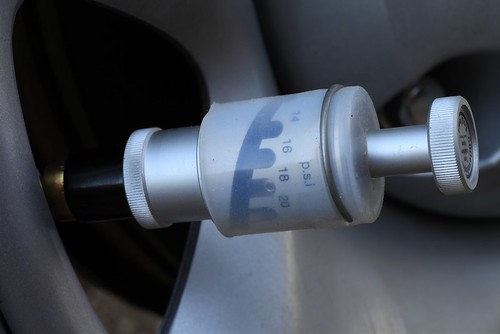
Of course, you pay for that convenience, speed, and accuracy. A single CB deflator costs significantly more than an entire set from Trailhead or Staun. A full set of four would be a frightening chunk of cash. And you cannot drive with the bulky CBs in place, so are tied to the time it takes for however many you own to do their work. The CB deflators also lack the upper range of the Stauns or Trailheads—the highest range model carried by Extreme Outback Products, the U.S. distributor, stops at 20 psi (CB Developments makes another that extends to 24). That means those of you with Sportsmobiles and other heavy rigs, who consider 40 psi to be “aired down,” are out of luck. In fact 20 psi might be marginal for our Tacoma and Four Wheel Camper in anything but soft sand; on the road we keep 50 psi in the rear E-rated BFGs.
Conclusions
All these deflators worked as advertised, and all were very accurate once calibrated. So in a way you can’t go wrong. But in the end I did have preferences.
The Trailhead deflators boast the lowest cost—I’ve seen street prices under $60 for a set—and they were significantly faster than the Stauns. The multi-color option is a nice feature. Their single-hex-key adjustment makes them easier to manipulate than the two-piece adjusters on the Stauns—although as we have seen, the Trailheads take more fiddling to arrive at the target setting. But their biggest drawback is the lack of a manual-start function, and the significant difference in pressure necessary for them to self-initiate. I can recall many situations I’ve been in where they simply would not have worked.
The Staun II deflators run roughly $10 more per set than the Trailheads. However, for that you get a much wider pressure range in one part number, faster calibration, and the ability to initiate deflation with just a few psi difference between the tire and your target. Their sole downside was the slower speed, if the difference between two and a half minutes and three and a quarter minutes is critical to you. I’ll be curious to see how a potential “Trailhead II” deflator responds to the Staun II challenge.
The CB deflators are in a league of their own, in performance, convenience, and price. As long as the psi settings you require lie within the range of the device, there is no easier or more accurate deflator. I keep a pair in my FJ40, and their versatility more than makes up for the fact that I have to deflate tires a pair at a time. If I need to reduce pressure from my nominal 18 to, say, 14, it’s the work of an instant to change the setting—no guesswork needed.
Among the automatic deflators, then, the CB Development Mil-spec product wins if price is no object and the range fits your vehicle. If you baulk at the thought of a $400 set of deflators (or even $200 for a pair), an $80 set of Stauns will serve admirably—and suit a wider range of vehicles to boot.
As to the ARB EZ Deflator, while it is a manual tool, it is in many ways the most versatile of the bunch. If you have a Global Expedition Vehicle* at one end of your garage that you only air down to 55 psi, and a rock buggy with beadlocks at the other end that you take down to four, the ARB is the only tool here that will handle both—and anything in between. At $40 it is the least expensive of all these options. (*That is, ahem, if you didn’t order the GXV’s optional central tire inflation system, which makes this entire article a moot point for you . . .)
Searching for a bottom line, I ran a series of back-to-back double-blind experiments controlled for temperature, humidity, and elevation, and determined that the mean time to stop the truck, deploy a set of Staun deflators, let them finish, and pack them away again is six minutes 37 seconds—which happens to be the exact time it takes to retrieve a cold Coke from the fridge of the JATAC and finish it while sitting in the shade.
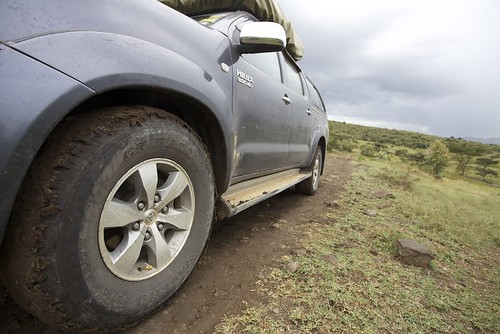
Staun deflators at work in the Rift ValleySource links: ARB, Trailhead, Staun (Coyote Enterprises), CB Developments (Extreme Outback Products)
A Hi-Lift jack mount for the JATAC
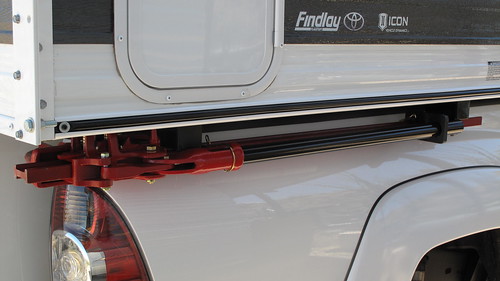
The Hi-Lift jack is a useful tool, but it’s also a pain to carry securely on a vehicle, especially if you want to keep it reasonably accessible. I’ve seen many mounts that achieved one but not the other—and too often, safety loses out to convenience. Sadly I had neither a camera nor a cell phone with me a few years ago when I spotted a Hi-Lift mounted horizontally on top of a bull bar on a truck, just above hood level—and secured with a pair of tightly wrapped bungee cords. The imagery of what could happen if that truck were smartly rear-ended was . . . colorful, not to mention what could happen to an innocent person if Mr. Thatoughttaholdit rear-ended someone else. For reference, a 30-pound Hi-Lift mounted on a vehicle that comes to an abrupt halt from 30 mph exerts a force of 903 foot-pounds of energy on whatever is holding it to that vehicle.
I see a lot of Hi-Lifts bolted to roof racks—secure, safe but for the modest impact on CG, and more likely to stay free of road grime, which can quickly foul the Hi-Lift’s mechanism. It’s not a bad spot if you can access it without climbing. Also good are dedicated mounts on rear tire carriers (as opposed to the ones that bolt behind the spare tire, which are a pain). I suppose a properly engineered mount atop a bull bar is okay; it’s certainly handy there. But I’ve never seen one that didn’t impede forward vision and access to the engine compartment. And on a strictly personal note, it looks just a little too, well, Moaby, if I may coin a word.
Mounting a Hi-Lift on the JATAC presented its own challenges. The roof is out of reach and devoted to solar panels. We’ll be installing a Hi-Lift-compatible winch bumper up front soon, but that was rejected for the reasons stated above. And we’ve also decided not to install a rear bumper with big swingaways, to hold down mass at the back of the vehicle. What did that leave us?
I asked Tom Hanagan at Four Wheel Campers about fabricating a mount that would bolt to the rear wall of the camper, directly through the vertical aluminum frame members, to hold the jack vertically to the right of the door. He thought it could work, but was hesitant to sanction the idea unequivocally. And that location would still hang the mass off the back of the vehicle.
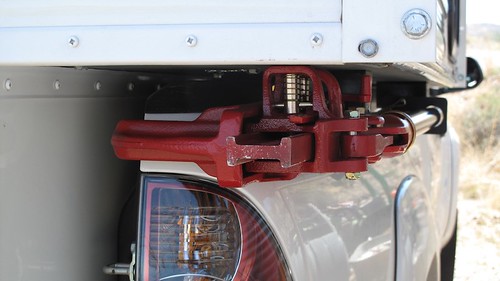
Then, while walking around the truck stroking my chin and pondering, I noticed the area where the camper overhangs the truck’s bed on each side. I held up a Hi-Lift to the spot, and it tucked in as though designed to ride there. The location would be completely out of the way yet quickly accessed, and while the weight would still be toward the back, it was significantly forward of a rear wall mount. I decided to mount it on the passenger side, to compensate for the weight of the truck’s fuel tank and the camper’s water heater, both of which are on the driver’s side.
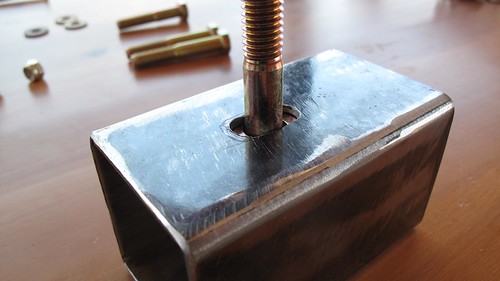
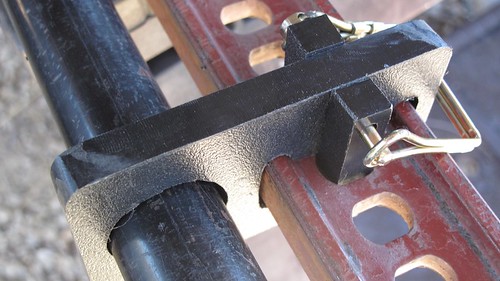
I used two short lengths of two-inch-square steel tube for the brackets. First I located the spots I’d drill through to hang the brackets—one in the propane tank compartment, one behind the fridge inside the camper. I used two 1/4-inch grade 8 bolts with fender washers to anchor each bracket through the plywood (which fortuitously is double thickness in the propane compartment, where the heaviest part of the jack would be). To secure the jack to the brackets, I used a 3/8ths-inch grade 8 bolt on each one. The bolt was too long to slide into the tube and down through the hole I drilled, so I drilled an adjacent hole and made a slot to get the bolt through. I tack-welded each bolt in place, and welded a short piece of thicker steel under each bolt as reinforcement. On the rear mount I extended the reinforcing strip forward and drilled a hole through it, to secure a padlock through the mount and the standard of the jack.
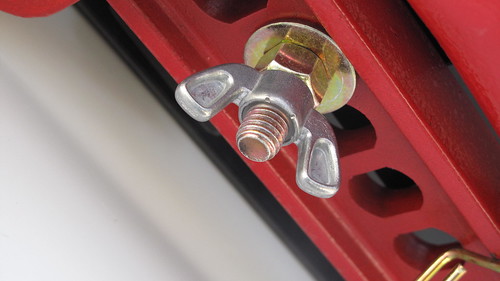
Positioning the mounts laterally was tricky. I wanted the jack tucked all the way under the camper, but needed clearance to drop it free of the mounting bolts without scraping the sheet metal of the truck’s bed. With a bit of winkling, I got them just about right. One needs to be cautious and not just yank the jack free; it must be twisted slightly to get in or out without hitting the lifting mechanism on the back of the bed, but it’s easy to do single-handed. To secure the jack to the bracket I use a grade 8 nut to hold the weight, and a nylock wingnut to keep it snug.
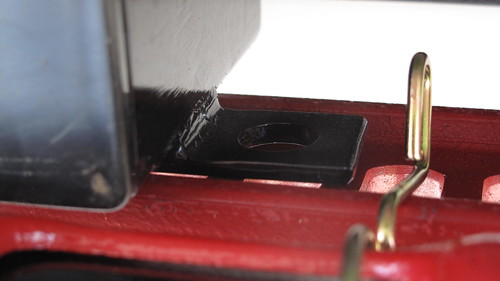
 The next issue was to ensure the jack’s operating handle stayed secure while driving. I have a stock rubber handle keeper, which slides over the handle and the standard, but it can migrate when subjected to vibration. So I fabricated a modified version from some half-inch-thick polyethylene I had around, and cut two polyethylene pieces that lock the keeper in place via a spring clevis pin. Done.
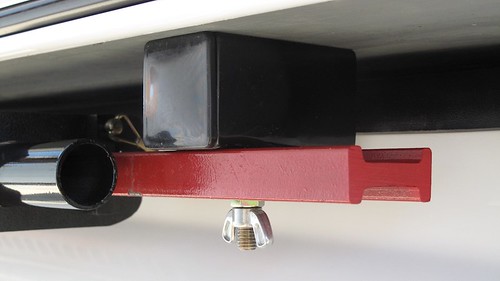
With the jack’s base plate in place, the right turn signal is just slightly obscured from above and behind the truck. It would only be an issue if someone in a semi was close behind us, but we’ll keep the base plate in our recovery kit anyway, and thus avoid potential legal issues as well. With that gone, one needs to be absolutely certain that the selecting lever of the jack is in the “lift” position, otherwise the entire lifting mechanism could migrate off the back of the standard while driving (or be propelled off it in an accident). Not good. I’ll use some sort of secondary arrangement as backup, likely a short bolt and wing nut. (Note here: A Hi-Lift should always be stored with the lever in the lift position anyway.)
So far the arrangement works perfectly. The jack is totally out of the way, yet easy to retrieve. In terms of safety, the mount should be secure through any but the most catastrophic impact: The force applied by the brackets to the floor of the camper would be in sheer; with four grade 8 bolts securing the assembly I’m sanguine.
Next task: to mount a front bumper on the JATAC that will properly accept a Hi-Lift jack for recovery purposes.
Hint: When using “Search,” if nothing comes up, reload the page, this usually works. Also, our “Comment” button is on strike thanks to Squarespace, which is proving to be difficult to use! Please email me with comments!
Overland Tech & Travel brings you in-depth overland equipment tests, reviews, news, travel tips, & stories from the best overlanding experts on the planet. Follow or subscribe (below) to keep up to date.
Have a question for Jonathan? Send him an email [click here].
SUBSCRIBE
CLICK HERE to subscribe to Jonathan’s email list; we send once or twice a month, usually Sunday morning for your weekend reading pleasure.
Overland Tech and Travel is curated by Jonathan Hanson, co-founder and former co-owner of the Overland Expo. Jonathan segued from a misspent youth almost directly into a misspent adulthood, cleverly sidestepping any chance of a normal career track or a secure retirement by becoming a freelance writer, working for Outside, National Geographic Adventure, and nearly two dozen other publications. He co-founded Overland Journal in 2007 and was its executive editor until 2011, when he left and sold his shares in the company. His travels encompass explorations on land and sea on six continents, by foot, bicycle, sea kayak, motorcycle, and four-wheel-drive vehicle. He has published a dozen books, several with his wife, Roseann Hanson, gaining several obscure non-cash awards along the way, and is the co-author of the fourth edition of Tom Sheppard's overlanding bible, the Vehicle-dependent Expedition Guide.


