Overland Tech and Travel
Advice from the world's
most experienced overlanders
tests, reviews, opinion, and more
An odd winch bumper
I’m always on the lookout for inspiring—or horrifying—modifications and accessories on the four-wheel-drive vehicles I spot anywhere in the world. But this curious example was right here in Tucson.
I’ve written many times about the critical need to have visual and tactile access to the winch drum, and if this Jeep actually had a winch mounted to the bumper the operator would certainly have that access. But the plate securing the roller fairlead stumps me. For the life of me I cannot figure out the point of having it angled the way it is. The best wild guess I could come up with is that it vaguely mimics the look of the “stingers” so popular in a certain segment of the 4x4 community; however, it certainly wouldn’t function as one, and looks to me like it would hamper the function of the fairlead.
With no winch mounted it’s difficult to be certain, but it appears the winch line would skim the bottom of the cutout for the fairlead very closely indeed when the drum was full. Since the side rollers are angled, a side pull would result in the line partially dragging on the roller, reducing its effectiveness—a minor flaw to be sure, since given a hawse fairlead the line drags all the time. However, on a steep uphill pull (a common winching scenario) with a side pull factor thrown in, the line would be at a very steep angle near the top of the side roller.
Finally, on a general note: While I’m no welding expert, the bead along the winch plate and fairlead plate is really sloppy, and looks as though it might be lacking adequate penetration as well.
An odd winch bumper, to be sure.
Accu-Gage customer service
For many years my go-to tire gauge has been the Accu-Gage from G.H. Meiser & Co. (even though, yes, the “Gage” bit makes the editor in me wince). They come in different ranges and configurations, and I’ve always found them to be absolutely consistent and reliable. I must have at least five or six; I’m not even sure.
A few months back I managed to crack the plastic face of the one on the left here. It sat in my desk for weeks before I finally emailed the company to ask if I could either purchase a new face, or send it in for repair. I wasn’t expecting much given such things these days, but I got back an immediate reply saying simply, “What’s your address?”
A week lated a new face showed up. No charge. Nice.
G.H. Meiser is here. Needless to say, highly recommended.
Hack your tire plug kit for more versatility
There are two tire plug kits I recommend above all others I’ve tried: The Extreme Outback Ultimate Puncture Repair Kit, and ARB’s Speedy Seal kit.
Each has its advantages. The ARB kit comes in a snap-in, well-organized blow-molded case, so everything you need is easy to access and nothing you don’t need is in the way. The reamer and plug insertion tool are stoutly made with solid aluminum handles—critical for working on tough all-terrain tires. (Never, ever buy plastic-handled plug tools.) Included are pliers for pulling out whatever has holed your tire, a razor for trimming the inserted plug, lube to ease insertion (no wise cracks please!), a tire gauge, and a kit containing spare valves and valve cores, valve caps, and a valve tool. Finally, 40 plugs are included, which should suffice for a very long time—except see below.
The Extreme Outback Ultimate Puncture Repair Kit is the one you want if you are heading out to drive around the world, or you are a professional leading self-drive tours, or if you just want to guarantee that you can repair any tire issue short of a carcass-shredding blowout. In addition to everything in the ARB kit (except the pliers), the EO kit includes an exhaustive selection of patches and rubber cement to repair seriously large punctures or even sidewall tears from the inside out, once you have broken the bead and removed one side of the tire from the rim. There are even thread and needles to sew up sidewall tears before patching them, and such thoughtful additions as a piece of chalk to mark where your tire and rim meet, so when you remount the tire your balance will not be lost, and packets of hand wipes. The one downside not shared by the ARB kit is that all this stuff is crammed into a heavy-duty zippered nylon case. It’s amazingly compact, but you need to pull just about everything out to accomplish even the simplest plug job.
Also included are plenty of plugs—but, as with the ARB, there is a problem.
I’ve always maintained that the plugs in the ARB kit, which are about 8mm in diameter, are far too large for the average nail or screw hole. They are extremely difficult to insert in such a hole in any tire with a tough carcass, especially a stout E-rated AT, even after a vigorous reaming.
Up until recently, the Extreme Outback kit included two sizes of plugs, about 6mm and 4mm. The 4mm plugs were perfect for most small holes—in fact, when teaching tire repair and actually drilling 3/16th-inch holes in tires for students to practice on, the thin plugs were all I used. Only when demonstrating more challenging situations did I need the larger sizes.
Now, however, the EO kit only comes with 6mm plugs, which, while easier to insert than the ARB’s, are still problematic for many repairs. Case in point: At the last Expo I was having students plug tires after I drilled holes in them. The first volunteer was a woman, and she simply could not get a plug from the EO kit inserted, even with plenty of lube and while putting virtually all her body weight on it. Finally Mark Kellgren, who was teaching with me, took over—and had nearly as hard a time getting the thing in there. Finally I realized I had unwittingly run out of the 4mm plugs and had substituted one of the thicker ones, which was clearly too large for such a hole.
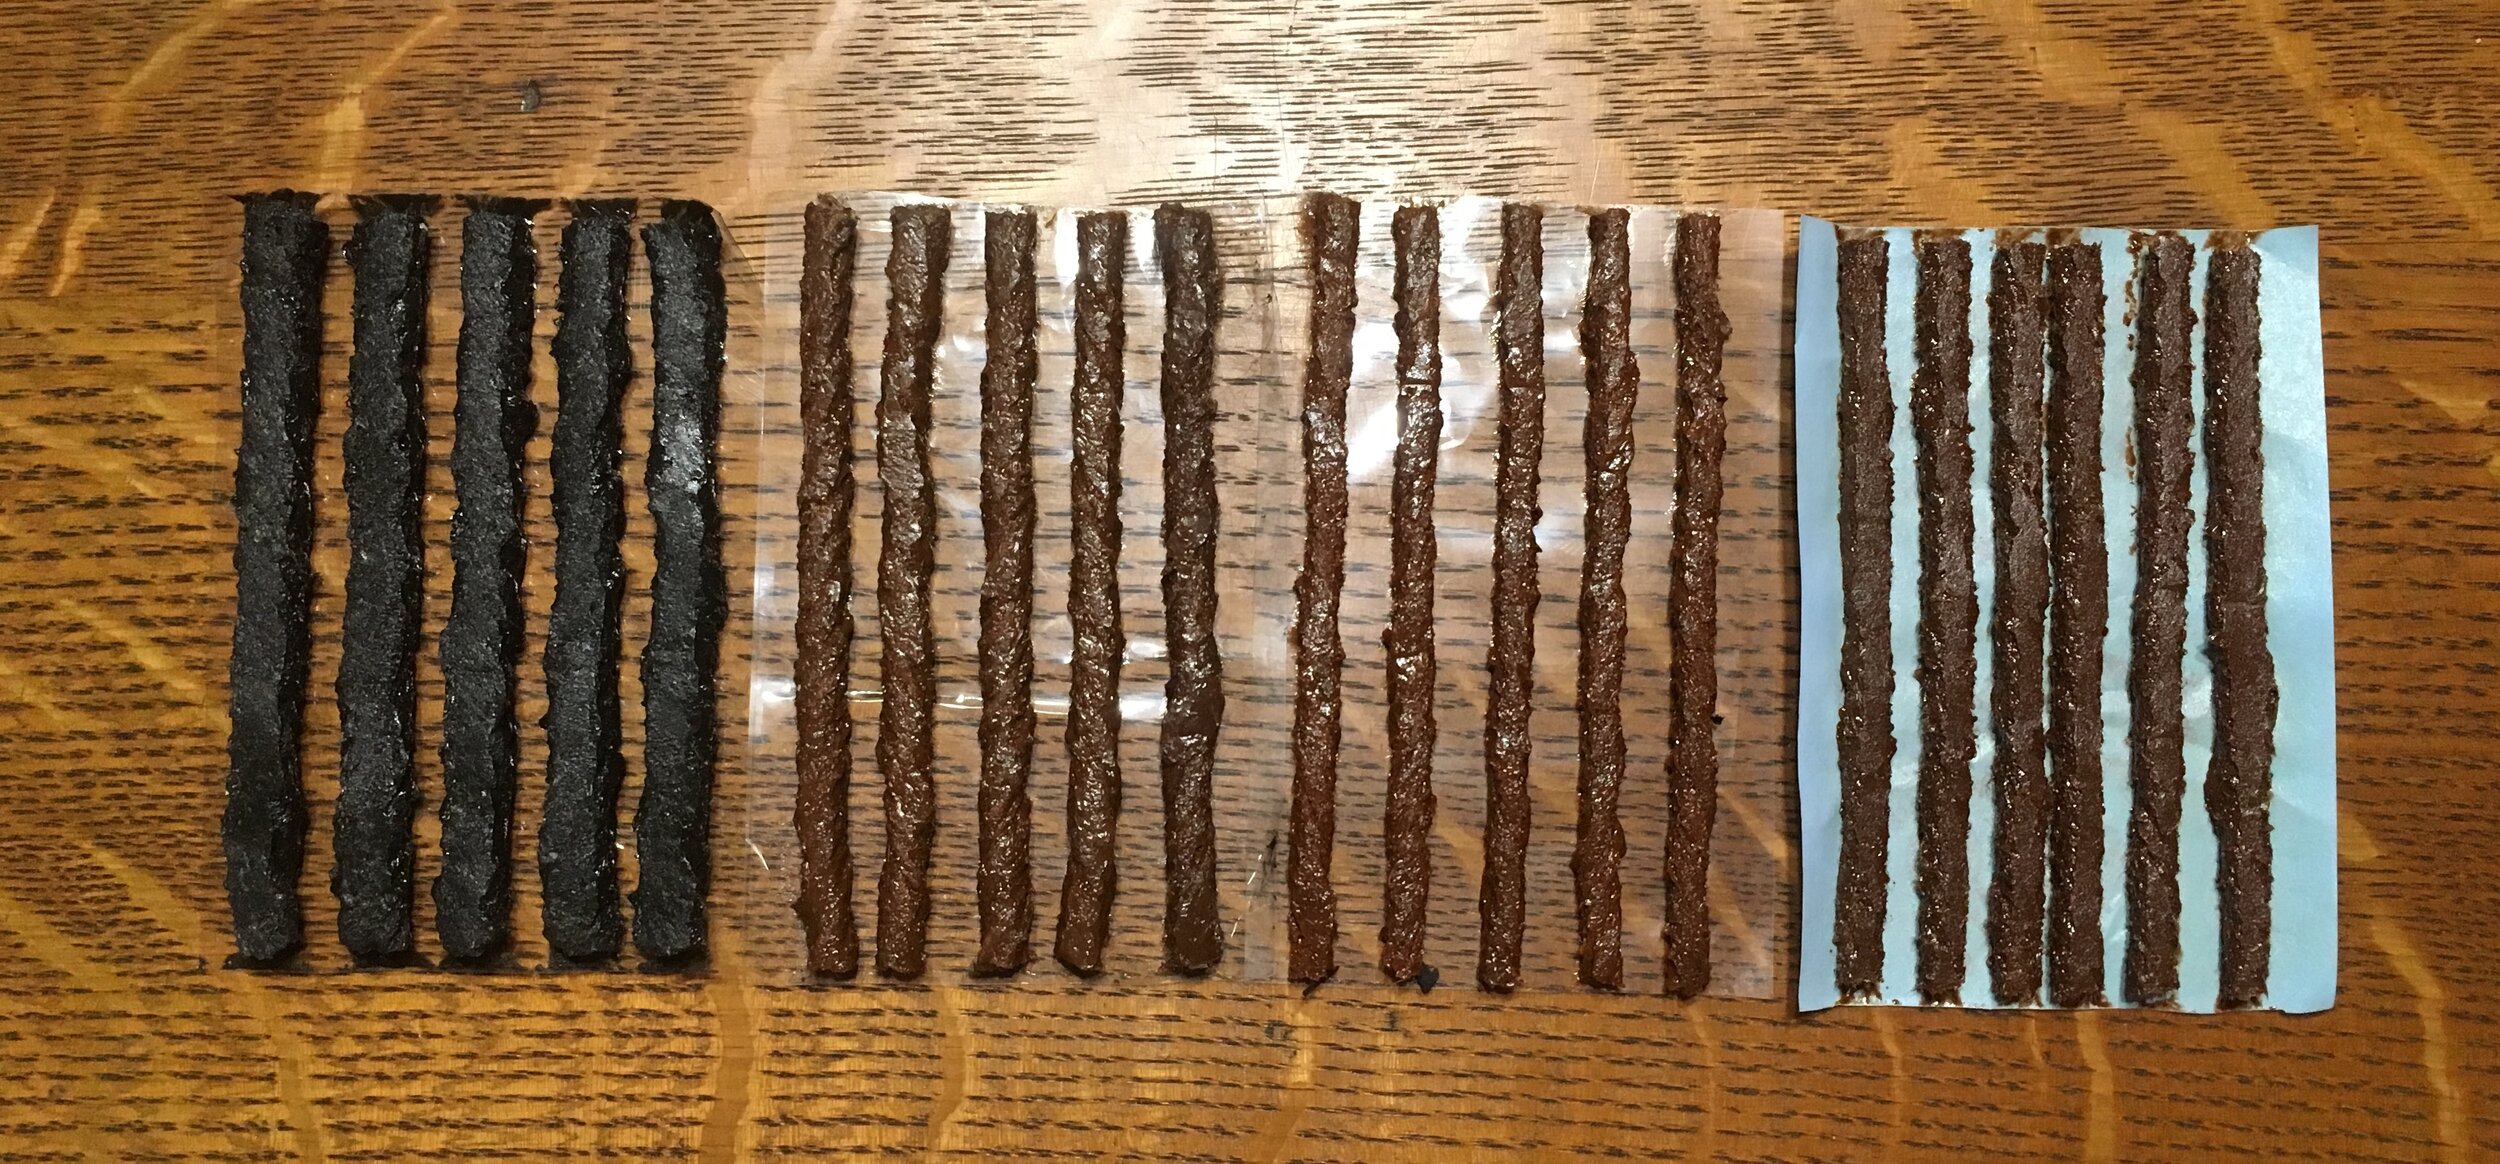
Left to right: ARB, Extreme Outback thick and thin, and Safety Seal Slim tire plugs. (The Safety Seal plugs are slightly flattened and look thicker than they are.)
I called George Carousos, who owns Extreme Outback, and he told me the kits were no longer available with the thinner plugs. So I decided it was time to hack all our ARB and EO kits. I looked up Safety Seal, a company that has been making tire repair products for half a century, and ordered a box of their slim plugs. At a listed 3.2mm these should be smaller than the old thin EO plugs, but if anything they look a tiny bit thicker. Nevertheless they should suffice for those smaller holes. So I’ve replaced half the thicker plugs in all our kits with thinner versions, which should make each kit far more versatile.
The (more) versatile ARB jack base
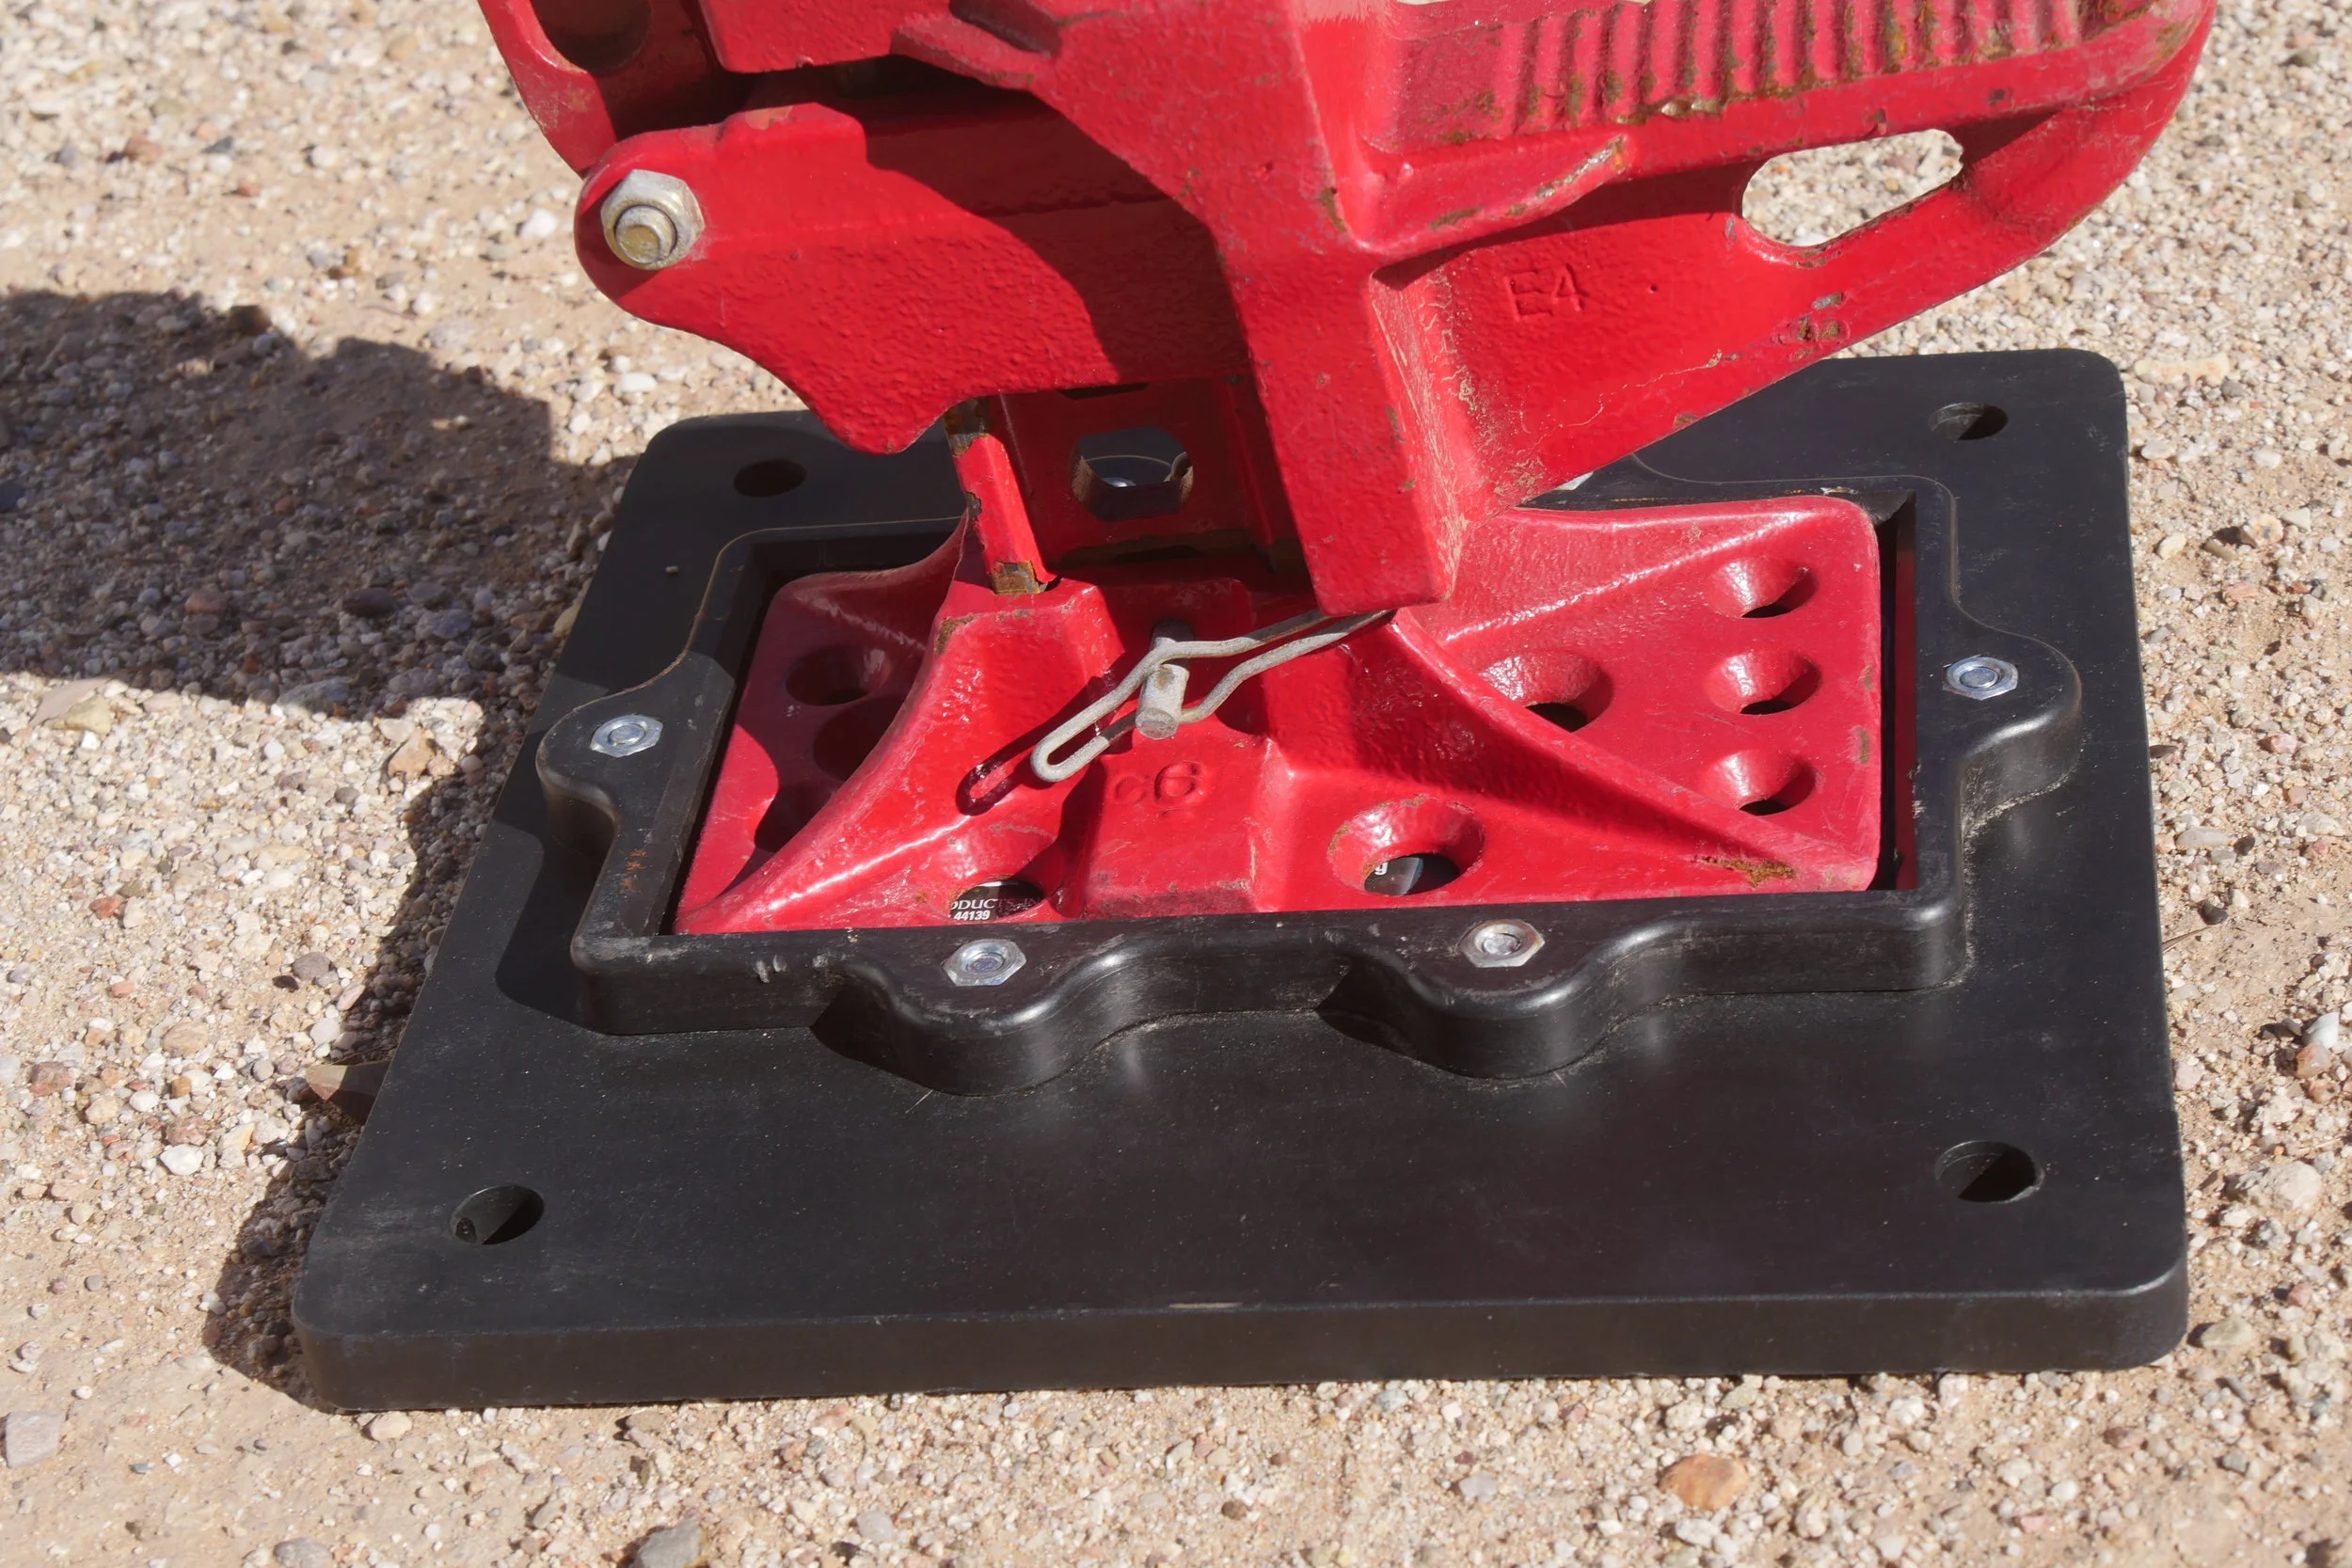
Nearly everyone I know who owns a Hi-Lift jack also owns one of the ubiquitous red plastic base plates, which hugely enhance flotation in soft sand or mud. Recently ARB introduced their own base plate, which is of course designed to accept the rounded base of the ARB hydraulic jack. However, ARB cleverly molded the recess so it will also accept a Hi-Lift, and furthermore I found it fits many bottle jacks as well, which the red Hi-Lift base plate will not. So if you have a Hi-Lift but haven’t yet bought a base for it, consider the more versatile ARB version. Bonus: If you ever decide to spring for that pricey but superb ARB Jack, you’ll be ahead of the game.
Warn's 70th anniversary M8274-70 winch
Warn’s venerable 8274 winch is one of two—the other being the Superwinch Husky—that could legitimately claim to be the best electric winch on the planet.
Each has its advantages. The Husky’s worm drive means it needs no external braking system; it is fully controlled whether powering in or out. The 8274’s spur drive gear train does require a brake but is significantly more efficient (about 75 percent versus 40 percent). It’s more a personal (or patriotic—British versus American) choice rather than a which-one-is-better decision.
Now, to celebrate the company’s 70th anniversary, Warn has announced a limited-edition, uprated version of the 8,000-pound-rated M8274-50. Only 999 will be available world-wide, at an eye-opening retail price of $3,100 (although $2,500 seems to be the going street price). The commemorative M8274-70 is rated to a full 10,000 pounds, and includes 150 feet of 3/8” synthetic line, a solid-state, waterproof Albright contactor rather than a solenoid, plus a few odds and ends such as uprated bearings, a stainless steel spool knob, and a billet aluminum hawse fairlead. (Warn’s site also notes that the winch’s box “features commemorative packaging.”)
I’ve had an 8274 on my FJ40 for about ten years now, and it has performed flawlessly both in the field and through many training sessions. So I delved into the new one to see what had changed besides the extra power (courtesy of a series-wound six-horsepower motor rather than the 4.6 hp version in mine).
And immediately this caught my eye:
“Up to 50% faster line speed at rated load vs. previous M8274-50.”
Fifty percent faster? One of my only complaints about the M8274-50 is that it is too fast already. Speeding it up even more is the last thing this winch needs.
Winching, more than any other recovery technique, is fraught with the potential for errors that could have disastrous consequences if the operator is not properly trained, paying one hundred percent attention, and ensuring that every step of the procedure is conducted in a controlled manner. The best way to guarantee a safe and successful winch recovery is to go slowly. The only exceptions I can think of to this rule are if you have stupidly bogged your vehicle below high tide line with an incoming tide, or have gotten stuck in the middle of a fast-flowing river that is scouring substrate out from under your tires and sinking the vehicle farther. Otherwise my opinion is that it is impossible to have a winch that is too slow. Indeed, on most recoveries or lessons with my 8274 I rig a double-line pull out of habit, just to ease the pace (since a double-line pull halves line speed while doubling power). I can’t imagine it 50 percent faster.
I wonder if the impetus behind this drive for faster line speed comes from a misdirected emulation of competition events such as King of the Hammers, where winches are commonly modified to achieve outrageous line speeds. Suffice to say that for overland travel, you do not want to use competition rock buggies as your build inspiration.
This in no way (well, barely) diminishes my respect for Warn’s 8274 series winches. The new one would be a fine choice for a heavier expedition vehicle in the 7,000-8,000-pound range. But I’d suggest employing a pulley for most recoveries—unless shark fins are circling offshore or trout are showing up in the footwells.
New MAXTRAX Xtreme
It’s well-known that I’m a fan of the original MaxTrax, and have defended them against cut-price copies. I’ve also noted that I refuse to use the company’s all-caps MAXTRAX spelling, which as a grammarian I find wincingly annoying (I compromise with MaxTrax). Now . . . sigh . . . the company is torturing me again with their new product, named the Xtreme. Ugh.
I grit my teeth and continue, because the new product, a prototype of which I received recently, looks to be a significant leap in the technology of composite recovery mats. Why? Because the teeth, or studs, of the new mat are made from hard-coated aluminum rather than molded-in nylon. And . . . they are user-replaceable.
As anyone who has used them knows, the salient disadvantage of composite recovery mats is that, if you allow too much wheel spin while attempting to climb onto them, the studs can melt, significantly and permanently reducing the effectiveness of the product. Recent mats using harder plastic studs helped but did not cure the issue. The Xtreme might just do so.
The composite base of the new mat is the same reinforced nylon material as the original MaxTrax, which I and many other testers have found to be superior to the polyethylene used by some lower-priced competitors. There is also extra reinforcement in the bottom webbing. Combining that with the aluminum studs should provide vastly improved durability.
As you might expect, the Xtreme is a bit heavier than the standard MaxTrax—8.9 versus 7.4 pounds each. But at 18 pounds per pair that’s still lighter than even perforated aluminum sand mats.
They are not, however, cheaper. Retail on the Xtreme will be $449 a pair. I remember being scandalized at the idea of the original $300 MaxTrax—until I used them. I suspect our perspectives will continue to evolve as long as such price increases are backed up by such meaningful improvements.
A better Hi-Lift base plate.
Let’s be honest: You can make a perfectly functional base plate for a Hi-Lift jack by gluing together a couple of foot-square pieces of 3/4-inch plywood. If you want to get fancy you can add a third layer of 1/2-inch plywood with a cutout for the jack’s foot, to help stabilize it. This is exactly what I used for years.
However, the plywood got chewed up pretty quickly, and once I used it in mud it started delaminating. So I switched to one of the ubiquitous red plastic bases. It was (and is) an excellent product, and mine has held up through not only personal use but numerous training classes as well.
My only real issue with the red base is its bulk, which is significant if you’re storing it in the back of an FJ40. It takes up an inordinate amount of volume for a single-function implement.
While shopping for some items we needed for Expo East this November at one of the Tractor Supply Company (TSC) stores, I chanced upon a solution in the form of the Reese Farm Jack Foot Plate. Constructed of thick polypropylene, it’s far more compact than the red base, yet boasts a 7,000-pound capacity. I put it to an unusual but effective trial at the show: Our 20-foot cargo trailer, which hauls all the Expo equipment and grosses about 10,000 pounds, had to be parked where the tongue jack would be in very soft mud. So I placed the Reese plate under the tongue’s foot, lowered probably 2,500-pounds plus onto it—and left it there for the duration of the show. It emerged unscathed and unwarped.
The Reese plate is one-third the height of the red base but seemes even thinner, it’s so easy to stash. And I like the low-profile black color, too. This is my new standard-equipment Hi-Lift base plate. About $25 from TSC or Amazon.
Classic Kit: The capstan winch
If you’ve ever crewed (or skippered) a sailboat longer than 20 feet or so, you’ve probably used a capstan winch to control lines such as the jib and spinnaker sheets. A basic capstan winch comprises a vertical drum geared so it will only turn one way (always clockwise on a sailboat). When you wrap the line around the drum (again, clockwise) two or three times, you can more easily control the forceful pull of the sail. The friction of the wraps helps prevent the line being pulled away from you. If you need more power to sheet in a sail in a breeze, a a fitting on top of the drum allows you to insert a crank for extra leverage. There are more elaborate capstan winches with two speeds, self-tailing mechanisms—and electrically powered winches that eliminate the need for manual cranking.
For many years, a capstan winch could also be ordered as a factory option on Land Rovers and a few other vehicles. Visually the vehicle-mounted capstan winch was very similar to our sailboat winch; however, it was powered through a gearset from a driveshaft usually connected directly to the vehicle’s crankshaft via a sliding coupler. The worm-drive gearset reduced the 600 or 700 rpm of an idling engine crankshaft to just a dozen or so turns per minute of the drum (which, curiously, rotates counterclockwise on every one I’ve seen).
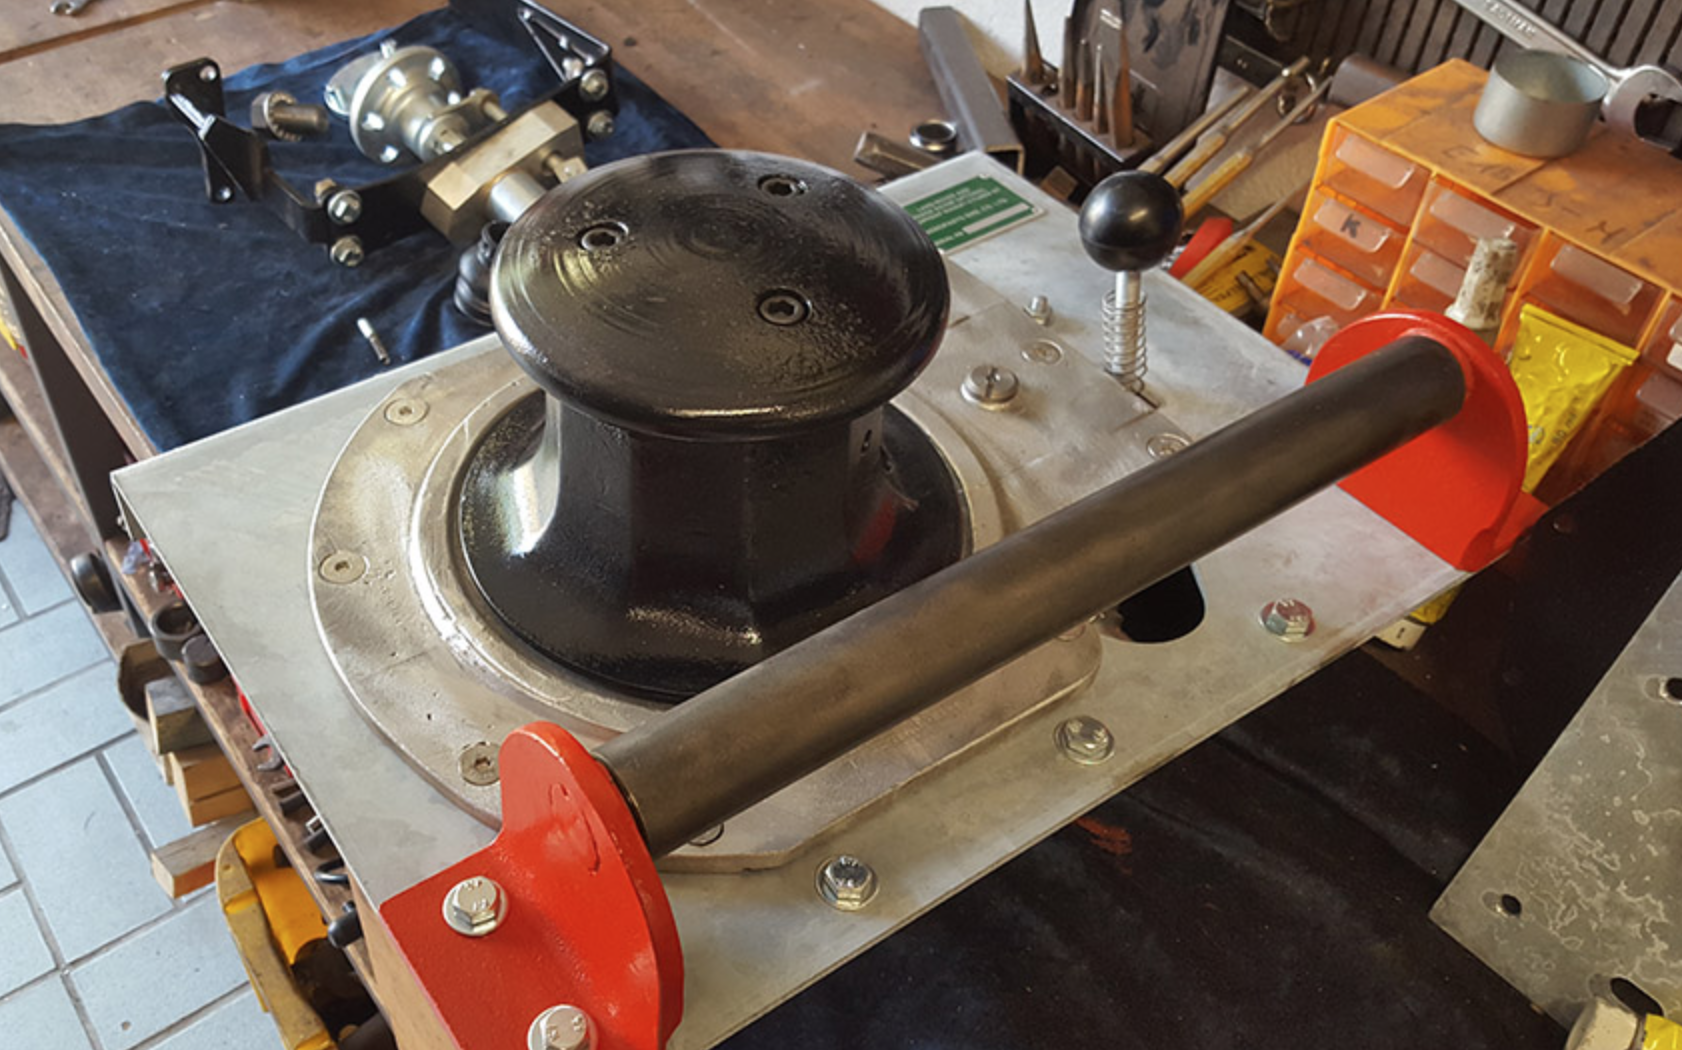
A capstan winch at LR-Winches. Engagement lever is at upper right. The rope is led under the roller from the anchor or object to be moved.
A capstan winch has an entirely different method of operation from the common, horizontal-drum electric, hydraulic, or even PTO winch with which we’re familiar. You don’t store line on the capstan, and it cannot use steel cable. Instead you carry a separate, low stretch rope—traditionally 3/4-inch manila or an equivalent natural fiber—of whatever length you chose, with a hook on one end.
Let’s say you’re driving your Series II 88 along a forest track and you come across a downed tree blocking the way. Pulling it out of the path would go like this:
Position the vehicle so the winch has a clear route to drag the tree off the path. Leave the engine idling, transmission in neutral (obviously), parking brake on and, if possible, the wheels chocked as well. (If you have a hand throttle you can bump up the engine rpm a bit.) Wrap a strap around the tree and connect your winch rope to it with its hook. Take the free end of the rope back to the vehicle, run it under the roller guide and around the drum three or four times counterclockwise in an ascending spiral, then lay the free end of the rope off to the left of the vehicle as you’re facing the front. With the coils of the rope around the drum still loose, engage the lever to connect the drum to the gearset and the drum will begin turning slowly—but the loose rope will simply slip around it. Now stand back from the vehicle a few feet and pull on the free and of the rope to tighten the wraps around the drum. The drum will grab the rope and begin pulling on the downed tree, as you take in the rope fed you by the winch. You now control the speed and engagement of the winch simply by pulling or slacking off on the rope to tighten or loosen it around the drum. Once the tree is off the path, let the rope go slack, disengage the gearset with the lever, and de-rig. It’s that simple.
Of course you can also connect the rope to a standing tree or another vehicle to free yours if it is bogged; however, since the capstan winch requires someone standing outside the vehicle to operate the winch, it’s nearly mandatory to have a second person in the driver’s seat to steer the vehicle and stop it once it’s free. Solo vehicle recovery with a capstan winch can be a very dicey operation indeed.
Consider the situation pictured below. Tom Sheppard was in Mali in 1978, en route to Timbuktu, driving his Land Rover Velar—that’s right, the original prototype of the Range Rover—and towing a trailer full of fuel and water, when a section of mud proved a bit deeper and stickier than was apparent from the driver’s seat.
Tom’s Range Rover was equipped with a Fairey capstan winch cleverly hidden behind the grille—note the horizontal roller on the bumper. To deploy it one simply unscrewed the center grille section, a matter of a couple of minutes. However, Tom was, as is common with him, traveling solo. Therefore he first unloaded all 21 (!) jerry cans from the trailer, decoupled it from the Range Rover, and recovered the Range Rover with aluminum sand (i.e. mud) ladders. Then he positioned the Range Rover in a spot where he could use the capstan winch to recover the trailer, re-connect it to the Range Rover, reload all 21 jerry cans, and continue on his way.
(Tom’s story made me remember the tour Roseann and I got of the Gaydon Museum, courtesy Land Rover historian extraordinaire, Roger Crathorne. I looked up one of the photos, which shows, in addition to Roger and me, one of the Range Rovers used on the 1971/72 Trans-Americas Expedition—and there was a capstan winch peeking out from behind the grille.)
The capstan winch’s labor-intensive method of operation, combined with its modest power—most were rated for around 3,000 pounds, as was the rope used on them—saw them fade from popularity with the increasing availability of horizontal-drum electric winches of considerably higher rating. Yet the capstan had its advantages. It could work all day without overheating or stressing the vehicle’s electric system, and its line capacity was essentially unlimited—if you needed to rig a 200-foot pull, all you needed was a 220-foot rope. And that labor-intensive method of operation gave the operator instant control over the procedure—let off on the rope tension and the pull stops instantly. The capstan winch, with its leisurely speed, hands-on attitude, and natural-fiber rope, always struck me as, well, the friendly winch compared to the whining, straining, ozone-smelling electric winches of today (hugely capable though they certainly are). Go ahead, laugh.
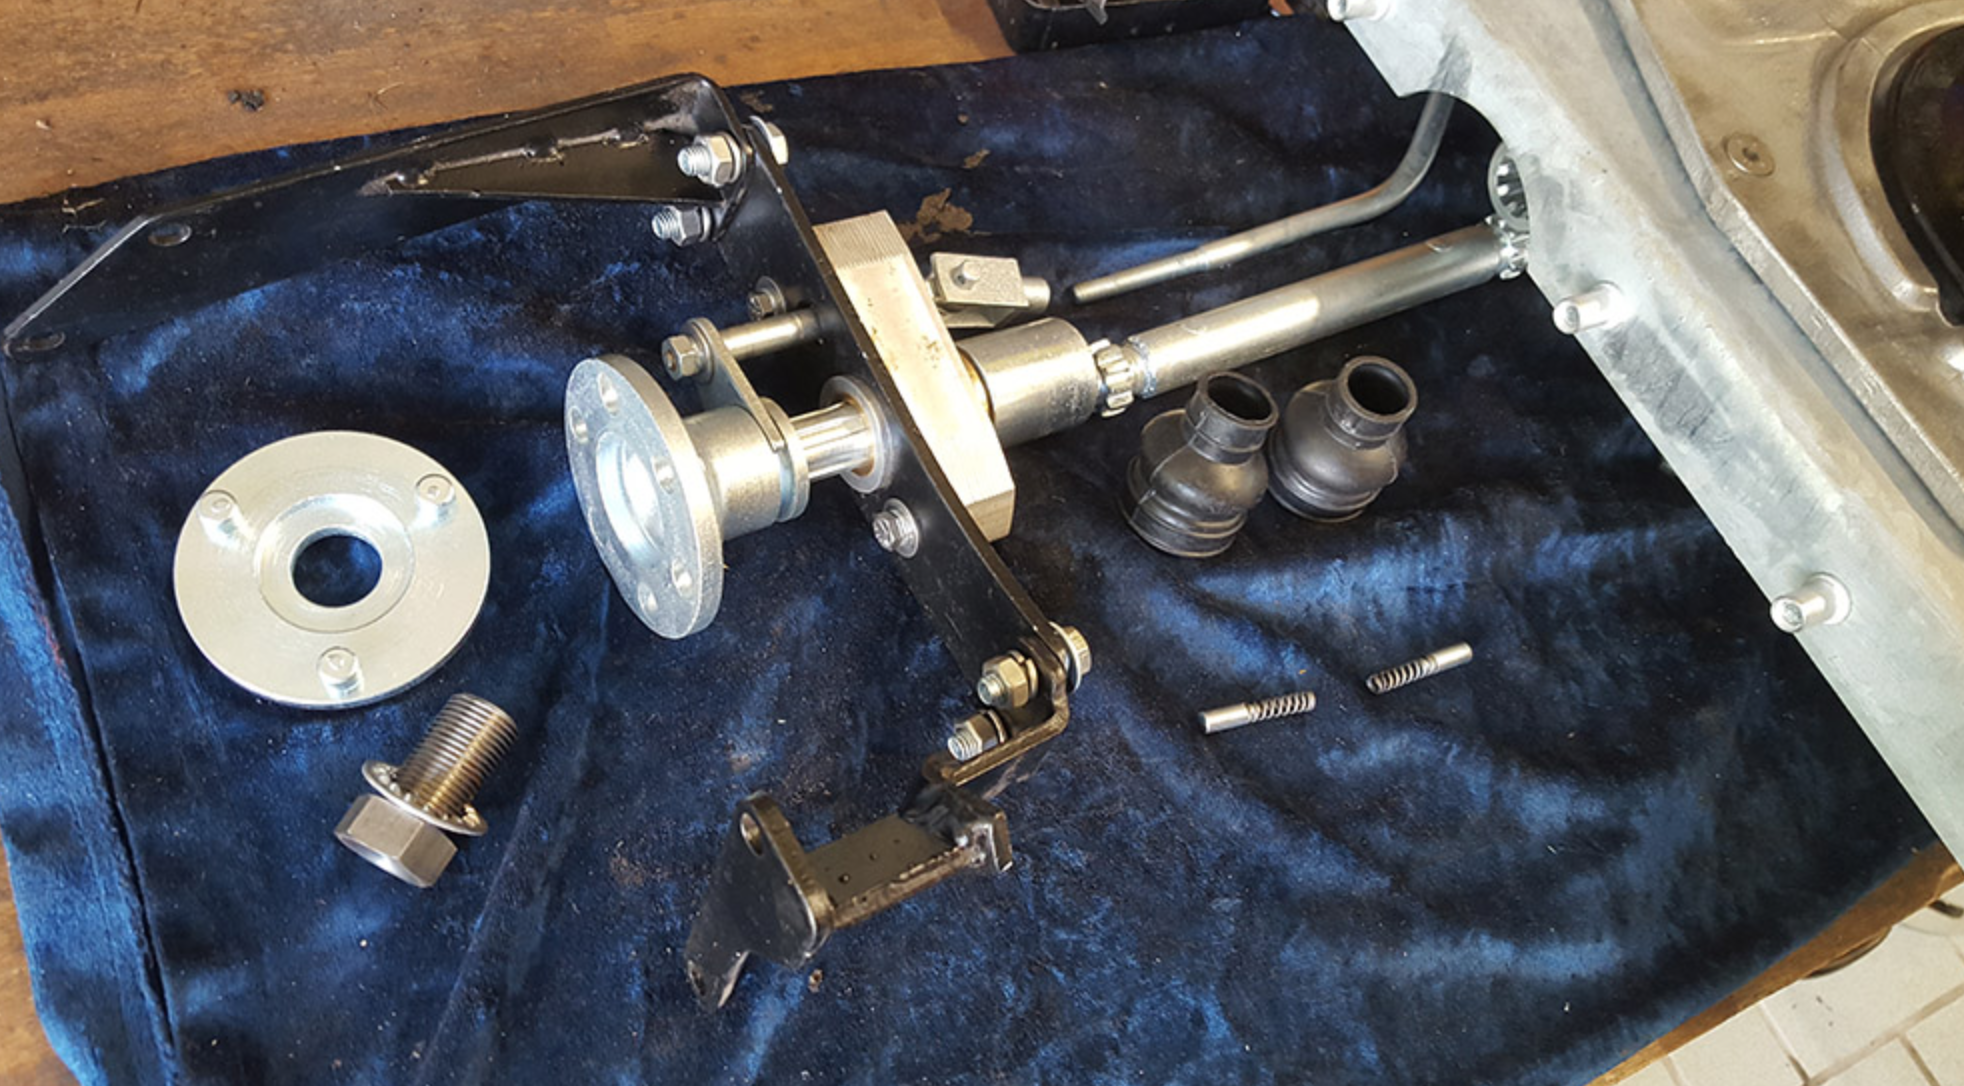
This is the driveshaft and engagement mechanism that allows the capstan to be powered off the front of the vehicle’s engine.
You can still, very occasionally, spot a vehicle equipped with a capstan winch—virtually always a Series Land Rover. If you own a Series Land Rover and have a hankering for a curious and historical piece of very useful equipment, you can still buy one (or parts for one) through sources such as the experts at LR-Winches (where most of these images originated). You can even buy a synthetic rope suitable for a capstan winch, from LR-Bits.co.
But I’d recommend sticking with the manila rope. It’s just . . . friendlier.
For a . . . curious . . . installation of a capstan winch, see here.
Hint: When using “Search,” if nothing comes up, reload the page, this usually works. Also, our “Comment” button is on strike thanks to Squarespace, which is proving to be difficult to use! Please email me with comments!
Overland Tech & Travel brings you in-depth overland equipment tests, reviews, news, travel tips, & stories from the best overlanding experts on the planet. Follow or subscribe (below) to keep up to date.
Have a question for Jonathan? Send him an email [click here].
SUBSCRIBE
CLICK HERE to subscribe to Jonathan’s email list; we send once or twice a month, usually Sunday morning for your weekend reading pleasure.
Overland Tech and Travel is curated by Jonathan Hanson, co-founder and former co-owner of the Overland Expo. Jonathan segued from a misspent youth almost directly into a misspent adulthood, cleverly sidestepping any chance of a normal career track or a secure retirement by becoming a freelance writer, working for Outside, National Geographic Adventure, and nearly two dozen other publications. He co-founded Overland Journal in 2007 and was its executive editor until 2011, when he left and sold his shares in the company. His travels encompass explorations on land and sea on six continents, by foot, bicycle, sea kayak, motorcycle, and four-wheel-drive vehicle. He has published a dozen books, several with his wife, Roseann Hanson, gaining several obscure non-cash awards along the way, and is the co-author of the fourth edition of Tom Sheppard's overlanding bible, the Vehicle-dependent Expedition Guide.


