
Overland Tech and Travel
Advice from the world's
most experienced overlanders
tests, reviews, opinion, and more
Battery welding done right
The magic of battery welding has been known to field mechanics for years now, and one of the most popular classes at the Overland Expo is the hands-on introduction to the skill, taught by experts such as welding wizard Tim Scully. Briefly, by combining several standard automotive batteries in series—that is, positive terminal to negative terminal, in a chain—you create in effect one large 24V (with two batteries) or 36V (three batteries) cell, and this produces enough power to weld a lot of things that can be prone to breaking on vehicles used in rugged conditions: shock and spring mounts, motor mounts, ancillary brackets, roof racks—the list is endless, and full of items that can bring a trip to a sudden halt.
Until now, most impromptu battery welding has been jury rigged with standard jumper cables. While this works, it is far from ideal. Jumper-cable wire is cheap stuff designed for a few second’s starting duty at a time; its coarse strands are inefficient at conducting the power produced by series-connected batteries. And the toothed clamps, although adequate for attaching to battery terminals, are poor for gripping slender welding rods. In addition, you need a way to connect the batteries to each other, which either requires another set (or two) of jumper cables, or yet more jury rigging with your existing battery leads.
All that just ended, thanks to the Trail Weld kit, developed by Tim Scully himself. Tim evaluated the compromises that go into the normal battery-welding setup, and fixed them all.
- The cables are now fine-strand, four-gauge Temco welding wire, with 360-degree crimps on all fittings. A 12-foot length on positive and negative leads allows you to put a safe distance between the batteries and sparks. The flexible cable makes controlling the clamp and rod much easier.
- The positive lead ends in a proper welding-rod clamp, and the negative lead ends in a dedicated ground clamp.
- Two short leads of Temco wire make quick work of connecting batteries, and reduce voltage loss.
- All battery connections are high-quality terminal clamps, greatly enhancing conductivity and thus efficiency.
- All connections are color-coded with heat-shrink wrap.
- A selection of correctly sized welding rods is included in a plastic protective case.
- A pair of self-powered auto-darkening goggles is also included.
- Available containers range from a simple bag to a .50-caliber ammo can to a Pelican Case.
The complete system is so efficient that Tim reports two batteries are sufficient to weld material that requires three if using jumper cables. As he told me, “If you are using three batteries you’d better be welding at least quarter-inch-thick stock.” Since an increasing number of overland vehicles these days are equipped with two batteries, that means you can be completely self-sufficient for field-welding repairs.
For welding amateurs such as myself, the auto-darkening goggles make all the difference when welding with rod, as there’s no pre-positioning the rod at the correct gap and then fumbling with a standard goggle or, worse, a jury-rigged square of welding glass taped to a cardboard face shield, as I’ve always carried. (Of course you’ll still want face, arm, and hand protection.)
For more information, visit the Trail Weld site, here. At the upcoming Overland Expo WEST, Trail Weld kits will be on display during the welding classes, and available for purchase at the 7P booth. Highly recommended.
The ins and outs of airing down
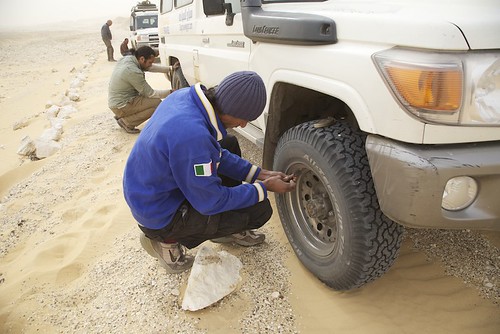
Airing down in Egypt
My early four-wheel-drive experience was strictly trial and error, heavy on the error. A friend owned a beat-up mid-60s FJ40 shod with skinny Armstrong True Tracs and equipped with a Ramsey winch wrapped with a rusty steel cable. We took that thing everywhere, including trails around southern Arizona that I’d later learn were rated 4+ and even 5 on the vehicle-based system. When we got stuck or couldn’t drive up some ledge, which was frequently, we’d simply unspool the winch cable, wrap it around a big rock and hook it to itself (I know, I know), and pull ourselves out. The rocker panels on that poor 40 eventually got battered into gentle arcs (call it a “redneck body lift”). But we had fun and learned a lot—enough that when I got my own, much nicer, FJ40 I was able to keep its rocker panels the way the ARACO body plant meant them to be.
This do-it-yourself approach explains why I came late to the concept of airing down tires on off-pavement trails and four-wheel-drive routes—I simply didn’t hear about it until well into the 1990s, when I began subscribing to magazines that included articles by expedition travelers such as Tom Sheppard. It never would have occurred to me on my own that deliberately letting air out of one’s tires could be a good thing.
Now, of course, the benefits are well-known to anyone who has read anything about overland travel: Reducing tire pressure to suit the conditions allows the tire to more effectively mold itself to the terrain. That increases traction, which reduces wheel spin. That in turn reduces trail damage as well as stress on the vehicle’s drivetrain and wear on the tire itself. In soft sand the enlarged footprint (which comes mostly from lengthening of the tire carcass, rather than widening) provides hugely increased flotation. It’s basically a win-win-win technique, as long as one is circumspect about mixed terrain: You might choose 14 psi for soft sand unless that sand is interspersed with sharp rocks likely to puncture a sidewall (as we encountered in Egypt with the dreaded kharafish—razor-edged lumps of limestone). Airing down even enhances ride comfort on rough roads, as it allows the tire to conform to small obstacles rather than bouncing over them.
If the benefits of airing down are so well-known, why don’t more people practice it? It boils down to two issues: sheer laziness, and lack of proper equipment. And the former is often caused by the latter. If you have to deflate each tire one at a time using the awl on your Swiss Army knife or the button on the back of a tire gauge, and if re-inflation is a 45-minute process tackled with a $29.95 compressor (“with flashlight!”) better suited to blowing up volleyballs, you’re just not likely to do it unless you actually get stuck first.
Since tire failure—whether a simple puncture, losing a bead, or damaging a sidewall—is still the number one cause of vehicle breakdowns, a high-quality compressor should be part of your kit anyway. In fact, after the most basic upgrades on any 4WD vehicle—tires, for example—a proper compressor comes near the top on my list. Maybe even before a fridge.
With a good compressor to handle re-inflation, your next goal is to avoid prolonged genuflecting in front of each tire, letting air hiss out slowly though the valve. There is a dirt-cheap way to accomplish this: Buy a valve-core removal tool. Although it seems drastic, removing the valve core is the absolute quickest way to deflate a tire, yet it’s not so quick as to be difficult to control. Your pressure gauge will still work, and you just need to be ready to reinsert the valve core when the pressure gets close to your target.
The big problem with this technique—besides the fact that it’s a manual, one-at-a-time procedure—is that the tire pressure will do its best to wrest the tiny valve core out of your grasp just as you’re removing (or reinserting) it, and send it flying ten feet over your shoulder. By the time you find it (assuming you can), you’ve got a flat tire.
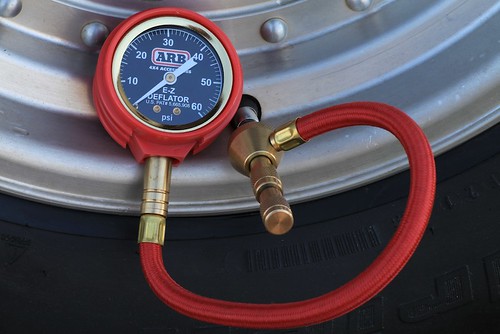
A safer and more stylish approach to the VCR technique can be had with the ARB E-Z Deflator. This tool comprises an elegantly complex brass fitting with a hose and gauge. The fitting screws on to the valve stem, and a separate knob then unscrews the valve core but contains it securely within the mechanism. Pulling back on the collar attached to the air hose and gauge then allows air to escape with a satisfying whoosh. Push back in to stop the flow and check the pressure. It appears to be just as fast as the riskier method—I deflated a 235/85 R16 BFG All-Terrain (my reference tire for the entire test) from 40 psi to 18 in 33 seconds flat.
However fast it is, the ARB still requires full operator attention—which brings us to automatic deflators. While not as quick individually as valve-core removal, you can be doing other things, such as chatting to your friends, getting a snack, or checking the vehicle, while the tool does its work, and if you have multiple deflators the total process can be quicker than the fastest one-at-a-time technique. In fact, with two of the types of deflator reviewed here, you can drive off while they’re attached and working, thus reducing the time stopped to a couple minutes, and pretty much eliminating your last excuse not to do so.
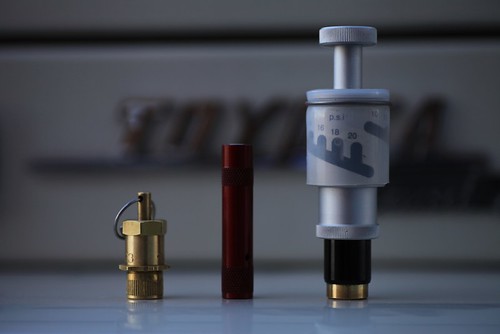
Left to right: Staun II, Trailhead, and CB Developments automatic deflators
The mechanics of an automatic tire deflator are deceptively simple. Essentially the device comprises a plunger with a seal, and a spring calibrated to compress at a certain psi to allow air to flow past the seal and out of the tire. By using a screw-in cap as a base for the spring, its tension can be altered to allow multiple settings in one deflator. The engineering feat is to produce a device that will do this accurately and repeatably over a broad range of pressure.
Coyote Enterprises Staun II $80 (set of four)
Staun is the grandfather of deflators, designed in Australia in 1998. I had one of the early sets, and while they were convenient, I found the target pressure to vary by as much as two or three psi—potentially critical if you’re airing down to the low teens (below one bar) in soft sand. Go too low unintentionally and apply too much welly or steering lock and you can pop the tire bead off the rim. So I was curious to see if the newer style would be more accurate.
The second-generation Staun (made in the U.S., and covered by a lifetime warranty) benefits from a number of modifications. The claimed range is now an astonishing 3 to 50 psi—the original Stauns needed three part numbers to cover this span. Two sets of springs are included to adjust the limits. Also, there is a manual start ring, which among other things allows you to initiate deflation if there is insufficient pressure difference to trigger it otherwise—say, if your tires are at 21 psi and the Stauns are set to 18, or if you want to bump the pressure back down after airing down on a cold morning and driving until the tires warm up (they regain a bit of pressure when hot). The new Stauns also take only two or three turns to lock onto the valve stem. Finally, the maker now sanctions driving off with the Stauns in place and letting them work en route.
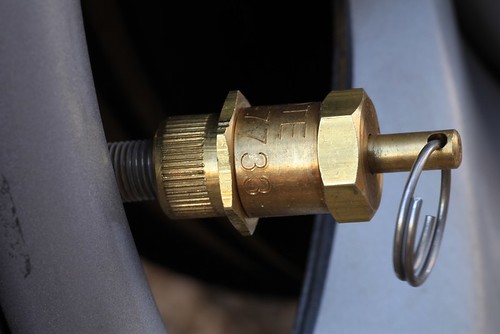
Made of solid and confidence-inspiring brass, the Stauns come with a clear set of calibrating instructions. First, manually deflate a tire to the nominal pressure at which you want to set the Stauns. Turn the hex locking nut and the top of the deflator all the way down (clockwise). Now screw the deflator on the tire until it’s snug, and slowly turn the top of the deflator counterclockwise until air is released. Immediately turn it back clockwise until the air just stops, then turn the lock nut up until it locks the body in place. That’s it. If you prefer different pressures on the front and rear of the vehicle, you can set two to each, and file a notch in the edge of one pair to identify them.
I used 18 psi as my target—it’s a good rough-trail pressure for my FJ40 and many similar-sized vehicles. If you’re quick you can calibrate all four deflators on the reference tire without adding air, but I bumped it back up with the compressor after two (the 235/85s don’t have a lot of volume). With the tire reinflated to 40 psi, I screwed on one of the Stauns and clicked a stopwatch. Three minutes and 19 seconds later, the device snapped closed, and my calibrated gauge confirmed that the shutoff pressure was dead on 18 psi. Reinflating to various pressures and trying the remaining three produced nearly identical results: None was more than a half pound off. Furthermore, with the manual-start ring I found I could initiate deflation even when the tire pressure was only two or three psi higher than the set pressure.
You can estimate a new setting on the Stauns in the field by loosening the lock ring and turning the cap. One turn either direction (clockwise to increase, counterclockwise to decrease) equals “three to four” psi according to the instructions. Mine seemed to do about three per turn, but it’s definitely a rough guide.
Given its accuracy and additional features, the Staun II is clearly a worthy upgrade to the original.
Trailhead $75 (set of four)
Trailhead (originally Oasis) deflators pioneered the “drive-away” function, which made stopping to air down a two-minute procedure. While the Stauns now offer the same capability, I have to admit I was hesitant to do so given their relatively weighty brass construction. Not so with the Trailheads—each slim anodized-aluminum unit weighs barely ten grams, compare to 25 for a Staun.
The procedure for calibrating the Trailhead deflator is a contrast as well. Using the included 5/32 hex key, you unscrew the internal cap until it is perfectly flush with the body. This represents the lower end of the range (5 psi on my 5 to 20 psi model; a 15 to 40 model is also available). From there, each full turn back in supposedly represents an increase of 1.5 psi. To get to my target of 18, I counted up—6.5, 8, 9.5, etc.—until I got to 17, and then added about two-thirds of a turn to estimate 18. I screwed on the deflator and hit the stopwatch, and it shut off just two minutes and 19 seconds later. However, when I checked the pressure in the tire it was at 20 psi. I gave the cap a full turn back out and tried again. This time, after two minutes and 31 seconds, it was within a half pound of 18. I tried the same procedure with the other three units, and each one stopped around two pounds short of the target pressure. So setting the Trailheads precisely required more fiddling. Once finished, however, they remained accurate.
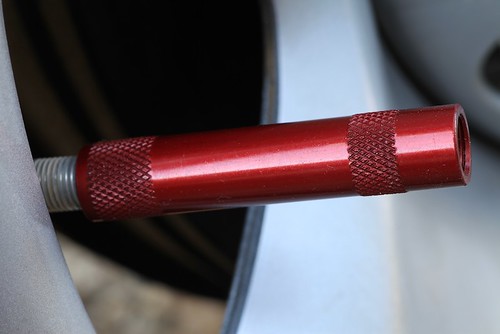
The Trailhead deflators have no manual start function, and the instructions caution that initial tire pressure must be roughly twice the set pressure for them to self-initiate. I found that a bit pessimistic—mine would all initiate at 32 psi when set to 18. But trying again at 30 produced only silence. So if you drive a vehicle that takes that 30 psi on the road, you’ll have to air down to 16 or below for the Trailhead deflators to work.
The Trailheads can be bought in mixed colors —aluminum, red, or blue—making it easy to identify when you set them up differently for front and rear tires. They are made in the U.S. and come in a pouch with instructions, the hex key, a tire gauge, and a handy tire deflation guide.
CB Developments Mil-Spec Tyre Deflation Valve $100 (each)
Compared to the lengthy calibration sequence necessary to set up the Staun and Trailhead products, the procedure for CB deflators couldn’t be more different: There isn’t one. Push and turn the knurled knob so the pin indexes with the target psi on the body of the deflator, and screw the assembly on your valve stem. That’s it. No need to deflate a reference tire, and no need to use math and a wrench if you want to change settings for differing conditions (or different vehicles) in the field—just turn the knob to the new target. I set one of the CB deflators to 18 psi, screwed it on my 40-psi test tire, and just two minutes and 22 seconds later it was finished, beating out both the Staun and, by a slim margin, the Trailhead. Furthermore, every setting I tried, all the way down to 10 psi, was within a half pound of my calibrated gauge. And the deflator would initiate with as little as two pounds of difference between the tire’s pressure and the target. An excellent performance.
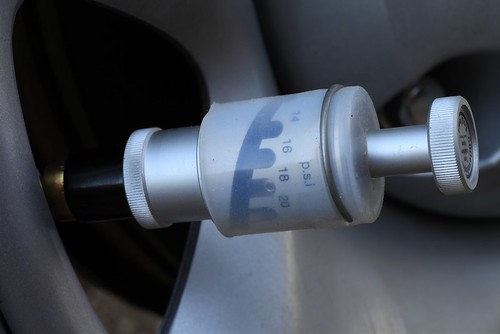
Of course, you pay for that convenience, speed, and accuracy. A single CB deflator costs significantly more than an entire set from Trailhead or Staun. A full set of four would be a frightening chunk of cash. And you cannot drive with the bulky CBs in place, so are tied to the time it takes for however many you own to do their work. The CB deflators also lack the upper range of the Stauns or Trailheads—the highest range model carried by Extreme Outback Products, the U.S. distributor, stops at 20 psi (CB Developments makes another that extends to 24). That means those of you with Sportsmobiles and other heavy rigs, who consider 40 psi to be “aired down,” are out of luck. In fact 20 psi might be marginal for our Tacoma and Four Wheel Camper in anything but soft sand; on the road we keep 50 psi in the rear E-rated BFGs.
Conclusions
All these deflators worked as advertised, and all were very accurate once calibrated. So in a way you can’t go wrong. But in the end I did have preferences.
The Trailhead deflators boast the lowest cost—I’ve seen street prices under $60 for a set—and they were significantly faster than the Stauns. The multi-color option is a nice feature. Their single-hex-key adjustment makes them easier to manipulate than the two-piece adjusters on the Stauns—although as we have seen, the Trailheads take more fiddling to arrive at the target setting. But their biggest drawback is the lack of a manual-start function, and the significant difference in pressure necessary for them to self-initiate. I can recall many situations I’ve been in where they simply would not have worked.
The Staun II deflators run roughly $10 more per set than the Trailheads. However, for that you get a much wider pressure range in one part number, faster calibration, and the ability to initiate deflation with just a few psi difference between the tire and your target. Their sole downside was the slower speed, if the difference between two and a half minutes and three and a quarter minutes is critical to you. I’ll be curious to see how a potential “Trailhead II” deflator responds to the Staun II challenge.
The CB deflators are in a league of their own, in performance, convenience, and price. As long as the psi settings you require lie within the range of the device, there is no easier or more accurate deflator. I keep a pair in my FJ40, and their versatility more than makes up for the fact that I have to deflate tires a pair at a time. If I need to reduce pressure from my nominal 18 to, say, 14, it’s the work of an instant to change the setting—no guesswork needed.
Among the automatic deflators, then, the CB Development Mil-spec product wins if price is no object and the range fits your vehicle. If you baulk at the thought of a $400 set of deflators (or even $200 for a pair), an $80 set of Stauns will serve admirably—and suit a wider range of vehicles to boot.
As to the ARB EZ Deflator, while it is a manual tool, it is in many ways the most versatile of the bunch. If you have a Global Expedition Vehicle* at one end of your garage that you only air down to 55 psi, and a rock buggy with beadlocks at the other end that you take down to four, the ARB is the only tool here that will handle both—and anything in between. At $40 it is the least expensive of all these options. (*That is, ahem, if you didn’t order the GXV’s optional central tire inflation system, which makes this entire article a moot point for you . . .)
Searching for a bottom line, I ran a series of back-to-back double-blind experiments controlled for temperature, humidity, and elevation, and determined that the mean time to stop the truck, deploy a set of Staun deflators, let them finish, and pack them away again is six minutes 37 seconds—which happens to be the exact time it takes to retrieve a cold Coke from the fridge of the JATAC and finish it while sitting in the shade.
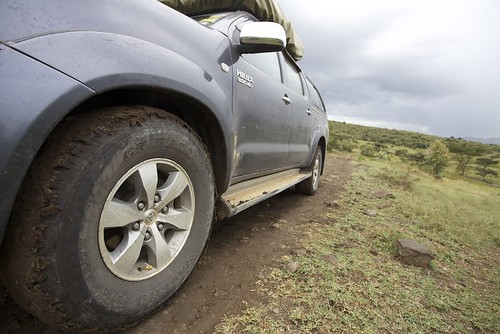
Staun deflators at work in the Rift ValleySource links: ARB, Trailhead, Staun (Coyote Enterprises), CB Developments (Extreme Outback Products)
Irreducible imperfection: the SOL Origin
Manufacturing miniature survival kits must be the closest thing to printing your own money short of selling bottled water. I’ve looked at dozens of them, and rarely found contents worth more than about $2.95—usually some fish hooks and monofilament, a few feet of cheap paracord, matches or friction fire starter, a button compass, and a couple of safety pins. Maybe a tiny mirror for signaling. For a while many of them came with a condom, the stated purpose of which was not to provide safe sex with that drooling grizzly bear loping in your direction, but to carry water. Right.
I’ve recently been evaluating the SOL Origin survival kit, which retails for around $40, and I must say the contents of this kit are a step up from some. In fact, I’d say there’s a good six or seven bucks worth of stuff in here.
SOL stands for Survive Outdoors Longer (as well as the banal double entendre). SOL is a division of the parent company that owns Adventure Medical Kits, which I’ll say up front produces some of the very finest expedition first-aid kits, one of which is standard equipment on all our African projects.
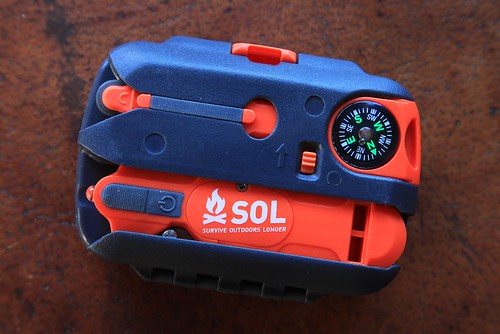
The SOL Origin comprises an ABS plastic case enclosing the following:
- Three square feet of aluminum foil—sorry, heavy-duty aluminum foil according to SOL
- A combination knife, LED flashlight, and whistle
- A liquid-filled button compass
- A “Fire Lite” thumb-wheel fire striker
- Four #10 fish hooks
- Fishing line
- Six feet of .020” stainless-steel wire
- Signal mirror
- Two snap swivels
- Two split-shot line weights
- Four pieces of braided “Tinder Quick”
- Sewing needle
- Ten feet of 150-pound-test braided nylon cord
Okay—maybe I was wrong about the six or seven bucks worth of contents. Let’s make it five.
So, what do we have here? I’ll start with the palm-sized case, which for some strange reason comes with a wrist lanyard, as though that’s how you’d carry it around ready for deployment the instant you felt disoriented. The case is constructed in such a way that the knife/flashlight/whistle, the fire striker, and the button compass slide into slots on the outside. This accomplishes several nifty things at once. It increases the chance one or more of those items (the most critical in the kit) will be damaged or come loose and be lost; it severely reduces the internal volume of the case, rendering it unusable for, say, scooping water out of a crevice or digging; and it makes the device look much more tactical, meaning the maker can charge more than if they gave you a simple metal box that could also be used for cooking or boiling water.
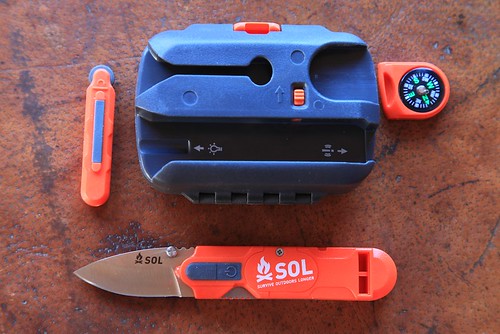 You hope they don't come out of their own volition. The LED bulb is visible at the base of the knife blade; whistle on the other end. Battery compartment is under the "SOL" lettering.
The button compass is simple, well-dampened, and seems to work just fine. Since most people who become lost know more or less in which cardinal direction civilization (or at least the road) lies, it could be a useful tool. There’s a little thumbnail slot in it to facilitate removing it from the case; if this had been pushed through all the way you’d have the option of hanging the compass around your neck on a cord. You could easily drill it out.
The knife blade is 1 3/4 inches long, made from actually-not-bad AUS-8 stainless steel, and is quite sharp. It opens with a right-handed thumb stud, and even locks with a simple Walker liner lock—at least, it’s supposed to. I found that light finger pressure easily overpowered the lock. Best to pretend it’s not there rather than count on it to prevent getting cut. The blade flexes back and forth rather alarmingly on its pivot. The knife would be perfectly functional for gutting a trout or making feather sticks to start a fire, but for anything beyond that—building a shelter, for example—it’s worthless (and I think many so-called survival knives are far too large). The tiny LED flashlight casts a decent keychain-light-level glow and is supposed to shine for 15 hours. There is room in the case for a spare pair of button batteries (which you’d have to buy on your own). But the battery compartment is secured with a tiny Phillips-head screw, so unless you have the means to remove that . . .
The flashlight bulb shines along the axis of the knife, which sort of helps you see what you’re cutting, but it’s not nearly as effective—or as bright—as a separate flashlight would be, even one powered by a single AA battery.
The whistle opposite the knife blade is loud. Just don’t get distracted if you spot a would-be rescuer while whittling a tent peg or something, and stick the wrong end in your mouth.
 Lit - finally - but not much of a flame.
Next is the fire striker, to be used in conjunction with the four, inch-long bits of braided tinder inside, which appear to be infused with paraffin or something similar. Since, in many if not most survival scenarios, fire is your single most vital survival and signaling (not to mention psychological) tool, one would expect care to be taken here. The striker is said to produce up to 5,000 sparks, but—and this is assuming the thing hasn’t come out of its slot and disappeared—the sparks it generates are nothing like the shower produced by a proper ferrocerium stick. I tried it on one of the pieces of tinder, and it took me two minutes of repeated striking to finally get the cord lit, after which it burned with the strength of a large candle for a bit over two minutes, showing very little resistance to the light breeze that was blowing at the time. I literally used up a hundred or more of those 5,000 sparks to light a manufactured bit of tinder. I wouldn’t even try it on natural tinder. Could the cord have dried out during the time this kit sat on a shelf? Not good if so.
Last on the exterior list is the polycarbonate signal mirror, which hinges off the lid and thus at least can’t be lost easily. The aiming hole in the center of the mirror incorporates retro-reflective mesh, a material that allows extremely accurate aiming. The fold-out “survival pamphlet” in the case includes clear instructions on how to use it—which is lucky, because the graphic under the mirror is utterly incomprehensible. Nevertheless, the mirror is adequately sized and bright, protected from scratching, and undoubtedly the best implement in the kit.
 The signal mirror is a good one, but don't try to figure out how to use it from the graphic.
On to the inside contents. First, the “three square feet” of “heavy-duty” aluminum foil. At 5.5 by 11.5 inches, their math is a bit off, at least for the piece in my kit. My arithmetic comes up with slightly less than half a square foot. Second, I’ve encountered heavier foil wrapped around a stick of Juicy Fruit—this piece came pre-holed on one of the folds. Finally, even the makers seem unsure what to do with the stuff. The pamphlet says, under “Improvisation,” that it “can be used as a reflective device for signaling.” Isn’t the mirror better for that? Another suggested use is as “ . . . a head covering when the night comes on cold.” Okaaaay. So I tried it. I felt like a stick of Juicy Fruit.
 The author, contemplating actually facing the wilderness with this stuff.
Onward. Ten feet of braided nylon is perhaps enough to string between two trees to support a poncho or Space Blanket for a shelter. Or you could lash your 1 3/4-inch SOL knife to a stick and go hunting for . . . well . . . chipmunks, perhaps. Or meadowlarks. Twenty feet would have been better, and 20 feet of 550 paracord even better.

Safety pins. Three of them. I want to know: HAS ANYONE IN RECORDED HISTORY EVER NEEDED A SAFETY PIN IN A SURVIVAL SITUATION?
A sewing needle. So you can keep your survival duds neatly mended, or suture the gashes you sustained when that grizzly bear tried to . . . never mind.
Four #10 fish hooks, snap swivels, split shot, and monofilament line. A fine addition to the kit, given the right circumstances of course. In fact, I would have preferred more hooks in different sizes, and more line. The company’s site doesn’t specify the test of the included line, but it appears to be more than adequate for the hook size. It’s up to you to figure out out to crimp the split shot on the line. It’s also up to you to know the proper fisherman’s knot that will secure the slippery monofilament line to the snap swivels; the pamphlet includes none.
Six feet of snare wire (okay, they call it “safety wire,” but the pamphlet suggests using it for snaring). Another fine idea in theory. With a bit of training—and as with the fish hooks, the right habitat—snaring small mammals is a viable survival technique that requires minimal materials and minimal energy expenditure. However, the wire in the SOL Origin was so completely useless for this purpose as to be laughable if the company weren’t touting it as a life-saving device. It was so springy that even after concerted effort I could not straighten it enough to form a stable loop, yet it also kinked horribly. Finally, while holding one end down with a boot and pulling on the other end to try to straighten it, the wire simply snapped at one of the kinks. Not good. Even if the wire were suitable, you need multiple snares to ensure success, and six feet is not enough.
 The worthless- and broken - "safety wire" from the SOL Origin in the middle, with a professionally made wire snare capable of taking small game.
Thankfully, that was the last item in the kit, because by this point I was shaking my head in disbelief that the SOL Origin had ever reached the market in this form.
Let’s stop to postulate here. You’re lost in the wilderness. You have no vehicle, no means of communication. Depending on environmental conditions, the next 48 hours will determine whether you live or die. Do you really want to pin your future on a two-inch knife, a plastic spark generator, and some Reynolds Wrap?
Oddly, the kit’s pamphlet (written by Buck Tilton, who should know what he’s talking about, and who calls this “the best little survival kit in the world”) properly identifies survival priorities: positive attitude, medical care, shelter/fire, signaling, water, and food. The SOL Origin fails to address medical care and water at all (not even a few iodine tablets included), is marginal at best on food (worthless snare wire and adequate fishing supplies), and is poor on fire/shelter (build a lean-to with that knife?). Daytime signaling is the only facet that achieves good marks.
I’d even give it a fail on engendering a positive attitude. Given that up to half or more of your time spent lost is going to be at night, with all the attendant practical and psychological implications, the failure to include a proper flashlight is a strong hint that this kit was designed by a designer, not anyone with experience in survival situations.
I could go on to rant about the pamphlet too, but I won’t. Okay, just one: Water. Buck tells us, among other gems, that “ants” mean water is not too far away. I can show Buck lots of ants that don’t live within 50 miles of water. Also, “Birds, especially grain-eating birds, fly to water at dawn and dusk.” Buck, the operative word there is “fly.” And finally he repeats the old saw about “digging at the bends of dry washes.” The only thing you’ll wind up with eleven months of the year if you try that where I live is a pre-excavated grave.
The concept of a palm-sized survival kit is interesting, and I suppose one could argue that the SOL kit is better than nothing at all. But it would be absurdly easy to put together a kit taking up little if any more space, which would be infinitely more useful for saving your life. Yes, it would cost more—if you don’t think your life is worth more than a nice lunch out, I have an SOL Origin I’ll part with for a pittance. As it is, if I somehow found myself caught out with this thing in a survival situation, my first thought would be:
Man, I am SOL.
 Unfortunately, Buck won't be there when you need him.
The one-case tool kit, part 1
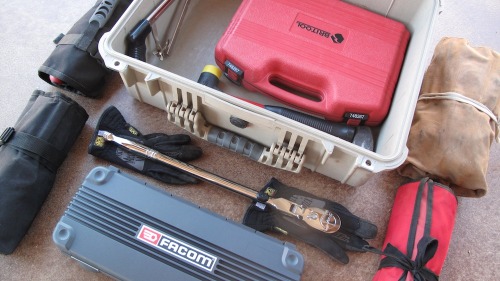
It would be pretty easy to bring along all the tools you’re likely to need on even an extended overlanding trip, covering virtually any repair not involving a new long block. What’s that? Oh—you also want room for, like, food? And maybe a tent and sleeping bags? Hmm . . . now that’s a problem.
The size of tool kit you carry (or should carry) is subject to a bunch of variables. The length of the trip and the remoteness of the route are two obvious considerations. The age of the vehicle is certainly a factor—even reliable vehicles need more attention as they get older. If you can just go out and write a check for a new Land Cruiser every time you leave on a major trip, your need for tools should be minimal. On the other hand there are people like, well, Roseann and me. A brief survey and some arithmetic established that the average age of all the four- and two-wheeled vehicles currently in our fleet—1970 Triumph Trophy, 1973 FJ40, 1974 Series III 88, 1981 BMW R80 G/S, 1982 Porsche 911SC, 1985 Mercedes 300D, and a practically spanking-new 1987 Honda NX250—is 33 years. All solid vehicles, but inevitably in need of attention now and then, especially the . . . (Ha! you were ready for a facile brand quip here, right? Not this time.)

You might think, if you’re utterly mechanically ignorant, that it makes no sense to waste money and space on tools you don’t know how to use anyway. Au contraire—if something goes wrong and you need the assistance of strangers, the least you can offer them is the tools to render that assistance. At a minimum, even on a brand-new Land Cruiser you should carry enough to make what I call generically “rubber repairs,” involving the replacement of pliable things such as fan and serpentine belts, and radiator and heater hoses. These are items that can fail or be damaged even on a new vehicle. A set of standard and Phillips-head screwdrivers, a socket and ratchet set, and a set of combination wrenches will suffice to start (note that for our purposes I consider tire-repair tools a separate subject). But if you want to cover more than first base, you'll need a few additional items.
Okay, so you’re going to buy some tools. You take a look around the web and find, for example, one set of metric combination open/box-end wrenches, from 10mm to 19mm, for $14.95, and another set of the exact same number and size wrenches, from a different manufacturer, for $298 (I am not making up these prices). You’d be forgiven if your brain texts to itself, WTF? We’re not talking about the difference in value between a Corvette and a Carrera here—this is more like Tata Nano versus Aston Martin Vantage. At least with the cars it’s easy to spot a few differences besides the fact that they’re both designed to go from point A to point B. The wrenches don’t even have any moving parts, and appear more or less identical. What gives?
Three factors contribute to the discrepancy: quality, reputation, and pure status.
Quality on even something as simple as a wrench can vary tremendously. Consider what goes into its manufacture:
- What is the alloy used in the steel—plain carbon? Chrome molybdenum? Chrome vanadium?
- How is the tool formed—is it machined, cast, or drop-forged? Drop-forging helps align the internal grain in the steel, increasing strength.
- How is it finished? If chromed to resist corrosion and dirt, what process was used?
- How precise are the tolerances? This is a critical factor in how well the wrench performs—sloppy tolerances increase the chances the wrench will strip a tight bolt or nut.
- Does the box end of the wrench employ the superior “Flank Drive” system pioneered by Snap-on and now copied everywhere? Look for rounded rather than sharp teeth; these bear on the stronger flats of the nut rather than the corners. (The Flank Drive Plus system on new Snap-on wrenches adds the same capability to the open end of the wrench via grooves on the flats. This has been copied by other makers as well.)
- What about ergonomics? Is the wrench long enough to provide adequate leverage (unless it's a shorty designed to fit in tight spaces)? Fully chromed and polished tools don't just look nice and resist corrosion; they're easier to keep clean as well.
- Finally, how socially responsible is the tool? Was environmental protection a factor in the mine-to-maker-to-consumer chain? Do workers in that chain earn a fair wage?
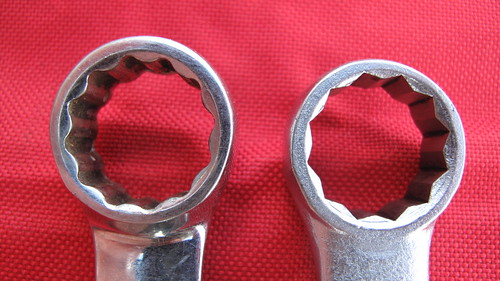 Flank Drive wrench head on the left, standard head on the right
It’s nearly impossible for a consumer to evaluate many of these parameters accurately. A tool marked “drop-forged” could be forged to low tolerances with poor-quality steel. One has to wonder if the wrenches in that $14.95 set were made by a laborer in his or her 60th hour of work that week, and if the smelter or factory do anything to reduce their emissions. It’s sheer common sense that for ten wrenches to be produced in Asia, shipped across the Pacific Ocean, trucked to a Harbor Freight store in Topeka, and sold at a profit for 15 bucks, something along the line had to give: quality, ethics, or both.
That’s where reputation figures into the equation. Although it’s not a guarantee, buying tools from manufacturers with solid reputations for quality at least makes it far more likely you’ll be getting a good product either produced in the U.S. or under decent conditions elsewhere. I’m referring here to such makers as Sears Craftsman, Kobalt, Proto, S-K, and Husky. A set of wrenches from those makers will cost more than $14.95, but it’s very probable the extra expense will be worth it on several levels.
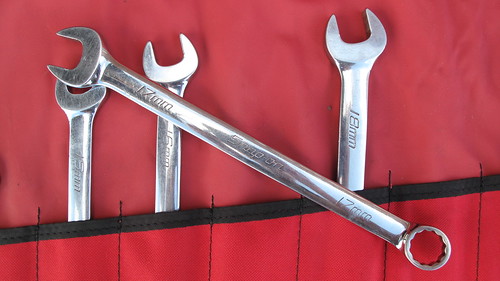
Finally, there’s status. The “boutique” tool makers such as Snap-on (the producer of that $298 set of wrenches), and to a lesser extent Mac and Matco, have transcended reputation and moved on to the level of status symbol. There’s little doubt that that set of Snap-on wrenches (which are, just to be clear, certainly the best on the market) could be duplicated in every detail and sold for much less, but the Snap-on (or Mac or Matco) label adds a premium eagerly paid by both professional mechanics and well-to-do (or savvy, see below) amateurs. The reason is that, tool snobbery aside, these companies have stayed at the very forefront of tool development and quality. If you pay the premium prices for tools from these manufacturers, you can be absolutely certain you're getting the best tools with the most advanced features.
What to buy then? I’ll continue to repeat it for as long as it takes to make it into one of those 1001 Famous Quotes books: If you’ve brought out the tools, something has already gone wrong. Why risk compounding the situation by using cheap tools to try to fix it? I recently read an article on bush repairs in a respected Australian four-wheel-drive magazine, in which the writer opined, “Your tools don’t have to be good, just good enough.” And how, exactly, do you identify that fine line of “good enough” except when one breaks at the worst possible time and you’re left holding a handle and thinking, Hmm . . . not good enough.
So, fine—just go stop a Snap-on truck, hand the driver your AmEx card, and say, “Tool me.” Except that very few of us can afford that option. Instead, I suggest prioritizing.
The most critical component of an automotive tool kit is the ratchet and socket set. This is what you’ll be using for any serious repairs, and its various pieces are the most susceptible to poor quality control. The ratchet head encloses a lot of very small parts that can be put under enormous strain. It’s easy to make a strong ratchet head with a coarse (i.e. 24 or 36) tooth count, but such ratchets need to be turned many degrees to engage the next tooth—a real issue in tight spaces. The best ratchets these days have 72, 80, even 84-tooth heads, yet are immensely strong. The sockets themselves need to be as thin-walled as possible to fit over nuts in tight spots, yet stout enough not to split. That mandates the very best steel and the tightest tolerances.
If you’re putting together a complete tool kit, you’ll probably want one socket set in 3/8ths-inch drive, and another in 1/2-inch drive. The 3/8ths set is for general use; when something big needs fixing or replacing the 1/2-inch stuff will come out, so that’s the most critical in terms of quality.
Next are the wrenches, which do many of the same tasks as sockets but have the advantage of no moving parts. Nevertheless, quality is key—in many situations you’ll need a socket on one side of a fastener and a wrench on the other. I’ve only broken one wrench in my life, but I’ve used many that fit poorly.
So my advice is to spend until it hurts on your ratchet/socket sets, a bit less so on the wrenches. Next on my list would be a really good set of screwdrivers. After that, you can economize on many pieces with little risk of failure in the field.
A good place to compare quality in one spot is a Sears store. Take a look at ratchets. Their new, green-handled Evolv series (what’s with the cute missing “e” anyway?) represents the price-leader, and it shows. Pass. Move up to the standard Craftsman stuff—non-polished, coarse tooth count, but smoother. Now look at the fully-polished, thin-profile handles. Nicer and more comfortable, easier to keep clean, although the tooth count still feels fairly low. Finally, look at one of the Premium Grade products: Sealed head to keep out grime, industry-leading 84-tooth ratcheting mechanism that goes snicksnicksnick instead of click click click. My only complaints are the lack of a socket-release button, and the fact that the feel of several I tried seemed to vary slightly, as though manufacturing consistency wasn’t quite spot-on.
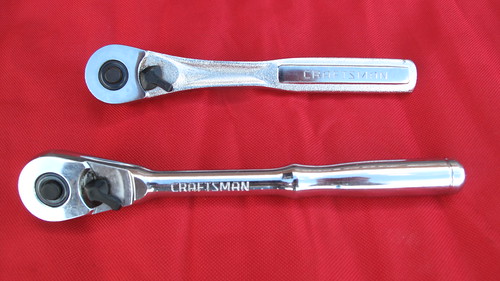 Standard Craftsman ratchet, top, fully polished, bottom. Both unfortunately have plastic selector levers, but are solid tools. The standard ratchet is now made in China.
For several decades I relied on Craftsman ratchets and wrenches, with only a scant few split sockets to their discredit during field repairs (replaced with no questions asked at Sears . . . after I got home of course). Recently I decided to up the ante. I started haunting eBay, looking at Snap-on socket and wrench sets. There were a few decent deals, but nothing spectacular—until I realized that the sets on offer that were missing a piece or two went for much less than the complete sets. Soon I snagged a lot of current-production 1/2-inch sockets, from 12mm all the way up to a giant 36mm, missing only a 19mm, which I quickly added on an individual auction. Same thing with a wrench set from 6mm to 30mm, missing the 14 and 17, again easily replaced.
My one retail splurge was the 1/2-inch ratchet handle. I consider this the single most critical tool in my kit. If I break out the 1/2-inch sockets, it’s usually because something significant has gone wrong with either my own vehicle or someone else’s. And if your ratchet handle breaks removing the 21mm bolts from a transmission bell housing, you can bet you won’t be getting them off with a pair of Vise-grips. So I went to the Snap-on website and plunked down $164.95 for part number SF80A: an 18-inch-long, flex-handle ratchet with a Swiss-watch-smooth 80-tooth mechanism—astonishing on a ratchet with a foot and a half of leverage, but Snap-on uses the same head on a 24-inch handle, so they obviously have confidence in it. The locking flex head gives this ratchet great flexibility, the length makes it an effective breaker bar for the tightest bolts, and the fine-toothed mechanism requires only 4.5 degrees of swing to engage the next tooth, a boon in restricted quarters. Every time I use it I’m impressed, and swear it makes me a better mechanic than I really am. It certainly makes me look like a better mechanic than I am.
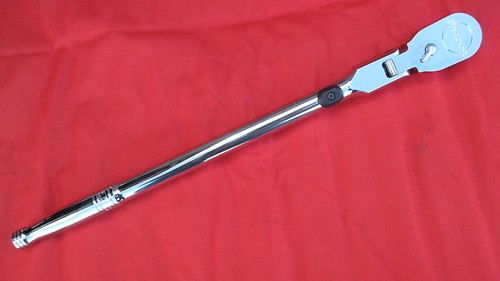 Worth every penny: The Snap-on SF80A 1/2-inch ratchet.
With these two fine sets in hand, I began contemplating my entire traveling tool kit. Specifically, I started musing on a question that had been at the back of my mind for some time: Would it be possible to assemble a high-quality tool kit that could handle virtually any field repair up to and including such things as clutch or differential replacement, suspension work, hub disassembly, or cylinder-head removal—in other words, the types of repairs one might expect on an extended overland trip in remote areas—yet still fit inside one manageable case?
Interesting idea. Time to look at some Pelican cases.
Next: a compact, high-quality 3/8ths-inch socket set. Read part 2 HERE.
Mistaken mystique: myths of tire repair
 Despite significant advances in technology and huge reductions in the frequency of failure (certain infamous Firestone models excepted), tires remain the number one cause of vehicle trouble, whether you’re driving your minivan to Disneyland or a Defender to Dodoma.
The minivan can get by with a single spare tire. For an expedition vehicle you need to think a little more comprehensively. A second spare is a good start, but the very best strategy is to combine that with the means to accomplish your own tire repairs. Fortunately there are many products available to make the job easier, if not always effortless.
A surprising number of the Land Cruisers Roseann and I see and use in Tanzania and Kenya still ride on stout, tube-type, 10-ply-rated bias-ply tires mounted on split rims (or, more properly, retaining-ring or locking-ring rims). I even ran this type of rim (with BFG All-Terrains) on my FJ40 for several years while guiding in Mexico. Such rims can be disassembled with hand tools to remove the tire and tube, but I found I experienced more flats with tubes, and the process to repair a simple puncture involved the same complete disassembly of the rim as a major sidewall split. I got really good at it, but it was still a pain, and the romance of having clients marvel at the procedure soon wore off.
Given todays’ availability of high-quality compressors, comprehensive tire-plug repair kits, and, for extensive sidewall repairs, various bead-breaking tools, there’s really no reason any more to use tubes or locking-rim wheels. Most simple punctures can be repaired with a plug while the wheel is still on the vehicle—I’ve repaired such holes before the tire had a chance to completely deflate.
It’s easy to become proficient at plug repairs with just a practice session or two, and that skill will handle probably 90 percent of tire problems you’ll encounter. But when presented with a tire that has popped its bead off the rim, or a serious sidewall split that demands repair from inside the tire carcass, most of us still become gripped with angst. Doesn’t reseating a bead involve flammable liquids and YouTube-prone explosive effects, or at the very least an air compressor or tank capable of producing a really big volume of air? Hundreds of posts on dozens of forums will tell you so. Even a video I recently watched from someone who should know better reinforced the idea that you need a big compressor and/or air reservoir to successfully reseat the bead on a tire.
The truth is, it just ain’t so. To prove it, I once reseated the bead on a 255/85 R16 tire using an Extreme Outback ExpeditionAire compressor, a clever product that employs a pair of toy-like AtomAire pumps each capable of no more than .9 cfm (cubic feet per minute) flow. Doing the same with any decent compressor is easy (although I won’t vouch for the $29.99 Costco variety).
 Any quality compressor, such as this Quick Air X (sadly no longer available), is capable of reseating tire beads
Let’s imagine you’ve put a nice two-inch split in the outboard sidewall of a tire, but it’s still seated firmly on the rim. You need to get behind the split to apply a patch, which means you need to pop the bead off the rim first, then pry the edge of the tire off the rim. This is also a procedure viewed as black magic by many, but it’s easily done. (Before you attempt any of the following, don a pair of gloves and eye protection.) The most elegant way I’ve found is with a set of Tyrepliers, which comprise a lever system that angles between the bead and rim and pries the former off the latter with little fuss. The next most elegant way is with a product called a Beadbuster, a plate incorporating a curved spade that bolts to the bottom of a Hi-Lift jack. To use it, you place your tire and rim under the bumper of your vehicle, position the jack with the curved spade next to the rim against the bead, and use the jack with pressure against the bumper to force the bead downward and off.
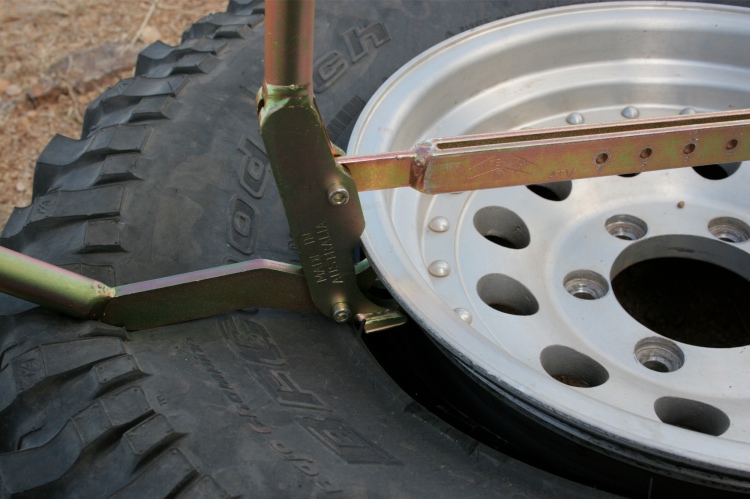 These Tyrepliers, from Australia, make quick and elegant work of breaking a bead
Failing either of these accessories, the base of the Hi-Lift by itself will do the same thing; it just puts a bit more stress on the tire’s sidewall than you do with the Beadbuster. In fact, people have unseated beads by simply driving over the edge of the tire with another vehicle. Whatever technique you use, be sure to mark the tire and rim first so you can reposition the tire in the same place, preserving the balance. (If you’ve popped off both beads through overzealous hooning this obviously won’t be possible.)
Once the outside bead has popped off, it’s much easier to get the inside bead off. You’ll want to do this so you can position the inside bead in the center groove of the wheel. With that done, a pair of tire irons will enable you to pry the outside bead over the edge of the rim, at which point you can patch the split by reaching inside (taking the tire completely off the rim is possible, but much more difficult and rarely necessary).
 The Beadbuster works in conjunction with a Hi-Lift jack
Once you’ve applied the patch and pushed the bead back over the edge of the wheel, it’s time to reseat the beads (if you’ve just popped one off while driving you’ll begin here). First, remove the valve core—once you’ve seated the tire you’ll re-install the core to completely inflate the tire.
Virtually all experts recommend running a ratchet strap around the circumference of the tire and cranking it tight. The theory is that this pushes the beads out against the rim to assist sealing. But when I compared the ratchet technique with using nothing at all during the course of mounting eight BFG tires on four Land Cruiser and four Land Rover steel rims, I could detect no difference whatsoever in effectiveness. If anything, I found it easier to position the tire correctly without the strap. Your results might vary (and if your wheels are too wide for your tires it could help), but I’ve stopped bothering with the strap.
Now comes the important part. Stand the tire and wheel upright so you can inspect both the inside and outside of the rim. You want the wheel centered as perfectly as possible inside the tire, so the gap between the edge of the rim and the tire is as even as possible all the way around, on both the inside and outside of the rim. If the rim sits cockeyed so that one edge is right against the tire and there’s a big gap opposite, it won’t matter how big a compressor you have; the air will simply escape.
Next, you’ll want some sort of liquid to lubricate the tire so it can pop over the rim’s grooves more easily. The very best is water mixed with some liquid soap or detergent, but plain water will do in a pinch (so will, my nephew reports, Keystone Light beer, which is certainly the best use to which you could possibly put that stuff). A squirt bottle makes it easy to wet the entire circumference on both sides, but just splashing it on works too. Be generous with the solution. Especially if it's the "beer." Next time bring liquid soap and better beer.
Connect your compressor’s chuck to the valve. The clamp-on style makes things easier, but it’s not mandatory. Get the air going in, and watch both sides of the tire. The soap solution will help locate any bad gaps; if you see one and the tire refuses to expand, stop and realign the rim. If you have everything right, though, you’ll see the tire start to expand outward on both sides. It won’t happen symmetrically, but as long as there’s a seal it won’t matter. One bead will snap on first—it almost always seems to be the outside one for me, but that might just be happenstance. In any case, you won’t miss it happening—it can make an alarmingly loud pop. As soon as the second bead pops on, remove the compressor. Air will come rushing back out through the coreless valve, but that’s of no consequence—the beads won’t come back off once they’re on.
Reinstall the valve core, inflate to normal pressure, and you’re finished. No fuss, no big compressor or air tank needed—and no YouTube-prone pyrotechnics.
If you’d like some excellent hands-on instruction in all facets of tire repair, sign up for the two-hour tire-repair class at the Overland Expo. Adventure motorcycle attendees will find equivalent classes from the qualified folks at RawHyde Adventures.
Touring tip: When it's tool time on the road
 Published with the permission of RoadRUNNER Motorcycle Touring & Travel Magazine for Overland Tech & Travel / Overland Expo only. Not for sale or distribution.
 If you’re like most adventure motorcyclists, you don’t want any type of mechanical problem to deal with during a motorcycle tour. And, of course, the best way to keep that from happening is a heavy dose of preventative medicine before your bike ever leaves the garage. But unforeseen mechanical malfunctions can and do happen out on the road. So, taking selected tools with you and knowing how to use them are sensible precautions for any touring rider.
Key Assumptions: If you ask 10 different riders for their list of necessary tools to have along, you may get 10 different lists. That’s probably because of the assumptions each person is making in several key areas:
- Length of Trip: The longer you expect to be on the road the more likely it is that something on the bike will need repair. If your trip involves going around the globe, then many more tools and spare parts will be needed than for a weekend jaunt to the mountains.
- Type of Bike & Riding: All other things being equal, dual-sport riding and adventure touring are more likely to result in something coming loose or a bike going down than while street riding.
- Riding Environment: Riding in remote locations usually requires riders to be more self-reliant in fixing whatever needs repairing.
- Number of Riders in the Group: The solitary rider must carry all of the tools and spare parts he or she might need. In group riding situations the load can be spread amongst the riders.
- Mechanical Expertise of Rider(s): There’s no point in carrying a lot of tools and spare parts if you don’t know how to use them to make the repairs. Riders traveling long distances in remote areas, however, should have the requisite mechanical expertise and equipment to repair most any type of mechanical malfunction.
 Published with the permission of RoadRUNNER Motorcycle Touring & Travel Magazine for Overland Tech & Travel / Overland Expo only. Not for sale or distribution.
 If you’re like most adventure motorcyclists, you don’t want any type of mechanical problem to deal with during a motorcycle tour. And, of course, the best way to keep that from happening is a heavy dose of preventative medicine before your bike ever leaves the garage. But unforeseen mechanical malfunctions can and do happen out on the road. So, taking selected tools with you and knowing how to use them are sensible precautions for any touring rider.
Key Assumptions: If you ask 10 different riders for their list of necessary tools to have along, you may get 10 different lists. That’s probably because of the assumptions each person is making in several key areas:
- Length of Trip: The longer you expect to be on the road the more likely it is that something on the bike will need repair. If your trip involves going around the globe, then many more tools and spare parts will be needed than for a weekend jaunt to the mountains.
- Type of Bike & Riding: All other things being equal, dual-sport riding and adventure touring are more likely to result in something coming loose or a bike going down than while street riding.
- Riding Environment: Riding in remote locations usually requires riders to be more self-reliant in fixing whatever needs repairing.
- Number of Riders in the Group: The solitary rider must carry all of the tools and spare parts he or she might need. In group riding situations the load can be spread amongst the riders.
- Mechanical Expertise of Rider(s): There’s no point in carrying a lot of tools and spare parts if you don’t know how to use them to make the repairs. Riders traveling long distances in remote areas, however, should have the requisite mechanical expertise and equipment to repair most any type of mechanical malfunction.
Most Common Malfunctions on the Road
It behooves all riders to have the necessary tools and skills to fix the motorcycle malfunctions that are most likely to occur on tour:
- Flat Tire: For tubeless tires, there are a number of kits available in the marketplace that enable riders to perform a temporary repair, without removing the tire from the bike. Besides the CO2 cartridges that come with these kits, it’s a good idea to have a small compressor to ensure that the re-inflated tire has sufficient pressure for safe riding. (You’ll need a tire pressure gauge to know for sure.) However, riders should have a professional technician repair or replace the tire as soon as possible.
For tube-type tires, the repair process is more involved and requires more tools. (Helpful hint: Even if a tire is marked “tubeless” on the outside, if it’s mounted on a spoke wheel, a tube will be required on the inside.) The wheel and tire must be removed from the bike, so the necessary wrenches should be on board for both the front and rear axles. Tire irons and a bead buster will be needed to remove the tube for repair or replacement.
- Electrical Malfunction: The most common types of electrical problems are blown fuses and burned out light bulbs. So, it’s important to know where the fuses are located on the bike and to have spares with the correct wattage. Also, it’s a good idea to carry extra bulbs for the headlight, taillight and turn signals, and to have the correct tools and expertise to replace them.
- Broken Cable(s) and Levers(s): Broken cables are a potential issue only on bikes with a manual clutch (i.e., non-hydraulic) or drum brakes. In these situations, carry an extra cable(s) already zip-tied in place with the one in use. This will dramatically reduce repair time if a cable breaks.
A broken clutch or brake lever, usually caused by a fall, can be a big problem on the road. Although the risk of a broken brake lever is somewhat hedged by the fact that there are two of them, there is only one clutch lever and it’s pretty hard to ride a motorcycle without the benefit of a clutch. Consequently, taking extra levers is a good insurance policy.
- Fouled Spark Plug(s): It’s always a good idea to have extra spark plugs, which have been pre-gapped, along on your trips. They don’t take up much space and can make the difference of whether you're stranded or not. Obviously, the proper wrenches will be needed to replace them.
- Low Motor Oil: If your bike has a history of using oil, it makes a lot of sense to take along a quart of motorcycle oil, which might otherwise be difficult to find on a Sunday, Monday or Holiday.
- Broken Bodywork: Sometimes a spill can leave cracked and loose body parts, which can make the motorcycle unsafe to ride. A roll of duct tape can often do wonders in these situations.
The above list is not an exhaustive one, but it does represent the type of malfunctions that could occur on a trip of several weeks.
 Customizing Your Toolkit
Unfortunately, the tool kits that come with bikes are often of inferior quality. You don’t want a wrench breaking or rounding off a nut when you’re relying on it to get you out of a predicament. Consequently, I’m an advocate of building a customized toolkit that’s designed around the type of repairs you may have to perform on the road. Based on the key assumptions about your touring plans and the types of repairs that are likely to occur, acquire the specific, high quality sockets, ratchets, screwdrivers and other wrenches that are needed to perform these tasks. It’s OK to use items from the manufacturers toolkit if they’re of sufficient quality. To make sure you have what’s needed, use your tool kit while still at home to remove the wheels, change a spark plug, replace a light bulb, etc.
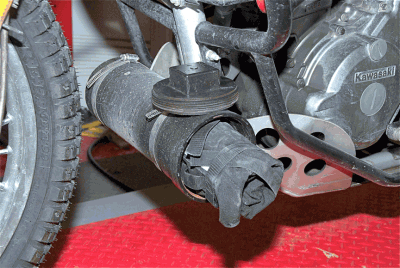
I found that the customized tool kit for my dual-sport bike would no longer fit under the seat, so I fashioned a separate container out of PVC pipe and mounted it on the skid plate. So far I’ve been able to make any needed repairs on the road - but the best tools to have along are still a cell phone and a credit card.
Published with the permission of RoadRUNNER Motorcycle Touring & Travel Magazine for Overland Tech & Travel / Overland Expo only. Not for sale or distribution.
FI-PIG, Gorilla Tape, and WD-40: Essential fix-it stuff
 I would like an expert opinion about assembling a selection of adhesives, chemicals, and other products most useful for overland vehicle field repair issues such as cracked hoses, radiators, or fuel lines, and for replacing gaskets, joining metal or plastic pieces, sealing electrical repairs, and so on.
Alexander in Florida
Alexander’s question brought to mind the old aphorism about the perfect two-piece tool kit: WD-40 (to fix the things that are supposed to move but won’t) and duct tape (to fix the things that aren’t supposed to move but do). Kidding aside, it’s an excellent question—a very large number of field repairs involve some sort of leak or breakage that requires a chemical or mechanical fix. I looked in my own kit, enlisted the help of two of our OT&T experts—Duncan Barbour and Graham Jackson—and also queried my nephew, Jake Beggy, a master Toyota mechanic and fabricator. Here’s what we came up with, first in the way of commercial products and then in “bodge” fixes when nothing else is available.

Gary Haynes repairing a door stop on a Land Rover Defender 110. South Rift, Kenya. Note two essential lubricants at hand: WD-40 and bourbon.
Toyota FIPG
 No matter what brand of vehicle you drive, Toyota’s FIPG (Form In Place Gasket) sealant/glue—which Toyota mechanics refer to as “FI-PIG,” is markedly superior in adhesion, sealing, and durability to the generic silicone RTV gasket sealant found in most hardware and auto supply stores. It comes in two colors: black, used to seal parts that will come in contact with oil or water, and a thicker red formula specifically designed for applications involving gear oil—transmissions, transfer cases, and differentials. The black stuff is the general-purpose tube to carry for most field repairs. It dries to a tough, rubberlike consistency and so can be used for about a zillion fixes besides vehicle problems. However, once the Toyota parts man tells you the price, you probably won’t think about using it to repair your Hi-Tecs.
AlumAseal radiator sealant
Available in a mess-proof powder form, AlumAseal will effectively squelch any but the most grievous radiator or heater core leak. It’s compatible with all types of antifreeze and any radiator material. Duncan mentions Bar’s Leaks as an equivalent.
Rescue Tape self-fusing silicone tape
There are other self-fusing silicone tapes on the market; this brand just happens to be the one I carry. I’ve used it once to repair a split radiator hose and it worked brilliantly. I’ve heard of it being used to seal high-pressure air lines and even fuel lines as well. It only sticks to itself, thus getting it off to effect a proper repair back home is no trouble. I know of someone who completely mummified a distributor in it for a (successful) deep-water crossing.
Two-part epoxy
It’s easy to forget just how strong two-part epoxy can be. Graham once epoxied a nut to the stripped head of a stuck timing cover bolt and was then able to remove it. He also used it to repair a stripped hole for an oil pump bolt, by filling the hole with epoxy, then drilling and tapping it once cured. Graham and Duncan both mentioned fuel tank repairs with epoxy; Duncan specified that by first plugging the leak with bar soap you can then clean the area and apply epoxy to further seal and reinforce it.
J-B Weld
Sort of a three-dimensional epoxy, since it can be built up to cover frighteningly large holes in things that shouldn’t have holes in them. I actually have sort of a love/hate relationship with it. Why? Because it’s so effective it seems to be the material of choice for unscrupulous people attempting to unload vehicles with serious problems. I’ve read account after account of victims finding cracked engine blocks sealed with it, oil leaks covered up with blobs of it, and worse. Nevertheless, such stories perversely confirm the versatility of the product. The standard formula is the strongest, but takes up to 24 hours to cure. The quick-set version is nearly as good.
Gasket material
There are all sorts of acceptable substitutes for gaskets, but why not have a sheet or two of the proper item? The thin cardboard material is good for many applications; I also carry one of slightly thicker reinforced material, and one of thin rubber sheeting.
Yes, there is a difference in duct tape. This stuff beats “Duck” tape and all the generic gaffer tapes by a mile. Yet it’s still easy to tear by hand or teeth—as it should be when you’re single-handedly attempting to secure the cracked center ferrule of a sea kayak paddle while bouncing around in the middle of the Gulf of California. True story.
Cable ties
Yes, believe it or not, there are also differences in cable ties or “zip ties.” You want the kind with a metal, rather than plastic, locking tab. The Ty-Rap ties from Thomas and Betts are arguably the best. The little ones secure wiring, medium sizes are good for fuel and air lines, and the really big ones will lock down just about anything, with a tensile strength of up to 175 pounds each. T&B also offers heat- and UV-resistant versions.
Baling wire
As near as I can tell, there’s no better or worse brand of this. Its uses are legion—I’ve successfully secured a broken motor mount on a 600-pound 2F Land Cruiser engine with it, and I know of situations up to and including a broken chassis crossmember that were stabilized with baling wire. Unlike duct tape, it’s heat resistant—how many dodgy exhaust systems have been semi-permanently repaired with baling wire? Where we live I’m not even sure it’s considered a “repair.”
Parachute cord
Paracord has become quite fashionable among the “tactical” crowd lately, especially for wrapping knife handles. The idea is that in a survival situation you can channel your inner Bear Grylls, unwrap the cord and use it to lash the knife to a stick as a spear, then go out and break or lose it altogether by hurling it at a large game animal. Seriously, paracord is an astonishingly versatile light rope, and worth buying in bulk—however, there’s a lot of substandard product out there. Make sure you get the genuine all-nylon kernmantle with seven three-ply inner strands. Type III paracord is the standard—called “550” for its rated strength in pounds. The proper military designation is Mil-C-5040H TYPE III, and current authentic military-contract paracord has one inner strand with black and yellow threads woven into it, if you want to be really picky (I recommend the excellent aviation survival equipment company Best Glide as a source: Best Glide). I carry it in 50 or 100 foot lengths, but if you want a way to have 10 feet of it always at hand, and also support a good cause, the Veteran’s Museum (Veteran's Museum) sells handsome braided paracord bracelets with Fastex buckles (although I haven’t checked to see if they’re using true military issue paracord).
Synthetic wheel bearing grease
You don’t really need the synthetic version, but it’s not that much more expensive. On an extended trip you’re likely to have numerous opportunities to use proper grease—on wheel bearings, CV joints, bushings, leaf spring pads, etc. A dab of it smeared on the back of disc brake calipers will stop squealing, and, well . . . it’s grease. You’ll find lots of other uses for it.
Graham mentioned this product, which used to be common but is rarely employed any more. Too bad, because it’s excellent for preventing threaded parts that need to be unthreaded now and then from rusting or otherwise locking up—especially threaded parts constantly exposed to road grime and moisture. Wheel lug threads are a perfect example, as are tie rod ends.
And, yes: WD-40
Did you know the name means “Water Displacing,” and the “40” refers to the number of unsuccessful formulas before they hit on the right one? There are actually a number of decent spray lubricant/water displacers on the market; a can of any of them is a must.
In a perfect world we’d always have the correct glue or sealant or tape to properly repair a broken component. Alas, such is not always the case. Ergo, a few suggestions from our panel on bodge substitutes.
Just weeks ago Jake successfully sealed a leaking radiator using the prosaic but effective two-egg procedure. Just dump the whites from a couple of eggs (yolks won’t hurt but they’re superfluous) in the filler cap (making sure the pressure has been relieved). The hot water cooks the whites, and they migrate naturally toward the leak. Duncan reports that pepper works well too. Add some mushrooms and you’ve got an omelette.
Duncan notes that repair patches and glue for inner tubes work just as well on radiator hose, although he recommends reinforcing the patch with duct tape or something similar. He also suggests a fix I think I first read about in the classic Land Rover manual Working in the Wild: If your alternator brushes go bad, remove the carbon rod from the center of a dry-cell battery and carve new ones. I simply must try that one some time. On the other hand, I’m intimately familiar with a ubiquitous African fastener Duncan mentions: leggans—cut strips of automotive inner tube. (I was delighted to learn his term for them—I’ve always called them “cut strips of automotive inner tube.”) The ultimate in recycled cordage, leggans can easily be made 20 or 30 feet long simply by slicing the inner tube in a spiral. When wrapped tightly and tucked under itself, it binds naturally and doesn’t require a knot. Anyone who’s been in the bush anywhere in Africa has seen monstrous loads secured effectively with this homemade elastic cinch strapping.
I could have collected bodge-repair ideas for weeks, but for now I’ll wind up with a habit I’ve cultivated for years. Friends have at times noted with amusement that I always use Grade 8 bolts and nuts (or the equivalent Grade 10.9 in metric) to mount even the most modest accessories—radios, fire extinguishers, air compressors, driving lights, and more. My reasoning is this: If I ever need a bolt or nut to replace a missing or broken one on a critical component, and I don’t have the correct one in my spares kit and need to cannibalize something, I can be sure of having a selection of high-strength potential candidates close at hand. Meanwhile, I can be absolutely certain my fire extinguisher and radio aren’t going to fall off.
Oh . . . okay. Duty compels me to include just one more. Jake finished off his list with the following note: “I discovered that Keystone Light beer makes a good emergency lube for a sticky Hi-Lift Jack.”
Comment would be superfluous, except to mention that lubing a Hi-Lift jack is absolutely the best use I can think of for Keystone Light . . .
Swedish steel meets English wood
(WARNING: If you are annoyed by unapologetic encomiums to fine, hand-crafted tools made one at a time by one person at a time, do not read further!)
Some time ago I splurged on a Gränsfors Bruks Scandinavian Forest Axe, after eyeing them for years. If you aren’t familiar with the brand, Gränsfors Bruks has been making axes and hatchets in Sweden since 1902. While countless other companies—including some fine American brands—gradually sacrificed quality for quicker, cheaper production, Gränsfors Bruks took a step backward in the 1980s and returned to making only best-quality tools. Craftsmen in the forge in Hälsingland stand before fearsome flywheel-driven trip hammers to form the heads, then stamp their initials in the steel (mine was made by Kjell-Åke Sjölund). After annealing, tempering, and sharpening, an oiled hickory handle is inserted with a hydraulic press, then fixed with two wedges, one wood and one steel.
The result is as elemental a tool as humans can make, the latest iteration in an unbroken line dating to the first time a Neolithic tinkerer lashed a knapped hunk of flint to a stick and discovered the magic of force multiplication.
My Scandinavian Forest Axe looks almost dainty next to a standard American felling axe (which Gränsfors Bruks also makes, along with such intriguing anachronisms as throwing axes and replicas of 7th-century bearded axes). Just 25 inches long and 2.6 pounds, I can choke up on it one-handed to lop small limbs off a larger branch, or back off to a two-fisted grip and power through a six-inch-diameter trunk in 30 seconds flat. It wouldn’t be my first choice for building a Dick Proenneke-style cabin in the North Woods, but if pressed it could probably handle it—and it’s nearly perfect for every job I’m likely to encounter around the house or on an overland journey.
But . . . sometimes you need a saw.
An axe is unexcelled at certain tasks: splitting logs, quickly trimming branches off larger limbs, notching logs, cutting through green wood that can bind a saw, or sharpening stakes made from branches. Of course your axe also makes a decent hammer for pounding in those stakes.

A saw is a more precise instrument. It’s generally faster for cutting through dry wood, and produces less waste. If you need to trim trailside overgrowth, a saw can take off a limb surgically at the node, leaving the shrub or tree looking more natural.
The axe is of course the more “dangerous” tool, capable of cleaving tibias as well as trees. However, while I’ve never experienced an injury from a hatchet or axe, I have suffered innumerable nasty tearing cuts from carelessly handled saws, and my acquaintances report similar histories. I theorize the perceived “danger” in swinging an axe might induce sensible people to be more careful with it than they are with a saw. So I’ll call that comparison a draw—as long as you use both tools properly.
So—which saw to carry with my fine Swedish axe?
I own a couple of good folding saws—a Gerber Sports Saw and a Bahco Laplander. Both are excellent for limbs up to about three inches in diameter, and the compact configuration allows them to fit into tight spots. But they’re fairly light-duty tools. For bigger logs, and more comfortable extended use, I prefer a bow or buck saw, and since the buck saw can be broken down, it makes the most sense for a vehicle.
I looked at the clever Trail Blazer buck saw, which collapses to fit into its own handle tube. However, its 18-inch blade offers little advantage over a folding saw. Besides, as a companion to the Gransfors axe its all-metal construction seemed rather soulless. What I needed was a wood-framed model. I thought I had it when I browsed through the Lehman’s site (lehmans.com) and discovered their beautiful hickory buck saws, which are made by a local Amish craftsman. Excellent—except the Lehman’s saw wasn’t designed to be broken down quickly, and its 28-inch blade rendered it a bit too large for most field use.
Finally, a burst of recovered memory led me to the Woodlore site (raymears.com) in England. Founded by Ray Mears, the avuncular English survival expert whose television programs are a refreshing antidote to the gritted-teeth epics from the strictly-for-entertainment bug-eating fringe, Woodlore’s online shop offers a modest selection of high-quality gear—and in the saw section, there it was.
The Woodlore folding buck saw collapses in seconds when not in use, and the just-right 24-inch blade is tensioned with a simple Spanish windlass arrangement, which helps keep total weight down to less than two pounds including a fine canvas and leather case that incorporates a slot for the saw and another that accepts—ready?—a Gränsfors Bruks Scandinavian Forest Axe.
Sold.
Not that I needed more convincing, but I was pleased to discover the Woodlore saw is made by Chris Boyton, an English longbow maker well known to me (I once made my own longbow, and Chris’s work was an inspiration and template). The wood is light but strong European beech of excellent, straight grain, and the included Bahco blade simply whizzes through logs up to five inches in diameter without shifting, or ten inches if you roll it and make a second cut from the other side.
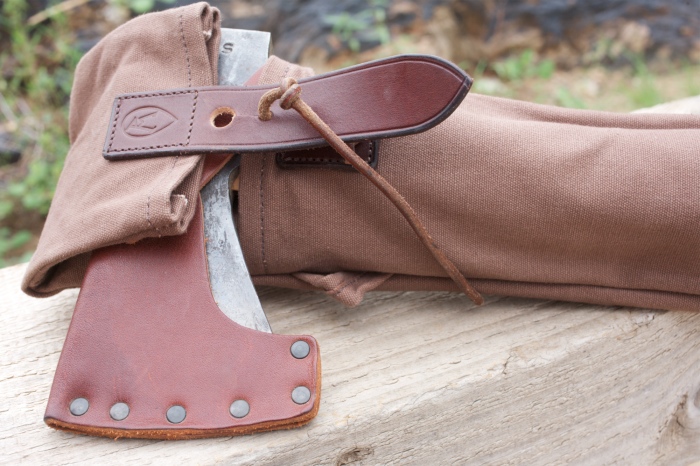 So now I’m delighted to own an elegant pairing of axe and saw that carry together perfectly, complement each other’s strengths, and should last a lifetime. And I know the names of the craftsmen who made each one—a rare thing in our world.
Hint: When using “Search,” if nothing comes up, reload the page, this usually works. Also, our “Comment” button is on strike thanks to Squarespace, which is proving to be difficult to use! Please email me with comments!
Overland Tech & Travel brings you in-depth overland equipment tests, reviews, news, travel tips, & stories from the best overlanding experts on the planet. Follow or subscribe (below) to keep up to date.
Have a question for Jonathan? Send him an email [click here].
SUBSCRIBE
CLICK HERE to subscribe to Jonathan’s email list; we send once or twice a month, usually Sunday morning for your weekend reading pleasure.
Overland Tech and Travel is curated by Jonathan Hanson, co-founder and former co-owner of the Overland Expo. Jonathan segued from a misspent youth almost directly into a misspent adulthood, cleverly sidestepping any chance of a normal career track or a secure retirement by becoming a freelance writer, working for Outside, National Geographic Adventure, and nearly two dozen other publications. He co-founded Overland Journal in 2007 and was its executive editor until 2011, when he left and sold his shares in the company. His travels encompass explorations on land and sea on six continents, by foot, bicycle, sea kayak, motorcycle, and four-wheel-drive vehicle. He has published a dozen books, several with his wife, Roseann Hanson, gaining several obscure non-cash awards along the way, and is the co-author of the fourth edition of Tom Sheppard's overlanding bible, the Vehicle-dependent Expedition Guide.


