Overland Tech and Travel
Advice from the world's
most experienced overlanders
tests, reviews, opinion, and more
Handmade, solid oak camp furniture
Several months ago Roseann and I were honored to be asked by our friend Brian DeArmon to evaluate prototypes of some collapsible camping tables he had designed and made in his garage. Brian’s idea was to combine the character of a solid wood table with the portability of the roll-up vinyl-covered camp tables we all know, while enhancing the rigidity of the structure beyond the wobbly norm of such products.
I use the term “prototype” loosely, because the prep-height and cocktail tables we took along on a trip up the Continental Divide were, we both agreed, completely functional and ready to go to work. Knowing the thought Brian has put into everything we’ve seen him do, from completely rebuilding a Four Wheel Camper to crafting a stunning writing desk to welding a winch bumper for my FJ40, we weren’t the least surprised. He took two months to design, evaluate, and test the carrying cases for his tables. (Blue Ridge Overland Gear, in Virginia, will be manufacturing the cases in the U.S. from splash-proof and nearly indestructible 1000-denier polyester material.)
Last night I got a text from Brian confirming that the website for Arizona Outdoor Furniture is up and ready to take orders, and I’m delighted to share the news.
The two full-size tables—a nearly square dining height (29 inches) and a rectangular prep height (32 inches)—share solid white oak construction with the shorter and smaller cocktail table. When one first removes the pieces of either large table from the stout carrying case, assembly looms as a complicated process; in fact, even without instructions one could soon divine the clever and strong way the dovetailed side pieces slot into the legs, and are then tensioned by diagonal inside braces. Slot the center top support into the middle, unroll and position the slatted top, and you’ve got a piece of furniture that’s probably nicer than the stuff in your living room. Rigidity is excellent, especially considering the lack of any complicated metal leg bracing; nothing detracts from the warm wood appearance.
It’s a rare product that adds both function and style to a campsite. Any of the tables from Arizona Outdoor Furniture, made one at a time by Brian, will do so for you and most likely several generations of your heirs. Most highly recommended.
Arizona Outdoor Furniture is HERE.
Knives of the Overland Expo
One of the best things about being on the setup crew and teaching staff of the Overland Expo is working around a lot of knives.
That is, it’s great to be among a group of people for whom a proper fixed-blade sheath knife is unremarkable daily wear—because it’s likely to be used several times every day. And boy do we use them during the five or six frantic days of prepping a couple tons of equipment and several tons of logs, the three dawn-to-dusk days of the show itself, and the relaxed but busy day and a half of take-down. Deployment might range from the plebeian but necessary task of cutting open taped shipping boxes (for which some of us will subtly substitute a Swiss Army knife so as not to sully our main blades with sticky residue) to the much more stylish—and difficult—test of slicing through Dyneema.
This year I remembered to gather up a selection of what we’ll call W.O.U.R.N. knives (What’s On U Right Now) from the staff at dinner one evening, and snap a photo. Here’s a rundown of the batch, left to right.
- Bruce Douglas has carried this AG Russell knife for well over a decade. Its three-and-three-quarter-inch blade is hollow ground from what was at the time one of the best stainless steels around: ATS-34. While eclipsed somewhat by newer alloys it’s still a fine steel. I know it holds an edge because Bruce has helped me field dress two elk with it. The hollow-ground edge makes it a very fine slicer, albeit a bit less robust for bushcraft tasks such as batoning. The scales are almost black cocobolo.
- Volunteer Jayston Landon’s carry knife is a CRKT (Columbia River Knife and Tool) Chugash Range Hunter, with a three-and-a-half-inch blade that reminds me of a Scandinavian pukko. Big-knife aficionados laugh at blades this size; meanwhile, the Scandinavians shrug and continue to use their pukkos to field dress 800-pound moose.
- Nick Taylor carries this impressive Böker Vollintegral, with the longest blade in the group at four and five-eighths inches—still a modest size compared to a lot of the silliness out there. Its full-tang blade is made from 440C stainless—a prosaic choice in this age of wonder alloys (and at its premium price), but a reliable workhorse steel nonetheless. The solid bolster and pommel give the knife a fine, substantial feel, and the black micarta scales (comprising layers of linen in epoxy) lend both comfort and style. Finger grooves offer a secure grip in either hand. The blade combines a flat-ground spine with a hollow-ground edge.
- A sublime example of pattern-welded steel (also known erroneously but persistently as Damascus), Andy Dacey’s knife is certainly the most beautiful here, yet it gives up nothing in utility, proving that a knife can be all things. Hand-forged in Japan, where the pattern-welded effect is called suminagashi, the core of the blade is Cowry X, a very high-carbon and chrome content steel, allowing it to be tempered to an astonishingly hard Rc-66 (most knives are hardened to Rc-58 to Rc-60). At that hardness steel can be brittle, thus the 32 layers of nickel steel on either side, which support the edge. The full tang is graced with desert ironwood scales secured with ornate rivets. This knife is flat ground, which should make it an exceptional slicer—and, given that steel, one that will not need sharpening for a very long time.
- My own knife this trip was brand new, furnished to me by a promising new maker, Shannon Carter, whose business is called Fall Creek Knives. Shannon got my attention because he only makes working knives, no fantasy wall-hangers or zombie killers, and charges very reasonable prices. This bushcraft style uses very strong O1 tool steel in its four-inch blade, which is ground in a classic Scandinavian, or scandi, edge: Most of the blade is full-width; the edge comprises a single, wide bevel. This makes for easy sharpening in the field with a simple stone, as the edge is easy to orient at the proper angle. The scandi edge is also good for punishing tasks such as splitting kindling or even batoning cross-grain. Desert ironwood scales with black liners, and interesting pinning, along with acid etching on the blade, make this an attractive as well as useful tool. I’ll be posting a full review soon.
- Duncan Barbour’s Bison Bushcraft knife makes all the others here look like drawer queens. It clearly shows the strenuous use of over a decade. Duncan shows it no mercy. He’s just as happy to use it on cardboard boxes as Dyneema—or cheese—but it still functions perfectly, thanks to tough O1 steel in the blade and an easily touched-up scandi edge, which is just about ready for some reprofiling to regain the proper flat bevel. The Bison Bushcraft knife is a near clone of the original Woodlore knife designed by Ray Mears in the 1990s. The original Woodlore design, made in England by Alan Wood, boasts a waiting list of several years and a price upwards of a thousand dollars; fortunately for those of modest means the best clones are every bit as good.
- And then there’s Graham Jackson. At first I thought I just caught him at an awkward moment, but no—this Leatherman Skeletool was his main cutting implement the entire week, and no one accused him of slacking off. With that said, a couple of days after the event, as we were picking up a few things at the Frugal Backpacker, Graham splurged on a very nice fixed-blade Helle Temagami.
The "ultimate" tent stake?
Anyone who has used a tent of any size in the field has experienced the comically inadequate nature of the stakes supplied with most of them. Tent manufacturers are driven to, a) publish the lightest possible packed weight of their product, and, b) save as much as possible on the ancillaries supplied with it. As a result, the stakes you get with a tent vary from spaghetti-like round aluminum pegs the diameter of a medium-sized nail (which I have as a demonstration bent in my teeth), to, if you’re lucky with a high-quality tent such as the excellent models from Hilleberg or Terra Nova, a heat-treated, V or T-shaped DAC stake—but still no more than six inches long. The latter work acceptably in perfect grass turf, the former work acceptably nowhere. If you expect to be able to safely anchor your tent in a range of conditions and substrates, you need aftermarket stakes.
The Ultimate stake on top, with a high-quality but too-small factory stake below
Thirty years ago, Black Diamond Equipment produced something they called the Chouinard T-Stake. It was made in two sizes, eight or nine and a half inches, from 2024 T3 heat-treated aluminum. We bought a dozen or so. If I’d known then what I know now, I’d have taken out a loan and bought a hundred. T-Stakes proved virtually indestructible, and the holding power was superb. My old Marmot Taku survived numerous howling Chubascos on Sea of Cortez islands anchored with just one upwind T-Stake; our North Face VE25 sat unperturbed through an arctic storm on the Beaufort Sea coast that the VHF radio said was gusting past 60 mph.
Sadly, tent stakes have a way of evaporating. It’s so easy to miss one after taking down a tent that used eight or ten or more with various guylines. Over the years our original supply of T-Stakes has dwindled to the point where we only have six or seven, jealously hoarded and thus rarely used, which defeats the purpose. Recently I missed an auction on eBay for nine of them, in good condition, with a buy-it-now price of a hundred bucks. I’m glad I missed it, because I would have been tempted.
You’ve gathered that I’ve yet to find a fully comparable stake, and you’re right. I’ve never encountered the combination of reasonable weight and size with that much strength. But I might just have come close. In doing some research for another publication, I literally stumbled upon something called the “Ultimate” stake, at, of all places, Campmor.
Ultimate stake on top, a well-used Chouinard T-Stake below
Made from 6061 T6 aluminum, and available in a stout nine-inch length and an even stouter twelve-inch, the Ultimate stake certainly looks the part. A central U-shaped body is backed up by a substantial gusset—no bending this one with my teeth. At the top are both a hook and a hole for tent loops or guylines (the hook also helps when pulling the stake out). Campmor says they’re made in the U.S., but I found not a trace of branding on the four nine-inch versions I ordered to try. I don’t know if Campmor has them made or is simply retailing them. That’s weird.
The machining on the Ultimate stakes is definitely a step down from the superior anodized finish on the T-Stakes—although, at $3.49 each for the nine-inch size, they’re only a dollar more than the larger T-Stake cost 30 years ago. I plan to take a Dremel to the hook and hole to round off the sharp edges and reduce chafe on guylines and stake-out tabs. Presumably the Ultimate stake is designed to be inserted with the U-shaped edge toward the tent. This gives the stake less cross-sectional area than the large T-Stake and about the same as the small one (although I suppose the U shape might enhance resistance over a flat stake). I wonder if in soft soil using it sideways might be more effective, given the broad gusset.
I tested the resilience of the Ultimate stake by hammering one repeatedly into compacted Arizona Sonoran Desert soil—used for centuries by residents to make bricks, literally. It held up just fine, the most obvious signs of use being a slight peening on top. My experiences with other stakes, especially the T-Stake, leads me to believe this sort of stabilizes over time, whether from work hardening, simple expansion of the contact area and resultant dispersal of impact force, or some combination of the two.
Great—time for test-to-destruction. I chose a patch of asphalt in town and started hammering the Ultimate stake into it—or rather, at it, because penetration was minimal. However, the “weak point” of the stake revealed itself: the point right at the hook, where the gusset narrows. The neck began to bend backwards at that point. A demonstration beyond reasonable expectations, but it did point out where one of these would fail if you seriously abused it.
"Weak point"revealed: note bend at neck
So is the Ultimate stake the ultimate stake? Given the astonishing condition of my 30-year-old Chouinard T-Stakes, none of which shows the slightest sign of bending, I’d have to say no. However, it’s a damned good stake. Available here.
Lynx tie-down straps
Update on January 13, 2015. I just learned that Lynx will have a booth at Overland Expo WEST this May, so you'll be able to see this clever tie-down system in action and pick up a set or two.
I hate cargo nets.
Every one I’ve had the misfortune to use has proven itself unwieldy, snarl-prone, and impossible to adjust to achieve uniform tension across bulky and mismatched baggage. Yet there are many situations in which standard ratchet straps simply will not work. And doing without is not an option—if, God forbid, you find yourself in a road accident or a rollover situation on a trail, it would be embarrassing if your shoulder belts and air bags all worked perfectly to save you, and a flying camera bag or camp stove gave you a concussion, or worse.
The Lynx tie-down straps are the answer to a lot of those situations.
Each Lynx tie-down comprises an adjustable nylon strap, a short length of solid-natural-rubber elastic sheathed in polyester, a quick-release Fastex-like buckle, and a plastic hook on each end. Okay, so what? Here’s the trick to the patented straps: The cunning hooks can be snapped together to create a completely customized web suited to almost any pile of cargo you need to secure. Each one adjusts from 19 to 45 inches in length, but you can also join them end to end to create almost any length you need.
The hooks snap together . . .
I gathered up a motley assortment of Pelican cases, range bags, and camera bags, and had no problems quickly assembling a five-legged spider of Lynx straps to secure the pile to the tie-down loops in the back of my FJ40 (of course a prerequisite for the straps to work is a decent array of strong tie-down loops in your cargo area). If I’d been doing the same thing in the back of a long-bed pickup, I could have assembled two spiders and joined them with a connecting strap. The configurations are limited only by your imagination.
. . . to lengthen a strap or create a web.
The adjuster buckle on each strap makes one-hand snugging of cargo easy, and the elastic section assures that a rough road or a load that manages to settle won’t allow a hook to come loose. It also make unfastening the system simple without the necessity of loosening the adjuster or unfastening the buckle. Given that elastic component, the Lynx straps can’t be considered replacements for full-on ratchet straps. I wouldn’t secure a line of full jerry cans against a bulkhead with only these, nor would I trust them to immobilize my 60-pound Pelican case full of tools in a collision (the company conservatively rates them at 25 pounds each; a web should handle a corresponding multiple of the individual rating). But the straps seem perfect for securing clothes duffels, camera bags, tents, stoves, and the like—all those sundry items that go in on top after you’ve ratchet-strapped the really heavy stuff.
Best of all, if you just need a couple of straps for, say, securing a sleeping bag to a motorcycle seat, just disassemble your FJ40 spider and there you go. Or hook four or five inline to create a ridgeline for a tarp—and use extras to create guylines that give a bit in a breeze. The hooks will fit standard tarp grommets, and are large enough to grab most motorcycle luggage racks and the upper rails of many roof racks (if not, you can simply loop the strap around the rail and put the hook through it). Pondering further, I remember a roof tent I reviewed equipped with a fly that flapped in the mildest wind. A few Lynx straps would have solved that problem more effectively and with much less hassle than the paracord solution I devised..
As you can see, a half-dozen of these straps could come in handy in dozens of situations. And I’m free at last from cargo nets.
The Lynx website is here. (Just ignore the ATVs parked off the trail.)
What is it?


More soon . . .
Since Craig recognized the mystery product as a Sunrocket, a solar kettle/thermos, here's the rest of the story.
The Sunrocket is manufactured by Sun Cooking, an Australian company that also makes a solar oven. Lest you dismiss solar ovens as a street-fair curiosity suitable for roasting hot dogs one at a time, know that Roseann uses a solar oven (from a U.S. company) to produce probably 25 percent of the meals at our off-the-grid home in the desert, summer and winter. Those meals have included roast chicken, stews, biscuits, even cakes and cookies, all produced with zero fossil fuel and zero carbon emissions. So I was intrigued by the idea of a solar kettle, the counterpart to my venerable volcano kettle that boils water in a couple of minutes using a twig fire oxygenated by a vortex effect.
The Sunrocket (made in China) comprises a central tube of doubled, evacuated glass with a high silicon content for thermal stability and strength, side reflectors of polished aluminum, and a plastic body, with a metal handle that doubles as a lock for the reflectors and a prop to orient the tube toward the sun. A vent in the screw-in lid releases steam when the contents boil and acts as a safety valve. The capacity is listed at a half liter (17 ounces); however, the instructions say to leave a bit of air space at the top, leaving actual capacity at a bit under a pint. This would be enough for two cups of tea, or one large cup of coffee using a pour-through filter. (Curiously, while the website calls it a Sunrocket, as does the box it comes in, the embossing on the actual product says SunKettle, which I like better anyway and plan to use as the generic reference.)
I filled this one and set it in the sun on a balmy (70ºF) afternoon. An hour later the water inside was at 160ºF. Okay, so it's no volcano kettle—however, that temperature and dwell time would have been enough to safely purify water from a suspect source. And of course I was free to ignore the kettle and start writing this piece. The center tube was cool to the touch—fascinating how easily heat can get in and yet not out. Thirty minutes later the water was at a near-boiling 200º—plenty hot enough for coffee or tea. And given the vacuum insulation, the contents will stay hot for hours.
 The sun kettle, deployed.
Conclusion? While it's not exactly compact (the box, in which I'd be sure to carry it for protection, is 4.5 by 18 inches), or fast, the effortless and completely green nature of the Sunrocket makes it a nifty device for camping. I'll continue to use my volcano kettle for morning coffee (which I want right now), but the Sunrocket will have water hot for elevensies. And it would be excellent for leaving in the sun to heat water for washing—or purifying—while you do other things.
Sun Cooking is HERE. The Sunrocket ($67 including shipping) is available in the U.S. HERE.
JATAC gets an outdoor kitchen
by Roseann Hanson (co-director, Overland Expo)
There's a lot I love about having a stove, sink, and fridge inside a truck camper—all-weather cooking, protection from mosquitoes, and the convenience of a full kitchen (see this article, about our "Just a Tacoma and Camper" setup). But I miss cooking outside. It's more social, and enjoying the views is why we explore and camp. Nothing like sipping a cool drink, tending some thick pork chops, and gazing out over the Grand Canyon while a condor soars overhead . . .
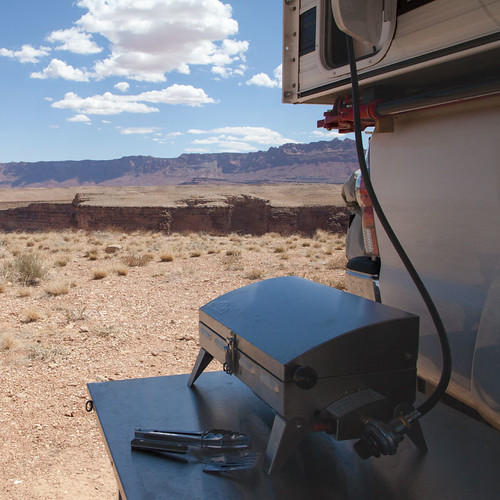
To facilitate outdoor cooking, we sorted out a camp table and awning. Jonathan rigged us a sleek and easy mount for the sturdy stainless steel table from Frontrunner Outfitters (see story here). And although it was initially a tough decision ($800), we invested in a high-quality, quick-deploying Fiamma awning for the starboard side. Importantly, this is also the side for access to the Four Wheel Camper's dual 10-pound propane tanks, since I settled on a propane grill, for convenience and when local fire restrictions or wood availability obviates our Snow Peak portable fireplace grill. My idea was to leave one tank hooked up to the inside stove and hot water heater, and the second tank rigged with a portable grill hose so all we had to do was hook it up and start cooking.
Now all I needed was a portable propane grill that was powerful, not too bulky, high-quality, and functional.
Easier said than done. I looked at many name brands, including Coleman, Char-Broil, Weber, and NexGrill (a sister brand of Jenn-Air). Some had great BTU ratings (the NexGrill boasts 20,000 and has 2 burners with separate controls). Some were clever (the Coleman Road Trip has an integrated stand that scissors down, so you don't need to use up valuable table space). Some were cheap (the Char-Broil at $30 via Amazon—with the savings you could buy a lot of top sirloin . . .). Some were compact (the Fuego Element closes like a sleek clamshell and is just 9x12).
But in the end my eye was caught by the Napoleon PTSS165P portable grill ($189 MSRP), built for the demanding marine environment (you can order very pricey sailboat cockpit mounts for it). Runner up was the NexGrill (model 820-0015, $180 at Home Depot) but reviews on Amazon indicated the finish quality was poor, with some users claiming not all parts are stainless, or were flimsy with sharp edges. The quality of the Napoleon looked so good, I decided to take a gamble on its 9,000 BTUs (compared to twice that for the NexGrill) and single burner control.
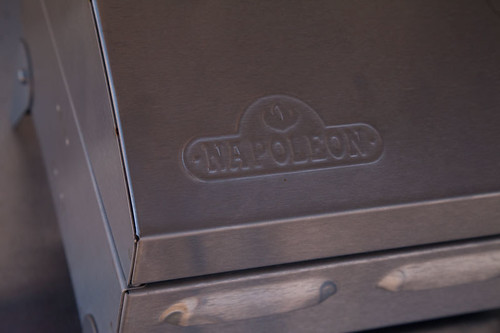
The finish quality of the Napoleon is beyond reproach: folded and riveted corners, smoothly finished vent holes, and sturdy (not at all "tinny") 304 stainless throughout.
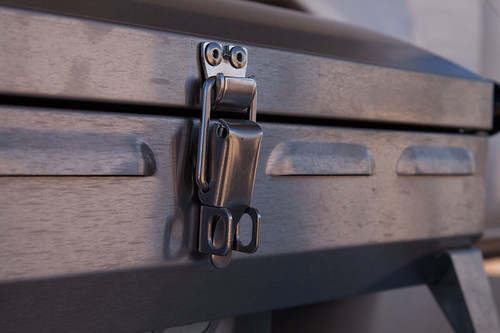
Details like the high-quality latch and rivets won me over.
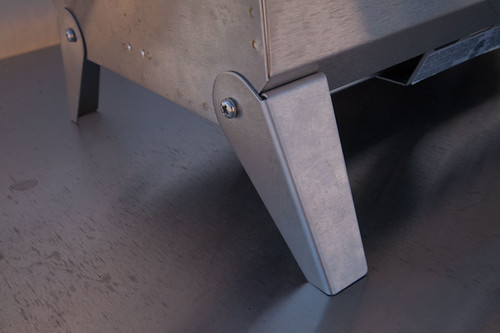
The four-inch legs are anchored with stainless bolts, and pivot flush to the bottom for storage. Only complaint: they do scratch the tabletop, so we're going to coat the bases in Plasti-Dip.

The handle stays cool even after long periods of cooking. However, it's on the wrong side for a right-handed person (when grilling, you usually hold a utensil in your right hand and would use your left to open the grill to check cooking progress). The pietzo-igniter stopped working after the first night. The propane regulator is also on this side. The Napoleon only comes with a mount for small 1-pound canisters; we had to buy a 5-foot hose to connect it to our 10-pound tank.
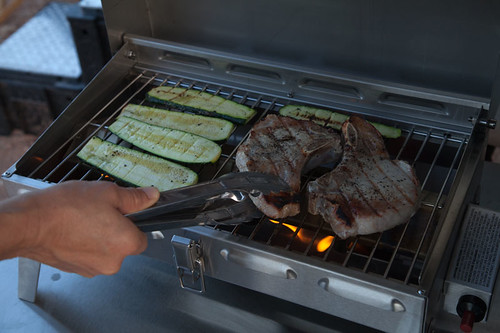
Cooking area is 17.25 x 9.25 and just about perfect for two people. For more food than that, cooking in shifts would be recommended. To get searing temperatures, the instructions recommend lighting the grill and pre-heating for 10 minutes. This did produce temperatueres just right for searing the pork chops. I do wish it had two burners so I could turn one off to create a cooler location for finishing things like vegetables.
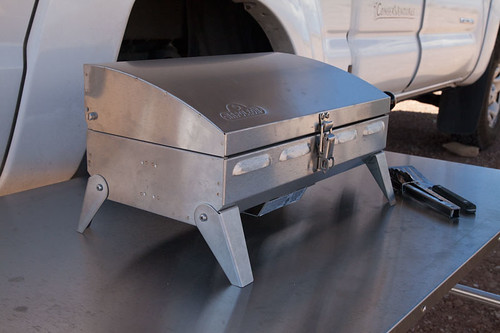
The slightly domed lid is vented but very windproof (we cooked two dinners in 10-15 MPH gusts), and its height would allow cooking a small whole chicken or something in a deep-dish pan; you could even bake a cake or low-top bread. There is a slide-out grease trap tray on the bottom, which made clean-up super easy.
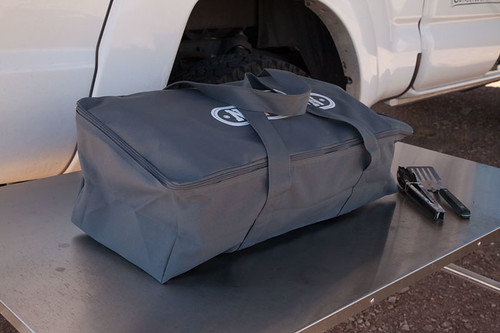
The carrying case fits well but its quality is not commensurate to the grill: the fabric is thin Cordura and is poorly sewn (on ours, the inside pocket for the gas regulator pulled out at the bottom), so I'm not expecting it to last as long as the high-quality grill.
We've now used the Napoleon half a dozen times on a 2,800 mile trip, and are overall extremely pleased with the quality. It's also transformed our camping by doubling our "living area" to include a spacious, convenient, shaded outdoor kitchen where we can easily grill salmon steaks, cook lasagna, bake a cake, or turn out bacon and pancakes on a griddle for a small group.
(Awning: Fiamma.com; table: FrontrunnerOutfitters.com or a similar version from K9 racks and Equipt Expedition Outfitters, available in three sizes)
The blue vinyl table is dead!
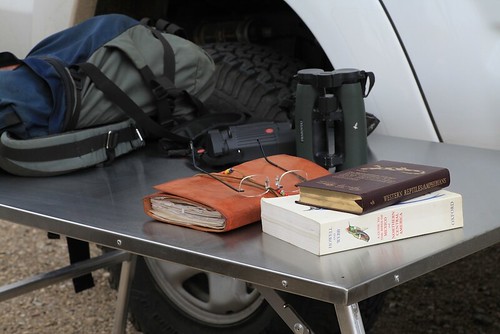
A few years ago on a long road trip, Roseann and I opted for convenience over our usual preference for solitude, and stopped for the night in a developed campground: picnic tables, barbecues, flat sites, perfectly symmetrical pine trees—actually quite nice as such places go. That evening an enormous motorhome inched carefully into a nearby slot. The driver emerged just long enough to open a side panel and pull out a remarkably colon-like corrugated hose, which he plugged into his deluxe site’s sewage receptacle. Another umbilical fed electricity to the behemoth. The man then scurried back inside, and soon I heard the sound of some TV program on what I assumed had to be at least a 40-inch flatscreen. And that was the last we saw of either him or his wife.
I try not to judge fellow travelers on the size or splendor of their vehicles. After all, to someone in a CJ5 with a Eureka A-frame tent our Four Wheel Camper must seem pretty posh. But, while the camper provides us a cozy, stormproof home away from home, holing up inside is not the goal when we’re traveling—even in Jellystone Park. In good weather we like to be outside as much as possible. With the camper’s excellent Fiamma awning deployed, and a table and chairs set up, we can lay out snacks and drinks, then tackle some weighty biological issue like seeing how many bird species we can document while sitting down. “Nine species in one martini!” Roseann is likely to announce (although identification skills wane somewhat after the second, and we're likely to record birds never seen in this hemisphere . . .).
Where was I? Right: Until recently we relied for our outdoor table on one of those ubiquitous roll-up blue-vinyl-covered things with the screw-in aluminum legs. It was ugly and wobbly, but perversely durable despite my best attempts to “accidentally” destroy it. A Maasai shuka used as a tablecloth improved its looks immeasurably, but I still knew what was underneath . . .
Then, a few months ago, Roseann emailed me (from across the room) a link to the Front Runner camp table, designed to slot under the company’s roof rack. We'd used a version of it in Tanzania and Kenya several times and had been very impressed. Here was a proper outdoor table: welded and braced aluminum legs that folded flat under a top formed and welded from a single sheet of stainless steel. At 29 by 45 inches, the table was large enough for food prep, eating (it seats four snugly), or work, and it weighed a reasonable 23 pounds. She also linked to the Z brackets designed to attach to the Front Runner rack—and then asked, “Could we mount this under the front overhang of the camper?”
I emailed back, “Great idea,” then did some measuring on the camper—plenty of room. Tom at FWC said no problem drilling the composite sheet that forms the bed area of the camper as long as I sealed it well, and certainly no problem with the extra weight: the FWC’s overhang is tested to 1,100 pounds (or, as he and I quipped at the exact same time, “Two average Americans.”).
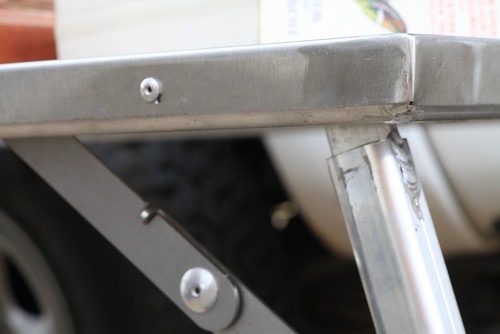 The table's top is formed, welded at the corners, and riveted to the aluminum frame.
When the table arrived it met my expectations and then some. Compared to its cheesy roll-up predecessor it was the Rock of Gibraltar. All the hardware was cadmium-plated and secured with nylocks. The stainless top would be impervious to spills or heat. True, at $285 such features should be taken for granted. Nevertheless it was a relief to consign the blue vinyl table to the Cemetery of Obsolete but Kept Around Forever Camping Gear down in the storeroom.
Exercising due measure-thrice-cut-once caution, I marked and drilled, then veeery carefully countersunk (so the bed’s top section could slide over the bolt heads) three holes for each of the Front Runner Z-brackets from inside the camper. They are designed to hold the table on its narrow ends, but I needed them to hold it on the longer sides, meaning the table would protrude about a half a foot each way.
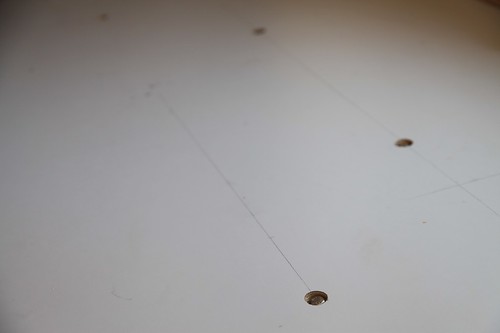 The bolt heads are countersunk just enough to allow the bed extender to slide over them.
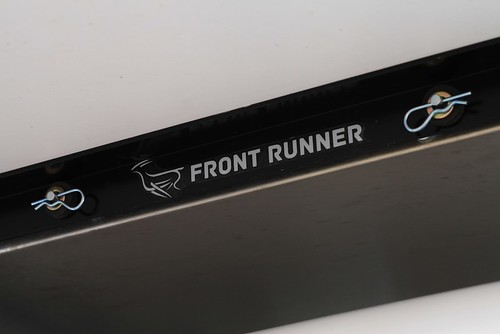
The latch mechanism included with the brackets wouldn’t work in our application, so I used a 24-inch-long piece of 1.25-inch aluminum angle iron as an end stop on the passenger side of the truck. I drilled two holes sideways through the frame and top of the table, and inserted a pair of two-inch-long 1/4-inch-diameter clevis pins through them. A pair of hairpin clips holds the pins to the table:
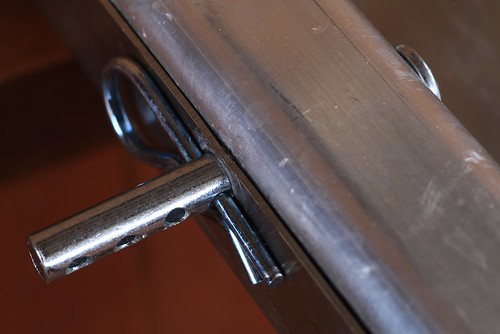
The pins extend through two holes in the end bracket and are secured with two more hairpin clips backed by a rubber washer and a metal washer. I also glued a couple of furniture bumpers on the back of the end bracket, and two flat pieces of rubber gasket on the insides of the Z brackets where the table slides in from the driver’s side of the truck.
The Z brackets came with carpet strips glued along the bottom, so I hoped all the rubber and carpet would minimize any rattling directly over our heads. My last step was to install a backup latch at the other end, using two of the cunning little Expeditionware Transport Loops sold by Expedition Exchange, plus a Quicklink. (My plan is to try to find a small padlock that will fit through these loops.)
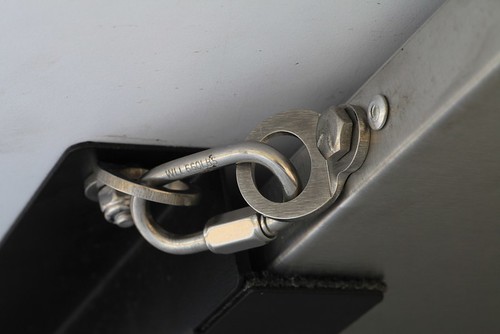
Twelve hours after I finished up, the installation got a good test when we left for a biological survey in the Sierra Aconchi in Mexico, which involved a 230-mile paved approach, then a rough ten-mile climb up a four-wheel-drive trail. On the highway the table created no noise at all. On rough slow pavement with the windows open we could very infrequently hear a barely perceptible oilcan effect over sharp bumps as the table top flexed. On the trail there was zero sound from the table or mount, at least none we could hear over the tire and drivetrain noise.
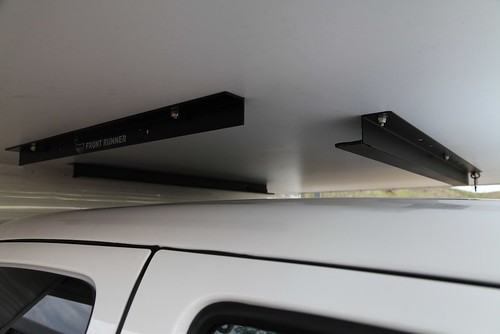 The completed bracket assembly.
Once in camp the table proved just about perfect. There was plenty of room to spread out plant samples, notebooks, bird guides, and binoculars; at a group dinner we covered it with chips and salsa and vegetables, then served the outstanding pizzas Roseann somehow managed to make on the camper’s stove top. One night delivered a torrential rain which bothered the table’s aluminum and stainless steel not at all. Total time to set it up on the first day and stow it on our last morning: about two minutes each.
So, not only did we gain a big upgrade in the quality of our outdoor table, we also gained storage space inside the truck. If you have an overhead camper—or a roof rack—I can recommend the Front Runner approach.
On the other hand, if you have a fondness for blue vinyl, email me.
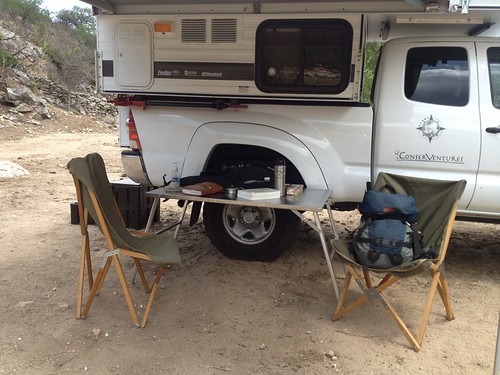
Addendum: A forum member on Wander the West suggested that the Front Runner brackets could be set up to carry a solar panel in the same spot. Brilliant.
Equipt Expedition Outfitters also carries similar tables from K9 racks, in three sizes.
Front Runner Outfitters is here.
The Transport Loops are available here.
A versatile storage box: the Wolf Pack
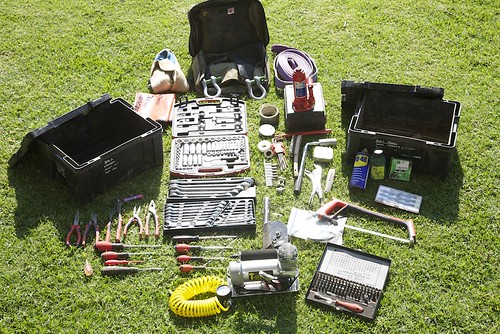 A pair of Wolf Packs holds tools for a Defender 110 in Tanzania.I have yet to meet the perfect overlanding cargo box. Pelican cases are nearly perfect when contents absolutely, positively must be kept dry and dust-free, thus they are the box of choice for, say, photo and video equipment. But Pelican cases are quite heavy for their volume, and pretty expensive for everyday cargo. Zarges (or the similar Alu-Box) aluminum cases are strong, lightweight, and boast excellent interior to exterior volume, but are even more expensive (although you can consider the expense an investment as they last forever with reasonable care).
But more economical alternatives always have some fatal flaw. The affordable Rubbermaid Action Packers are excellent for home storage, but their volumetric efficiency is abysmal and they leak if rained on, so you can’t leave them outside the vehicle when camped unless they’re under cover. If strapped down too tightly (i.e., properly . . .), they collapse. Lower-priced alternatives are even worse.
Several years ago in Tanzania I discovered the plastic ammunition cases used by the South African military, now commercially produced and known widely as Wolf Packs. They’re moderately sized and so easy to arrange in a cargo bay, completely rainproof and reasonably dustproof, and vertical-sided to avoid wasted space (except for hollow corner pieces). They stack securely for convenient storage at home. The Wolf Packs suffer from poorly designed latches—those familiar with them will call that a hilarious understatement— and the lids flex more than I’d like when called upon to do duty as a step, but otherwise they are sturdy, versatile, and sport a certain exotic flair given their origins. Front Runner Vehicle Outfitters is now a U.S. distributor, and for $40 each you can justify several—trust me, you’ll find uses for all you get. We have six, and just glancing around the shop I can see uses for another six. Or ten.
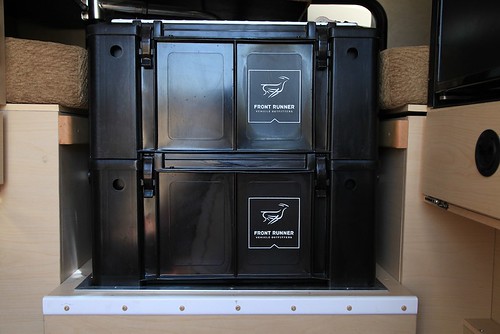
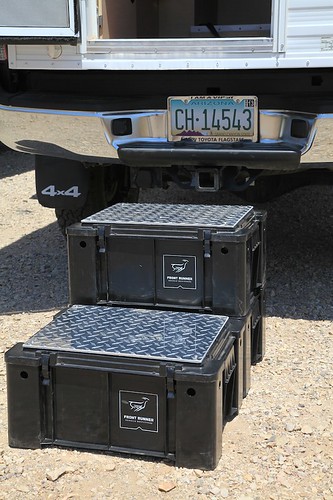
We found that a pair of Wolf Packs stacks and straps down perfectly in the shower grate of the JATAC, under the dinette table. Another rides near the door, and holds all the items we use for pitching camp: drain hose for the galley sink, leveling blocks, guylines and stakes for the awning, etc. I sourced some 1/4-inch thick aluminum diamondplate and fabricated steps for the lids of two of them, attached with small stainless bolts; the three now form a perfect staircase to access the camper when we’re parked.
I also keep two in the back of my FJ40. One holds recovery gear; the other contains a small stove and cook kit, water, and other odds and ends to make an emergency camp or an impromptu picnic.
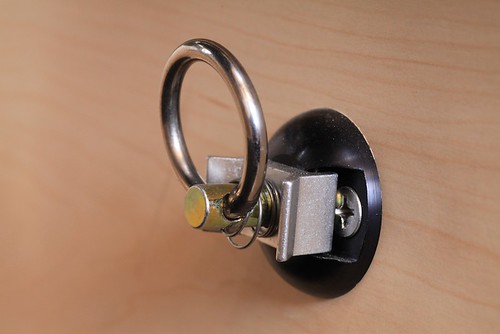 A pair of Mac's Tie-Downs anchor plates and rings, bolted through each side of the dinette seat box, provides anchors for the ratchet strap that secures the boxes.
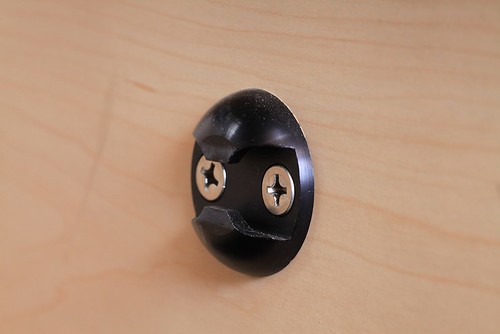 When not needed, the ring detaches instantly.
Front Runner's website is here. They also sell improved steel latches.
Hint: When using “Search,” if nothing comes up, reload the page, this usually works. Also, our “Comment” button is on strike thanks to Squarespace, which is proving to be difficult to use! Please email me with comments!
Overland Tech & Travel brings you in-depth overland equipment tests, reviews, news, travel tips, & stories from the best overlanding experts on the planet. Follow or subscribe (below) to keep up to date.
Have a question for Jonathan? Send him an email [click here].
SUBSCRIBE
CLICK HERE to subscribe to Jonathan’s email list; we send once or twice a month, usually Sunday morning for your weekend reading pleasure.
Overland Tech and Travel is curated by Jonathan Hanson, co-founder and former co-owner of the Overland Expo. Jonathan segued from a misspent youth almost directly into a misspent adulthood, cleverly sidestepping any chance of a normal career track or a secure retirement by becoming a freelance writer, working for Outside, National Geographic Adventure, and nearly two dozen other publications. He co-founded Overland Journal in 2007 and was its executive editor until 2011, when he left and sold his shares in the company. His travels encompass explorations on land and sea on six continents, by foot, bicycle, sea kayak, motorcycle, and four-wheel-drive vehicle. He has published a dozen books, several with his wife, Roseann Hanson, gaining several obscure non-cash awards along the way, and is the co-author of the fourth edition of Tom Sheppard's overlanding bible, the Vehicle-dependent Expedition Guide.


