
Overland Tech and Travel
Advice from the world's
most experienced overlanders
tests, reviews, opinion, and more
The Micro-Start XP-1
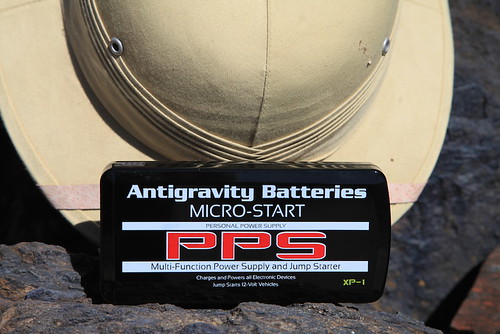
Experienced mechanics don't often sound giddy over the phone, but Dave Anderson sounded giddy when he called me from his Flagstaff, Arizona, shop, the Good Carma Garage (which really should be a radio program).
“I just bought this thing off a tool truck, and you have to get one,” he said, “You’re going to think it should be on every overlander’s equipment list—even before he buys a pith helmet.”
Dave. Such a kidder. As it happens, I own a pith helmet. And not one of those fake ones made from cork or, worse, styrofoam, either (I won’t even mention Graham’s mesh thing)—mine is a genuine pith helmet made in Vietnam from the pith of the Aeschynomene aspera, or sola plant (one of the original names for the helmet, sola topee, was later corrupted to solar topee). While they’re now little more than a Hollywood cliché, pith helmets are eminently practical—the thick fibrous material offers exceptional insulation from the tropical sun when touring one’s tea plantation or stalking a man-eating tiger with a Rigby.
Where was I? Oh, right: At Dave’s insistence I ordered a Micro-Start XP-1 from Antigravity Batteries. The zippered pouch that arrived three days later was no bigger than a calendar/day planner (remember those?). Inside was a bewildering array of adapters for charging various electronic devices from phones to laptops, and an astonishingly lightweight (15 ounces), 225-amp-hour lithium/ion battery, just one by three by six inches, which, incidentally, can also be used to jump-start your truck.
Say what?
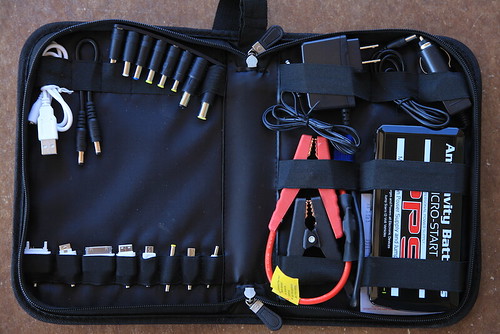
It’s true. The pouch includes a set of battery-post clamps, and the company claims the power pack will start a V8-engined truck—not once, but several times.
Could this mean the end of jumper cables? I’ve always hated those things, and especially I hate what happens when I play good Samaritan to jump some poor bloke’s dead Malibu—in trying to help he always wants to grab the cables and hook them up in the wrong sequence—if not to the wrong terminals. I have to come off as a tyrant just to do a good deed. With the Micro-Start I’d be in complete control of the situation. And of course if your own vehicle becomes stranded you are completely removed from the need for a donor vehicle—handy if the nearest candidate might be 40 miles away.
The instructions for jump-starting a vehicle tell you to hook up the terminal clamps to the dead battery first, then plug the siamese fitting into the power pack. The reason for this is that, while the teeth of the clamps are well-surrounded by plastic, it would theoretically be possible to screw up and touch them together, resulting in the same alarming pop and flash you get when you do the same thing with jumper cables. If you were really determined and managed to clamp the teeth together, a puff of smoke would signal the death of your power source. I found it easy to remember to hook up the clamps first and then attach the battery, and virtually impossible to remember to unplug them first and then undo the clamps after use. But I never shorted anything.
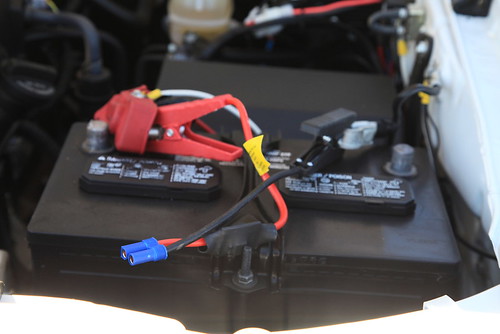 Hook up the terminal clips first, then plug in the power pack.
So how well does the XP-1 work? I disconnected our Tacoma’s battery to give it a try by clamping the leads directly to the battery cables. I wanted to video the process, and while setting up the camera I simply stashed the XP-1 battery in my back Levi’s pocket—it really is that small.
You can find more torturous demonstrations online, but the initial trial on the Tacoma went thusly:
It was impossible to detect a difference between the XP-1 and the way the truck fires with its own battery. I started it three times in a row with no trouble at all, and there were four blue LEDs left out of five on the battery’s charge indicator. Clearly there’s not only sufficient amperage inside that little brick to turn a V6’s starter motor, but to do it multiple times.
As impressive as that demonstration was, it simply confirmed the maker’s claims. Looking around for an unfair test, my eyes alighted on our 1985 Mercedes 300D turbodiesel. To start that the XP-1 would first have to power the glow plugs, then turn the hi-amperage starter necessary to crank a five-cylinder engine with 18:1 compression. After recharging the power pack and removing the cables from the 300D’s massive battery, I hooked up the XP-1, and:
Okay, so that was a bit too much to ask. (Scot Schafer at Antigravity Batteries confirms that they have a model in the works that will be configured for the much tougher task of starting diesel engines.) Rather alarmingly, there were no blue LEDs left on the charge indicator after the Mercedes experiment. Had I killed this thing 15 minutes after first deploying it? I plugged in its 120-volt charger (there’s also a 12-volt car adapter)—and an hour later it was back at full charge. It’s a resilient piece of equipment.
If your vehicle is powered by anything up to a 400-cubic-inch gasoline V8, the XP-1 will provide you with ample starting capability. The battery will retain its charge for many months at a time; if you remember to give it a top-up every half year or so you should be pretty much immune to becoming stranded due to a bad battery. And think of the effect on the owner of the dead Malibu when you start his car with a magic box the size of a paperback. It might be a good idea to keep a few XP-1 kits in the truck to sell at an exorbitant profit . . .
The XP-1 is a bargain at around $140. A basic model, the XP-3, sans the adapters for personal electronic devices, is available for about $30 less. AntiGravity Batteries is HERE.
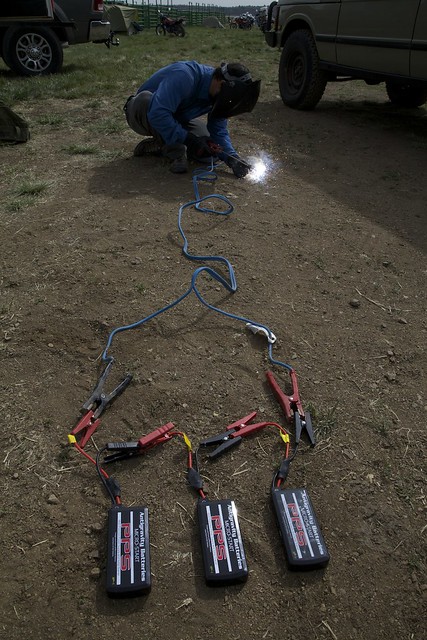
An update: While discussing the Micro-Start as we were setting up the Overland Expo, Graham Jackson, Tim Scully, and I started musing on whether one could weld by hooking up three of them in series. Taking a chance that we'd blow all three units we owned, Tim hooked them up, connected cables and a welding rod—and produced a perfect bead connecting two pieces of 1/4-inch steel. We were gobsmacked. We then hooked up two of the units to my Redi-Welder DC wire-feed unit, and again got a perfect result.
Obviously this is not something endorsed by the maker, and would quite rightly invalidate your warranty. But it showed what would be possible if a weld repair might make the difference between walking and driving out of a remote location.
The LS2 MX453 Dual-sport Adventure helmet
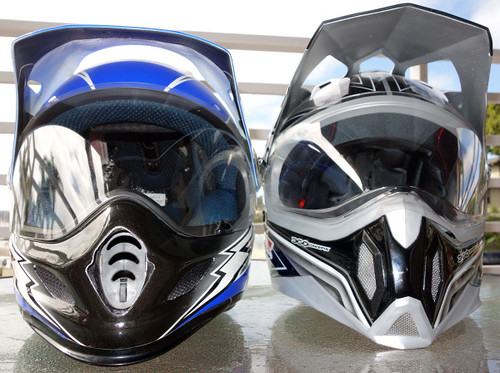 $400 Arai Xd-3, left; $160 MX453, right
(Editor's note: Carla King recently conducted one of her typically thorough tests of a new and very affordable helmet from LS2, on a trip to Baja with Jonathan Ely. Thanks to Carla for the fine review.)
By Carla King
When my friend Reg Kittrelle asked me if I’d like to try an LS2 MX453 Dual-Sport Adventure Motorcycle Helmet I said, "I've never heard of it, but dual-sport adventure? I'm in!" I guess I have been living under a rock because LS2 sponsored 76 riders in the 2013 Dakar rally, including the winner Cyril Despres, and almost 100 riders in the 2014 rally. But the company has operated in stealth mode for quite some time, making helmets for well-known brands (as MHR helmets) before deciding to strike out on their own. They hired a Spanish marketing firm who set to work on design and style, then started selling factory direct to keep prices low. The MX453 Adventure costs only $169.95, undercutting name brands in the dual-sport adventure helmet market by hundreds while vastly surpassing the quality of other helmets in its price range.
The category "dual-sport adventure helmet" is defined by its hybrid components: a dual-sport or motocross style helmet with a large eye port covered by a flip-down shield where you’d normally wear goggles. These helmets also sport a visor to shield your eyes from the sun and an extended chin bar for breathing room and ventilation. All this so you can exercise your right to wrestle your bike through the dirt heading west at sunset. Here's Reg on YouTube explaining the "adventure helmet" concept.
The target market for this variation on helmets is riders like me with our single-cylinder dual-sport enduros like the KLR 650 and KTM 690, and the big-bore adventure motorcyclists with BMW and KTM Adventures and the skills for off-tarmac fun. I see another great market in riders of the smaller dual-sport bikes who set off across the Sahara all the way to Cape Town, never exceeding 40 mph.
Touring helmets, like my Schuberth C3 modular (review HERE), by contrast, are targeted to long-distance tarmac riders attracted to speed and aerodynamics. In short, a visor, despite the sunshade, would only slow us down. But if you do both touring and dual-sport touring, your need for more than one purpose-built helmet is justified—along with a stable of motorcycles to match, of course.

The LS2 MX453 arrived just in time for Jonathan Ely and me to take it along on a trip to Baja, trailering our KTM 350 and 450 EXCs. Jonathan, by the way, owns the pricy Arai XD-3 ($500) which made it easy to compare the Adventure feature-by-feature. (The new Arai XD-4 is available now.) For this review I also researched many other helmets in the dual-sport adventure category, doing some price and feature comparisons on the most popular. The two closest competitors are the Fly Trekker and AFX FX-41 in the $125 range. There really is no “mid-range” product in this category - though it could be argued that the LS2 would sit here if sold at a higher price via an intermediary. I did find the Icon Variant, which looks similar but is more a “hybrid” street helmet than a dual-sport helmet. One Variant is priced at $350 and the lighter carbon fiber model is $550. Then there’s the rock-bottom Bilt brand starting at an unbelievable $69. Finally you’ve got the brands on the highest ends, the Shoei Hornet and Arai Xd-4, both at over $550. There are many more but I just had to stop geeking out on this topic and finish this review.
In Baja, Jonathan and I unloaded the KTM dual-sports to explore backcountry and beaches, taking them for short rides down the tarmac at about 50 mph. We rode long stretches of remote sandy beaches and some scrabbly trails that usually dead-ended in impassible cactus-infested rock faces. Since the KTMs are unfaired I had expected the visor on the Adventure to catch the wind and throw my head back at tarmac speeds, but two very large diamond-shaped cutouts let the air through and prevented liftoff. Though Jonathan loyally defends his Arai, he had to admit that this was a thoughtful feature. Check out the photo comparing the two designs and you’ll see why I have less lift-off when riding at high speeds.
The MX453 Adventure’s fiberglass tricomposite shell also makes the helmet impressively light - not noticeably heavier than Jonathan’s size medium XD-3. My size small fit me perfectly and I found it very comfortable riding all afternoon. I haven’t used it for all-day touring yet but I think four or five hours at a time proves its wearability. The cheek pads are cut from one solid block of foam and other inner padding is smooth and substantial enough to keep my head from rattling around or making contact with any hard parts. There is also not any noticeable noise from the helmet itself, an irritation I’ve found with many lower-priced helmets.
When I took it for the first ride down Baja Highway One I was immediately struck by the view afforded by the ultra-large eye port they branded with the term “360 Concepts.” It actually gave me the startling feeling I wasn’t wearing a helmet at all. It was truly weird to feel as if there was nothing between my face and the road and I kept tapping the shield just to make sure. Soon there were a couple of bugs on it which eased my mind. This would also attest to the quality of the shield, which doesn’t distort the view. I wore my polarized Maui Jim sunglasses under the helmet with no discomfort. (My shield is clear but you can buy tinted shields.) Of course I also appreciated the visor to shade my eyes from the glaring Baja sun.

In the photo of the Arai and the LS2 side-by-side you can also see the large curved area at the bottom of the shield, which makes it easy to flip up no matter where you put your thumb. (But it also distorts your view when looking straight down, which didn’t really bother me.) The shield actuation is incredibly smooth and it stays where you put it. Many other helmets have one small visor-lift tab placed on the left side. The shield actuation on the Arai is on the firm side, and it’s sealed with a substantial gasket. The only irritation I’ve had with the MX453 so far is that the flimsy gray gasket has already started to pull away on the left side where my thumb rubbed when I pushed up the shield. (You can also see that in the photo.) Since I ride in San Diego and Mexico I wonder if that’s a result of the glue drying out in our consistently dry weather conditions. It’s nothing that a new application of glue won’t fix, and I’m not trying to compare it directly to the Arai, which of course is three times the price. That said, you’ll notice that Jonathan’s front vent went missing in Baja, again, possibly due to hot dry conditions drying out the glue. Oh, the sacrifices we make for living in Southern California!
The venting on the Adventure was adequate with a more airy feel than any other motocross helmet or conventional helmet I’ve ever worn. This might be more indicative of this style of helmet than the LS2 specifically, since they’ve all got the motocross helmet style breathing room and a shield instead of goggles pushing against your face. Speaking of goggles, other reviewers have noted that it’s much easier to fit goggles under the shield on the Adventure than other brands. (The shield is also easy to remove if you want to wear googles only.) There’s a lot of room in the chin bar for heavy breathing which is so much appreciated when working hard to get the bike through rocks and sand. A switch inside the chin bar controls the front vents, and two vents on top are also switchable. I could feel airflow through the chin and top of the head all the way to the exhaust vents at the back.
You can buy the LS2 MX453 Adventure helmet at online dealers and even at Amazon, along with replacement padding, shields, and visors. The sizes seem "true" and it was an easy fit with no pressure points - which is the impression other reviewers have had as well.
Jonathan bought his $500 Arai because it’s the quietest dual-sport adventure helmet available and it’s also got very high safety ratings. Comparatively, the $160 Adventure seems quiet enough and in fact one respected reviewer found it quieter than the Shoei Hornet. Nevertheless, I still wear earplugs (which I don’t always wear with my Schuberth C3) because the KTM is louder and buzzier than my other bikes and of course I ride off-pavement at higher RPMs.
The MX453 Adventure is DOT and ECE approved but not Schnell approved, but if it’s good enough for Europe it’s good enough for me. The chinstrap is nicely padded and has a standard D-ring closure system. (But I do wish everyone would go to the European ratchet system that I’ve grown so fond of on my Schuberth C3.)
When you compare the Adventure feature-by-feature with other helmets in this price range it quickly becomes apparent that this is the best buy by far in the low to mid-priced group. This may be a result of the factory-direct distribution which cuts out the intermediary sales channel. The new Arai Xd-4 at over $500 is generally considered as the best in this category, and it is proven the quietest. But of course if you have a Shoei head (and $500), you’d spend your money with them. If you’re super price conscious you might be tempted by the Bilt helmet at an amazingly low $69, or the popular ACX or Fly models at $30 less. But after a few casual try-ons at motorcycle stores, and after researching expert opinions around the web, I’ve come to the conclusion that spending the $160 on the LS2 MX453 Adventure would be the wisest investment.
I’m really glad Reg at LS2 approached me to test out this helmet. It is perfect for my style of riding, which is mainly adventure touring on the KLR and the R100GS, and dual-sporting on the smaller KTM 350 EXC. Heck, I might even try it when riding my big Moto Guzzi cruiser, so that on my rides from Borrego Springs back home to San Diego the visor shelters me from the glare of the setting sun.

LS2 is HERE.
What is it?


More soon . . .
Since Craig recognized the mystery product as a Sunrocket, a solar kettle/thermos, here's the rest of the story.
The Sunrocket is manufactured by Sun Cooking, an Australian company that also makes a solar oven. Lest you dismiss solar ovens as a street-fair curiosity suitable for roasting hot dogs one at a time, know that Roseann uses a solar oven (from a U.S. company) to produce probably 25 percent of the meals at our off-the-grid home in the desert, summer and winter. Those meals have included roast chicken, stews, biscuits, even cakes and cookies, all produced with zero fossil fuel and zero carbon emissions. So I was intrigued by the idea of a solar kettle, the counterpart to my venerable volcano kettle that boils water in a couple of minutes using a twig fire oxygenated by a vortex effect.
The Sunrocket (made in China) comprises a central tube of doubled, evacuated glass with a high silicon content for thermal stability and strength, side reflectors of polished aluminum, and a plastic body, with a metal handle that doubles as a lock for the reflectors and a prop to orient the tube toward the sun. A vent in the screw-in lid releases steam when the contents boil and acts as a safety valve. The capacity is listed at a half liter (17 ounces); however, the instructions say to leave a bit of air space at the top, leaving actual capacity at a bit under a pint. This would be enough for two cups of tea, or one large cup of coffee using a pour-through filter. (Curiously, while the website calls it a Sunrocket, as does the box it comes in, the embossing on the actual product says SunKettle, which I like better anyway and plan to use as the generic reference.)
I filled this one and set it in the sun on a balmy (70ºF) afternoon. An hour later the water inside was at 160ºF. Okay, so it's no volcano kettle—however, that temperature and dwell time would have been enough to safely purify water from a suspect source. And of course I was free to ignore the kettle and start writing this piece. The center tube was cool to the touch—fascinating how easily heat can get in and yet not out. Thirty minutes later the water was at a near-boiling 200º—plenty hot enough for coffee or tea. And given the vacuum insulation, the contents will stay hot for hours.
 The sun kettle, deployed.
Conclusion? While it's not exactly compact (the box, in which I'd be sure to carry it for protection, is 4.5 by 18 inches), or fast, the effortless and completely green nature of the Sunrocket makes it a nifty device for camping. I'll continue to use my volcano kettle for morning coffee (which I want right now), but the Sunrocket will have water hot for elevensies. And it would be excellent for leaving in the sun to heat water for washing—or purifying—while you do other things.
Sun Cooking is HERE. The Sunrocket ($67 including shipping) is available in the U.S. HERE.
A versatile storage box: the Wolf Pack
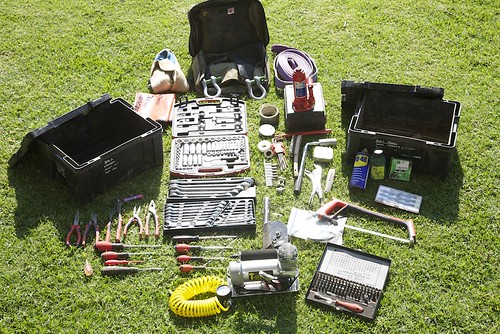 A pair of Wolf Packs holds tools for a Defender 110 in Tanzania.I have yet to meet the perfect overlanding cargo box. Pelican cases are nearly perfect when contents absolutely, positively must be kept dry and dust-free, thus they are the box of choice for, say, photo and video equipment. But Pelican cases are quite heavy for their volume, and pretty expensive for everyday cargo. Zarges (or the similar Alu-Box) aluminum cases are strong, lightweight, and boast excellent interior to exterior volume, but are even more expensive (although you can consider the expense an investment as they last forever with reasonable care).
But more economical alternatives always have some fatal flaw. The affordable Rubbermaid Action Packers are excellent for home storage, but their volumetric efficiency is abysmal and they leak if rained on, so you can’t leave them outside the vehicle when camped unless they’re under cover. If strapped down too tightly (i.e., properly . . .), they collapse. Lower-priced alternatives are even worse.
Several years ago in Tanzania I discovered the plastic ammunition cases used by the South African military, now commercially produced and known widely as Wolf Packs. They’re moderately sized and so easy to arrange in a cargo bay, completely rainproof and reasonably dustproof, and vertical-sided to avoid wasted space (except for hollow corner pieces). They stack securely for convenient storage at home. The Wolf Packs suffer from poorly designed latches—those familiar with them will call that a hilarious understatement— and the lids flex more than I’d like when called upon to do duty as a step, but otherwise they are sturdy, versatile, and sport a certain exotic flair given their origins. Front Runner Vehicle Outfitters is now a U.S. distributor, and for $40 each you can justify several—trust me, you’ll find uses for all you get. We have six, and just glancing around the shop I can see uses for another six. Or ten.
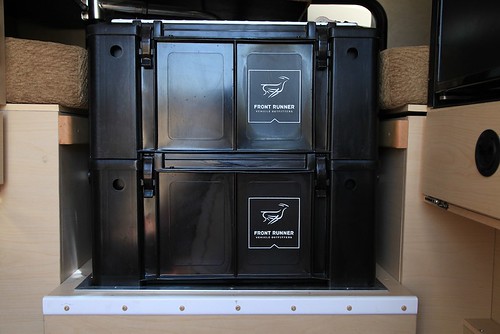
We found that a pair of Wolf Packs stacks and straps down perfectly in the shower grate of the JATAC, under the dinette table. Another rides near the door, and holds all the items we use for pitching camp: drain hose for the galley sink, leveling blocks, guylines and stakes for the awning, etc. I sourced some 1/4-inch thick aluminum diamondplate and fabricated steps for the lids of two of them, attached with small stainless bolts; the three now form a perfect staircase to access the camper when we’re parked.
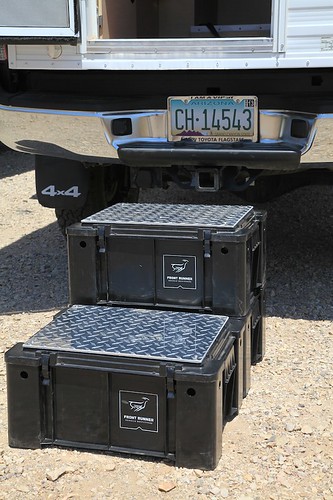
I also keep two in the back of my FJ40. One holds recovery gear; the other contains a small stove and cook kit, water, and other odds and ends to make an emergency camp or an impromptu picnic.
 A pair of Mac's Tie-Downs anchor plates and rings, bolted through each side of the dinette seat box, provides anchors for the ratchet strap that secures the boxes.
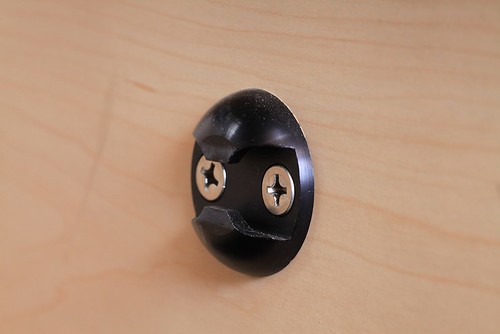 When not needed, the ring detaches instantly.
Front Runner's website is here. They also sell improved steel latches.
The ins and outs of airing down
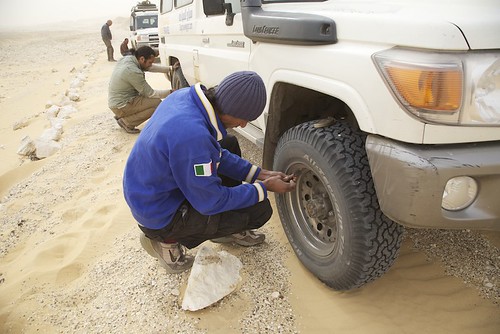
Airing down in Egypt
My early four-wheel-drive experience was strictly trial and error, heavy on the error. A friend owned a beat-up mid-60s FJ40 shod with skinny Armstrong True Tracs and equipped with a Ramsey winch wrapped with a rusty steel cable. We took that thing everywhere, including trails around southern Arizona that I’d later learn were rated 4+ and even 5 on the vehicle-based system. When we got stuck or couldn’t drive up some ledge, which was frequently, we’d simply unspool the winch cable, wrap it around a big rock and hook it to itself (I know, I know), and pull ourselves out. The rocker panels on that poor 40 eventually got battered into gentle arcs (call it a “redneck body lift”). But we had fun and learned a lot—enough that when I got my own, much nicer, FJ40 I was able to keep its rocker panels the way the ARACO body plant meant them to be.
This do-it-yourself approach explains why I came late to the concept of airing down tires on off-pavement trails and four-wheel-drive routes—I simply didn’t hear about it until well into the 1990s, when I began subscribing to magazines that included articles by expedition travelers such as Tom Sheppard. It never would have occurred to me on my own that deliberately letting air out of one’s tires could be a good thing.
Now, of course, the benefits are well-known to anyone who has read anything about overland travel: Reducing tire pressure to suit the conditions allows the tire to more effectively mold itself to the terrain. That increases traction, which reduces wheel spin. That in turn reduces trail damage as well as stress on the vehicle’s drivetrain and wear on the tire itself. In soft sand the enlarged footprint (which comes mostly from lengthening of the tire carcass, rather than widening) provides hugely increased flotation. It’s basically a win-win-win technique, as long as one is circumspect about mixed terrain: You might choose 14 psi for soft sand unless that sand is interspersed with sharp rocks likely to puncture a sidewall (as we encountered in Egypt with the dreaded kharafish—razor-edged lumps of limestone). Airing down even enhances ride comfort on rough roads, as it allows the tire to conform to small obstacles rather than bouncing over them.
If the benefits of airing down are so well-known, why don’t more people practice it? It boils down to two issues: sheer laziness, and lack of proper equipment. And the former is often caused by the latter. If you have to deflate each tire one at a time using the awl on your Swiss Army knife or the button on the back of a tire gauge, and if re-inflation is a 45-minute process tackled with a $29.95 compressor (“with flashlight!”) better suited to blowing up volleyballs, you’re just not likely to do it unless you actually get stuck first.
Since tire failure—whether a simple puncture, losing a bead, or damaging a sidewall—is still the number one cause of vehicle breakdowns, a high-quality compressor should be part of your kit anyway. In fact, after the most basic upgrades on any 4WD vehicle—tires, for example—a proper compressor comes near the top on my list. Maybe even before a fridge.
With a good compressor to handle re-inflation, your next goal is to avoid prolonged genuflecting in front of each tire, letting air hiss out slowly though the valve. There is a dirt-cheap way to accomplish this: Buy a valve-core removal tool. Although it seems drastic, removing the valve core is the absolute quickest way to deflate a tire, yet it’s not so quick as to be difficult to control. Your pressure gauge will still work, and you just need to be ready to reinsert the valve core when the pressure gets close to your target.
The big problem with this technique—besides the fact that it’s a manual, one-at-a-time procedure—is that the tire pressure will do its best to wrest the tiny valve core out of your grasp just as you’re removing (or reinserting) it, and send it flying ten feet over your shoulder. By the time you find it (assuming you can), you’ve got a flat tire.
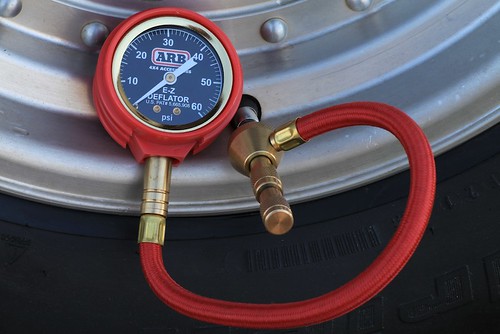
A safer and more stylish approach to the VCR technique can be had with the ARB E-Z Deflator. This tool comprises an elegantly complex brass fitting with a hose and gauge. The fitting screws on to the valve stem, and a separate knob then unscrews the valve core but contains it securely within the mechanism. Pulling back on the collar attached to the air hose and gauge then allows air to escape with a satisfying whoosh. Push back in to stop the flow and check the pressure. It appears to be just as fast as the riskier method—I deflated a 235/85 R16 BFG All-Terrain (my reference tire for the entire test) from 40 psi to 18 in 33 seconds flat.
However fast it is, the ARB still requires full operator attention—which brings us to automatic deflators. While not as quick individually as valve-core removal, you can be doing other things, such as chatting to your friends, getting a snack, or checking the vehicle, while the tool does its work, and if you have multiple deflators the total process can be quicker than the fastest one-at-a-time technique. In fact, with two of the types of deflator reviewed here, you can drive off while they’re attached and working, thus reducing the time stopped to a couple minutes, and pretty much eliminating your last excuse not to do so.
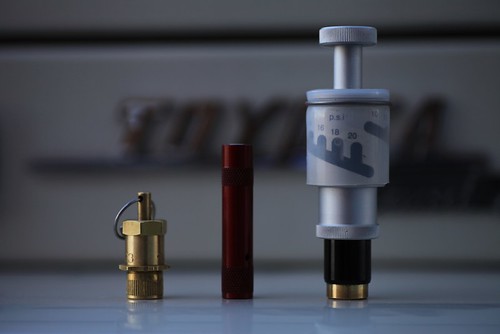
Left to right: Staun II, Trailhead, and CB Developments automatic deflators
The mechanics of an automatic tire deflator are deceptively simple. Essentially the device comprises a plunger with a seal, and a spring calibrated to compress at a certain psi to allow air to flow past the seal and out of the tire. By using a screw-in cap as a base for the spring, its tension can be altered to allow multiple settings in one deflator. The engineering feat is to produce a device that will do this accurately and repeatably over a broad range of pressure.
Coyote Enterprises Staun II $80 (set of four)
Staun is the grandfather of deflators, designed in Australia in 1998. I had one of the early sets, and while they were convenient, I found the target pressure to vary by as much as two or three psi—potentially critical if you’re airing down to the low teens (below one bar) in soft sand. Go too low unintentionally and apply too much welly or steering lock and you can pop the tire bead off the rim. So I was curious to see if the newer style would be more accurate.
The second-generation Staun (made in the U.S., and covered by a lifetime warranty) benefits from a number of modifications. The claimed range is now an astonishing 3 to 50 psi—the original Stauns needed three part numbers to cover this span. Two sets of springs are included to adjust the limits. Also, there is a manual start ring, which among other things allows you to initiate deflation if there is insufficient pressure difference to trigger it otherwise—say, if your tires are at 21 psi and the Stauns are set to 18, or if you want to bump the pressure back down after airing down on a cold morning and driving until the tires warm up (they regain a bit of pressure when hot). The new Stauns also take only two or three turns to lock onto the valve stem. Finally, the maker now sanctions driving off with the Stauns in place and letting them work en route.
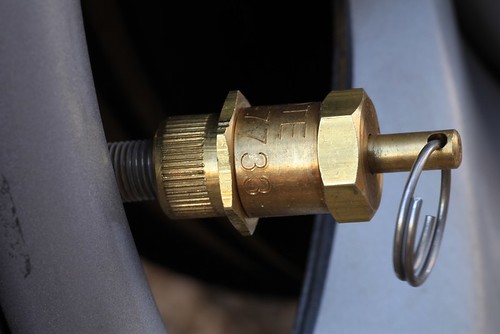
Made of solid and confidence-inspiring brass, the Stauns come with a clear set of calibrating instructions. First, manually deflate a tire to the nominal pressure at which you want to set the Stauns. Turn the hex locking nut and the top of the deflator all the way down (clockwise). Now screw the deflator on the tire until it’s snug, and slowly turn the top of the deflator counterclockwise until air is released. Immediately turn it back clockwise until the air just stops, then turn the lock nut up until it locks the body in place. That’s it. If you prefer different pressures on the front and rear of the vehicle, you can set two to each, and file a notch in the edge of one pair to identify them.
I used 18 psi as my target—it’s a good rough-trail pressure for my FJ40 and many similar-sized vehicles. If you’re quick you can calibrate all four deflators on the reference tire without adding air, but I bumped it back up with the compressor after two (the 235/85s don’t have a lot of volume). With the tire reinflated to 40 psi, I screwed on one of the Stauns and clicked a stopwatch. Three minutes and 19 seconds later, the device snapped closed, and my calibrated gauge confirmed that the shutoff pressure was dead on 18 psi. Reinflating to various pressures and trying the remaining three produced nearly identical results: None was more than a half pound off. Furthermore, with the manual-start ring I found I could initiate deflation even when the tire pressure was only two or three psi higher than the set pressure.
You can estimate a new setting on the Stauns in the field by loosening the lock ring and turning the cap. One turn either direction (clockwise to increase, counterclockwise to decrease) equals “three to four” psi according to the instructions. Mine seemed to do about three per turn, but it’s definitely a rough guide.
Given its accuracy and additional features, the Staun II is clearly a worthy upgrade to the original.
Trailhead $75 (set of four)
Trailhead (originally Oasis) deflators pioneered the “drive-away” function, which made stopping to air down a two-minute procedure. While the Stauns now offer the same capability, I have to admit I was hesitant to do so given their relatively weighty brass construction. Not so with the Trailheads—each slim anodized-aluminum unit weighs barely ten grams, compare to 25 for a Staun.
The procedure for calibrating the Trailhead deflator is a contrast as well. Using the included 5/32 hex key, you unscrew the internal cap until it is perfectly flush with the body. This represents the lower end of the range (5 psi on my 5 to 20 psi model; a 15 to 40 model is also available). From there, each full turn back in supposedly represents an increase of 1.5 psi. To get to my target of 18, I counted up—6.5, 8, 9.5, etc.—until I got to 17, and then added about two-thirds of a turn to estimate 18. I screwed on the deflator and hit the stopwatch, and it shut off just two minutes and 19 seconds later. However, when I checked the pressure in the tire it was at 20 psi. I gave the cap a full turn back out and tried again. This time, after two minutes and 31 seconds, it was within a half pound of 18. I tried the same procedure with the other three units, and each one stopped around two pounds short of the target pressure. So setting the Trailheads precisely required more fiddling. Once finished, however, they remained accurate.
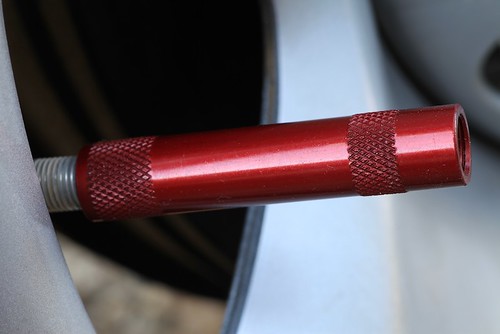
The Trailhead deflators have no manual start function, and the instructions caution that initial tire pressure must be roughly twice the set pressure for them to self-initiate. I found that a bit pessimistic—mine would all initiate at 32 psi when set to 18. But trying again at 30 produced only silence. So if you drive a vehicle that takes that 30 psi on the road, you’ll have to air down to 16 or below for the Trailhead deflators to work.
The Trailheads can be bought in mixed colors —aluminum, red, or blue—making it easy to identify when you set them up differently for front and rear tires. They are made in the U.S. and come in a pouch with instructions, the hex key, a tire gauge, and a handy tire deflation guide.
CB Developments Mil-Spec Tyre Deflation Valve $100 (each)
Compared to the lengthy calibration sequence necessary to set up the Staun and Trailhead products, the procedure for CB deflators couldn’t be more different: There isn’t one. Push and turn the knurled knob so the pin indexes with the target psi on the body of the deflator, and screw the assembly on your valve stem. That’s it. No need to deflate a reference tire, and no need to use math and a wrench if you want to change settings for differing conditions (or different vehicles) in the field—just turn the knob to the new target. I set one of the CB deflators to 18 psi, screwed it on my 40-psi test tire, and just two minutes and 22 seconds later it was finished, beating out both the Staun and, by a slim margin, the Trailhead. Furthermore, every setting I tried, all the way down to 10 psi, was within a half pound of my calibrated gauge. And the deflator would initiate with as little as two pounds of difference between the tire’s pressure and the target. An excellent performance.
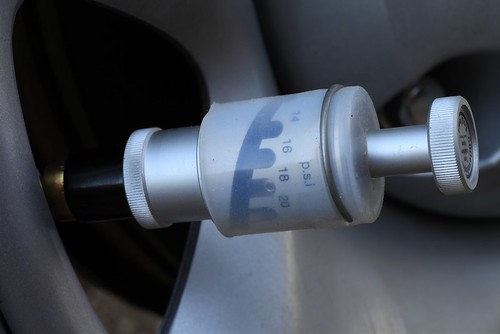
Of course, you pay for that convenience, speed, and accuracy. A single CB deflator costs significantly more than an entire set from Trailhead or Staun. A full set of four would be a frightening chunk of cash. And you cannot drive with the bulky CBs in place, so are tied to the time it takes for however many you own to do their work. The CB deflators also lack the upper range of the Stauns or Trailheads—the highest range model carried by Extreme Outback Products, the U.S. distributor, stops at 20 psi (CB Developments makes another that extends to 24). That means those of you with Sportsmobiles and other heavy rigs, who consider 40 psi to be “aired down,” are out of luck. In fact 20 psi might be marginal for our Tacoma and Four Wheel Camper in anything but soft sand; on the road we keep 50 psi in the rear E-rated BFGs.
Conclusions
All these deflators worked as advertised, and all were very accurate once calibrated. So in a way you can’t go wrong. But in the end I did have preferences.
The Trailhead deflators boast the lowest cost—I’ve seen street prices under $60 for a set—and they were significantly faster than the Stauns. The multi-color option is a nice feature. Their single-hex-key adjustment makes them easier to manipulate than the two-piece adjusters on the Stauns—although as we have seen, the Trailheads take more fiddling to arrive at the target setting. But their biggest drawback is the lack of a manual-start function, and the significant difference in pressure necessary for them to self-initiate. I can recall many situations I’ve been in where they simply would not have worked.
The Staun II deflators run roughly $10 more per set than the Trailheads. However, for that you get a much wider pressure range in one part number, faster calibration, and the ability to initiate deflation with just a few psi difference between the tire and your target. Their sole downside was the slower speed, if the difference between two and a half minutes and three and a quarter minutes is critical to you. I’ll be curious to see how a potential “Trailhead II” deflator responds to the Staun II challenge.
The CB deflators are in a league of their own, in performance, convenience, and price. As long as the psi settings you require lie within the range of the device, there is no easier or more accurate deflator. I keep a pair in my FJ40, and their versatility more than makes up for the fact that I have to deflate tires a pair at a time. If I need to reduce pressure from my nominal 18 to, say, 14, it’s the work of an instant to change the setting—no guesswork needed.
Among the automatic deflators, then, the CB Development Mil-spec product wins if price is no object and the range fits your vehicle. If you baulk at the thought of a $400 set of deflators (or even $200 for a pair), an $80 set of Stauns will serve admirably—and suit a wider range of vehicles to boot.
As to the ARB EZ Deflator, while it is a manual tool, it is in many ways the most versatile of the bunch. If you have a Global Expedition Vehicle* at one end of your garage that you only air down to 55 psi, and a rock buggy with beadlocks at the other end that you take down to four, the ARB is the only tool here that will handle both—and anything in between. At $40 it is the least expensive of all these options. (*That is, ahem, if you didn’t order the GXV’s optional central tire inflation system, which makes this entire article a moot point for you . . .)
Searching for a bottom line, I ran a series of back-to-back double-blind experiments controlled for temperature, humidity, and elevation, and determined that the mean time to stop the truck, deploy a set of Staun deflators, let them finish, and pack them away again is six minutes 37 seconds—which happens to be the exact time it takes to retrieve a cold Coke from the fridge of the JATAC and finish it while sitting in the shade.
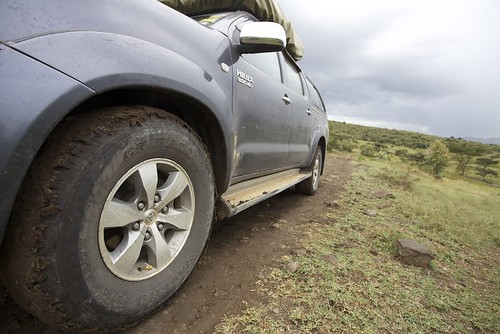
Staun deflators at work in the Rift ValleySource links: ARB, Trailhead, Staun (Coyote Enterprises), CB Developments (Extreme Outback Products)
An update for the Safe Jack
If you've read THIS entry, you know I was impressed by the Safe Jack stabilizer for the Hi-Lift Jack. In many scenarios it vastly increases the utility and safety of the Hi-Lift, and the base plate on its own makes a fine replacement for the old orange plastic ORB base in soft sand or mud.
I've been using the tool for a couple months now, and remain impressed. However, like almost any new product, I noticed potential for improvement. The design of the upper clevis precluded the jack's handle from resting against the standard, so the spring clip that holds the handle vertical when the jack is unattended would not engage. (I've been carrying a strip of One-Wrap Velcro to secure the handle when needed.) The clevis also limited somewhat the upper travel of the jack's foot.
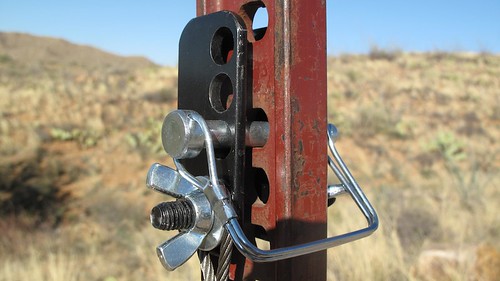
Apparently Richard Bogert of Bogert Engineering noticed the same issues, because he recently sent me a redesigned upper clevis. The new piece now attaches to the front of the standard rather than the rear, and the eyebolt tensioner is gone. This increases travel, and allows the handle to touch the standard, engaging the spring clip. A new clevis pin with a wire latch simplifies attachment, and two side-mounted wing nuts adjust tension if necessary. The new piece even saves weight compared to the old one, and on the front face is a section of UHMW polyethylene to protect the vehicle should the tool come into contact with it.
If you own a Safe Jack with the original clevis, Bogert will send you the updated version for fifteen bucks. That's barely more than postage alone would cost. Of course new Safe Jacks will all be equipped with the updated part.
It's an excellent upgrade, and makes a good tool even better. Production should be underway within a week; check with Bogert Engineering HERE.
Kaufmann Mercantile

My first encounter with Kaufmann Mercantile was nearly my last.
A friend sent me a link to a page on their site that featured a slingshot. Cool—except this slingshot was made from the natural fork of a buckthorn tree branch, its air of Tom Sawyer Americana yours for $21.
What?
No one buys a treefork slingshot, I spluttered. A treefork slingshot is something you make yourself when you’re 10 years old, using a cut-up bicycle inner tube as propulsion. I made one, and used it to essentially random effect before discovering the relative deadliness of the Trumark Wrist Rocket*.
I nearly clicked off the site, but some sort of morbid curiosity induced me to read further. Turns out the buckthorn is an invasive species in Minnesota, and the trees are regularly cut down to stumps by community service groups. A fellow named Bill Pine makes slingshots from the offcuts.
Well . . . okay. I still was of the opinion that red-blooded kids should make their own damn slingshots, but at least the philosophy behind these was commendable. So I forced myself to look beyond the nearby “handmade wooden rope swings” (don’t get me started . . .)—and wound up spending a good half hour browsing through a fascinating hodgepodge of high-quality odds and ends, from sturdy wire crates built in a century-old factory in Texas, to handmade ceramic growlers, to riveted aluminum lunch boxes from Canada, to Sheffield-made cabinet-maker’s screwdrivers (or should I say “turnscrews”). I could have dropped a thousand bucks effortlessly in that time—yet, unlike so many twee boutique online catalogs, the Kaufmann site also had loads of interesting items under $20. Clearly the founder of the company, Sebastian Kaufmann, wasn’t just interested in expensive stuff; he simply liked good stuff, especially if it’s unique.
So . . . sigh . . . now I’m on Kaufmann’s insidious emailing list, and rarely a week goes by without some temptation.
Recently I had them send me a couple of intriguing items: a pair of elkskin work gloves with, unusually, the smooth, outer side of the leather turned in, and a so-called EDC (Every-Day Carry) keychain kit, about which more in a minute.

The gloves are made in Centralia, Washington, by a company called Geier, who’ve been doing it since 1927. Like deerskin, elkskin is soft and somewhat elastic, but considerably thicker and more durable. Most significantly, turning the smooth outer surface of the leather inside creates what is simply the most comfortable work glove I’ve ever used, and I go through a lot of gloves where we live. Ordinary full-grain cow-leather gloves, with the rough surface in, can become work-hardened—especially if they’ve gotten wet during use—and offer less than perfect protection against friction. The Geier/Kaufmann gloves should stay pliable until worn completely through. They can even be washed safely with soap and warm water.
I used them for some Hi-Lift jack demonstration, and also for shoveling and pick work. In both situations the feel of the tool through the glove was excellent—critical for safe operation, particularly on the jack—but I could feel no hot spots whatsoever through the slightly springy leather. The suede exterior surface is grippy enough so I didn’t need to squeeze unduly hard to maintain a safe hold.

I did find one contra-indicated use: The suede is not as resistant as smooth leather to constant friction, for example when respooling winch line (even synthetic). I’d recommend either the smooth-out Geier elkskin glove or one of their cowhide (or bison!) gloves for such use.
Alexis at Kaufmann also suggested I try one of their EDC keychain kits, and what an immediately useful trinket that turned out to be. It comprises a mini pry bar, one standard and one phillips screwdriver, an Uncle Bill’s precision tweezer in a little clip, and a curious little stainless-steel lozenge that looks like it could be a container for medication.
I used the mini pry bar within days for removing paint can lids and those nasty big staples that secure shipping boxes. The screwdrivers take a surprising amount of torque if you use the keychain as a grip and lever—I removed door-hinge screws as an experiment, with no trouble. The tweezer: I live in cactus country, ‘nuff said.

And the lozenge? Unscrew it, and it reveals what I have to say is the cutest lighter I’ve ever seen. It takes standard lighter fuel, has an O-ring to prevent fluid getting out and water getting in, and lights every time. The one caution is, you don’t want to leave it burning for more than about 15 seconds, or the whole thing gets alarmingly hot.

Looking at the lighter, I was reminded of the spark generator in the SOL Origin survival kit (reviewed HERE), with which I was less than impressed. Aside from the fact that it was billed as something that could save your life, it was also described as waterproof—a claim I hadn’t tested. I wondered how the survival tool would stack up against this little trifle of a lighter, so I dunked them both in a glass of water for 15 minutes. Afterwards, the “survival tool” would barely produce a flicker of a spark—I might have been able to ignite a bucket of gasoline, but natural tinder? Forget it. The little lighter, on the other hand, fired right up. Drop me in the middle of the forest and there’s no question which of these I’d rather have with me. As with the other items in the EDC kit, it’s available separately, and I can think of places to keep two or three of them handy. (The pry bar too is especially useful as a keychain accessory—it prevents you from pressing your Swiss Army Knife's screwdriver into tasks for which it was not designed.)

Kaufmann Mercantile is HERE, but I absolve myself of responsibility for the consequences if you go.
*New York state apparently finds them too deadly: wrist-braced slingshots are illegal there. I am not making this up.
Irreducible imperfection: the SOL Origin
Manufacturing miniature survival kits must be the closest thing to printing your own money short of selling bottled water. I’ve looked at dozens of them, and rarely found contents worth more than about $2.95—usually some fish hooks and monofilament, a few feet of cheap paracord, matches or friction fire starter, a button compass, and a couple of safety pins. Maybe a tiny mirror for signaling. For a while many of them came with a condom, the stated purpose of which was not to provide safe sex with that drooling grizzly bear loping in your direction, but to carry water. Right.
I’ve recently been evaluating the SOL Origin survival kit, which retails for around $40, and I must say the contents of this kit are a step up from some. In fact, I’d say there’s a good six or seven bucks worth of stuff in here.
SOL stands for Survive Outdoors Longer (as well as the banal double entendre). SOL is a division of the parent company that owns Adventure Medical Kits, which I’ll say up front produces some of the very finest expedition first-aid kits, one of which is standard equipment on all our African projects.
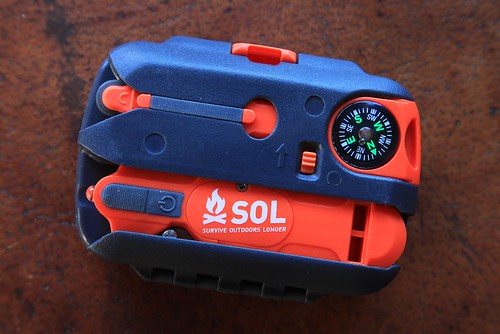
The SOL Origin comprises an ABS plastic case enclosing the following:
- Three square feet of aluminum foil—sorry, heavy-duty aluminum foil according to SOL
- A combination knife, LED flashlight, and whistle
- A liquid-filled button compass
- A “Fire Lite” thumb-wheel fire striker
- Four #10 fish hooks
- Fishing line
- Six feet of .020” stainless-steel wire
- Signal mirror
- Two snap swivels
- Two split-shot line weights
- Four pieces of braided “Tinder Quick”
- Sewing needle
- Ten feet of 150-pound-test braided nylon cord
Okay—maybe I was wrong about the six or seven bucks worth of contents. Let’s make it five.
So, what do we have here? I’ll start with the palm-sized case, which for some strange reason comes with a wrist lanyard, as though that’s how you’d carry it around ready for deployment the instant you felt disoriented. The case is constructed in such a way that the knife/flashlight/whistle, the fire striker, and the button compass slide into slots on the outside. This accomplishes several nifty things at once. It increases the chance one or more of those items (the most critical in the kit) will be damaged or come loose and be lost; it severely reduces the internal volume of the case, rendering it unusable for, say, scooping water out of a crevice or digging; and it makes the device look much more tactical, meaning the maker can charge more than if they gave you a simple metal box that could also be used for cooking or boiling water.
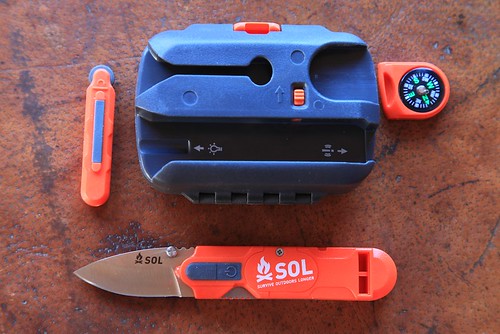 You hope they don't come out of their own volition. The LED bulb is visible at the base of the knife blade; whistle on the other end. Battery compartment is under the "SOL" lettering.
The button compass is simple, well-dampened, and seems to work just fine. Since most people who become lost know more or less in which cardinal direction civilization (or at least the road) lies, it could be a useful tool. There’s a little thumbnail slot in it to facilitate removing it from the case; if this had been pushed through all the way you’d have the option of hanging the compass around your neck on a cord. You could easily drill it out.
The knife blade is 1 3/4 inches long, made from actually-not-bad AUS-8 stainless steel, and is quite sharp. It opens with a right-handed thumb stud, and even locks with a simple Walker liner lock—at least, it’s supposed to. I found that light finger pressure easily overpowered the lock. Best to pretend it’s not there rather than count on it to prevent getting cut. The blade flexes back and forth rather alarmingly on its pivot. The knife would be perfectly functional for gutting a trout or making feather sticks to start a fire, but for anything beyond that—building a shelter, for example—it’s worthless (and I think many so-called survival knives are far too large). The tiny LED flashlight casts a decent keychain-light-level glow and is supposed to shine for 15 hours. There is room in the case for a spare pair of button batteries (which you’d have to buy on your own). But the battery compartment is secured with a tiny Phillips-head screw, so unless you have the means to remove that . . .
The flashlight bulb shines along the axis of the knife, which sort of helps you see what you’re cutting, but it’s not nearly as effective—or as bright—as a separate flashlight would be, even one powered by a single AA battery.
The whistle opposite the knife blade is loud. Just don’t get distracted if you spot a would-be rescuer while whittling a tent peg or something, and stick the wrong end in your mouth.
 Lit - finally - but not much of a flame.
Next is the fire striker, to be used in conjunction with the four, inch-long bits of braided tinder inside, which appear to be infused with paraffin or something similar. Since, in many if not most survival scenarios, fire is your single most vital survival and signaling (not to mention psychological) tool, one would expect care to be taken here. The striker is said to produce up to 5,000 sparks, but—and this is assuming the thing hasn’t come out of its slot and disappeared—the sparks it generates are nothing like the shower produced by a proper ferrocerium stick. I tried it on one of the pieces of tinder, and it took me two minutes of repeated striking to finally get the cord lit, after which it burned with the strength of a large candle for a bit over two minutes, showing very little resistance to the light breeze that was blowing at the time. I literally used up a hundred or more of those 5,000 sparks to light a manufactured bit of tinder. I wouldn’t even try it on natural tinder. Could the cord have dried out during the time this kit sat on a shelf? Not good if so.
Last on the exterior list is the polycarbonate signal mirror, which hinges off the lid and thus at least can’t be lost easily. The aiming hole in the center of the mirror incorporates retro-reflective mesh, a material that allows extremely accurate aiming. The fold-out “survival pamphlet” in the case includes clear instructions on how to use it—which is lucky, because the graphic under the mirror is utterly incomprehensible. Nevertheless, the mirror is adequately sized and bright, protected from scratching, and undoubtedly the best implement in the kit.
 The signal mirror is a good one, but don't try to figure out how to use it from the graphic.
On to the inside contents. First, the “three square feet” of “heavy-duty” aluminum foil. At 5.5 by 11.5 inches, their math is a bit off, at least for the piece in my kit. My arithmetic comes up with slightly less than half a square foot. Second, I’ve encountered heavier foil wrapped around a stick of Juicy Fruit—this piece came pre-holed on one of the folds. Finally, even the makers seem unsure what to do with the stuff. The pamphlet says, under “Improvisation,” that it “can be used as a reflective device for signaling.” Isn’t the mirror better for that? Another suggested use is as “ . . . a head covering when the night comes on cold.” Okaaaay. So I tried it. I felt like a stick of Juicy Fruit.
 The author, contemplating actually facing the wilderness with this stuff.
Onward. Ten feet of braided nylon is perhaps enough to string between two trees to support a poncho or Space Blanket for a shelter. Or you could lash your 1 3/4-inch SOL knife to a stick and go hunting for . . . well . . . chipmunks, perhaps. Or meadowlarks. Twenty feet would have been better, and 20 feet of 550 paracord even better.

Safety pins. Three of them. I want to know: HAS ANYONE IN RECORDED HISTORY EVER NEEDED A SAFETY PIN IN A SURVIVAL SITUATION?
A sewing needle. So you can keep your survival duds neatly mended, or suture the gashes you sustained when that grizzly bear tried to . . . never mind.
Four #10 fish hooks, snap swivels, split shot, and monofilament line. A fine addition to the kit, given the right circumstances of course. In fact, I would have preferred more hooks in different sizes, and more line. The company’s site doesn’t specify the test of the included line, but it appears to be more than adequate for the hook size. It’s up to you to figure out out to crimp the split shot on the line. It’s also up to you to know the proper fisherman’s knot that will secure the slippery monofilament line to the snap swivels; the pamphlet includes none.
Six feet of snare wire (okay, they call it “safety wire,” but the pamphlet suggests using it for snaring). Another fine idea in theory. With a bit of training—and as with the fish hooks, the right habitat—snaring small mammals is a viable survival technique that requires minimal materials and minimal energy expenditure. However, the wire in the SOL Origin was so completely useless for this purpose as to be laughable if the company weren’t touting it as a life-saving device. It was so springy that even after concerted effort I could not straighten it enough to form a stable loop, yet it also kinked horribly. Finally, while holding one end down with a boot and pulling on the other end to try to straighten it, the wire simply snapped at one of the kinks. Not good. Even if the wire were suitable, you need multiple snares to ensure success, and six feet is not enough.
 The worthless- and broken - "safety wire" from the SOL Origin in the middle, with a professionally made wire snare capable of taking small game.
Thankfully, that was the last item in the kit, because by this point I was shaking my head in disbelief that the SOL Origin had ever reached the market in this form.
Let’s stop to postulate here. You’re lost in the wilderness. You have no vehicle, no means of communication. Depending on environmental conditions, the next 48 hours will determine whether you live or die. Do you really want to pin your future on a two-inch knife, a plastic spark generator, and some Reynolds Wrap?
Oddly, the kit’s pamphlet (written by Buck Tilton, who should know what he’s talking about, and who calls this “the best little survival kit in the world”) properly identifies survival priorities: positive attitude, medical care, shelter/fire, signaling, water, and food. The SOL Origin fails to address medical care and water at all (not even a few iodine tablets included), is marginal at best on food (worthless snare wire and adequate fishing supplies), and is poor on fire/shelter (build a lean-to with that knife?). Daytime signaling is the only facet that achieves good marks.
I’d even give it a fail on engendering a positive attitude. Given that up to half or more of your time spent lost is going to be at night, with all the attendant practical and psychological implications, the failure to include a proper flashlight is a strong hint that this kit was designed by a designer, not anyone with experience in survival situations.
I could go on to rant about the pamphlet too, but I won’t. Okay, just one: Water. Buck tells us, among other gems, that “ants” mean water is not too far away. I can show Buck lots of ants that don’t live within 50 miles of water. Also, “Birds, especially grain-eating birds, fly to water at dawn and dusk.” Buck, the operative word there is “fly.” And finally he repeats the old saw about “digging at the bends of dry washes.” The only thing you’ll wind up with eleven months of the year if you try that where I live is a pre-excavated grave.
The concept of a palm-sized survival kit is interesting, and I suppose one could argue that the SOL kit is better than nothing at all. But it would be absurdly easy to put together a kit taking up little if any more space, which would be infinitely more useful for saving your life. Yes, it would cost more—if you don’t think your life is worth more than a nice lunch out, I have an SOL Origin I’ll part with for a pittance. As it is, if I somehow found myself caught out with this thing in a survival situation, my first thought would be:
Man, I am SOL.
 Unfortunately, Buck won't be there when you need him.
Hint: When using “Search,” if nothing comes up, reload the page, this usually works. Also, our “Comment” button is on strike thanks to Squarespace, which is proving to be difficult to use! Please email me with comments!
Overland Tech & Travel brings you in-depth overland equipment tests, reviews, news, travel tips, & stories from the best overlanding experts on the planet. Follow or subscribe (below) to keep up to date.
Have a question for Jonathan? Send him an email [click here].
SUBSCRIBE
CLICK HERE to subscribe to Jonathan’s email list; we send once or twice a month, usually Sunday morning for your weekend reading pleasure.
Overland Tech and Travel is curated by Jonathan Hanson, co-founder and former co-owner of the Overland Expo. Jonathan segued from a misspent youth almost directly into a misspent adulthood, cleverly sidestepping any chance of a normal career track or a secure retirement by becoming a freelance writer, working for Outside, National Geographic Adventure, and nearly two dozen other publications. He co-founded Overland Journal in 2007 and was its executive editor until 2011, when he left and sold his shares in the company. His travels encompass explorations on land and sea on six continents, by foot, bicycle, sea kayak, motorcycle, and four-wheel-drive vehicle. He has published a dozen books, several with his wife, Roseann Hanson, gaining several obscure non-cash awards along the way, and is the co-author of the fourth edition of Tom Sheppard's overlanding bible, the Vehicle-dependent Expedition Guide.


