Overland Tech and Travel
Advice from the world's
most experienced overlanders
tests, reviews, opinion, and more
Classic Kit: The capstan winch
If you’ve ever crewed (or skippered) a sailboat longer than 20 feet or so, you’ve probably used a capstan winch to control lines such as the jib and spinnaker sheets. A basic capstan winch comprises a vertical drum geared so it will only turn one way (always clockwise on a sailboat). When you wrap the line around the drum (again, clockwise) two or three times, you can more easily control the forceful pull of the sail. The friction of the wraps helps prevent the line being pulled away from you. If you need more power to sheet in a sail in a breeze, a a fitting on top of the drum allows you to insert a crank for extra leverage. There are more elaborate capstan winches with two speeds, self-tailing mechanisms—and electrically powered winches that eliminate the need for manual cranking.
For many years, a capstan winch could also be ordered as a factory option on Land Rovers and a few other vehicles. Visually the vehicle-mounted capstan winch was very similar to our sailboat winch; however, it was powered through a gearset from a driveshaft usually connected directly to the vehicle’s crankshaft via a sliding coupler. The worm-drive gearset reduced the 600 or 700 rpm of an idling engine crankshaft to just a dozen or so turns per minute of the drum (which, curiously, rotates counterclockwise on every one I’ve seen).
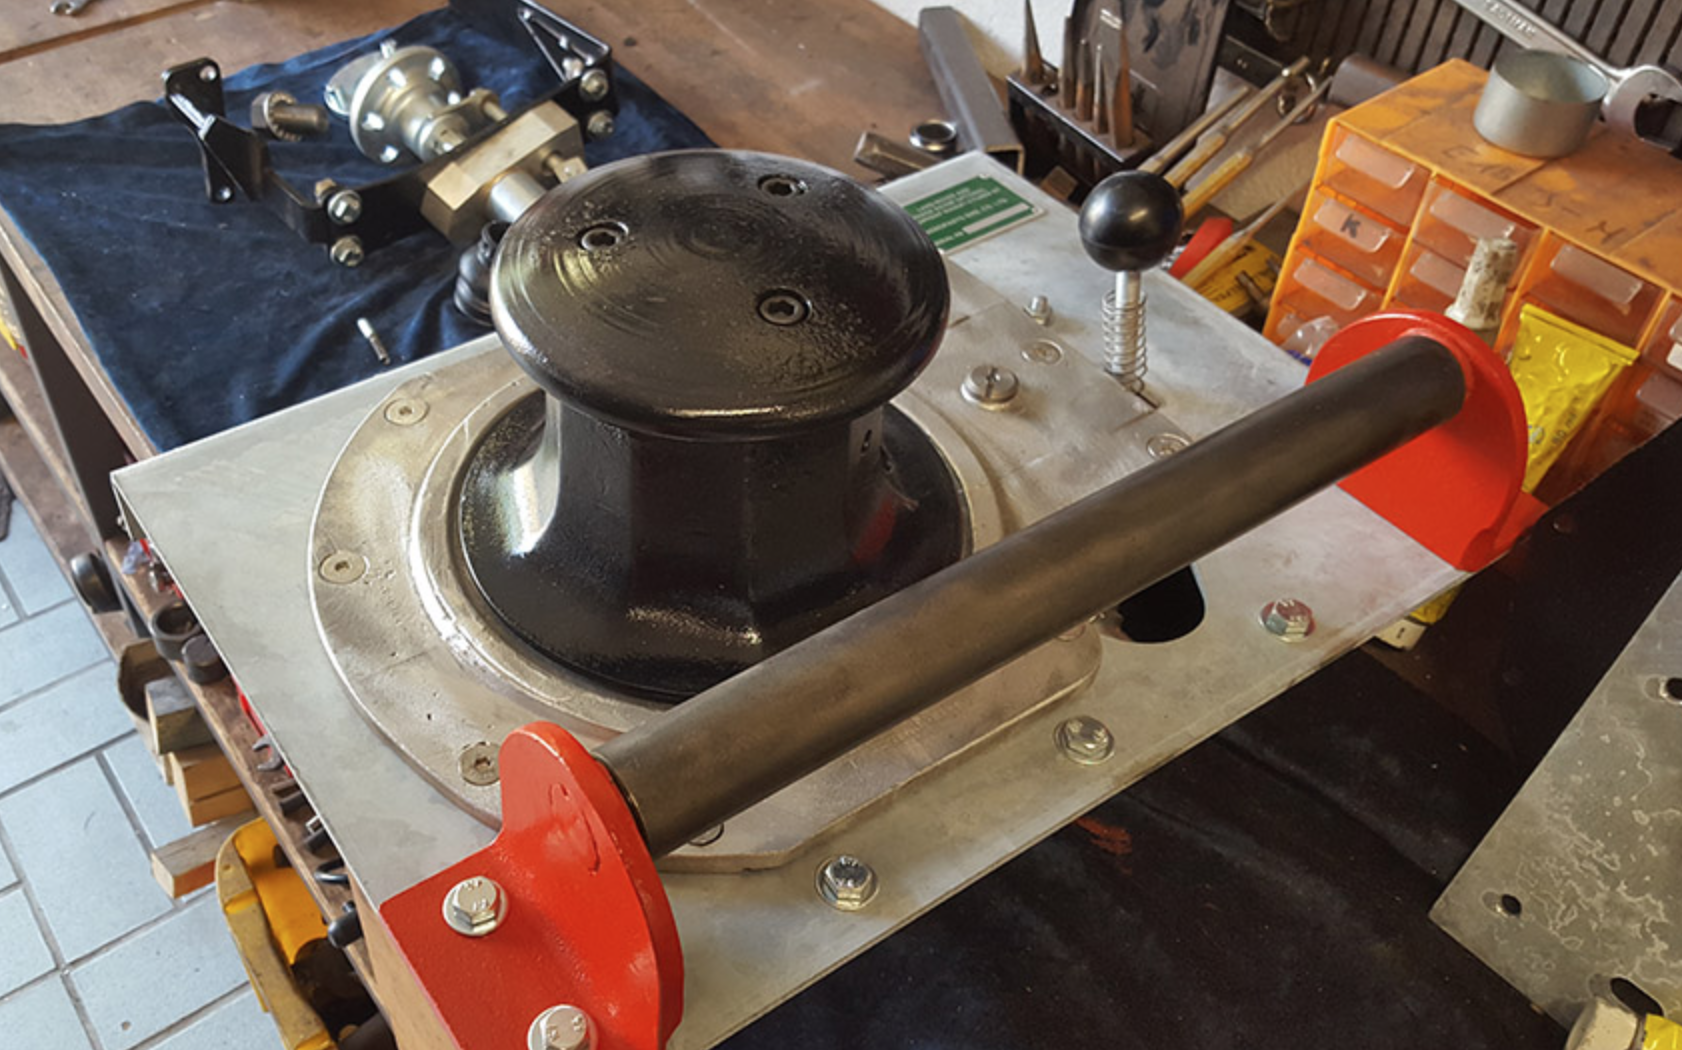
A capstan winch at LR-Winches. Engagement lever is at upper right. The rope is led under the roller from the anchor or object to be moved.
A capstan winch has an entirely different method of operation from the common, horizontal-drum electric, hydraulic, or even PTO winch with which we’re familiar. You don’t store line on the capstan, and it cannot use steel cable. Instead you carry a separate, low stretch rope—traditionally 3/4-inch manila or an equivalent natural fiber—of whatever length you chose, with a hook on one end.
Let’s say you’re driving your Series II 88 along a forest track and you come across a downed tree blocking the way. Pulling it out of the path would go like this:
Position the vehicle so the winch has a clear route to drag the tree off the path. Leave the engine idling, transmission in neutral (obviously), parking brake on and, if possible, the wheels chocked as well. (If you have a hand throttle you can bump up the engine rpm a bit.) Wrap a strap around the tree and connect your winch rope to it with its hook. Take the free end of the rope back to the vehicle, run it under the roller guide and around the drum three or four times counterclockwise in an ascending spiral, then lay the free end of the rope off to the left of the vehicle as you’re facing the front. With the coils of the rope around the drum still loose, engage the lever to connect the drum to the gearset and the drum will begin turning slowly—but the loose rope will simply slip around it. Now stand back from the vehicle a few feet and pull on the free and of the rope to tighten the wraps around the drum. The drum will grab the rope and begin pulling on the downed tree, as you take in the rope fed you by the winch. You now control the speed and engagement of the winch simply by pulling or slacking off on the rope to tighten or loosen it around the drum. Once the tree is off the path, let the rope go slack, disengage the gearset with the lever, and de-rig. It’s that simple.
Of course you can also connect the rope to a standing tree or another vehicle to free yours if it is bogged; however, since the capstan winch requires someone standing outside the vehicle to operate the winch, it’s nearly mandatory to have a second person in the driver’s seat to steer the vehicle and stop it once it’s free. Solo vehicle recovery with a capstan winch can be a very dicey operation indeed.
Consider the situation pictured below. Tom Sheppard was in Mali in 1978, en route to Timbuktu, driving his Land Rover Velar—that’s right, the original prototype of the Range Rover—and towing a trailer full of fuel and water, when a section of mud proved a bit deeper and stickier than was apparent from the driver’s seat.
Tom’s Range Rover was equipped with a Fairey capstan winch cleverly hidden behind the grille—note the horizontal roller on the bumper. To deploy it one simply unscrewed the center grille section, a matter of a couple of minutes. However, Tom was, as is common with him, traveling solo. Therefore he first unloaded all 21 (!) jerry cans from the trailer, decoupled it from the Range Rover, and recovered the Range Rover with aluminum sand (i.e. mud) ladders. Then he positioned the Range Rover in a spot where he could use the capstan winch to recover the trailer, re-connect it to the Range Rover, reload all 21 jerry cans, and continue on his way.
(Tom’s story made me remember the tour Roseann and I got of the Gaydon Museum, courtesy Land Rover historian extraordinaire, Roger Crathorne. I looked up one of the photos, which shows, in addition to Roger and me, one of the Range Rovers used on the 1971/72 Trans-Americas Expedition—and there was a capstan winch peeking out from behind the grille.)
The capstan winch’s labor-intensive method of operation, combined with its modest power—most were rated for around 3,000 pounds, as was the rope used on them—saw them fade from popularity with the increasing availability of horizontal-drum electric winches of considerably higher rating. Yet the capstan had its advantages. It could work all day without overheating or stressing the vehicle’s electric system, and its line capacity was essentially unlimited—if you needed to rig a 200-foot pull, all you needed was a 220-foot rope. And that labor-intensive method of operation gave the operator instant control over the procedure—let off on the rope tension and the pull stops instantly. The capstan winch, with its leisurely speed, hands-on attitude, and natural-fiber rope, always struck me as, well, the friendly winch compared to the whining, straining, ozone-smelling electric winches of today (hugely capable though they certainly are). Go ahead, laugh.
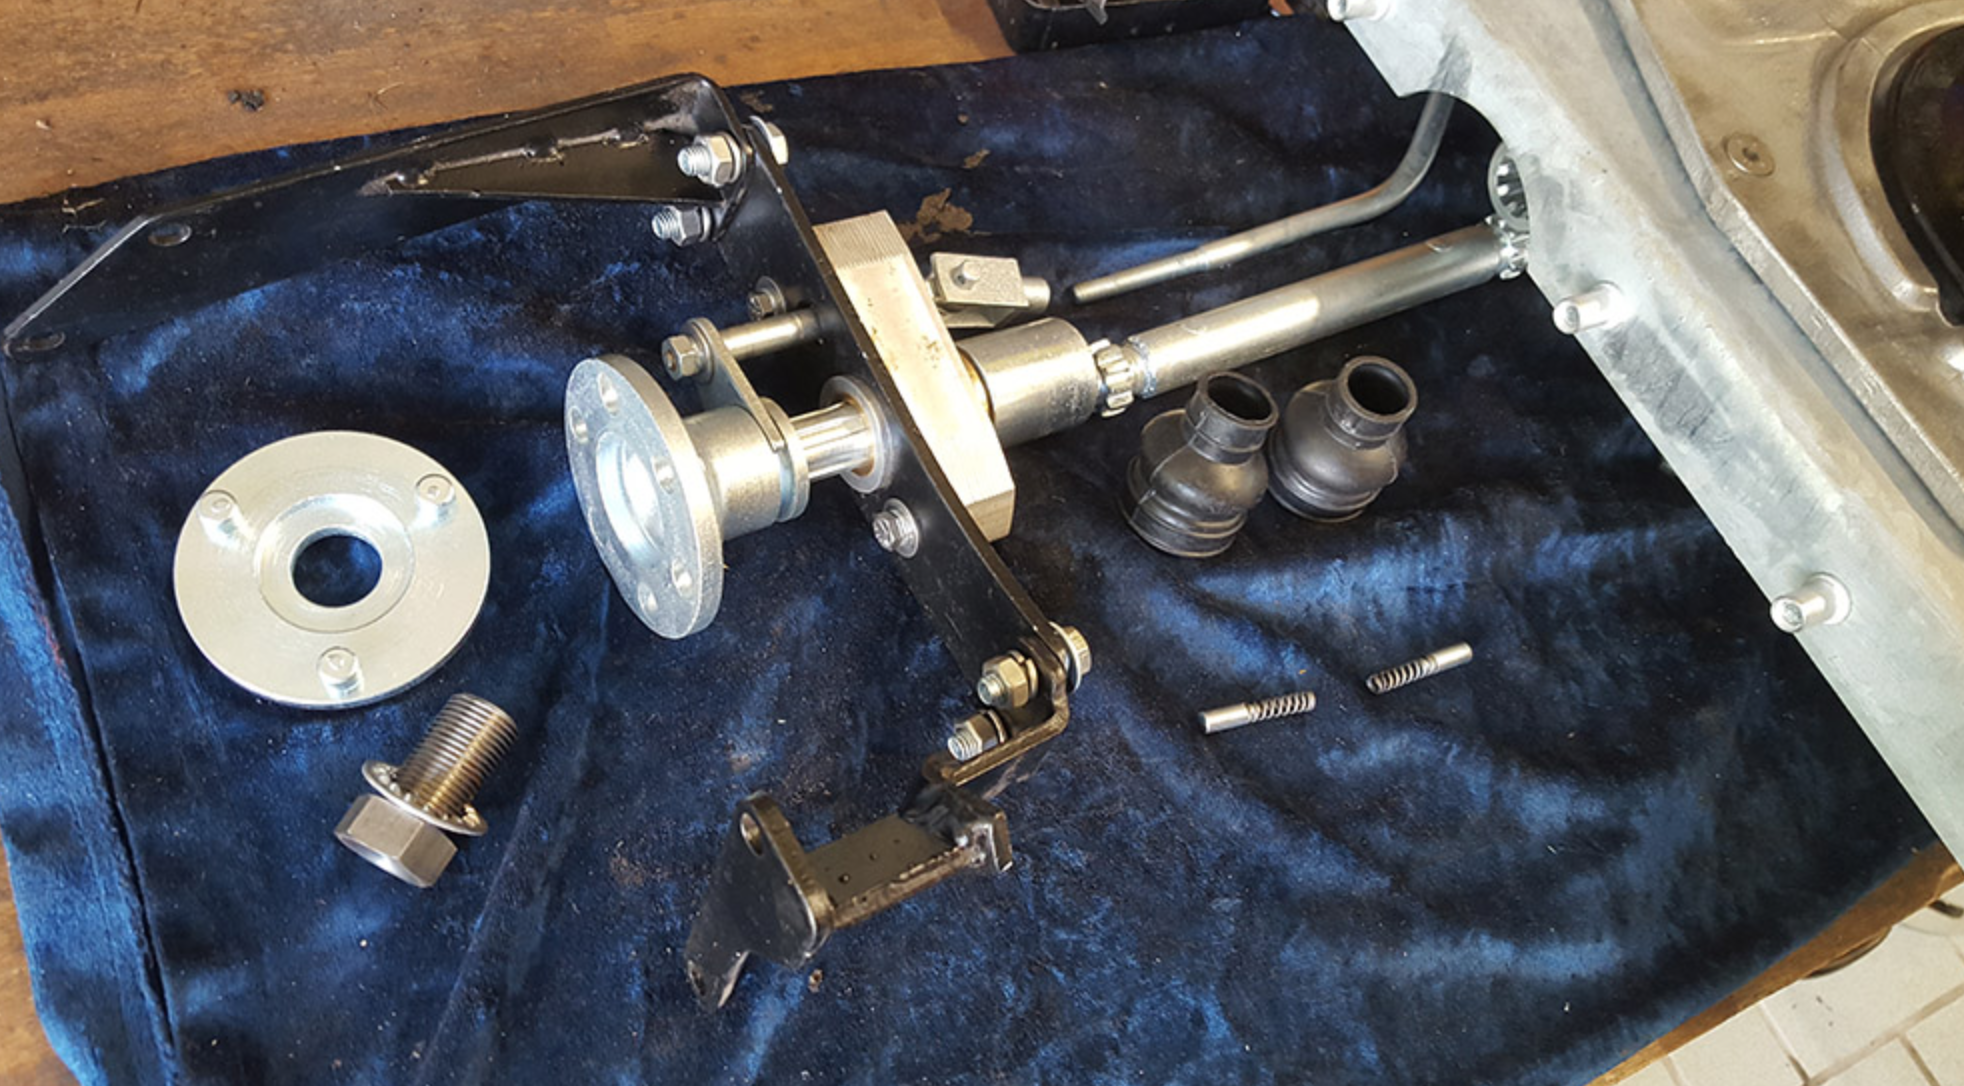
This is the driveshaft and engagement mechanism that allows the capstan to be powered off the front of the vehicle’s engine.
You can still, very occasionally, spot a vehicle equipped with a capstan winch—virtually always a Series Land Rover. If you own a Series Land Rover and have a hankering for a curious and historical piece of very useful equipment, you can still buy one (or parts for one) through sources such as the experts at LR-Winches (where most of these images originated). You can even buy a synthetic rope suitable for a capstan winch, from LR-Bits.co.
But I’d recommend sticking with the manila rope. It’s just . . . friendlier.
For a . . . curious . . . installation of a capstan winch, see here.
The versatile 1/4-inch ratchet . . .
The ratchet and socket set is the most critical component of your tool kit. It’s what comes out when things need attention that are held on to the vehicle with actual nuts and bolts, rather than just trim screws or plastic press fittings. Important things, in other words. I’ve always maintained it’s the part of your kit you should spend the most money on, to get the absolute highest quality. Of all the tools I’ve broken over the years, the majority by far have been cheap sockets that split, or cheap ratchets that jammed or broke altogether.
Most owners—me included—start out with a 3/8ths-inch ratchet and socket set (the 3/8ths refers to the diameter of the anvil, the square peg on the ratchet to which you attach the sockets). A 3/8ths set will comfortably handle bolts or nuts from about 9mm or 5/16ths inch up to 19mm or 3/4 inch. That’s suited for a lot of medium-sized repairs—replacing fan or serpentine belts, water pumps, radiators, etc. Above that you really should step up to a 1/2-inch ratchet, which is able to handle larger sockets for fittings such as those on suspension components, which need more torque to remove or fasten securely.
Thus for a long time my automotive tool kit has included a 3/8ths-inch ratchet and socket set for general work and a 1/2-inch set for major repairs. And that worked just fine. But lately I’ve been rethinking. Why? Several reasons.
Even a 3/8ths ratchet can be a bit long and bulky when working in tight spaces on fasteners smaller than 11 or 12mm. Yes, you can add a short-handled ratchet to the kit, but the head will still be just as bulky. And your 3/8ths socket set will probably have a lot of overlap with your 1/2-inch set. Typically the former will include sockets up to about 19mm, and the latter will include sockets down to 12mm. I’d rather use a 1/2-inch ratchet for that 19mm nut, yet a 1/2-inch ratchet is silly overkill for any 12mm bolt or nut I’ve ever encountered.
Enter the 1/4-inch ratchet. It’s smaller all around, able to fit into spaces no 3/8ths equivalent could. You can argue that the ratcheting mechanism is inevitably weaker as well, but consider two things: First, there is only so much torque necessary for even a 12 or 13mm fastener; second, a high-quality ratchet will withstand force comfortably in excess of any you’re likely to need. I’ve yet to meet a 12mm or even 13mm nut that I couldn’t remove with a 1/4-inch ratchet. And it will be far handier for smaller sizes.
Additionally, a 1/4-inch ratchet and socket set will cost less than a larger one, so you can go for higher quality. Finally, the 1/4-inch set will be lighter and take up less space, a surprisingly real consideration even in something such as our Troop Carrier, the tool bin of which is approaching maximum capacity and the GVWR of which is approaching, period.
So I’ve been wondering if a versatile combination might be a 1/4-inch set with sockets ranging from very small, say 4 or 5mm, up to about 13mm, and a 1/2-inch set with sockets from 12 or 13mm up to whatever you like—my current set goes up to 32mm. The slight overlap would mean that if you ever did run into a recalcitrant 12 or 13mm bolt while using the 1/4-inch kit, you could switch up to the 1/2-inch.
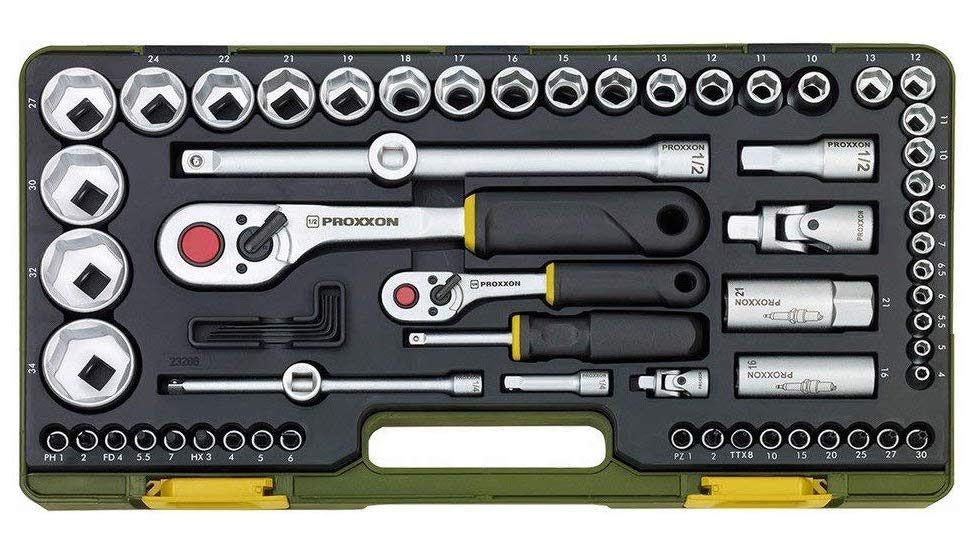
I have a nice mixed set of 1/4-inch stuff, but this scheme was a perfect opportunity to spend money on tools. I like investigating brands new to me, and my friend, driving trainer extraordinaire Graham Jackson, is fond of the German brand Proxxon, so I looked them up on Amazon, and ordered the 23280 49-piece “Precision Engineer’s” 1/4-inch drive set.
The first thing that impresssed me was the box it came in. While plastic rather than metal, it had decent sliding latches rather than the usual flimsy snap latches with stressed-plastic hinges, which invariably fail. A nice touch.
Inside I first examined the ratchet itself. The mechanism was a fine 72-tooth unit. Check. Push-button release, check. Lever-operated reversing switch, check. Perfect. The offset head is supposed to ease access to tight spaces. Not sure about that one.
The selection of sockets was very good. Standard sockets from 4mm to 13mm—perfect. They’re forged from chrome vanadium with a double-nickel and single chrome layer finish for corrosion resistance. They of course employ a copy of Snap-on’s Flank Drive system to help grip rounded off nuts (and to avoid rounding them off). A bonus was a comprehensive selection of bits for either the ratchet or the included driver: Screwdriver bits, hex bits, and Torx bits. Five sockets for external Torx fittings. There was even a little selection of angled allen keys, 1.25 to 3mm. The set included two ratchet extensions—one of which included a (removable) sliding T-bar fitting—and a universal joint.
The only flaw I found was the paucity of deep sockets—just four of them, in 6, 7, 8, and 10mm. Odd. Why not a full complement up to 13mm? I would have traded the external Torx sockets for them. As it was there was no space in the tray for additional sockets. But . . . what’s this? There appeared to be some voids in the box under the molded tray. Indeed, when I lifted it out there were several generous gaps.
I called the U.S. Proxxon headquarters. They told me they don’t directly import the hand tools sets, only power tools (I bought mine through a third party dealer). However, when I told them what I was trying to do they generously offered to special-order the sockets I wanted. So I filled in the deep sockets and bought a flexible drive extension as well. All those plus a Snap-on flex-head 1/4-inch ratchet fit underneath the tray.
I guess I need to clean up those holes.
Now I had a comprehensive 1/4-inch socket and ratchet set with the bonus of the driver bits and handle. As expected, it was significantly more compact than an equivalent in 3/8ths. The last task was to make it easier to get the molded tray out when I wanted the stuff in the bottom. So I Dremelled two slots in the tray, and ran a piece of flat 1/2-inch webbing through them and under the tray, leaving the ends loose on top. It’s now easy to pull the tray free.
Our Troop Carrier has a comprehensive set of tools, but they live in a cabinet under a bench that is somewhat of a pain to get to. I’ve been wanting to have a more convenient tool kit for small repairs and adjustments. This Proxxon set, with its combination of sockets and bits, should fill that role perfectly—and it’s compact enough to fit behind a seat.
Hmm . . . I wonder if I should order another two or three sets?
Epilogue: Regarding my idea that a 1/4-inch socket set combined with a 1/2-inch set might be all one needs for just about any job: Proxxon sells a kit (23286) that combines just that, with sockets from 4mm all the way to 34mm. Impressive. Just add some deep sockets and a breaker bar.
The Hiplok Z Lok
Securing one’s possessions while on a trip is an annoying but critical concern. Inside the vehicle we lock down our large, important items—Pelican cases, etc.—with bicycle-style cables and padlocks stout enough to resist all but a really determined criminal with bolt-cutters and time.
But there are many other smaller items, and other circumstances, where one needs minimal protection from a snatch-and-run thief, involving minimal hassle and weight. Some time ago I read about the Z Lok from Hiplok, and my bicycling friend Geoff in Sydney just gave me one.
The Z Lok is essentially a glorified ziptie, but much stouter, cored with a strip of steel—and, saliently, reusable. A simple forked key disengages the double steel teeth that secure the tie inside a steel-reinforced head. It’s strong enough to resist a really strong yank, and would be nearly impossible to cut with a knife (although not with a good pair of side cutters).
While any thief could buy one and carry the forked key around looking for an opportunity, that’s an unlikely scenario. The Z Lok would be excellent for many situations—locking my camera case to the table while I’m having lunch at an outdoor café; securing my bicycle helmet to the bike—even quickly locking the bike itself if I just wanted to duck inside a coffee shop for a takeaway.
At around 12 bucks on Amazon, or $20 for a pair, I can think of a zillion uses for these things.
Smittybilt "Recovery Strap"
Before last year’s Overland Expo West, as we were juggling trucks and trailers and various four-wheel-drive vehicles to make sure we had all the transport and training equipment we’d need in Flagstaff, Roseann mentioned that we should have a basic recovery kit—a Microstart and a recovery strap—in every vehicle. Of course our main travel vehicles already had full kits to go with the winches on them, so I went online and found some inexpensive (Chinese-made) but brand-name “recovery straps” from Smittybilt. I tossed one in each of the spare trucks.
This morning, for the first time, I took one out of its cellophane wrapper, and was incredulous at what I found.
Nowhere on either the paper label or on the strap itself does it indicate whether this is a kinetic recovery strap or a non-kinetic tow strap. The only mention of materials is the note that it has “ballistic nylon reinforced ends,” which of course says nothing about the composition of the strap itself. Elastic nylon or non-elastic polyester? The paper label claims the two-inch-wide strap is rated to 20,000 pounds. Nowhere on the strap itself does it indicate this, or whether that rating is a working load limit or a minimum breaking strength. The sole scant indication of intended use comes all the way down the list of characteristics on the label, a line that says simply, “low stretch.” Does that mean minimal stretch, as one needs for a tow strap, or low stretch as in it will stretch if used kinetically, but not a lot?
My conclusion is that the Smittybilt “Recovery Strap” is actually a non-kinetic tow strap. But the lack of solid information, especially regarding the composition of the strap, and its advertisement as a “recovery” product, could effortlessly lead a consumer to employ this in a kinetic situation, with potentially disastrous consequences.
This is a bad, bad effort on Smittybilt’s part.
If you’re shopping for a tow strap or a recovery strap, make sure what you buy lists clearly its:
Precise intended use—towing or kinetic recovery
Materials—stretchy nylon or non-stretchy polyester
Working load limit (WLL) or minimum breaking strength (MBS)
And make sure all this information is on a durable label on the product itself.
Don't risk "Gargo damage." And note that "Strenght" could be reduced . . .
A new fuel can
Carrying extra fuel, whether for the vehicle or an accessory such a a generator or chainsaw, always requires balancing different requirements. First and most critical is absolutely leakproof storage. Next comes ease of handling, and the speed with which the fuel can be dispensed. Then there must be a way to secure the container so that it will not shift even in the event of a traffic accident or rollover on a trail.
The gold standard as far as I'm concerned—despite its origins in 1937—is still the classic steel NATO-style (ex-Wehrmacht) jerry can, with the original cammed lid. I've found them to be absolutely leakproof, even when stored on their sides in full summer sun. The clamp-on spout incorporates a breather that makes dispensing a very fast process—convenient now but essential when your Kubelwagen was about to be strafed by a Spitfire. Even without the spout attached, dispensing fuel into a funnel is easy thanks to a built-in lip. I have a pair of NATO cans on my FJ40 that I bought at least 15 years ago—and they were surplus then. I've replaced the cap gaskets once; they still function perfectly.
When the U.S. reverse-engineered the Wehrmacht can in WWII to produce the so-called Blitz can, we sadly cut corners. Rather than perimeter-welding the seam, we used a crimped bottom and side seam, and replaced the brilliant cammed lid with a screw-on lid that was too large in diameter, making it virtually impossible to tighten enough to prevent seepage. I've never owned a Blitz can that didn't seep at the crimped base and leak at the lid. Pouring fuel from a Blitz can without a spout is an exercise in annoyance as there is no lip whatsoever and fuel cascades down the can and all over one's boots.
Likewise, my experience with the current plastic U.S. Scepter can has been disappointing, for the same reason: The large-diameter screw-on lid does not develop sufficient clamping force. As proof look at the several styles of double-handed wrenches available to augment one's own muscle power when installing or removing the lid. Not needed with the NATO can's cammed lid.
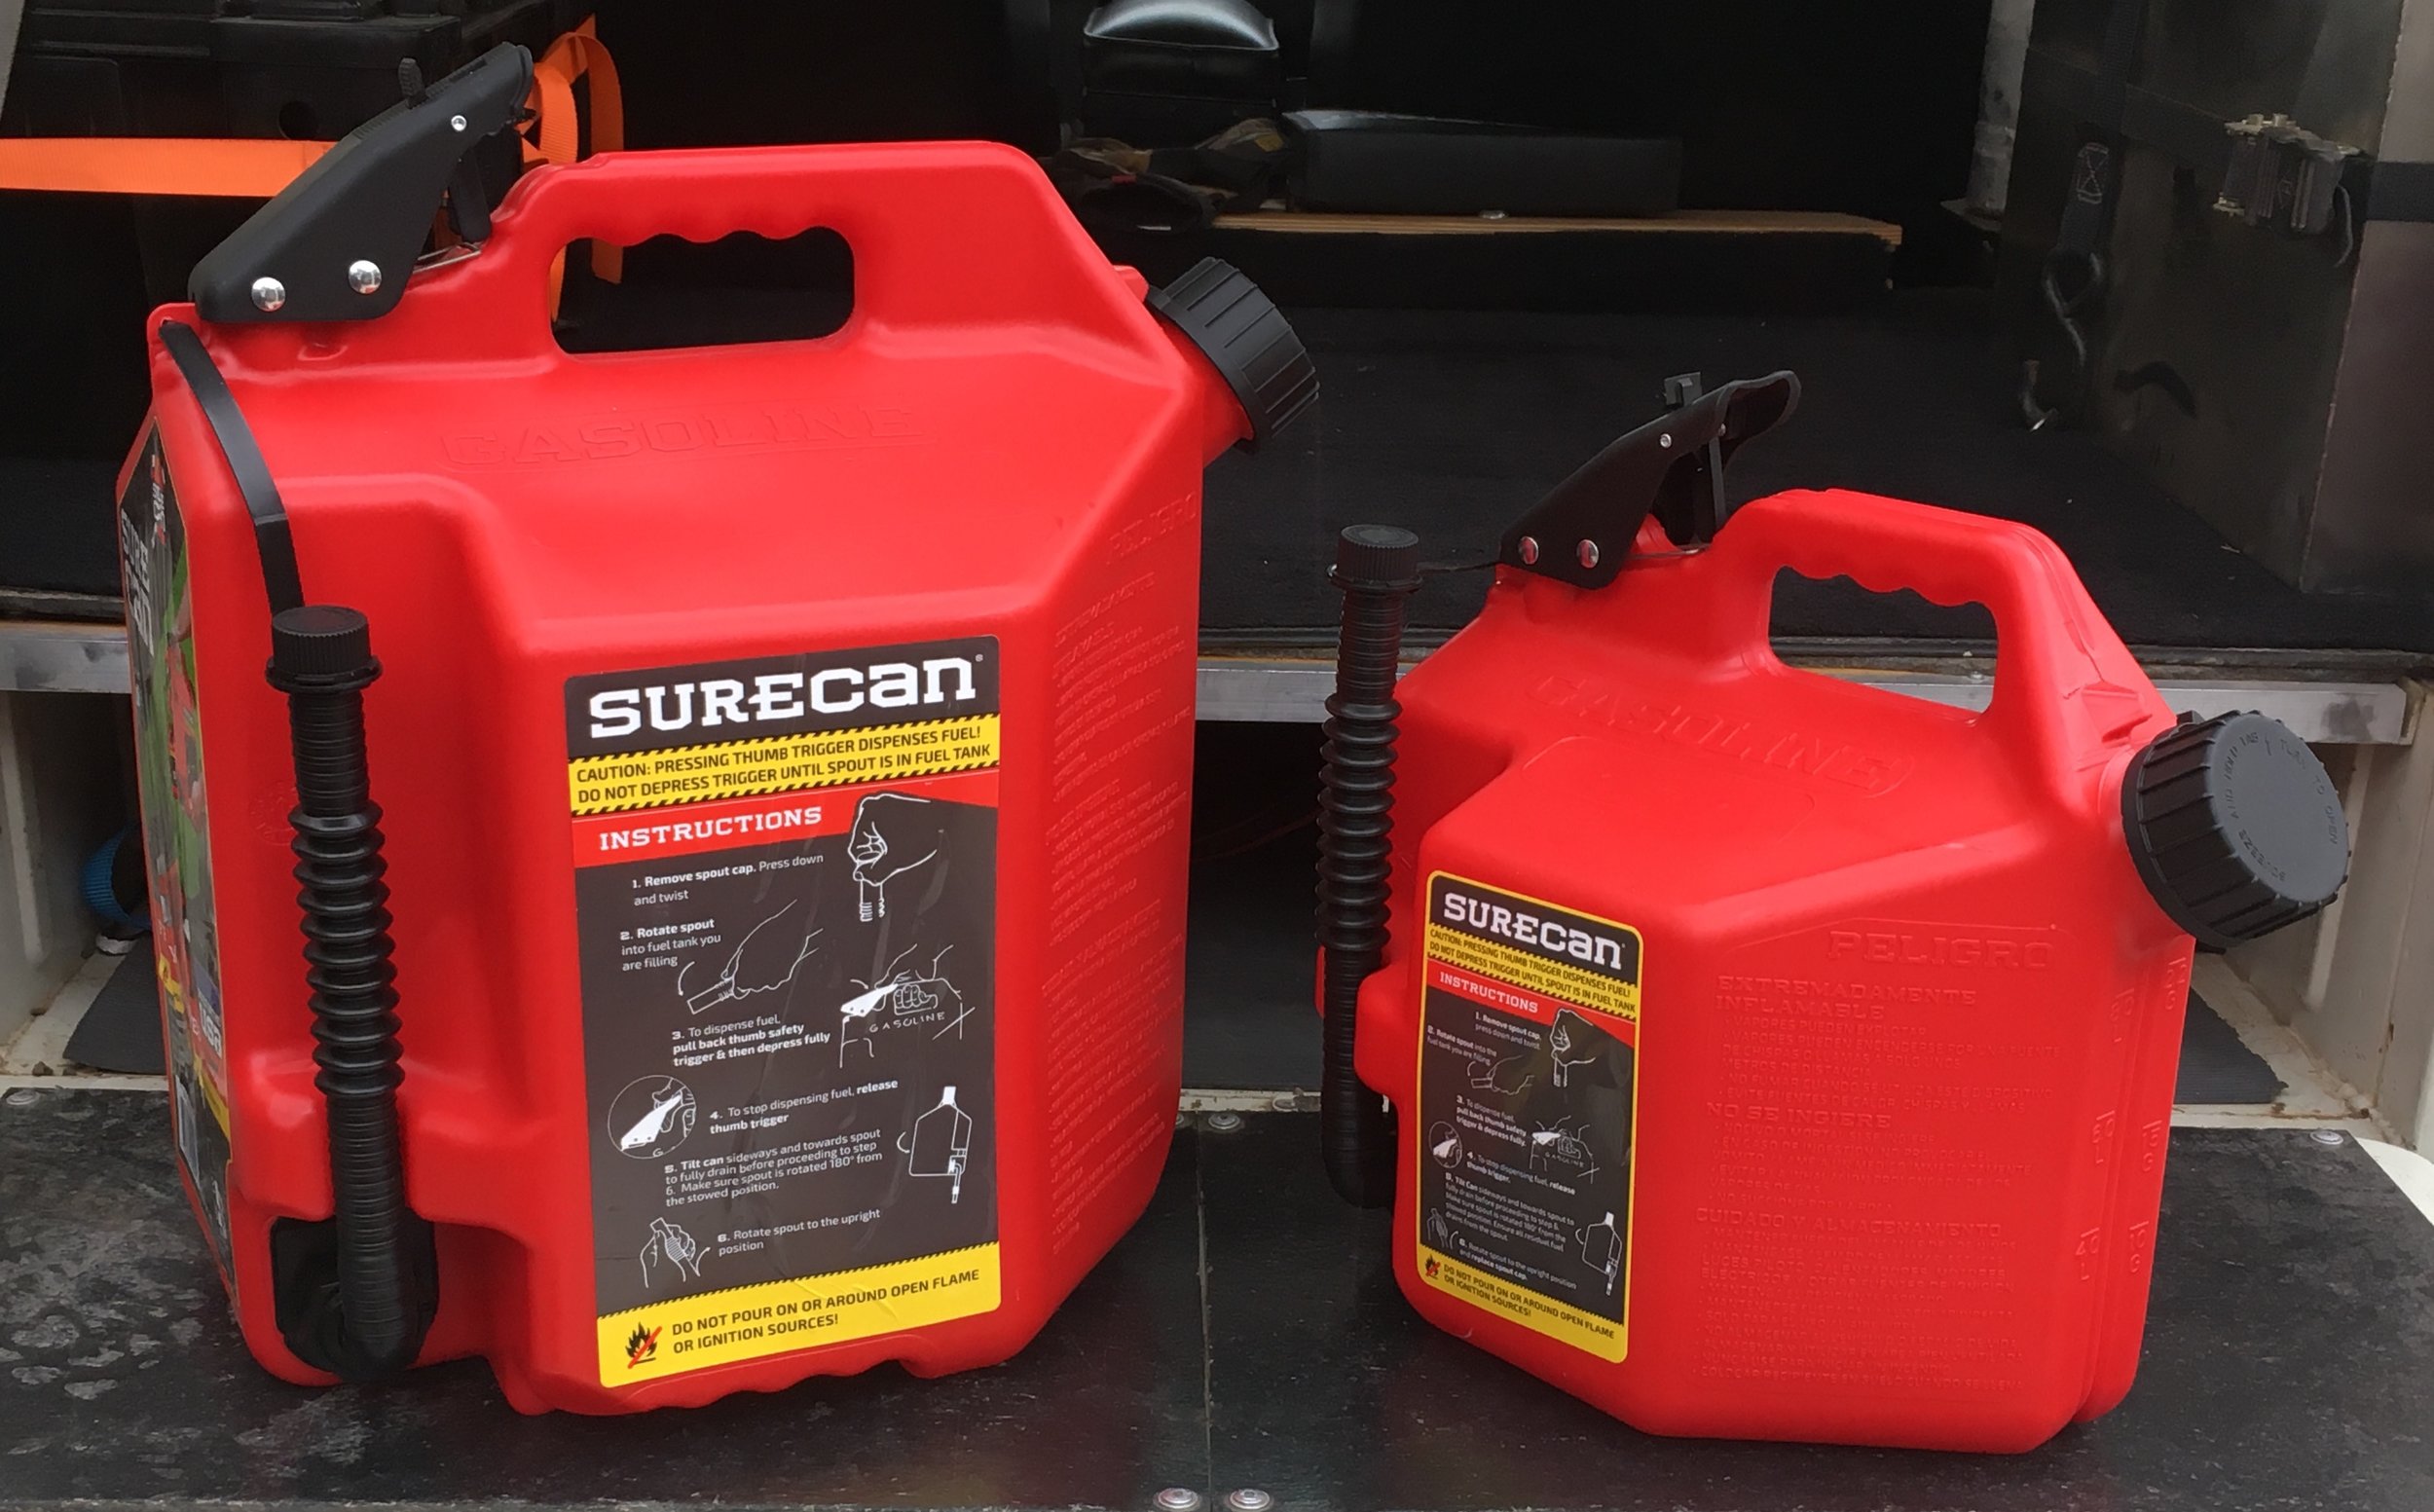
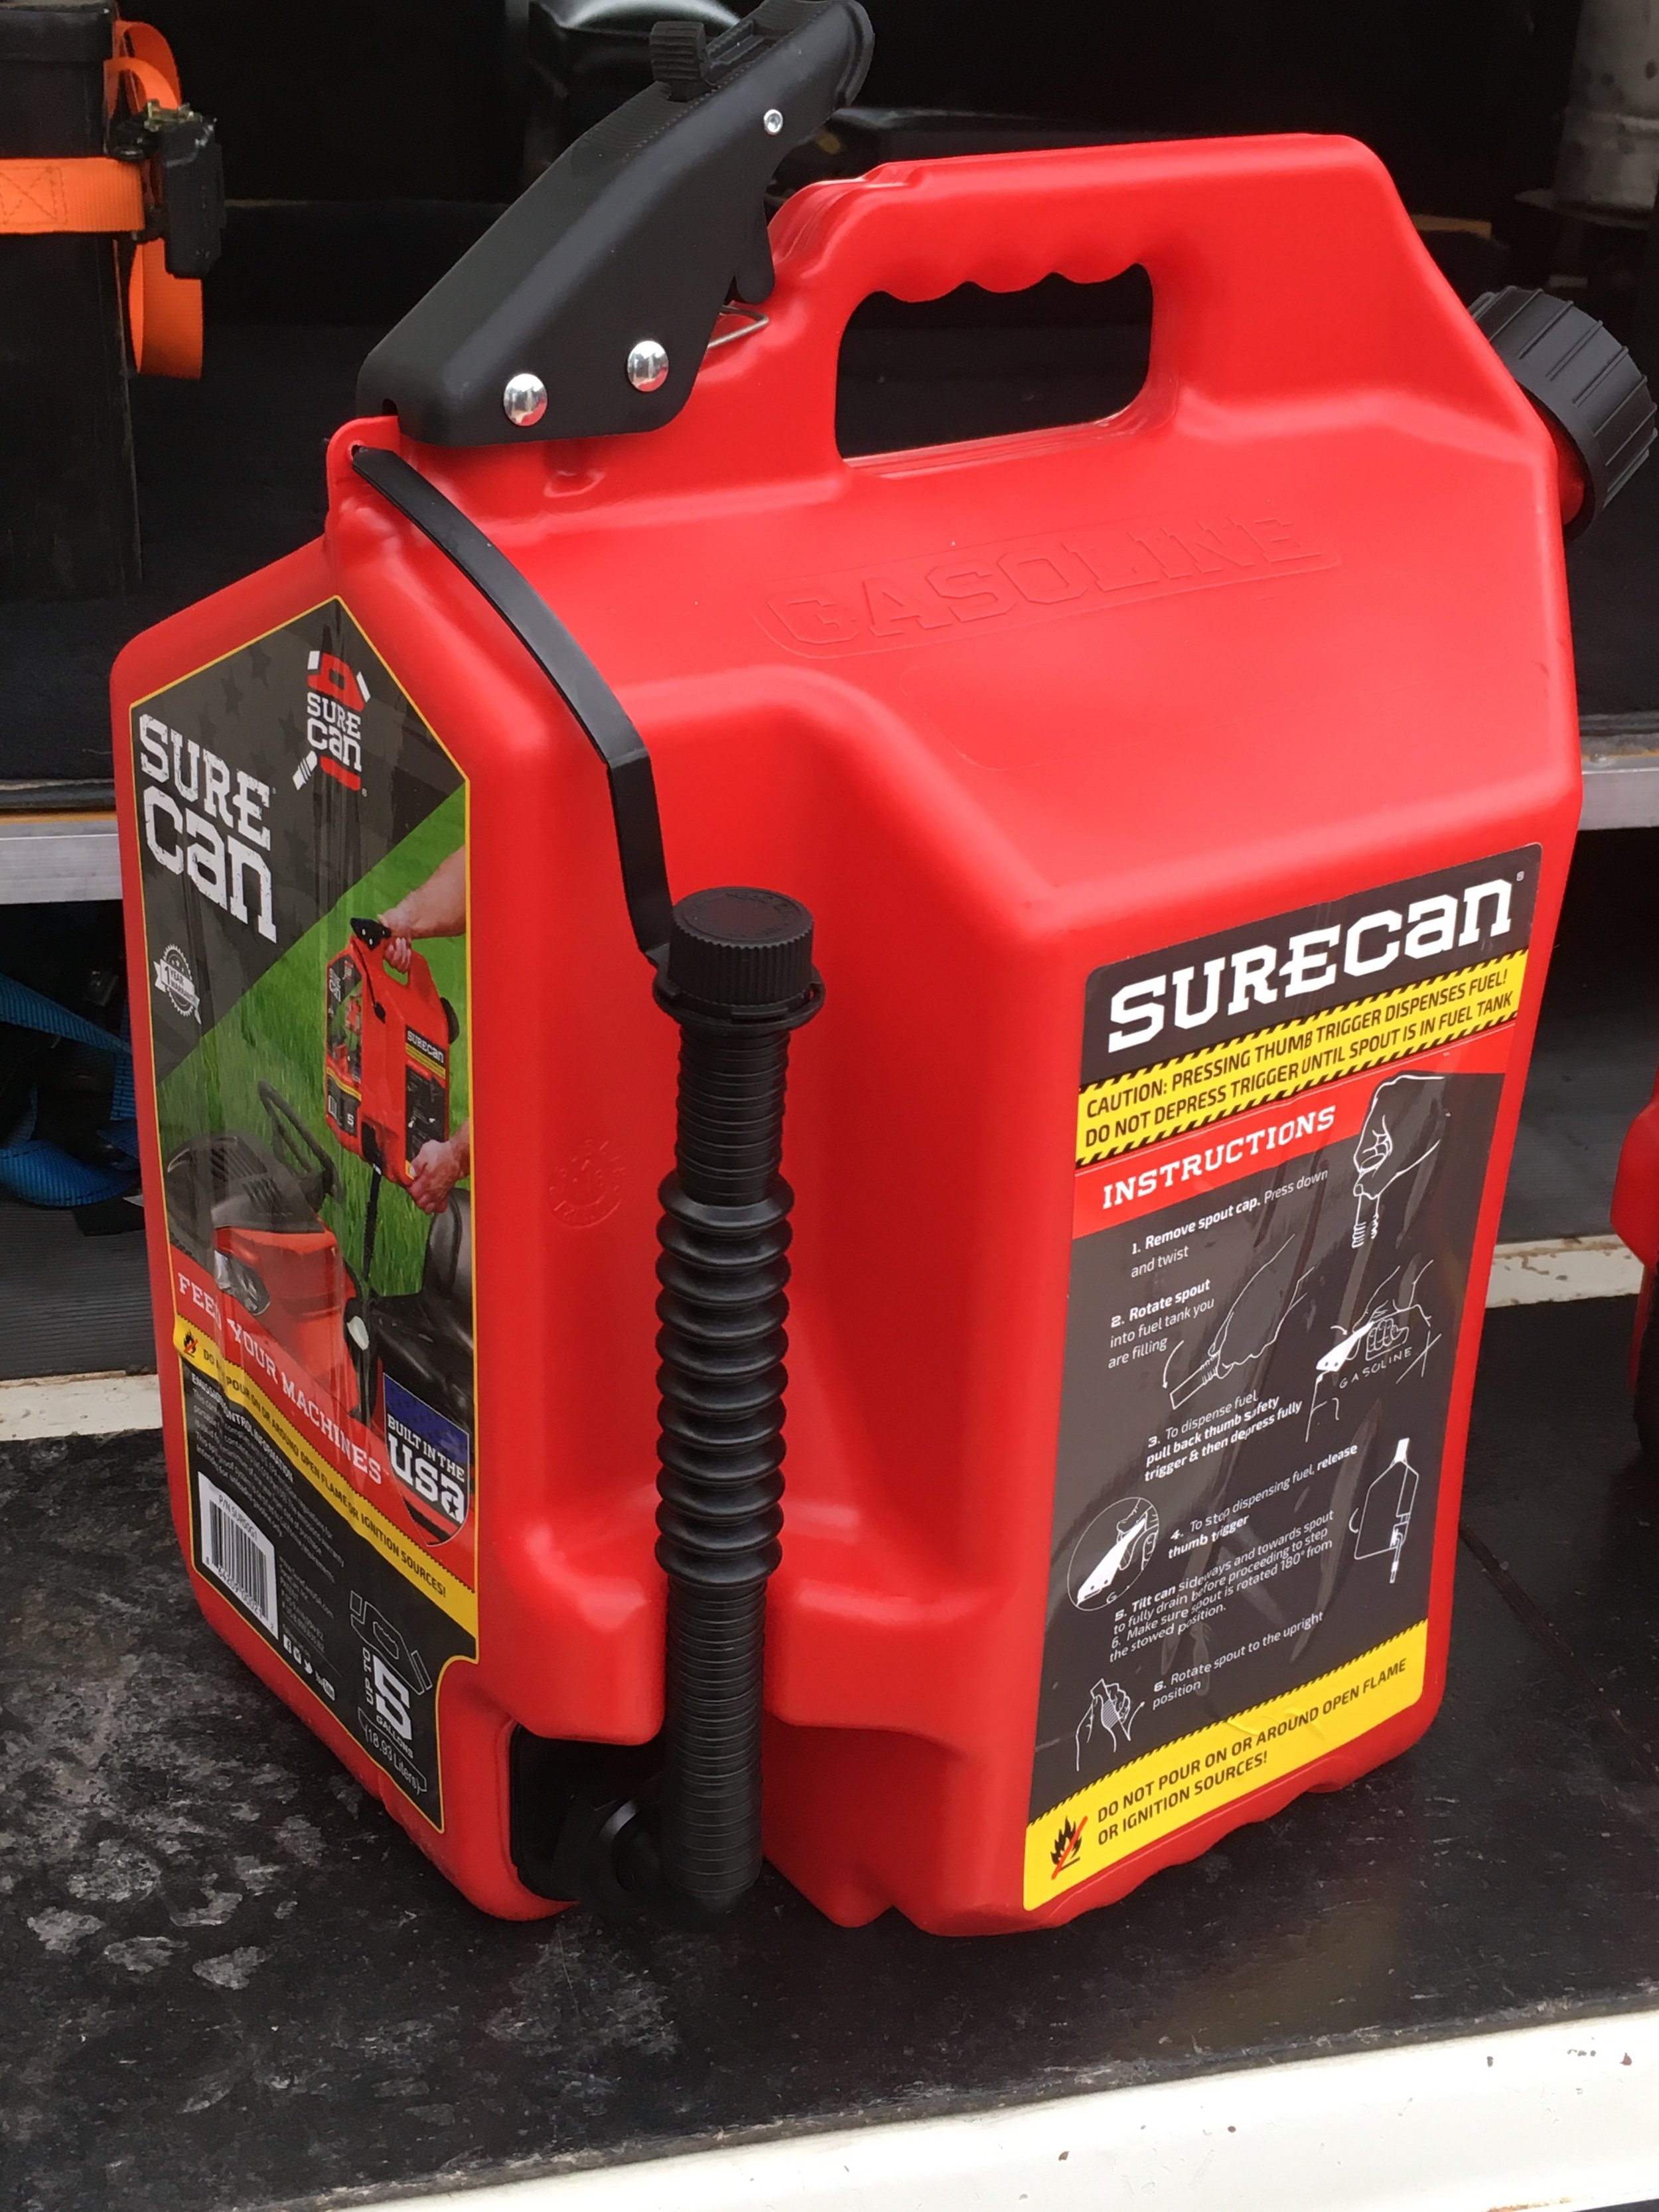
Of course, to dispense fuel from any of the above three styles of fuel container, you must tip them. And that brings us to the two new containers—one 2.2 gallon, one five-gallon—just sent to me from SureCan.
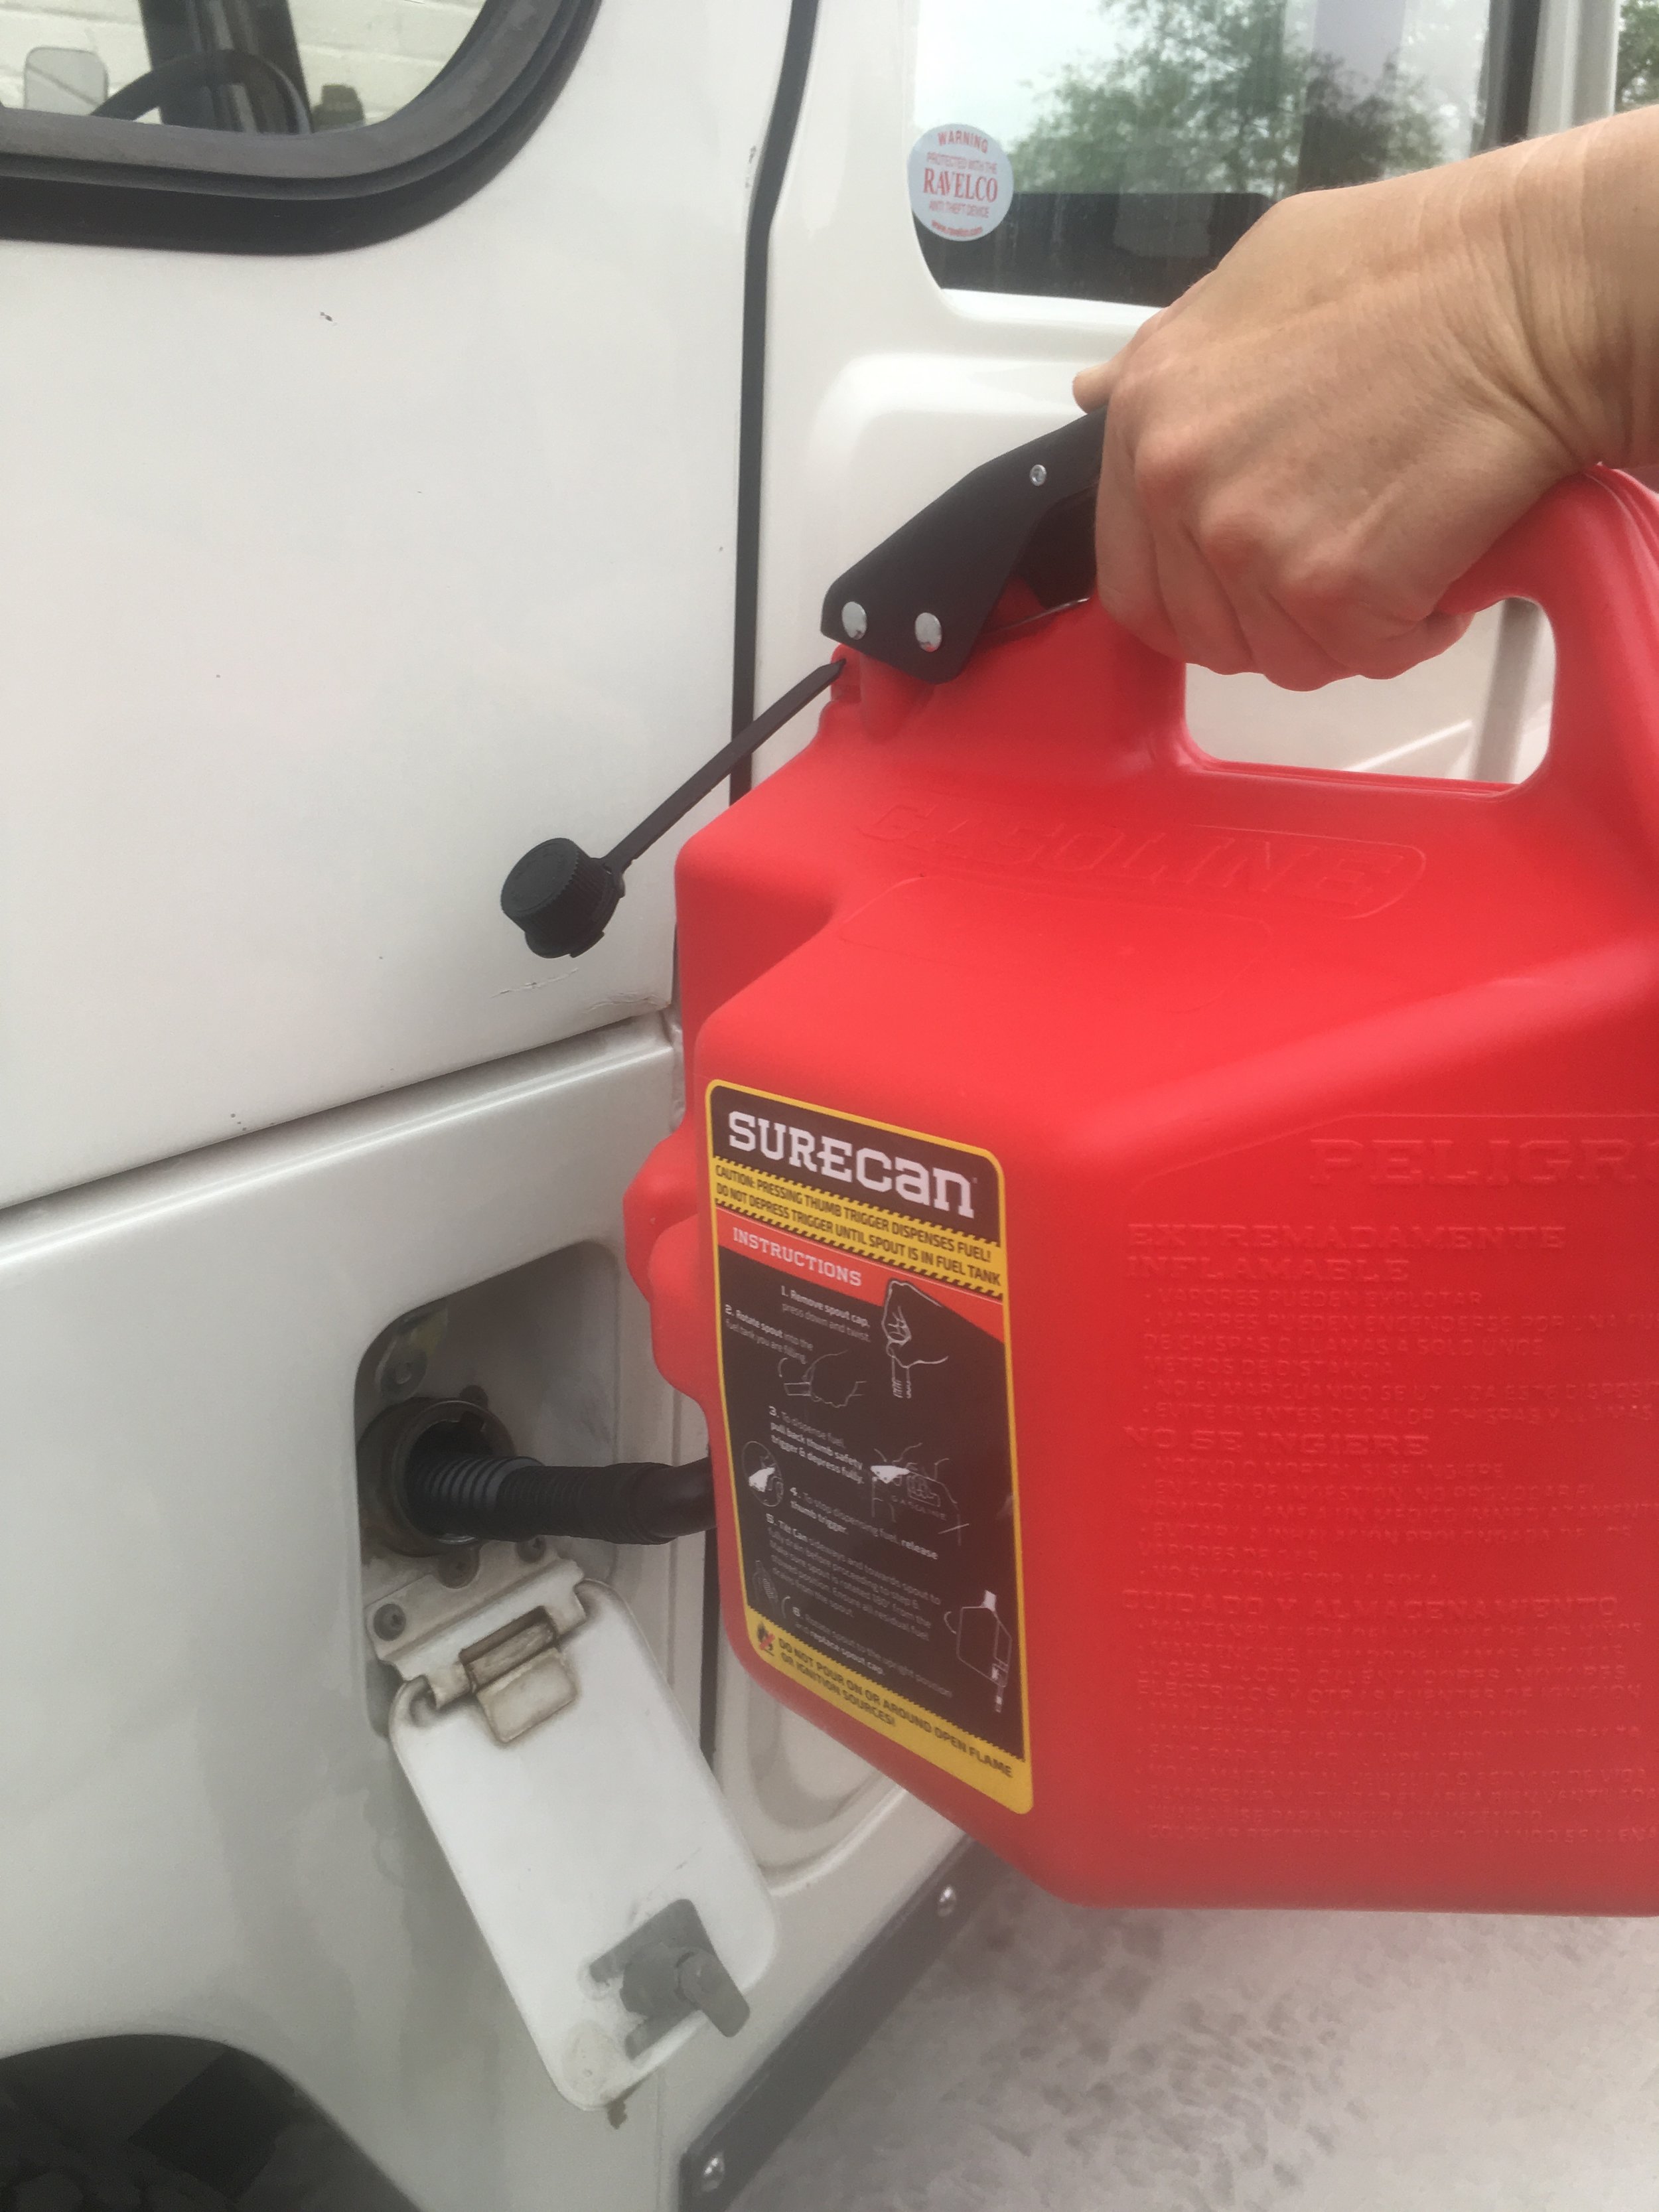
The SureCan incorporates a clever system that makes dispensing fuel something you could do while wearing your dress Afrika Korps uniform. Unscrew the cap from the built-in spout, then rotate the spout downward and insert it into whatever needs fuel. Press the safety catch on the top lever, squeeze the lever, and voila—fuel dispenses at a very rapid pace thanks to a breather mechanism built in to the valve assembly. Let go the lever and the fuel stops, right now. Tip the can sideways a bit to get the last few drops out of the spout, tip it back up to its locked position and secure the cap, and you're finished.
I used the SureCan to fill our generator when I needed to do some welding, and the process was absurdly easy and fast. Dispensing into a vehicle was more difficult, as you need to raise the can above the level of the filler. However, it was still easier than lifting and tipping a standard container.
I don't yet know if the SureCan will function well as an expeditionary fuel container. While it's easy to strap down securely through the handle, it does not fit into a standard can carrier on a rear rack. Also—and this is the big question—I don't yet know if the can will remain tight and leakproof when filled and carried where it will be exposed to high temperatures, full sun, and rough roads. The mechanism is much more complex than a simple lid, and there are more openings, including at the lever and the joint where the spout connects to the can, where leakage or outgassing might occur. I'll report back after trying it.
What I will say is that the SureCan has become my go-to container for around-the-ranch use for filling generators, chainsaws, and the like. A lot of new products seem too clever for their own good, but the SureCan is just clever enough to work.
SureCan is here.
Old school and new school . . .
Here's something you don't see every day: a PTO winch spooled with synthetic line.
PTO (Power Take Off) winches were common decades ago on Land Rovers and Land Cruisers. Rather than being powered by electricity, they ran off a driveshaft attached to an auxiliary gearbox on the transfer case. The advantage to them was that as long as the engine was running, the winch would run as well, with zero danger of overheating as is quite possible with the electric version. The disadvantage, of course, was that if the engine was not running, neither was the winch. These days very few vehicles are equipped with the take-off point on the transfer case that accepts the PTO driveshaft.
I had a PTO winch on my FJ40 for some time, but after I swapped transmissions I kept putting off cutting the hole in the new tunnel for the operating linkage, so the winch became nothing but a fashion item. When a Warn 8274 electric winch presented itself as the perk from a review, I swapped that in and sold the PTO for four times what I'd paid for it.
Probably a mistake—one Maggie McDermut did not make with her BJ74 Land Cruiser. At the 2018 Overland Expo West, the lads from 7P Overland spooled 80 feet of 3/8ths-inch Dyneema onto the drum, and spliced in a Factor 55 thimble. She now has the best of old and new.
The drive mechanisms on PTO winches varied from year to year and maker to maker. Maggie's is perhaps ideal, in that the winch can be run in any gear, depending on the speed and power needed. Choose first gear for low speed and high power, or run it in second or even third with more throttle if you're just pulling a small log off the road. The single disadvantage of her setup as it is now is the hawse fairlead, which is inset into the chrome front bumper, and could very well let the line contact the edges of the opening on either a right or left-side off-center pull. She'll need to use caution to arrange a straight pull.
I hope she gets a chance to use it on her journey to Alaska as a Change Your World Fund grantee.
Revolutionary . . .
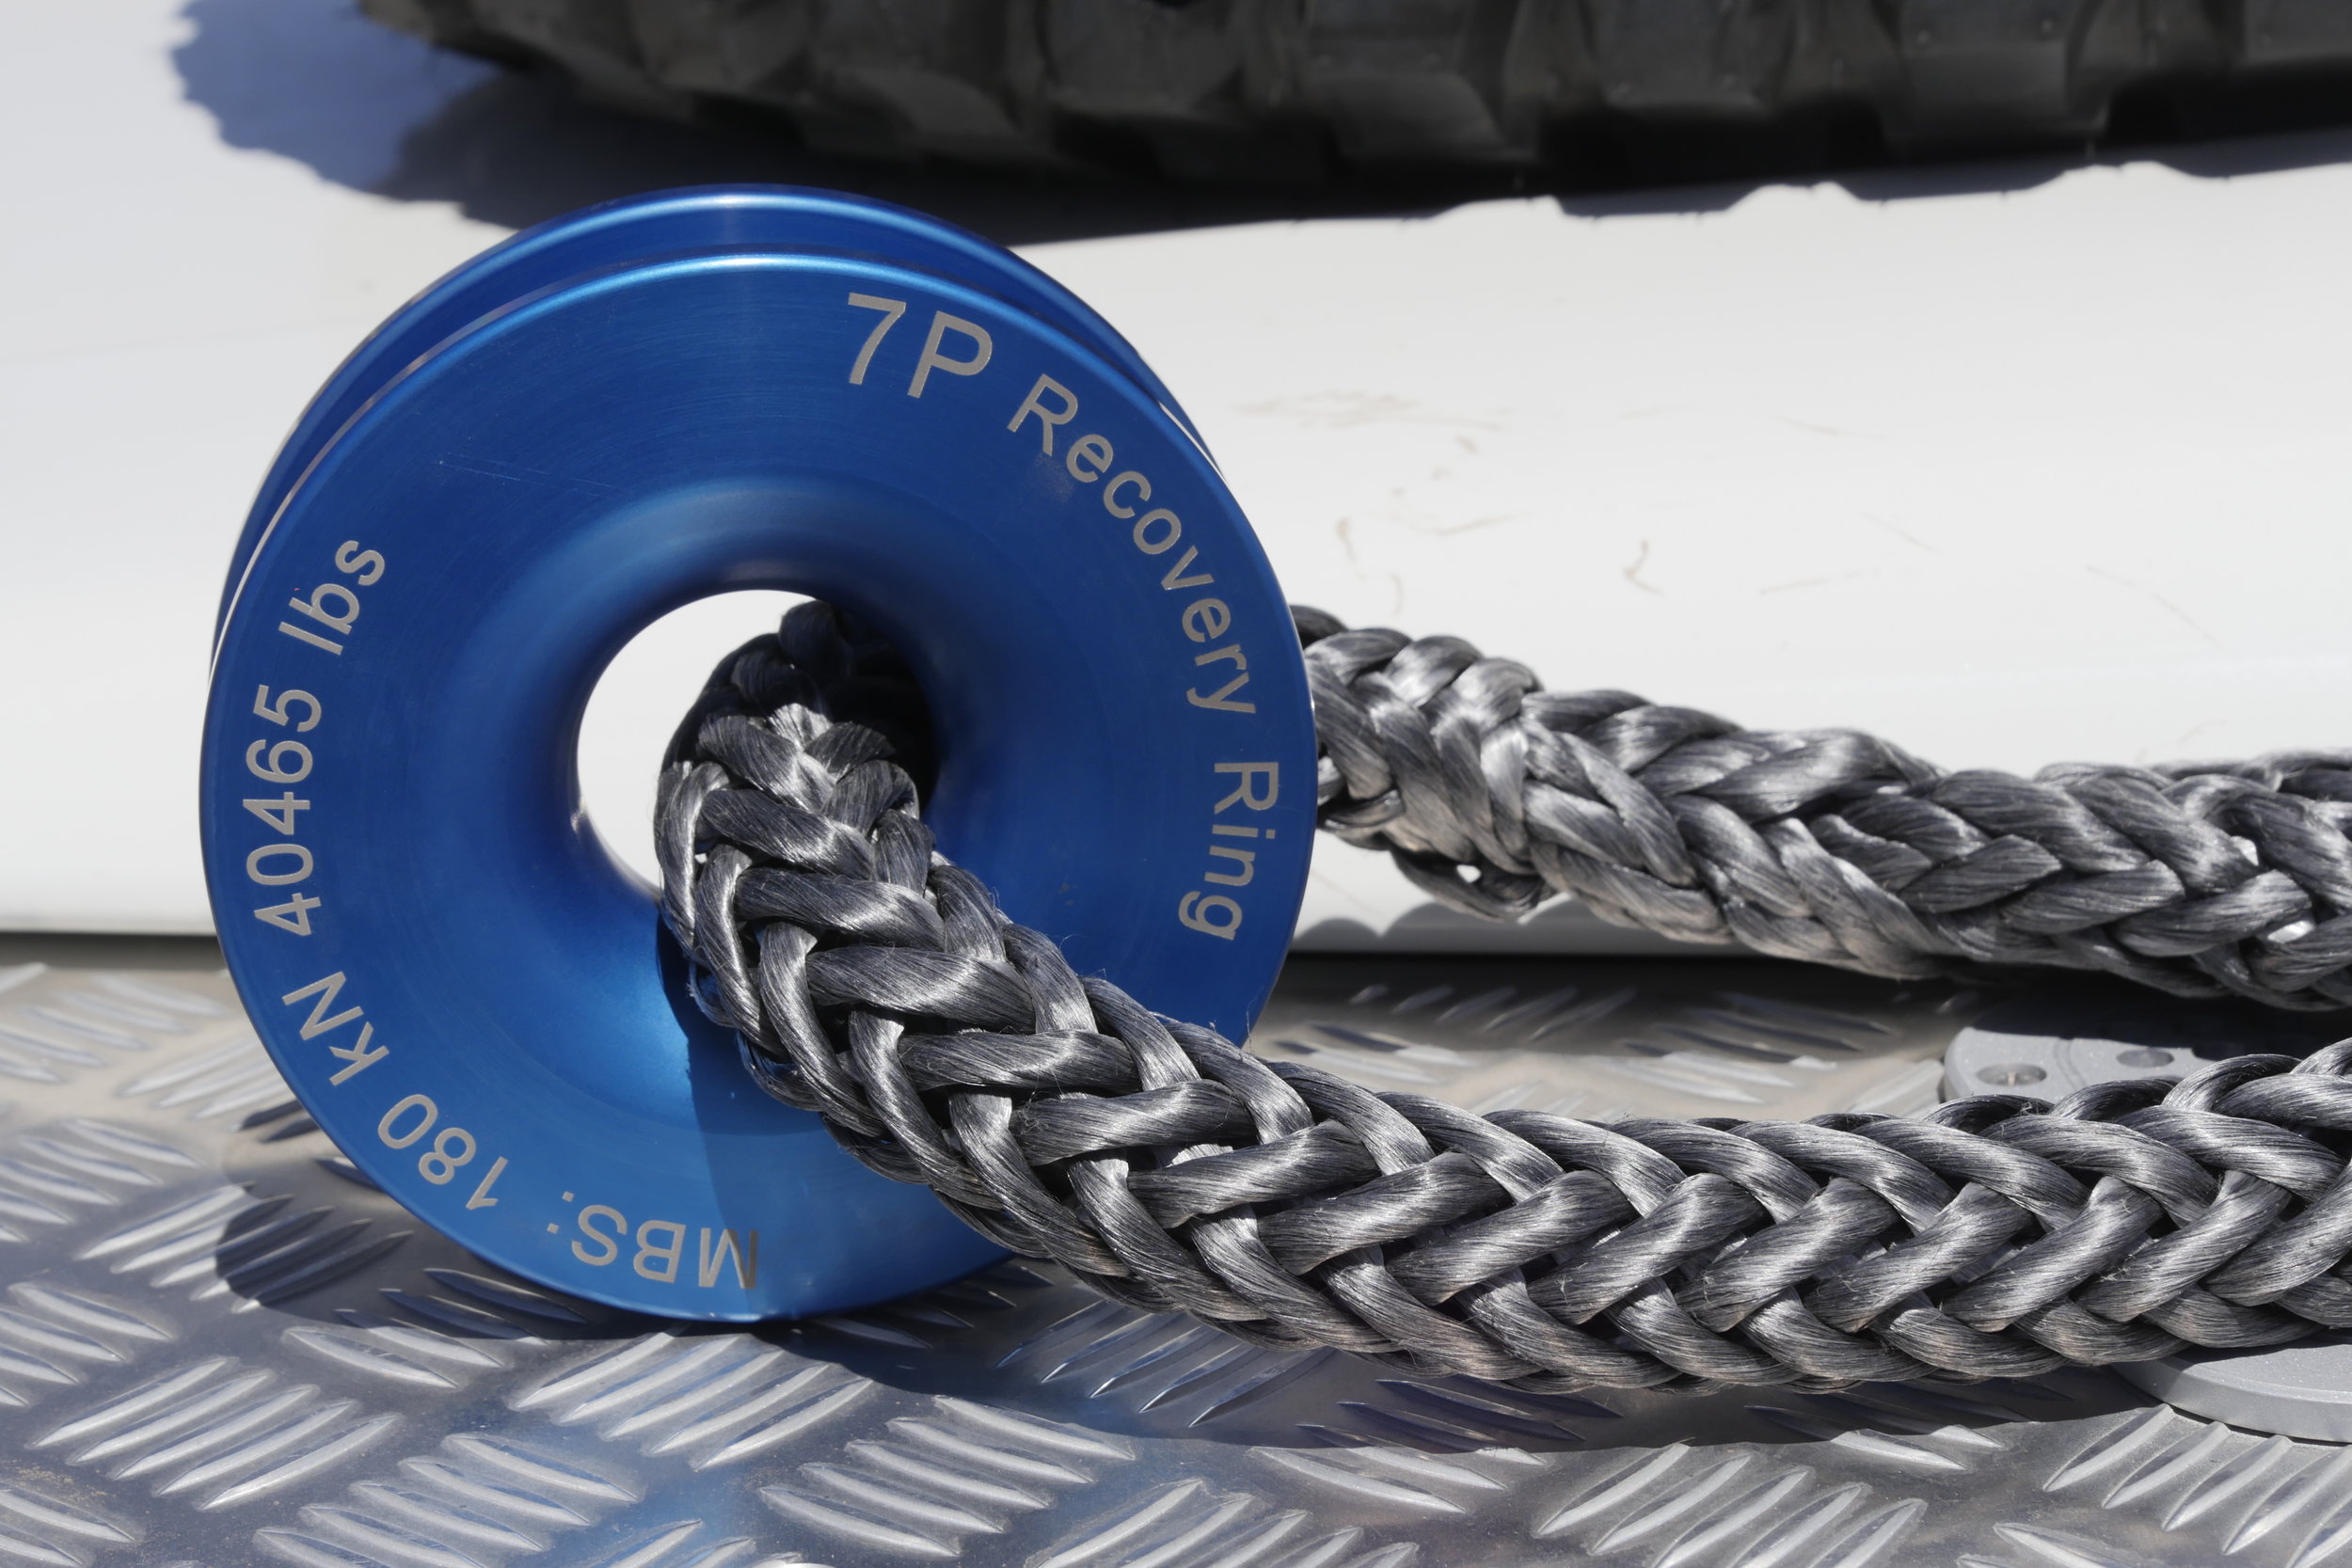
It's not often I use that word. It certainly applied to the introduction of the MaxTrax, and it absolutely applies to this product (displayed by Kelsey Huber) being debuted at the Overland Expo. More about it soon, but it's going to have a massive impact on the practice of vehicle recovery.
The 7P Recovery Ring is actually a winch pulley (or snatch block) with zero moving parts. The soft shackle simply slides slowly around inside the opening as the winch line is pulled across the pulley. Surprisingly, there is minimal heat buildup—in testing the Recovery Ring successfully extracted seriously stuck military trucks with no issues. Note the MBS (minimum breaking strength), an astounding 40,465 pounds.
Video to follow . . .
Field testing versus Expo testing
The training area at the Overland Expo is obviously an artificial environment, so one could argue that testing equipment there is inferior to doing so in the field. And indeed I do the latter as often as possible.
But there are advantages to testing under controlled conditions too. First, at the Expo we engineer genuinely demanding scenarios that can be just as hard on equipment as the field—in fact at times it might be harder, since if a student fails at an obstacle he or she is likely to repeat it until successful. Second, we’re always monitoring the proceedings carefully, so when something fails we know exactly when and how it did so, which can be helpful in figuring out why. Was the product overstressed or employed outside the manufacturer’s prescribed use, or did it simply fail due to poor materials or workmanship?
As an example consider the pair of Traction Jacks we’ve been using. I briefly tested these in the field (here), in sand, and they seemed to work well. The folding design had clear advantages for storage, and they seemed stout—in fact they were surprisingly heavy at 28 pounds per pair, compared to, say, MaxTrax at 18 pounds per pair. So I decided to throw them into the mix of recovery gear we use in various classes at the Expo.
They did not last long. The first incident was closely described by instructor Tim Hüber. He was teaching a class in lockers and traction control, for which we use two massive roller assemblies to simulate complete loss of traction. A Dodge pickup was having trouble getting up onto the first roller, and spun the rear tires with the diff locked. So Tim backed the vehicle up, made a ramp with doubled MaxTrax for one front tire, and placed a Traction Jack where the rear tire had spun. Tim estimates there was a depression about an inch deep under device, which he figured it could flex into without harm. Not so—as soon as the tire rolled onto the Traction Jack it snapped in two sharply, without any sign of flexing or bending first.
The second one broke at some point thereafter, right at the hinge, under circumstances I’ve not yet discovered. The other half of that unit is missing completely.
I checked back on my initial review of the Traction Jack. The model we have is rated for 1,900 pounds per tire according to the manufacturer. The weight over the rear tire on a full-size Ram might well be close to that, but not over by much. So it doesn’t seem like the unit should have failed with the minor flexing it would have experienced—unless the composition of the Traction Jack relies on it remaining perfectly flat and supported underneath when weight is on it. I’ve emailed the company for more information but have not yet heard back. Originally the Traction Jack was offered two weight classes, the 1,900-pound version and a heavy-duty alternative rated to 4,500 pounds; however, I no longer see two models listed on the site.
Our experience with the Traction Jack might be limited, but it is in marked contrast to our extensive experience with the two sets of MaxTrax in our kit, both of which have been used and abused for years, up to and including being employed to recover the BFGoodrich semi from mud.
Until I learn more, if someone asked me about the Traction Jacks as a more compact alternative to traditional sand mats, I would strongly recommend restricting their use to lighter vehicles.
Hint: When using “Search,” if nothing comes up, reload the page, this usually works. Also, our “Comment” button is on strike thanks to Squarespace, which is proving to be difficult to use! Please email me with comments!
Overland Tech & Travel brings you in-depth overland equipment tests, reviews, news, travel tips, & stories from the best overlanding experts on the planet. Follow or subscribe (below) to keep up to date.
Have a question for Jonathan? Send him an email [click here].
SUBSCRIBE
CLICK HERE to subscribe to Jonathan’s email list; we send once or twice a month, usually Sunday morning for your weekend reading pleasure.
Overland Tech and Travel is curated by Jonathan Hanson, co-founder and former co-owner of the Overland Expo. Jonathan segued from a misspent youth almost directly into a misspent adulthood, cleverly sidestepping any chance of a normal career track or a secure retirement by becoming a freelance writer, working for Outside, National Geographic Adventure, and nearly two dozen other publications. He co-founded Overland Journal in 2007 and was its executive editor until 2011, when he left and sold his shares in the company. His travels encompass explorations on land and sea on six continents, by foot, bicycle, sea kayak, motorcycle, and four-wheel-drive vehicle. He has published a dozen books, several with his wife, Roseann Hanson, gaining several obscure non-cash awards along the way, and is the co-author of the fourth edition of Tom Sheppard's overlanding bible, the Vehicle-dependent Expedition Guide.


