
Overland Tech and Travel
Advice from the world's
most experienced overlanders
tests, reviews, opinion, and more
An update for the Safe Jack
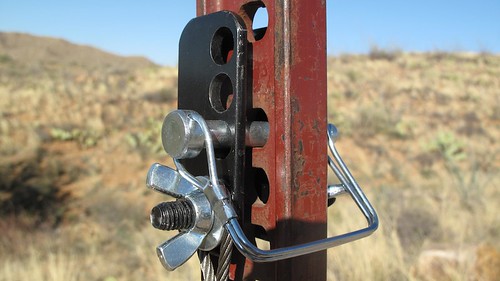
If you've read THIS entry, you know I was impressed by the Safe Jack stabilizer for the Hi-Lift Jack. In many scenarios it vastly increases the utility and safety of the Hi-Lift, and the base plate on its own makes a fine replacement for the old orange plastic ORB base in soft sand or mud.
I've been using the tool for a couple months now, and remain impressed. However, like almost any new product, I noticed potential for improvement. The design of the upper clevis precluded the jack's handle from resting against the standard, so the spring clip that holds the handle vertical when the jack is unattended would not engage. (I've been carrying a strip of One-Wrap Velcro to secure the handle when needed.) The clevis also limited somewhat the upper travel of the jack's foot.
Apparently Richard Bogert of Bogert Engineering noticed the same issues, because he recently sent me a redesigned upper clevis. The new piece now attaches to the front of the standard rather than the rear, and the eyebolt tensioner is gone. This increases travel, and allows the handle to touch the standard, engaging the spring clip. A new clevis pin with a wire latch simplifies attachment, and two side-mounted wing nuts adjust tension if necessary. The new piece even saves weight compared to the old one, and on the front face is a section of UHMW polyethylene to protect the vehicle should the tool come into contact with it.
If you own a Safe Jack with the original clevis, Bogert will send you the updated version for fifteen bucks. That's barely more than postage alone would cost. Of course new Safe Jacks will all be equipped with the updated part.
It's an excellent upgrade, and makes a good tool even better. Production should be underway within a week; check with Bogert Engineering HERE.
The one-case tool kit, part 4
(Please read part 1 here, part 2 here, and part 3 here)
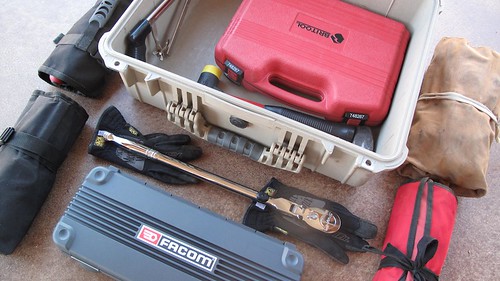
I've finally wrapped up my project to assemble a comprehensive one-case field tool kit—and I’m really glad I restricted myself to a Pelican 1550.
It’s absolutely axiomatic when assembling a tool kit that it will expand to fit the available space, and it would have been effortless to fill a much larger container with Oh-I-should-have-this items, to the point where any notion of portability went out the window. As it is, the case and contents had nudged above 55 pounds by the time I was satisfied.
But after over a year of playing stump-the-tool-kit, I have yet to come across a task the contents couldn’t handle. It’s been employed successfully for jobs ranging from repairing a Honda generator in Mexico’s Sierra Madre (used, critically, to power UV lights for an insect survey) to replacing the dreaded trap oxidizer on our old Mercedes 300D at home (which incidentally resulted in a good 20 percent power increase). One fiendishly positioned nut on that device eventually required the Snap-on 18-inch ratchet, two extensions, a universal joint, and a socket to access—all there in the case. The closest I came to being stymied was removing the 10mm allen-head bolts on a Porsche 911SC anti-roll bar. The swiveling allen key in the kit baaarely got those loose; I’ve decided to add a set of 1/2-inch-drive allen-head sockets, which will take up scant room.
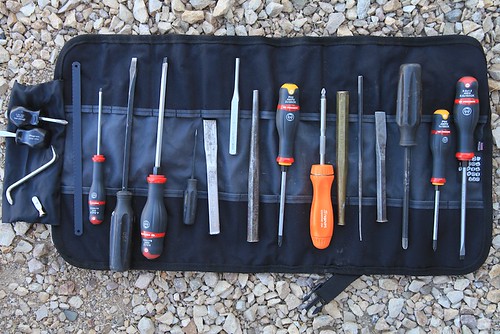
So: What’s in it? Here is the complete list (see previous installments for the justification for each):
- Britool 748267 3/8ths-inch socket/ratchet set (1/4” to 1” SAE sockets; 6mm to 24mm metric sockets, Torx sockets T8 to T16, assorted driver bits)
- Facom S.200 DP 1/2-inch socket/ratchet set (10mm to 32mm metric sockets)
- Snap-on SX80A 18-inch flex-head ratchet
- 1 1/2-pound sledge-head hammer
- Craftsman replaceable-head soft-faced hammer
- Combination wrenches (7mm to 25mm plus 27 and 30)
- Facom torque converter
- Facom Pro-Twist Shock screwdriver set
- Assorted Craftsman screwdrivers including stubbies
- Snap-on replaceable-bit ratcheting driver
- Brass drift
- Three cold chisels
- Two punches
- Small pry bar
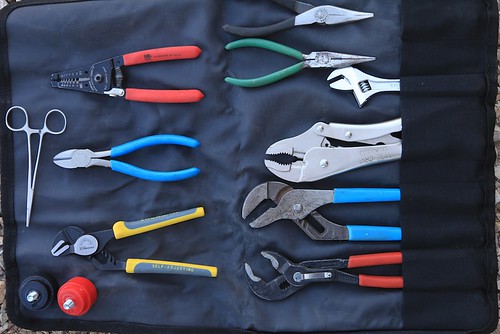
- Knipex and Channel-Lock pliers
- Two pairs needle-nosed pliers
- Vise-Grip pliers
- Small self-adjusting plier
- Side cutter
- Electrical stripping/crimping tool
- Hemostats
- Six-inch adjustable wrench
- Three snap-ring pliers
- Adjustable hacksaw
- Combination flat/half-round file
- Round file
- Tin snips
- Two LED flashlights
- Box cutter
- Spark-plug puller
- Radiator-hose pick
- Feeler gauges
- Power Probe voltage/resistance tester
- Continuity tester
- Swiveling hex-key set
- Small wire brush
- Mechanic’s gloves
- Tube of hand cleaner
- Safety glasses
So—while the selection is meager compared to what I have available in the rollaway chest in the shop, even I, who had high hopes, have been surprised at how effective it is. Yes, if I need a hammer at home I can choose among nine or ten to get exactly the right weight and head, while in the case I must make do with two—but so far I’ve been able to make do nicely.
Believe it or not, there’s a bit of room left over in the Pelican. If I were to embark on a really long journey, I could still fit in, say, a hand drill and bits, a pickle fork to separate ball joints, a hub socket to fit the Land Cruiser, and a couple other more obscure items.
I don’t consider this selection definitive. I have absolutely no doubt that sooner or later I’ll run into a situation I can’t handle (although I’d allow myself a pass on true special tools required for certain specific tasks on many vehicles). But for now I’m convinced I have put together a pretty good one-case tool kit. Is it "The Ultimate One-case Tool Kit?" I guess that's open to a challenge . . .
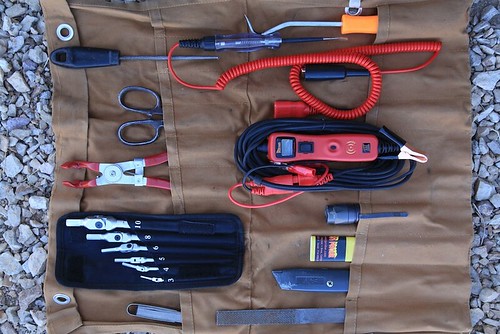
At the Overland Expo, May 17-19 2013, I'll be demonstrating the one-case tool kit for Overland Experience package holders on Friday at 2:00 PM and Saturday at 4:00 PM. Overland Experience attendees can also attend my class on assembling a basic tool kit, Friday at 1:00 PM and Saturday at 3:00 PM. Find out more about the Overland Expo HERE.
Warn M8000—ultimate overlanding winch!
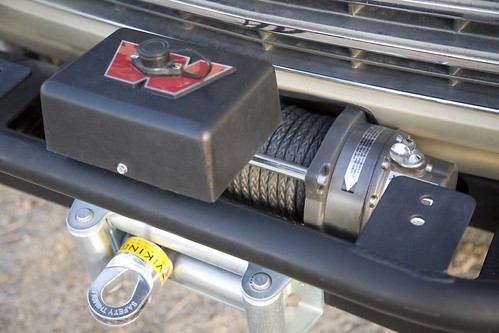
I wrote that title deliberately. One of my eye-rolling pet peeves as a reader and editor is the ubiquity of magazine headlines and cover blurbs that begin with, “Ultimate”—followed by an utterly non-ultimate product—followed by a “!” Firearms periodicals seem especially obsessed with the term. I’ve forgotten how many times I’ve been breathlessly introduced to the “Ultimate Compact .45!” or the “Ultimate Tactical 9mm!” (And don’t get me started on the “tactical” lunacy.)
Of course there is very rarely such a thing as an “ultimate” anything (although Fuller’s 1845 might come close in the bottled beer category). There is only, at best, the ultimate compromise—and this applies universally to the equipment we add to our vehicles. High quality or low price? Strength or light weight? Multi-function operation or ease of use?
If you’re looking at winches for an overlanding vehicle, there’s an additional question to ponder: Do you really need one at all? I addressed this issue some time ago (click here to go to article), but now we’re going to assume you’ve decided that the advantages outweigh the disadvantages, and are planning to install one. (Either that, or you’ve simply succumbed helplessly to winch envy.) In either case, how do you minimize those disadvantages?
Aside from cost, the salient drawback to a winch is weight. Not just the weight of the winch and line and fairlead, but also a properly constructed bumper on which to mount it, and perhaps the dual battery system you’ll install to make sure you don’t run your only source dry during a long, maximum-amperage pull. And that weight is in the worst possible spot, way out in front of the vehicle where it applies leverage on the suspension. Aside from spending yet more money on suspension modifications, an obvious solution is a very light winch, but then we run into a compromise: light weight equals low power.
It’s axiomatic that a winch should be rated at around 1.5 times the loaded weight of the vehicle on which it is mounted. Why 1.5 times? Shouldn’t a 6,000-pound winch be perfectly adequate for a vehicle that weighs 6,000 pounds all up? Theoretically, yes, but several things complicate matters. First is the simple fudge factor inherent in the rating of many products. Second, and more universal, is the fact that all winches are rated with just a single layer of line on the drum. More layers equal less rotational leverage for the winch and less pulling power (roughly ten percent per layer)—and it’s not always possible or practical to arrange a winch recovery so that most of the line is pulled out first. Additionally, substrate makes a difference: For example, deep, sticky mud adds significantly to the effective weight of any stuck vehicle, and a large boulder in the middle of a steep uphill pull can spike the effective weight well past its actual mass. Finally, off-center pulls and other awkward situations add to the load on the winch. So the 1.5 factor is a wise generalization.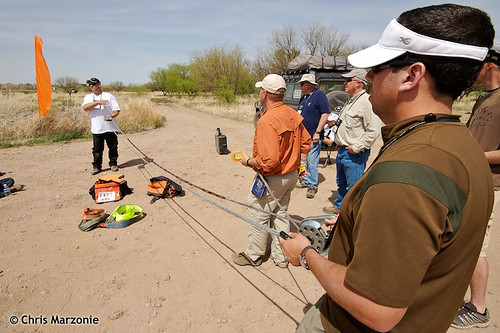 Rigging a winch line with a pulley block at Overland Expo 2010. Photo by Chris Marzonie
On the other hand, technique can optimize the power of a winch. First is making sure you have as much line out as possible, either by backing up the anchor vehicle or picking an anchor tree that’s farther away. You can also use a redirected pull to get more line out, for example by attaching a pulley block to a nearby tree, and running the line though that to another anchor tree back closer to you. You’ll lose a bit to pulley friction, but if you can get a couple of layers of line off the drum it will be worth it.
However, the best way to maximize a winch’s capability is to rig a double-line pull: from the winch of the stuck vehicle through a pulley block on a fixed anchor vehicle or tree, then back to the stuck vehicle (or, if you’re rescuing a stuck vehicle with your winch, to a pulley block attached to the rescuee and then back to your vehicle). This setup halves the line speed of the winch but doubles its power, in addition to getting out more line and reducing the layers on the drum. Obviously, relying on this technique also halves the reach of your winch, but, at least in my experience, in the vast majority of overlanding situations (with the glaring exception of tropical-rainy-season mud), 45 feet of usable line is enough to access a natural anchor or another vehicle—and if not, a winch line extension will give you the reach you need. You can gain even more power by adding another pulley block and rigging a triple-line pull, at the expense of even less reach. (Remember to always leave at least five full wraps of line on the drum if you get down to the first layer.) 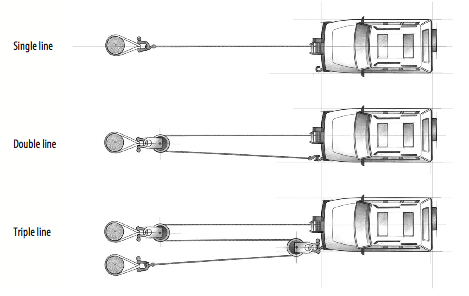
With the limitations of reach accepted, the 1.5 factor becomes somewhat flexible. Which brings us to the Warn M8000 (and its new brother, the M8000-s).
The M8000 is rated at—surprise—8,000 pounds, which, for example, is a bit under the 1.5 factor for our FJ60 when it’s fully loaded with gear, fuel, and two people. A lot of later full-size SUVs would blow past it before a single sleeping bag was tossed inside. On the other hand, it’s right in the ballpark for many compact pickups and small SUVs. And the M8000 is very light. I recently had ours off while the vehicle got a full repaint, and put each component on a scale. The bare winch, with no line or solenoid box, weighs only 35.6 pounds. The solenoid box and 1/0 cables to the battery total 7.2 pounds. The steel roller fairlead is 11 even, and 100 feet of Viking synthetic winch line adds a hardly-worth-measuring 2.8 pounds with a safety thimble (the standard steel cable is 13.2 pounds without a hook or thimble).
That’s a total of just 56.6 pounds—and we could reduce that to under 50 pounds with an aluminum hawse fairlead. Interestingly, the Warn M8000-s comes with synthetic line and an aluminum fairlead, and its advertised weight is 55 pounds. Mount it to an Aluminess bumper—which can be ordered without the bull bar so few of us really need—and you’ve got a complete system for around 125 pounds.
The M8000 might be light, but it’s also built to last. I’ve seen, either in person or in photos, disassembled examples of three “different” discount-brand winches (all of them most likely built in the same factory, the Ningbo Lift Winch Manufacture Company in Ningbo Mingzhou Industrial City, China). All appeared to be virtual clones of the M8000—until you looked inside, where compromises in motors, gear trains, and wiring were apparent.*
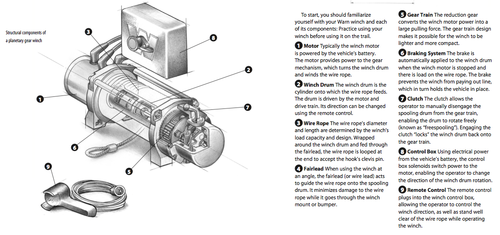
The motor is the heart of the winch, and it consists of two main components: a central set of wire coils wrapped around the shaft, called the rotor (or armature), and an outer assembly called the stator. When current is supplied to the rotor and stator it produces opposing magnetic fields, which cause the rotor and its attached shaft to turn via the attracting and repelling forces of the fields. The rotor is called an electromagnet because it only becomes magnetized when current passes through it. The stator can also comprise a wire coil magnetized by current, in which case the assembly is called a “series-wound” motor. Alternatively the stator can be constructed with standard metallic magnets that are thus always “on,” as it were. This is then known, logically, as a “permanent-magnet” motor.
Permanent-magnet motors are cheaper to make and use slightly less current (since none is needed to magnetize the stator). However, they overheat more easily than series-wound motors, and the magnets can lose their field strength over time (and temporarily in very cold weather). Permanent-magnet motors work very well in light-duty situations, but for high-stress applications series-wound motors—such as that found in the M8000—are superior. However, not all series-wound motors are the same. Hidden differences in wiring, bearings and bushings, and tolerances mean that in a winch (or any other electrical appliance) the standards demanded by the manufacturer still determine the final quality of the assembled product.
 Click on image to open in larger window.
The other major electrical component in a winch assembly is the switch gear that controls power to the motor, typically housed in a plastic box attached to the winch. Traditionally, these have been relays (commonly called solenoids). A relay in our application is essentially a mechanical on-off switch capable of handling large amounts of current, controlled by a smaller-capacity switch elsewhere—the winch’s remote in this case. A relay thus shortens the length of heavy-duty cable that would otherwise be necessary to insure adequate amperage to the winch (the same holds true for other high-draw devices, such as driving lights, that use a relay and a remote switch). Winches usually employ relays in multiples—one or two to handle power-in switching, one or two to handle power-out.
Since relays utilize moving mechanical contacts to transfer current, they are subject to wear and corrosion. Often the result will be that the relay simply stops working, but very rarely a worn relay will stick in the “on” position—with predictable ramifications if you’re operating a powerful electrical device which you need to be able to turn off right now.
In the last few years, solid-state devices known as contactors have begun to replace relays in many winches, including the M8000. A contactor employs a high-capacity semi-conductor to route current; thus there are no moving parts to wear out or corrode. Contactors can still fail, but it’s virtually impossible that they would do so in the “on” position.
The last link in the winch assembly is the gear train by which the motor turns the spool and pulls in (or lets out) the line. Since the motor turns at a high speed, its revolutions per minute must be reduced considerably, both to gain mechanical advantage and to keep the line speed to a manageable level. There are three main types of gear train: worm, spur, and planetary. The latter is the type found the M8000 and most consumer winches these days. Planetary gears are so called because the central gear, driven by the motor, is literally orbited by the secondary gears that drive the spool.
Planetary-gear systems are very compact, inexpensive to manufacture, and reasonably efficient. Their salient drawback is that they have no intrinsic braking capability when the winch is spooling out under power, so an internal brake is required, usually inside the spool. This brake will transfer heat to the drum, and subsequently the inner wraps of the line, if, for example, it’s necessary to lower a vehicle’s weight against the winch on a long downhill recovery. This can be an issue with synthetic winch line, which loses strength if it is heated too much. According to Thór Jónsson at Viking, current Dyneema winch line will begin to lose strength if it reaches 150ºF while under load, and will begin to melt in the high 300º range. While the latter point is unlikely during any normal single-vehicle recovery, the former isn’t. For this reason, planetary-gear winches should always be set to free-spool when you are pulling out line to rig the recovery, and should be powered out under load for no more than 20 seconds at a time, then allowed to cool. No such precaution is necessary when powering in, the normal mode for the vast majority of winch recoveries.
(An interesting characteristic of synthetic winch line is that, even if heated to over 150º, it will regain the strength it lost once it cools. At first glance, the bottom layers of synthetic line might appear to be melted after any load, but they’re really just compressed. However, if you exceed that critical 300º-plus point, you’ll be left with a chunk of melted plastic. Thór once had a customer complain after he melted the Viking line on his M8000. Questioning revealed that he’d been lowering all his friends’ trucks down a steep incline one after the other. Further questioning revealed that he’d also melted the winch’s motor.)
Four-wheel-drive overland travel is different than trail running. My early experiences with the latter involved a friend with a beat-up 1964 Land Cruiser FJ40 equipped with a Ramsey winch and an alarmingly frayed steel cable. We took that vehicle over some ridiculous trails, getting stuck numerous times a day and hooking the winch to whatever was nearby to pull it out. I’m still amazed we both survived with limbs intact, but that Ramsey did yeoman duty time after time.
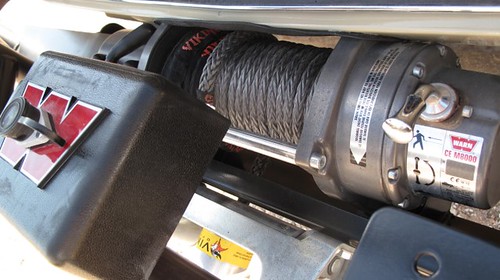
However, on a long overland journey, it’s vital to minimize stress on the vehicle. The aim is to avoid becoming stuck, to take the easy route when possible. Challenging conditions are tackled only when there is no other way through. Thus, on most overland trips a winch is rarely needed, which leads some to argue, why not buy a cheap winch since you’ll hardly use it anyway? While it’s a valid question, my response is the same one I give people who argue for cheap hand tools: If you need the tools—or the winch—something has already gone wrong. Why risk compounding the situation by relying on substandard equipment? A knock-off winch built with inferior materials might well simply seize up after a long period of non-use. Before I get a raft of responses: I’ve known several people who bought new 8,000-pound Chinese winches for $350 or less and have had absolutely stellar service from them. And I know several others who bought similar winches and had them fail quickly or perform poorly. That crapshoot factor is the scary part, even if you’re unoffended by companies willing to reverse-engineer someone else’s work simply to cheapen it and sell it for less.
The final aspect of installing a winch, of course, is learning how to use it properly. You can take the trial-and-error approach my friend and I did, but a far better (and infinitely safer) way is to get professional instruction. Even a basic course such as that taught at the Overland Expo will increase your knowledge and confidence immensely; full classes can be taken from competent schools such as High Trails Expeditions or Overland Experts. Once you have the basic techniques in hand, it’s vital to practice them until every move is instinctive and firmly planted in your long-term memory.
That way, when your truck goes frame-deep in Tanzanian black cotton soil you’ll handle the situation with—dare I say this?—ultimate proficiency.
* * * * * * * * * *
Diagrams are from an excellent Warn manual, available online as a PDF; click here to download.
* Sadly and ironically, Warn now offers a line of cut-price winches, the VR series, built to lower specs than the M series, to compete with the brands that copied and undercut Warn in the first place. I’m not sure whether I’m more disappointed in Warn, for not simply redoubling their efforts to convince customers that better quality is worth the investment, or with consumers who are blinkered to everything but price. In their defense, I’ll note that Warn furnishes the same warranty with the VR series winches as they do with their high-end lines; nevertheless, my advice is, if you can’t afford a new M8000 or another top-quality winch, buy a used one—you’ll still be better off than compromising on internal quality.
Do I really need a winch?
 Recently my friend Sergio Mendez Santiago emailed me from Puerto Vallarta, Mexico, where he and his wife, Ruth, are putting the finishing touches on their new Mitsubishi Triton, a fine turbodiesel-powered 4WD pickup (sadly unavailable in the U.S.). Like so many of us setting up a new vehicle, Sergio has been vacillating on the decision of whether or not to install a winch. We both thought it would be a good subject to explore. Since I have a Warn 8274 on my FJ40, and I installed a Warn M8000 on Roseann’s FJ60, I certainly appreciate their value (and I think my objectivity is on solid ground)—however, I certainly don’t think one absolutely needs a winch to be able to undertake even ambitious journeys.
 Recently my friend Sergio Mendez Santiago emailed me from Puerto Vallarta, Mexico, where he and his wife, Ruth, are putting the finishing touches on their new Mitsubishi Triton, a fine turbodiesel-powered 4WD pickup (sadly unavailable in the U.S.). Like so many of us setting up a new vehicle, Sergio has been vacillating on the decision of whether or not to install a winch. We both thought it would be a good subject to explore. Since I have a Warn 8274 on my FJ40, and I installed a Warn M8000 on Roseann’s FJ60, I certainly appreciate their value (and I think my objectivity is on solid ground)—however, I certainly don’t think one absolutely needs a winch to be able to undertake even ambitious journeys.
No matter what vehicle you drive, from a two-wheel-drive pickup with street tires to a Jeep Rubicon on BFG Mud-Terrains with diff locks front and rear, a 4:1 transfer case, disconnecting sway bar, etc. etc, you’re going to find yourself in situations for which a judgement call is needed. Obviously the two-wheel-drive pickup will have a much, much lower threshold at which discretion should kick in and you turn around, but the Rubicon will have its own threshold, beyond which you stand a good chance of getting stuck.
In such cases, a winch can give you the leeway to push the threshold, a little or a lot depending on several factors:
- Are you with other vehicles that can serve as anchor points for the winch line, or which are equipped with winches themselves?
- If you are traveling solo, are there natural anchor points, such as substantial trees, within reach of your winch line? If not, would it be possible to rig an anchor, such as by burying a spare wheel in sand?
- If the vehicle becomes immobilized, will the situation be immediately hazardous to occupants or the vehicle itself? Examples would be getting stuck in an off-camber situation next to a drop-off, or in beach sand below the high tide line.
- If you are traveling solo, and for some reason cannot self-recover even with the winch, are you a three-hour walk from help, or a three-day trek from civilization?
 A winch also provides insurance for situations when you’re simply caught unaware and find yourself stuck—a seemingly firm dry lake bed that suddenly gives way, an innocuous patch of snow that reveals itself as tractionless ice. If you travel solo frequently, and far off the beaten track, a winch offers substantial peace of mind even if you’re not prone to pushing the envelope. And of course with a winch you can assist others, although few people are willing to spend the money solely to be able to act as a good Samaritan.
Speaking of money: There’s more to buying a winch than buying a winch. You’ll need a rock-solid bumper designed to accommodate the winch you’ve chosen. You’ll also need a full recovery kit, including a tree-protector strap, at least two properly rated shackles, a snatch block, a winch-line damper, gloves, and preferably a winch line extension. I strongly recommend replacing the steel winch cable that comes with most winches with a synthetic line, which is far lighter and safer—and more expensive. Even with that weight savings, you’ll probably need to beef up your front suspension to properly handle the mass suddenly placed far out on the front of the vehicle. Finally, you’ll need a heavy-duty battery and charging system in the vehicle—preferably a dual-battery system in case of failure of the primary battery.
Add up everything and you can figure on tripling the cost of a moderately priced winch by the time you’re finished. (Speaking of which, I urge staying away from the cut-price Chinese clones of Warn and Ramsey winches, for reasons of both quality and ethics.)
 Learning about winches and winch lines at OX10.Oh, one more thing: A winch is fully capable of maiming or killing its operator or nearby spectators. So if you do install one, you are obligated to learn its proper and safe use.
Given the significant expense, the significant associated modifications, and the learning curve, it’s tempting—and a perfectly reasonable strategy—to simply do without the winch; to use prudence when faced with questionable situations, and to make sure you have alternate methods for self-recovery.
To start with, a high-quality air compressor will enable you to properly reduce tire pressure when needed. Obviously you don’t need a compressor at all to lower tire pressure, but if all you have with you is an inexpensive compressor that takes a half-hour to inflate them again, you’re much less likely to air down when it’s called for. Very frequently, if a vehicle becomes stuck in soft sand, all that’s needed to get underway again is to reduce tire pressure to one bar (around 14 psi) or even a little lower.

Some people swear by sand mats, others spurn them, still others seem to view them as a necessary overland fashion accessory. The lightweight aluminum replacements for the old surplus steel PSP are much easier to manage, as are even newer plastic designs such as the Maxtrax. But sand mats are still a bulky, mostly single-purpose tool. You must make up your own mind if the terrain you explore makes them worth carrying.
 Sand mats, like these plastic ones from MaxTrax, are another good addition to your kit.Another love-it-or-hate-it tool is the exhaust jack, essentially a giant heavy-duty balloon you inflate with the vehicle’s exhaust. An exhaust jack can lift one side of a vehicle clear of even clingy muck. However, I’ve witnessed more failures of these things than makes me comfortable, from incompatible exhaust pipes to failed blow-off valves. Here’s an example from LROTV:
Put me in the hate-it camp.
Finally, of course, there’s the Hi-Lift jack, the tool everyone loves to hate. Awesomely versatile, fond of jamming, and dangerous if used incorrectly, the Hi-Lift can do everything up to and including winching—if you’re careful.
I think one of the best uses for the Hi-Lift is as a “casting” jack. Sometimes when a vehicle is stuck in a rut, the only thing needed to regain traction is to move it sideways out of the rut. In such a situation, you can jack up one end of the vehicle until the tires are clear, then simply shove the vehicle sideways off the jack and on to firmer ground. It sounds and looks quite alarming, but is perfectly safe if done carefully. This was the first thing I was taught to do with a Hi-Lift, but the technique seems to have been mostly lost.
A Hi-Lift can be used to lift buried tires out of sand in order to insert sand mats, but you’re wasting effort if you lift the body of the vehicle and have to overcome suspension droop. Better to use the optional fitting made to hook onto a wheel; then your efforts will produce immediate results.
Winching with the Hi-Lift is glacially slow, and requires a fair amount of chain and other accoutrements—but it works, and its very slowness gives you time to think and avoid unsafe moves. There are several kits made to turn the Hi-Lift into a winch; this video is about the most succinct I’ve seen on the actual process:
So there’s my stance. A winch is a valuable accessory, but I would never let the lack of one stop me from exploring—in fact my FJ40 had no winch for the first 20 years I owned it, including all the time I was guiding other vehicles into remote beaches in Mexico, and towing a trailer full of sea kayaks. If you wonder whether it’s possible to accomplish higher-level expedition travel without a winch, I give you Tom Sheppard, who has soloed 100,000 miles of the Sahara in a succession of Land Rovers and a Mercedes G-Wagen—not one of them burdened with a winch.
Do I really need a winch?
 Recently my friend Sergio Mendez Santiago emailed me from Puerto Vallarta, Mexico, where he and his wife, Ruth, are putting the finishing touches on their new Mitsubishi Triton, a fine turbodiesel-powered 4WD pickup (sadly unavailable in the U.S.). Like so many of us setting up a new vehicle, Sergio has been vacillating on the decision of whether or not to install a winch. We both thought it would be a good subject to explore. Since I have a Warn 8274 on my FJ40, and I installed a Warn M8000 on Roseann’s FJ60, I certainly appreciate their value (and I think my objectivity is on solid ground)—however, I certainly don’t think one absolutely needs a winch to be able to undertake even ambitious journeys.
 Recently my friend Sergio Mendez Santiago emailed me from Puerto Vallarta, Mexico, where he and his wife, Ruth, are putting the finishing touches on their new Mitsubishi Triton, a fine turbodiesel-powered 4WD pickup (sadly unavailable in the U.S.). Like so many of us setting up a new vehicle, Sergio has been vacillating on the decision of whether or not to install a winch. We both thought it would be a good subject to explore. Since I have a Warn 8274 on my FJ40, and I installed a Warn M8000 on Roseann’s FJ60, I certainly appreciate their value (and I think my objectivity is on solid ground)—however, I certainly don’t think one absolutely needs a winch to be able to undertake even ambitious journeys.
No matter what vehicle you drive, from a two-wheel-drive pickup with street tires to a Jeep Rubicon on BFG Mud-Terrains with diff locks front and rear, a 4:1 transfer case, disconnecting sway bar, etc. etc, you’re going to find yourself in situations for which a judgement call is needed. Obviously the two-wheel-drive pickup will have a much, much lower threshold at which discretion should kick in and you turn around, but the Rubicon will have its own threshold, beyond which you stand a good chance of getting stuck.
In such cases, a winch can give you the leeway to push the threshold, a little or a lot depending on several factors:
- Are you with other vehicles that can serve as anchor points for the winch line, or which are equipped with winches themselves?
- If you are traveling solo, are there natural anchor points, such as substantial trees, within reach of your winch line? If not, would it be possible to rig an anchor, such as by burying a spare wheel in sand?
- If the vehicle becomes immobilized, will the situation be immediately hazardous to occupants or the vehicle itself? Examples would be getting stuck in an off-camber situation next to a drop-off, or in beach sand below the high tide line.
- If you are traveling solo, and for some reason cannot self-recover even with the winch, are you a three-hour walk from help, or a three-day trek from civilization?
 A winch also provides insurance for situations when you’re simply caught unaware and find yourself stuck—a seemingly firm dry lake bed that suddenly gives way, an innocuous patch of snow that reveals itself as tractionless ice. If you travel solo frequently, and far off the beaten track, a winch offers substantial peace of mind even if you’re not prone to pushing the envelope. And of course with a winch you can assist others, although few people are willing to spend the money solely to be able to act as a good Samaritan.
Speaking of money: There’s more to buying a winch than buying a winch. You’ll need a rock-solid bumper designed to accommodate the winch you’ve chosen. You’ll also need a full recovery kit, including a tree-protector strap, at least two properly rated shackles, a snatch block, a winch-line damper, gloves, and preferably a winch line extension. I strongly recommend replacing the steel winch cable that comes with most winches with a synthetic line, which is far lighter and safer—and more expensive. Even with that weight savings, you’ll probably need to beef up your front suspension to properly handle the mass suddenly placed far out on the front of the vehicle. Finally, you’ll need a heavy-duty battery and charging system in the vehicle—preferably a dual-battery system in case of failure of the primary battery.
Add up everything and you can figure on tripling the cost of a moderately priced winch by the time you’re finished. (Speaking of which, I urge staying away from the cut-price Chinese clones of Warn and Ramsey winches, for reasons of both quality and ethics.)
 Learning about winches and winch lines at OX10.Oh, one more thing: A winch is fully capable of maiming or killing its operator or nearby spectators. So if you do install one, you are obligated to learn its proper and safe use.
Given the significant expense, the significant associated modifications, and the learning curve, it’s tempting—and a perfectly reasonable strategy—to simply do without the winch; to use prudence when faced with questionable situations, and to make sure you have alternate methods for self-recovery.
To start with, a high-quality air compressor will enable you to properly reduce tire pressure when needed. Obviously you don’t need a compressor at all to lower tire pressure, but if all you have with you is an inexpensive compressor that takes a half-hour to inflate them again, you’re much less likely to air down when it’s called for. Very frequently, if a vehicle becomes stuck in soft sand, all that’s needed to get underway again is to reduce tire pressure to one bar (around 14 psi) or even a little lower.

Some people swear by sand mats, others spurn them, still others seem to view them as a necessary overland fashion accessory. The lightweight aluminum replacements for the old surplus steel PSP are much easier to manage, as are even newer plastic designs such as the Maxtrax. But sand mats are still a bulky, mostly single-purpose tool. You must make up your own mind if the terrain you explore makes them worth carrying.
 Sand mats, like these plastic ones from MaxTrax, are another good addition to your kit.Another love-it-or-hate-it tool is the exhaust jack, essentially a giant heavy-duty balloon you inflate with the vehicle’s exhaust. An exhaust jack can lift one side of a vehicle clear of even clingy muck. However, I’ve witnessed more failures of these things than makes me comfortable, from incompatible exhaust pipes to failed blow-off valves. Here’s an example from LROTV:
Put me in the hate-it camp.
Finally, of course, there’s the Hi-Lift jack, the tool everyone loves to hate. Awesomely versatile, fond of jamming, and dangerous if used incorrectly, the Hi-Lift can do everything up to and including winching—if you’re careful.
I think one of the best uses for the Hi-Lift is as a “casting” jack. Sometimes when a vehicle is stuck in a rut, the only thing needed to regain traction is to move it sideways out of the rut. In such a situation, you can jack up one end of the vehicle until the tires are clear, then simply shove the vehicle sideways off the jack and on to firmer ground. It sounds and looks quite alarming, but is perfectly safe if done carefully. This was the first thing I was taught to do with a Hi-Lift, but the technique seems to have been mostly lost.
A Hi-Lift can be used to lift buried tires out of sand in order to insert sand mats, but you’re wasting effort if you lift the body of the vehicle and have to overcome suspension droop. Better to use the optional fitting made to hook onto a wheel; then your efforts will produce immediate results.
Winching with the Hi-Lift is glacially slow, and requires a fair amount of chain and other accoutrements—but it works, and its very slowness gives you time to think and avoid unsafe moves. There are several kits made to turn the Hi-Lift into a winch; this video is about the most succinct I’ve seen on the actual process:
So there’s my stance. A winch is a valuable accessory, but I would never let the lack of one stop me from exploring—in fact my FJ40 had no winch for the first 20 years I owned it, including all the time I was guiding other vehicles into remote beaches in Mexico, and towing a trailer full of sea kayaks. If you wonder whether it’s possible to accomplish higher-level expedition travel without a winch, I give you Tom Sheppard, who has soloed 100,000 miles of the Sahara in a succession of Land Rovers and a Mercedes G-Wagen—not one of them burdened with a winch.
Overland Tech: Battery welding in the field
 Welding with automotive batteries is one of those near-mythical skills, like seating a tire bead with starting fluid, that most people never even attempt. But unlike explosive bead-seating, which a quick YouTube search will confirm can go wrong easily, battery welding is pretty straightforward. Recently, Doug Manzer had an opportunity to try it in the backcountry of Utah.
 Welding with automotive batteries is one of those near-mythical skills, like seating a tire bead with starting fluid, that most people never even attempt. But unlike explosive bead-seating, which a quick YouTube search will confirm can go wrong easily, battery welding is pretty straightforward. Recently, Doug Manzer had an opportunity to try it in the backcountry of Utah.
Doug and his 11-year-old son, Nick, were on a solo-vehicle trip in their Toyota FJ Cruiser, towing a military M416 trailer modified by Doug for camping duty. While climbing a series of 90-degree rock ledges, both front spring mounts tore off the trailer’s frame. Inspection revealed that insidious rust had weakened the mounts.
 Doug had seen Matt Savage’s video of battery welding on one of Overland Expo’s 60-Second Overlander spots, and realized he had the perfect opportunity to try it. However, he only had two batteries with him, and was lacking a few other needed items, so he and Nick left the trailer and made the three-hour drive to the nearest town, Green River, for supplies.
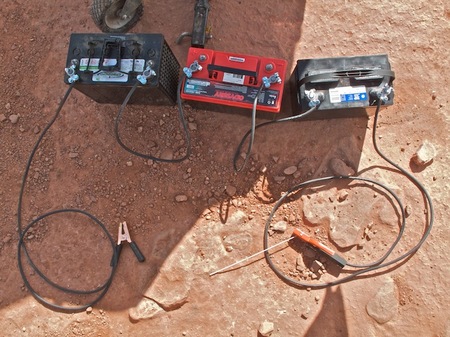
 Click for larger imageBack on site, Doug hooked up his existing AGM batteries, including the main Odyssey, in series (positive to negative) with a purchased lead-acid battery, to create a 36-volt power source. He used a standard jumper clip on the positive terminal and a welding rod holder on the negative end. A C-clamp and the Toyota’s receiver hitch served as a makeshift vise for cutting 2 by 5-inch rectangles of flat steel to create a spring mount reinforcement.
In his first attempt, using 6011 and then 6013 rods, Doug actually found the arc too hot and focused. A 316 rod turned out to be perfect for the thick, mild steel. A few rough but strong beads later, and father and son were on the trail again. So adequate did those welds turn out that all Doug did on returning home was to clean them up a bit. He’s certain the battery-powered field repair is far stronger than the factory mounts.
An interesting postscript: The Odyssey battery, reinstalled in the FJ Cruiser, started it right up after welding duty. But a check of the new lead-acid battery at home showed it to be 90 percent discharged. Chalk up one more anecdote for the superb Odyssey.

 (Editor’s note: For those intrigued by the concept of battery welding, but inexperienced at using sticks, check out the excellent Ready Welder, a wire-feed unit capable of welding steel up to 1/2 inch thick using three batteries.)
Equipment review: Hi-Lift vs. Hydra-Jac

If you’ve never cursed a Hi-Lift jack, you’ve never used one.
For all its awesome capabilities—two-and-a-quarter-ton jacking capacity, plus the ability to winch with it or employ it as a vice, not to mention the endless imaginative bodge fixes for which people have employed the hollow handle or main beam—the Hi-Lift is a recalcitrant, capricious beast, its mechanism prone to jamming solid with trail dirt and its handle prone to catching a careless user’s head with enough force to cause bleeding from the ears. Nevertheless, if you need a tool that can lift one end of an F350 clear of the ground, pull your winchless Land Rover out of a mud hole, or squeeze crushed sheet metal out of the way of steering components to get your rolled vehicle home, for over a century your choice has been a Hi-Lift or . . . a Hi-Lift. Until now?
 In 2008 I chanced upon a reference to the Hydra-Jac, a lightweight (13 pounds versus the Hi-Lift’s 30), hydraulically operated jack with what appeared to be a similar range of lift travel to the Hi-Lift. The Hydra-Jac is manufactured by Radflo, a company already well-known for sophisticated long-travel shock absorbers designed for race vehicles and rock buggies. It seemed a logical step for them to apply this expertise to a long-travel jack. It was clear the Hydra-Jac was not designed as a replacement for the Hi-Lift, given its relatively modest 2,200-pound capacity compared to the Hi-Lift’s nominal 4,660 (although the company’s website refers to “that old-fashioned cast-iron jack you’ve been lugging around”).
But it seemed a fair trade given the handiness and what promised to be much easier and safer operation, via a short lever that didn’t appear capable of doing much damage even if you did manage to get your head between it and the cylinder. A one-ton-plus rating should be enough to lift one end of most medium-sized 4WD vehicles clear of the ground. The price was wincingly high at over $300—three times the price of a Hi-Lift—but if the performance justified it, I thought the Hydra-Jac might represent a viable alternative if used within its design parameters.
Notice I mentioned that was 2008? I spent the next two years trying to actually get a Hydra-Jac to test.
The fault was not with Radflo’s independent public relations rep, who was eager to help. But the first time I requested a unit to review, he told me another publication had been promised “exclusive rights” for the first article, and I couldn’t have one for several months. Um . . .okay.
The next time I checked, I was told the company had agreed to loan a jack to me for testing if I guaranteed it would be returned “in the same condition in which it was shipped.” Say what? It’s a jack—the first time I used it, much less tested it, its condition was bound to change. I said no thanks.
A year later I tried again. This time it was mentioned that the owner of Radlfo “might have apprehensions about loaning the product to journalists he’s never met,” and that I should drop by the booth at SEMA to introduce (i.e. ingratiate?) myself. By now I was beginning to wonder if I was wasting my time, and if there was another reason Radflo didn’t want their jack tested in the real world. I skipped SEMA that year anyway for other reasons (not really into posters signed by Hooter’s girls). But, astonishingly, in another few months the skies parted and a Hydra-Jac appeared at my shipping depot.
On first inspection I couldn’t see what all the hesitation had been about. The Hydra-Jac appears to be very well-made, and adequately specced for its metric-ton rating. The piston is a 22mm chrome-plated rod, sleeved with a 35mm steel tube. The operating handle looks absurdly delicate compared to the blunt-force-trauma club of a Hi-Lift, but it implies easy cranking. The actual travel of the piston (and thus the lifting foot) is 18 inches—not a lot when you realize a Hi-Lift’s foot will climb nearly the full 48 or 60 inches of its main beam—but the Hydra-Jac’s foot can be loosened and repositioned to suit the application, which increases versatility. Complementing the light weight is its compact length—just 37 inches (a 48-inch model is also available).
So let’s do some comparing.
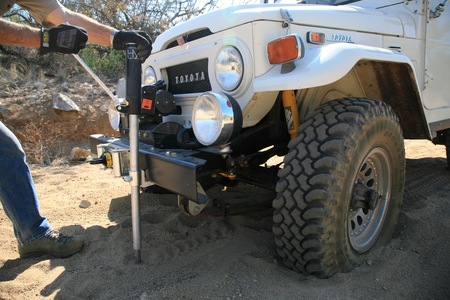 First off, you won’t be doing any winching or vising with the Hydra-Jac. It’s made for jacking, period. I suppose you might be able to wedge the round base on a chassis member to pry off some bent sheet metal or straighten a tie rod, but essentially this tool is made for lifting things.
I first tried a simple face-off by jacking up the back end of my FJ40 until both wheels were in the air. Using the Hi-Lift, the procedure is to make sure the reversing lever is in its ‘up’ position (it should always be stored thusly), after which it’s possible to pull the mechanism and foot of the jack up the main beam with the operating handle until the foot meets the bottom of the vehicle’s bumper. Making sure the jack is vertical and well-located, one then pumps the operating handle, keeping (gloved!) fingers out of the space between the handle and the main beam, and most definitely keeping one’s head out of said space. Without too much effort the rear wheels were dangling. Moving the reversing lever to ‘down’ (which usually involves a swift bang with a fist), and the procedure is essentially reversed. Once the jack has less than around 150 pounds pressure on it the lifting mechanism will drop to the base (this characteristic has caught more than one new Hi-Lift user by surprise).
With the Hydra-Jac, effort from start (picking up the jack) to finish (lowering the vehicle) was vastly reduced. The movable foot happened to be in the right position to engage the Land Cruiser’s bumper, so I simply tightened the hydraulic lock valve on the jack’s tubular body, and began working the lever. No opportunity without considerable trouble to put oneself in harm’s way—there’s never any recoil potential on the lever. In 15 seconds the tires were in the air, after which it was the work of a second to loosen the lock and lower the vehicle. Control was good enough to bring it down a millimeter at a time, or all the way with a whoosh. First round to the Hydra-Jac.
Then it was time for a recovery. I decided to bury the front (heavier) end of the Land Cruiser in sand and use each jack to lift it high enough to place sand mats under the tires. Normally this isn’t my preferred method of sand recovery, since it forces you to lift the body of the vehicle far enough to max out the suspension travel before the wheels begin to rise, whereas if you can get a bottle jack under the axle you only need to lift a fraction of the distance. But I wanted to put the jacks at their most disadvantageous.
I drove down to the wash that feeds our cattle tank. It has a sandy but not treacherously soft surface. As usual, when you want to get a vehicle stuck it’s nearly impossible. In two-wheel-drive with full street pressure, time and time again I revved the engine and popped the clutch, and the FJ40 just pulled on out. Finally I managed to spin a couple of rather pathetic holes, pulled the front wheels into them, and shoveled sand back around the tires.
 Again the Hi-Lift was first. I didn’t bother with the big red plastic ORB jack base, but the Hi-Lift’s base barely sank as I started pumping the handle. It took considerably more effort to raise the front of the 40 with that massive cast-iron six in there, plus the suction of the sand. The ironic thing about the Hi-Lift is that the harder it is to pump, the more difficult it is to keep one’s head out of the Danger Zone arc of the handle, and the more dire the potential consequences if one’s grip slips. But, as usual, the thing does work, and out came the tires.
Now for the Hydra-Jac. This time, the foot was too high on the shaft to get under the front bumper. So I had to get a wrench to loosen and lower it to the correct height, rather than being able to instantly adjust for any starting height as with the Hi-Lift. More interestingly, as soon as I began pumping the operating lever, the Hydra-Jac’s round base headed straight for China through the gravelly sand. It sank at least seven or eight inches before the Land Cruiser started to rise, and I ran out of travel before the tires were high enough to insert sand mats.
Some quick math explained it. The Hydra-Jac’s round base is four inches in diameter, giving it just 12.5 square inches of area. The Hi-Lift’s four by seven-inch rectangular base has well over twice the area—28 square inches.
I retracted the Hydra-Jac’s piston and put the ORB base underneath. Even though not designed for this jack, the ORB gave plenty of support, and the Land Cruiser rose much quicker. Pumping the hydraulic arm required significantly more effort than when raising the back end on firm ground, but was still infinitely easier than working the Hi-Lift. However, I noticed another quirk regarding the Hydra-Jac. Its design means that the hydraulic ram, which is attached to the base, is free to rotate inside the cylinder. The result was that if the vehicle was not perfectly level side to side, the jack tried to swivel on its foot against the bumper. I came close to tipping the vehicle sideways off the jack, as if I were employing the classic “casting jack” technique to move the vehicle sideways out of a rut.
So round two went to the Hi-Lift, which, despite the greater effort and care required, was actually faster and less troublesome than the Hydra-Jac. Since recovery is the most vital—and the most common—use to which either of these jacks is likely to be put, I had to conclude that the Hi-Lift remains the most versatile jacking tool for backcountry travel.
I do think the Hydra-Jac has potential. If the base were enlarged it would solve one major drawback. If some way could be found to prevent the ram from being able to turn inside the cylinder, I believe the jack would gain significantly in control and ease of use. Its light weight, ease of storage, much lighter pumping action, and greater margin of safety are obvious advantages.
The last thing I would have liked to test was the Hydra-Jac’s durability, especially regarding the hydraulic mechanism. Hi-Lifts might get ornery and stiff, but they rarely break. Alas, Radlfo declined to leave the jack with me for a long-term test.
So, for now, at least, I’m back to cursing—and counting on—my well-used Hi-Lift jack.
Equipment review: Viking Off Road Recovery Bag $130
 I wrote a brief review of Thor Jonsson’s stout U.S.-made Recovery Bag when I was with Overland Journal, but since then I’ve had more experience with it in the field. Nothing I’ve seen has altered my initial impressions of its quality and utility.
If your vehicle is equipped with a winch designed for anything but pure poseurship, you need a comprehensive recovery kit to accompany it. A winch doesn’t work in isolation: If you’re winching from a tree you must use a tree saver strap to prevent damage to the trunk that could kill the tree; if you’re attaching to another vehicle you need proper shackles. In many situations you’ll want a pulley block to redirect a pull or increase power. Gloves, a winchline extension, a KERR (kinetic energy recovery rope) or strap, a winchline damper—all should be part of a winch kit.
Furthermore, if you’re winching it’s likely to be at least a somewhat stressful (and certainly potentially dangerous) situation, so you’ll want everything organized to eliminate fumbling and delays. Therefore I consider the recovery kit’s container to be just as important as the contents.
The first thing you’ll notice about the Viking bag is the can’t-miss-me-orange 3M reflective tape, which will prevent you misplacing the bag at night, and will warn anyone driving up on the scene to slow down. Open the bag and you’ll see the sturdy double-layer construction, using an orange liner which keeps the contents easy to see. Actually there’s a third layer: The central rope/chain compartment comes out for easy cleaning after a recovery that renders stuff muddy. The other compartments tidily hold shackles, pulley blocks, gloves, a KERR, a winchline damper (which can be Velcroed to the exterior via straps)—virtually everything associated with a comprehensive recovery kit. The lot is comfortable carried via a fat rubberized handle or a broad shoulder strap.
If you stuff this bag with the full assortment including a choker chain, it will represent a potential 30-pound projectile in the event of an accident or rollover, so it should be secured any time the vehicle is moving. I run a single ratchet strap over mine, but Viking has also thoughtfully included four tie-down rings on the base.
Virtually everything I could have thought of to include in a recovery kit bag is here, thanks to Thor’s extensive experience. It’s a U.S.-made product I highly recommend. Incidentally—I had my own recovery gear to fill this bag, but Viking offers a selection of well-considered kits to suit any overland vehicle from a Subaru to a Unimog.
Hint: When using “Search,” if nothing comes up, reload the page, this usually works. Also, our “Comment” button is on strike thanks to Squarespace, which is proving to be difficult to use! Please email me with comments!
Overland Tech & Travel brings you in-depth overland equipment tests, reviews, news, travel tips, & stories from the best overlanding experts on the planet. Follow or subscribe (below) to keep up to date.
Have a question for Jonathan? Send him an email [click here].
SUBSCRIBE
CLICK HERE to subscribe to Jonathan’s email list; we send once or twice a month, usually Sunday morning for your weekend reading pleasure.
Overland Tech and Travel is curated by Jonathan Hanson, co-founder and former co-owner of the Overland Expo. Jonathan segued from a misspent youth almost directly into a misspent adulthood, cleverly sidestepping any chance of a normal career track or a secure retirement by becoming a freelance writer, working for Outside, National Geographic Adventure, and nearly two dozen other publications. He co-founded Overland Journal in 2007 and was its executive editor until 2011, when he left and sold his shares in the company. His travels encompass explorations on land and sea on six continents, by foot, bicycle, sea kayak, motorcycle, and four-wheel-drive vehicle. He has published a dozen books, several with his wife, Roseann Hanson, gaining several obscure non-cash awards along the way, and is the co-author of the fourth edition of Tom Sheppard's overlanding bible, the Vehicle-dependent Expedition Guide.


