Overland Tech and Travel
Advice from the world's
most experienced overlanders
tests, reviews, opinion, and more
Quality . . .
It’s no secret that I’m a believer in high-quality gear, whether it’s the vehicle, accessories, tools, camping equipment, or personal accoutrements. I also try to buy American-made products when possible (and when they meet my standards, which is not always the case).
But for certain products there simply is no longer a U.S.-made (or even North American-made) choice.
Recently I was in the market for a new Gore-Tex parka, and turned to Arc’Teryx, a company I can modestly claim to have helped publicize in their early days, when I reviewed gear for Outside magazine. I was impressed with the quality of Arc-Teryx’s products—even among a suite of superb contemporaries such as Marmot—and at the time they were making their clothing in Canada.
Sadly, that no longer seems to be the case. The Beta AR jacket I bought was made in, of all places, Myanmar (Burma to many of us).
But my initital disappointment more or less evaporated when I examined the jacket closely. Try as I might, I could find not a single flaw in its construction—indeed, the closer I looked the more impeccable were the details and stitching. In the end I had to admit it was fully the equal of any of the company’s early efforts.
That doesn’t mean I’m happy that the manufacturing of so many thousands of products has shifted overseas to save labor costs here—and, make no mistake, that is the sole reason to do so—but it did serve as a reminder to me that quality is not intrinsic to any geographic locale. So perhaps it’s now more important than ever for consumers to actually pay attention to what they buy, and evaluate it on its merits rather than any arbitrary prejudice.
The only three knots you need for paracord lashing
In my opinion nothing beats a ratchet strap for securing cargo. Cheaper cinch straps—even the superior style with the roller buckle—just can’t be cinched tight enough to reliably secure heavier and potentially dangerous items.
But it’s not always possible to use ratchet straps. Often you’ll simply run out of your supply, or the hooks won’t fit where you need to secure a load. Sometimes with a bulky roof-rack load you might need to run your lashing back and forth a dozen times to prevent flapping.
Time for the paracord.
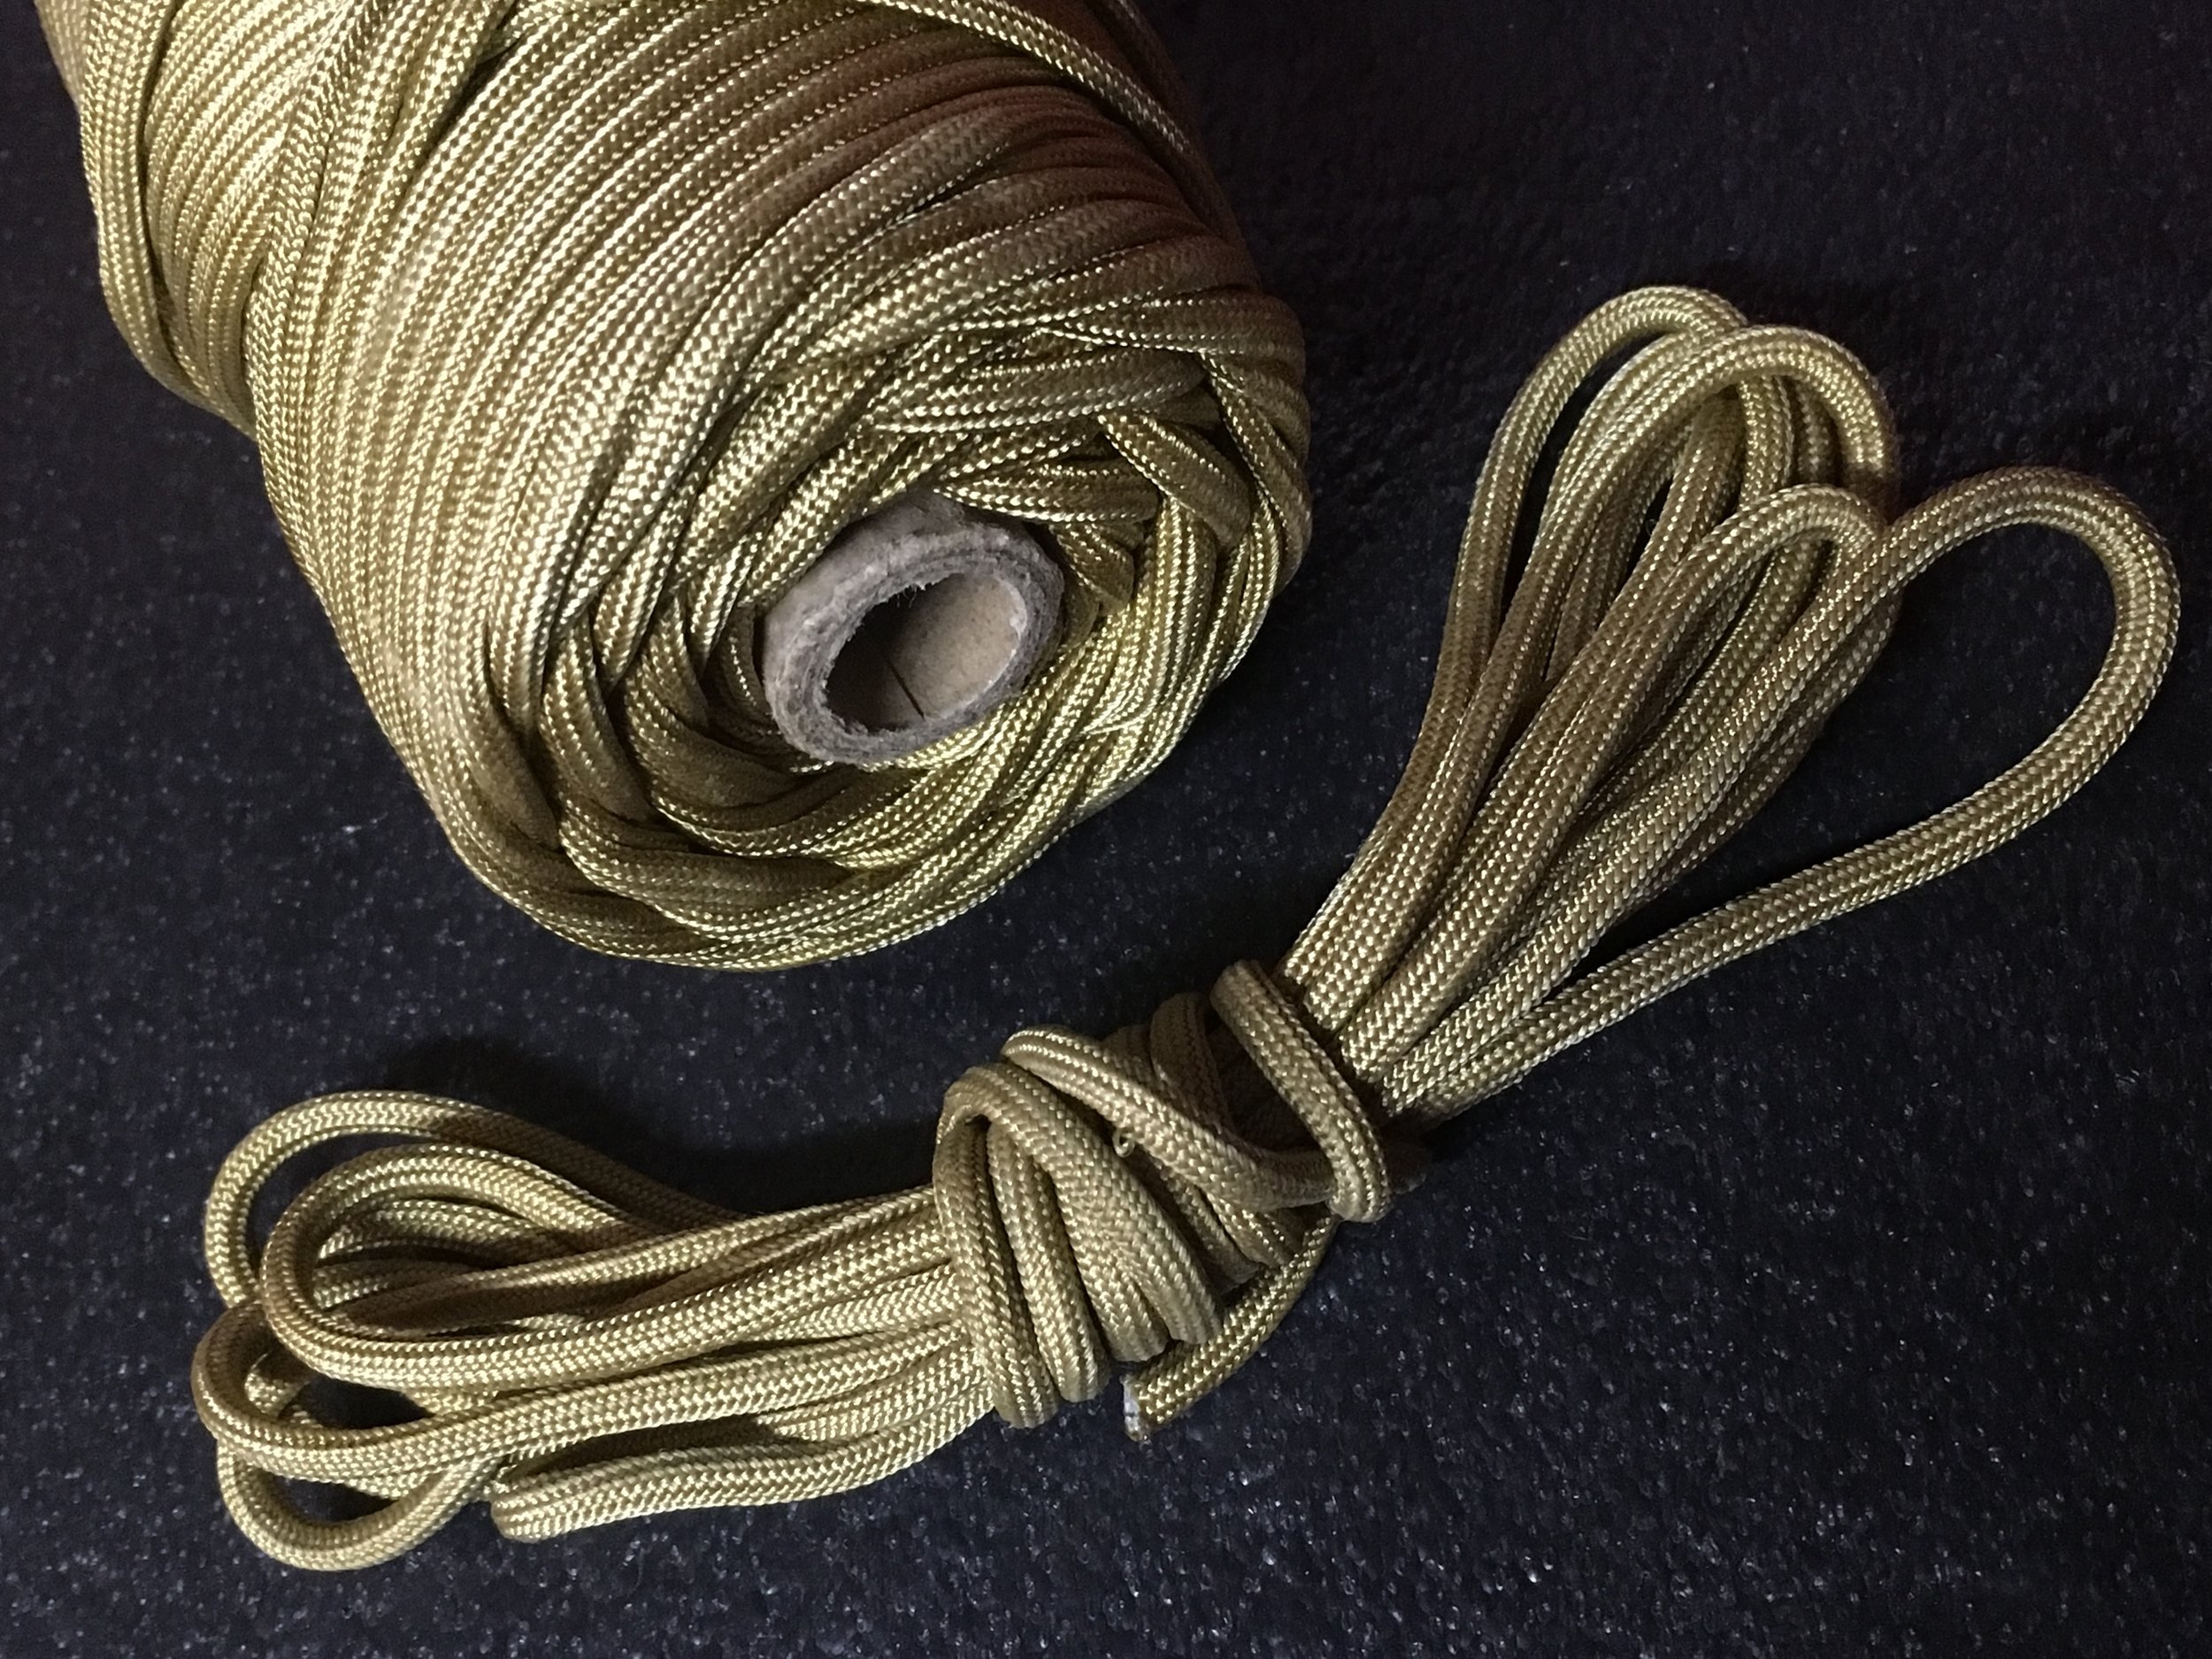
Parachute cord has come a long way since its original application. Now you can find it everywhere from those ubiquitous “survival” bracelets and wrapped “tactical” knife handles to—ready?—the Hubble Space Telescope, where astronauts from the space shuttle Discovery used 35 feet of it to resecure loose thermal blankets protecting the instrument.
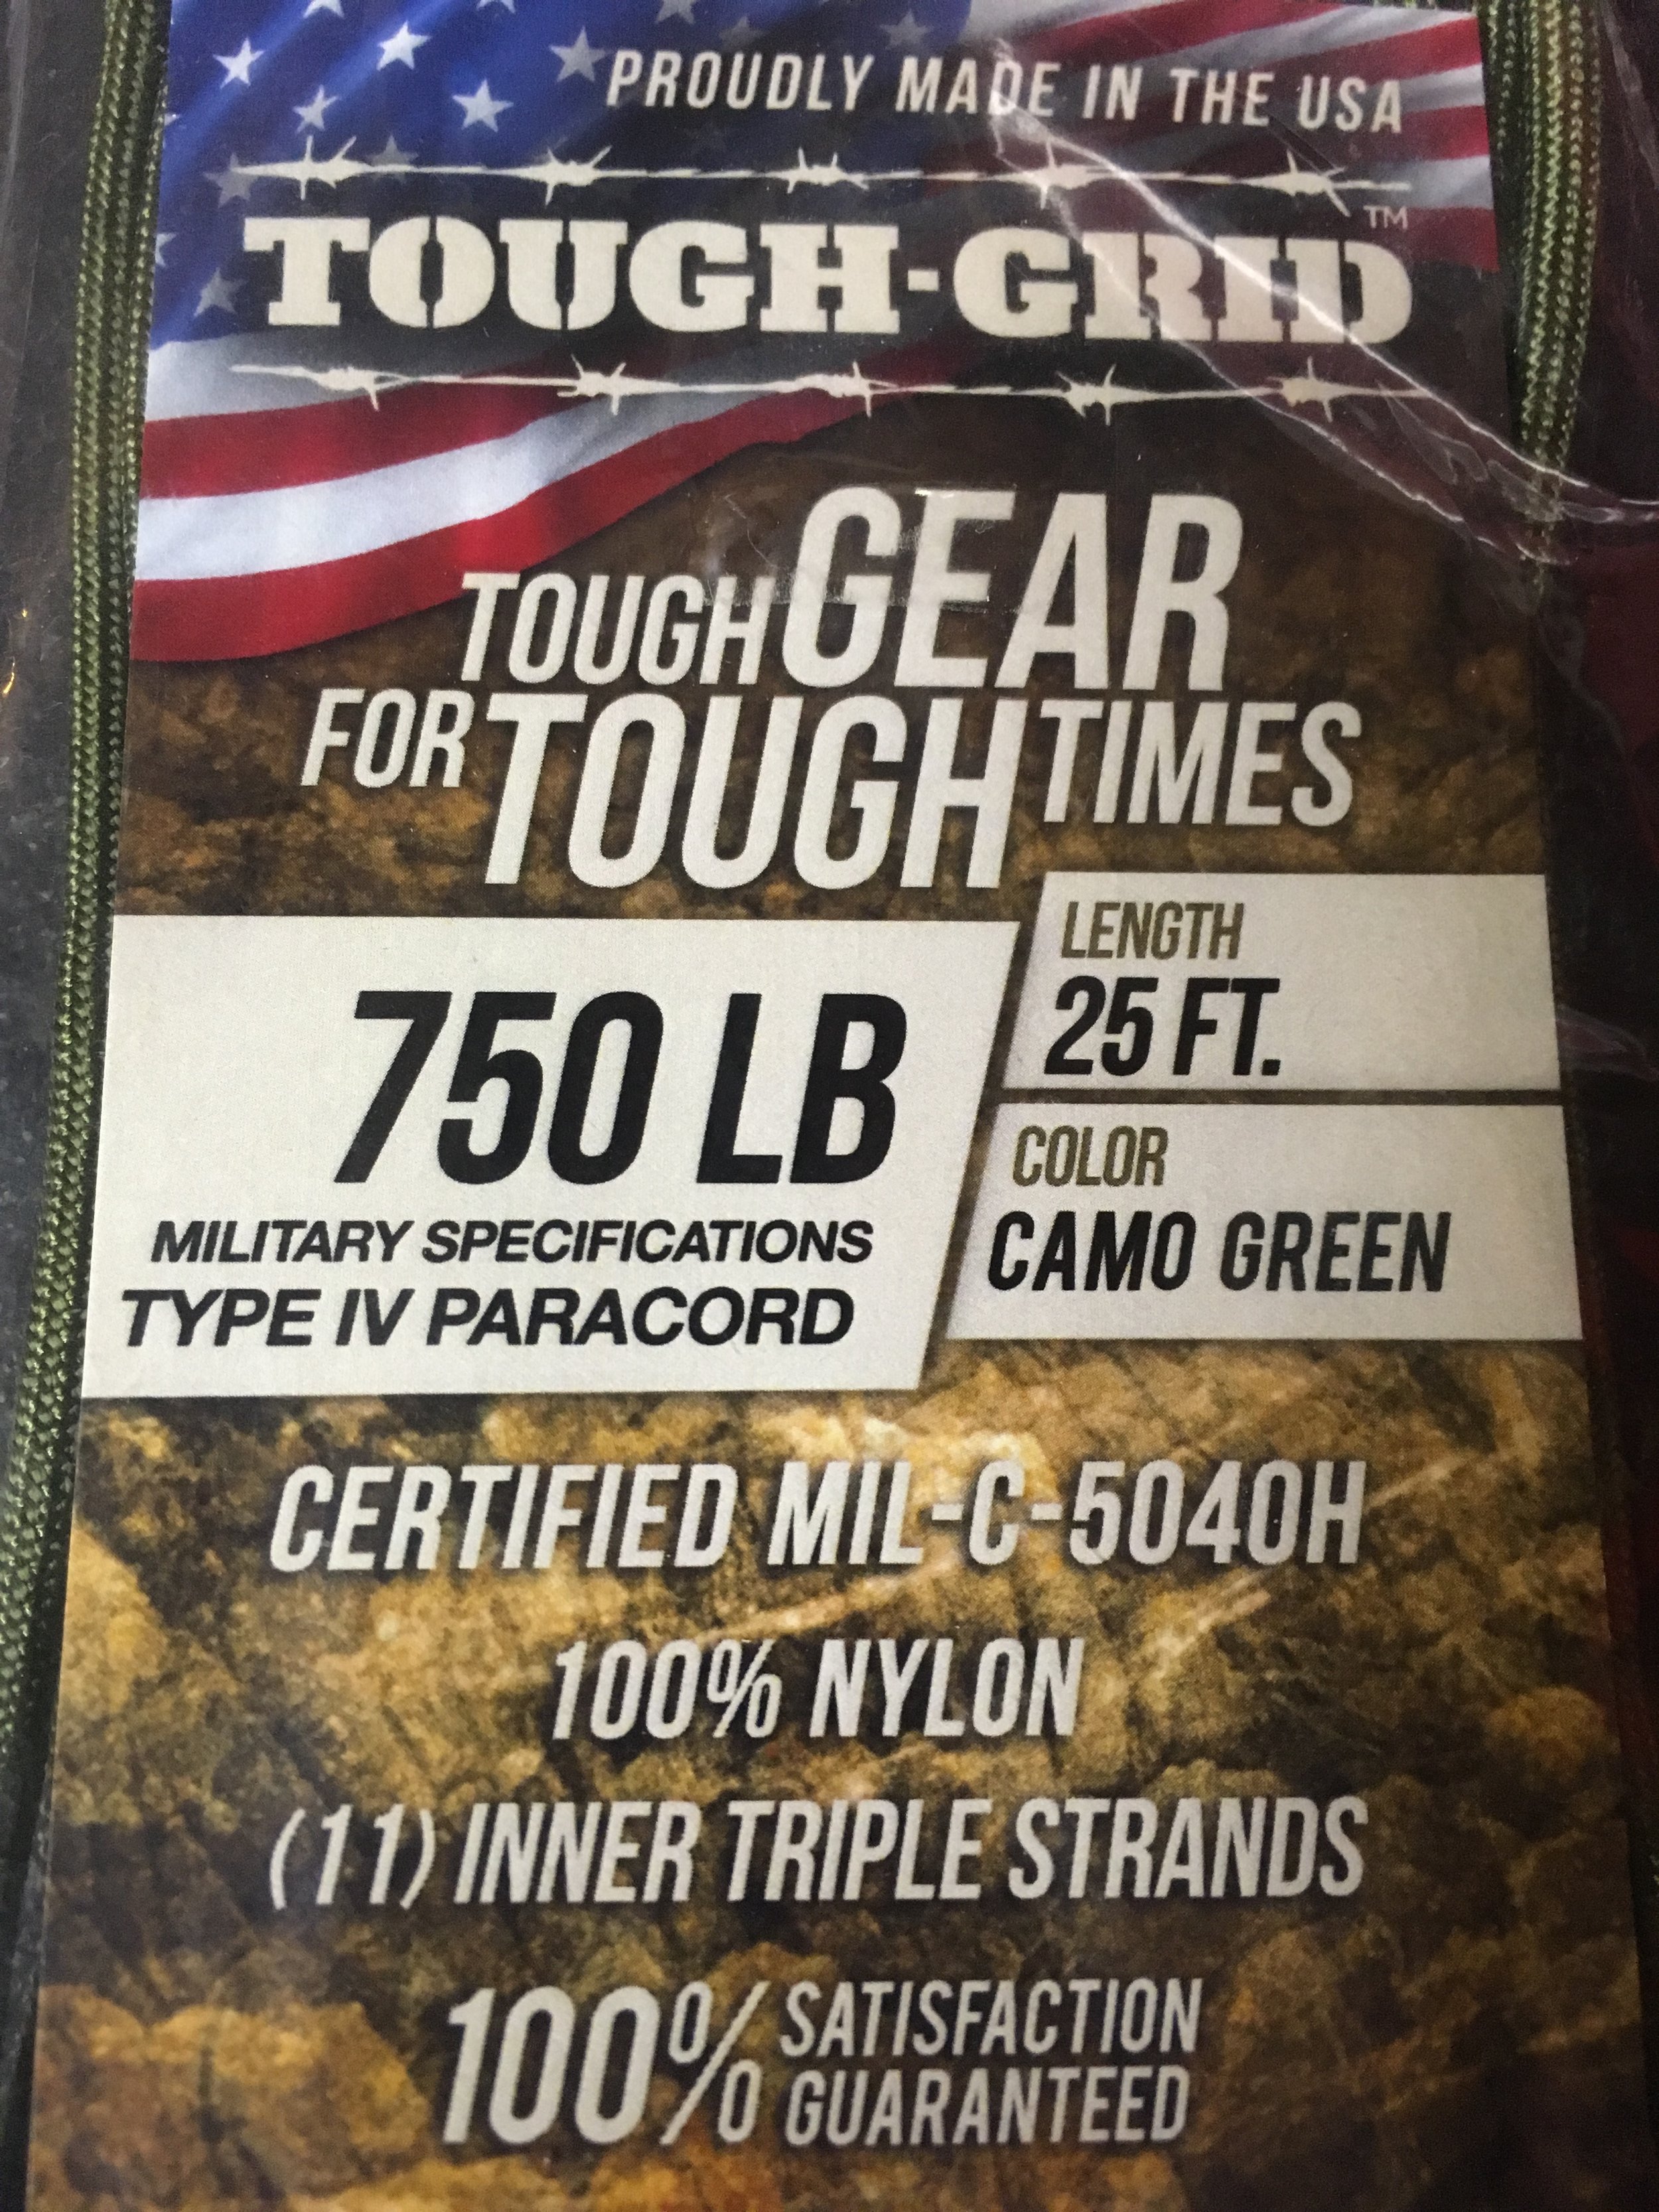
That ubiquity has spawned a lot of substandard variations of the authentic product. Genuine mil-spec nylon paracord will advertise its conformity to military standard C-540H Type III (“550” paracord, indicating its rated breaking strength in pounds), or C-540H Type IV (“750” paracord, again indicating breaking strength). If you pull apart the end of a length of paracord you can confirm authenticity by counting the individual cords within the kernmantle sheath. Genuine mil-spec paracord will have between seven and 11 of them, and each cord will comprise three twisted strands (cheaper paracord might have fewer cords made from only two strands). On genuine mil-spec paracord one of the inner cords will be a contrasting color; this is a marker for the manufacturer.
Even genuine mil-spec paracord is inexpensive enough that keeping a couple hundred feet in the vehicle for odd jobs is affordable. Of course, you can opt for larger and more expensive kernantle cordage, even Kevlar if you want the ultimate in strength. But 550 or 750 paracord is pretty stout, as long as you keep in mind that a knot—any knot, to a greater or lesser degree—will reduce its strength by up to 25 percent.
Once you’ve determined the need for a fabbed up lashing and have cut the length you need, don’t neglect to fuse the end, otherwise the interior cords can protrude and snarl and your work will look decidedly less than pro. I work the kernmantle sheath over the end, so when I apply a flame it (usually) melts nicely and encapsulates the cords. Just make sure you have a solid, tight blob. I find that putting the flame next to but not right on the end helps melt the cord neatly.
Now you need to secure that cargo securely. Paracord has two characteristics that can work with and against you. It’s a bit stretchy, which makes it easier to tell when you’ve pulled it tight enough but can let the load shift if you haven’t. And it’s fairly slippery, which makes it easier to pull tight across duffels and other luggage, but which also means knots can come loose if not chosen correctly and tied properly.
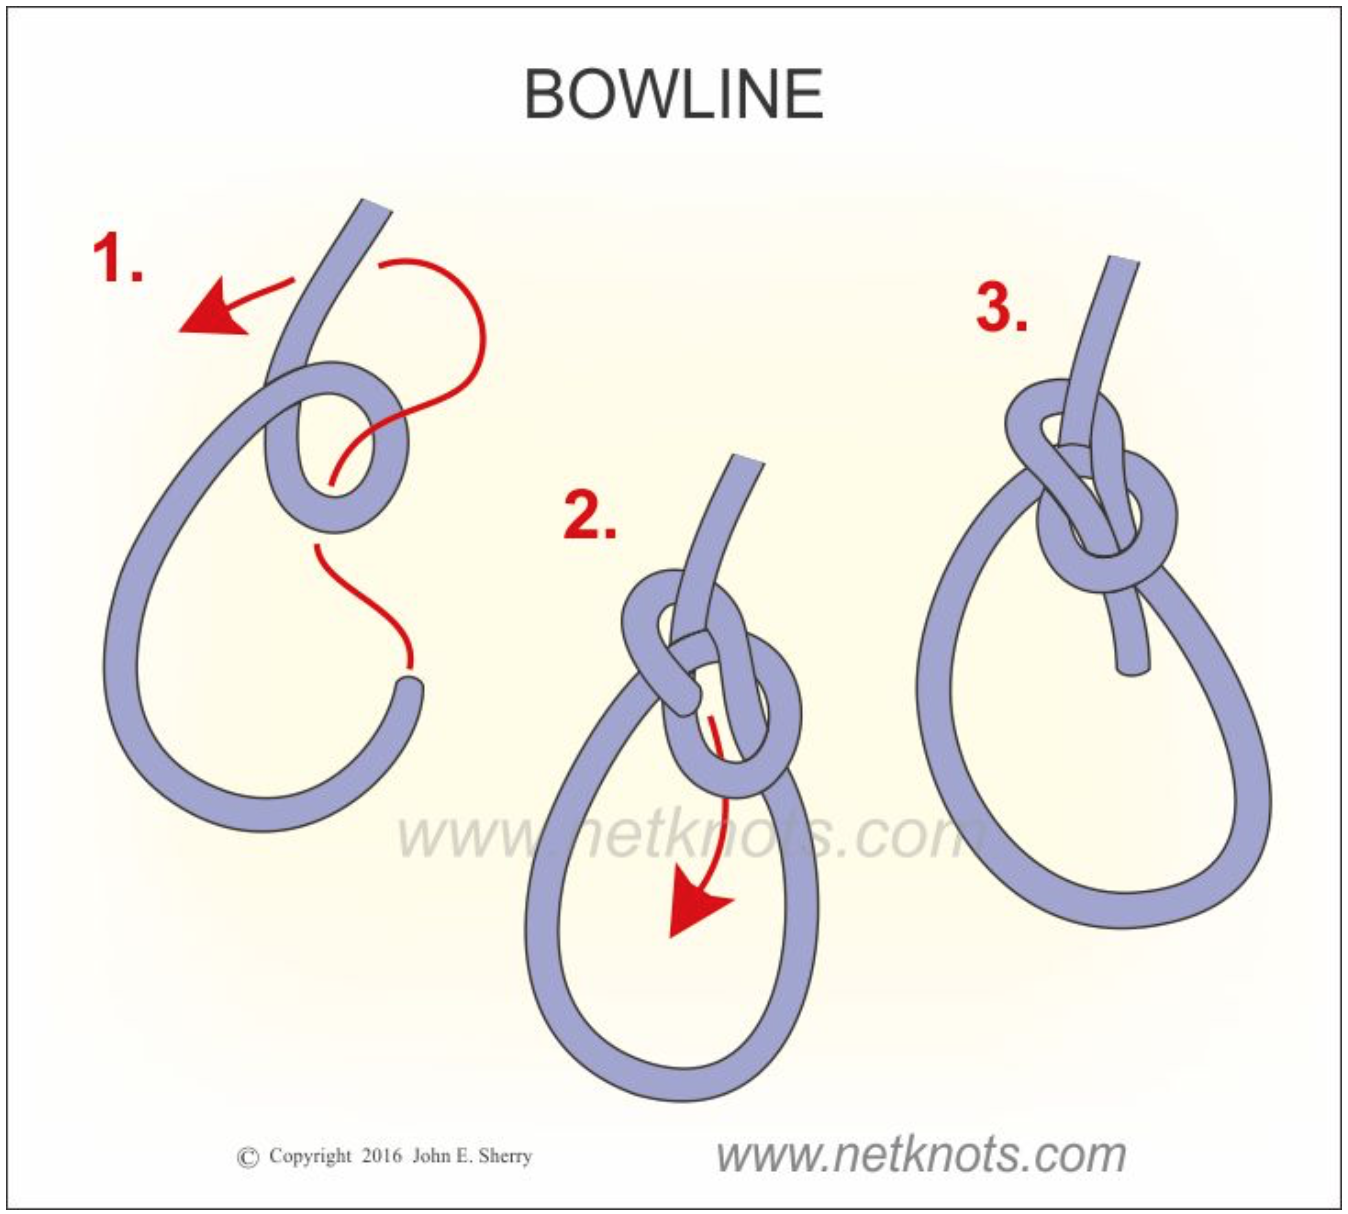
To ensure that, you need know only three: a bowline, a trucker’s hitch, and a sheetbend.
The bowline is the best way to make a secure loop, to tie the first end of your paracord to the roof rack or cargo eyelet. (I’ve blatantly lifted the still images here from the excellent site netknots.com, because I urge you to go there and watch the easy-to-follow animations of these knots, and dozens more.) The bowline is strong, it weakens the rope less than some other knots, yet it is easy to undo.
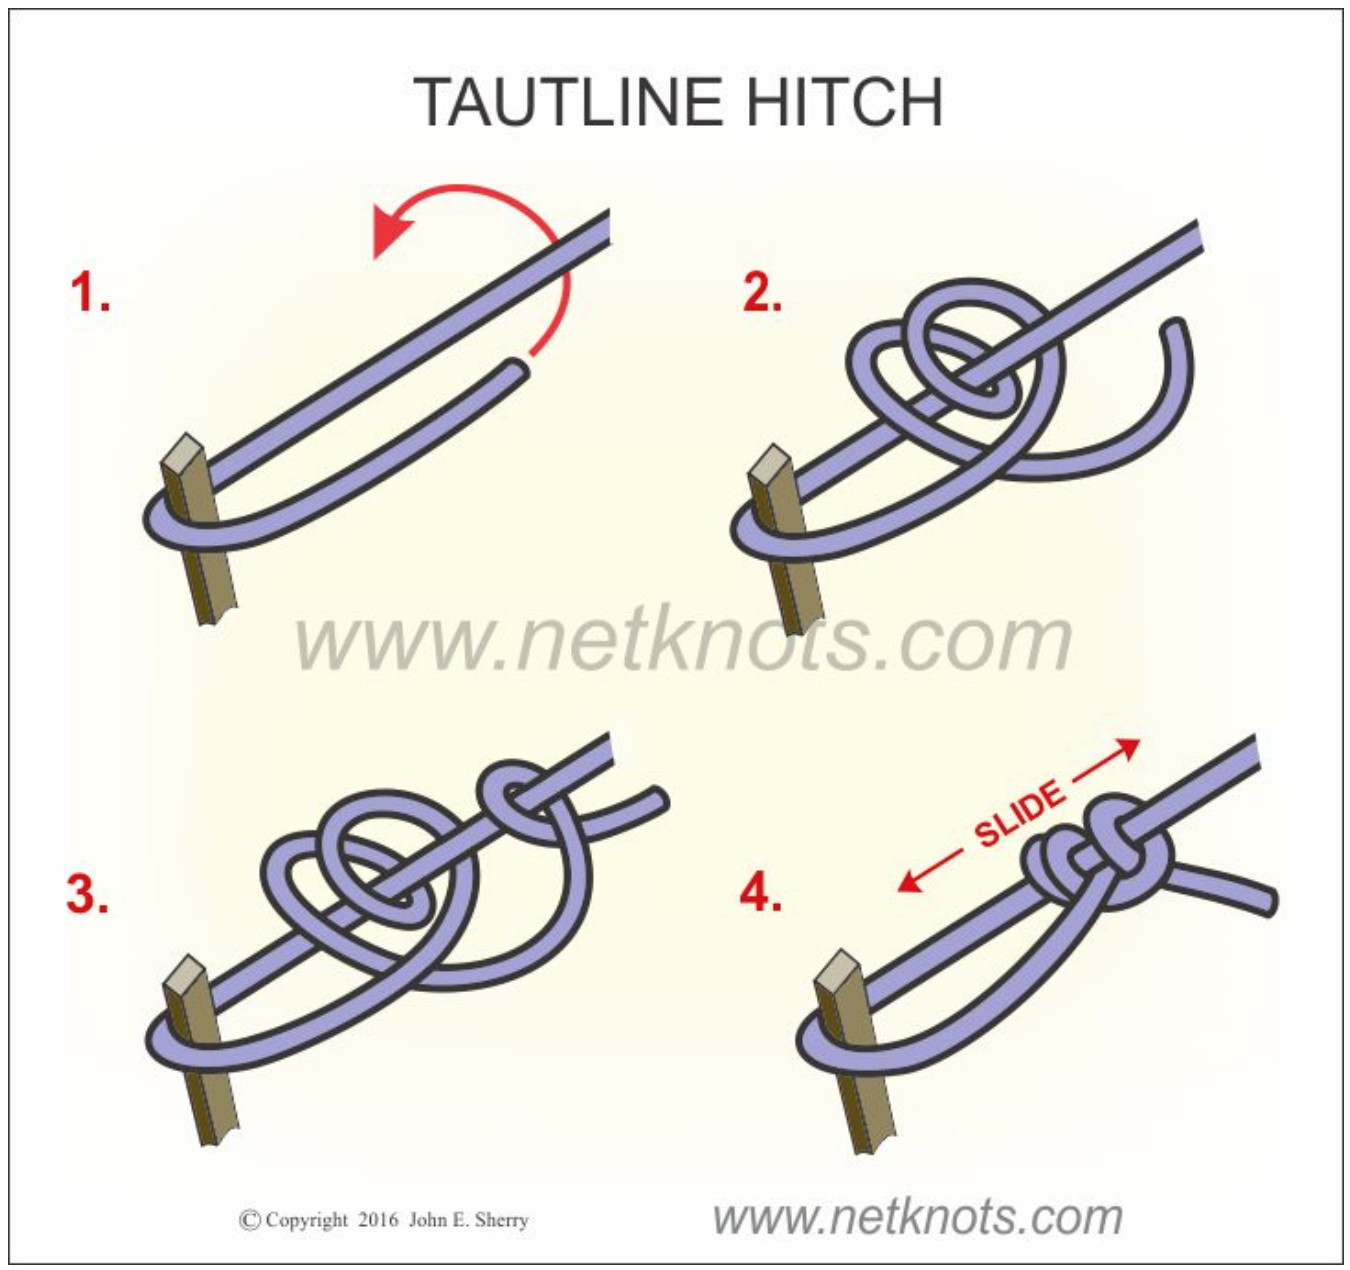
At the other end, you want to pull that cord as tight as possible and secure it so it won’t loosen. The trucker’s hitch actually functions as a jive pulley to multiply the force you’re pulling with, and when tied off properly will not slip.
When using paracord I suggest augmenting the netknots instructions. In part three, they finish off the knot with a single loop (basically a half hitch). However, paracord can slip if secured thusly. I strongly suggest looping the end of the cord through twice, then looping it the opposite direction below, so you in effect add a tautline hitch, like this:
Do this finishing knot right up against the “pulley” loop. Just as with the bowline, the trucker’s hitch unties easily, and in fact the slippery half hitch you tied to use as the “pulley” will pop loose simply by pulling on either end of the cord.
The last knot you’ll use if you need to join two cords that are each too short: the sheet bend. It’s an incredibly simple knot, almost a square knot except the free end of the second (blue here) cord tucks under as shown.
For extra security you can double the knot as in the diagram. The brilliant thing about the sheet bend is that it will effectively join two cords or ropes of different diameter. Just remember to use the smaller line for the second (blue) part of the knot.
And the brilliant thing about all these knots is that they’re useful in hundreds of other situations. So cut yourself a three-foot piece of mil-spec paracord and practice them until they’re second nature. They’ll serve you well.
The versatile 1/4-inch ratchet . . .
The ratchet and socket set is the most critical component of your tool kit. It’s what comes out when things need attention that are held on to the vehicle with actual nuts and bolts, rather than just trim screws or plastic press fittings. Important things, in other words. I’ve always maintained it’s the part of your kit you should spend the most money on, to get the absolute highest quality. Of all the tools I’ve broken over the years, the majority by far have been cheap sockets that split, or cheap ratchets that jammed or broke altogether.
Most owners—me included—start out with a 3/8ths-inch ratchet and socket set (the 3/8ths refers to the diameter of the anvil, the square peg on the ratchet to which you attach the sockets). A 3/8ths set will comfortably handle bolts or nuts from about 9mm or 5/16ths inch up to 19mm or 3/4 inch. That’s suited for a lot of medium-sized repairs—replacing fan or serpentine belts, water pumps, radiators, etc. Above that you really should step up to a 1/2-inch ratchet, which is able to handle larger sockets for fittings such as those on suspension components, which need more torque to remove or fasten securely.
Thus for a long time my automotive tool kit has included a 3/8ths-inch ratchet and socket set for general work and a 1/2-inch set for major repairs. And that worked just fine. But lately I’ve been rethinking. Why? Several reasons.
Even a 3/8ths ratchet can be a bit long and bulky when working in tight spaces on fasteners smaller than 11 or 12mm. Yes, you can add a short-handled ratchet to the kit, but the head will still be just as bulky. And your 3/8ths socket set will probably have a lot of overlap with your 1/2-inch set. Typically the former will include sockets up to about 19mm, and the latter will include sockets down to 12mm. I’d rather use a 1/2-inch ratchet for that 19mm nut, yet a 1/2-inch ratchet is silly overkill for any 12mm bolt or nut I’ve ever encountered.
Enter the 1/4-inch ratchet. It’s smaller all around, able to fit into spaces no 3/8ths equivalent could. You can argue that the ratcheting mechanism is inevitably weaker as well, but consider two things: First, there is only so much torque necessary for even a 12 or 13mm fastener; second, a high-quality ratchet will withstand force comfortably in excess of any you’re likely to need. I’ve yet to meet a 12mm or even 13mm nut that I couldn’t remove with a 1/4-inch ratchet. And it will be far handier for smaller sizes.
Additionally, a 1/4-inch ratchet and socket set will cost less than a larger one, so you can go for higher quality. Finally, the 1/4-inch set will be lighter and take up less space, a surprisingly real consideration even in something such as our Troop Carrier, the tool bin of which is approaching maximum capacity and the GVWR of which is approaching, period.
So I’ve been wondering if a versatile combination might be a 1/4-inch set with sockets ranging from very small, say 4 or 5mm, up to about 13mm, and a 1/2-inch set with sockets from 12 or 13mm up to whatever you like—my current set goes up to 32mm. The slight overlap would mean that if you ever did run into a recalcitrant 12 or 13mm bolt while using the 1/4-inch kit, you could switch up to the 1/2-inch.
I have a nice mixed set of 1/4-inch stuff, but this scheme was a perfect opportunity to spend money on tools. I like investigating brands new to me, and my friend, driving trainer extraordinaire Graham Jackson, is fond of the German brand Proxxon, so I looked them up on Amazon, and ordered the 23280 49-piece “Precision Engineer’s” 1/4-inch drive set.
The first thing that impresssed me was the box it came in. While plastic rather than metal, it had decent sliding latches rather than the usual flimsy snap latches with stressed-plastic hinges, which invariably fail. A nice touch.
Inside I first examined the ratchet itself. The mechanism was a fine 72-tooth unit. Check. Push-button release, check. Lever-operated reversing switch, check. Perfect. The offset head is supposed to ease access to tight spaces. Not sure about that one.
The selection of sockets was very good. Standard sockets from 4mm to 13mm—perfect. They’re forged from chrome vanadium with a double-nickel and single chrome layer finish for corrosion resistance. They of course employ a copy of Snap-on’s Flank Drive system to help grip rounded off nuts (and to avoid rounding them off). A bonus was a comprehensive selection of bits for either the ratchet or the included driver: Screwdriver bits, hex bits, and Torx bits. Five sockets for external Torx fittings. There was even a little selection of angled allen keys, 1.25 to 3mm. The set included two ratchet extensions—one of which included a (removable) sliding T-bar fitting—and a universal joint.
The only flaw I found was the paucity of deep sockets—just four of them, in 6, 7, 8, and 10mm. Odd. Why not a full complement up to 13mm? I would have traded the external Torx sockets for them. As it was there was no space in the tray for additional sockets. But . . . what’s this? There appeared to be some voids in the box under the molded tray. Indeed, when I lifted it out there were several generous gaps.
I called the U.S. Proxxon headquarters. They told me they don’t directly import the hand tools sets, only power tools (I bought mine through a third party dealer). However, when I told them what I was trying to do they generously offered to special-order the sockets I wanted. So I filled in the deep sockets and bought a flexible drive extension as well. All those plus a Snap-on flex-head 1/4-inch ratchet fit underneath the tray.
I guess I need to clean up those holes.
Now I had a comprehensive 1/4-inch socket and ratchet set with the bonus of the driver bits and handle. As expected, it was significantly more compact than an equivalent in 3/8ths. The last task was to make it easier to get the molded tray out when I wanted the stuff in the bottom. So I Dremelled two slots in the tray, and ran a piece of flat 1/2-inch webbing through them and under the tray, leaving the ends loose on top. It’s now easy to pull the tray free.
Our Troop Carrier has a comprehensive set of tools, but they live in a cabinet under a bench that is somewhat of a pain to get to. I’ve been wanting to have a more convenient tool kit for small repairs and adjustments. This Proxxon set, with its combination of sockets and bits, should fill that role perfectly—and it’s compact enough to fit behind a seat.
Hmm . . . I wonder if I should order another two or three sets?
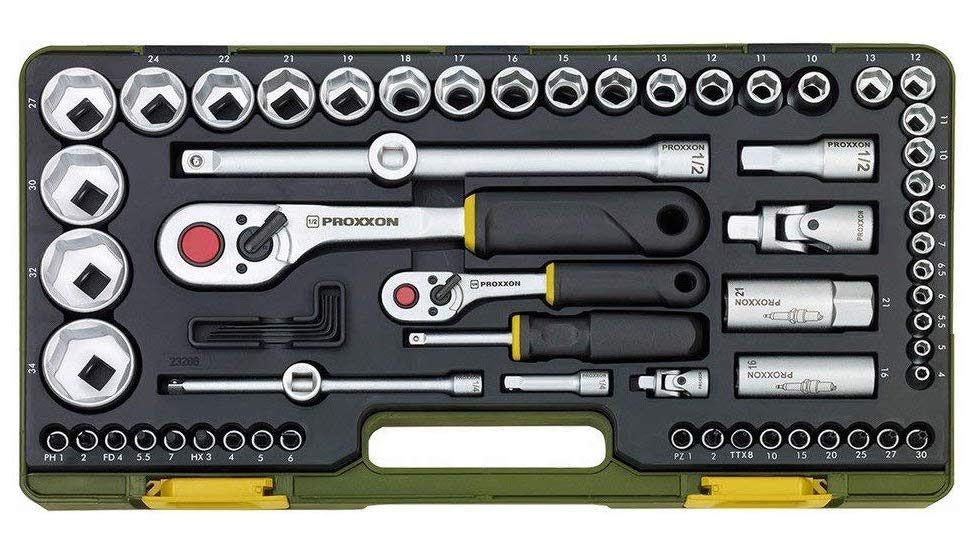
Epilogue: Regarding my idea that a 1/4-inch socket set combined with a 1/2-inch set might be all one needs for just about any job: Proxxon sells a kit (23286) that combines just that, with sockets from 4mm all the way to 34mm. Impressive. Just add some deep sockets and a breaker bar.
For want of an M8 x 30mm bolt . . .
It still amazes me how well I can prepare for a long, remote journey, yet still find myself unprepared.
Over the course of four trips to Australia in the Land Cruiser Troopy we bought there, I slowly accumulated a pretty decent selection of tools, highlighted by a superb Bahco S106 combination kit (see here), which includes full 1/4 and 1/2-inch socket sets, wrenches, plus numerous drive fittings. An additional set of 1/2-inch deep sockets, a screwdriver selection, an electrical tester, and various pliers rounds out the kit.
Our recent trip was without doubt the hardest on both our Troopy and that belonging to Graham Jackson and Connie Rodman, as we covered 2,600 kilometers of dirt tracks between Coober Pedy to Perth, some of them heavily corrugated. And as on earlier trips, substandard work done by a mechanic in Sydney (not the Expedition Centre which did all the camper conversions, but a repair shop nearby) began to manifest itself. A new radiator installed on Graham’s vehicle, bought long distance before we arrived—and guaranteed by the mechanic to be “as good as Toyota”—began leaking halfway through the journey. Radiator stop-leak controlled but did not completely plug it. Next, I found the transfer case lever in our vehicle would engage four wheel drive but flopped back and forth rather than engage low range. The nut on that section of linkage had fallen off. (The transmission had been removed to repair a leak before a previous trip.)
A bit farther on, Roseann and I started noticing a rattle that seemed to be coming from the exhaust, as if some gravel had become caught on top of a heat shield. But soon we could hear an obvious exhaust leak. Underneath the vehicle I inspected the “performance” exhaust system the mechanic had installed. A joint near the middle was completely loose. It had been connected with two bolts and nuts—no flat washers, no lock washers, no jam or nylock nut, no Loctite. One bolt and nut was completely gone; the other I easily removed with my fingers, to find most of the thread stripped.
And that was a problem, because while I had plenty of tools with which to install or remove virtually any nut or bolt on the truck, I had not gotten around to the item on my pre-trip list that read BUY SPARE BOLTS AND NUTS.
Sigh . . .
This time I got lucky. We had some leftover washers from a RAM mount, plus several bolts I had bought to secure it, and against all odds they just happened to be a suitable size and length. We were soon back on the road with a quiet exhaust (and Graham had found an extra M8 nut with which to fix the low-range linkage).
Needless to say, when we got to Perth I made my first task a trip to the local Bunnings to get a start on rectifying the situation before we loaded the Land Cruisers into a container for Africa.
One suggestion: I usually buy mostly high-tensile spare bolts (Grade 8 in SAE or 8.8 or 10.9 in metric), figuring that it won't hurt to replace a missing standard bolt with a high-tensile spare, and I can be assured of having the proper strength fastener for a critical component.
The Hiplok Z Lok
Securing one’s possessions while on a trip is an annoying but critical concern. Inside the vehicle we lock down our large, important items—Pelican cases, etc.—with bicycle-style cables and padlocks stout enough to resist all but a really determined criminal with bolt-cutters and time.
But there are many other smaller items, and other circumstances, where one needs minimal protection from a snatch-and-run thief, involving minimal hassle and weight. Some time ago I read about the Z Lok from Hiplok, and my bicycling friend Geoff in Sydney just gave me one.
The Z Lok is essentially a glorified ziptie, but much stouter, cored with a strip of steel—and, saliently, reusable. A simple forked key disengages the double steel teeth that secure the tie inside a steel-reinforced head. It’s strong enough to resist a really strong yank, and would be nearly impossible to cut with a knife (although not with a good pair of side cutters).
While any thief could buy one and carry the forked key around looking for an opportunity, that’s an unlikely scenario. The Z Lok would be excellent for many situations—locking my camera case to the table while I’m having lunch at an outdoor café; securing my bicycle helmet to the bike—even quickly locking the bike itself if I just wanted to duck inside a coffee shop for a takeaway.
At around 12 bucks on Amazon, or $20 for a pair, I can think of a zillion uses for these things.
Don't be the beta tester
Roof rack brackets broken straight through the adjustment holes
A few years ago my wife and I helped lead a self-drive trip along the U.S. portion of the Continental Divide, the great mountain range that divides North America’s watershed. In addition to our 2012 Tacoma and Four Wheel Camper and the other trip leader’s Ford Raptor, there were a dozen vehicles along, ranging from a pristine late 80s Ford Bronco to a couple of Sportsmobiles, FJ Cruisers, and Jeep Wranglers. Another Raptor and Tacoma, and a recently restored FJ60 Land Cruiser completed the convoy.
Several of the participants had done a lot of last-minute modifications to their vehicle to prepare for the trip, and the FJ60 was fresh off a major rebuild, with some untested components of its own.
It soon began to show.
Climbing through New Mexico, one of the FJ Cruisers pulled off to the side of the trail, and the owner climbed out and began inspecting the custom tire carrier on the back. We stopped and I went over, to find that welds on the carrier were beginning to split, allowing the rack and tire to bang back and forth. We used some ratchet straps to secure the carrier and belay any further cracking—which if left unchecked would have eventually allowed the entire assembly to fall off.
By the Colorado border other issues were surfacing.
A custom auxiliary battery tray on another vehicle began to rattle itself loose. A four-wheel-drive Chevy Van had developed narcolepsy, and would simply stop running for an hour or two, then magically wake up.
A rough trail over a high pass into Wyoming really started to shake things apart. The fenders on a cargo trailer towed by one of the support vehicles—which had been running an easier, parallel course to ours—simply fell off. Another auxiliary battery tray came loose, along with a shock absorber mount.
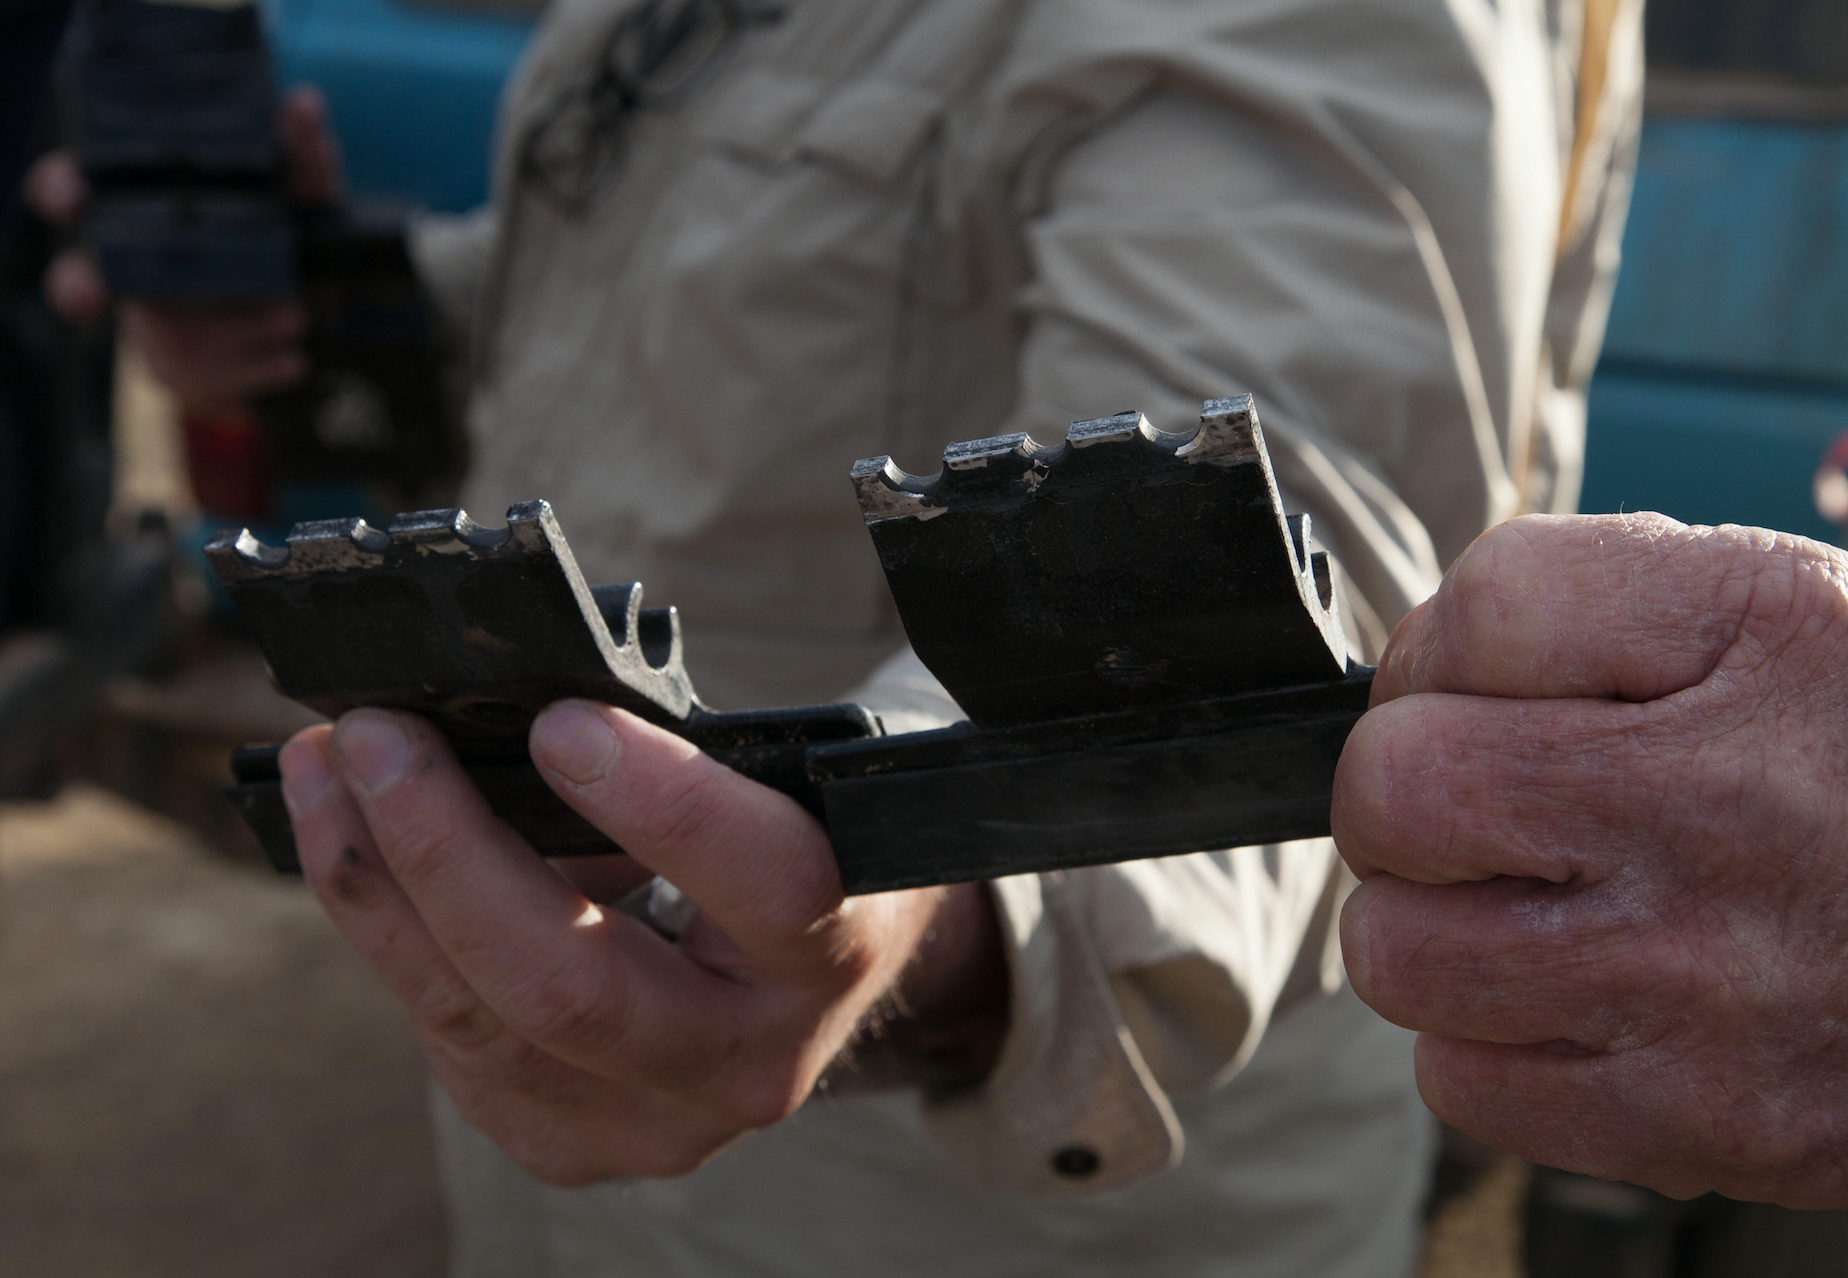
The FJ60 had a lightweight aluminum roof rack installed, mounted with an Autohome roof tent and a side awning. When the rack started making noise, we inspected it, and found one of the aluminum gutter mounts cracked almost all the way through. That was secured—more or less—with duct tape, and we continued. Then another one cracked, and another. Soon all six mounts were near failing. An inspection showed that, incredibly, the manufacturer—a well-respected South African company—had drilled three adjusting holes in each one right across the area where the most strength was needed. Failure on this part was never a possibility—it was an inevitability.
There was no way to adequately repair the mounts in the field, so at the next rendezvous with the support trucks we took off the entire rack, tent and all, and strapped it on top of the massive welded steel construction rack on the support truck. For the rest of the trip the two guys driving the Land Cruiser had a penthouse suite on an F450.
That Continental Divide trip was an extreme example, but I’ve run into this syndrome time after time after time: A vehicle owner has a much-anticipated trip coming up, and work schedules and budgets dictate a rush of last-minute modifications—many of which are not even really needed, just desired. And out in the real world of washboard trails and rocky hillclimbs it is discovered too late that some of those modifications were under-engineered. In the worst of cases the issues can spell the end of the trip; at best they delay progress and inconvenience traveling companions.
If you have a major trip planned, and a list of things you really want or need to do to your vehicle for that trip, do them enough in advance so you can thoroughly test their quality on shorter excursions. It’s much better to do without an accessory than to find out it is more of a hindrance than an asset. And don’t assume just because something is sold by a famous company that it actually has been proven by them before they sell it to you. Let them do their beta testing on someone else.
Battery decluttering
Even in a vehicle as electrically antediluvian as a 1973 FJ40, connections to the battery can get out of hand with the addition of just a few accessories. For many years, I’ve used battery terminals incorporating a threaded vertical post to secure positive and negative cables and wires, both for basic functions (starter, etc.) and accessories such as the 2-gauge cables powering the Warn 8274 winch, and the 10-gauge connection to the auxiliary driving lights.
But over time the connections have been stacking up—there’s now a separate cable to charge the auxiliary battery, and another for the ARB compressor. Even with the installation of an Optima yellow-top battery with redundant side terminals, it was beginning to look cluttered, and probably doing nothing to maintain adequate current flow.
So I ordered a pair of Pico 0810PT “Military style” (their words) terminals from Amazon. Nothing fancy—no gold plating or built-in digital voltmeter—but substantial, and the horizontal bolt not only doubles the available connections but is far more secure than the wing nut on the old terminals. At $10 for the pair it was a bargain for a significant improvement in my wiring.
Will I ever learn?
A cockroach brain has barely a million cells, whereas a human brain has about 100 billion. Nevertheless, cockroaches are capable of learning and remembering things such as mazes.
I'm not sure about myself.
Last week I needed to install a new set of Baja Designs LED lamps on the FJ40—an S2 Sport reversing lamp, and a pair of XLR-Pro driving lamps up front. To incorporate the wiring harness of each into the existing reverse and driving lamp wiring harnesses, I wanted to properly solder the connections to ensure connectivity and longetivity. However, my good soldering gun was out at our desert cottage, 40 miles away, and we needed to stay in town for several commitments. So I thought, I’ll just buy a cheap soldering iron to have here, and ordered one from Amazon with next-day delivery. Just $19.99. You can already see where this is going, can’t you?
Indeed. The kit arrived, in a plastic box with a coil stand and some accessories. Next morning I got to work—and the iron proved utterly incapable of heating a connector sufficiently to melt flux-core solder on a 50-degree morning. Or, later, on a 65-degree day with a trace of a breeze.
Sigh . . .
So I drove to a hardware store and bought the identical 100/140-watt Weller soldering gun I have at Ravenrock ($36.95) and had the connections soldered in minutes.
Anyone need a heated coffee stirrer?
Buy good tools.
Hint: When using “Search,” if nothing comes up, reload the page, this usually works. Also, our “Comment” button is on strike thanks to Squarespace, which is proving to be difficult to use! Please email me with comments!
Overland Tech & Travel brings you in-depth overland equipment tests, reviews, news, travel tips, & stories from the best overlanding experts on the planet. Follow or subscribe (below) to keep up to date.
Have a question for Jonathan? Send him an email [click here].
SUBSCRIBE
CLICK HERE to subscribe to Jonathan’s email list; we send once or twice a month, usually Sunday morning for your weekend reading pleasure.
Overland Tech and Travel is curated by Jonathan Hanson, co-founder and former co-owner of the Overland Expo. Jonathan segued from a misspent youth almost directly into a misspent adulthood, cleverly sidestepping any chance of a normal career track or a secure retirement by becoming a freelance writer, working for Outside, National Geographic Adventure, and nearly two dozen other publications. He co-founded Overland Journal in 2007 and was its executive editor until 2011, when he left and sold his shares in the company. His travels encompass explorations on land and sea on six continents, by foot, bicycle, sea kayak, motorcycle, and four-wheel-drive vehicle. He has published a dozen books, several with his wife, Roseann Hanson, gaining several obscure non-cash awards along the way, and is the co-author of the fourth edition of Tom Sheppard's overlanding bible, the Vehicle-dependent Expedition Guide.


