Overland Tech and Travel
Advice from the world's
most experienced overlanders
tests, reviews, opinion, and more
A serendipitous funnel hack
Okay, I might be the last person on earth to discover this, but . . .
I went out to change the oil on our Troopy this morning, and discovered that somehow all my funnels had ended up at Ravenrock, our desert place . . . 40 miles away. No problem: I had an empty gallon bottle of windshield washer fluid, so I cut off the bottom to make an impromptu funnel.
And, lo and behold, when I inserted it into the fill port of the Troopy it engaged more or less perfectly with the threads. I was able to screw it in and employ both hands to control the oil pour. Plus, when I was finished I screwed the cap back on the bottom of my new “funnel,” so the residual oil wouldn’t seep out into the box where it’s stored.
I’m curious how many vehicles this would work on. Going to try the rest of ours . . .
Accu-Gage customer service
For many years my go-to tire gauge has been the Accu-Gage from G.H. Meiser & Co. (even though, yes, the “Gage” bit makes the editor in me wince). They come in different ranges and configurations, and I’ve always found them to be absolutely consistent and reliable. I must have at least five or six; I’m not even sure.
A few months back I managed to crack the plastic face of the one on the left here. It sat in my desk for weeks before I finally emailed the company to ask if I could either purchase a new face, or send it in for repair. I wasn’t expecting much given such things these days, but I got back an immediate reply saying simply, “What’s your address?”
A week lated a new face showed up. No charge. Nice.
G.H. Meiser is here. Needless to say, highly recommended.
Hack your tire plug kit for more versatility
There are two tire plug kits I recommend above all others I’ve tried: The Extreme Outback Ultimate Puncture Repair Kit, and ARB’s Speedy Seal kit.
Each has its advantages. The ARB kit comes in a snap-in, well-organized blow-molded case, so everything you need is easy to access and nothing you don’t need is in the way. The reamer and plug insertion tool are stoutly made with solid aluminum handles—critical for working on tough all-terrain tires. (Never, ever buy plastic-handled plug tools.) Included are pliers for pulling out whatever has holed your tire, a razor for trimming the inserted plug, lube to ease insertion (no wise cracks please!), a tire gauge, and a kit containing spare valves and valve cores, valve caps, and a valve tool. Finally, 40 plugs are included, which should suffice for a very long time—except see below.
The Extreme Outback Ultimate Puncture Repair Kit is the one you want if you are heading out to drive around the world, or you are a professional leading self-drive tours, or if you just want to guarantee that you can repair any tire issue short of a carcass-shredding blowout. In addition to everything in the ARB kit (except the pliers), the EO kit includes an exhaustive selection of patches and rubber cement to repair seriously large punctures or even sidewall tears from the inside out, once you have broken the bead and removed one side of the tire from the rim. There are even thread and needles to sew up sidewall tears before patching them, and such thoughtful additions as a piece of chalk to mark where your tire and rim meet, so when you remount the tire your balance will not be lost, and packets of hand wipes. The one downside not shared by the ARB kit is that all this stuff is crammed into a heavy-duty zippered nylon case. It’s amazingly compact, but you need to pull just about everything out to accomplish even the simplest plug job.
Also included are plenty of plugs—but, as with the ARB, there is a problem.
I’ve always maintained that the plugs in the ARB kit, which are about 8mm in diameter, are far too large for the average nail or screw hole. They are extremely difficult to insert in such a hole in any tire with a tough carcass, especially a stout E-rated AT, even after a vigorous reaming.
Up until recently, the Extreme Outback kit included two sizes of plugs, about 6mm and 4mm. The 4mm plugs were perfect for most small holes—in fact, when teaching tire repair and actually drilling 3/16th-inch holes in tires for students to practice on, the thin plugs were all I used. Only when demonstrating more challenging situations did I need the larger sizes.
Now, however, the EO kit only comes with 6mm plugs, which, while easier to insert than the ARB’s, are still problematic for many repairs. Case in point: At the last Expo I was having students plug tires after I drilled holes in them. The first volunteer was a woman, and she simply could not get a plug from the EO kit inserted, even with plenty of lube and while putting virtually all her body weight on it. Finally Mark Kellgren, who was teaching with me, took over—and had nearly as hard a time getting the thing in there. Finally I realized I had unwittingly run out of the 4mm plugs and had substituted one of the thicker ones, which was clearly too large for such a hole.
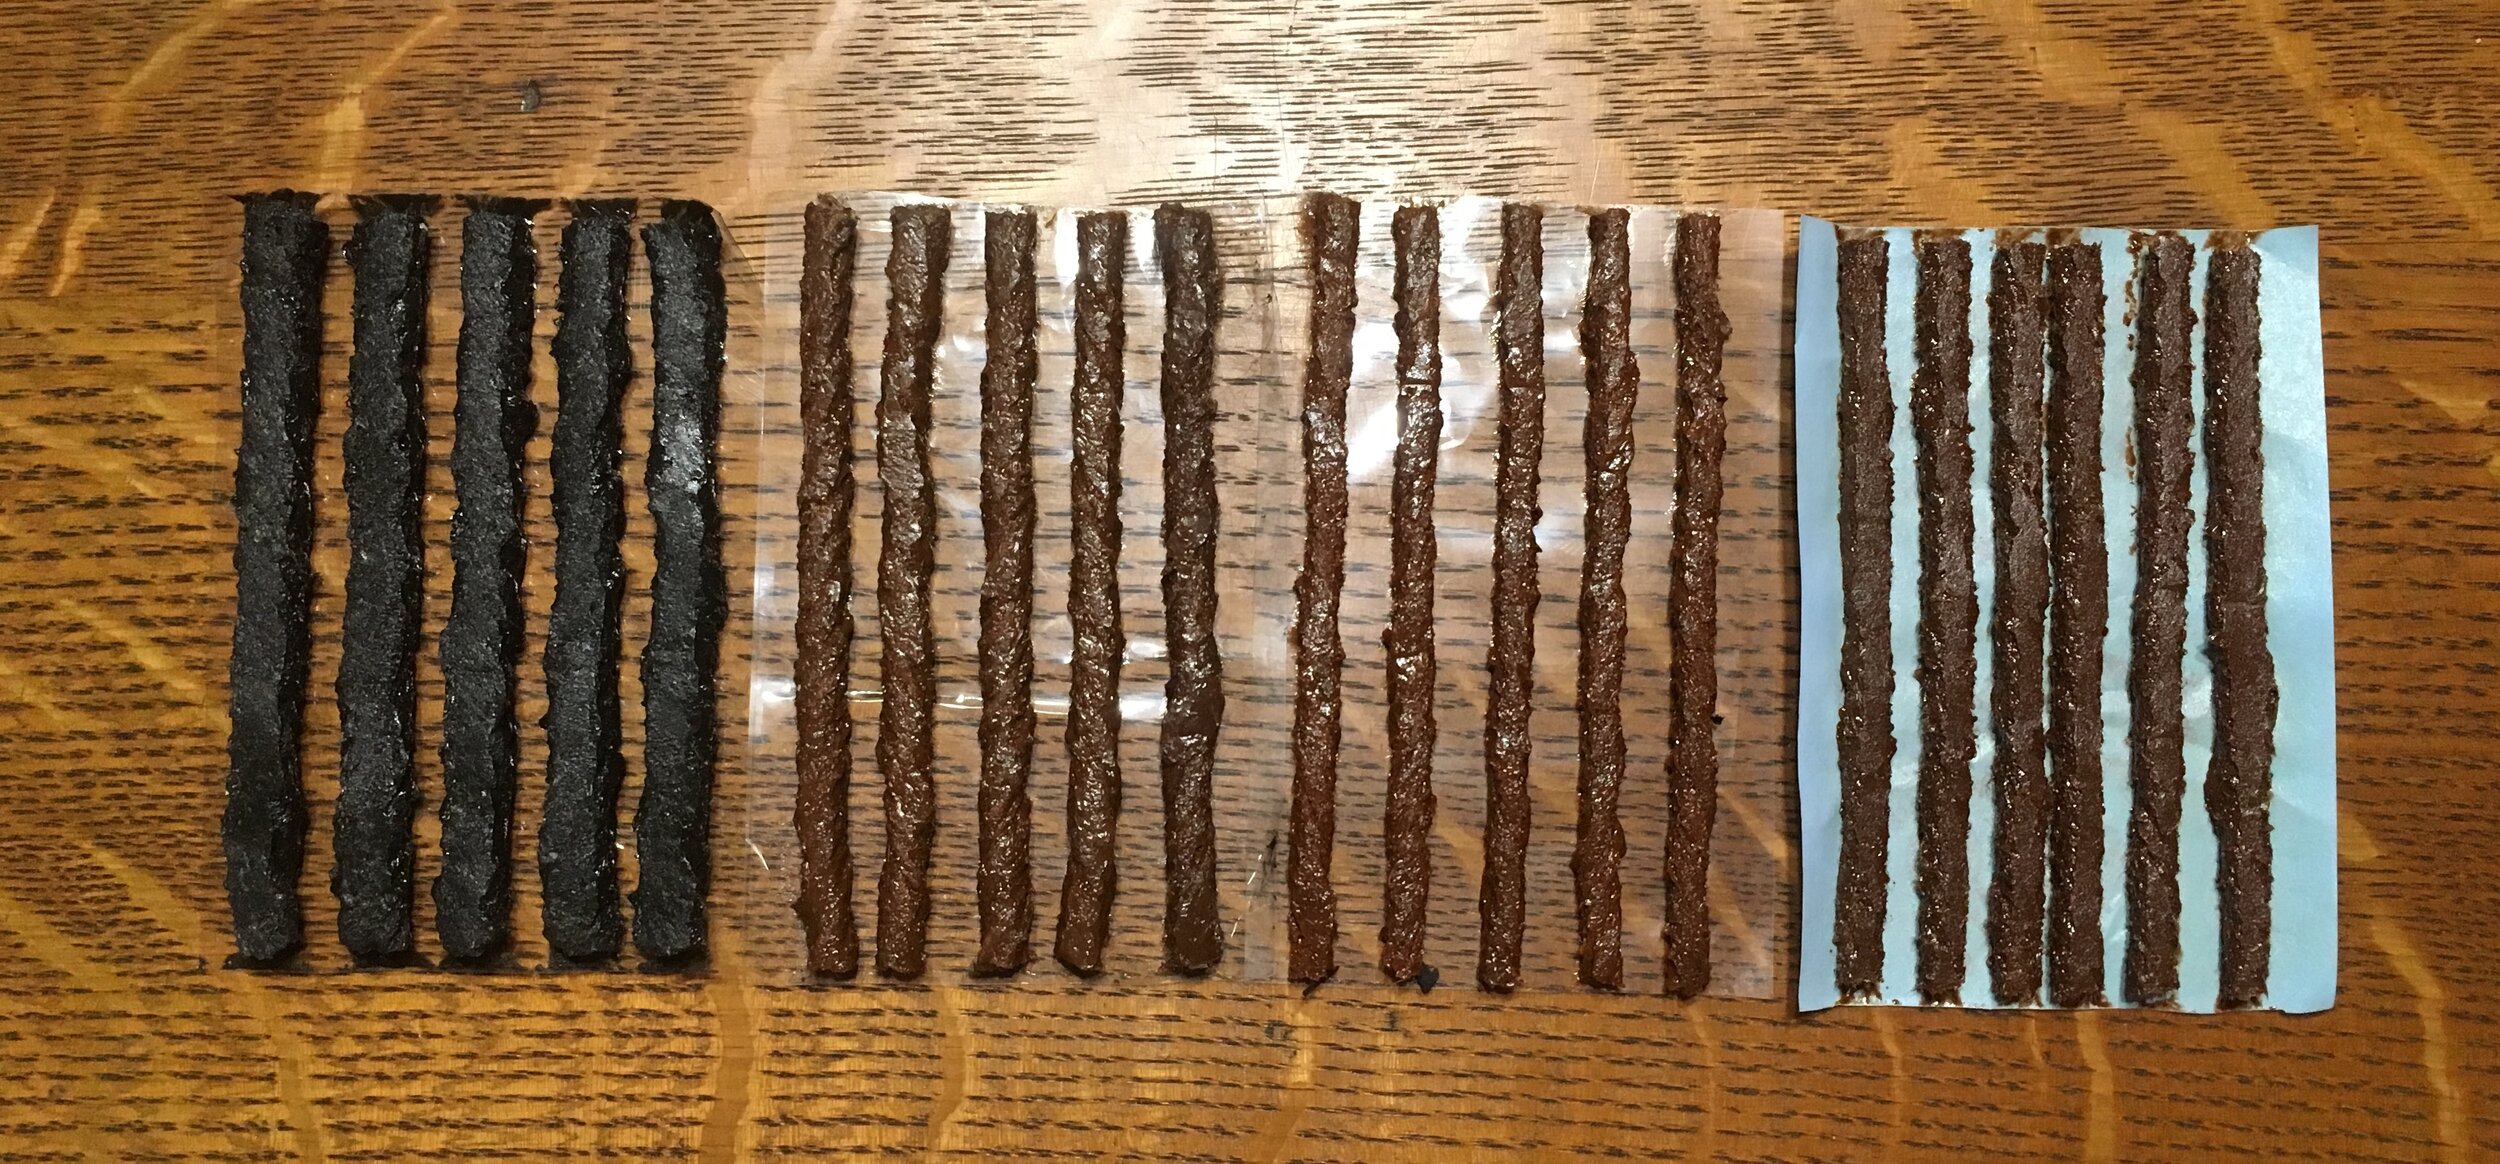
Left to right: ARB, Extreme Outback thick and thin, and Safety Seal Slim tire plugs. (The Safety Seal plugs are slightly flattened and look thicker than they are.)
I called George Carousos, who owns Extreme Outback, and he told me the kits were no longer available with the thinner plugs. So I decided it was time to hack all our ARB and EO kits. I looked up Safety Seal, a company that has been making tire repair products for half a century, and ordered a box of their slim plugs. At a listed 3.2mm these should be smaller than the old thin EO plugs, but if anything they look a tiny bit thicker. Nevertheless they should suffice for those smaller holes. So I’ve replaced half the thicker plugs in all our kits with thinner versions, which should make each kit far more versatile.
Simply brilliant: Rennstands
If you have ever done repair or maintenance work under a vehicle, you’ve run into this problem: You need to jack up the vehicle at the appropriate spot on its chassis or axles—but, quite frequently, that same spot is the best or even the only place to subsequently support the vehicle safely on jack stands.
On a vehicle with solid axles, such as my FJ40, this isn’t much of an issue as there is generally enough leeway to jack in one spot under the axle tube and place a jack stand adjacent to it. But on trucks with independent suspension it’s different, and if working on a unibody sedan there are often very specific spots under the pinch weld that are the only recommended spots to put either a jack or a jack stand.
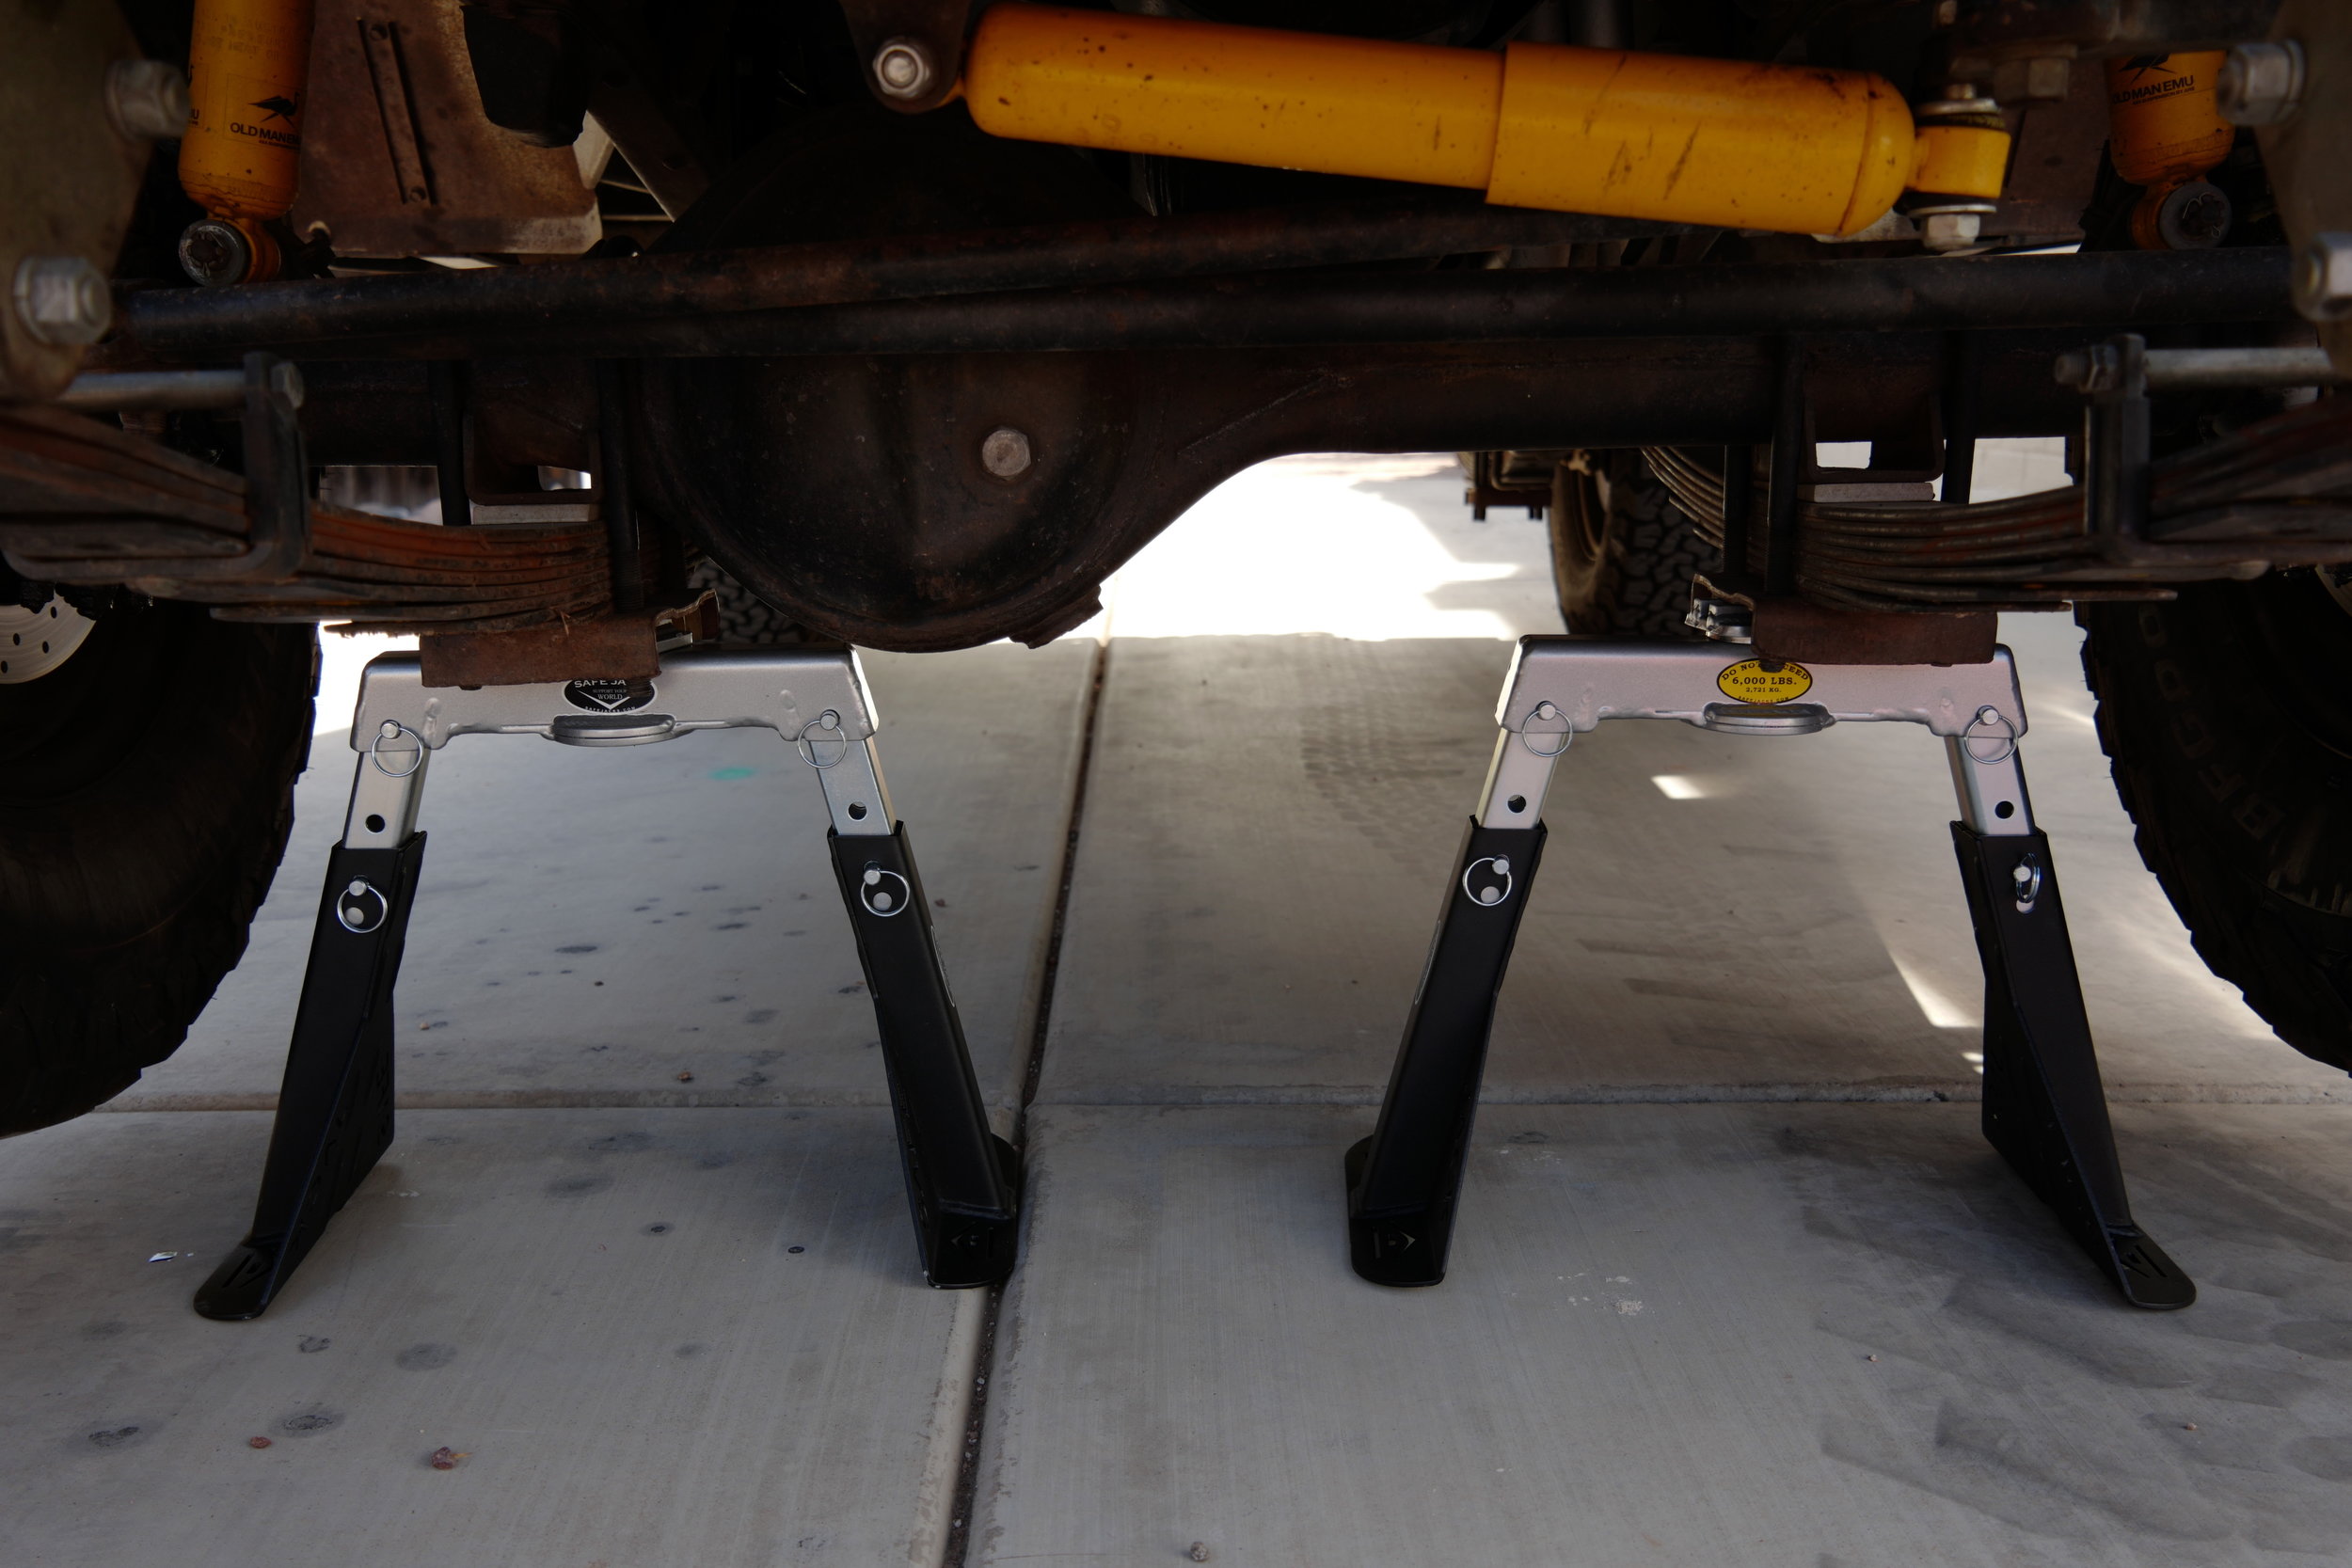
Problem solved, thanks to Richard Bogert of Bogert Engineering, the same people who make the excellent Safe Jack systems. The Rennstand allows you to jack up your vehicle at the correct point and then secure it in the same spot on a three-ton stand, all in one operation.
Operation is simple. Position the Rennstand’s crossbeam on your floor jack’s pad (it will also work with a bottle jack with an adapter) and insert the appropriate cradle for your vehicle, whether a model-specific pinch-weld bracket, a flat plate, or a dished cradle. Jack up the vehicle at the appropriate spot.
Insert the Rennstand’s adjustable legs into the crossbeam’s sockets and insert the locking pins, then pull the locking pins on the lower section ot the legs, adjust them to length, and re-insert the pins. Lower the jack and you’re finished.
The crossbeam adds just under two inches to the lowest height of your floor jack, which could present issues with some sedans or sports cars if you don’t have a low-profile jack. The Rennstand is also wider than many “normal” jack stands, which I suppose might be an issue in certain situations, but not one I’ve run into. The upside of that width is that it is reassuringly stable. The three-ton working load limit (WLL) means that a pair of Rennstands will easily support the front end of a very heavy vehicle indeed (They’ve been tested to 150 percent of that according to ASME standards). The lowest setting on its legs is 11.5 inches, the tallest is 16.5. Bogert plans to introduce taller models for lifted vehicles.
Using the Rennstands on our Tacoma was eye-opening, as I’d always struggled to fit both a floor jack and standard jack stands under suitable sections of the front chassis. Not any more. In fact it made the job easier even on the FJ40. In the past I had to place the jack fairly far inboard on the axle in order to leave room for the stand. This made jacking more difficult since I was lifting more of the vehicle, and undoubtedly put more stress on the axle (not that Land Cruiser axle tubes are exactly weak).
Of course, it should be obvious that the Rennstands can be employed as standard jack stands as well.
I remember testing Richard’s early products, especially the original Safe Jack for Hi-Lift jacks, and being impressed with his imagination and ability to engineer seemingly simple solutions to problems no one seemed to be able to solve before. The Rennstand (which is patented), is yet another great idea.
You can find Rennstands here. Note that production is currently running about two weeks behind demand. If you order you’ll be placed in the queue and the stands will be shipped as soon as they’re made.
Life . . . and a trouble-free journey . . . is all about the details
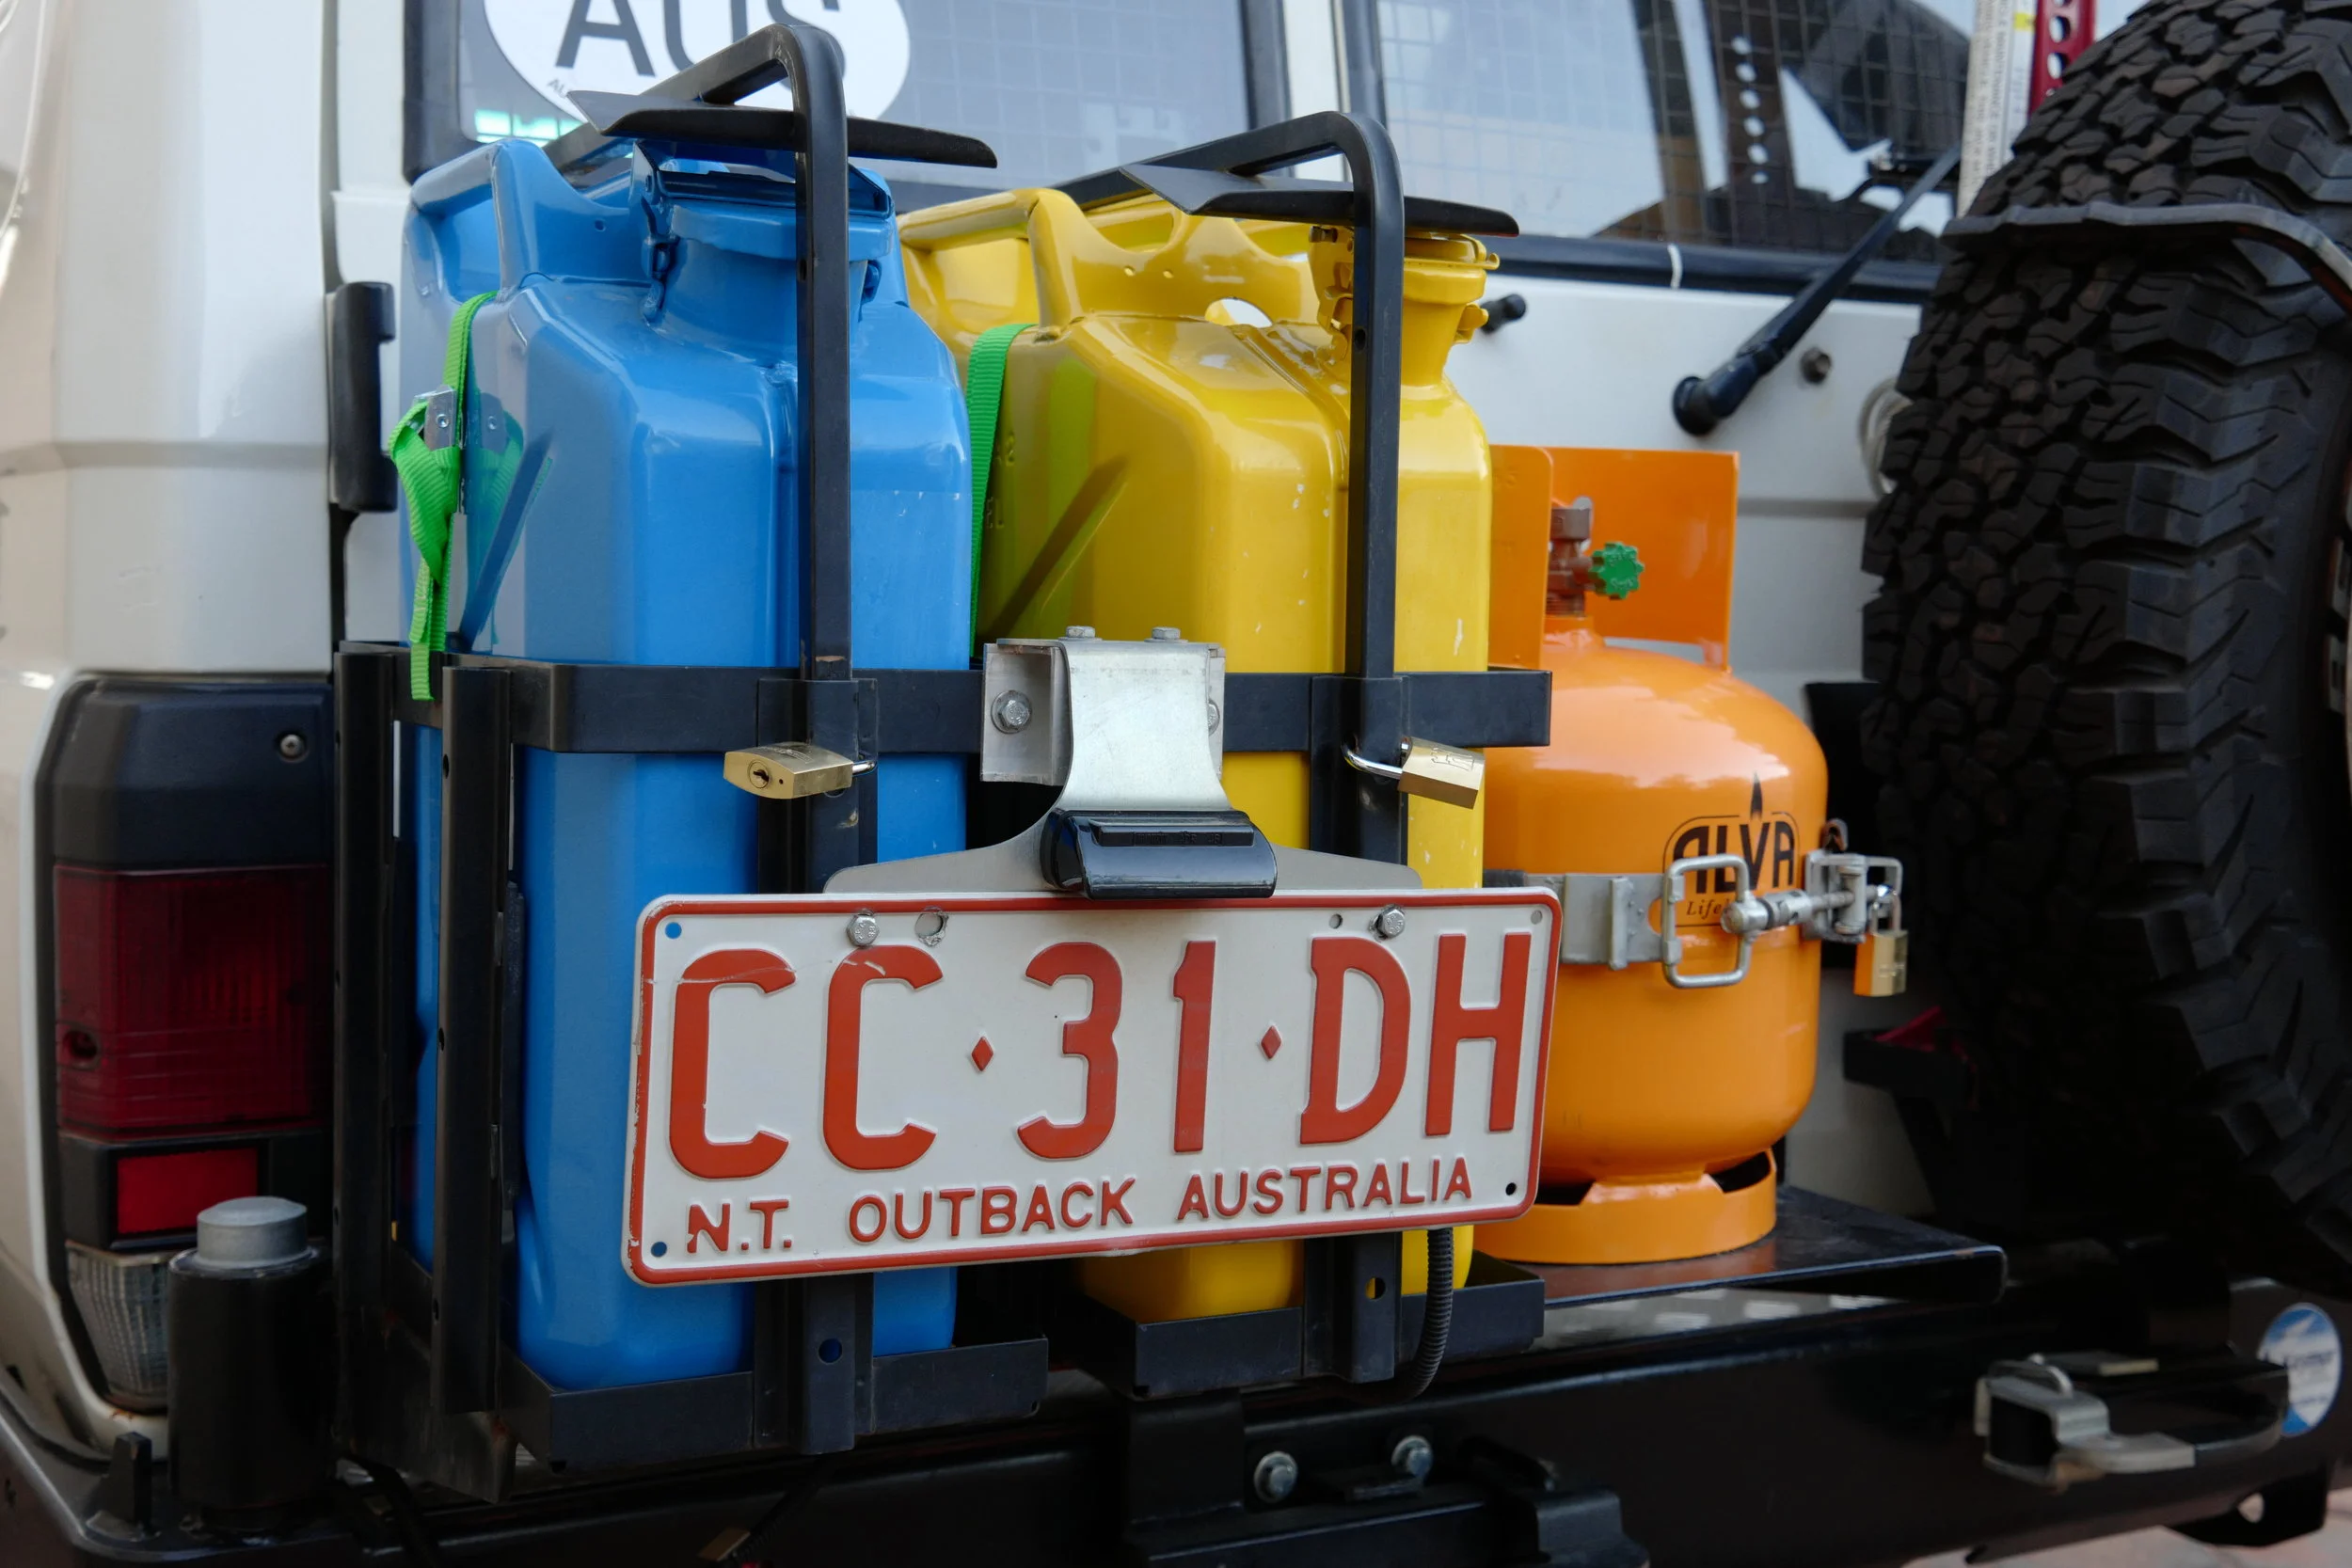
Okay, no snickering about the technicolor assemblage above. The two jerry cans are colored appropriately for their purpose—blue and water, yellow for diesel. The tangerine gas bottle is courtesy Graham Jackson, who bought it and had it filled for us in Durban while we were still en route to Africa. Not sure if that was the only color available or if he was having some fun. And the straps? Green was all they had, okay?
But that’s not the story here. The story is about the level of detail one should aim for when inspecting a vehicle before a major trip, and especially the level of detail one should aim for when inspecting a new piece of equipment or a new accessory.
Consider this double jerry can and gas bottle carrier, custom-made to fit on the Kaymar rear bumper on our Land Cruiser Troopy. It seemed more than adequate when we picked up the vehicle after its installation. The pivot rides on a heavy-duty bearing and was rock-solid. I liked the locking bars to prevent fuel or water theft. I wasn’t pleased with the sharp edges of the tie-down strap keepers, but they seemed adequate until we got the Troopy back to the states where I could modify them. Our supplier had already installed a NATO fuel can and a plastic water can in it, so we simply filled them and left on the trip, which this time was a long, long route with no fuel resupply for at least 700 miles. And we had no trouble with the carrier.
The next trip, our last in Australia, involved another long no-resupply section (have you gathered these are common in Australia?). Although we had more than enough fuel under even the most pessimistic calculations, I nevertheless filled the yellow can on the rack.
A good ways along the Anne Beadell Highway, at the Ilkurlka Roadhouse, I walked around the back of the vehicle and smelled, then saw, diesel fuel pouring in a tiny but steady stream from the bottom of the can. When I pulled out the can and looked at the bottom of its receptacle, I immediately saw why. The base of the receptacle had been assembled in such a way that it left four welds protruding above the rest of the base. One of those welds had simply ground its way through the jerry can.
It was not an issue for that trip, but it could well have been on another with more critical fuel needs. People have, indeed, died from identical issues. While we were in convoy with friends, and had satellite telephones, it still could have presented a major hassle.
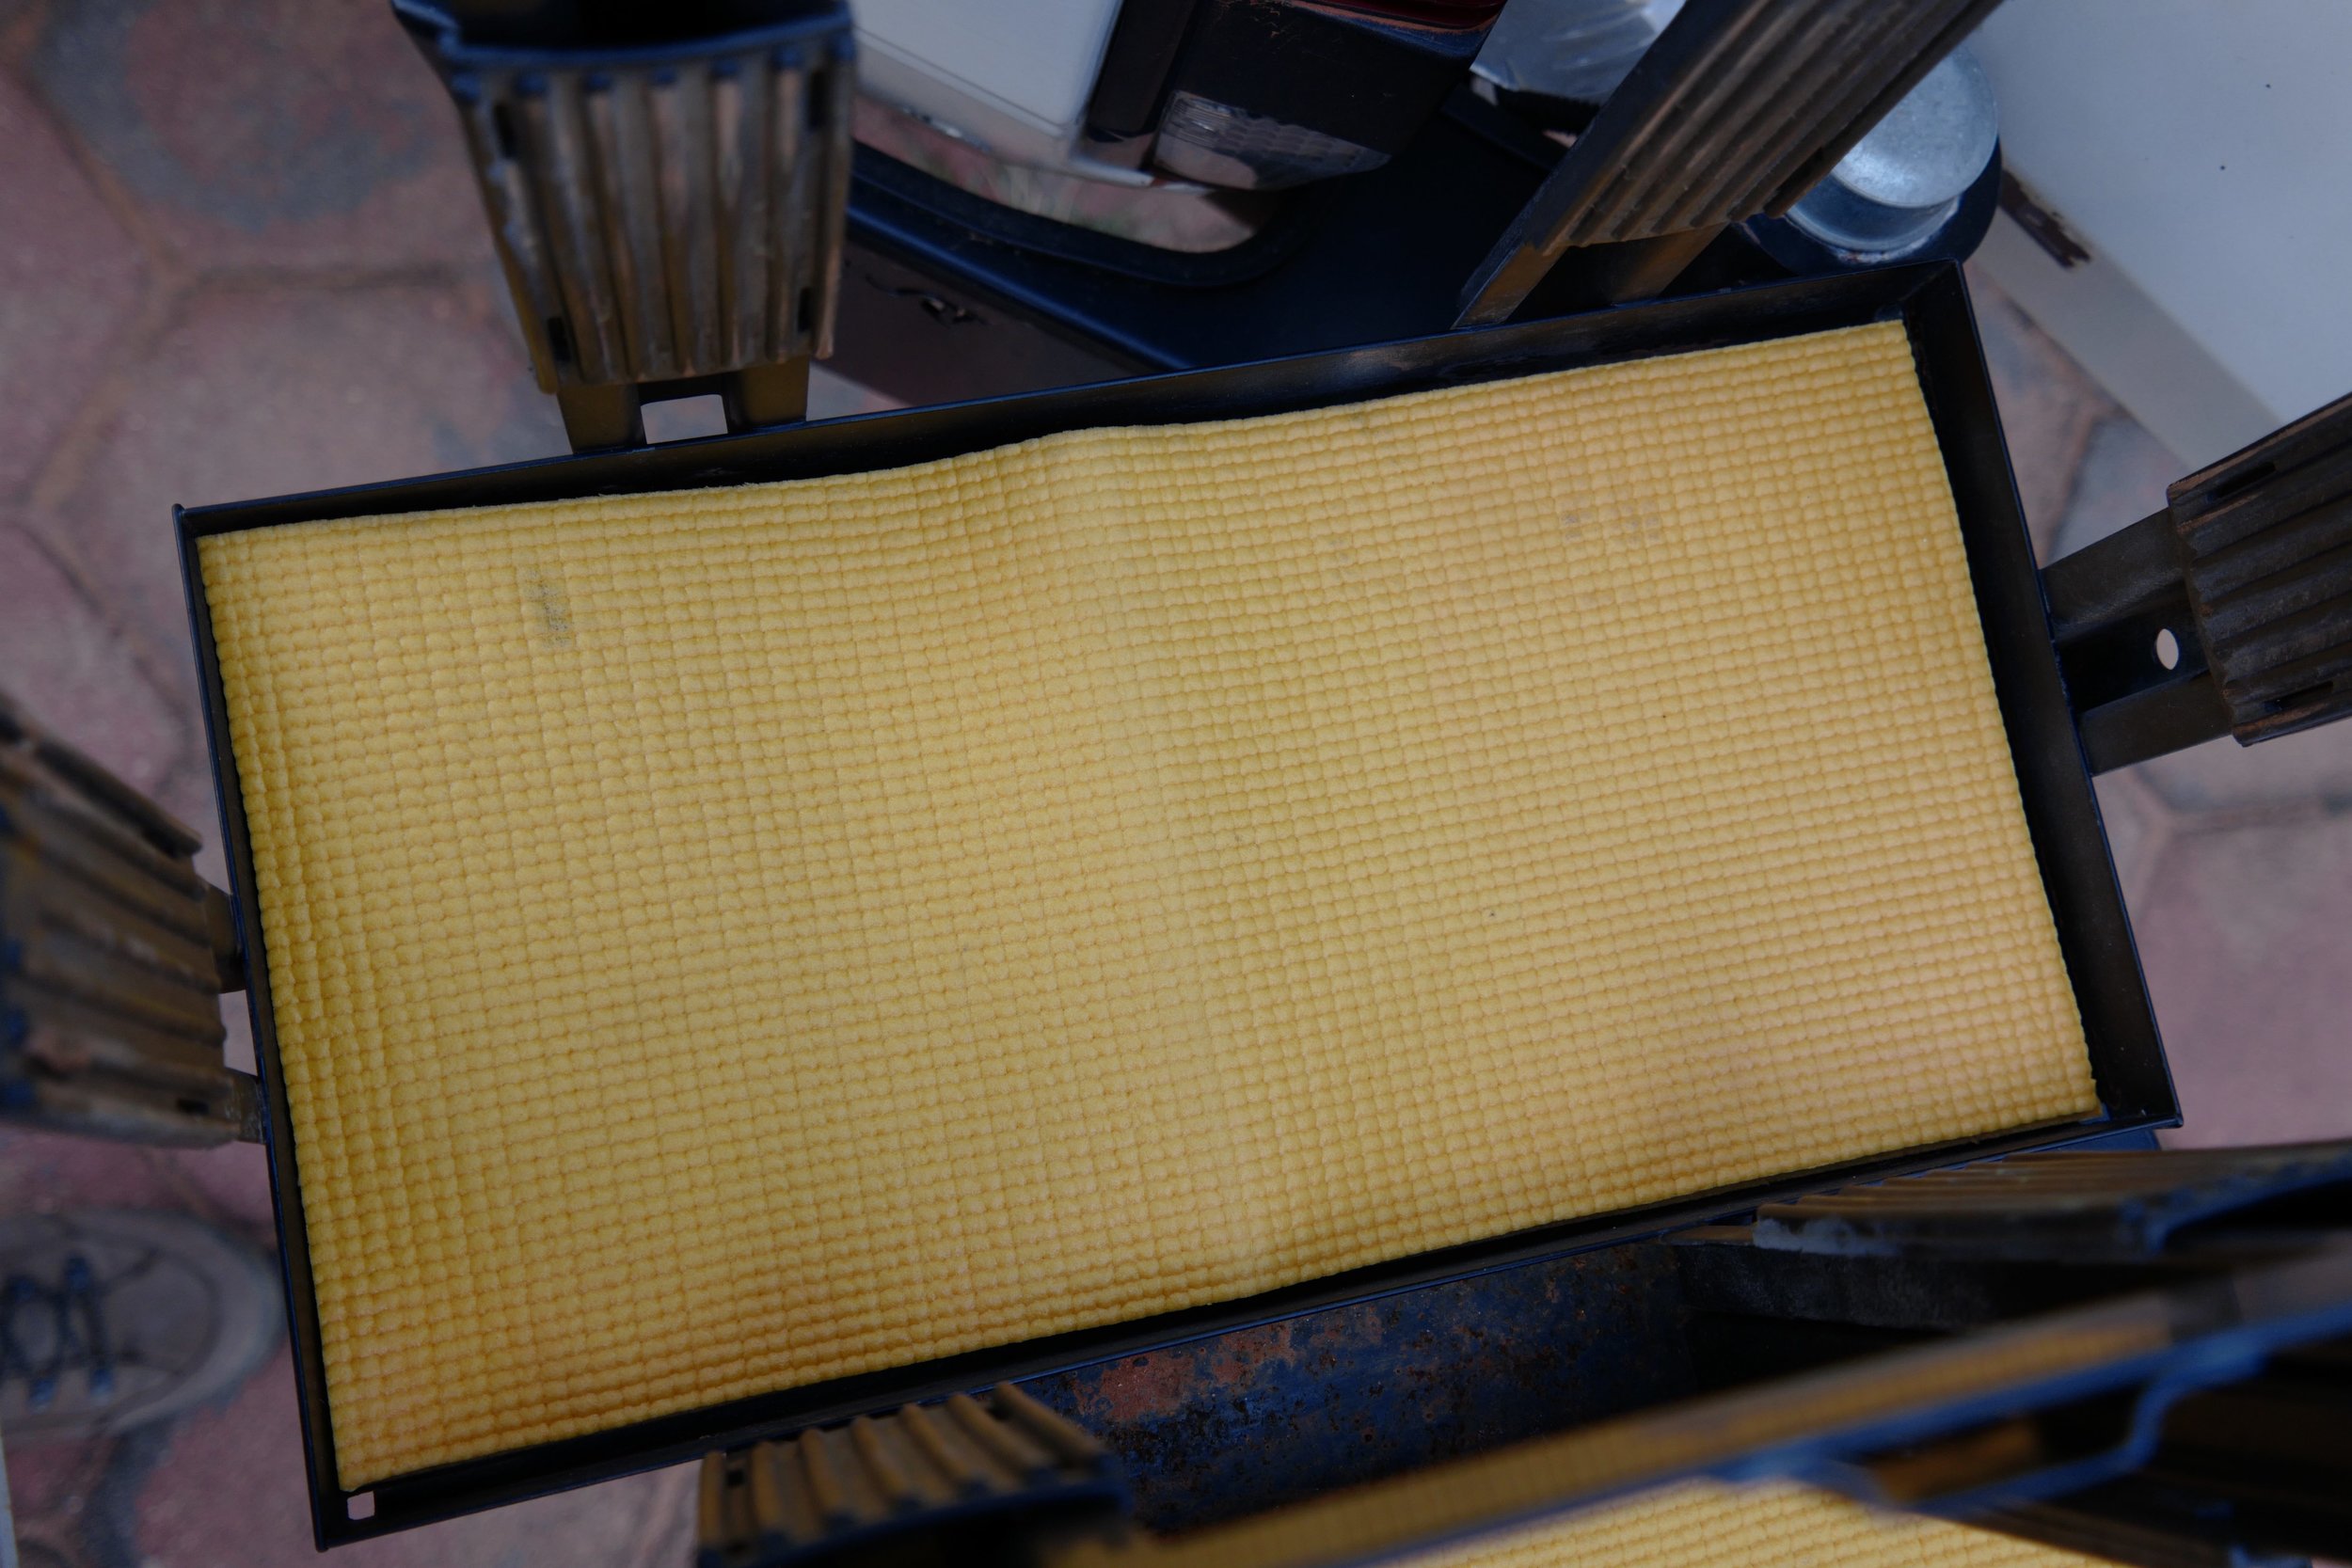
When we picked up the Troopy in Durban this week, I addressed the problem temporarily but effectively with a double layer of the yoga mat material we always carry for lining cabinets and stopping random rattles. With new jerry cans in place we were on our way.
It was a good lesson.
Better brake lamps for older vehicles
It’s ironic that, as the car screeched to a halt scant feet behind my FJ40 while I sat helpless at a stoplight, my first panicked thought centered on the vehicle and not my cervical spine.
But after all, the value of the Land Cruiser has arced somewhere northwards of $50,000 (my last offer from a walk-up stranger at the west Overland Expo). A rear-end collision would do no favors for that arc. So—for about the tenth time in several months—I determined to install better brake lamps. This time I acted on it.
The revolution of the LED has affected all areas of automotive lighting. But while most amazement centers around the astounding brilliance, power conservation, and durability of LED headlamps and driving lamps, we might better appreciate their advantage in brake lamps. Why? No, not just because they are brighter, but because an LED lamp reaches full brightness two tenths of a second faster than an incandescent bulb. That might not sound like much, but consider that a vehicle moving at 40 mph travels 12 feet in two-tenths of a second. So that slight advantage could very well mean the difference between a near miss and a car-and-cervical-spine-crunching collision.
My FJ40 wears a rear bumper/rack from Stout Equipment (now sadly defunct), and in place of the stock round lamps has oval Truck-Lite lamps, but fitted with the same dual-filament bulbs (Sylvania 2057LL) with staggered locating posts, common on millions of older vehicles. A short search led me to a kit from Aaron LED comprising a pair of LED bulbs and the requisite 50-watt resistors.
That requirement for a resistor confuses many people, as it confused me. The simple explanation is that an LED bulb retrofitted in an application such as this uses less current than the original bulb. Supplied with full current, on the turn-signal function it will flash far too quickly. The over-current condition can also reduce the lifespan of the bulb. The resistor simply converts the excess current to heat—which, the astute among you will guess, negates the energy-saving characteristic of the LED. Obviously in a brake and turn-signal lamp only on intermittently this is of scant concern. More so is the fact that the resistor can get quite hot and should be mounted to a metal surface to help dissipate this heat. (Other LED lamps are designed to use full current and do not suffer this loss of efficiency.)
The kit came with cheap Siamese clips to tap into the existing wiring. I hate those things, which expose the wiring to the elements and fail at a remarkably consistent rate. So I cut the wires and used crimped connections covered with heat-shrink tubing. (Those more purist than I might scoff that I did not solder the conections. However, I have crimped connections protected with heat-shrink tubing on this vehicle that are at least 25 year old and still working perfectly. For high-amperage installations I’ll solder, but I don’t think it’s necessary for low-wattage bulbs. And I do use a proper crimping tool, not pliers.)
Old and new.
The result was a satisfyingly obvious increase in the brightness of my brake lamps, not to mention the faster activation. I’m now considering adding even more security with a high-mounted LED third brake lamp from Truck-Lite. I really hate those screeching noises behind me.
Factory vs. aftermarket
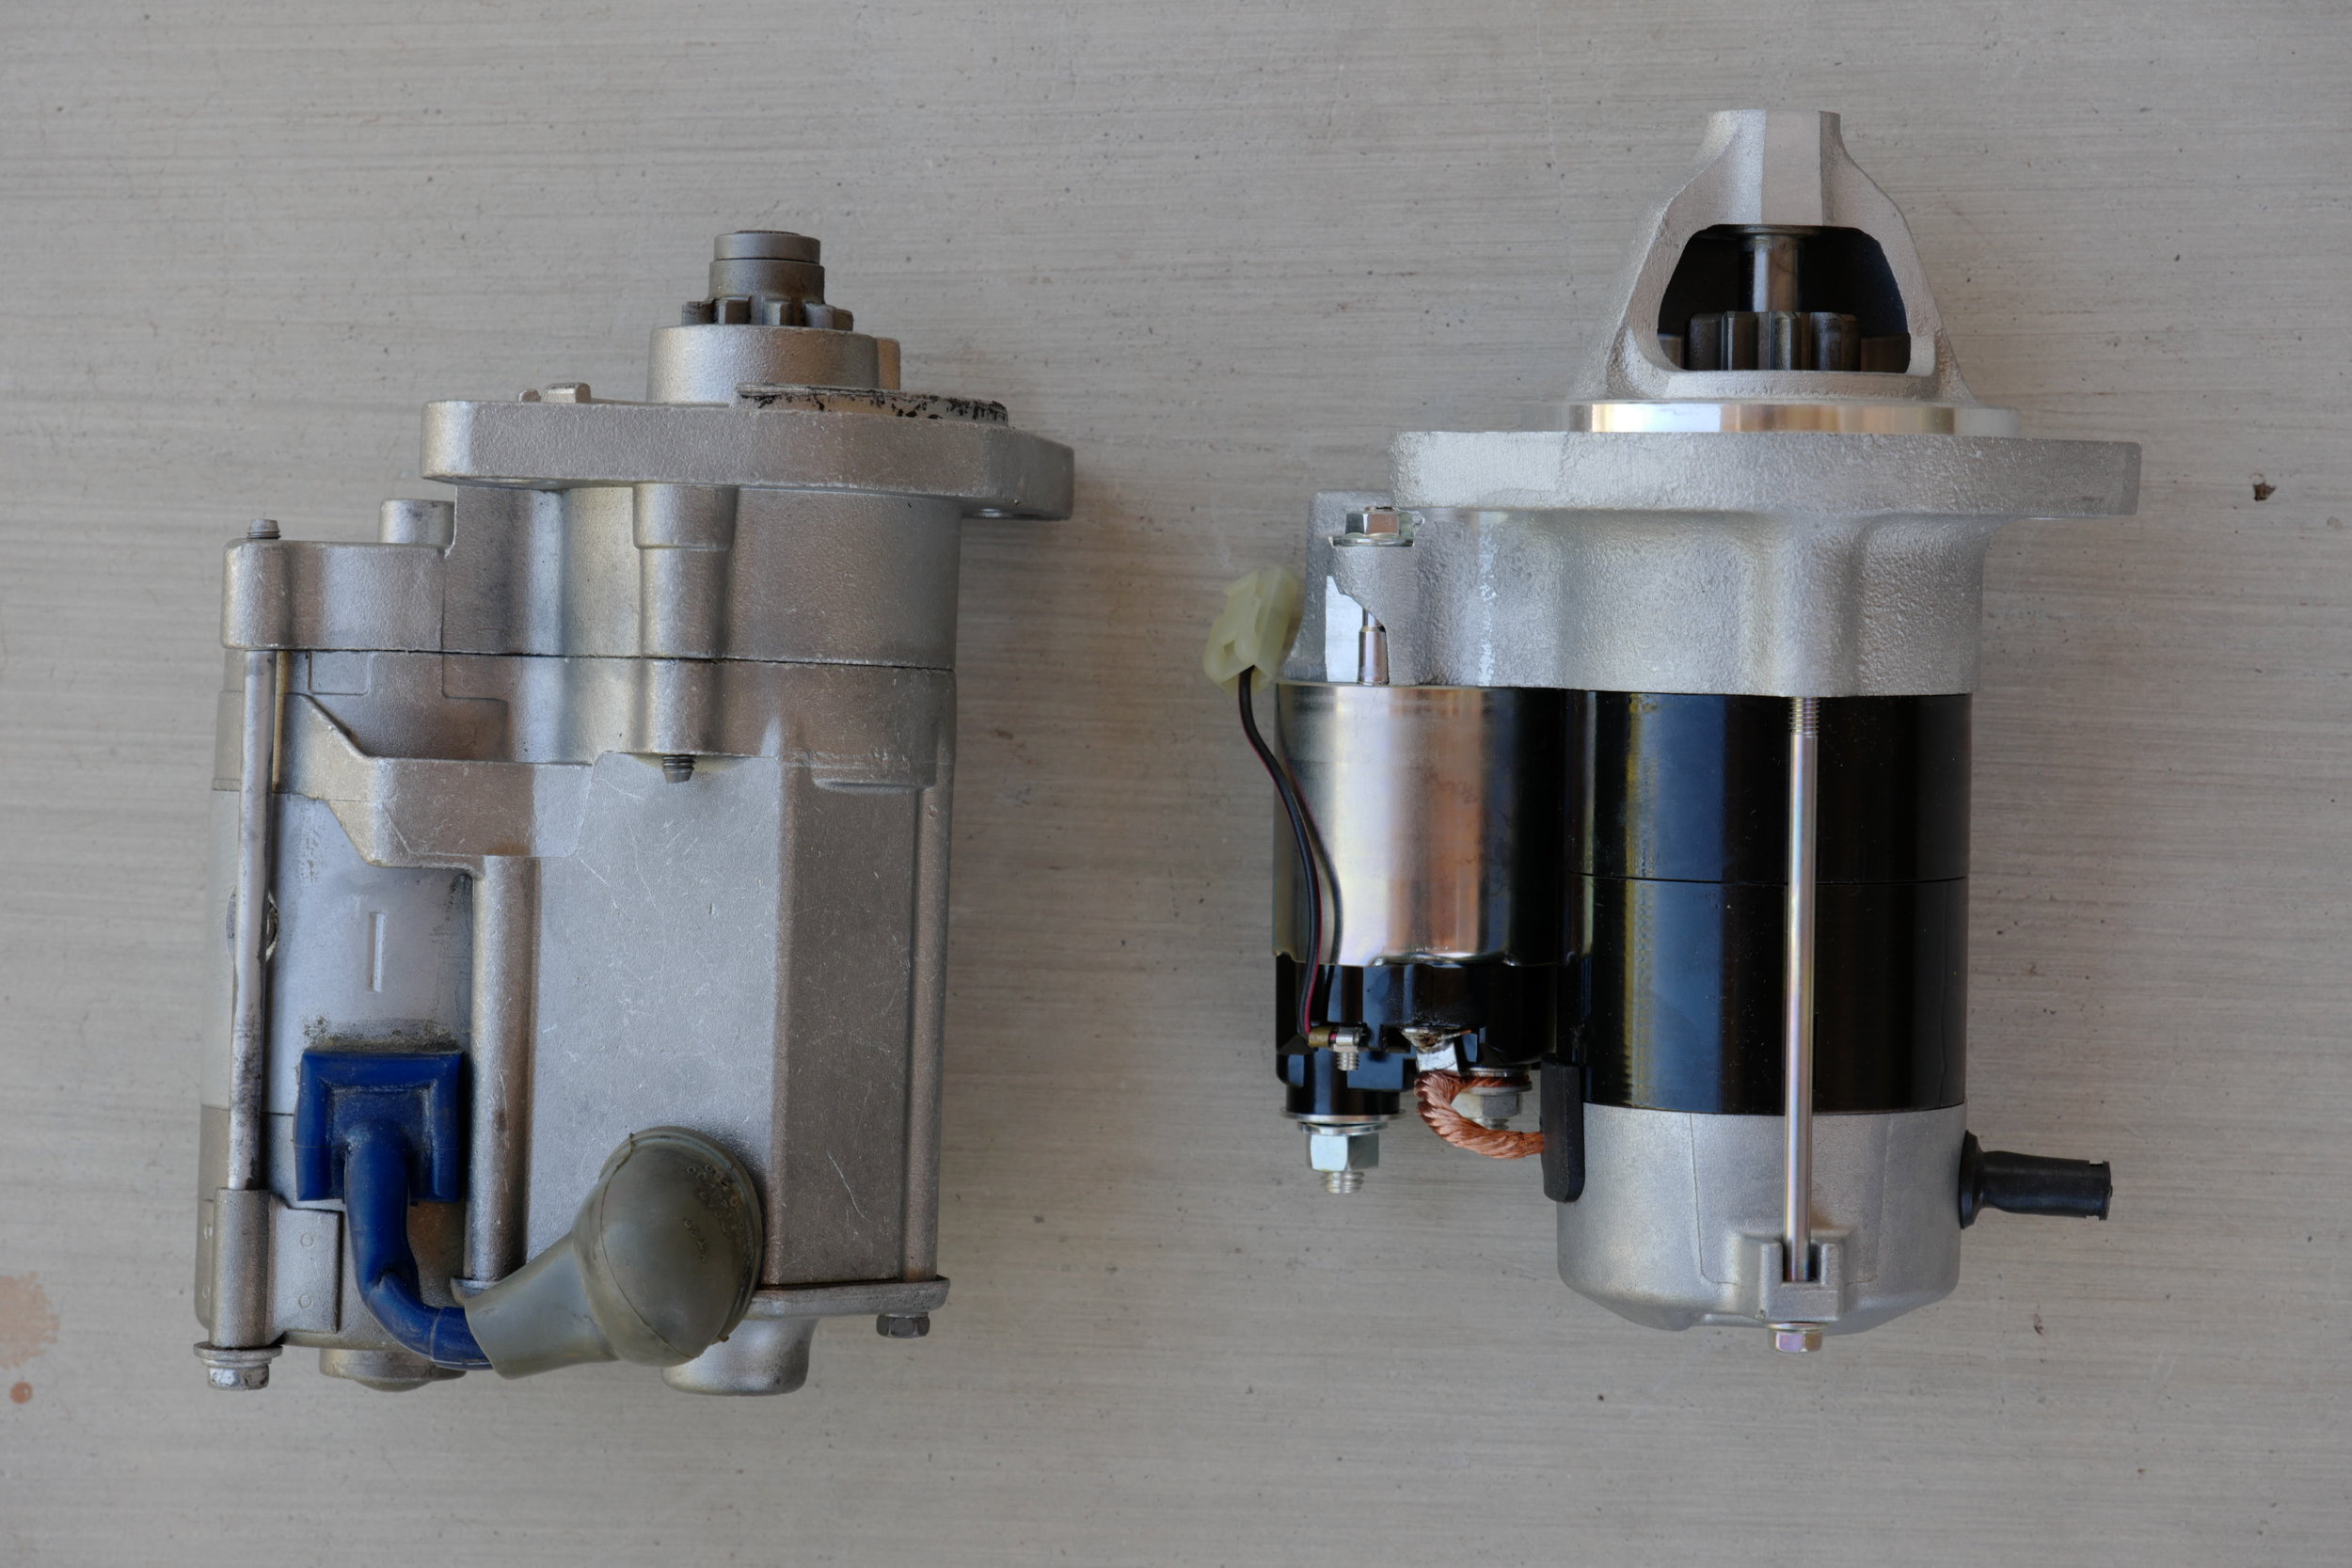
Aftermarket starter on the left; Toyota starter on the right
If you’ve ever turned over an engine by hand you know it’s no easy thing to do. You’re working against a lot of internal friction, plus the compression as each piston rises on the firing stroke. Your starter has to do the same job, except a lot faster. So it clearly needs to be built well.
Take a look at these two starters for a Land Cruiser F or 2F engine—an aftermarket unit on the left and a factory Toyota unit on the right. If you’re not familiar with how a starter works, notice the small gear visible at the top of each unit. When you turn the ignition key to start the engine, that gear slides forward and engages the flywheel behind the engine, and spins it rapidly to enable the ignition to catch and start the engine. Once it starts and you release the key, the gear slides back out of engagement.
It should be obvious that that gear is subjected to a great deal of stress—which is why the factory starter has a nose cone that supports the end of the shaft on which the gear slides, hugely increasing its stiffness (and also possibly helping keep random dirt and debris away from the shaft and gear).
Now look at the aftermarket starter. No nose cone, no support for the gear. Cheaper to make, for sure.
Which would you expect to last longer?
Handbrakes. Don't be one.
This is a handbrake.
Burned in my memory is the first time I read a post on a popular overlanding forum by a fellow who wanted to go on a particular trip, except, as he put it, “The handbrake won’t go if there aren’t bathrooms.”
I was confused for a fraction of a second, until I realized the guy was referring to a human being—specifically his wife.
Shocked, I looked at subsequent posts to enjoy him get flamed for such a demeaning reference. Not only did he not; he had plenty of company. Since then I’ve run across the term dozens of times.
So is this.
I’m sure the guys who use the term would act like it was I who were offending them, and laugh it off as “just a joke” if confronted, just as my stepfather used to laugh it off as “just a joke” when he referred to people as Pollacks and Nips, and worse. Spare me. No one uses such a reference as “just a joke.” It is a dehumanizing put-down and points out its user as someone lacking even a vestige of class.
Now that I have that off my chest, I would like to address the very real issue of differing expectations and needs while on journeys, because there is no doubt that many couples have them—especially when dealing with divergent attitudes toward “roughing it.” And let’s be honest: While in some cases it is the other way around (I know of several personally), usually it is the female half of the couple who resists the inconveniences associated with “roughing it.” So what to do?
This is not.
Easy: Just make it not rough.
One of the benefits of the explosion in interest in overlanding over the last decade is the commensurate explosion in equipment of all kinds. It has never been easier to bring along most of the comforts of home. Here’s a look by category.
Bathroom. This is the big point of resistance for most women. It’s easy for men to forget that for a woman, going “#1” is basically as involved as it is for a man going “#2.” Fortunately there are numerous ways to make the procedure both comfortable and private. You can store a pop-up enclosure in the back of the vehicle and deploy and un-deploy it in seconds if privacy is necessary or desired. Portable toilet systems now range from basic but surprisingly comfortable seats that fit over a five-gallon bucket with a liner, to porta-pottis with a water reservoir for flushing, and cassette toilets that simplify emptying later. Add something as simple as a tap on a five-gallon water can for washing, and you’ll have all the same things covered as you would at home: privacy, comfort, and cleanliness.
Shower. Closely related to the bathroom issue, since the enclosure can serve both. However, bathing and changing is much easier in a fairly large and decently windproof enclosure (i.e. not a pop-up), so there’s nothing wrong with carrying a compact pop-up for on-the-road bathroom breaks, as well as a larger enclosure for camp duty as both toilet and shower room. There are lots of excellent products on the market that will provide a hot shower, from simple but effective hanging bags heated by the sun to engine-mounted heat exchangers to propane-heated units with 12V powered pumps. Go with whatever level of luxury you feel your mate desires—or deserves.
Bedroom. If you have a camper or trailer this is pretty easy. If not, consider either a roof tent with a dressing room attachment, or a ground tent with standing headroom (e.g., a Turbo Tent or a Springbar, two of my favorites). Equip the ground tent with generously-sized cots, thick Therm-a-Rest camp mattresses, a flannel-lined sleeping bags, and a real pillow, and there’s a good chance your significant other will wake up the next morning and say, “That was more comfortable than our bed at home.”
Kitchen. You might be fine with spooning SpaghettiOs out of a can heated in the fire when you’re out on your own. Or you may have the full-on Snow Peak Iron Grill kit. In either case, when your mate is along you need to orient the kitchen and food to her (or his) taste. Does she do the cooking at home? If so, would she like to in the outdoors as well given a sufficiently well-equipped kitchen? Then make it so. If she cooks at home but has no desire to do so on the road, then do your finest to provide her with excellent meals. With the superb 12V fridges available now, there is no excuse not to bring fresh produce and meats and have menus fully the equivalent of those at home. And if getting her out means skipping camp food for restaurants now and then, do it. Along those lines . . .
Hotels. I’ve talked with a surprising number of both men and women who enjoy camping—just not for weeks at a time. If your situation is similar, then work out trips and itineraries so that camp days can alternate with hotel or lodge days on whatever schedule works best. Do this for a while and you might find you both start being happy with more days camping and fewer under roofs.
Overlanding does not have to be an all-or-nothing proposition, unless your loved one simply does not like camping at all, period. Even in that case it’s possible to compromise. Enjoy civilized trips together, then every once in a while you can take off on your own, skip showers for a week, pee on trees, and eat SpaghettiOs.
Just don’t be the handbrake on your relationship.
Hint: When using “Search,” if nothing comes up, reload the page, this usually works. Also, our “Comment” button is on strike thanks to Squarespace, which is proving to be difficult to use! Please email me with comments!
Overland Tech & Travel brings you in-depth overland equipment tests, reviews, news, travel tips, & stories from the best overlanding experts on the planet. Follow or subscribe (below) to keep up to date.
Have a question for Jonathan? Send him an email [click here].
SUBSCRIBE
CLICK HERE to subscribe to Jonathan’s email list; we send once or twice a month, usually Sunday morning for your weekend reading pleasure.
Overland Tech and Travel is curated by Jonathan Hanson, co-founder and former co-owner of the Overland Expo. Jonathan segued from a misspent youth almost directly into a misspent adulthood, cleverly sidestepping any chance of a normal career track or a secure retirement by becoming a freelance writer, working for Outside, National Geographic Adventure, and nearly two dozen other publications. He co-founded Overland Journal in 2007 and was its executive editor until 2011, when he left and sold his shares in the company. His travels encompass explorations on land and sea on six continents, by foot, bicycle, sea kayak, motorcycle, and four-wheel-drive vehicle. He has published a dozen books, several with his wife, Roseann Hanson, gaining several obscure non-cash awards along the way, and is the co-author of the fourth edition of Tom Sheppard's overlanding bible, the Vehicle-dependent Expedition Guide.


