
Overland Tech and Travel
Advice from the world's
most experienced overlanders
tests, reviews, opinion, and more
The Micro-Start XP-1
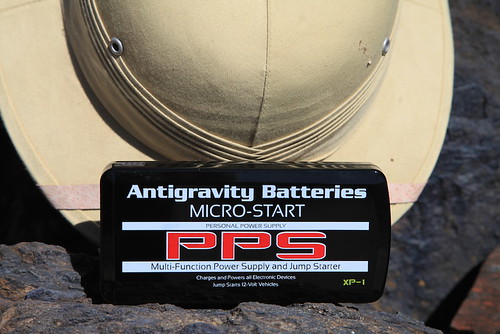
Experienced mechanics don't often sound giddy over the phone, but Dave Anderson sounded giddy when he called me from his Flagstaff, Arizona, shop, the Good Carma Garage (which really should be a radio program).
“I just bought this thing off a tool truck, and you have to get one,” he said, “You’re going to think it should be on every overlander’s equipment list—even before he buys a pith helmet.”
Dave. Such a kidder. As it happens, I own a pith helmet. And not one of those fake ones made from cork or, worse, styrofoam, either (I won’t even mention Graham’s mesh thing)—mine is a genuine pith helmet made in Vietnam from the pith of the Aeschynomene aspera, or sola plant (one of the original names for the helmet, sola topee, was later corrupted to solar topee). While they’re now little more than a Hollywood cliché, pith helmets are eminently practical—the thick fibrous material offers exceptional insulation from the tropical sun when touring one’s tea plantation or stalking a man-eating tiger with a Rigby.
Where was I? Oh, right: At Dave’s insistence I ordered a Micro-Start XP-1 from Antigravity Batteries. The zippered pouch that arrived three days later was no bigger than a calendar/day planner (remember those?). Inside was a bewildering array of adapters for charging various electronic devices from phones to laptops, and an astonishingly lightweight (15 ounces), 225-amp-hour lithium/ion battery, just one by three by six inches, which, incidentally, can also be used to jump-start your truck.
Say what?
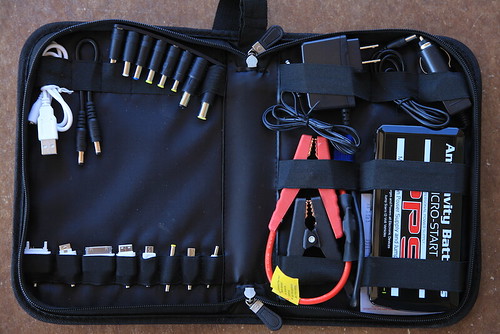
It’s true. The pouch includes a set of battery-post clamps, and the company claims the power pack will start a V8-engined truck—not once, but several times.
Could this mean the end of jumper cables? I’ve always hated those things, and especially I hate what happens when I play good Samaritan to jump some poor bloke’s dead Malibu—in trying to help he always wants to grab the cables and hook them up in the wrong sequence—if not to the wrong terminals. I have to come off as a tyrant just to do a good deed. With the Micro-Start I’d be in complete control of the situation. And of course if your own vehicle becomes stranded you are completely removed from the need for a donor vehicle—handy if the nearest candidate might be 40 miles away.
The instructions for jump-starting a vehicle tell you to hook up the terminal clamps to the dead battery first, then plug the siamese fitting into the power pack. The reason for this is that, while the teeth of the clamps are well-surrounded by plastic, it would theoretically be possible to screw up and touch them together, resulting in the same alarming pop and flash you get when you do the same thing with jumper cables. If you were really determined and managed to clamp the teeth together, a puff of smoke would signal the death of your power source. I found it easy to remember to hook up the clamps first and then attach the battery, and virtually impossible to remember to unplug them first and then undo the clamps after use. But I never shorted anything.
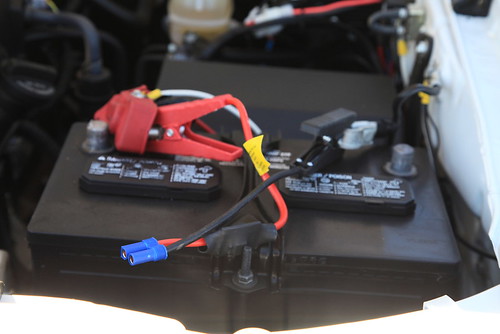 Hook up the terminal clips first, then plug in the power pack.
So how well does the XP-1 work? I disconnected our Tacoma’s battery to give it a try by clamping the leads directly to the battery cables. I wanted to video the process, and while setting up the camera I simply stashed the XP-1 battery in my back Levi’s pocket—it really is that small.
You can find more torturous demonstrations online, but the initial trial on the Tacoma went thusly:
It was impossible to detect a difference between the XP-1 and the way the truck fires with its own battery. I started it three times in a row with no trouble at all, and there were four blue LEDs left out of five on the battery’s charge indicator. Clearly there’s not only sufficient amperage inside that little brick to turn a V6’s starter motor, but to do it multiple times.
As impressive as that demonstration was, it simply confirmed the maker’s claims. Looking around for an unfair test, my eyes alighted on our 1985 Mercedes 300D turbodiesel. To start that the XP-1 would first have to power the glow plugs, then turn the hi-amperage starter necessary to crank a five-cylinder engine with 18:1 compression. After recharging the power pack and removing the cables from the 300D’s massive battery, I hooked up the XP-1, and:
Okay, so that was a bit too much to ask. (Scot Schafer at Antigravity Batteries confirms that they have a model in the works that will be configured for the much tougher task of starting diesel engines.) Rather alarmingly, there were no blue LEDs left on the charge indicator after the Mercedes experiment. Had I killed this thing 15 minutes after first deploying it? I plugged in its 120-volt charger (there’s also a 12-volt car adapter)—and an hour later it was back at full charge. It’s a resilient piece of equipment.
If your vehicle is powered by anything up to a 400-cubic-inch gasoline V8, the XP-1 will provide you with ample starting capability. The battery will retain its charge for many months at a time; if you remember to give it a top-up every half year or so you should be pretty much immune to becoming stranded due to a bad battery. And think of the effect on the owner of the dead Malibu when you start his car with a magic box the size of a paperback. It might be a good idea to keep a few XP-1 kits in the truck to sell at an exorbitant profit . . .
The XP-1 is a bargain at around $140. A basic model, the XP-3, sans the adapters for personal electronic devices, is available for about $30 less. AntiGravity Batteries is HERE.
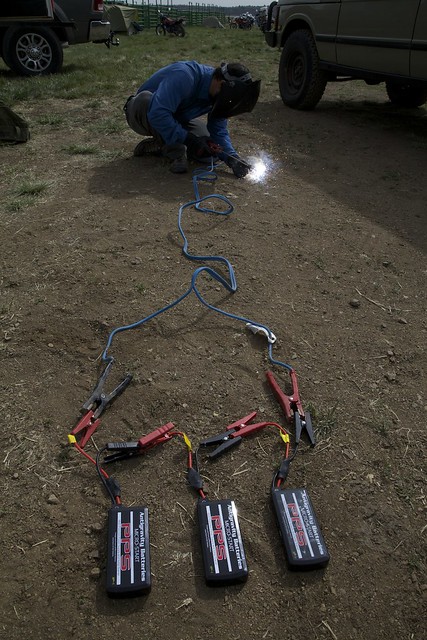
An update: While discussing the Micro-Start as we were setting up the Overland Expo, Graham Jackson, Tim Scully, and I started musing on whether one could weld by hooking up three of them in series. Taking a chance that we'd blow all three units we owned, Tim hooked them up, connected cables and a welding rod—and produced a perfect bead connecting two pieces of 1/4-inch steel. We were gobsmacked. We then hooked up two of the units to my Redi-Welder DC wire-feed unit, and again got a perfect result.
Obviously this is not something endorsed by the maker, and would quite rightly invalidate your warranty. But it showed what would be possible if a weld repair might make the difference between walking and driving out of a remote location.
The amazing ClampTite
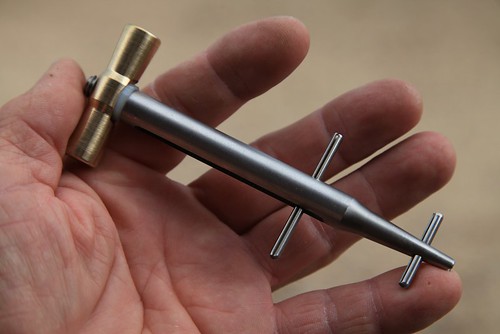
I know, I know—I’m starting to sound like Ron Popeil. But it’s been some time since I used a tool as cunning as this little device, which can do everything from replacing a broken hose clamp on a fuel line or seizing a rope end to repairing a stress-fractured luggage rack on a motorcycle or splinting a broken tie rod on a Land Rover.
But wait, there’s more! The ClampTite uses ordinary safety wire you can buy with the tool, or almost any on-hand substitute in a pinch, including fence wire and even coat hanger wire, to securely wrap just about anything that needs to be fastened or immobilized. And the size range it will handle is essentially limited only by the length of the wire.
You might think you could approximate what the ClampTite does with a pair of pliers and some twisting, but trust me, you wouldn’t be able to apply the amount of tension available through the tool’s threaded collar. Look at this sample of both a single and double wrap on a length of rigid PVC pipe. I tried and failed completely to get that much compression with an ordinary hose clamp.

The ClampTite can make either a single-wire or double-wire clamp (see above). With a single wire you can use as many wraps as necessary, although, depending on the material, friction will start to overcome the ability of the tool to adequately tighten the wire if you overdo it. On a radiator hose like I used for the test, a single wrap of doubled wire is more than stout enough; if you were repairing, say, a split axe handle you could use several wraps of a single wire, then repeat in several places along the split to completely secure it. The same procedure could secure a Hi-Lift jack handle along a broken tie rod, or . . . you name it. The potential applications are endless.
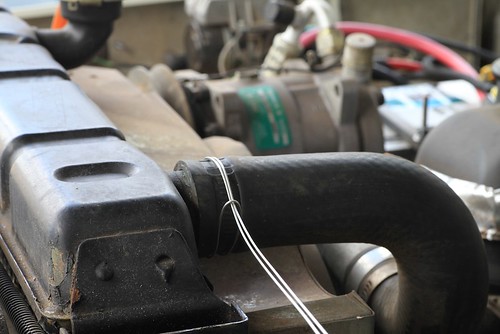 Begin a hose clamp by doubling a length of wire and wrapping it like so.
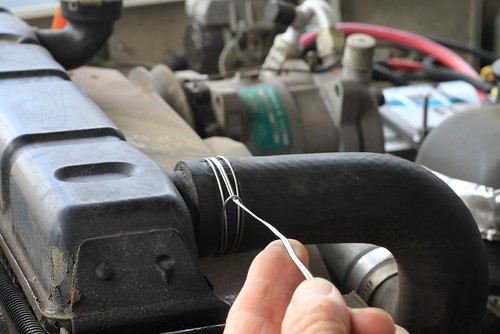 Wrap it again and through the loop.
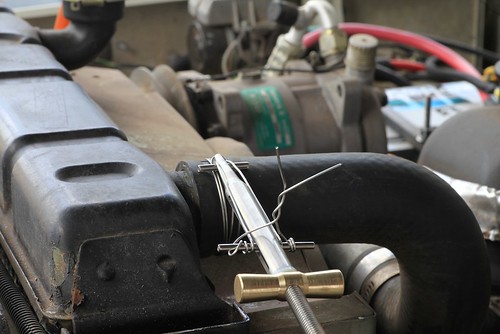 Attach the ClampTite, secure the ends of the wire, and screw in the bronze nut to tension the clamp.
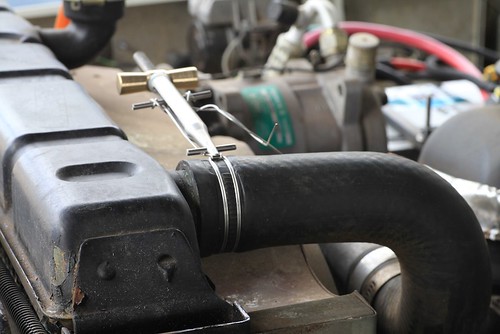 Flip the tool to lock the wire.
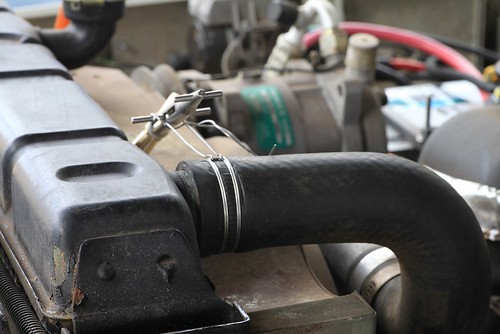 Release the tension on the tool, clip the wires, and . . .
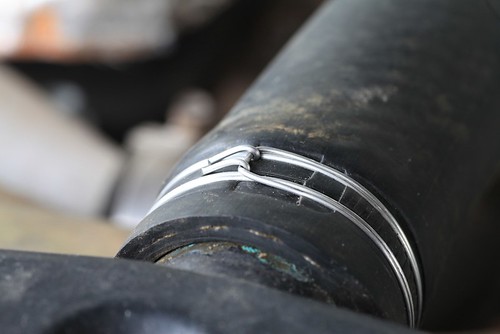 . . . you're finished.
I found the ClampTite easy to use. My biggest challenge was keeping the wire lined up correctly while installing a double-wrap clamp, to keep it from overlapping—although that probably wouldn't affect the seal on a radiator hose.
While it’s impressively compact (a larger model is also available), there will be places you simply can’t use the ClampTite. You need to be able to access the trouble spot to wrap it with wire, attach the tool at the spot, and have room to flip it (double wire) or twist it (single wire) 180 degrees to anchor the clamp once you’ve tightened it. But with ingenuity you can overcome many obstacles. Looking around our vehicles, I found a fuel line fitting on a carburetor that would be inaccessible if its hose clamp broke. However, by removing the fitting from the carburetor first and taking off the other end of the fuel line, one could clamp the line to the fitting, screw the fitting back in with the line attached, then re-attach the other end.
I think the ClampTite would be at least as useful on a motorcycle as in a four-wheeled vehicle, if not more so. I’ve seen many more parts fail on bikes due to the higher intrinsic vibrations and necessarily harsher ride. We had Tiffany Coates’s legendary BMW R80GS, Thelma, parked at our place for nearly a year some time ago. Thelma has seen long (200,000 miles), hard use and it shows. Thinking back, I’m sure I could have used up at least a hundred yards of safety wire reattaching various dangling bits on that bike.
ClampTite tools start at just $30 for a plated steel and aluminum model, which would be ideal for a motorcycle. The stainless and bronze unit I tested is $70.
Final note: Unlike the Ronco 25-piece Six Star knife set, ClampTite tools are made in the U.S. And you won’t get a free Pocket Fisherman with your purchase. Sorry.

ClampTite tools are here. Thanks to Duncan Barbour for the tip!
A Hi-Lift jack mount for the JATAC
The Hi-Lift jack is a useful tool, but it’s also a pain to carry securely on a vehicle, especially if you want to keep it reasonably accessible. I’ve seen many mounts that achieved one but not the other—and too often, safety loses out to convenience. Sadly I had neither a camera nor a cell phone with me a few years ago when I spotted a Hi-Lift mounted horizontally on top of a bull bar on a truck, just above hood level—and secured with a pair of tightly wrapped bungee cords. The imagery of what could happen if that truck were smartly rear-ended was . . . colorful, not to mention what could happen to an innocent person if Mr. Thatoughttaholdit rear-ended someone else. For reference, a 30-pound Hi-Lift mounted on a vehicle that comes to an abrupt halt from 30 mph exerts a force of 903 foot-pounds of energy on whatever is holding it to that vehicle.
I see a lot of Hi-Lifts bolted to roof racks—secure, safe but for the modest impact on CG, and more likely to stay free of road grime, which can quickly foul the Hi-Lift’s mechanism. It’s not a bad spot if you can access it without climbing. Also good are dedicated mounts on rear tire carriers (as opposed to the ones that bolt behind the spare tire, which are a pain). I suppose a properly engineered mount atop a bull bar is okay; it’s certainly handy there. But I’ve never seen one that didn’t impede forward vision and access to the engine compartment. And on a strictly personal note, it looks just a little too, well, Moaby, if I may coin a word.
Mounting a Hi-Lift on the JATAC presented its own challenges. The roof is out of reach and devoted to solar panels. We’ll be installing a Hi-Lift-compatible winch bumper up front soon, but that was rejected for the reasons stated above. And we’ve also decided not to install a rear bumper with big swingaways, to hold down mass at the back of the vehicle. What did that leave us?
I asked Tom Hanagan at Four Wheel Campers about fabricating a mount that would bolt to the rear wall of the camper, directly through the vertical aluminum frame members, to hold the jack vertically to the right of the door. He thought it could work, but was hesitant to sanction the idea unequivocally. And that location would still hang the mass off the back of the vehicle.
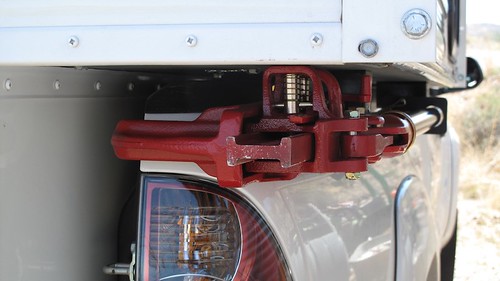
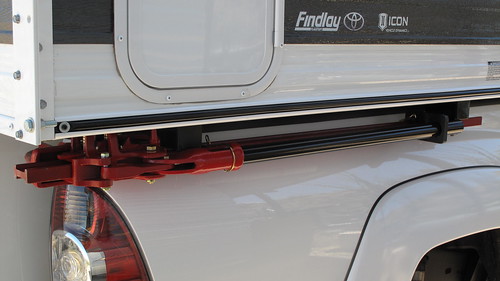
Then, while walking around the truck stroking my chin and pondering, I noticed the area where the camper overhangs the truck’s bed on each side. I held up a Hi-Lift to the spot, and it tucked in as though designed to ride there. The location would be completely out of the way yet quickly accessed, and while the weight would still be toward the back, it was significantly forward of a rear wall mount. I decided to mount it on the passenger side, to compensate for the weight of the truck’s fuel tank and the camper’s water heater, both of which are on the driver’s side.
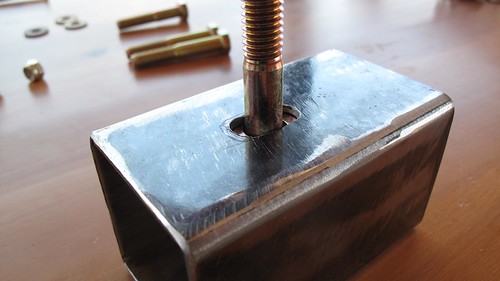
I used two short lengths of two-inch-square steel tube for the brackets. First I located the spots I’d drill through to hang the brackets—one in the propane tank compartment, one behind the fridge inside the camper. I used two 1/4-inch grade 8 bolts with fender washers to anchor each bracket through the plywood (which fortuitously is double thickness in the propane compartment, where the heaviest part of the jack would be). To secure the jack to the brackets, I used a 3/8ths-inch grade 8 bolt on each one. The bolt was too long to slide into the tube and down through the hole I drilled, so I drilled an adjacent hole and made a slot to get the bolt through. I tack-welded each bolt in place, and welded a short piece of thicker steel under each bolt as reinforcement. On the rear mount I extended the reinforcing strip forward and drilled a hole through it, to secure a padlock through the mount and the standard of the jack.
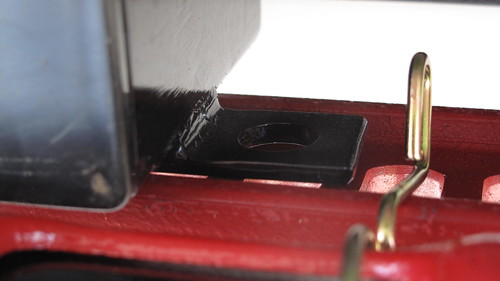
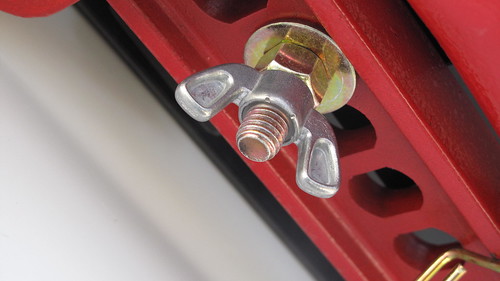
Positioning the mounts laterally was tricky. I wanted the jack tucked all the way under the camper, but needed clearance to drop it free of the mounting bolts without scraping the sheet metal of the truck’s bed. With a bit of winkling, I got them just about right. One needs to be cautious and not just yank the jack free; it must be twisted slightly to get in or out without hitting the lifting mechanism on the back of the bed, but it’s easy to do single-handed. To secure the jack to the bracket I use a grade 8 nut to hold the weight, and a nylock wingnut to keep it snug.
 The next issue was to ensure the jack’s operating handle stayed secure while driving. I have a stock rubber handle keeper, which slides over the handle and the standard, but it can migrate when subjected to vibration. So I fabricated a modified version from some half-inch-thick polyethylene I had around, and cut two polyethylene pieces that lock the keeper in place via a spring clevis pin. Done.
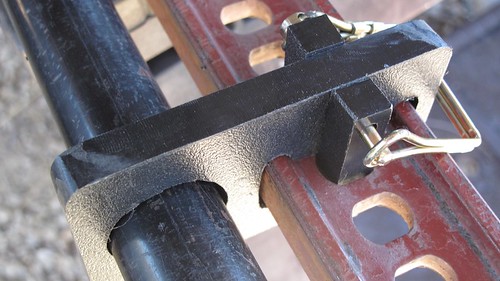
With the jack’s base plate in place, the right turn signal is just slightly obscured from above and behind the truck. It would only be an issue if someone in a semi was close behind us, but we’ll keep the base plate in our recovery kit anyway, and thus avoid potential legal issues as well. With that gone, one needs to be absolutely certain that the selecting lever of the jack is in the “lift” position, otherwise the entire lifting mechanism could migrate off the back of the standard while driving (or be propelled off it in an accident). Not good. I’ll use some sort of secondary arrangement as backup, likely a short bolt and wing nut. (Note here: A Hi-Lift should always be stored with the lever in the lift position anyway.)
So far the arrangement works perfectly. The jack is totally out of the way, yet easy to retrieve. In terms of safety, the mount should be secure through any but the most catastrophic impact: The force applied by the brackets to the floor of the camper would be in sheer; with four grade 8 bolts securing the assembly I’m sanguine.
Next task: to mount a front bumper on the JATAC that will properly accept a Hi-Lift jack for recovery purposes.
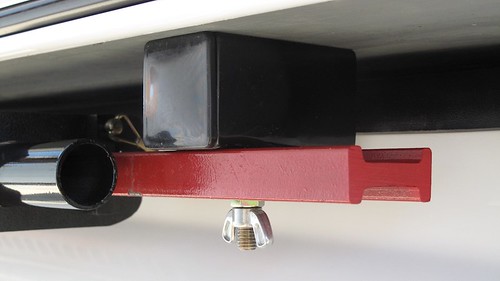
An update for the Safe Jack
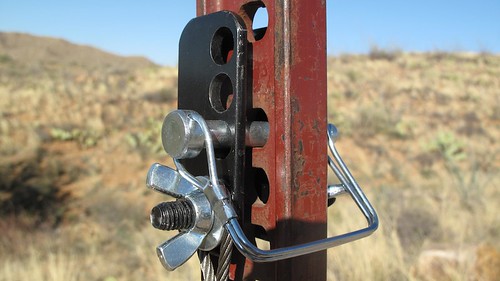
If you've read THIS entry, you know I was impressed by the Safe Jack stabilizer for the Hi-Lift Jack. In many scenarios it vastly increases the utility and safety of the Hi-Lift, and the base plate on its own makes a fine replacement for the old orange plastic ORB base in soft sand or mud.
I've been using the tool for a couple months now, and remain impressed. However, like almost any new product, I noticed potential for improvement. The design of the upper clevis precluded the jack's handle from resting against the standard, so the spring clip that holds the handle vertical when the jack is unattended would not engage. (I've been carrying a strip of One-Wrap Velcro to secure the handle when needed.) The clevis also limited somewhat the upper travel of the jack's foot.
Apparently Richard Bogert of Bogert Engineering noticed the same issues, because he recently sent me a redesigned upper clevis. The new piece now attaches to the front of the standard rather than the rear, and the eyebolt tensioner is gone. This increases travel, and allows the handle to touch the standard, engaging the spring clip. A new clevis pin with a wire latch simplifies attachment, and two side-mounted wing nuts adjust tension if necessary. The new piece even saves weight compared to the old one, and on the front face is a section of UHMW polyethylene to protect the vehicle should the tool come into contact with it.
If you own a Safe Jack with the original clevis, Bogert will send you the updated version for fifteen bucks. That's barely more than postage alone would cost. Of course new Safe Jacks will all be equipped with the updated part.
It's an excellent upgrade, and makes a good tool even better. Production should be underway within a week; check with Bogert Engineering HERE.
Kaufmann Mercantile

My first encounter with Kaufmann Mercantile was nearly my last.
A friend sent me a link to a page on their site that featured a slingshot. Cool—except this slingshot was made from the natural fork of a buckthorn tree branch, its air of Tom Sawyer Americana yours for $21.
What?
No one buys a treefork slingshot, I spluttered. A treefork slingshot is something you make yourself when you’re 10 years old, using a cut-up bicycle inner tube as propulsion. I made one, and used it to essentially random effect before discovering the relative deadliness of the Trumark Wrist Rocket*.
I nearly clicked off the site, but some sort of morbid curiosity induced me to read further. Turns out the buckthorn is an invasive species in Minnesota, and the trees are regularly cut down to stumps by community service groups. A fellow named Bill Pine makes slingshots from the offcuts.
Well . . . okay. I still was of the opinion that red-blooded kids should make their own damn slingshots, but at least the philosophy behind these was commendable. So I forced myself to look beyond the nearby “handmade wooden rope swings” (don’t get me started . . .)—and wound up spending a good half hour browsing through a fascinating hodgepodge of high-quality odds and ends, from sturdy wire crates built in a century-old factory in Texas, to handmade ceramic growlers, to riveted aluminum lunch boxes from Canada, to Sheffield-made cabinet-maker’s screwdrivers (or should I say “turnscrews”). I could have dropped a thousand bucks effortlessly in that time—yet, unlike so many twee boutique online catalogs, the Kaufmann site also had loads of interesting items under $20. Clearly the founder of the company, Sebastian Kaufmann, wasn’t just interested in expensive stuff; he simply liked good stuff, especially if it’s unique.
So . . . sigh . . . now I’m on Kaufmann’s insidious emailing list, and rarely a week goes by without some temptation.
Recently I had them send me a couple of intriguing items: a pair of elkskin work gloves with, unusually, the smooth, outer side of the leather turned in, and a so-called EDC (Every-Day Carry) keychain kit, about which more in a minute.

The gloves are made in Centralia, Washington, by a company called Geier, who’ve been doing it since 1927. Like deerskin, elkskin is soft and somewhat elastic, but considerably thicker and more durable. Most significantly, turning the smooth outer surface of the leather inside creates what is simply the most comfortable work glove I’ve ever used, and I go through a lot of gloves where we live. Ordinary full-grain cow-leather gloves, with the rough surface in, can become work-hardened—especially if they’ve gotten wet during use—and offer less than perfect protection against friction. The Geier/Kaufmann gloves should stay pliable until worn completely through. They can even be washed safely with soap and warm water.
I used them for some Hi-Lift jack demonstration, and also for shoveling and pick work. In both situations the feel of the tool through the glove was excellent—critical for safe operation, particularly on the jack—but I could feel no hot spots whatsoever through the slightly springy leather. The suede exterior surface is grippy enough so I didn’t need to squeeze unduly hard to maintain a safe hold.

I did find one contra-indicated use: The suede is not as resistant as smooth leather to constant friction, for example when respooling winch line (even synthetic). I’d recommend either the smooth-out Geier elkskin glove or one of their cowhide (or bison!) gloves for such use.
Alexis at Kaufmann also suggested I try one of their EDC keychain kits, and what an immediately useful trinket that turned out to be. It comprises a mini pry bar, one standard and one phillips screwdriver, an Uncle Bill’s precision tweezer in a little clip, and a curious little stainless-steel lozenge that looks like it could be a container for medication.
I used the mini pry bar within days for removing paint can lids and those nasty big staples that secure shipping boxes. The screwdrivers take a surprising amount of torque if you use the keychain as a grip and lever—I removed door-hinge screws as an experiment, with no trouble. The tweezer: I live in cactus country, ‘nuff said.

And the lozenge? Unscrew it, and it reveals what I have to say is the cutest lighter I’ve ever seen. It takes standard lighter fuel, has an O-ring to prevent fluid getting out and water getting in, and lights every time. The one caution is, you don’t want to leave it burning for more than about 15 seconds, or the whole thing gets alarmingly hot.

Looking at the lighter, I was reminded of the spark generator in the SOL Origin survival kit (reviewed HERE), with which I was less than impressed. Aside from the fact that it was billed as something that could save your life, it was also described as waterproof—a claim I hadn’t tested. I wondered how the survival tool would stack up against this little trifle of a lighter, so I dunked them both in a glass of water for 15 minutes. Afterwards, the “survival tool” would barely produce a flicker of a spark—I might have been able to ignite a bucket of gasoline, but natural tinder? Forget it. The little lighter, on the other hand, fired right up. Drop me in the middle of the forest and there’s no question which of these I’d rather have with me. As with the other items in the EDC kit, it’s available separately, and I can think of places to keep two or three of them handy. (The pry bar too is especially useful as a keychain accessory—it prevents you from pressing your Swiss Army Knife's screwdriver into tasks for which it was not designed.)

Kaufmann Mercantile is HERE, but I absolve myself of responsibility for the consequences if you go.
*New York state apparently finds them too deadly: wrist-braced slingshots are illegal there. I am not making this up.
The one-case tool kit, part 4
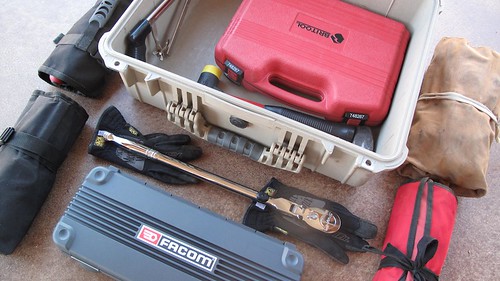
(Please read part 1 here, part 2 here, and part 3 here)
I've finally wrapped up my project to assemble a comprehensive one-case field tool kit—and I’m really glad I restricted myself to a Pelican 1550.
It’s absolutely axiomatic when assembling a tool kit that it will expand to fit the available space, and it would have been effortless to fill a much larger container with Oh-I-should-have-this items, to the point where any notion of portability went out the window. As it is, the case and contents had nudged above 55 pounds by the time I was satisfied.
But after over a year of playing stump-the-tool-kit, I have yet to come across a task the contents couldn’t handle. It’s been employed successfully for jobs ranging from repairing a Honda generator in Mexico’s Sierra Madre (used, critically, to power UV lights for an insect survey) to replacing the dreaded trap oxidizer on our old Mercedes 300D at home (which incidentally resulted in a good 20 percent power increase). One fiendishly positioned nut on that device eventually required the Snap-on 18-inch ratchet, two extensions, a universal joint, and a socket to access—all there in the case. The closest I came to being stymied was removing the 10mm allen-head bolts on a Porsche 911SC anti-roll bar. The swiveling allen key in the kit baaarely got those loose; I’ve decided to add a set of 1/2-inch-drive allen-head sockets, which will take up scant room.
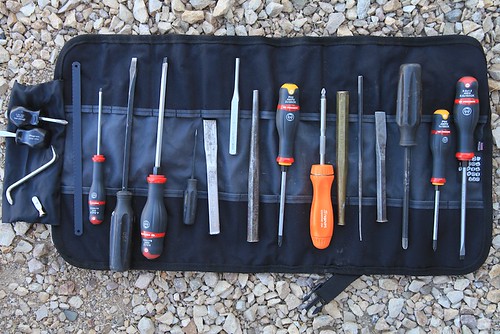
So: What’s in it? Here is the complete list (see previous installments for the justification for each):
- Britool 748267 3/8ths-inch socket/ratchet set (1/4” to 1” SAE sockets; 6mm to 24mm metric sockets, Torx sockets T8 to T16, assorted driver bits)
- Facom S.200 DP 1/2-inch socket/ratchet set (10mm to 32mm metric sockets)
- Snap-on SX80A 18-inch flex-head ratchet
- 1 1/2-pound sledge-head hammer
- Craftsman replaceable-head soft-faced hammer
- Combination wrenches (7mm to 25mm plus 27 and 30)
- Facom torque converter
- Facom Pro-Twist Shock screwdriver set
- Assorted Craftsman screwdrivers including stubbies
- Snap-on replaceable-bit ratcheting driver
- Brass drift
- Three cold chisels
- Two punches
- Small pry bar
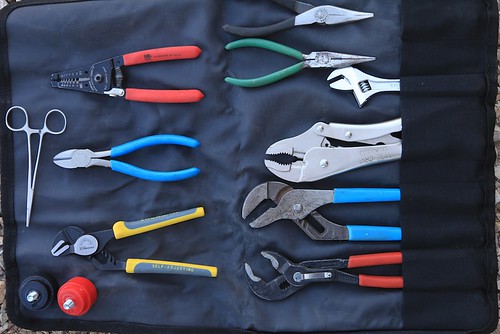
- Knipex and Channel-Lock pliers
- Two pairs needle-nosed pliers
- Vise-Grip pliers
- Small self-adjusting plier
- Side cutter
- Electrical stripping/crimping tool
- Hemostats
- Six-inch adjustable wrench
- Three snap-ring pliers
- Adjustable hacksaw
- Combination flat/half-round file
- Round file
- Tin snips
- Two LED flashlights
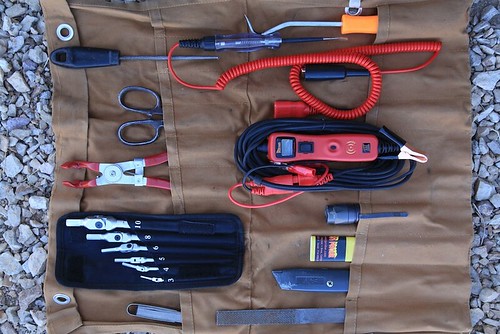
- Box cutter
- Spark-plug puller
- Radiator-hose pick
- Feeler gauges
- Power Probe voltage/resistance tester
- Continuity tester
- Swiveling hex-key set
- Small wire brush
- Mechanic’s gloves
- Tube of hand cleaner
- Safety glasses
So—while the selection is meager compared to what I have available in the rollaway chest in the shop, even I, who had high hopes, have been surprised at how effective it is. Yes, if I need a hammer at home I can choose among nine or ten to get exactly the right weight and head, while in the case I must make do with two—but so far I’ve been able to make do nicely.
Believe it or not, there’s a bit of room left over in the Pelican. If I were to embark on a really long journey, I could still fit in, say, a hand drill and bits, a pickle fork to separate ball joints, a hub socket to fit the Land Cruiser, and a couple other more obscure items.
I don’t consider this selection definitive. I have absolutely no doubt that sooner or later I’ll run into a situation I can’t handle (although I’d allow myself a pass on true special tools required for certain specific tasks on many vehicles). But for now I’m convinced I have put together a pretty good one-case tool kit. Is it "The Ultimate One-case Tool Kit?" I guess that's open to a challenge . . .
At the Overland Expo, May 17-19 2013, I'll be demonstrating the one-case tool kit for Overland Experience package holders on Friday at 2:00 PM and Saturday at 4:00 PM. Overland Experience attendees can also attend my class on assembling a basic tool kit, Friday at 1:00 PM and Saturday at 3:00 PM. Find out more about the Overland Expo HERE.
The one-case tool kit, part 1
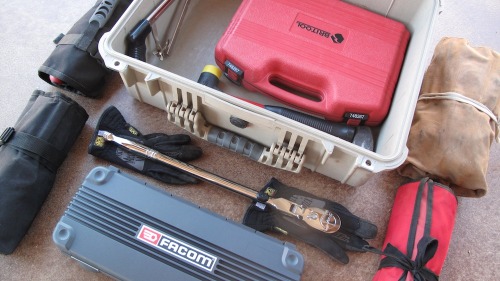
It would be pretty easy to bring along all the tools you’re likely to need on even an extended overlanding trip, covering virtually any repair not involving a new long block. What’s that? Oh—you also want room for, like, food? And maybe a tent and sleeping bags? Hmm . . . now that’s a problem.
The size of tool kit you carry (or should carry) is subject to a bunch of variables. The length of the trip and the remoteness of the route are two obvious considerations. The age of the vehicle is certainly a factor—even reliable vehicles need more attention as they get older. If you can just go out and write a check for a new Land Cruiser every time you leave on a major trip, your need for tools should be minimal. On the other hand there are people like, well, Roseann and me. A brief survey and some arithmetic established that the average age of all the four- and two-wheeled vehicles currently in our fleet—1970 Triumph Trophy, 1973 FJ40, 1974 Series III 88, 1981 BMW R80 G/S, 1982 Porsche 911SC, 1985 Mercedes 300D, and a practically spanking-new 1987 Honda NX250—is 33 years. All solid vehicles, but inevitably in need of attention now and then, especially the . . . (Ha! you were ready for a facile brand quip here, right? Not this time.)

You might think, if you’re utterly mechanically ignorant, that it makes no sense to waste money and space on tools you don’t know how to use anyway. Au contraire—if something goes wrong and you need the assistance of strangers, the least you can offer them is the tools to render that assistance. At a minimum, even on a brand-new Land Cruiser you should carry enough to make what I call generically “rubber repairs,” involving the replacement of pliable things such as fan and serpentine belts, and radiator and heater hoses. These are items that can fail or be damaged even on a new vehicle. A set of standard and Phillips-head screwdrivers, a socket and ratchet set, and a set of combination wrenches will suffice to start (note that for our purposes I consider tire-repair tools a separate subject). But if you want to cover more than first base, you'll need a few additional items.
Okay, so you’re going to buy some tools. You take a look around the web and find, for example, one set of metric combination open/box-end wrenches, from 10mm to 19mm, for $14.95, and another set of the exact same number and size wrenches, from a different manufacturer, for $298 (I am not making up these prices). You’d be forgiven if your brain texts to itself, WTF? We’re not talking about the difference in value between a Corvette and a Carrera here—this is more like Tata Nano versus Aston Martin Vantage. At least with the cars it’s easy to spot a few differences besides the fact that they’re both designed to go from point A to point B. The wrenches don’t even have any moving parts, and appear more or less identical. What gives?
Three factors contribute to the discrepancy: quality, reputation, and pure status.
Quality on even something as simple as a wrench can vary tremendously. Consider what goes into its manufacture:
- What is the alloy used in the steel—plain carbon? Chrome molybdenum? Chrome vanadium?
- How is the tool formed—is it machined, cast, or drop-forged? Drop-forging helps align the internal grain in the steel, increasing strength.
- How is it finished? If chromed to resist corrosion and dirt, what process was used?
- How precise are the tolerances? This is a critical factor in how well the wrench performs—sloppy tolerances increase the chances the wrench will strip a tight bolt or nut.
- Does the box end of the wrench employ the superior “Flank Drive” system pioneered by Snap-on and now copied everywhere? Look for rounded rather than sharp teeth; these bear on the stronger flats of the nut rather than the corners. (The Flank Drive Plus system on new Snap-on wrenches adds the same capability to the open end of the wrench via grooves on the flats. This has been copied by other makers as well.)
- What about ergonomics? Is the wrench long enough to provide adequate leverage (unless it's a shorty designed to fit in tight spaces)? Fully chromed and polished tools don't just look nice and resist corrosion; they're easier to keep clean as well.
- Finally, how socially responsible is the tool? Was environmental protection a factor in the mine-to-maker-to-consumer chain? Do workers in that chain earn a fair wage?
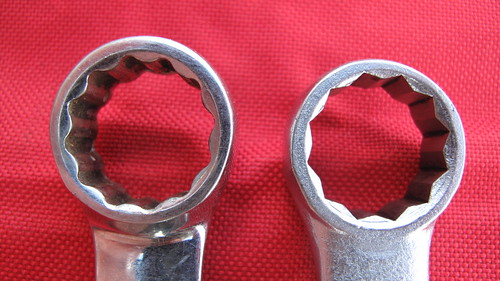 Flank Drive wrench head on the left, standard head on the right
It’s nearly impossible for a consumer to evaluate many of these parameters accurately. A tool marked “drop-forged” could be forged to low tolerances with poor-quality steel. One has to wonder if the wrenches in that $14.95 set were made by a laborer in his or her 60th hour of work that week, and if the smelter or factory do anything to reduce their emissions. It’s sheer common sense that for ten wrenches to be produced in Asia, shipped across the Pacific Ocean, trucked to a Harbor Freight store in Topeka, and sold at a profit for 15 bucks, something along the line had to give: quality, ethics, or both.
That’s where reputation figures into the equation. Although it’s not a guarantee, buying tools from manufacturers with solid reputations for quality at least makes it far more likely you’ll be getting a good product either produced in the U.S. or under decent conditions elsewhere. I’m referring here to such makers as Sears Craftsman, Kobalt, Proto, S-K, and Husky. A set of wrenches from those makers will cost more than $14.95, but it’s very probable the extra expense will be worth it on several levels.
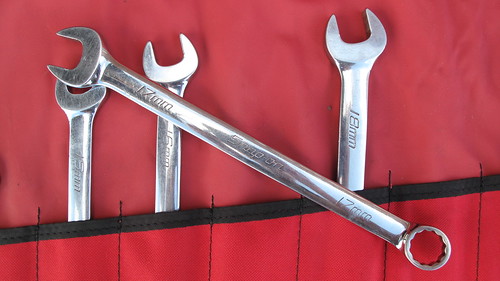
Finally, there’s status. The “boutique” tool makers such as Snap-on (the producer of that $298 set of wrenches), and to a lesser extent Mac and Matco, have transcended reputation and moved on to the level of status symbol. There’s little doubt that that set of Snap-on wrenches (which are, just to be clear, certainly the best on the market) could be duplicated in every detail and sold for much less, but the Snap-on (or Mac or Matco) label adds a premium eagerly paid by both professional mechanics and well-to-do (or savvy, see below) amateurs. The reason is that, tool snobbery aside, these companies have stayed at the very forefront of tool development and quality. If you pay the premium prices for tools from these manufacturers, you can be absolutely certain you're getting the best tools with the most advanced features.
What to buy then? I’ll continue to repeat it for as long as it takes to make it into one of those 1001 Famous Quotes books: If you’ve brought out the tools, something has already gone wrong. Why risk compounding the situation by using cheap tools to try to fix it? I recently read an article on bush repairs in a respected Australian four-wheel-drive magazine, in which the writer opined, “Your tools don’t have to be good, just good enough.” And how, exactly, do you identify that fine line of “good enough” except when one breaks at the worst possible time and you’re left holding a handle and thinking, Hmm . . . not good enough.
So, fine—just go stop a Snap-on truck, hand the driver your AmEx card, and say, “Tool me.” Except that very few of us can afford that option. Instead, I suggest prioritizing.
The most critical component of an automotive tool kit is the ratchet and socket set. This is what you’ll be using for any serious repairs, and its various pieces are the most susceptible to poor quality control. The ratchet head encloses a lot of very small parts that can be put under enormous strain. It’s easy to make a strong ratchet head with a coarse (i.e. 24 or 36) tooth count, but such ratchets need to be turned many degrees to engage the next tooth—a real issue in tight spaces. The best ratchets these days have 72, 80, even 84-tooth heads, yet are immensely strong. The sockets themselves need to be as thin-walled as possible to fit over nuts in tight spots, yet stout enough not to split. That mandates the very best steel and the tightest tolerances.
If you’re putting together a complete tool kit, you’ll probably want one socket set in 3/8ths-inch drive, and another in 1/2-inch drive. The 3/8ths set is for general use; when something big needs fixing or replacing the 1/2-inch stuff will come out, so that’s the most critical in terms of quality.
Next are the wrenches, which do many of the same tasks as sockets but have the advantage of no moving parts. Nevertheless, quality is key—in many situations you’ll need a socket on one side of a fastener and a wrench on the other. I’ve only broken one wrench in my life, but I’ve used many that fit poorly.
So my advice is to spend until it hurts on your ratchet/socket sets, a bit less so on the wrenches. Next on my list would be a really good set of screwdrivers. After that, you can economize on many pieces with little risk of failure in the field.
A good place to compare quality in one spot is a Sears store. Take a look at ratchets. Their new, green-handled Evolv series (what’s with the cute missing “e” anyway?) represents the price-leader, and it shows. Pass. Move up to the standard Craftsman stuff—non-polished, coarse tooth count, but smoother. Now look at the fully-polished, thin-profile handles. Nicer and more comfortable, easier to keep clean, although the tooth count still feels fairly low. Finally, look at one of the Premium Grade products: Sealed head to keep out grime, industry-leading 84-tooth ratcheting mechanism that goes snicksnicksnick instead of click click click. My only complaints are the lack of a socket-release button, and the fact that the feel of several I tried seemed to vary slightly, as though manufacturing consistency wasn’t quite spot-on.
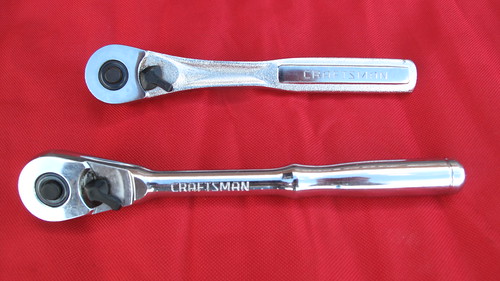 Standard Craftsman ratchet, top, fully polished, bottom. Both unfortunately have plastic selector levers, but are solid tools. The standard ratchet is now made in China.
For several decades I relied on Craftsman ratchets and wrenches, with only a scant few split sockets to their discredit during field repairs (replaced with no questions asked at Sears . . . after I got home of course). Recently I decided to up the ante. I started haunting eBay, looking at Snap-on socket and wrench sets. There were a few decent deals, but nothing spectacular—until I realized that the sets on offer that were missing a piece or two went for much less than the complete sets. Soon I snagged a lot of current-production 1/2-inch sockets, from 12mm all the way up to a giant 36mm, missing only a 19mm, which I quickly added on an individual auction. Same thing with a wrench set from 6mm to 30mm, missing the 14 and 17, again easily replaced.
My one retail splurge was the 1/2-inch ratchet handle. I consider this the single most critical tool in my kit. If I break out the 1/2-inch sockets, it’s usually because something significant has gone wrong with either my own vehicle or someone else’s. And if your ratchet handle breaks removing the 21mm bolts from a transmission bell housing, you can bet you won’t be getting them off with a pair of Vise-grips. So I went to the Snap-on website and plunked down $164.95 for part number SF80A: an 18-inch-long, flex-handle ratchet with a Swiss-watch-smooth 80-tooth mechanism—astonishing on a ratchet with a foot and a half of leverage, but Snap-on uses the same head on a 24-inch handle, so they obviously have confidence in it. The locking flex head gives this ratchet great flexibility, the length makes it an effective breaker bar for the tightest bolts, and the fine-toothed mechanism requires only 4.5 degrees of swing to engage the next tooth, a boon in restricted quarters. Every time I use it I’m impressed, and swear it makes me a better mechanic than I really am. It certainly makes me look like a better mechanic than I am.
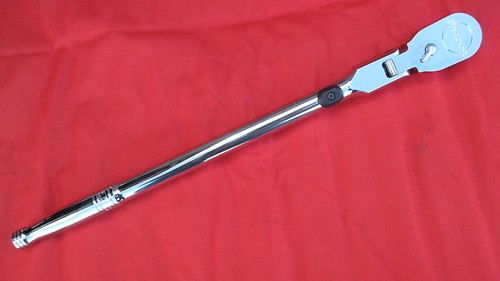 Worth every penny: The Snap-on SF80A 1/2-inch ratchet.
With these two fine sets in hand, I began contemplating my entire traveling tool kit. Specifically, I started musing on a question that had been at the back of my mind for some time: Would it be possible to assemble a high-quality tool kit that could handle virtually any field repair up to and including such things as clutch or differential replacement, suspension work, hub disassembly, or cylinder-head removal—in other words, the types of repairs one might expect on an extended overland trip in remote areas—yet still fit inside one manageable case?
Interesting idea. Time to look at some Pelican cases.
Next: a compact, high-quality 3/8ths-inch socket set. Read part 2 HERE.
Fit to be tied: Tie-down torture tests the metal of Expeditionware Transport Loops
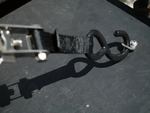 I’m never sure which alarms me more: a vehicle loaded with completely unsecured cargo and equipment, or one loaded with cargo and equipment secured poorly. After all, the former implies simple ignorance on the part of the owner, and ignorance can be overcome with education. But the latter implies some rudimentary level of awareness—and then a complete failure to do the simple arithmetic that will tell you what will happen to the 30-pound Hi-Lift jack bungeed to your front brush guard should you be, say, rear-ended at a stoplight. No, I am not making this up, and yes, I checked. Two neatly wound bungee cords comprised the total attachment of that jack to that brush guard. I’ve seen another Hi-Lift bungeed to a very well-constructed internal roll cage (talk about Manichaean reasoning), and uncounted tool boxes, fridges, and Pelican cases all held down by what are, let’s be frank, glorified rubber bands.
 I’m never sure which alarms me more: a vehicle loaded with completely unsecured cargo and equipment, or one loaded with cargo and equipment secured poorly. After all, the former implies simple ignorance on the part of the owner, and ignorance can be overcome with education. But the latter implies some rudimentary level of awareness—and then a complete failure to do the simple arithmetic that will tell you what will happen to the 30-pound Hi-Lift jack bungeed to your front brush guard should you be, say, rear-ended at a stoplight. No, I am not making this up, and yes, I checked. Two neatly wound bungee cords comprised the total attachment of that jack to that brush guard. I’ve seen another Hi-Lift bungeed to a very well-constructed internal roll cage (talk about Manichaean reasoning), and uncounted tool boxes, fridges, and Pelican cases all held down by what are, let’s be frank, glorified rubber bands.
Bungees have their uses, but heavy cargo in an overland vehicle should be secured with ratchet straps capable of withstanding the forces generated should you experience an unplanned encounter with Isaac Newton. Anything much heavier than a sleeping bag can cause injury or worse in an accident or rollover. (Come to think of it, I wouldn’t want to be clobbered by my 18-pound Butler sleeping bag . . .)
Decent ratchet straps are available at any hardware store. But very few, if any, vehicles come from the factory with tie-down points strong enough and numerous enough to anchor those straps. It’s almost always up to the owner to add proper loops or eye bolts. The conundrum of where to locate them is rarely solved permanently. A few items such as the fridge might have a more or less permanent location, but the distribution of other gear is subject to change, and to the addition of new gear. Bolt in too many tie-down loops and they can be almost as much a hindrance as a help to properly securing stuff. Adjustable rails such as those from Mac’s Custom Tie-Downs add versatility; the anchor plate systems from the same company, which leave only an unobtrusive rounded base when not needed, are useful as well. But both of these need a fair amount of space to install.
A few years ago, while looking for tie-down loops for the rear of my FJ40, I found the Ring Products Transit Loops at Expedition Exchange. The stainless-steel loops were originally designed to be attached to motorcycles to provide easily accessible points on which to hook tie-down straps when transporting the bike on the trailer or in a truck. Lightweight and unobtrusive, they obviated the need to loop cinch straps awkwardly around handlebars or luggage racks. However, with my FJ40 in mind, I realized they looked just the right size to bolt down on top of the join between the body tub and hardtop, using the numerous existing 10mm bolts.
Indeed, such proved the case, and a half dozen of the rings gave me a solid perimeter tie-down system. I added a few more on the wheel wells, then started looking at our other vehicles and realizing there were a nearly infinite number of places the little rings could be utilized to secure a nearly infinite number of items. They could be installed in very tight spaces, and needed only a single 1/4-inch hole to mount. Visually, a pair didn’t look like overkill when securing something as small as a pack of road flares (with a bungee—a proper use for one), but four of them would lock down an Engel immovably.
And then the company went out of business. Damn.
I moved on to other tie-down systems for other projects—but how I missed those versatile little rings.
The fellows at Expedition Exchange apparently shared my thoughts, because after trying in vain for years to track down the Ring Products company or principals, they decided they’d exercised due diligence—and had a leftover reproduced at a local machinist. Skimming the EE website a few months ago, I noticed the newly introduced Expeditionware Transport Loops. Woohoo! I immediately ordered some to look at, and found them to be apparently exact copies. Excellent.
However, as I examined the new loops I found myself, for the first time, wondering about the ultimate strength of such a compact fitting. I’d always assumed that, since four of the originals were designed to hold down a motorcycle during road transport, they were certainly strong enough to secure a fridge or a Pelican case full of tools. But now I was curious about their limits.
 With a loop in hand, I looked around our shop and carport for a way to put it to the test. I had neither a strain gauge nor a scale sufficient to register the several hundred pounds I assumed the loop would take before it failed. Bolt it to one of the steel roof beams in the carport and hang successive weights off it? Perhaps, but how to suspend 400—or 600 or 800—pounds in successive increments? Hook one between two Land Cruisers and try to pull it apart? But that wouldn’t tell us what the failure point was, and sounded like a procedure that would wind up either as an object lesson at the next Overland Expo, or a feature on YouTube.
But, hmm . . . the Land Cruiser. I looked at the rear bumper/tire carrier on the FJ40, specifically at the stout, one-inch-thick shackle mounts on either corner. Then I looked at the Hi-Lift jack nearby. That might do . . .
Using a grade 8 bolt and some graduated washers, I affixed the ring to the shackle mount via the smaller of its two holes. Then, with a steel quick-link connector through the larger hole, I attached the ring to the slot on the bottom of the Hi-Lift’s tongue, which I’d position just above the shackle mount.
Now I had a mechanism, but I still didn’t have a means of measuring the stress on the ring. Given that my FJ40 weighs a bit over 4,000 pounds, I decided rather arbitrarily that if I could lift one rear wheel off the ground—or even come reasonably close to doing so—the Expeditionware Transport Loop would have proved its mettle as far as I was concerned. I donned a heavy Carhart jacket, gloves, and safety glasses in case the ring exploded and flung bits of stainless steel hither and yon.
I began working the Hi-Lift’s handle and the loop took up strain. The assembly started to emit ominous metallic creakings, and for the first time I begin to wonder if this was a good idea. How could I expect a tiny ring a few millimeters thick to lift a corner of a 4WD vehicle?
 The bumper rose, and the right rear leaf spring started to flex. Now, if I peaked around the Hi-Lift’s main beam, which I was keeping between me and the poor little ring, I could see the latter flattening. Was there some stretching going on as well? The sidewall bulge came out of the right rear tire as the bumper continued to rise with each stroke of the jack handle, but it remained planted on the ground. Now I could clearly see the large hole in the Transit Loop elongating. More creaking, and a ping or two from somewhere in there.
But then—the tire was a few millimeters off the ground. I could spin it with a boot. A single Transit Loop had successfully lifted the corner of an FJ40 off the ground—and one equipped with a massive Stout Equipment bumper/tire rack at that.
I have no way of knowing exactly how much strain the loop was withstanding at the end, but I’m certainly convinced that, employed in suitable numbers, the Expeditionware Transit Loops are more than up to the job of safely locking down the heaviest fridges, tool boxes, and equipment cases.
At nine bucks each you can afford to buy a bunch. I guarantee you’ll find uses for as many as you have.
Unless you’re still convinced a bungee or two will suffice. Expeditionware Transport Loops

Hint: When using “Search,” if nothing comes up, reload the page, this usually works. Also, our “Comment” button is on strike thanks to Squarespace, which is proving to be difficult to use! Please email me with comments!
Overland Tech & Travel brings you in-depth overland equipment tests, reviews, news, travel tips, & stories from the best overlanding experts on the planet. Follow or subscribe (below) to keep up to date.
Have a question for Jonathan? Send him an email [click here].
SUBSCRIBE
CLICK HERE to subscribe to Jonathan’s email list; we send once or twice a month, usually Sunday morning for your weekend reading pleasure.
Overland Tech and Travel is curated by Jonathan Hanson, co-founder and former co-owner of the Overland Expo. Jonathan segued from a misspent youth almost directly into a misspent adulthood, cleverly sidestepping any chance of a normal career track or a secure retirement by becoming a freelance writer, working for Outside, National Geographic Adventure, and nearly two dozen other publications. He co-founded Overland Journal in 2007 and was its executive editor until 2011, when he left and sold his shares in the company. His travels encompass explorations on land and sea on six continents, by foot, bicycle, sea kayak, motorcycle, and four-wheel-drive vehicle. He has published a dozen books, several with his wife, Roseann Hanson, gaining several obscure non-cash awards along the way, and is the co-author of the fourth edition of Tom Sheppard's overlanding bible, the Vehicle-dependent Expedition Guide.


