Overland Tech and Travel
Advice from the world's
most experienced overlanders
tests, reviews, opinion, and more
Tested: Kanz Field Kitchen
by Roseann Hanson
When I was little my family had a chuck box for camping. Most of our camping was with the Boy Scouts, for whom my father was a Scoutmaster. His name is Charles, and friends called him Chuck, so I always thought it was his box, spelled with capital letters, as in “Chuck's Box.”
My mind and heart store so many indelible memories associated with that old beat up box . . . cold nights in pine forests (a treat for a desert kid), smoky fires, charred marshmallows, howling coyotes (we pretended they were wolves), tales of the Lost Dutchman Mine in the Superstition Wilderness, and mom serving forth from the chuck box innumerable stews and casseroles, invariably containing Cream of Mushroom Soup. High dining for an 8-year-old.
Fast-forward to 1987: in our third year of married bliss, knowing how much I loved the old family box, Jonathan built me a wooden chuck box, varnished as lovingly as an Alden schooner. It had a piano-hinged drop-down front, cork lining, silverware drawer, plate slots, shelves, and a secret panel along the back of the drawer, with a row of cutout leaping dolphins. Used on our first and subsequently countless trips to Baja and Sonora, throughout the American West and even the Arctic—first in my ‘78 JF55 and then in several Toyota pickups—it logged 75,000 miles+ of exploration.
Alas, it was retired when we upscaled to a Four Wheel Camper in the late 1990s. But lately, I had been missing my old chuck box (which is retired to a place of honor in storage, with our original Sigg cook set and brass Svea stove). I'm back to camping out of a classic Land Cruiser, so when I had a chance to test out the Kanz Field Kitchen, I jumped at it.
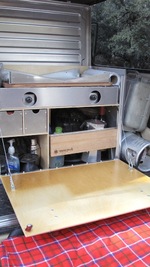
 I was intimidated at first. Fully half again as large as my old box, the 19" x 25" x 15" Kanz is gleaming burnished aluminum with beautiful satin-finished Baltic birch. I could lift and carry the old box, but the Kanz takes two of us. This is because it is a kitchen, not just a chuck box; included with our kit is the 22" Partner Steel stove and Kanz's own complete cookware / utensil set. The box + stove is 36 pounds (40 with the Coleman dual-fuel), and 52 with cookware etc. (Kanz's set includes a top-line Snow Peak cookset, Kanz' own double-wall mugs, a percolator, enamelware, and flatware).
It is hard to come up with any engineering complaints about this kitchen. Designed over a 12-year period by industrial designer Harald Kanz, the kitchen is the embodiment of German meticulousness for detail and quality. As a young boy, Harald's imagination was captivated by stories of adventure and exploration, he’s said. Fascinated by how things work in the outdoors, he sketched his first tent designs and fire setups while on camping trips with his parents in Germany.
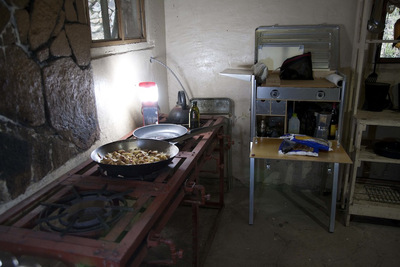 On a recent science expedition to the Sierra Madre in Mexico, we used the Kanz Field Kitchen to augment the very rudimentary kitchen at the old camp.The Kanz Kitchen’s easily detachable legs (fitted with clever pressure springs that you don’t have to fuss with, they just slide in and out easily but hold tight when they need to) perch the kitchen’s top surface at optimal working height (37"); the lid acts as windscreen, can be laid flat as a shelf (with optional hardware), or can detach as serving tray. A custom cutting board fits into the Partner stove, and the 2 drawers, which look deceptively small, swallow all necessary utensils plus 4 double-walled mugs (and, I found out happily, my Sea to Summit folding bucket). There is a 2" hole for the propane line right where it needs to be (with an included cap, which we’ve needed to seal up the kitchen against mice), and the whole unit can be ordered as
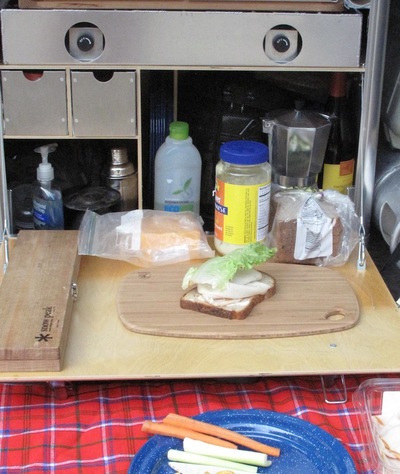 The drawers swallow all our utensils, coffee mugs, and even a folding Sea to Summit bucket. A full-sized cook kit from Snow Peak, an espresso maker, bottle of wine, dish soap, six plates, a full set of spices, coffee making filter, and martini shaker round out the kit, with room to spare. an optional certified-bear-safe unit. The 2 side shelves which are optional are very handy.
The only thing I found curiously lacking was a paper towel holder. A simple holder that would hang under a side shelf would be great. In keeping with Kanz’ environmentally aware design, perhaps this is by design—a gentle reminder I should be using washable towels instead, but I hate smelly kitchen towels when on camping trips.
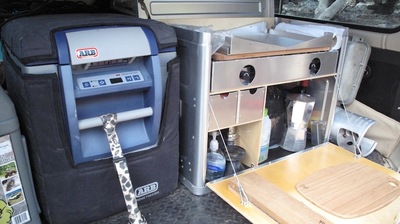
I used the kitchen out of the back of the Land Cruiser, facing outwards, for fixing lunch on a recent science expedition into the Sierra Madre backcountry in Mexico. Sitting next to the ARB fridge, the top area was very convenient for setting things when they came out of the fridge, and the fold-down work surface perfect for making sandwiches.
For our camp, it’s easier to pull the kitchen out and use it on its legs, rather than on the tailgate. I like the longer legs, but the height of the stove makes it little harder to use big pots; it’s an adjustment to the usual tailgate-height or height of your at-home stove, but it’s do-able considering the convenience. We use the stove with our aluminum propane cylinder, the same one Kanz sells (he actually got the idea from Jonathan’s article on propane systems in Overland Journal). I have yet to put a mount into the back of my Land Cruiser for the cylinder, but I plan to (Kanz also sells this . . .).
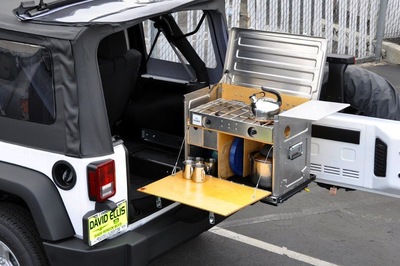 On Tembo Tusk's side-out slide.The Kanz Field Kitchen is large enough that, with the ARB fridge in the back of the Land Cruiser, it fills the back, with no room for our nice stainless steel water tank (we had to resort to using the Rhino plastic jug, the horror!). For ultimate convenience we are working on a layout that would allow us to mount the water tank as well as the fridge and Kanz Field Kitchen on pull-out runners, but we haven’t quite sorted it out.
Kanz does sell Tembo Tusk's superb quality sliders (side-out or front-out) for the Field Kitchen. Though expensive and heavy, they are the best available and really add to the utility of the kitchen. 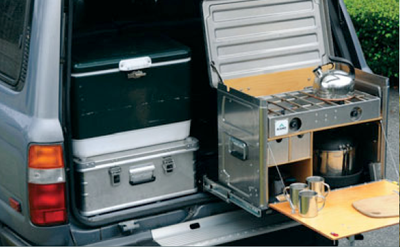 On Tembo Tusk's front-out slide.
Kanz accessories include a matching pantry box and a bridge / work surface that joins the two. Thinking of everything (so German!), Kanz also sells wall mounts, a soft cover for transit-protection, and leather straps for horse outfitters.
They also sell my favorite food boxes: Zarges K470 aluminum cases (in photo at left, under the cooler), which are light and stack nicely. I currently use one for my own pantry, with a collapsible metal stand (an old Coleman stove stand), and it matches the Kanz Field Kitchen nicely.
I was ready to find the Kanz Kitchen lacking in comparison to my old dear ones, if only out of loyalty, but I could not: it’s a new classic, ready to fill the old shoes with honor. The price is, of course, daunting, and could be off-putting for some. But with absolute top-quality, made-in-America workmanship, exceptional materials, fit, and finish, it is worth every penny. A field kitchen is, after all, more than just a place to store your kitchen gear. With time and use, it will store many wonderful memories, of good times and beautiful places with special friends.
Specifications, Kanz Field Kitchen:
Outside Dimensions (H x W x D): 19.4 in x 25.4 in x 15.00 in, (492 mm x 645 mm x 381 mm)
Inside Dimensions of stove compartment (H x W x D): 6.3 in x 24.8 in x 14.0 in, (160 mm x 630 mm x 355 mm)
Inside Dimensions of silver ware drawer (H x W x D): 4.0 in x 3.8 in x 13.9 in, (100 mm x 97 mm x 353 mm)
Group size + guest: 6+2
Weight (empty): 25 lbs (12 kg)
Weight (with Partner Steel propane stove): 36 lbs (16.3 kg)
Weight (with Coleman 414 dual fuel stove): 40 lbs (18.1 kg)
Weight of optional cookware set): 16 lbs (7.3 kg)
Table top height (on long leg set): 26 in (660 mm)
Counter top height (long leg ; short leg set): 43 in (109 mm); 37 in (940 mm)
Transport: One foldable sprung handle on each side with rubber grip
Material: Baltic birch plywood riveted to marine grade aluminum panels
Finish: Polyurethane clear coat on wood panels inside and outside
Price without stove or cooking set: $595
Price as tested (with Partner Steel Stove and complete cooking set): $1399
FI-PIG, Gorilla Tape, and WD-40: Essential fix-it stuff
 I would like an expert opinion about assembling a selection of adhesives, chemicals, and other products most useful for overland vehicle field repair issues such as cracked hoses, radiators, or fuel lines, and for replacing gaskets, joining metal or plastic pieces, sealing electrical repairs, and so on.
Alexander in Florida
Alexander’s question brought to mind the old aphorism about the perfect two-piece tool kit: WD-40 (to fix the things that are supposed to move but won’t) and duct tape (to fix the things that aren’t supposed to move but do). Kidding aside, it’s an excellent question—a very large number of field repairs involve some sort of leak or breakage that requires a chemical or mechanical fix. I looked in my own kit, enlisted the help of two of our OT&T experts—Duncan Barbour and Graham Jackson—and also queried my nephew, Jake Beggy, a master Toyota mechanic and fabricator. Here’s what we came up with, first in the way of commercial products and then in “bodge” fixes when nothing else is available.

Gary Haynes repairing a door stop on a Land Rover Defender 110. South Rift, Kenya. Note two essential lubricants at hand: WD-40 and bourbon.
Toyota FIPG
 No matter what brand of vehicle you drive, Toyota’s FIPG (Form In Place Gasket) sealant/glue—which Toyota mechanics refer to as “FI-PIG,” is markedly superior in adhesion, sealing, and durability to the generic silicone RTV gasket sealant found in most hardware and auto supply stores. It comes in two colors: black, used to seal parts that will come in contact with oil or water, and a thicker red formula specifically designed for applications involving gear oil—transmissions, transfer cases, and differentials. The black stuff is the general-purpose tube to carry for most field repairs. It dries to a tough, rubberlike consistency and so can be used for about a zillion fixes besides vehicle problems. However, once the Toyota parts man tells you the price, you probably won’t think about using it to repair your Hi-Tecs.
AlumAseal radiator sealant
Available in a mess-proof powder form, AlumAseal will effectively squelch any but the most grievous radiator or heater core leak. It’s compatible with all types of antifreeze and any radiator material. Duncan mentions Bar’s Leaks as an equivalent.
Rescue Tape self-fusing silicone tape
There are other self-fusing silicone tapes on the market; this brand just happens to be the one I carry. I’ve used it once to repair a split radiator hose and it worked brilliantly. I’ve heard of it being used to seal high-pressure air lines and even fuel lines as well. It only sticks to itself, thus getting it off to effect a proper repair back home is no trouble. I know of someone who completely mummified a distributor in it for a (successful) deep-water crossing.
Two-part epoxy
It’s easy to forget just how strong two-part epoxy can be. Graham once epoxied a nut to the stripped head of a stuck timing cover bolt and was then able to remove it. He also used it to repair a stripped hole for an oil pump bolt, by filling the hole with epoxy, then drilling and tapping it once cured. Graham and Duncan both mentioned fuel tank repairs with epoxy; Duncan specified that by first plugging the leak with bar soap you can then clean the area and apply epoxy to further seal and reinforce it.
J-B Weld
Sort of a three-dimensional epoxy, since it can be built up to cover frighteningly large holes in things that shouldn’t have holes in them. I actually have sort of a love/hate relationship with it. Why? Because it’s so effective it seems to be the material of choice for unscrupulous people attempting to unload vehicles with serious problems. I’ve read account after account of victims finding cracked engine blocks sealed with it, oil leaks covered up with blobs of it, and worse. Nevertheless, such stories perversely confirm the versatility of the product. The standard formula is the strongest, but takes up to 24 hours to cure. The quick-set version is nearly as good.
Gasket material
There are all sorts of acceptable substitutes for gaskets, but why not have a sheet or two of the proper item? The thin cardboard material is good for many applications; I also carry one of slightly thicker reinforced material, and one of thin rubber sheeting.
Yes, there is a difference in duct tape. This stuff beats “Duck” tape and all the generic gaffer tapes by a mile. Yet it’s still easy to tear by hand or teeth—as it should be when you’re single-handedly attempting to secure the cracked center ferrule of a sea kayak paddle while bouncing around in the middle of the Gulf of California. True story.
Cable ties
Yes, believe it or not, there are also differences in cable ties or “zip ties.” You want the kind with a metal, rather than plastic, locking tab. The Ty-Rap ties from Thomas and Betts are arguably the best. The little ones secure wiring, medium sizes are good for fuel and air lines, and the really big ones will lock down just about anything, with a tensile strength of up to 175 pounds each. T&B also offers heat- and UV-resistant versions.
Baling wire
As near as I can tell, there’s no better or worse brand of this. Its uses are legion—I’ve successfully secured a broken motor mount on a 600-pound 2F Land Cruiser engine with it, and I know of situations up to and including a broken chassis crossmember that were stabilized with baling wire. Unlike duct tape, it’s heat resistant—how many dodgy exhaust systems have been semi-permanently repaired with baling wire? Where we live I’m not even sure it’s considered a “repair.”
Parachute cord
Paracord has become quite fashionable among the “tactical” crowd lately, especially for wrapping knife handles. The idea is that in a survival situation you can channel your inner Bear Grylls, unwrap the cord and use it to lash the knife to a stick as a spear, then go out and break or lose it altogether by hurling it at a large game animal. Seriously, paracord is an astonishingly versatile light rope, and worth buying in bulk—however, there’s a lot of substandard product out there. Make sure you get the genuine all-nylon kernmantle with seven three-ply inner strands. Type III paracord is the standard—called “550” for its rated strength in pounds. The proper military designation is Mil-C-5040H TYPE III, and current authentic military-contract paracord has one inner strand with black and yellow threads woven into it, if you want to be really picky (I recommend the excellent aviation survival equipment company Best Glide as a source: Best Glide). I carry it in 50 or 100 foot lengths, but if you want a way to have 10 feet of it always at hand, and also support a good cause, the Veteran’s Museum (Veteran's Museum) sells handsome braided paracord bracelets with Fastex buckles (although I haven’t checked to see if they’re using true military issue paracord).
Synthetic wheel bearing grease
You don’t really need the synthetic version, but it’s not that much more expensive. On an extended trip you’re likely to have numerous opportunities to use proper grease—on wheel bearings, CV joints, bushings, leaf spring pads, etc. A dab of it smeared on the back of disc brake calipers will stop squealing, and, well . . . it’s grease. You’ll find lots of other uses for it.
Graham mentioned this product, which used to be common but is rarely employed any more. Too bad, because it’s excellent for preventing threaded parts that need to be unthreaded now and then from rusting or otherwise locking up—especially threaded parts constantly exposed to road grime and moisture. Wheel lug threads are a perfect example, as are tie rod ends.
And, yes: WD-40
Did you know the name means “Water Displacing,” and the “40” refers to the number of unsuccessful formulas before they hit on the right one? There are actually a number of decent spray lubricant/water displacers on the market; a can of any of them is a must.
In a perfect world we’d always have the correct glue or sealant or tape to properly repair a broken component. Alas, such is not always the case. Ergo, a few suggestions from our panel on bodge substitutes.
Just weeks ago Jake successfully sealed a leaking radiator using the prosaic but effective two-egg procedure. Just dump the whites from a couple of eggs (yolks won’t hurt but they’re superfluous) in the filler cap (making sure the pressure has been relieved). The hot water cooks the whites, and they migrate naturally toward the leak. Duncan reports that pepper works well too. Add some mushrooms and you’ve got an omelette.
Duncan notes that repair patches and glue for inner tubes work just as well on radiator hose, although he recommends reinforcing the patch with duct tape or something similar. He also suggests a fix I think I first read about in the classic Land Rover manual Working in the Wild: If your alternator brushes go bad, remove the carbon rod from the center of a dry-cell battery and carve new ones. I simply must try that one some time. On the other hand, I’m intimately familiar with a ubiquitous African fastener Duncan mentions: leggans—cut strips of automotive inner tube. (I was delighted to learn his term for them—I’ve always called them “cut strips of automotive inner tube.”) The ultimate in recycled cordage, leggans can easily be made 20 or 30 feet long simply by slicing the inner tube in a spiral. When wrapped tightly and tucked under itself, it binds naturally and doesn’t require a knot. Anyone who’s been in the bush anywhere in Africa has seen monstrous loads secured effectively with this homemade elastic cinch strapping.
I could have collected bodge-repair ideas for weeks, but for now I’ll wind up with a habit I’ve cultivated for years. Friends have at times noted with amusement that I always use Grade 8 bolts and nuts (or the equivalent Grade 10.9 in metric) to mount even the most modest accessories—radios, fire extinguishers, air compressors, driving lights, and more. My reasoning is this: If I ever need a bolt or nut to replace a missing or broken one on a critical component, and I don’t have the correct one in my spares kit and need to cannibalize something, I can be sure of having a selection of high-strength potential candidates close at hand. Meanwhile, I can be absolutely certain my fire extinguisher and radio aren’t going to fall off.
Oh . . . okay. Duty compels me to include just one more. Jake finished off his list with the following note: “I discovered that Keystone Light beer makes a good emergency lube for a sticky Hi-Lift Jack.”
Comment would be superfluous, except to mention that lubing a Hi-Lift jack is absolutely the best use I can think of for Keystone Light . . .
Fit to be tied: Tie-down torture tests the metal of Expeditionware Transport Loops
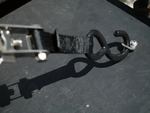 I’m never sure which alarms me more: a vehicle loaded with completely unsecured cargo and equipment, or one loaded with cargo and equipment secured poorly. After all, the former implies simple ignorance on the part of the owner, and ignorance can be overcome with education. But the latter implies some rudimentary level of awareness—and then a complete failure to do the simple arithmetic that will tell you what will happen to the 30-pound Hi-Lift jack bungeed to your front brush guard should you be, say, rear-ended at a stoplight. No, I am not making this up, and yes, I checked. Two neatly wound bungee cords comprised the total attachment of that jack to that brush guard. I’ve seen another Hi-Lift bungeed to a very well-constructed internal roll cage (talk about Manichaean reasoning), and uncounted tool boxes, fridges, and Pelican cases all held down by what are, let’s be frank, glorified rubber bands.
 I’m never sure which alarms me more: a vehicle loaded with completely unsecured cargo and equipment, or one loaded with cargo and equipment secured poorly. After all, the former implies simple ignorance on the part of the owner, and ignorance can be overcome with education. But the latter implies some rudimentary level of awareness—and then a complete failure to do the simple arithmetic that will tell you what will happen to the 30-pound Hi-Lift jack bungeed to your front brush guard should you be, say, rear-ended at a stoplight. No, I am not making this up, and yes, I checked. Two neatly wound bungee cords comprised the total attachment of that jack to that brush guard. I’ve seen another Hi-Lift bungeed to a very well-constructed internal roll cage (talk about Manichaean reasoning), and uncounted tool boxes, fridges, and Pelican cases all held down by what are, let’s be frank, glorified rubber bands.
Bungees have their uses, but heavy cargo in an overland vehicle should be secured with ratchet straps capable of withstanding the forces generated should you experience an unplanned encounter with Isaac Newton. Anything much heavier than a sleeping bag can cause injury or worse in an accident or rollover. (Come to think of it, I wouldn’t want to be clobbered by my 18-pound Butler sleeping bag . . .)
Decent ratchet straps are available at any hardware store. But very few, if any, vehicles come from the factory with tie-down points strong enough and numerous enough to anchor those straps. It’s almost always up to the owner to add proper loops or eye bolts. The conundrum of where to locate them is rarely solved permanently. A few items such as the fridge might have a more or less permanent location, but the distribution of other gear is subject to change, and to the addition of new gear. Bolt in too many tie-down loops and they can be almost as much a hindrance as a help to properly securing stuff. Adjustable rails such as those from Mac’s Custom Tie-Downs add versatility; the anchor plate systems from the same company, which leave only an unobtrusive rounded base when not needed, are useful as well. But both of these need a fair amount of space to install.
A few years ago, while looking for tie-down loops for the rear of my FJ40, I found the Ring Products Transit Loops at Expedition Exchange. The stainless-steel loops were originally designed to be attached to motorcycles to provide easily accessible points on which to hook tie-down straps when transporting the bike on the trailer or in a truck. Lightweight and unobtrusive, they obviated the need to loop cinch straps awkwardly around handlebars or luggage racks. However, with my FJ40 in mind, I realized they looked just the right size to bolt down on top of the join between the body tub and hardtop, using the numerous existing 10mm bolts.
Indeed, such proved the case, and a half dozen of the rings gave me a solid perimeter tie-down system. I added a few more on the wheel wells, then started looking at our other vehicles and realizing there were a nearly infinite number of places the little rings could be utilized to secure a nearly infinite number of items. They could be installed in very tight spaces, and needed only a single 1/4-inch hole to mount. Visually, a pair didn’t look like overkill when securing something as small as a pack of road flares (with a bungee—a proper use for one), but four of them would lock down an Engel immovably.
And then the company went out of business. Damn.
I moved on to other tie-down systems for other projects—but how I missed those versatile little rings.
The fellows at Expedition Exchange apparently shared my thoughts, because after trying in vain for years to track down the Ring Products company or principals, they decided they’d exercised due diligence—and had a leftover reproduced at a local machinist. Skimming the EE website a few months ago, I noticed the newly introduced Expeditionware Transport Loops. Woohoo! I immediately ordered some to look at, and found them to be apparently exact copies. Excellent.
However, as I examined the new loops I found myself, for the first time, wondering about the ultimate strength of such a compact fitting. I’d always assumed that, since four of the originals were designed to hold down a motorcycle during road transport, they were certainly strong enough to secure a fridge or a Pelican case full of tools. But now I was curious about their limits.
 With a loop in hand, I looked around our shop and carport for a way to put it to the test. I had neither a strain gauge nor a scale sufficient to register the several hundred pounds I assumed the loop would take before it failed. Bolt it to one of the steel roof beams in the carport and hang successive weights off it? Perhaps, but how to suspend 400—or 600 or 800—pounds in successive increments? Hook one between two Land Cruisers and try to pull it apart? But that wouldn’t tell us what the failure point was, and sounded like a procedure that would wind up either as an object lesson at the next Overland Expo, or a feature on YouTube.
But, hmm . . . the Land Cruiser. I looked at the rear bumper/tire carrier on the FJ40, specifically at the stout, one-inch-thick shackle mounts on either corner. Then I looked at the Hi-Lift jack nearby. That might do . . .
Using a grade 8 bolt and some graduated washers, I affixed the ring to the shackle mount via the smaller of its two holes. Then, with a steel quick-link connector through the larger hole, I attached the ring to the slot on the bottom of the Hi-Lift’s tongue, which I’d position just above the shackle mount.
Now I had a mechanism, but I still didn’t have a means of measuring the stress on the ring. Given that my FJ40 weighs a bit over 4,000 pounds, I decided rather arbitrarily that if I could lift one rear wheel off the ground—or even come reasonably close to doing so—the Expeditionware Transport Loop would have proved its mettle as far as I was concerned. I donned a heavy Carhart jacket, gloves, and safety glasses in case the ring exploded and flung bits of stainless steel hither and yon.
I began working the Hi-Lift’s handle and the loop took up strain. The assembly started to emit ominous metallic creakings, and for the first time I begin to wonder if this was a good idea. How could I expect a tiny ring a few millimeters thick to lift a corner of a 4WD vehicle?
 The bumper rose, and the right rear leaf spring started to flex. Now, if I peaked around the Hi-Lift’s main beam, which I was keeping between me and the poor little ring, I could see the latter flattening. Was there some stretching going on as well? The sidewall bulge came out of the right rear tire as the bumper continued to rise with each stroke of the jack handle, but it remained planted on the ground. Now I could clearly see the large hole in the Transit Loop elongating. More creaking, and a ping or two from somewhere in there.
But then—the tire was a few millimeters off the ground. I could spin it with a boot. A single Transit Loop had successfully lifted the corner of an FJ40 off the ground—and one equipped with a massive Stout Equipment bumper/tire rack at that.
I have no way of knowing exactly how much strain the loop was withstanding at the end, but I’m certainly convinced that, employed in suitable numbers, the Expeditionware Transit Loops are more than up to the job of safely locking down the heaviest fridges, tool boxes, and equipment cases.
At nine bucks each you can afford to buy a bunch. I guarantee you’ll find uses for as many as you have.
Unless you’re still convinced a bungee or two will suffice. Expeditionware Transport Loops

Book review: Tom Sheppard’s Four-by-four Driving (revised 2nd edition)
 Quick: How many four-wheel-drive systems can you name off the top of your head? Let’s see. Just from Jeep we have Quadra-Trac and Command-Trac—oh, and Selec-Trac. And, um, Quadra-Drive, and Freedom-Drive. BMW has xDrive; Mercedes counters with 4Matic. Toyota has ActiveTrak; Nissan offers the rather unimaginatively labelled All-Mode 4WD. That’s just five manufacturers. How many four-wheel-drive systems can there possibly be? Read Tom Sheppard’s Four-by-four Driving and you’ll learn that, once the marketing hype is peeled away, there are basically just three (with one arguable exception—you’ll have to read the book to find out which). The profusion of trademarked drivetrains are all just slightly tweaked variations on a trio of themes.
 Quick: How many four-wheel-drive systems can you name off the top of your head? Let’s see. Just from Jeep we have Quadra-Trac and Command-Trac—oh, and Selec-Trac. And, um, Quadra-Drive, and Freedom-Drive. BMW has xDrive; Mercedes counters with 4Matic. Toyota has ActiveTrak; Nissan offers the rather unimaginatively labelled All-Mode 4WD. That’s just five manufacturers. How many four-wheel-drive systems can there possibly be? Read Tom Sheppard’s Four-by-four Driving and you’ll learn that, once the marketing hype is peeled away, there are basically just three (with one arguable exception—you’ll have to read the book to find out which). The profusion of trademarked drivetrains are all just slightly tweaked variations on a trio of themes.
Few people on earth can boast the expedition travel experience of Tom Sheppard, starting a decade before he led the 1975 Joint Services Expedition west-east crossing of the Sahara, and leading to more recent explorations of the most remote corners of Algeria. Since the vast majority of Tom’s journeys have been accomplished via a solo vehicle—with himself frequently the sole participant—you can bet his expertise in four-wheel-drive technique and equipment reflects the utmost attention to detail, an attention that recognizes the dire consequences of becoming irretrievably stuck 150 miles off-tracks in the Sahara. It’s likely no one short of a test pilot delves as thoroughly into the minutiae of his craft—and Tom Sheppard was a test pilot before he took up earth-bound journeying.
 Click to enlargeFour-by-four Driving is frequently assumed to be a condensed version of Sheppard’s legendary Vehicle-Dependent Expedition Guide; in fact it is an almost entirely different book, and should be considered a prerequisite to the latter. Four-by-four Driving teaches you what you need to know—in terms of vehicle systems and driving skills—to fully exploit the awesome depth of expedition travel expertise contained in VDEG.
Four-by-four Driving reads less as text than as though Tom were an earnest but personable professor—or squadron leader—talking to you from the front of a classroom, pointer whacking diagrams on a flip-chart. And, as in a class, you’re expected to pay attention. Try to read section 2.3 without first reading section 2.1 and you’ll not only wind up confused, you’ll be parenthetically reminded of the material you should have already covered. If Four-by-four Driving were less engagingly written the depth of explication could have tipped over into pedantry, but, inevitably, just at the moment your eyes begin to cross with the details of, say, electronic differential locks, the following section will be titled something such as We have ways of making you torque, and you smile and dive back in.
A bit less than the first third of Four-by-four Driving covers four-wheel-drive systems (and this is where much of the current edition’s revisions necessarily reside). The next fat third discusses driving techniques and recovery, and here Tom’s huge experience shines, especially regarding his overriding mantra of mechanical sympathy—the constant awareness of the vehicle’s strengths and limitations, vital to ensure one not only makes it through difficult terrain, but all the way back home. This section alone is worth the cost of the book, and even if you consider yourself an expert driver, I guarantee you’ll learn something. The last third, titled Expedition basics, is just that—an introduction into material covered in much more depth in VDEG.
 Click to enlargeIt feels monstrously presumptuous to point out shortcomings in any work by a man whose books are the bibles of overlanders the world over, but a book review without critique would be simply an ad. There are a few quibbles, albeit mostly due simply to limited space. The section on winching, for example, is (as stated right up front by the author) brief in the extreme, and inadequate as anything but familiarization in preparation for finding real instruction. The discussion doesn’t even mention synthetic winch line, which could fairly be considered a revolution in the application of the equipment. Similarly, the Hi-Lift jack, an expedition mainstay, merits barely a paragraph—and the photo of one in use shows the operating handle positioned ideally to cleave the skull of the user from the chin up should he lose his grip.
As far as I can tell reading back through my jealously hoarded collection of Sheppard’s articles (which date to a 1984 Car magazine piece testing a new 110 pickup in Algeria), he has rarely if ever equipped his vehicles with either a winch or a Hi-Lift, so perhaps this brevity is simply Tom’s own nod to his lack of complete intimacy with the devices. (On the other hand, I still plan to someday slavishly copy his cunning bespoke wheel claw adaptor, which allows easy raising of one tire out of deep sand using a simple bottle jack.)
Tom includes an comprehensive section (8.2) on tires and tire selection; however, I would like to have seen a primer on repairing tubeless tires with plugs—an easy and fast method to get back under way after experiencing what is by far the most common cause of breakdown. Also, Tom still seems to be under the impression that it takes a big, fast volume of air to reseat the bead on a tubeless tire. I’ve successfully accomplished it with very small compressors.
Okay, duty done—I’ve critiqued. The simple fact is, whether you’re an accomplished overlander or have just moved from your Corolla into a Land Cruiser and are wondering what that extra gear lever does, Four-by-four Driving is an absolutely essential volume for any expedition library—as well as a delightful glimpse into the persona of one of the overlanding world’s legends. You can order it directly from its author at Desert Winds Publishing, here: Desert Winds Publishing
How do I find information for shipping a bike or vehicle overseas?
What are some resources for someone wanting to ship a Jeep overseas, such as China or Australia?
- David T., USA (via email)
Long Term Review: First Gear Monarch motorcycling jacket and Escape pants for women
 A couple of years ago I conducted an extensive review of armored motorcycling jackets suitable for touring and off-pavement riding. The selection ranged from a budget, Chinese-made, $300 offering from Fieldsheer to an outrageously exquisite $1,300 Rukka from Finland, presumably sewn by organically grown virgins in Helsinki.
A bit up from the bottom of the pack pricewise was a First Gear Rainier, a $400 jacket made in Vietnam. It stood out in value with its combination of good quality and looks, comfortable armor, and effective waterproofing. Based on those initial impressions, Roseann decided to order a women’s Monarch jacket and Escape pants from the company. She’s now had two years and two motorcycles worth of time wearing the set, and we decided to do a long-term update.
An adventure-motorcycling jacket must strive to combine several features that are mutually exclusive. It must be warm in cold weather and cool in hot weather. It must be able to resist not just rain, but rain driven at 60mph or more, while allowing flow-through ventilation in sunny conditions. It must protect the wearer against abrasion and impact forces in a laydown on a trail or a more serious accident on pavement, while retaining freedom of movement and comfort, and avoiding bulk. Finally, it’s nice if the package looks good.
Obviously no jacket combines all these features perfectly. A Motoport Ultra II jacket in that first test boasted unequalled crash protection, but was so bulky that, as I mentioned at the time after looking in a mirror at my bloated profile, “Entomologists will think you’re pupating.”
On the other end of the fashion scale was the legendary waxed-cotton Barbour International, which lends anyone who dons it a rakish hint of Steve McQueen but which lacks any armor whatsoever. So picking a motorcycling jacket is a matter of deciding on one’s own priorities, up to and including style, while also keeping in mind keeping one’s mortality and fragile, evolutionarily compromised anatomy.
I was leery about including First Gear at the time of that review, since the company had been through several changes of ownership. But the current management, motorcycle equipment distributors Tucker Rocky, apparently had cracked the whip and gotten a handle on quality control. Roseann’s experience seems to confirm that—her jacket and pants have held up well, showing no fraying stitching, failing DWR (durable water-repellent) coating on the exterior, or even pilling on the fleece neck lining. Only the slightest wear on the inside of the knit cuffs is apparent.
In terms of performance, the rundown she gave me while I took notes adds up to a grade of about a solid B.
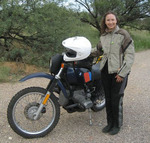
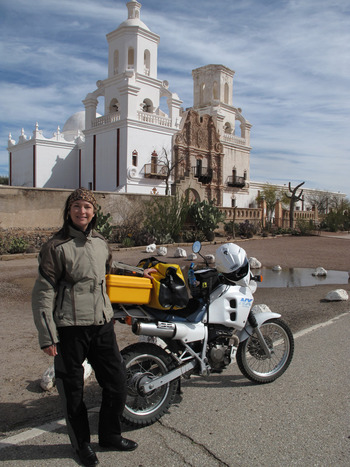 The Monarch and Escape on its first tour, two years ago, during a March southern Arizona dirt-and-pavement weekend.First, she noted that the jacket really does seem to be cut for women in the shoulders, arms, and torso; it’s not merely a men’s small masquerading as gender-specific.
Significantly, she mentioned that she’s able to forget the Knox CE-rated shoulder and elbow armor while riding; some armored jackets I’ve worn (such as that Motoport) never let you do so. Her only note was that the jacket’s arms fit somewhat loosely on her 115-pound frame even with the two Velcro cinch straps pulled all the way tight, resulting in some flapping at speeds over 110 mph. I think she was kidding about that last bit.
The pants, while also very comfortable around their armored hips, weren’t quite so forgettable in the knees: When in a normal riding position, Roseann found she needed to slightly hitch up each leg to arrange the knee armor comfortably on top of her knee rather than binding below it. This might be a personal fit issue, but it points out the importance of trying on armored cycling clothing before buying it if possible. Fortunately the knee issue is a small and correctable one.
Roseann rated ventilation in the Monarch as “adequate.” A seven-inch zippered vent in front of each shoulder lets in the breeze; corresponding vents in back let it out again. Small vents behind each sleeve add a bit of air movement up the arms. Considering Roseann’s Arizona-native tolerance for heat and preference for riding in the desert summer, I’d guess her “adequate” means ventilation in the Monarch could be slightly better.
There are two approaches to the conundrum of rain protection versus ventilation in motorcycling jackets. One is to make an outer armored jacket of breathable or even mesh material, and employ a separate inner waterproof (and frequently insulated) shell for dryness. This works well for mostly dry environments, but the waterlogged outer shell can become annoying if 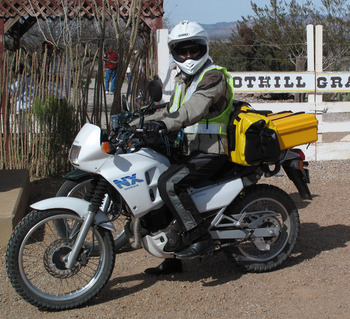 Lacking sufficient reflective tape, Roseann opts to wear a safety vest when riding pavement; the pants' knee pads are a little low, and have to be manually adjusted each time the bike is mounted.experienced too frequently.
The other approach is to make the outer shell waterproof, and ventilate it as well as possible with covered or waterproof zippers. The latter is the approach First Gear took; the Monarch is waterproofed with an interior coating of minimally breathable polyurethane (dubbed “Hypertex”) and an outer DWR coating.
Nevertheless, the company includes an inner shell incorporating a three-layer waterproof laminate (and a fleece lining). The outer jacket on its own has proven completely rain-tight so far. The inner jacket is stylish enough to be worn on its own, a good addition to kit for long journeys where you might need a jacket for visiting museums or restaurants.
With nary a spill to her credit, Roseann is in no position to rate the crash effectiveness of the Monarch and Escape. On paper, however, the specs look good. Both jacket and pants are sewn from 600-denier nylon, a step above the 500-denier fabric generally accepted as the minimum for adequate abrasion resistance. Kevlar underlay at knees, shoulders, and elbows should help prevent fabric tearing in an accident (Kevlar fibers resist shearing but, surprisingly, nylon is more abrasion-resistant). The CE-rated (Conformité Européenne) shock-absorbing armor is generously sized in the same three areas; a simpler closed-cell-foam pad adds some protection on the back.
On details and convenience, Roseann had nothing but praise. Pockets on both jacket and pants are plentiful, easy to access, and well-sealed with storm flaps or YKK water-resistant zippers. An MP3/phone pocket is completely protected inside. Jacket and pants zip together, enhancing both draft protection and safety in a fall and slide on pavement (when an unsecured jacket can ride up and expose skin).
All in all, Roseann’s experience with the Monarch and Escape seems to have reinforced the favorable impression my brief time with the Rainier left with me. First Gear has produced an affordable, yet comfortable and protective set of outerwear that should hold up well to extended riding.
Even if it’s not sewn by organically grown virgins in Helsinki.
* * * * * * * * * * *
First Gear Monarch Jacket, msrp $470 (5-year warranty, 2-year crash protection policy). Three colors, sizes XS-XXL. Men's equivalent: Teton Jacket. Now includes LED light that clips on back.
First Gear Escape Pant, msrp $380 (5-year warranty, 2-year crash protection policy). Black, sizes 6-18. Also in Men's. Now includes inner liner pant.
The Myth of Compression Braking
 Recently a remark by an acquaintance triggered me to dredge up a bit of knowledge I came by ages ago, during a short stint driving a diesel tractor/trailer rig for J.C. Penney between Phoenix and Tucson. The fellow, a UK resident, had recently sold his mid-90s Land Rover Discovery V8 with a five-speed manual transmission, and purchased a similar Discovery equipped with a 200 Tdi turbodiesel engine, also with a five-speed. Besides instantly doubling his fuel economy and then some, he’d noticed something else and mentioned it in an email. “I might be daft,” he wrote, “but I swear the petrol engine had better compression braking. But I know that’s impossible. It only had 9:1 compression, and the Tdi is 19:1. Something else must be at work.”
I wrote him back a short reply: “That’s because diesel engines have no compression braking.” Which caused him to respond, “Now I think you’re daft.”
My next email was much longer, and read something like this:
First, the term “compression” braking is a misnomer. While there are several forces at work (including simple internal friction) when a driver lifts off the throttle in a vehicle and the engine slows it, the force often referred to as compression braking is more accurately called vacuum braking. It occurs in a gasoline engine because the throttle, i.e. the gas pedal, works by regulating the amount of air entering the engine—the fuel-to-air ratio is kept relatively constant. The air flow is controlled by a rotating plate or series of plates in the fuel injection’s intake system (or, in older vehicles, in the carburetor). When you lift off the gas pedal, that plate closes off the intake nearly completely. The engine, which is still turning at speed via its connection to the turning wheels, then has to suck air past the closed plate, and that retards the engine, and that is what allows our manual-transmission, gasoline-engined vehicles to creep down quite steep inclines in first gear low range, without the need for brakes.
A diesel engine is different. In a diesel, the throttle controls the amount of fuel being injected into the engine, rather than the air flow. The air intake system in a diesel is always fully open. Thus, when you lift off the pedal in a diesel-engined vehicle, the fuel supply is reduced, but there is no vacuum effect to slow the engine. Thus, no “compression” braking.
You might ask, but what about the air still being compressed in each cylinder as the piston rises on that 19:1 compression stroke? Doesn’t that retard the engine? The answer is, yes, it does; however, once the piston passes top dead center, that compressed air is still pushing against the piston, only now it’s trying to speed up the engine, even without enough fuel injected to produce real power via combustion. So the two forces essentially cancel each other (the same effect applies to gasoline engines).
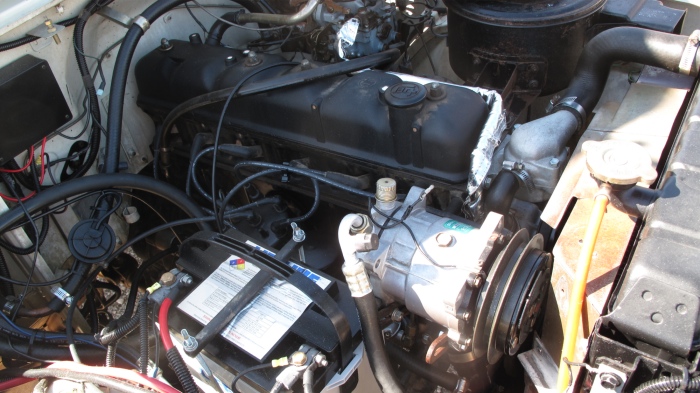
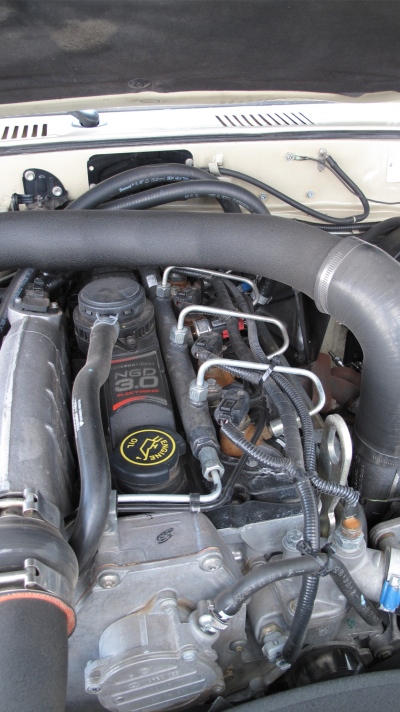 Opening photo: A 3.8-liter gasoline engine. This photo: A 3.0-liter Turbodiesel. Which one has more engine braking?
This lack of what we really should just refer to as engine braking is why many big diesel trucks, such as that J.C. Penney tractor/trailer rig, employ what is known generically as a Jake brake, after Jacobs, the company that originally manufactured the device. A Jake brake opens the exhaust valve on each cylinder at the top of the compression stroke, so the compressed air is released out the exhaust (with a machine-gun-like hammering that prompts communities to post those signs prohibiting their use within urban areas). That leaves just the compression stroke working to retard the engine—so a diesel truck with a Jake brake really does have compression braking.
The exhaust brake is another, quieter (although generally less effective) method of engine braking on a diesel truck. This device partially closes off the exhaust, so the air pushed out through the exhaust valve on the exhaust stroke is restricted, slowing the engine and the vehicle. Some trucks now employ both Jake and exhaust brakes to maximize efficiency while reducing noise.
So that’s why an engine with more compression can have less “compression” braking.
I checked: Unfortunately, Jacobs doesn’t make a model for the 200 Tdi . . .
A home in the bed of your truck: Four Wheel Campers
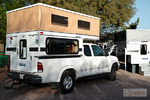 FWC has been an OX sponsor since the beginning.
Over the years, we have been through a lot of vehicle-based camping setups, beginning with a couple of sleeping bags rolled out on the roof rack of my FJ40. We’ve gone minimalist with backpacking tents and stoves, luxurious with family-sized cabin tents and padded cots. We’ve tried roof tents, trailers, truck-bed mattresses. For some time we owned a WilderNest, a pickup shell with a cunning roof that flipped sideways to turn into a bed, with an enormous tent erected semi-automatically above it. I remember spending a mostly sleepless night trying to brace the frame of that spinnaker-like tent in a 40mph Sea of Cortez Norte. It was never quite the same afterward. Of all the setups that have come and gone, the one about which we wax most nostalgic is our Four Wheel Camper. Mounted first on a 1990 4WD Toyota pickup powered by a willing but overmatched 22RE four-cylinder, then on a 2000 4WD Tacoma with the 3.4-liter six (60 percent more power and better gas mileage), we put over 150,000 miles on that camper, using it as a mobile base for dozens of freelance magazine assignments and several books.
At the time, we lived on a wildlife refuge seven miles down a rough dirt road, so even driving to town for groceries gave the rig a workout. Nevertheless, the sum total of my repairs to that camper was a rebuild of the door, which had begun to sag and needed reinforcing.
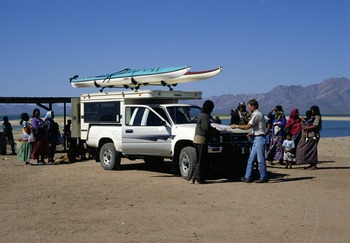 Our FWC in the 1990s, Punta Chueca, Sonora, Mexico, visiting Seri Indian country.We loved the FWC’s 30-second transformation into a full-standing-headroom camper with queen-sized bed, fridge, sink, and stove, and a comfortable settee. Sit-down snack at a rest stop on a highway trip? Easy. A couple of years into ownership, we experienced another Sea of Cortez Norte more furious than the first—and slept like babes. The pop-up roof didn’t even quiver. Despite the comfort and strength, the camper’s relatively feathery, aluminum-framed 700 pounds barely taxed the truck, and never kept us from reaching secluded backcountry hideouts.
Gripes? Sure, we had a few. The water tank was too small and mounted too high. The main cabinet doors were flimsy sliding panels of 1/8th-inch plywood. And the three-way fridge gave up even slightly cooling its contents in any ambients over 90ºF. But they were tiny gripes compared to the consummate ease of pulling into a camp spot and having a home ready in less than a minute.
I write this up front so you don’t think what follows is some slavish encomium concocted in trade for sponsorship or ad revenue: We developed our enthusiasm for Four Wheel Campers the old-fashioned way—at full retail. So we jumped at the chance to make a second pilgrimage to the factory in Woodland, California, to visit with owners Tom and Celeste Hanagan, who’ve become good friends over the years. (Alas, this time we weren’t there to pick up a new camper.)
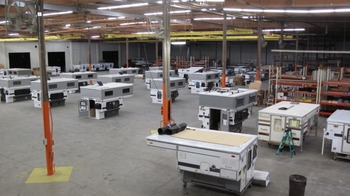 New factory floor in Woodland, CA. Older models belonging to customers, in for modifications or repairs after accidents, are in the lower right.Actually, it’s a different factory, significantly larger than the old one. A good thing, it seemed, because the space was clearly being utilized to the fullest already. A triple row of campers, aligned as if by laser, stood waiting for successive construction steps, from welding of the bare, elegant aluminum frame to final touches in flooring and lighting. There’s now more room for the ancillary shops such as upholstery and carpentry, which were formerly wedged into corners.
Most interestingly, I got an inside look—literally—at the evolution of the Four Wheel Camper under Tom and Celeste’s guidance. The small, high-mounted water tank I mentioned on ours? It’s been nearly doubled in size (now 22 gallons) and moved to the floor under a settee at the front of the camper, perfect for weight distribution. The cabinets now have proper hinged doors. The fridge option now includes a compressor-driven unit guaranteed not to go on strike in summer. And the corners of the main entrance door have been radiused to add significant rigidity.
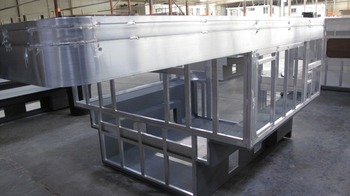 The amazing aluminum frame, a work of art.There was more. The roof—which on ours comprised three sections, yet never leaked despite the fact that I through-drilled it to mount racks for our sea kayaks—is now a one-piece, screw-free aluminum sheet that can’t leak. Much of the interior plywood is now superb multi-laminate European birch; exterior insulation is now rigid foam rather than fiberglass. Appliances have been upgraded, headroom augmented without changing the travel profile, the dining table is now a portable unit that can be used outside—nothing seemed to have escaped scrutiny and improvement.
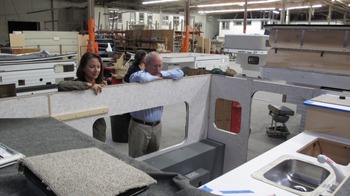 Tom and Roseann looking at an interior under construction.A lot of those improvement can even be applied to older Four Wheel Campers. In a corner of the factory was a cluster of customer-owned campers in various stages of repair and renewal. One vintage model at least 20 years old was receiving a new one-piece roof; others were having skins, water tanks, upholstery, or appliances replaced and updated. It was a reminder that a Four Wheel Camper is a genuine investment—as if prices on the used market weren’t reminder enough. We sold ours (to pay off our land) for 85 percent of what we paid for it new, despite all the use and mileage.
Ack. I just reminded myself that we sold it. Take my advice: If you buy one, keep it. Who needs land if you have a home on wheels?
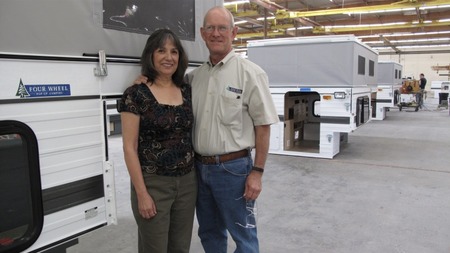 Tom and Celeste Hanagan, the power duo behind the quality and success of Four Wheel Campers.
Hint: When using “Search,” if nothing comes up, reload the page, this usually works. Also, our “Comment” button is on strike thanks to Squarespace, which is proving to be difficult to use! Please email me with comments!
Overland Tech & Travel brings you in-depth overland equipment tests, reviews, news, travel tips, & stories from the best overlanding experts on the planet. Follow or subscribe (below) to keep up to date.
Have a question for Jonathan? Send him an email [click here].
SUBSCRIBE
CLICK HERE to subscribe to Jonathan’s email list; we send once or twice a month, usually Sunday morning for your weekend reading pleasure.
Overland Tech and Travel is curated by Jonathan Hanson, co-founder and former co-owner of the Overland Expo. Jonathan segued from a misspent youth almost directly into a misspent adulthood, cleverly sidestepping any chance of a normal career track or a secure retirement by becoming a freelance writer, working for Outside, National Geographic Adventure, and nearly two dozen other publications. He co-founded Overland Journal in 2007 and was its executive editor until 2011, when he left and sold his shares in the company. His travels encompass explorations on land and sea on six continents, by foot, bicycle, sea kayak, motorcycle, and four-wheel-drive vehicle. He has published a dozen books, several with his wife, Roseann Hanson, gaining several obscure non-cash awards along the way, and is the co-author of the fourth edition of Tom Sheppard's overlanding bible, the Vehicle-dependent Expedition Guide.

