
Overland Tech and Travel
Advice from the world's
most experienced overlanders
tests, reviews, opinion, and more
The Holy Grail of factory tool kits
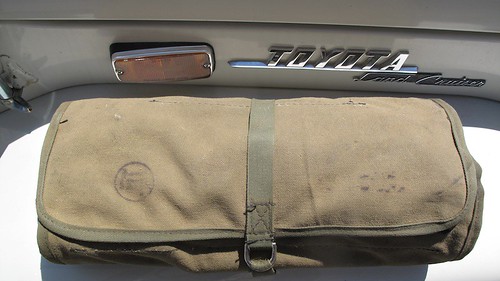
Who remembers when new four-wheel-drive vehicles came with any factory tools beyond a cheesy scissors jack and a dog-leg lug-nut wrench, and maybe an OnStar account?
It wasn’t always that way. In the halcyon days of Series II and III Land Rovers and 40-Series Land Cruisers, it wasn’t considered a sign of weakness or a failure of the accounting department to acknowledge that hard-working vehicles needed maintenance and repair now and then, and it was presumed that the owners of those vehicles would be doing a good bit of that work themselves. A decent tool kit was a selling point that actually showed up in ads. (The only automotive corollary I can think of is the exquisite trunk-lid tool kits that used to come with high-end BMW sedans. I'm not sure how many of those saw any owner use . . . )
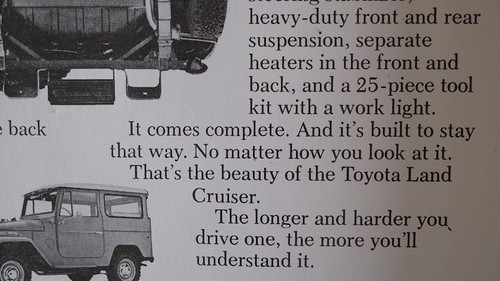
When I bought my 1973 FJ40 Land Cruiser, the excellent factory tool kit was still in place and complete. It included screwdrivers, wrenches, a spark-plug tool, and more, in a vinyl roll that stored under the driver’s seat. Sadly I can’t furnish a complete inventory or photo, because it was stolen when I stupidly left the vehicle unlocked one night. Since this was before eBay and Craigslist, I simply fumed and vowed to find another some day. It’s not like I didn’t have plenty of other tools, but the Land Cruiser just felt incomplete without its own kit.
Then, about ten years ago, I happened to stop by the shop of the local lord of Land Cruiser used parts, set amidst a sprawling three-acre compound of partially disassembled vehicles. An old shipping container next to the shop was a sort of trove of odd and rare bits. As we were looking for a turn signal switch to fit my 40, Tim said, “Aren’t you interested in factory tool kits?” I allowed as to how I was, and his eyes twinkled. “Then I have something for you.” He ducked into the container and brought out a roll—oiled canvas rather than vinyl, redolent of the military surplus store I worked at after high school—and laid it on the workbench. It seemed fatter than I remembered my old kit, and when he unrolled it I saw why.

“Never seen another quite like it,” said Tim. And neither had I.
Nestled in stitched pockets was a superb selection of Toyota-branded tools, still sticky with cosmoline preservative. In addition to the screwdrivers and wrenches I remembered from my kit, this one added a wood-handled ball pein hammer, pliers, a crescent wrench, a compact grease gun, and, in a little pocket on the side, a plastic bag, still sealed, filled with a selection of spare fasteners: bolts, nuts, and washers, and a wheel stud. That last piece proved beyond doubt that someone who knew what was likely to go wrong in the bush had assembled this kit.
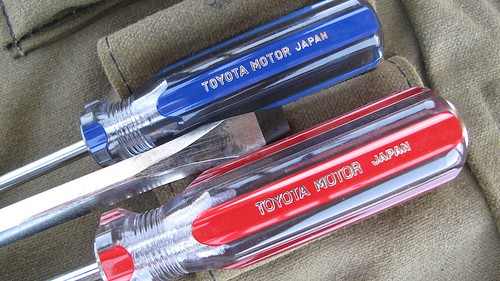
In true orderly Japanese fashion, a clear corner sleeve held a numbered content list.

One thing I’ve never been any good at is cool bargaining. I knew Tim already knew this, so I just sighed and said, “How much?” He named a price that was . . . high. Absurdly high. High enough that I would have been insane not to walk away and pick up an equivalent assortment from a Snap-on tool truck for the same price.
So I said, “Okay.”
At least now my FJ40 once again boasts its own proper set of branded tools.
That is, when I work up the nerve to bring them along. They’re worth too damned much to actually use.
 One thing that wasn't stolen from the original kit was the trouble light, stored in the glove box. Its 39-year-old bulb still works.
(Got a vintage - or otherwise - vehicle with a proper tool kit? Send me a photo.)
Insuring an older vehicle for overlanding outside the U.S.

Like you, I have an older vehicle that I've put a newer diesel engine in, and am hesitant to drive to Mexico without being able to get full coverage (ideally, an agreed amount policy). It seems that most companies that sell Mexican auto insurance (e.g., Sanborn's) won't provide full coverage for a vehicle older than 10 years (for some companies, 15). I'd like to drive my Land Rover to Mexico, but not if I can't get full coverage for it (not just liability). Any suggestions or advice (other than buy a cheap, newer vehicle)? Thanks.
We sold our FJ60 recently and are looking for a diesel pickup on which we'll put a Four Wheel Camper, so perhaps if we have Tom Hanagan at FWC plumb a toilet and make it a pass-through (which we'd like), we can qualify for better insurance.
Ditch the cigarette lighter
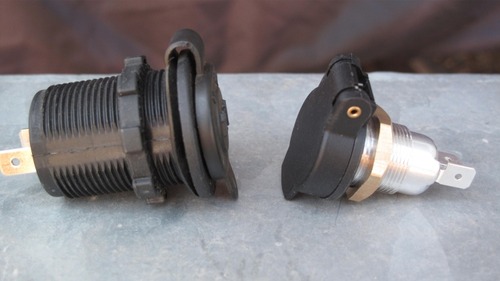 On the left, cigarette-lighter outlet: plastic body and lock ring, guaranteed-to-break rubber cover "hinge," press-fit back plate. On the right, German-made DIN receptacle: metal body, brass lock ring, rigid cover with spring-loaded hinge. The cordless automotive cigarette lighter was patented 90 years ago, and assumed its present configuration in 1956. I know for a fact that by 1960, car campers already had a range of 12-volt appliances from which to choose, such as the Boilmaster Junior Compact Kitchen coffee percolator featured in my old copy of The Ford Treasury of Station Wagon Living.
That means that for five decades those wishing to use their vehicles’ cigarette lighters for anything besides igniting a Pall Mall have put up with the “UL Standard 2089” 12-volt plug to try to get DC power to their portable percolators, tire pumps, GPS units, inverters—even their National Luna 74-liter double-door fridge-freezers.
Are we really that submissive to the dominant paradigm? If GM reintroduced front drum brakes and two-speed automatic transmissions would we all go, “Well . . . okay!” We’re talking the same era here.
Anyone who has ever used a standard auto lighter receptacle as a power outlet knows they’re garbage for that application. It’s impossible to tell when the positive post in the center of the male plug makes contact with the positive tab at the back of the female unit, and—especially if your appliance’s plug doesn’t have a spring-loaded post, or if the spring has seized, as most do after about two months of use—contact can be lost with no warning except when you stop for a cold Coke three hours later and find only tepid Cokes in the fridge. Worse, the most common aftermarket cigarette-lighter-type “power outlets,” which many of us install to run extra equipment, are constructed with a plastic back plate for the positive contact that is a simple press fit into the plastic body. Push too hard on the plug and the whole back end of the receptacle pops off.
There’s a better way, and by this time European readers and a lot of American BMW GS riders will be nodding their heads knowingly. They’ve been happily using the DIN (Deutsches Insitut für Normung) 12-volt plug system for years. The DIN plug, while more compact than the cigarette lighter (11/16-inch mounting hole versus one and a quarter) is significantly more rigid and wobble-free. The dash (female) socket grips the positive post of the plug with spring-loaded fingers—push in the plug and it snaps home with an authoritative click. No risk of pushing too hard, no risk of accidental disconnection, even on the roughest roads.
After years of muttering and cursing, and a brief consulation with my friend Brian DeArmon, I finally made the switch, courtesy of our local BMW motorcycle dealer in Tucson, Iron Horse. It’s easy to do, although if you want to install a DIN outlet in a hole made for a cigarette lighter you’ll need to buy or fab a thin washer to reduce its diameter. On the dash of my FJ40 I decided to leave the old receptacle in place so I wouldn’t have to use an adapter when borrowing or testing appliances equipped with that plug. I had a perfect place just below the old receptacle to install a DIN unit, where my stock dome-light switch was located. Since I use a Hella map light for a dome light now I had no need for the switch, so I simply enlarged the hole and installed the DIN receptacle. For now I just siamesed the wires to both receptacles and use a single fuse, since I never run two heavy-draw appliances from the dash at the same time.
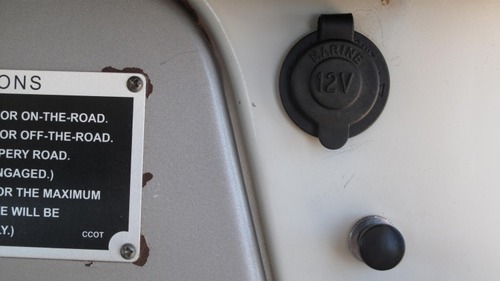 FJ40 dash with cigarette-lighter outlet, stock dome light switch underneath.
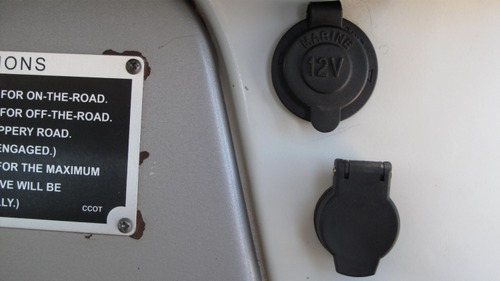 DIN receptacle in place, wired in parallel.
If you don’t have a BMW dealer nearby, you can get DIN plugs and accessories from a company called Powerlet. The standard socket is part #PSO-001, and there is a selection of plugs, including a nifty low-profile right-angle version. They even have a pretty decent-looking cigarette-lighter plug if you’re a fan of two-speed transmissions, or would like to leave one standard socket in the vehicle as I did.
Swapping plugs on your old appliances is easy, too. Some 12V fridges come with convertible plugs; a red spacer allows use with a cigarette lighter; remove the spacer for a DIN receptacle. It works okay, but switching to a DIN-only plug is more compact and stronger.
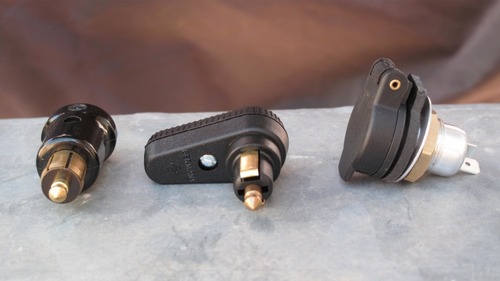 Straight and right-angle DIN plugs are available.As with many such simple and effective modifications, my only regret has been, why did I wait so long?
Historic bodge fixes: T.E. Lawrence
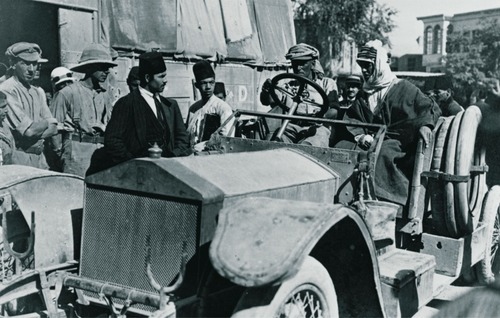 T.E. Lawrence, on right, enters Damascus in the Blue Mist.
Here’s a bit of history David Lean left out of his epic film Lawrence of Arabia: In addition to the camels T.E. Lawrence and his Bedouin allies used on their spectacular raids against Turkish outposts and railroads in what is now Saudi Arabia, Jordan, and Syria, Lawrence employed a fleet of automobiles.
An unabashed romantic, Lawrence was nevertheless also an utterly practical (and brilliant) military strategist, despite having no training whatsoever beyond the written accounts of historic campaigns he had devoured since childhood. He was the first battlefield commander to recognize and fully exploit the value of aircraft used in support of ground troops, and he pioneered aerial mapping techniques. His guerrilla tactics are still studied today by insurgents as well as counterinsurgents, yet at Tafileh in January of 1918 he proved himself equally capable of commanding a pitched conventional battle.
Lawrence also quickly realized that on the wide, flat deserts he had to cross with heavy loads of explosives and weapons, an automobile could cover ground much faster than a camel. After his stunning victory at Aqaba, he had the clout to request and receive a small detachment of armored cars, accompanied by automobile “tenders.”
But these weren’t just any automobiles. Lawrence’s desert raiding machines comprised nine Rolls Royce 40/50 Silver Ghost motorcars, including a personal vehicle he named the Blue Mist.
At the beginning of the war, Rolls Royce was already established as a maker of the finest automobiles, catering to the upper crust of society. But in those early days, such a reputation had as much to do with reliability and durability as it did luxury. In 1907 the company had entered one of its 40/50-horsepower models in the grueling Scottish Reliability Trials, and followed up the performance by driving the same car between London and Glasgow—27 times. The Autocar magazine declared it “the best car in the world”—still Rolls Royce’s motto a century later.
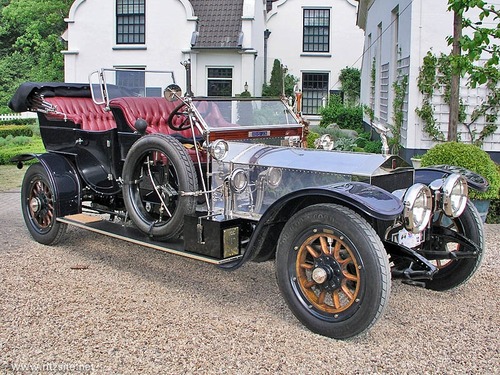 A Rolls Royce 40/50 Silver Ghost in more genteel surroundings. (Image courtesy www.ritzsite.nl)
That tremendous strength served Lawrence well in terrain and conditions far removed from what even Henry Royce had envisioned. In one passage from Seven Pillars of Wisdom Lawrence describes an exploratory excursion: “Their speedometers touched 65 mph; not bad for cars which had been months ploughing the desert with only such running repairs as the drivers had time and tools to give them.”
Alas, even the mighty Rolls Royce proved not completely immune to damage from constant, crushing abuse.
On September 16, 1917, Lawrence and a small team set out to demolish a railway bridge south of Amman, in what is now Jordan. The Blue Mist was “crammed to the gunwale” with explosives and detonators. While his companions, who had followed in another tender, engaged the Turkish post guarding the bridge in a brief but ferocious firefight, Lawrence coolly placed 150 pounds of charges in the bridge’s support spans, ignoring desperate signals from the two British officers supervising the cover fire that Turkish reinforcements were on the way. The explosion sent twisted shards of the bridge plunging into the ravine below, and further enraged the pursuing Turks.
And at that moment, as the group raced away from the rising smoke, one of the Blue Mist’s rear spring brackets snapped, dropping the body onto the tire and instantly halting forward progress. It was, as Lawrence later described it, the first and only time a Rolls let him down in the desert.
Anyone else would have simply abandoned the car, but Lawrence was loath to lose not only his faithful Blue Mist (“A Rolls in the desert was above rubies,” he wrote), but the extensive explosives kit inside. With the Turks perhaps ten minutes away, he and his driver (who was nicknamed “Rolls”) jacked up the car, and untied a length of wood plank kept with each car for deep sand recovery, with the idea of wedging it between the axle and chassis. It was too long, and “Rolls” estimated they’d need three thicknesses of the wood to support the car. They had no saw, but Lawrence solved the problem by simply shooting crosswise with his pistol through the plank several times in two places, until the board broke in three pieces. The Turks heard the firing and paused their pursuit, which lent Lawrence and “Rolls” time to rope the planks in place, using the running board as a mounting point, and make good their escape. Lawrence wrote:
“So enduring was the running board that we did the ordinary work with the car for the next three weeks, and took her so into Damascus at the end. Great was Rolls, and great was Royce! They were worth hundreds of men to us in these deserts.”
So, if you don’t already have them on board your own Rolls Royce, I suggest adding to your recovery kit one (1) wooden plank and one (1) pistol.
A legendary camp chair, resurrected
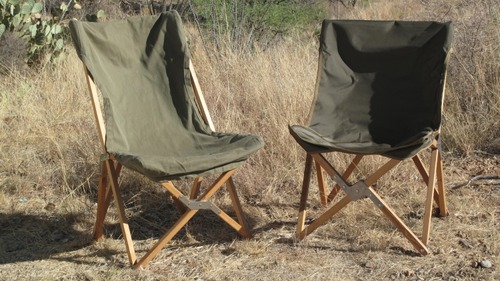 The legendary South African camp chair, left. Its offspring, right.About 20 years ago the owners of a well-known gun shop called Jensen’s, in Tucson, tried to branch out with a line of South African camping equipment: heavy canvas tents, folding sinks, cots, the works—in fact most of the stuff you can easily find today from importers such as Bundu Gear or Equipt. Sadly, Jensen’s was probably 15 years ahead of the curve. Cotton canvas was then considered hopelessly old-fashioned in the U.S., rather than being rightly regarded as a fabric that had stood the test of time and in fact retained several decided advantages over its more modern synthetic substitutes.
The store held a close-out sale, at which I noticed a folding wood-framed chair with a ripstop canvas cover. It reminded me of some old and very comfortable steel-framed butterfly chairs my mother had on her patio. I plopped down in one of the South African items, and . . . well, to claim that angels sang might be pushing it, but it was without doubt the most blissful experience I’d ever had in folding camp furniture. (Hmm—reading back over that makes me wonder if I should specify, “ . . . folding camp furniture designed for an upright posture.”). The chair was marked down to $9.95, and there were just four left. I bought all of them.
That lucky find begat something of a legend. Wherever Roseann and I camped, our chairs gathered acolytes faster than a television ministry in Mississippi. Frequently those who sat down “just to try it” could only be removed by threats of violence, including actual displays of edged weaponry. Multiple quests to find similar chairs proved futile, as did multiple quests to find substitutes anywhere near as comfortable. (In the course of searching I learned such chairs were generically called tripolinas and had been designed by an Englishman named Joseph Fenby in 1877.) The closest I came was a spring, 2009 review for Overland Journal, in which I included an outrageous version of the tripolina from safari outfitters Lewis Drake. The Lewis Drake Martin Chair was an exquisite concoction of rosewood, solid brass, and cotton canvas with buffalo-leather trim, and it retailed for $600—a figure that begat its own legend among both connoisseurs and disparagers of safari bling. It was certainly clear that the Lewis Drake chair failed as a remotely affordable alternative to our (admittedly close-out) $9.95 originals—and to be perfectly frank it wasn’t quite as comfortable, being slightly shorter in the seat and lacking their deep, seductive pocket shape.
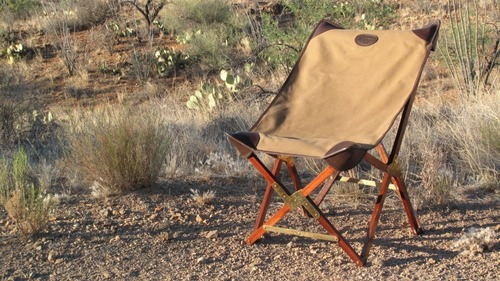 The infamous $600 camp chair. Undeniably a paragon of style.
In the meantime, Mike Spies, the U.S. distributor of AutoHome roof tents (AutoHome), had visited Roseann and me out in our Sonoran Desert camp-cum-home, and experienced first-hand the soaring notes of a heavenly choir while, from the comfort of a South African tripolina, he watched his English setter chase quail around our yard. On being told the tale, he asked, “Can I borrow one? I’d like to replicate it and put them back into production.” We entrusted one of our irreplaceable chairs to his keeping, and for a full two years received only occasional fractional cryptic updates along the lines of, “Sourcing Sitka spruce from piano industry,” “Searching for U.S. stainless steel fabricator,” and, “Looking into Forest Stewardship Council certification.” A couple of promising prototypes showed up at the 2011 Overland Expo, and this year, finally, I secured a “pre-production” but obviously fully developed example of Mike’s take on the South African tripolina.
It was worth the wait.
Mike clearly was not interested in producing a mere clone. That became obvious before I even saw the chair, when I pulled its 6 by 40-inch carrying case out of the UPS box. It’s sewn from fantastically heavy nylon ballistic cloth, has a handle made from 1.75-inch-wide webbing, and closes with a loop and eyelet system just like the bombproof arrangement of a military duffel bag—and the securing snap on Mike’s bag is solid brass, secured with a leash to the bag to prevent loss. The case is a huge step up from the cheap nylon drawstring sack our old chairs came in.
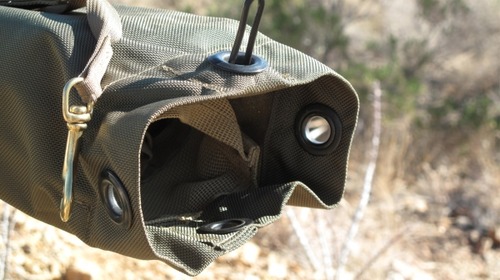 Hook the three grommets over the loop, secure with the brass snap. Bombproof. An internal pocket holds the rolled-up seat cover.
The chair itself lived up to the advance billing of its container. While the line of descent from our South African originals is unmistakable, upgrades are easily seen. The frame pieces—indeed made from Sitka spruce left over from piano manufacturing—are a bit thicker, .87 versus .82 inches, and are just as clear and straight. They appear to have a light oil finish. The folding hardware pieces are stainless steel, the same thickness as the originals (.064”) but much wider, secured similarly with fat rivets. The seat material is the same ballistic nylon as the case, sewn in two pieces to form a perfect pocket, in contrast to the single piece of ripstop cotton canvas used in the old chairs. The edges of both covers are fully bound.
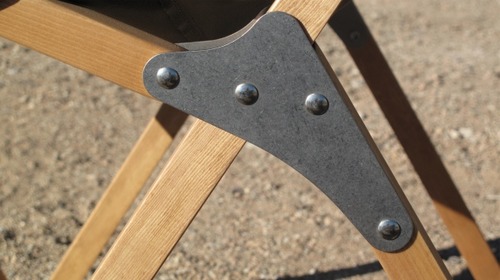 Hardware is stainless steel, broader than the original.
 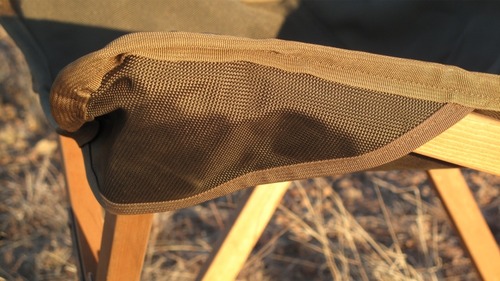 Ballistic nylon seat cover. Edges are fully bound for durability.
The more heavy-duty construction showed when I compared weights of just the frames (6.6 versus 5.6 pounds), the chairs with covers (7.4 versus 6.6), and the complete chairs in their cases (8.0 versus 6.8).
But what about actual comfort, the main point of the thing?
Roseann—who has remained faithful to those South African tripolinas for 20 years, no matter what potential rivals I brought home during gear tests—tried one of our veteran examples, then sat in the new one. She went back to the old one, then back to the new one. Finally she took a deep breath and said, “The new one’s better.” I did the same, and said, “Yep. Better.”
Note we said “better,” not “more comfortable.” The reason has to do with the frames. The structure of our South African chairs allows the front of the frame to spread out flat when you erect it. With the cover in place, you first sit down and then draw in the legs to form that deep pocket. Once that’s done, good luck convincing yourself there are camp chores that really need attention. For years I’ve intended to swage and attach a thin steel limiting cable that would tie the front legs together to eliminate the spread (which, to be fair, has undoubtedly worsened as the canvas fabric has stretched slightly over the years).
In Mike’s version, the frame and connecting pieces are constructed in such a way that the legs don’t spread flat, but lock to maintain the proper distance so that the cover automatically assumes the correct, blissful shape. So the two chairs are equally comfortable; the new one simply makes it easier to get there. The back of the new chair is slightly shorter, but neither offers head support for anyone but children, so that’s a wash. In other areas—seat height, back angle, etc.—the two seem interchangeable. Both are better for reclining than sitting upright, but both work just fine for eating or writing at a table as long as the top isn’t too high.
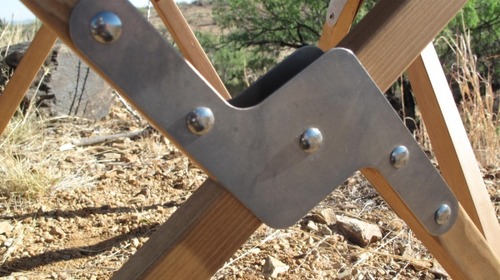 Front hinge plate holds legs in proper position for comfort.In fact I have only one significant gripe: The nylon seat material of the new chair is noticeably less breathable on a warm day than the canvas of the old. The nylon may well prove more durable (although given 20 years and counting on the canvas covers even that might be questionable), but I’d like to see Mike at least offer a cotton option for hot-weather use. He informed me of a couple of other tweaks that will be incorporated in the production chairs: a snap loop or two to prevent the cover being blown off an empty chair, and D-rings for a shoulder strap on the carrying case. Bravo to both.
Ah, yes—you’ve noted the future tense regarding production chairs. Mine is, as noted, a pre-production model. Mike already has suppliers contracted for the wood, carrying case, seat cover, and metal parts. He’s currently finalizing arrangements to have the wood pieces cut, shaped, drilled, and finished. Once that’s wrapped up he’ll be able to announce prices and availability.
I hope he hurries. There are a lot of people out there still annoyed at me for pulling knives on them.
Two Sahara veterans reunite
 In 1975, Squadron Leader Tom Sheppard led the Joint Services Expedition on the first west to east crossing of the Sahara Desert, from the Atlantic Ocean to the Red Sea—a trek that covered 7,500 miles and took 81 days coast to coast. The team used four of the very first production forward-control 1-tonne Land Rovers, two of which were equipped with powered-axle trailers driven from the rear PTO of the vehicles. In addition to completing the route, team members conducted a series of gravity measurements along the way, collected minerals, lizards, and bilharzia-bearing snails for researchers at the British Museum, and experimented with navigation techniques combining astro-fixes and sun compass bearings with calculations provided by what was then a cutting edge piece of technology: a Hewlett-Packard HP65 programmable pocket calculator.
Sheppard, already a desert veteran by that time, nevertheless learned much that would stand him in good stead on numerous solo Sahara treks by Land Rover and Mercedes G-Wagen, knowledge he subsequently shared through such books as the seminal Vehicle-Dependent Expedition Guide and Four-by-four Driving (not to mention his more introspective and lavishly photographed works such as Nobility of Wilderness and Quiet for a Tuesday: Solo in the Algerian Sahara).
In 1975, Squadron Leader Tom Sheppard led the Joint Services Expedition on the first west to east crossing of the Sahara Desert, from the Atlantic Ocean to the Red Sea—a trek that covered 7,500 miles and took 81 days coast to coast. The team used four of the very first production forward-control 1-tonne Land Rovers, two of which were equipped with powered-axle trailers driven from the rear PTO of the vehicles. In addition to completing the route, team members conducted a series of gravity measurements along the way, collected minerals, lizards, and bilharzia-bearing snails for researchers at the British Museum, and experimented with navigation techniques combining astro-fixes and sun compass bearings with calculations provided by what was then a cutting edge piece of technology: a Hewlett-Packard HP65 programmable pocket calculator.
Tom, already a desert veteran by that time, nevertheless learned much that would stand him in good stead on numerous solo Sahara treks by Land Rover and Mercedes G-Wagen, knowledge he subsequently shared through such books as the seminal Vehicle-Dependent Expedition Guide and Four-by-four Driving (not to mention his more introspective and lavishly photographed works such as Nobility of Wilderness and Quiet for a Tuesday: Solo in the Algerian Sahara).
Recently, at a Land Rover press event, Tom was reunited with one of the JSE vehicles, still mounted with the sun compass that carried him safely across the desert. He sent us these photos.
Tom Sheppard, left, discusses the 101FC with Roger Crathorne, Land Rover engineering legend.
Of course, for Tom, just standing around reminiscing would never do . . .
What would you have given to be that grinning passenger . . .
Mistaken mystique: myths of tire repair
 Despite significant advances in technology and huge reductions in the frequency of failure (certain infamous Firestone models excepted), tires remain the number one cause of vehicle trouble, whether you’re driving your minivan to Disneyland or a Defender to Dodoma.
The minivan can get by with a single spare tire. For an expedition vehicle you need to think a little more comprehensively. A second spare is a good start, but the very best strategy is to combine that with the means to accomplish your own tire repairs. Fortunately there are many products available to make the job easier, if not always effortless.
A surprising number of the Land Cruisers Roseann and I see and use in Tanzania and Kenya still ride on stout, tube-type, 10-ply-rated bias-ply tires mounted on split rims (or, more properly, retaining-ring or locking-ring rims). I even ran this type of rim (with BFG All-Terrains) on my FJ40 for several years while guiding in Mexico. Such rims can be disassembled with hand tools to remove the tire and tube, but I found I experienced more flats with tubes, and the process to repair a simple puncture involved the same complete disassembly of the rim as a major sidewall split. I got really good at it, but it was still a pain, and the romance of having clients marvel at the procedure soon wore off.
Given todays’ availability of high-quality compressors, comprehensive tire-plug repair kits, and, for extensive sidewall repairs, various bead-breaking tools, there’s really no reason any more to use tubes or locking-rim wheels. Most simple punctures can be repaired with a plug while the wheel is still on the vehicle—I’ve repaired such holes before the tire had a chance to completely deflate.
It’s easy to become proficient at plug repairs with just a practice session or two, and that skill will handle probably 90 percent of tire problems you’ll encounter. But when presented with a tire that has popped its bead off the rim, or a serious sidewall split that demands repair from inside the tire carcass, most of us still become gripped with angst. Doesn’t reseating a bead involve flammable liquids and YouTube-prone explosive effects, or at the very least an air compressor or tank capable of producing a really big volume of air? Hundreds of posts on dozens of forums will tell you so. Even a video I recently watched from someone who should know better reinforced the idea that you need a big compressor and/or air reservoir to successfully reseat the bead on a tire.
The truth is, it just ain’t so. To prove it, I once reseated the bead on a 255/85 R16 tire using an Extreme Outback ExpeditionAire compressor, a clever product that employs a pair of toy-like AtomAire pumps each capable of no more than .9 cfm (cubic feet per minute) flow. Doing the same with any decent compressor is easy (although I won’t vouch for the $29.99 Costco variety).
 Any quality compressor, such as this Quick Air X (sadly no longer available), is capable of reseating tire beads
Let’s imagine you’ve put a nice two-inch split in the outboard sidewall of a tire, but it’s still seated firmly on the rim. You need to get behind the split to apply a patch, which means you need to pop the bead off the rim first, then pry the edge of the tire off the rim. This is also a procedure viewed as black magic by many, but it’s easily done. (Before you attempt any of the following, don a pair of gloves and eye protection.) The most elegant way I’ve found is with a set of Tyrepliers, which comprise a lever system that angles between the bead and rim and pries the former off the latter with little fuss. The next most elegant way is with a product called a Beadbuster, a plate incorporating a curved spade that bolts to the bottom of a Hi-Lift jack. To use it, you place your tire and rim under the bumper of your vehicle, position the jack with the curved spade next to the rim against the bead, and use the jack with pressure against the bumper to force the bead downward and off.
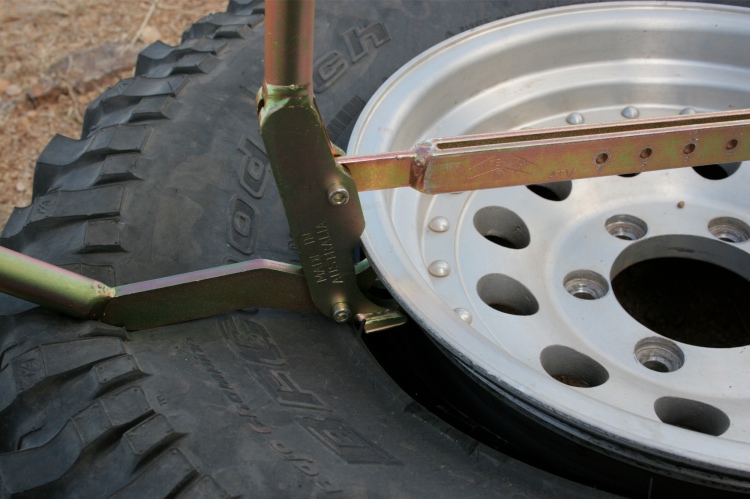 These Tyrepliers, from Australia, make quick and elegant work of breaking a bead
Failing either of these accessories, the base of the Hi-Lift by itself will do the same thing; it just puts a bit more stress on the tire’s sidewall than you do with the Beadbuster. In fact, people have unseated beads by simply driving over the edge of the tire with another vehicle. Whatever technique you use, be sure to mark the tire and rim first so you can reposition the tire in the same place, preserving the balance. (If you’ve popped off both beads through overzealous hooning this obviously won’t be possible.)
Once the outside bead has popped off, it’s much easier to get the inside bead off. You’ll want to do this so you can position the inside bead in the center groove of the wheel. With that done, a pair of tire irons will enable you to pry the outside bead over the edge of the rim, at which point you can patch the split by reaching inside (taking the tire completely off the rim is possible, but much more difficult and rarely necessary).
 The Beadbuster works in conjunction with a Hi-Lift jack
Once you’ve applied the patch and pushed the bead back over the edge of the wheel, it’s time to reseat the beads (if you’ve just popped one off while driving you’ll begin here). First, remove the valve core—once you’ve seated the tire you’ll re-install the core to completely inflate the tire.
Virtually all experts recommend running a ratchet strap around the circumference of the tire and cranking it tight. The theory is that this pushes the beads out against the rim to assist sealing. But when I compared the ratchet technique with using nothing at all during the course of mounting eight BFG tires on four Land Cruiser and four Land Rover steel rims, I could detect no difference whatsoever in effectiveness. If anything, I found it easier to position the tire correctly without the strap. Your results might vary (and if your wheels are too wide for your tires it could help), but I’ve stopped bothering with the strap.
Now comes the important part. Stand the tire and wheel upright so you can inspect both the inside and outside of the rim. You want the wheel centered as perfectly as possible inside the tire, so the gap between the edge of the rim and the tire is as even as possible all the way around, on both the inside and outside of the rim. If the rim sits cockeyed so that one edge is right against the tire and there’s a big gap opposite, it won’t matter how big a compressor you have; the air will simply escape.
Next, you’ll want some sort of liquid to lubricate the tire so it can pop over the rim’s grooves more easily. The very best is water mixed with some liquid soap or detergent, but plain water will do in a pinch (so will, my nephew reports, Keystone Light beer, which is certainly the best use to which you could possibly put that stuff). A squirt bottle makes it easy to wet the entire circumference on both sides, but just splashing it on works too. Be generous with the solution. Especially if it's the "beer." Next time bring liquid soap and better beer.
Connect your compressor’s chuck to the valve. The clamp-on style makes things easier, but it’s not mandatory. Get the air going in, and watch both sides of the tire. The soap solution will help locate any bad gaps; if you see one and the tire refuses to expand, stop and realign the rim. If you have everything right, though, you’ll see the tire start to expand outward on both sides. It won’t happen symmetrically, but as long as there’s a seal it won’t matter. One bead will snap on first—it almost always seems to be the outside one for me, but that might just be happenstance. In any case, you won’t miss it happening—it can make an alarmingly loud pop. As soon as the second bead pops on, remove the compressor. Air will come rushing back out through the coreless valve, but that’s of no consequence—the beads won’t come back off once they’re on.
Reinstall the valve core, inflate to normal pressure, and you’re finished. No fuss, no big compressor or air tank needed—and no YouTube-prone pyrotechnics.
If you’d like some excellent hands-on instruction in all facets of tire repair, sign up for the two-hour tire-repair class at the Overland Expo. Adventure motorcycle attendees will find equivalent classes from the qualified folks at RawHyde Adventures.
No poseur machine: Tiffany Coates' R80GS, Thelma
 When legendary motorcycle world traveler Tiffany Coates was in the U.S. for a speaking tour in 2010, BMW Motorrad USA offered to pay for parts and repairs on her 20-year-old R80GS, Thelma, which by then had carried her well over 150,000 miles on five continents.
When Tiffany told her father the good news, his response was, “Bloody hell—had they seen the bike when they offered that?”
 When legendary motorcycle world traveler Tiffany Coates was in the U.S. for a speaking tour in 2010, BMW Motorrad USA offered to pay for parts and repairs on her 20-year-old R80GS, Thelma, which by then had carried her well over 150,000 miles on five continents (TiffanysTravels.co.uk).
When Tiffany told her father the good news, his response was, “Bloody hell—had they seen the bike when they offered that?”
Indeed. A close (i.e. anything nearer than 50 feet) inspection of Thelma indicates that Tiffany pays diligent attention to the mechanical aspects of the bike, and pretty much files aesthetics under “patina.” A good third of the bumblebee yellow paint on the front guard seems to have been left in flakes in foreign countries, and various scrapes, gouges, blobs of third-world welds, and fraying wraps of duct tape attest to the drops and general wear unavoidable in the course of accumulating the spectacular CV of this motorcycle and its rider.
Tiffany will be at the 2012 Overland Expo, teaching classes in personal safety for women, contributing to regional travel forums and experts panels, and presenting a talk and slide show on central Asia.
Meanwhile, here’s a close look at Thelma, who’s been enjoying a break parked at the Overland Expo headquarters outside Tucson. If you haven’t yet seen Tiffany’s BMW Unscripted video clip, watch it here: http://www.youtube.com/watch?v=XAUhV1r-kUo
 A bit of road wear is apparent on the lamp guard
 Crash bars have some stories to tellThe modifications to Thelma are scant. Besides the much-repaired hard luggage mounts, here’s a comfortable Bill Mayer saddle, a custom Wilbers Suspension rear spring and shock, and, well . . . that’s about it.
 Running gear is virtually stock
 Single non-vented disc brake in front, drum in rear
 Hey, it still blinks . . .
 Underside shows the effects of 200,000 overland miles
 Weld repairs would give a German engineer nightmares
 But Mickey seems happy to ride along . . .
Hint: When using “Search,” if nothing comes up, reload the page, this usually works. Also, our “Comment” button is on strike thanks to Squarespace, which is proving to be difficult to use! Please email me with comments!
Overland Tech & Travel brings you in-depth overland equipment tests, reviews, news, travel tips, & stories from the best overlanding experts on the planet. Follow or subscribe (below) to keep up to date.
Have a question for Jonathan? Send him an email [click here].
SUBSCRIBE
CLICK HERE to subscribe to Jonathan’s email list; we send once or twice a month, usually Sunday morning for your weekend reading pleasure.
Overland Tech and Travel is curated by Jonathan Hanson, co-founder and former co-owner of the Overland Expo. Jonathan segued from a misspent youth almost directly into a misspent adulthood, cleverly sidestepping any chance of a normal career track or a secure retirement by becoming a freelance writer, working for Outside, National Geographic Adventure, and nearly two dozen other publications. He co-founded Overland Journal in 2007 and was its executive editor until 2011, when he left and sold his shares in the company. His travels encompass explorations on land and sea on six continents, by foot, bicycle, sea kayak, motorcycle, and four-wheel-drive vehicle. He has published a dozen books, several with his wife, Roseann Hanson, gaining several obscure non-cash awards along the way, and is the co-author of the fourth edition of Tom Sheppard's overlanding bible, the Vehicle-dependent Expedition Guide.


