
Overland Tech and Travel
Advice from the world's
most experienced overlanders
tests, reviews, opinion, and more
Do you want it hard or soft? (your motorcycle luggage, that is)
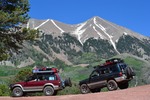
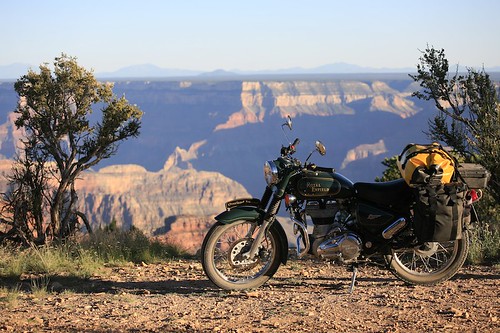 I equipped this test Royal Enfield with a combination of AndyStrapz canvas panniers, a Wolfman duffel, and a Pelican case rack trunk for a traverse of the Grand Canyon's North Rim
Just as our instinctive mental image of an expedition vehicle is more than likely a Land Rover 110 or Land Cruiser Troopie equipped with a roof rack loaded down with jerry cans and sand mats, so our image of an adventure motorcycle is likely to involve a giant BMW GS bulging with several square meters of aluminum sheet artfully folded and welded into rugged panniers and trunks covered with flag stickers from far-off places.
Thousands of the owners of these bikes have actually been to those far-off places. But how many riders chose those aluminum cases based solely on Long Way Round videos and magazine articles? How many remained satisfied with the approach after several thousand miles of travel? How many riders switch to soft luggage later on—and by the same token, how many riders start out with soft luggage and later switch to hard cases? Is there an overwhelming argument in favor of either, or is the choice simply a matter of trade-offs and priorities?
The debate has been the subject of endless forum threads begun by curious and innocent new riders. Replies generally fall into one of two categories: 1) “USE THE SEARCH FUNCTION!” or 2) Fifteen pages of opinions backed by rock-solid logic (and sometimes rock-solid experience) but little nuance. It’s either hard-luggage-is-the-only-way-to-go or soft-luggage-is-the-only-way-to-go.
The basic arguments for each are easily summarized. Soft luggage is less expensive, significantly lighter (with the equally important resultant benefit of a lower center of gravity), and not as likely to injure a foot or leg caught between luggage and ground during a spill or when working though rock gardens or sand. Soft luggage rarely requires special brackets to mount, generally results in a narrower bike profile, and can be compressed even further for shorter trips. If a soft pannier clips a rock or other obstacle during slow-speed maneuvering, it’s less likely to catch and throw the bike off balance.
Hard cases provide much better security from both outright theft and slash-and-grab attacks, are sometimes (but not always) more weatherproof, they sometimes can protect both rider and bike in a spill (as long as the situation described above doesn’t happen, and the luggage or its bracketing doesn’t damage the bike’s frame), and if easily removable can serve as seats or tables. Hard cases are easier to pack, provide better protection for fragile equipment, and can be modified easily with brackets for extra fuel canisters, etc.
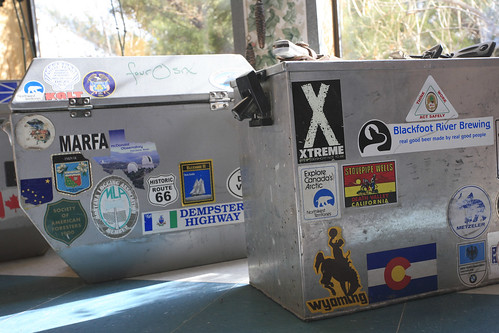 Doug Mote's hard cases, ready for "easy going."
Summarizing arguments is easy, but it doesn’t make a choice any easier. What I wondered, and had never seen in any luggage threads except as vague hints, was if there might be a formula that would use easily quantifiable variables specific to the rider to point him or her in the right direction.
My own motorcycle luggage expertise (not counting long ago rides wearing a Camp Trails frame pack, which provided spectacular windage) is limited to the excellent canvas luggage from Andy Strapz, combined with an equally excellent Wolfman duffel, and a Pelican case pressed into service as a security trunk. The combination suited me perfectly, but I wanted to get input from those with far more extensive riding history. So I sent out a poll asking the question: hard or soft, and why? I hoped the results might coalesce into a logical hierarchy that would lead to a simple formula.
Those who shared their experience included Carla King, Tiffany Coates, Lois Pryce, Austin Vince, Doug Mote, Kevan Harder, Nicole Espinosa, Brian DeArmon, and Bruce Douglas. The result comprised what I considered to be a useful cross-section of the long-distance riding community—both sexes, and a mix of body sizes, travel styles, and motorcycle choices (from 250 to 1200 cc).
Indeed, as I began going through the responses from this vast pool of experience, definite trends became apparent. In the end I was able to come up with an algorithm accurate enough that I could plug in variables from almost any of the experienced riders I polled and correctly predict what kind of luggage he or she used in what situation.
Essentially (aside from your budget), I decided only three variables are necessary to determine which type of luggage will best suit you. While there is some gray area, in general I think most people will find themselves trending one way or the other. The variables are:
- Size of motorcycle
- Size of rider
- Difficulty of terrain
No earth-shaking revelations there, but the relationship between the three can shift things one way or another. The chart shows how the recommended choice shifts from hard (red) to soft (blue), with purple as the could-go-either-way middle ground.
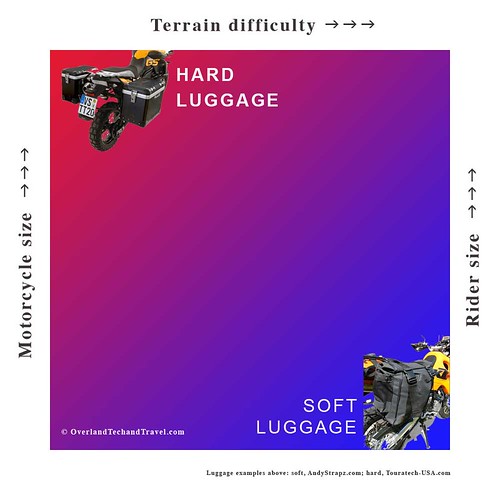
Simply explained, if you’re a big rider on a big bike and stick to asphalt or fairly well-maintained dirt roads, the advantages of hard luggage will most likely outweigh its disadvantages. Conversely, a small rider on a small bike who frequently challenges technically difficult routes would almost certainly be better off with soft luggage.
Some ambiguity arises if we start mixing and matching variables, but the observations of our experts still tilt the smart choice one way or the other. For example, small bikes—say under 650 cc—have a harder time coping with the weight and windage of hard luggage, regardless of terrain. Similarly, a big rider on a big bike who finds himself in central Africa during the rains, or deep in Egypt’s sand seas, or even on three-plus-rated 4x4 trails in the American West, will still benefit from the lighter weight, lower CG, and forgiving impact absorption of soft luggage.
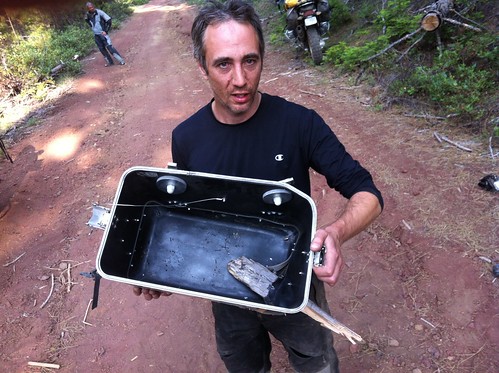 As filmmaker Sterling Noren recently found out, even anodized aluminum cases aren't impregnable
There’s also one more option to be considered regarding hard cases: While the Ewan-endorsed, steamer-trunk-sized aluminum cases represent the paradigm of hard luggage, lighter and smaller plastic cases, such as those offered by BMW for the F 650 GS, represent a viable middle ground in price, weight, and windage (and security). Another increasingly popular approach is to mount a small hard case such as a Pelican as a rack trunk, to provide security for cameras, laptops, and such, and go with soft cases for the rest of the luggage.
Here are some of the comments from our panel of experts, who collectively total a couple of million miles of motorcycle travel, including four circumnavigations.
Carla King’s motorcycle adventures began in 1995 with a 10,000-mile circumnavigation of the U.S. on a Ural with a sidecar, and haven’t stopped since. You can order the delightful book documenting the trip, along with her other published works, from her website here. Carla wrote, “Right now I’m setting up a new-to-me KLR, for which farkle options are famously infinite. After much research into cost, durability, security, convenience, and safety, I chose the Giant Loop soft luggage. Seems I can throw it on any bike, stuff almost any size and shape of thing into it, check it as luggage, and perhaps most importantly it’s not going to crunch my bones when I ride beyond my skill level and fall on (insert hard object here).”
Tiffany Coates set off on her first motorcycle trip, from the U.K. to India, with two months of riding experience. She has a bit more now—over 200,000 miles worth and counting, including the riding she did while filming a BMW unscripted commercial on Thelma, her much loved and well-used BMW R80GS. Tiffany still nurses the factory plastic cases that came on the bike, the latches of one of which long ago gave up trying to hold in the contents (small wonder - see photo below). According to her, “For me, the BMW plastic cases are ideal. Perfect size, with the ‘suitcase compression’ system which means I cram everything in and then sit on it (or two of us if we’re two up). Apparently we get more in these cases than the large metal ones due to the compression. Cheaper and lighter than metal cases and smaller—no risk of getting a leg caught under them if there is a fall. Also ultra-easy to unlock and whisk off the rack ready to carry into a hostel, or for emergency unloading in a river fall! As they are hard cases they are secure as well. I’m not anti-soft luggage, I have just never used it as the BMW panniers were on Thelma when I got her and so I never had a decision to make about what luggage to use.” Find out where Tiffany is now here.
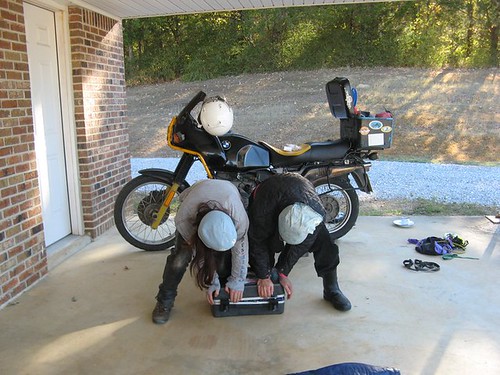 Tiffany and a friend do a little cargo compacting
Lois Pryce couldn’t seem to exorcise the motorcycle travel bug by riding a 225 cc Suzuki from Alaska to Tierra del Fuego. So she traded up to a much bigger bike (250 cc) and rode from her home in England to Cape Town (two excellent books here). As she was on tour in the Netherlands with her bluegrass band, the Jolenes, when I emailed her, her reply was short but thorough: “I prefer soft luggage: lighter, less ostentatious, no need for a rack, easy to lift on and off, easy to repair, and cheaper to buy. AndyStrapz panniers are the best.” (Want to hear the Jolenes? Go here. Lois is the banjo player.)
Austin Vince’s main claim to fame is that he’s married to Lois Pryce. Oh, well . . . he’s also ridden a Suzuki DR350 around the world. Twice. And made a rousing film of each trip. Austin is the antidote to anyone who tells you you need a $20,000 motorcycle and a further $5,000 in kit to do any serious adventuring. His riding suit is a pair of mechanics’ coveralls. His goggles appear to be Audrey Hepburn’s castoff sunglasses from Breakfast at Tiffany’s. Tent? A surplus shelter half. Luggage? I’ll let Austin explain.
“Soft. Here’s why:
1) Looks cooler and less aggressive compared with armoured-car-ish aluminum boxes. I really do think this is important when travelling amongst poorer societies.
2) Easily personalized and created from government surplus stores, etc. If your luggage is improvised then you are richer in terms of investment in your project. My current ALICE pack system has two major bags of 40 litres each, and 12 separate mini pouchlets of varying smaller volumes, all super-useful: Oil, rags, toilet paper, sun cream, water, etc. is all instantly accessible without undoing a single flap. Total cost, $35 U.S. No manufacturer can match this.
3) Safety. No one has broken a leg on a soft pannier.
4) Luggage is easily repaired and conversely, if it gets damaged, it only cost $35 so who cares?
5) All my DIY luggage is zero waterproof so I simply put my gear in a $5 waterproof liner therein—it’s so simple I want to cry.
6) Hard luggage makes the bike physically massive and far too unwieldy.
7) Jonathan, I love you (call me—like the old times).”
(Editor’s note: I take no responsibility for number 7. Just passing it on in the interest of full disclosure.)
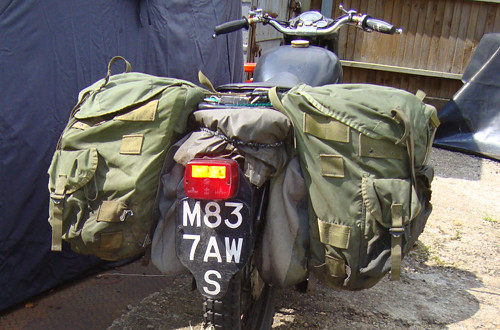 Austin Vince's $35 pannier system (courtesy U.S. government surplus)
Brian DeArmon is the thinking rider’s rider. Every equipment choice he makes is the result of not just long experience as a motorcyclist, but extensive research into pros and cons, competing brands, and above all, quality. Generally when Brian adds something to one of his bikes, that’s the last you hear about it, because it works. Given all that, it was no surprise that his detailed response more or less summarized my conclusions before I even reached any.
“Short version: Bigger bikes that are being used on easy to moderate terrain, with predictable weather conditions, I tend to favor hard bags (primarily for the security and ease of access). For small bikes, or any bike going where trail conditions are unknown, I prefer soft bags.
Long version:
Suspension: It’s too easy to overload a small bike already. Add in 15 or 20 pounds for the hard panniers and mounting brackets, you eat into valuable capacity. The big bikes are better able to handle those loads. Unfortunately, hard panniers also make it real easy to strap even more crap on the bike since they typically create a nice big surface area & include those nice tie down points.
Power: Smaller bikes typically don't have the power to push big loads down the road at the speeds required in the west. I've ridden the DR200 on the freeway with no load, and it’s kinda scary, even in the slow lane. I couldn't imagine doing it with an extra 40 pounds of pannier/gear/food/water (state highways and back roads, sure, just not freeways where traffic is moving 70 to 80 mph). Put that load on a GSA or big KTM and you don't have the same problem.
Trail conditions: On relatively tame roads, in known weather conditions, hard panniers are not much of a liability, IMO. The risk of crashing isn't that high. But once conditions become unknown, or weather conditions make a turn towards the wet side (mud), hard panniers become a huge liability. There is the obvious danger of tib/fib breaks, but also damage to the bike itself. My GS has a bent subframe caused by smacking a pannier on a rock. That is hardly a concern with soft bags.
Security and Convenience: Hard bags have a hands-down advantage for security and ease of use. Dump in your gear, close the lid, lock the latch, and you’re done. They’re typically easy to dismount and move into a hotel room, etc. Soft bags often have a convoluted mess of straps that makes it more difficult to access gear and install or remove. Soft bags also need to be checked regularly as loads change and straps loosen. Of course there is also the problem of having nothing between your gear and a thief but a knife.
Basically, I see soft bags as the default luggage system, with hard bags being a legitimate option if certain conditions are met.”
Nicole Espinosa didn’t like the racks available for the Suzukis she rides, so she made her own. Now she runs a business, Rugged Rider, which specializes in high-quality accessories for the reliable and overachieving small DRZs. Nicole wrote: “I feel the DRZ400 is the perfect bike to set up for adventure. It has a strong enough engine to maintain a comfortable 70 MPH on the highway, and is a nimble enough size to have fun on tight single-track fully loaded. That said, I prefer soft luggage for a tighter profile on highway against wind, and on trails for width. I only keep my clothes and rain gear in my Ortleib dry side bags, and have only traveled in North America as of yet, so I haven’t put the security of soft bags to the test internationally. I keep my expensive gear in my tank bag that I can carry with me or ratchet down on my locking combo luggage rack.”
All you need to know about Doug Mote as a rider is summed up below in his reference to “easy going.” Anything else I’d add would be superfluous, except to say he’s one of the nicest guys I know (despite his comment about kicking KTM ass). As a lumberjack and body double for Paul Bunyan, Doug was at the far end of my bell curve for big riders with big bikes. He sent: “I have hard and soft luggage, and use both. My preference depends on itinerary. For easy going, like say a run to Prudhoe Bay on a schedule, hard bags offer several advantages, not the least of which is better weather protection. On this type of good road trip in wide open spaces, there is little risk of leg or foot injury such as I have witnessed friends incurring when trapped between bag and earth. For tough going, where lightness and flexibility are key, soft luggage is superior. Spills are not so risky, and my entire kit weighs less than empty hard bags with mounting racks. I use only soft bags on the 650, either soft or hard with the 1150 depending on the route and how much KTM ass there is to kick. For extended travel with diverse route conditions, soft luggage is my clear choice."
I won’t claim that Bruce Douglas sometimes uncovers a motorcycle in his yard he’s forgotten he owns, but he does own a lot of them, and has based his transportation on motorcycles since his very first vehicle, a two-stroke Yamaha 360. His main backroad bike is a thoughtfully modified Suzuki DR650. Bruce wrote: “I’d say hard cases for security, appearance, and good mounting surface for other stuff. I think they’d be fine if I knew I wouldn’t be riding through any difficult terrain, but if there was a chance I might go down I’d have to go with soft bags. A few times when I’ve put my foot down while moving on the TransAlp I had it get caught under the hard case. It was clear how easily you could break something—and it wouldn’t be the case. I think I’m sold on soft bags now after the Baja trip. I like their versatility; I can use different bags with my mounts, since the main function of most mounts is to keep the bags away from the rear wheel. I’m happy with what I have, they’re simple and straight forward. The Wolfman Gen 2 mounts are interesting: a little complicated but they add more mounting points, and a means to carry extra fuel. Also knowing I can repair them with a sail needle and thread is nice. In a spill they flex, rather than dent. If the mounting straps tear off you can come up with a repair, or just tie it on with cord. The chance of the mounts coming out of hard cases is slim, but if they did, a field repair would be difficult. Soft bags aren’t as secure, but after undoing a few straps you can pull them off as saddle bags and carry them over your shoulder (a la John Wayne). In Baja I was able to carry all my gear in one trip: saddle bags on my shoulder, the tail bag in one hand, and whatever in the other hand. Soft bags also make you think about packing and not be tempted to just dump stuff into metal boxes.”
And finally, from Kevan Harder, a California police and SWAT officer who also works for RawHyde Adventures, where it often seems motorcycles are defined as BMW or . . . everything else . . . comes a firm vote for the red corner of the chart: “I strongly recommend hard bags for durability, protection of gear, and versatility (bike service stand, chair, table, etc).”
So there you have it, courtesy of some of the most experienced riders on the planet: an easy way to determine what type of motorcycle luggage will best suit you, your bike, and your riding.
Think this will end all those forum debates?
Ditch the cigarette lighter
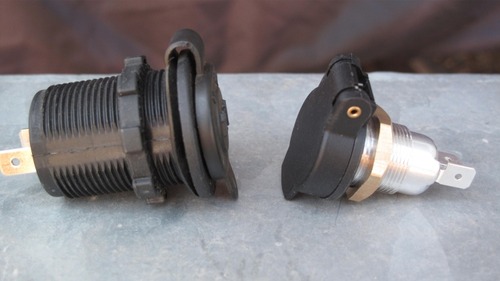 On the left, cigarette-lighter outlet: plastic body and lock ring, guaranteed-to-break rubber cover "hinge," press-fit back plate. On the right, German-made DIN receptacle: metal body, brass lock ring, rigid cover with spring-loaded hinge. The cordless automotive cigarette lighter was patented 90 years ago, and assumed its present configuration in 1956. I know for a fact that by 1960, car campers already had a range of 12-volt appliances from which to choose, such as the Boilmaster Junior Compact Kitchen coffee percolator featured in my old copy of The Ford Treasury of Station Wagon Living.
That means that for five decades those wishing to use their vehicles’ cigarette lighters for anything besides igniting a Pall Mall have put up with the “UL Standard 2089” 12-volt plug to try to get DC power to their portable percolators, tire pumps, GPS units, inverters—even their National Luna 74-liter double-door fridge-freezers.
Are we really that submissive to the dominant paradigm? If GM reintroduced front drum brakes and two-speed automatic transmissions would we all go, “Well . . . okay!” We’re talking the same era here.
Anyone who has ever used a standard auto lighter receptacle as a power outlet knows they’re garbage for that application. It’s impossible to tell when the positive post in the center of the male plug makes contact with the positive tab at the back of the female unit, and—especially if your appliance’s plug doesn’t have a spring-loaded post, or if the spring has seized, as most do after about two months of use—contact can be lost with no warning except when you stop for a cold Coke three hours later and find only tepid Cokes in the fridge. Worse, the most common aftermarket cigarette-lighter-type “power outlets,” which many of us install to run extra equipment, are constructed with a plastic back plate for the positive contact that is a simple press fit into the plastic body. Push too hard on the plug and the whole back end of the receptacle pops off.
There’s a better way, and by this time European readers and a lot of American BMW GS riders will be nodding their heads knowingly. They’ve been happily using the DIN (Deutsches Insitut für Normung) 12-volt plug system for years. The DIN plug, while more compact than the cigarette lighter (11/16-inch mounting hole versus one and a quarter) is significantly more rigid and wobble-free. The dash (female) socket grips the positive post of the plug with spring-loaded fingers—push in the plug and it snaps home with an authoritative click. No risk of pushing too hard, no risk of accidental disconnection, even on the roughest roads.
After years of muttering and cursing, and a brief consulation with my friend Brian DeArmon, I finally made the switch, courtesy of our local BMW motorcycle dealer in Tucson, Iron Horse. It’s easy to do, although if you want to install a DIN outlet in a hole made for a cigarette lighter you’ll need to buy or fab a thin washer to reduce its diameter. On the dash of my FJ40 I decided to leave the old receptacle in place so I wouldn’t have to use an adapter when borrowing or testing appliances equipped with that plug. I had a perfect place just below the old receptacle to install a DIN unit, where my stock dome-light switch was located. Since I use a Hella map light for a dome light now I had no need for the switch, so I simply enlarged the hole and installed the DIN receptacle. For now I just siamesed the wires to both receptacles and use a single fuse, since I never run two heavy-draw appliances from the dash at the same time.
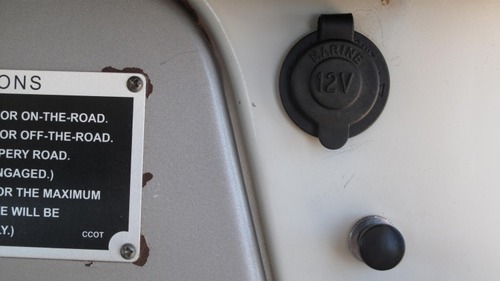 FJ40 dash with cigarette-lighter outlet, stock dome light switch underneath.
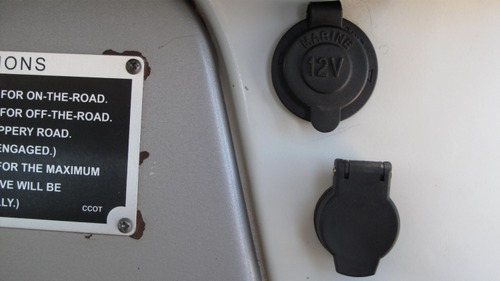 DIN receptacle in place, wired in parallel.
If you don’t have a BMW dealer nearby, you can get DIN plugs and accessories from a company called Powerlet. The standard socket is part #PSO-001, and there is a selection of plugs, including a nifty low-profile right-angle version. They even have a pretty decent-looking cigarette-lighter plug if you’re a fan of two-speed transmissions, or would like to leave one standard socket in the vehicle as I did.
Swapping plugs on your old appliances is easy, too. Some 12V fridges come with convertible plugs; a red spacer allows use with a cigarette lighter; remove the spacer for a DIN receptacle. It works okay, but switching to a DIN-only plug is more compact and stronger.
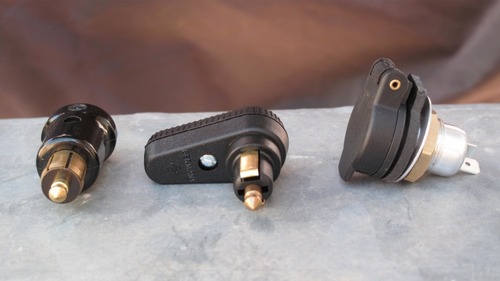 Straight and right-angle DIN plugs are available.As with many such simple and effective modifications, my only regret has been, why did I wait so long?
Mistaken mystique: myths of tire repair
 Despite significant advances in technology and huge reductions in the frequency of failure (certain infamous Firestone models excepted), tires remain the number one cause of vehicle trouble, whether you’re driving your minivan to Disneyland or a Defender to Dodoma.
The minivan can get by with a single spare tire. For an expedition vehicle you need to think a little more comprehensively. A second spare is a good start, but the very best strategy is to combine that with the means to accomplish your own tire repairs. Fortunately there are many products available to make the job easier, if not always effortless.
A surprising number of the Land Cruisers Roseann and I see and use in Tanzania and Kenya still ride on stout, tube-type, 10-ply-rated bias-ply tires mounted on split rims (or, more properly, retaining-ring or locking-ring rims). I even ran this type of rim (with BFG All-Terrains) on my FJ40 for several years while guiding in Mexico. Such rims can be disassembled with hand tools to remove the tire and tube, but I found I experienced more flats with tubes, and the process to repair a simple puncture involved the same complete disassembly of the rim as a major sidewall split. I got really good at it, but it was still a pain, and the romance of having clients marvel at the procedure soon wore off.
Given todays’ availability of high-quality compressors, comprehensive tire-plug repair kits, and, for extensive sidewall repairs, various bead-breaking tools, there’s really no reason any more to use tubes or locking-rim wheels. Most simple punctures can be repaired with a plug while the wheel is still on the vehicle—I’ve repaired such holes before the tire had a chance to completely deflate.
It’s easy to become proficient at plug repairs with just a practice session or two, and that skill will handle probably 90 percent of tire problems you’ll encounter. But when presented with a tire that has popped its bead off the rim, or a serious sidewall split that demands repair from inside the tire carcass, most of us still become gripped with angst. Doesn’t reseating a bead involve flammable liquids and YouTube-prone explosive effects, or at the very least an air compressor or tank capable of producing a really big volume of air? Hundreds of posts on dozens of forums will tell you so. Even a video I recently watched from someone who should know better reinforced the idea that you need a big compressor and/or air reservoir to successfully reseat the bead on a tire.
The truth is, it just ain’t so. To prove it, I once reseated the bead on a 255/85 R16 tire using an Extreme Outback ExpeditionAire compressor, a clever product that employs a pair of toy-like AtomAire pumps each capable of no more than .9 cfm (cubic feet per minute) flow. Doing the same with any decent compressor is easy (although I won’t vouch for the $29.99 Costco variety).
Despite significant advances in technology and huge reductions in the frequency of failure (certain infamous Firestone models excepted), tires remain the number one cause of vehicle trouble, whether you’re driving your minivan to Disneyland or a Defender to Dodoma.
The minivan can get by with a single spare tire. For an expedition vehicle you need to think a little more comprehensively. A second spare is a good start, but the very best strategy is to combine that with the means to accomplish your own tire repairs. Fortunately there are many products available to make the job easier, if not always effortless.
A surprising number of the Land Cruisers Roseann and I see and use in Tanzania and Kenya still ride on stout, tube-type, 10-ply-rated bias-ply tires mounted on split rims (or, more properly, retaining-ring or locking-ring rims). I even ran this type of rim (with BFG All-Terrains) on my FJ40 for several years while guiding in Mexico. Such rims can be disassembled with hand tools to remove the tire and tube, but I found I experienced more flats with tubes, and the process to repair a simple puncture involved the same complete disassembly of the rim as a major sidewall split. I got really good at it, but it was still a pain, and the romance of having clients marvel at the procedure soon wore off.
Given todays’ availability of high-quality compressors, comprehensive tire-plug repair kits, and, for extensive sidewall repairs, various bead-breaking tools, there’s really no reason any more to use tubes or locking-rim wheels. Most simple punctures can be repaired with a plug while the wheel is still on the vehicle—I’ve repaired such holes before the tire had a chance to completely deflate.
It’s easy to become proficient at plug repairs with just a practice session or two, and that skill will handle probably 90 percent of tire problems you’ll encounter. But when presented with a tire that has popped its bead off the rim, or a serious sidewall split that demands repair from inside the tire carcass, most of us still become gripped with angst. Doesn’t reseating a bead involve flammable liquids and YouTube-prone explosive effects, or at the very least an air compressor or tank capable of producing a really big volume of air? Hundreds of posts on dozens of forums will tell you so. Even a video I recently watched from someone who should know better reinforced the idea that you need a big compressor and/or air reservoir to successfully reseat the bead on a tire.
The truth is, it just ain’t so. To prove it, I once reseated the bead on a 255/85 R16 tire using an Extreme Outback ExpeditionAire compressor, a clever product that employs a pair of toy-like AtomAire pumps each capable of no more than .9 cfm (cubic feet per minute) flow. Doing the same with any decent compressor is easy (although I won’t vouch for the $29.99 Costco variety).
 Any quality compressor, such as this Quick Air X (sadly no longer available), is capable of reseating tire beads
Let’s imagine you’ve put a nice two-inch split in the outboard sidewall of a tire, but it’s still seated firmly on the rim. You need to get behind the split to apply a patch, which means you need to pop the bead off the rim first, then pry the edge of the tire off the rim. This is also a procedure viewed as black magic by many, but it’s easily done. (Before you attempt any of the following, don a pair of gloves and eye protection.) The most elegant way I’ve found is with a set of Tyrepliers, which comprise a lever system that angles between the bead and rim and pries the former off the latter with little fuss. The next most elegant way is with a product called a Beadbuster, a plate incorporating a curved spade that bolts to the bottom of a Hi-Lift jack. To use it, you place your tire and rim under the bumper of your vehicle, position the jack with the curved spade next to the rim against the bead, and use the jack with pressure against the bumper to force the bead downward and off.
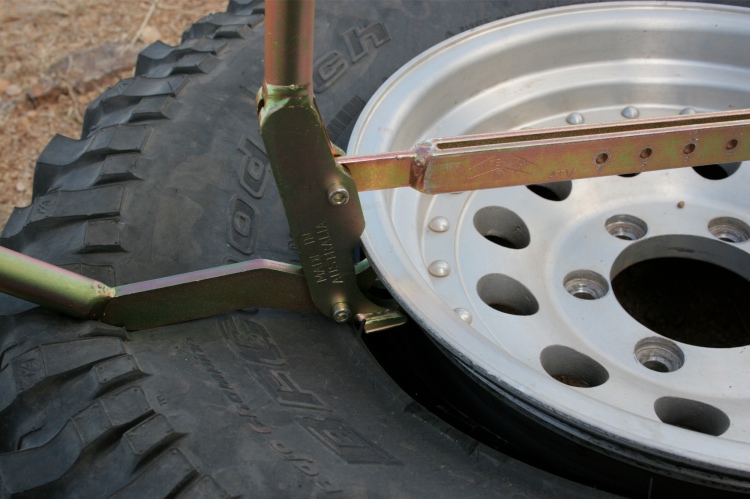 These Tyrepliers, from Australia, make quick and elegant work of breaking a bead
Failing either of these accessories, the base of the Hi-Lift by itself will do the same thing; it just puts a bit more stress on the tire’s sidewall than you do with the Beadbuster. In fact, people have unseated beads by simply driving over the edge of the tire with another vehicle. Whatever technique you use, be sure to mark the tire and rim first so you can reposition the tire in the same place, preserving the balance. (If you’ve popped off both beads through overzealous hooning this obviously won’t be possible.)
Once the outside bead has popped off, it’s much easier to get the inside bead off. You’ll want to do this so you can position the inside bead in the center groove of the wheel. With that done, a pair of tire irons will enable you to pry the outside bead over the edge of the rim, at which point you can patch the split by reaching inside (taking the tire completely off the rim is possible, but much more difficult and rarely necessary).
 The Beadbuster works in conjunction with a Hi-Lift jack
Once you’ve applied the patch and pushed the bead back over the edge of the wheel, it’s time to reseat the beads (if you’ve just popped one off while driving you’ll begin here). First, remove the valve core—once you’ve seated the tire you’ll re-install the core to completely inflate the tire.
Virtually all experts recommend running a ratchet strap around the circumference of the tire and cranking it tight. The theory is that this pushes the beads out against the rim to assist sealing. But when I compared the ratchet technique with using nothing at all during the course of mounting eight BFG tires on four Land Cruiser and four Land Rover steel rims, I could detect no difference whatsoever in effectiveness. If anything, I found it easier to position the tire correctly without the strap. Your results might vary (and if your wheels are too wide for your tires it could help), but I’ve stopped bothering with the strap.
Now comes the important part. Stand the tire and wheel upright so you can inspect both the inside and outside of the rim. You want the wheel centered as perfectly as possible inside the tire, so the gap between the edge of the rim and the tire is as even as possible all the way around, on both the inside and outside of the rim. If the rim sits cockeyed so that one edge is right against the tire and there’s a big gap opposite, it won’t matter how big a compressor you have; the air will simply escape.
Next, you’ll want some sort of liquid to lubricate the tire so it can pop over the rim’s grooves more easily. The very best is water mixed with some liquid soap or detergent, but plain water will do in a pinch (so will, my nephew reports, Keystone Light beer, which is certainly the best use to which you could possibly put that stuff). A squirt bottle makes it easy to wet the entire circumference on both sides, but just splashing it on works too. Be generous with the solution. Especially if it's the "beer." Next time bring liquid soap and better beer.
Connect your compressor’s chuck to the valve. The clamp-on style makes things easier, but it’s not mandatory. Get the air going in, and watch both sides of the tire. The soap solution will help locate any bad gaps; if you see one and the tire refuses to expand, stop and realign the rim. If you have everything right, though, you’ll see the tire start to expand outward on both sides. It won’t happen symmetrically, but as long as there’s a seal it won’t matter. One bead will snap on first—it almost always seems to be the outside one for me, but that might just be happenstance. In any case, you won’t miss it happening—it can make an alarmingly loud pop. As soon as the second bead pops on, remove the compressor. Air will come rushing back out through the coreless valve, but that’s of no consequence—the beads won’t come back off once they’re on.
Reinstall the valve core, inflate to normal pressure, and you’re finished. No fuss, no big compressor or air tank needed—and no YouTube-prone pyrotechnics.
If you’d like some excellent hands-on instruction in all facets of tire repair, sign up for the two-hour tire-repair class at the Overland Expo. Adventure motorcycle attendees will find equivalent classes from the qualified folks at RawHyde Adventures.
Speed vs. economy, or Fd = 1/2pv(squared) x CdA
 Diesel engines such as this fine 1HZ are inherently economical, but they still have to work harder to push a vehicle faster Fuel economy is a funny subject. Very, very few people want to admit their vehicles get poor mileage. The overwhelming tendency is to fudge the other way when the subject comes up. I know for a fact there are guys who get 25 miles per gallon at 75 miles per hour in their one-ton diesel pickups while towing their 30-foot Airstream trailers, because I hear it with astonishing frequency.
I also know they don’t.
I never say as much when presented with these or similar absurd boasts, because there’s simply no profit in doing so. All I do is raise my eyebrows and say, subtly, “Wow. That would be impressive.” To show skepticism, much less outright derision, provokes the same peculiar outrage one receives doubting someone who claims to have been abducted and studied by aliens. There’s just no point in arguing.
There’s also no point in arguing with the laws of physics—especially those relating to speed. Note that formula in the headline. In plain English it states that the drag (Fd) on a solid object moving through a fluid medium (which in physics includes air) is a function of one-half the density (p) of the medium times the speed (v) of the object, squared, times the drag coefficient (Cd) of the object times its cross sectional area (A).
Note in particular the reference to the square of speed. That means that as speed goes up, the drag that results rises on a logarithmic curve. If speed doubles, drag quadruples.
Here’s an example using an algorithm I found recently, calculated around a theoretical but representative vehicle with a drag coefficient of .30 (very low), and a frontal area of 30 square feet, on a paved road. Our vehicle requires just 2.6 horsepower to move at 20 mph. To reach 40 mph it needs 8.2 horsepower, and to reach 60 it needs 19.6. To cruise at 80 would require 39.9 horsepower—twice that needed to maintain 60. (To give you an idea of the drag acting on very high-performance sports cars, our vehicle would need 521 horsepower to hit 200 miles per hour.) The unassailable fact of highway driving is that beyond about 40 miles per hour aerodynamic drag overtakes powertrain friction and rolling resistance as the chief factor in fuel consumption—and from there on up it wages a rapidly escalating war on the level in your tank.
Another . . . interesting . . . claim I’ve heard is from guys (mileage fudging seems to be strictly a male pastime) who say something like, “I get better mileage at 80 than at 60 because my engine is in its power band there.” Sorry, but nonsense. There might be situations in which, say, shifting from fourth gear at 55 mph into an overdrive fifth gear and adding a few miles per hour will do no harm to or perhaps even slightly improve economy, but for a given gear, adding speed will increase fuel consumption, plain and simple. No one is going to get better gas mileage at 80 than at 60.
Algorithms are all well and good, but accurate real-world figures are more difficult to locate. Fortunately one of my best friends, Michael Cox, is diligent about recording the mileage he achieves with his 2006 4WD Dodge 2500 pickup, which has the Cummins turbodiesel, a six-speed manual transmission, and BFG All-Terrain tires. He can just break 21 mpg at 55 miles per hour. At 60 it drops to 19.5, at 65 it’s down to 18, and 70 mph knocks off another mile per gallon. He recorded similar changes with his Four Wheel Camper on the truck: 18.5 mpg at 60 mph, 16.5 at 65, and 15.5 or less at 70.
The immediate lesson from all this is so obvious I won’t bother to state it. But more subtle contributors to drag are worth investigating. Cleaning up the aerodynamics of a vehicle can have a significant effect on fuel economy, even on one with the base Cd of an apartment building. Removing the tall porthole ConFerr roof rack on my FJ40 increased my highway (i.e. 60 mph) fuel economy by a full one mile per gallon—and going from 16 mpg to 17 in an FJ40 is a blessing. Suspension lifts and wider tires increase drag, the former hugely. So, somewhat surprisingly, do such add-ons as bull bars and driving lights, which create a dirty front of turbulence before the air even hits the vehicle proper. Extreme example: When my nephew Jake exploited his newfound skills at welding and fabricated an exoskeleton roll cage for his V6 Tacoma, his mileage plummeted from 18 to 13 mpg. So, do you really need a fat grille bar to fend off stray kangaroos, or would you be served with a simple winch bumper? Do you need that Paris/Dakar-esque bank of driving lights, or would a headlamp upgrade provide all the safe illumination necessary? With gasoline poised to top $4.00 per gallon and diesel above that as I write this, every bit will help on a long highway trip.
 Ditching the roof rack helps. Brush guard and lights might not hurt the “aerodynamics” of an FJ40, but they can on a more streamlined vehicle.Although rolling resistance becomes less important than aerodynamic drag at high speeds, it’s still worth considering. That one mile per gallon I gained on my FJ40 made up for the exact same amount I lost when I switched from BFG All-Terrains to BFG Mud-Terrains on that vehicle. Long experience with various tread types has led me to the conclusion that there’s not a big mileage difference between street/trail tread patterns such as BFG’s Rugged Terrain and the slightly more aggressive All-Terrain—but jumping to a Mud-Terrain you’ll take a quantifiable hit. So if you put mud-pattern tires on your vehicle just because you like the look, think again. You’ll get better mileage, better handling, a better ride, and longer tread life with an all-terrain pattern, probably equivalent traction in most circumstances, and better in some.
What about tire width? Wider tires certainly increase frontal area and drag, but I’ve never seen an authoritative study to determine if a wide but short contact patch produces more rolling resistance than a longer, narrower one. You’d need to determine loading per square inch, hysteresis of the carcass, heat buildup, and other factors to make a solid judgement. With that said, I believe narrower tires offer advantages in so many other areas that I invariably stick with unfashionably skinny sizes. I just spent two weeks in Egypt’s sand seas in gargantuan Land Cruiser Troopies riding on pizza-cutter 235/85x16 All-Terrains, and we were never more than nominally stuck despite running near-street pressure in areas mined with the razor-sharp limestone outcroppings called kharafish.
 Narrow tires reduce frontal area and possibly rolling resistance, and they work just fine in sand if aired down properlyThe unique characteristics of individual vehicles can make a difference in fuel economy as well. For example, my mechanic friend Bill Lee had a customer who drove an FJ60 with a five-speed conversion, who complained of wildly varying mileage on the highway in the 60-65 mph range. Bill figured out that the secondary venturi on the 2F engine’s two-barrel carburetor started opening at around 63 miles per hour. If the driver kept the speed just below that, mileage was a full two or three miles per gallon better than just above it.
Modern fuel-injected engines are unlikely to have such a sharp break in efficiency. Nevertheless, it’s worth experimenting with varying speeds—especially if you have a mileage function on your vehicle’s computer—to see if it has a “sweet spot” above which consumption spikes.
In general though, you can expect your computer to tell you, “Yep—when you drive faster you use more fuel, stupid.”
Touring tip: When it's tool time on the road
 Published with the permission of RoadRUNNER Motorcycle Touring & Travel Magazine for Overland Tech & Travel / Overland Expo only. Not for sale or distribution.
 If you’re like most adventure motorcyclists, you don’t want any type of mechanical problem to deal with during a motorcycle tour. And, of course, the best way to keep that from happening is a heavy dose of preventative medicine before your bike ever leaves the garage. But unforeseen mechanical malfunctions can and do happen out on the road. So, taking selected tools with you and knowing how to use them are sensible precautions for any touring rider.
Key Assumptions: If you ask 10 different riders for their list of necessary tools to have along, you may get 10 different lists. That’s probably because of the assumptions each person is making in several key areas:
- Length of Trip: The longer you expect to be on the road the more likely it is that something on the bike will need repair. If your trip involves going around the globe, then many more tools and spare parts will be needed than for a weekend jaunt to the mountains.
- Type of Bike & Riding: All other things being equal, dual-sport riding and adventure touring are more likely to result in something coming loose or a bike going down than while street riding.
- Riding Environment: Riding in remote locations usually requires riders to be more self-reliant in fixing whatever needs repairing.
- Number of Riders in the Group: The solitary rider must carry all of the tools and spare parts he or she might need. In group riding situations the load can be spread amongst the riders.
- Mechanical Expertise of Rider(s): There’s no point in carrying a lot of tools and spare parts if you don’t know how to use them to make the repairs. Riders traveling long distances in remote areas, however, should have the requisite mechanical expertise and equipment to repair most any type of mechanical malfunction.
Published with the permission of RoadRUNNER Motorcycle Touring & Travel Magazine for Overland Tech & Travel / Overland Expo only. Not for sale or distribution.If you’re like most adventure motorcyclists, you don’t want any type of mechanical problem to deal with during a motorcycle tour. And, of course, the best way to keep that from happening is a heavy dose of preventative medicine before your bike ever leaves the garage. But unforeseen mechanical malfunctions can and do happen out on the road. So, taking selected tools with you and knowing how to use them are sensible precautions for any touring rider.
Key Assumptions: If you ask 10 different riders for their list of necessary tools to have along, you may get 10 different lists. That’s probably because of the assumptions each person is making in several key areas:
- Length of Trip: The longer you expect to be on the road the more likely it is that something on the bike will need repair. If your trip involves going around the globe, then many more tools and spare parts will be needed than for a weekend jaunt to the mountains.
- Type of Bike & Riding: All other things being equal, dual-sport riding and adventure touring are more likely to result in something coming loose or a bike going down than while street riding.
- Riding Environment: Riding in remote locations usually requires riders to be more self-reliant in fixing whatever needs repairing.
- Number of Riders in the Group: The solitary rider must carry all of the tools and spare parts he or she might need. In group riding situations the load can be spread amongst the riders.
- Mechanical Expertise of Rider(s): There’s no point in carrying a lot of tools and spare parts if you don’t know how to use them to make the repairs. Riders traveling long distances in remote areas, however, should have the requisite mechanical expertise and equipment to repair most any type of mechanical malfunction.
Most Common Malfunctions on the Road
It behooves all riders to have the necessary tools and skills to fix the motorcycle malfunctions that are most likely to occur on tour:
- Flat Tire: For tubeless tires, there are a number of kits available in the marketplace that enable riders to perform a temporary repair, without removing the tire from the bike. Besides the CO2 cartridges that come with these kits, it’s a good idea to have a small compressor to ensure that the re-inflated tire has sufficient pressure for safe riding. (You’ll need a tire pressure gauge to know for sure.) However, riders should have a professional technician repair or replace the tire as soon as possible.
For tube-type tires, the repair process is more involved and requires more tools. (Helpful hint: Even if a tire is marked “tubeless” on the outside, if it’s mounted on a spoke wheel, a tube will be required on the inside.) The wheel and tire must be removed from the bike, so the necessary wrenches should be on board for both the front and rear axles. Tire irons and a bead buster will be needed to remove the tube for repair or replacement.
- Electrical Malfunction: The most common types of electrical problems are blown fuses and burned out light bulbs. So, it’s important to know where the fuses are located on the bike and to have spares with the correct wattage. Also, it’s a good idea to carry extra bulbs for the headlight, taillight and turn signals, and to have the correct tools and expertise to replace them.
- Broken Cable(s) and Levers(s): Broken cables are a potential issue only on bikes with a manual clutch (i.e., non-hydraulic) or drum brakes. In these situations, carry an extra cable(s) already zip-tied in place with the one in use. This will dramatically reduce repair time if a cable breaks.
A broken clutch or brake lever, usually caused by a fall, can be a big problem on the road. Although the risk of a broken brake lever is somewhat hedged by the fact that there are two of them, there is only one clutch lever and it’s pretty hard to ride a motorcycle without the benefit of a clutch. Consequently, taking extra levers is a good insurance policy.
- Fouled Spark Plug(s): It’s always a good idea to have extra spark plugs, which have been pre-gapped, along on your trips. They don’t take up much space and can make the difference of whether you're stranded or not. Obviously, the proper wrenches will be needed to replace them.
- Low Motor Oil: If your bike has a history of using oil, it makes a lot of sense to take along a quart of motorcycle oil, which might otherwise be difficult to find on a Sunday, Monday or Holiday.
- Broken Bodywork: Sometimes a spill can leave cracked and loose body parts, which can make the motorcycle unsafe to ride. A roll of duct tape can often do wonders in these situations.
The above list is not an exhaustive one, but it does represent the type of malfunctions that could occur on a trip of several weeks.
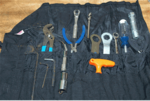
 Customizing Your Toolkit
Unfortunately, the tool kits that come with bikes are often of inferior quality. You don’t want a wrench breaking or rounding off a nut when you’re relying on it to get you out of a predicament. Consequently, I’m an advocate of building a customized toolkit that’s designed around the type of repairs you may have to perform on the road. Based on the key assumptions about your touring plans and the types of repairs that are likely to occur, acquire the specific, high quality sockets, ratchets, screwdrivers and other wrenches that are needed to perform these tasks. It’s OK to use items from the manufacturers toolkit if they’re of sufficient quality. To make sure you have what’s needed, use your tool kit while still at home to remove the wheels, change a spark plug, replace a light bulb, etc.
I found that the customized tool kit for my dual-sport bike would no longer fit under the seat, so I fashioned a separate container out of PVC pipe and mounted it on the skid plate. So far I’ve been able to make any needed repairs on the road - but the best tools to have along are still a cell phone and a credit card.
Published with the permission of RoadRUNNER Motorcycle Touring & Travel Magazine for Overland Tech & Travel / Overland Expo only. Not for sale or distribution.
Is Gross Vehicle Weight Rating . . . Overrated?
We all know most of America is overweight these days. But 2,000 pounds overweight?
Scott Lesak wrote us regarding his 1997 Mitsubishi Montero (the one in front here), which he has outfitted extensively for overland travel (his brother Mark owns the one following). Recently, Scott weighed virtually every piece of gear that goes into the Montero for a typical camping trip, and after adding in the curb weight of the vehicle, plus occupants, was concerned, if not really surprised, to find the total nearly 2,000 pounds higher than the factory’s listed 5,700-pound GVWR (Gross Vehicle Weight Rating includes empty vehicle weight plus all fluids, occupants, and cargo). He wondered if by carrying that much excess weight he was, a) risking damage to the vehicle, and, b) compromising safety on the road through reduced braking performance, etc.
To which, of course, the short answer is yes and yes.
If you’ve never weighed your own vehicle completely kitted and fitted for an overlanding trip, you might wonder how anyone could wind up a ton over the maximum recommended weight for a sturdy 4WD vehicle such as a second-generation Montero (which has a 1,300-pound cargo capacity including occupants). Trust me, it’s not that difficult. In many cases, the weight of just the modifications we bolt to our vehicles can come perilously close to topping the GVWR, before a single down sleeping bag gets tossed in the back. Look at Scott’s list of his own modifications:
150 lbs for upgrade to 35-inch tires
150 lbs for (empty) Garvin 84-inch roof rack
300 lbs for ARB bumper and 12,000-lb MM winch
200 lbs for custom rear bumper and swing-out mount
100 lbs for custom skids under transmission & transfer case
60 lbs for 15-gallon (empty) auxiliary fuel tank
100 lbs for rock sliders
80 lbs for extra AGM battery (105 amp hour; big and heavy for a 2nd battery)
100 lbs for custom drawer system (empty)
20 lbs for ExtremeAir compressor
50 lbs for fridge slide
80 lbs for Engel 60 freezer fridge (empty)
45 lbs for cargo barrier
25 lbs for 84-inch roll out awning
35 lbs for Hi-Lift Extreme jack
Remember that 1,300 pound cargo rating for the Montero? Scott just blew past that by almost 200 pounds—and he hasn’t loaded a single item of camping gear. Or fuel. Or himself. Let’s look at the rest of his list.
200 lbs for 25 gallons non-potable water for showering/cleaning
80 lbs for two 5-gallon jerry cans of potable water
92 lbs for 15 gallons fuel in auxiliary fuel tank
123 lbs for fuel in main tank
60 lbs clothing for 4 persons for 5 days
30 lbs for storage box #1 containing propane grill/heater and various accessories
40 lbs for storage box #2 containing cookware, electric coffee pot, dry food items
40 lbs for 4 sleeping bags, towels, pillows
20 lbs for 4 folding chairs
20 lbs for tent/awning mosquito net/folding table
20 lbs for firewood
10 lbs for propane tank
5 lbs for axe/sledge
700 lbs for passengers
40 lbs for hiking pack
60 lbs for gear in drawer (hoses for shower system, chains, recovery straps, 1 qt engine oil, 1 qt trans fluid, Hi-Lift attachments, basic tools, air hoses for tires/air mattress, lantern, fire ring, 1200 watt inverter)
20 lbs food/drink in the fridge
10 lbs cold weather clothing/rain gear suits
That’s another 1,570 pounds of people and stuff. And while it’s certainly comprehensive, there’s nothing in the entire list that’s really out of the ordinary for a vehicle set up for backroad exploration and camping with a family in mind. But what about unforeseen consequences from all that weight?

Every vehicle has a GVWR, or Gross Vehicle Weight Rating, specified by the manufacturer. The information is usually on a sticker on the edge of the driver’s door or door frame, as well as in the owner’s manual. There are dozens of factors that can be used to calculate GVWR, which isn’t to say that all manufacturers use the same list. Most obvious is the suspension, including spring rates, shock valving, anti-roll bars, etc. Braking capacity is another critical variable. Chassis design, wheel and tire size and rating, engine horsepower and torque, transmission capacity, differential gear size and ratio, driveshafts, axles, wheel bearings, CV joints—all these and more contribute in some way to the vehicle’s capacity to haul a load. Whether or not they’re all included by the manufacturer, they should be considered as an interdependent system by the owner.
You might think fear of litigation would drive manufacturers to be conservative regarding GVWR, but, particularly when discussing pickup trucks, advertising trumps reality. If your pickup has an 8,000-pound GVWR, and the brand across the street boasts a 8,500-pound GVWR, that makes your truck look puny in the one-upmanship game with which the American truck market is obsessed. So just because your vehicle is rated to carry 2,000 pounds of cargo doesn’t mean it can do it comfortably—or even safely. As an example, our 2000 Toyota Tacoma Extra Cab with the TRD package was rated to carry 1,400 pounds, if memory serves. Yet with nothing but an 800-pound Four Wheel Camper in the bed the rear end sagged alarmingly, the headlights lit up bedrooms in third-floor apartments, and we negotiated corners looking like a sailboat rounding a leeward buoy. Immediate suspension modification was called for. In our case, a set of heavy-duty shock absorbers and a pair of adjustable air bags handled the situation perfectly.
Scott’s Montero is equipped with a set of custom coil springs, and from photographs they appear to handle the extra load very well. The factory shocks that came on the vehicle are adjustable, and now live permanently in the “firm” mode (brother Mark’s Montero didn’t have that option and rides on Old Man Emu shocks).
Scott also extensively modified the vehicle for better performance on challenging trails. The tires are 35-inch Goodyear Wranglers, significantly taller (and heavier, as noted in his list) than the stock 30-inch tires. To fit them, Scott raised the suspension two inches and installed a two-inch body lift as well. He compensated for the taller tires by changing the differential gears from 4.2/1 to 4.9/1. In addition, the modest stock transfer case ratio of 1.9:1 is now a healthy 3.15:1, giving the Montero a very good 43:1 crawl ratio in 1st/low. The vehicle also has a stock Mitsubishi rear diff lock and an ARB front locker.
On Class 3 and 4 trails, there’s very little doubt Scott’s Montero would outperform a stock one. But how do his modifications, combined with the oversized load, affect its durability and safety as an overland vehicle?
The springs are clearly doing their job keeping the vehicle level and retaining sufficient suspension travel. The next component to consider is the braking system. Scott is lucky in that his Montero came with four-wheel disc brakes, not very common on mid-90s SUVs. Nevertheless, at nearly a ton over GVWR those discs are obviously working harder than they would be in a lightly loaded truck, and there’s no need for a track test to confidently assume emergency stopping distances are increased. And the bigger tires don’t help at all, as they add an enormous amount of rotating mass. I have a study in hand from the American Association of Motor Vehicle Administrators, in which they tested braking effectiveness with successively larger tires on a 1992 F150 Ford standard-cab pickup, in terms of the g-force generated by specific pressure on the brake pedal. For example, 76 pounds of pedal pressure—equivalent to a hard stop—produced .57g of retardation with 32-inch tires, but only .51g with 35-inch tires. With 150 pounds of pedal pressure—a full panic stop—they recorded .68g with the 32-inch tires, and only .62g with 35-inch tires. Since Scott’s Montero’s stock tires were 30-inchers, we might expect the difference to be larger in his case. In addition, the weight of the roof rack and its contents puts more stress on the front brakes in a panic stop, and will kick in the Montero’s rear anti-lock system earlier.
Those larger tires, combined with the suspension and body lift and the loaded roof rack, also negatively affect the center of gravity of the vehicle. In the same study referenced above, the Ford truck was evaluated for Static Stability Factor (SSF), an industry standard for determining the vehicle’s chances of rolling during a violent emergency maneuver. On stock 29-inch tires with no suspension modifications, the chances of rolling were calculated at 10 to 20 percent—low enough to earn the truck a four-star rating (out of a possible five). On 35-inch tires, with a three-inch body lift and a four-inch suspension lift—not at all out of the ordinary on a full-size truck—the chances of rolling went up to 30 to 40 percent, enough to drop it to a two-star rating. And that’s without a loaded roof rack. (I doubt any of this is a revelation to Scott, but I found it interesting to see actual figures attached to what we know instinctively.)
I got a dramatic seat-of-the-pants lesson in the effect a loaded roof rack can have on a trip to Mexico in my FJ40 (with its short 90-inch wheelbase and tall profile), when I rashly decided to carry an uninflated 14-foot Zodiac and a 40-horsepower Yamaha outboard up top. Total weight, including the massive Con-Ferr rack, about 600 pounds. All went reasonably well on the curvy road to Hermosillo—until I had to dodge a cow that stepped into my lane: Oh. ooh. C’mon. Jeeeez.
Back on four wheels, I thought calmly to myself, Right. Last trip with a powerboat on the roof.
Looking at the rest of Scott’s modifications, the 4.9 ring and pinion gears he installed are weaker than the stock 4.2 gears, due to the smaller pinion needed to achieve the higher ratio. Combined with the 35-inch tires this compromises the drivetrain strength. However, the second-generation Monteros came with mighty 9.5-inch rear ring gears, and substantial 8-inch gears in the front (independent) diff. So I suspect this won’t be the problem it is for those kids who stick 42-inch Mudders on Toyota pickups with 7.5-inch front diffs, then punch the locker when one wheel is spinning in thin air.
On the other side of the coin, the lower crawl ratio in the Montero is a definite asset, since it allows Scott to tackle rough sections at lower speeds, reducing the possibility of drivetrain stress, enhancing engine braking on descents, and easing transitions into off-camber situations with that higher CG. Of course high range isn’t negatively affected, so road performance remains normal—although I’d bet the combination of weight, windage, lift, and tires on Scott’s vehicle drops fuel economy of the V6 into the low teens more often than he’d like.
The last concern for Scott would be stress on the Montero’s bodywork and chassis. Again, he’s fortunate to have a strong, fully boxed ladder frame with no known weak points. The front double-wishbone and multilink rear suspension structure is sturdy and easy to modify for increased capacity. The roof rack mounting points on the drip rails might be a concern, but frequent inspection should be sufficient to detect any incipient issues.

What do the lessons from Scott Lesak’s thoughtfully outfitted, but overloaded, Montero tell the rest of us?
First, most obviously, is that if possible one should keep the all-up weight of the vehicle below the manufacturer’s GVWR. It’s easy to add a set of heavy-duty springs or air bags and then just start throwing stuff in, but just because the truck sits level doesn’t mean it isn’t dangerously overloaded. Scott showed a great deal of thoughtfulness by calculating the total weight of his Montero; how many of us have done the same, or paid five bucks at a commercial scale to see what our fully loaded overland vehicle weighs? With solid figures in hand, it’s a lot easier to decide if action is necessary to alleviate the situation.
However, rather than assembling a completely modified vehicle and camping kit, and then finding out what it all weighs, a better and less expensive strategy would be to learn from Scott’s example, and pay attention to weight from the beginning, when first modifying the vehicle and buying camping gear.
It’s common for those starting out in the overlanding world to be tempted to get the “look” down first (I certainly was). Those winch-mounted bull bars, roof racks with six driving lights, and multi-function rear bumper/swing-outs look absolutely ace, but each one not only adds weight, it does so in the worst possible place: on the ends of the vehicle, and on top. Decide carefully whether or not you really need each. How I wish more manufacturers made sturdy winch bumpers without the bull bar, which very, very few of us really need. But apparently the market demands the full-on Aussie look . . .
Camping equipment can get out of hand easily too. Personally I think it’s odd to drive a 4,000-pound vehicle somewhere, then sleep in a five-pound mountaineering tent and cook over a microweight backpacking stove, as some friends do—but if sleeping and eating are just chores to be dealt with for you in between hikes or fishing, why carry more weight? I like to tell people to evaluate their priorities and splurge there first. For example, when car camping I like to have a tent with stand-up headroom inside, and real cots to sleep on. But I’m happy with a single-burner stove and one-pot meals. Roseann enjoys cooking, so she prefers a more comprehensive kitchen. We’ve picked and chosen to arrive at a compromise—a modest-sized but full-height tent and lightweight aluminum cots; a well-equipped kitchen mitigated by such things as a Worthington aluminum propane cylinder, which weighs half what an equivalent steel tank does. The result is a comfortable camping setup for two people (a vital distinction from Scott’s family situation). Yet, according to my calculations taking into account the known weight of our FJ60 (with M8000 winch, Slee rear bumper, and 40 gallons of diesel), with everything aboard we are just nudging past its 5,380-pound GVWR—not too bad.
When loading gear for a trip, remember that everything adds up, not just the big bulky items. Do you really need an axe, or would a hatchet or folding saw suffice? One day not long ago I finally tossed out the never-used 25-pound choker chain in our winch kit. What a difference that made. I also discovered we had somehow wound up with two folding shovels in the vehicle—not really necessary. And what on earth was that old three-D-cell Maglite still doing stuffed under the front seat? Two pounds saved . . .
If you do find yourself unavoidably abusing your vehicle’s GVWR, there are several ways to mitigate the potential side effects. First, make sure your most vital item of safety gear—the braking system—is completely up to snuff. Eschew the $49.99 lifetime brake job at the muffler shop and install the best brake pads and shoes you can find. Likewise, suspension bits should be the best available. I’ve found that, especially with shock absorbers, you really do get what you pay for. If your vehicle is equipped with anti-roll bars (a.k.a. sway bars), consider upgrading them to thicker units to reduce body roll in turns (although this will diminish compliance on trails unless you have disconnectable bars). And when on a trip, force yourself to check everything on the vehicle religiously, from the tires on up, every day—particluarly those pieces that take the most abuse from weight.
Research your vehicle to see if there are well-known weak points in its running gear or chassis. The internet has made this child’s play—you can bet if a vehicle has a common problem, word will get out. For example, a search for “Toyota Tacoma frame problems” will acquaint you with the known weakness in the rear of the frames on first-generation Tacomas. Several companies sell weld-in gussets to address the issue on this otherwise superb truck. Mid-80s Chevy trucks are notorious for numerous frame, shock-mount, and steering box weaknesses. Even Ford’s recent über-truck, the Raptor, is showing early signs of a serious chassis flaw, at least for those owners who insist on driving them like the commercials suggest. All these problems have been extensively discussed on the web.
Finally, most obviously: Pay attention to your driving, and adjust it to suit the lower capabilities of the overloaded vehicle in terms of braking performance, emergency maneuvering, side-slope security, and so on.
What would I do differently in Scott’s place? Monday-morning quarterbacking is the easiest job in the world. However, given the situation he described, I’d be very tempted to look into a 4WD-capable utility trailer from one of the growing number of companies offering them. Offsetting the hassle of a trailer would be the elimination of that 150-pound roof rack (and ladder), and the redistribution of its load, along with much more gear from the Montero’s cargo bay—which would likely mean that the 100-pound drawer system could be tossed out, along with, perhaps, the 45-pound cargo barrier. That 280 pounds of water could go in the trailer as well, as could the jerry cans which now have to reside on that 200-pound custom rear bumper and swing out. Toss that too (or go for a much lighter Hi-Lift-capable bumper with just a tire mount). With the fridge in the trailer the 50-pound fridge slide could go. We just lost over 500 pounds in one paragraph—which would, ahem, go some ways toward offsetting the weight of the trailer (although towed weight is much different from carried weight). The entire load would be distributed much more evenly (and lower), relieving the burden on the Montero. I’d be curious to see a controlled experiment regarding highway fuel economy comparing a vehicle with a high roof load to one towing a utility trailer. I strongly suspect the trailer would add more drag, but it might not be a huge difference.
On the vehicle itself, a few things jumped out at me, but again from my own perspective. The Garvin roof rack seems immensely heavy—the full-length aluminum Front Runner rack we use when necessary on our FJ60 is light enough for me to lift with one arm, yet sturdy enough to stand on. Scott’s 12,000-pound-capacity Mile Marker winch is actually well-matched to the total weight of his vehicle (gross weight x 1.5 is the general rule), but depending on frequency of use I’d be tempted to go with a Warn M8000 and synthetic line—total weight less than 80 pounds—and employ snatch blocks to increase pulling power. That would not only save weight but would remove it from the end of the vehicle, where its effects are magnified.
Scott apparently knows what he needs in the way of tires, given where he wants to go (those dual diff locks and 43:1 crawl ratio are clues). For myself, I’ve never seen a need for tires larger than 33-inch on a vehicle that size. That would eliminate the need for the body lift, thus saving rotating weight (the worst kind) and lowering the center of gravity at the same time.
In the end, while Scott is certainly stretching the load-carrying ability of his vehicle, he could have done much worse than to choose the fine second-generation Montero as his platform. Here’s hoping it and Mark’s twin hold up for many thousands of miles of family adventuring.

Why I hate Nalgene bottles
 Few outdoor product manufacturers have attained the market dominance enjoyed by the Nalge Company, once an obscure maker of laboratory storage containers, after company president Marsh Hyman discovered his son’s Boy Scout troop was using their one-liter bottles as canteens early in the 1970s. The subsequent rebranding of Nalgene Outdoor Products was successful beyond the wildest dreams of marketing people who had previously relied on guys wearing lab coats and pocket protectors as customers. So successful, in fact, that I seriously doubt anyone reading this has not at some point had a drink of water from a Nalgene.
I drank the water, and the Kool-Aid, early on. The original one-liter white HDPE bottles with the wide cap were light, tough, and fit perfectly in the side pockets of my Camp Trails frame pack. They were easy to fill from a stream or bucket, and didn’t leak. You could chill the contents with ice cubes, or freeze the whole bottle with impunity. The Austrian Olicamp bottles I’d been using were leakproof and tough, too, but had a tiny opening and a fiddly two-piece top, so—despite years of yeoman service, including a backpacking trip spanning southern Arizona and three mountain ranges—I shelved them and shamelessly embraced their replacements.
When Nalgenes go bad . . .Few outdoor product manufacturers have attained the market dominance enjoyed by the Nalge Company, once an obscure maker of laboratory storage containers, after company president Marsh Hyman discovered his son’s Boy Scout troop was using their one-liter bottles as canteens early in the 1970s. The subsequent rebranding of Nalgene Outdoor Products was successful beyond the wildest dreams of marketing people who had previously relied on guys wearing lab coats and pocket protectors as customers. So successful, in fact, that I seriously doubt anyone reading this has not at some point had a drink of water from a Nalgene.
I drank the water, and the Kool-Aid, early on. The original one-liter white HDPE bottles with the wide cap were light, tough, and fit perfectly in the side pockets of my Camp Trails frame pack. They were easy to fill from a stream or bucket, and didn’t leak. You could chill the contents with ice cubes, or freeze the whole bottle with impunity. The Austrian Olicamp bottles I’d been using were leakproof and tough, too, but had a tiny opening and a fiddly two-piece top, so—despite years of yeoman service, including a backpacking trip spanning southern Arizona and three mountain ranges—I shelved them and shamelessly embraced their replacements.
Smaller Nalgene bottles that soon followed were ideal for toiletries, spices, and first-aid supplies. In fact, so enamored was I of Nalgene products that I spent an absurd sum special-ordering some of the first Nalgene 20-liter jerry cans then available in the U.S. I strapped two of them into my FJ40 and thought it was a pretty stylish setup.
The facade began to crack—literally—a few years later. Previously I’d noticed that the odd small bottle I used for toiletries or other incidentals had degraded. The translucent plastic would turn dull and opaque, then tiny stress cracks would appear. Forceful pressure with a finger would punch right through the material. At first I blamed this on the stuff I was putting in them (although an internal voice chided me that the containers were originally intended for lab use, and thus presumably should stand up to contents a lot more caustic than Suave Green Apple shampoo). But then one morning on a remote beach in Mexico I reached into the back of the Land Cruiser to pull out one of those stylish jerry cans, and the side split open right under the handle, spewing half my water supply into the sand.
Still I doubted my own doubts. UV exposure certainly could have been at fault in the jerry cans’ demise (inspection had shown the second one to be compromised as well)—although I’d had previous plastic water containers last longer. Regardless, my confidence was now shaken. I switched to Nalgene’s harder Lexan water bottles, but wondered why I should have to. The more oxidized white bottles I found in my pile of assorted Nalgenes, the more annoyed I became. (I have no idea if “oxidation” is the correct term for the problem, but that’s what I called it.) Once I narrowly avoided disaster when a camera bouncing around in my center console punched a small hole in an old six-ounce Nalgene bottle of window cleaner I kept there. Fortunately the hole was above the level of the liquid and I discovered it before it tipped over onto the camera.
Whatever the mechanism might be—UV degradation, shampoo corrosion, planned obsolescence (just kidding, Nalgene)—I’ve concluded that white HDPE Nalgene bottles seem to have a finite, potentially annoying or even hazardous, life expectancy. I can’t be sure what it is—given the hodgepodge of examples I’ve purchased over the years, there’s no way to determine the age of a compromised bottle. The apparent capriciousness of it is odd too—one two-liter square bottle I know I’ve had for ten years is still in fine, pliable shape. But the situation has reached the point where I look at every Nalgene not purchased the week before with suspicion—and that’s no way to have to view one’s outdoor equipment. I still use the small bottles for toiletries, having as yet found no leakproof substitute made in as wide a variety of sizes, but, like any disillusioned disciple, my former accolades have turned to acrimony, and I now spurn every Nalgene product for which I can find a reasonable substitute. Steel Wedco or plastic Scepter jerry cans hold bulk water; and an indestructible NATO canteen carries drinking water on hikes.
 30-year-old Olicamp bottles - still good . . .Then again, I just might go back to those Austrian-made Olicamp bottles. You see, out of curiosity, while writing this I dug them out of the recesses of my gear storage—they were right there next to the SVEA stove and Sigg Tourist cook kit. Thirty years after I carried them across southern Arizona, they’re still perfectly usable.
Anyone at Nalgene listening?
FI-PIG, Gorilla Tape, and WD-40: Essential fix-it stuff
 I would like an expert opinion about assembling a selection of adhesives, chemicals, and other products most useful for overland vehicle field repair issues such as cracked hoses, radiators, or fuel lines, and for replacing gaskets, joining metal or plastic pieces, sealing electrical repairs, and so on.
Alexander in Florida
Alexander’s question brought to mind the old aphorism about the perfect two-piece tool kit: WD-40 (to fix the things that are supposed to move but won’t) and duct tape (to fix the things that aren’t supposed to move but do). Kidding aside, it’s an excellent question—a very large number of field repairs involve some sort of leak or breakage that requires a chemical or mechanical fix. I looked in my own kit, enlisted the help of two of our OT&T experts—Duncan Barbour and Graham Jackson—and also queried my nephew, Jake Beggy, a master Toyota mechanic and fabricator. Here’s what we came up with, first in the way of commercial products and then in “bodge” fixes when nothing else is available.
I would like an expert opinion about assembling a selection of adhesives, chemicals, and other products most useful for overland vehicle field repair issues such as cracked hoses, radiators, or fuel lines, and for replacing gaskets, joining metal or plastic pieces, sealing electrical repairs, and so on.
Alexander in Florida
Alexander’s question brought to mind the old aphorism about the perfect two-piece tool kit: WD-40 (to fix the things that are supposed to move but won’t) and duct tape (to fix the things that aren’t supposed to move but do). Kidding aside, it’s an excellent question—a very large number of field repairs involve some sort of leak or breakage that requires a chemical or mechanical fix. I looked in my own kit, enlisted the help of two of our OT&T experts—Duncan Barbour and Graham Jackson—and also queried my nephew, Jake Beggy, a master Toyota mechanic and fabricator. Here’s what we came up with, first in the way of commercial products and then in “bodge” fixes when nothing else is available.

Gary Haynes repairing a door stop on a Land Rover Defender 110. South Rift, Kenya. Note two essential lubricants at hand: WD-40 and bourbon.
Toyota FIPG
 No matter what brand of vehicle you drive, Toyota’s FIPG (Form In Place Gasket) sealant/glue—which Toyota mechanics refer to as “FI-PIG,” is markedly superior in adhesion, sealing, and durability to the generic silicone RTV gasket sealant found in most hardware and auto supply stores. It comes in two colors: black, used to seal parts that will come in contact with oil or water, and a thicker red formula specifically designed for applications involving gear oil—transmissions, transfer cases, and differentials. The black stuff is the general-purpose tube to carry for most field repairs. It dries to a tough, rubberlike consistency and so can be used for about a zillion fixes besides vehicle problems. However, once the Toyota parts man tells you the price, you probably won’t think about using it to repair your Hi-Tecs.
AlumAseal radiator sealant
Available in a mess-proof powder form, AlumAseal will effectively squelch any but the most grievous radiator or heater core leak. It’s compatible with all types of antifreeze and any radiator material. Duncan mentions Bar’s Leaks as an equivalent.
Rescue Tape self-fusing silicone tape
There are other self-fusing silicone tapes on the market; this brand just happens to be the one I carry. I’ve used it once to repair a split radiator hose and it worked brilliantly. I’ve heard of it being used to seal high-pressure air lines and even fuel lines as well. It only sticks to itself, thus getting it off to effect a proper repair back home is no trouble. I know of someone who completely mummified a distributor in it for a (successful) deep-water crossing.
Two-part epoxy
It’s easy to forget just how strong two-part epoxy can be. Graham once epoxied a nut to the stripped head of a stuck timing cover bolt and was then able to remove it. He also used it to repair a stripped hole for an oil pump bolt, by filling the hole with epoxy, then drilling and tapping it once cured. Graham and Duncan both mentioned fuel tank repairs with epoxy; Duncan specified that by first plugging the leak with bar soap you can then clean the area and apply epoxy to further seal and reinforce it.
J-B Weld
Sort of a three-dimensional epoxy, since it can be built up to cover frighteningly large holes in things that shouldn’t have holes in them. I actually have sort of a love/hate relationship with it. Why? Because it’s so effective it seems to be the material of choice for unscrupulous people attempting to unload vehicles with serious problems. I’ve read account after account of victims finding cracked engine blocks sealed with it, oil leaks covered up with blobs of it, and worse. Nevertheless, such stories perversely confirm the versatility of the product. The standard formula is the strongest, but takes up to 24 hours to cure. The quick-set version is nearly as good.
Gasket material
There are all sorts of acceptable substitutes for gaskets, but why not have a sheet or two of the proper item? The thin cardboard material is good for many applications; I also carry one of slightly thicker reinforced material, and one of thin rubber sheeting.
 Gorilla Tape
Yes, there is a difference in duct tape. This stuff beats “Duck” tape and all the generic gaffer tapes by a mile. Yet it’s still easy to tear by hand or teeth—as it should be when you’re single-handedly attempting to secure the cracked center ferrule of a sea kayak paddle while bouncing around in the middle of the Gulf of California. True story.
Cable ties
Yes, believe it or not, there are also differences in cable ties or “zip ties.” You want the kind with a metal, rather than plastic, locking tab. The Ty-Rap ties from Thomas and Betts are arguably the best. The little ones secure wiring, medium sizes are good for fuel and air lines, and the really big ones will lock down just about anything, with a tensile strength of up to 175 pounds each. T&B also offers heat- and UV-resistant versions.
Baling wire
As near as I can tell, there’s no better or worse brand of this. Its uses are legion—I’ve successfully secured a broken motor mount on a 600-pound 2F Land Cruiser engine with it, and I know of situations up to and including a broken chassis crossmember that were stabilized with baling wire. Unlike duct tape, it’s heat resistant—how many dodgy exhaust systems have been semi-permanently repaired with baling wire? Where we live I’m not even sure it’s considered a “repair.”
Parachute cord
Paracord has become quite fashionable among the “tactical” crowd lately, especially for wrapping knife handles. The idea is that in a survival situation you can channel your inner Bear Grylls, unwrap the cord and use it to lash the knife to a stick as a spear, then go out and break or lose it altogether by hurling it at a large game animal. Seriously, paracord is an astonishingly versatile light rope, and worth buying in bulk—however, there’s a lot of substandard product out there. Make sure you get the genuine all-nylon kernmantle with seven three-ply inner strands. Type III paracord is the standard—called “550” for its rated strength in pounds. The proper military designation is Mil-C-5040H TYPE III, and current authentic military-contract paracord has one inner strand with black and yellow threads woven into it, if you want to be really picky (I recommend the excellent aviation survival equipment company Best Glide as a source: Best Glide). I carry it in 50 or 100 foot lengths, but if you want a way to have 10 feet of it always at hand, and also support a good cause, the Veteran’s Museum (Veteran's Museum) sells handsome braided paracord bracelets with Fastex buckles (although I haven’t checked to see if they’re using true military issue paracord).
Synthetic wheel bearing grease
You don’t really need the synthetic version, but it’s not that much more expensive. On an extended trip you’re likely to have numerous opportunities to use proper grease—on wheel bearings, CV joints, bushings, leaf spring pads, etc. A dab of it smeared on the back of disc brake calipers will stop squealing, and, well . . . it’s grease. You’ll find lots of other uses for it.
 Copper anti-seize lubricant
Graham mentioned this product, which used to be common but is rarely employed any more. Too bad, because it’s excellent for preventing threaded parts that need to be unthreaded now and then from rusting or otherwise locking up—especially threaded parts constantly exposed to road grime and moisture. Wheel lug threads are a perfect example, as are tie rod ends.
And, yes: WD-40
Did you know the name means “Water Displacing,” and the “40” refers to the number of unsuccessful formulas before they hit on the right one? There are actually a number of decent spray lubricant/water displacers on the market; a can of any of them is a must.
In a perfect world we’d always have the correct glue or sealant or tape to properly repair a broken component. Alas, such is not always the case. Ergo, a few suggestions from our panel on bodge substitutes.
Just weeks ago Jake successfully sealed a leaking radiator using the prosaic but effective two-egg procedure. Just dump the whites from a couple of eggs (yolks won’t hurt but they’re superfluous) in the filler cap (making sure the pressure has been relieved). The hot water cooks the whites, and they migrate naturally toward the leak. Duncan reports that pepper works well too. Add some mushrooms and you’ve got an omelette.
Duncan notes that repair patches and glue for inner tubes work just as well on radiator hose, although he recommends reinforcing the patch with duct tape or something similar. He also suggests a fix I think I first read about in the classic Land Rover manual Working in the Wild: If your alternator brushes go bad, remove the carbon rod from the center of a dry-cell battery and carve new ones. I simply must try that one some time. On the other hand, I’m intimately familiar with a ubiquitous African fastener Duncan mentions: leggans—cut strips of automotive inner tube. (I was delighted to learn his term for them—I’ve always called them “cut strips of automotive inner tube.”) The ultimate in recycled cordage, leggans can easily be made 20 or 30 feet long simply by slicing the inner tube in a spiral. When wrapped tightly and tucked under itself, it binds naturally and doesn’t require a knot. Anyone who’s been in the bush anywhere in Africa has seen monstrous loads secured effectively with this homemade elastic cinch strapping.
I could have collected bodge-repair ideas for weeks, but for now I’ll wind up with a habit I’ve cultivated for years. Friends have at times noted with amusement that I always use Grade 8 bolts and nuts (or the equivalent Grade 10.9 in metric) to mount even the most modest accessories—radios, fire extinguishers, air compressors, driving lights, and more. My reasoning is this: If I ever need a bolt or nut to replace a missing or broken one on a critical component, and I don’t have the correct one in my spares kit and need to cannibalize something, I can be sure of having a selection of high-strength potential candidates close at hand. Meanwhile, I can be absolutely certain my fire extinguisher and radio aren’t going to fall off.
Oh . . . okay. Duty compels me to include just one more. Jake finished off his list with the following note: “I discovered that Keystone Light beer makes a good emergency lube for a sticky Hi-Lift Jack.”
Comment would be superfluous, except to mention that lubing a Hi-Lift jack is absolutely the best use I can think of for Keystone Light . . .
Hint: When using “Search,” if nothing comes up, reload the page, this usually works. Also, our “Comment” button is on strike thanks to Squarespace, which is proving to be difficult to use! Please email me with comments!
Overland Tech & Travel brings you in-depth overland equipment tests, reviews, news, travel tips, & stories from the best overlanding experts on the planet. Follow or subscribe (below) to keep up to date.
Have a question for Jonathan? Send him an email [click here].
SUBSCRIBE
CLICK HERE to subscribe to Jonathan’s email list; we send once or twice a month, usually Sunday morning for your weekend reading pleasure.


Overland Tech and Travel is curated by Jonathan Hanson, co-founder and former co-owner of the Overland Expo. Jonathan segued from a misspent youth almost directly into a misspent adulthood, cleverly sidestepping any chance of a normal career track or a secure retirement by becoming a freelance writer, working for Outside, National Geographic Adventure, and nearly two dozen other publications. He co-founded Overland Journal in 2007 and was its executive editor until 2011, when he left and sold his shares in the company. His travels encompass explorations on land and sea on six continents, by foot, bicycle, sea kayak, motorcycle, and four-wheel-drive vehicle. He has published a dozen books, several with his wife, Roseann Hanson, gaining several obscure non-cash awards along the way, and is the co-author of the fourth edition of Tom Sheppard's overlanding bible, the Vehicle-dependent Expedition Guide.