
Overland Tech and Travel
Advice from the world's
most experienced overlanders
tests, reviews, opinion, and more
A stove with character
The SVEA 123 (Courtesy Spiritburner.com)
My first proper backpacking stove (not counting cans of Sterno here) was called a SVEA 123 (pronounced like a word: “Sveyah”). It was a lovely thing of solid brass that ran on white gas and needed no pumping—once primed, a loop in the fuel system atomized the gas picked up from the tank and produced a pressurized flame, accompanied by a distinctive roar that, while comforting, effectively drowned out any sounds of nature one might otherwise be enjoying. Turning off a SVEA was always as pleasurable as lighting it.
The priming procedure was intimidating at first. You were instructed to pour a bit of gas (I eventually hit on using an eye dropper) into a depression at the base of the burner tube, and apply a match—whereupon a jolly little fire would engulf the entire burner assembly. Just as the fire was dying you were to insert the little key into the stove’s control valve and open it. Timed correctly, a fine hot blue flame sprouted under the burner plate. Timed wrong, a foot-high flare of yellow fire indicated insufficient priming. Once going, the SVEA would boil water in a jiffy. Simmering béchamel—not so much. And woe to the user who neglected to remove the key from its fitting in between adjustments—I’m convinced I can still make out the burn scar on my thumb and index finger from repeated failures to do so.
Nothing wrong here; normal starting procedure . . .
If all this sounds a bit dodgy, the SVEA did have a valve in the filler cap that was designed to pop if the internal pressure exceeded safety margins. Just once I had this occur—fortunately when I was making coffee next to a stream in the open, because the result was a foot-long jet of flame that just happened to be pointed away from me. I stood up and kicked the entire stove into the water, instantly dousing both the burner flame as well as the “safety” one. Incredibly, once dried the stove fired up again as if nothing had happened.
That SVEA cost $12.99 if memory serves. I used it for a decade, augmented by a Sigg Tourist cook kit that substituted a much better wind screen for the nearly useless factory number, and included lightweight but thin aluminum pots that did not help the béchamel. Eventually I moved on to more modern and efficient stoves, but I still have that SVEA, and every decade or so I’ll fire it up just to prove it’s ready to go to work again if needed. Every time I do so I'm flooded with visual, olfactory, and auditory memories of trips taken, coffee brewed, and meals enjoyed in beautiful settings accessible only with effort and commitment, and the more splendid for that.
I was reminded of the stove recently while browsing an outdoor store in Boulder, Colorado. Because, you see, you can still buy a SVEA 123, although it’s now made by Optimus. The price has gone up by precisely an order of magnitude:
And some time ago I had another delightful reminder of how an inanimate object can have a personality and become a powerful repository of memories. My friend Ken Swanstrom purchased a SVEA on eBay—normally an anonymous and sterile way to buy something, right? Except for the note that accompanied the stove:
The note is poignant, yet one suspects Bonnie smiled as she wrote it. Had she become too old or busy to ever contemplate using her "trusty" stove again? Whatever her reason to sell, it's clear she is placing some responsibility on its new owner to treat it with the respect it deserves. If I ever sell mine, I'll do the same.
Continental Divide vehicle report
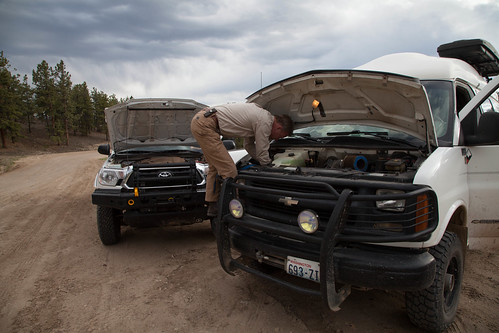
What sort of mischief can 1,600 uninterrupted miles of mixed corrugations, rocks, potholes, mud, and even some pavement wreak on a diverse group of four-wheel-drive vehicles? We found out on the recent Continental Divide trip organized by Rawhyde Adventures and us.
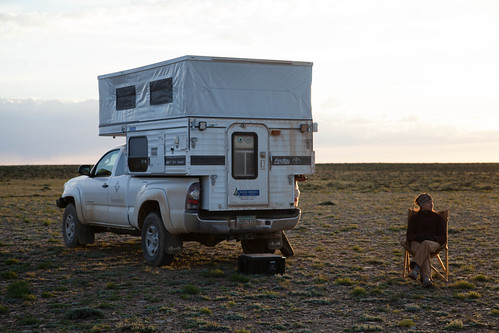
Our lineup on the ten-day journey included two Toyota Tacomas (one mounted with a Four Wheel Camper), two Ford Raptor pickups (one also mounted with a FWC), two Sportsmobiles (nine years apart in age), two Toyota FJ Cruisers (one towing an Adventure Trailer), two four-door Jeep Wranglers, one nicely maintained 1990 Ford Bronco, one newly restored and modified FJ60 Land Cruiser, a four-wheel drive Chevy Van conversion, and, occasionally, a Ford F250 pickup belonging to the Rawhyde staff’s self-taught 21-year-old mechanic/welder/marshmallow toaster (more on that later), Phil. Sadly, a Land Rover Defender 90 powered by a 200TDi diesel failed to make the start, after a blown head gasket and several other issues finally sidelined it despite valiant attempts by its owners to rectify things and meet us partway along the route.
We knew we were pushing the weather envelope on the trip, as it was scheduled right after the Overland Expo WEST, in late May. Additionally, the Rockies had experienced heavy snow fall just prior to our journey, so it was clear in advance some of the high passes would be . . . impassible. However, our group seemed to take this in stride as a more enjoyable challenge than cruising over the same passes might have been later in the year. One attempt, at a high pass above Lake de Nolda and the Alamosa River, involved first pulling a large fallen tree off the trail, then blasting through several drifts until the lead Ford Raptor found itself high-centered, all four wheels rotating uselessly, in a snow bank too deep to shoulder aside. In this case, everyone agreed that trying and failing was more fun than easy success.
Mostly, though, the miles we drove comprised easy to moderate backcountry routes with miles and miles of hammering from corrugations (or washboard if you prefer), and low-speed bouncing over freeze-induced potholes. The effects became apparent early on.
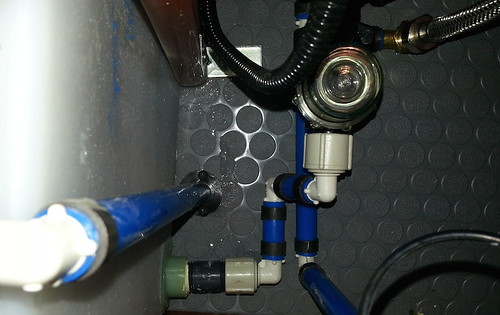
Both Sportsmobile owners glanced back into their living areas during a day’s trek to find their carpets soaked. The rough roads had caused (yet-to-be-determined) leaks in the vehicles’ plumbing systems, resulting in complete loss of water in the main tanks. Despite this, everyone was impressed with the Sportsmobiles’ utility and capability, especially considering their imposing size and 10,000-pound-plus GVW.
The FJ60 had just been the subject of a near-complete rebuild, including the installation of a factory 1HZ six-cylinder diesel engine with a turbo kit, plus a five-speed transmission, along with an extensive array of cargo-containment slides and suspension modifications. In fact, its owner, Adolfo Rapaport, only laid eyes on the vehicle a few days before joining us on the trip.
Among its accessories, the Land Cruiser had a full-length Eezi-Awn “K9” roof rack supporting an Autohome Columbus roof tent. Adolfo was delighted with the effortless setup of the clamshell tent (undo latch, climb in, go to sleep); however, an ominous development hinted at future issues: One of the six brackets supporting the rack failed on the third day of the trip. The aluminum base of the bracket cracked completely through where three holes are drilled in a horizontal line for connection to the steel upper bracket—an obvious potential failure point. Soon another bracket failed, then another. Each time the brackets were shuffled to retain support at the corners, but finally we simply ran out of brackets.
On the second to last day of the trip the mounts gave way altogether, and we pulled the rack and tent off the Land Cruiser and strapped it to the massive construction rack of the Rawhyde F450 support truck that rendezvoused with us each night. Adolfo and his son Josh enjoyed a penthouse apartment from that point on; they just had to avoid an assortment of welding tanks and generators when clambering up and down.
Post-trip investigation by both the chagrined builder of the vehicle and the importer of the rack revealed that the brackets had been completely redesigned sometime after the last container left South Africa, indicating that Eezi-Awn had become aware of the essentially guaranteed failure rate of the original. New brackets (four for each side rather than three) are on the way to Adolfo as I write.
One other issue surfaced on the Land Cruiser: The dual battery mounts in the front of the engine compartment had been engineered so only the rear of each battery was securely clamped, and they quickly worked loose. Folded cardboard provided a temporary but less-than-stylish fix.
The two Jeep Wranglers performed very well, as I expected, although a plastic fitting for the transfer case linkage on one of them failed, and Phil had to secure it temporarily with a zip tie. After a long, slow climb, the automatic transmission oil temperature warning light came on in the other, but it never happened again. And Chrysler still has not solved the problem of mud thrown up from the front tires, which packed the front door handles of both Wranglers with goop. We had this issue with the long-term Wrangler Rubicon we had four years ago. C’mon Jeep—a simple set of abbreviated mud flaps in front would at least keep the arc of the flung mud below the handles.
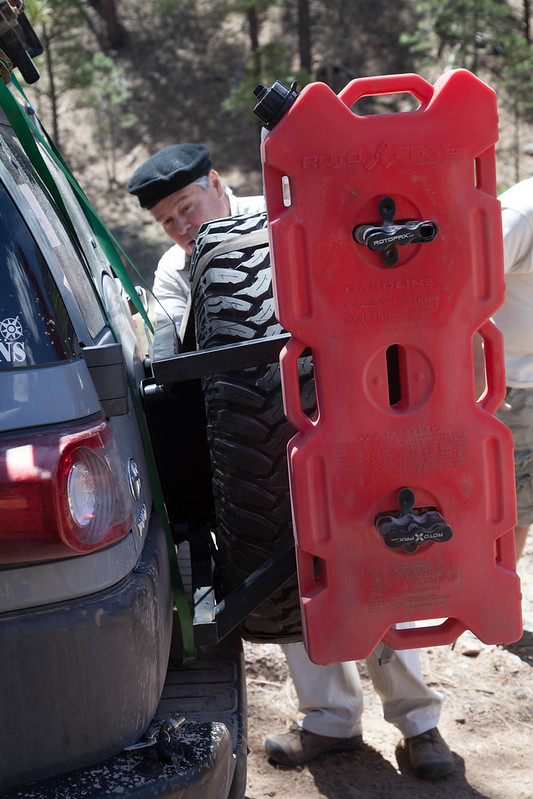
One of the FJ Cruisers sported a custom combination tire carrier and mount for two four-gallon Roto-Pax fuel containers. The assembly was welded to the stock tire carrier base on the rear door, and early on the four welds began to fail one by one. Fortunately Phil was able to re-weld the mount sufficiently to keep it intact for the remainder of the trip. The location of the Roto-Pax significantly increased the leverage on the mount; I think the fabricator should rethink the design.
Sterling Noren’s clever Chevrolet conversion kept up effortlessly with all the more technologically advanced and prepared four-wheel-drive vehicles, and survived numerous blasts of speed as he raced ahead of the main group to film. But late in the trip, and late each day, the vehicle began dying at random and refusing to move more than a few feet unless it was allowed to cool for an hour or so. No codes showed on the OBD reader, and standard diagnostic investigation was futile, so Sterling simply let the van have a nap when needed.
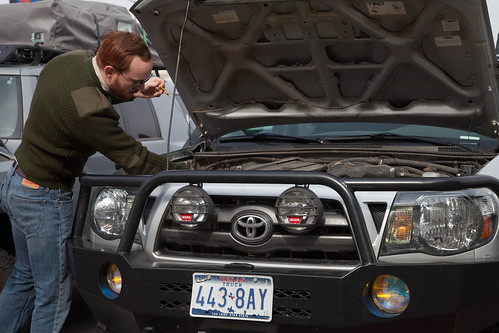
Both Raptors performed flawlessly, as did both Tacomas. Ross Blair's Tacoma benefitted from conscientious daily checks.
And that 1990 Bronco? It survived the trip in style as well.

On a related note, both Four Wheel Campers performed as they always do, providing a home away from home with a two-minute setup time, and scarcely affecting the backcountry abilities of the vehicles to which they're attached. With that said, the turnbuckle attachment system continues to require frequent checking; I'm determined to come up with a way to solidly anchor them. And, for the second time on ours, a silly strip of rubber trim around the front overhang came loose on a windy stretch of interstate, making a noise all out of proportion to its importance. Quibbles on a superb product, but needing attention.
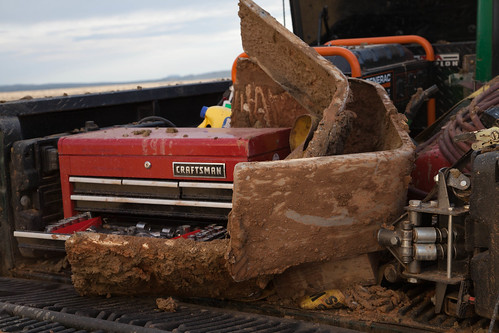
Other tidbits: Phil, who was towing an enclosed cargo trailer along a very muddy track in our wake on one of the easy sections, looked in his mirrors to note both fenders so loaded with sludge that they were ripping free of the trailer. He unbolted both and tossed them in the bed.
At one point I took over driving a two-wheel-drive support van shod with street tires along a level but treacherously slick muddy section, amusing the following drivers with the yaw angles I achieved while trying to keep the thing on the road. Luck was with me and I avoided ditching it. Total number of vehicle recoveries was remarkably low at three.
Oh, and, regarding Phil and the marshmallows? He proved remarkably apt at toasting them for s'mores with his oxy-acetylene torch.

Update
on 2014-06-12 00:52 by Jonathan Hanson
An update: Michael Collier, the owner of one of the Sportsmobiles that suffered a water leak, reports that the source in his was a connection between the water pump and the lower water tank. These connections have large knurled fittings that are designed to be hand-tightened. Once snugged, Michael says, the system has remained secure. The long-term solution seems to be regular checks while attending to basic daily maintenance.
Old and new OME
 My FJ40 Land Cruiser has been riding on an Old Man Emu suspension for about eight years now. It’s OME’s standard kit for the FJ40, comprising a useful but easy-on-driveshaft-angle two-inch lift (which gave me enough room to install 255/85-16 BFG MTs), and low-pressure nitrogen-gas-charged shock absorbers. It’s been flawlessly reliable, and does wonders for the short 90-inch wheelbase of the 40; in fact it rides better over the rough seven-mile dirt and rock approach to our desert cottage than our 2012 Tacoma (128-inch wheelbase) did on its stock springs and shocks, which were far too stiff.
The suspension is still perfectly functional—there is no obvious sagging and the shocks aren’t leaking—but it’s been looking tired. The shocks are faded and sand-blasted, and in photos I was amazed to see how rusty the springs looked; something I’d apparently become used to in person.

The 40 spends its time at the Overland Expo front and center—it’s either ensconced outside the Overland Oasis tent or used as a winch platform for the Camel Trophy team—and apparently ARB USA, the importers of OME suspension, felt that their springs and shocks shouldn’t be the rattiest looking component of the vehicle, because they supplied me with a replacement kit.
I spent the last couple of days removing the old suspension and installing the shiny new stuff, and it’s clear the FJ40 is feeling chuffed. It always runs a little better after it gets a spa treatment.
But here’s the amazing thing: When I pulled off the old front springs and set one of them next to one of the new springs, the height was . . . close? No—it was identical. Same with the rears. As far as my eye can tell those rusty old springs hadn’t lost a millimeter of height.

Not impressed? Consider this: I bought that original OME kit used. It had been on an FJ40 that was part of a fleet running guided 4WD tours in northern Arizona, and had several years of daily commercial use on it before I gave it a new lease on life, courtesy a local Land Cruiser scrounger who bought the entire fleet, if I recall correctly.
There’s one caveat: Those first OME springs were manufactured in Australia. The replacement set is from their “Dakar” line, which is manufactured in Malaysia (I guess calling it the “Malay” line just wouldn’t have the same cachet). The Dakar springs are made to OME’s specifications, have all the same construction features, and carry the same guarantee as their Australian predecessors, but they simply have not been around long enough to determine if they’ll prove as durable.
Expect an update in 2024.
 Cascade effect: I guess I need to paint my axles now . . .
Partial non sequitur: Among the myriad animals hanging around our place in the desert (see HERE) are small lizards whose common name is lesser earless, due to the logical fact that they have no external ear openings and are smaller than the greater earless lizard. I suspect lesser earless lizards evolved to follow large herbivores to catch the arthropods they kick up, because they are utterly fearless around humans and often get dangerously underfoot.

While I was replacing the suspension, I somehow lost one of the dished washers that compress the shock absorber eyes. I’ve no idea how I did it; it was simply gone when I went to install the new shock. I must have somehow flicked or kicked it into the gravel next to the concrete, but no amount of searching could unearth it. The washer is a dull gray, as is the gravel. It was maddening.
As I searched, the lesser earless that had been hanging around while I worked kept darting so close I was terrified of stepping on him. Finally, as I was making one last desperate effort to find the washer before giving up and ordering a new one, I again caught in my peripheral vision the lizard darting toward me. I looked down, and it had stopped and was looking up at me—with one foot on the washer.
If it had spoken aloud and said, “Here’s your washer; can I have a bug now?” I wouldn’t have been the slightest bit surprised.
Ceramic knife . . . fail

The one certain thing about any knife on earth is that it will eventually become dull with use. Since steel was first created by the accidental introduction of carbon into iron, knife makers have strived to balance several conflicting requirements, among them the ability to hold an edge and the ability to be sharpened easily. Obviously it’s essentially impossible to have both properties in the same blade (the Italics are there because it’s not quite a black and white choice). Serious knife users tend to fall into two categories: those who prefer a long-lasting edge and are willing to put up with the extra work necessary to sharpen it when it finally dulls, and those who want to be able to sharpen the knife quickly and are willing to do it more often. Count me in the former category: I don’t mind spending half an hour sharpening one knife at home if it will last through, say, skinning and butchering an elk in the field without needing touching up.
The basic gauge of steel hardness is the Rockwell Scale, named for Hugh and Stanley Rockwell, who developed a machine to quantify it. The Rockwell test for knife steels employs a 300-pound-plus weight that presses a sharp diamond cone into the material. The depth to which the cone penetrates the surface reveals the hardness of the material (on older Puma knives every product was subjected to this test, and the resulting tiny crater in the steel proudly indicated with a sticker).
So far, so good. Obviously, the harder the steel the stronger, and the better it will hold an edge, right? Simply buy a knife made from the hardest steel you can find. Done.
Not so fast. As steel becomes harder, it also frequently becomes more brittle, and this can make a fine edge—indeed the entire blade—susceptible to bending or impact forces.
A proper knife blade must thus balance several qualities. As described by knife makers:
Wear resistance indicates the resistance of the knife to abrasion. This is largely determined by the density and distribution of carbides (compounds of carbon and other metalic elements) within the finished blade.
Toughness describes the ability of the knife to survive impacts or bending without breaking. On the edge this translates to resistance to chipping.
Strength is the ability of the knife to resist bending in the first place. This is directly related to the Rockwell hardness. Strength helps prevent microscopic folding of the edge during use, which is perceived by the user as dulling.
Edge holding: Not the same thing as wear resistance, edge holding ability varies with all of the above properties.
Stain resistance is the least important quality of the steel, unless you really like shiny knives. Many stainless blades (which are only stain-resistant) lack the toughness and edge-holding of some non-stainless blades.
The science of making knife steel revolves around the blending of various alloys to achieve the best possible compromise. It’s easy and cheap to make a steel that holds an edge well or can withstand bending or is easy to sharpen; it’s extremely difficult to make one that displays all those qualities. But modern alloys are resulting in knife blades that are both tougher and stronger than those of just a decade ago. Manufacturers have found new ways of making steel, such as the particle metallurgy pioneered by Crucible Industries, which results in extremely fine microstructures in the finished alloy, enhancing virtually every desirable characteristic.
Once the steel is in the hands of the knifemaker, the art begins, because how the maker heat treats the blade determines how the particular alloy being used will perform in the end product. Heat treating involves successive heating and cooling of the blade, at different temperatures and speeds, sometimes on specific areas of the blade, sometimes immersed in different mediums to control certain aspects of the process. The result is that two knives made from an identical steel alloy can display significantly different performance. In fact, good steel can ruined with improper heat treating, and the lowliest carbon-steel knife can display awesome performance given careful differential heat treatment.
There are two other ways to alter or augment the properties of knife steel: laminating and pattern-welding. Laminated blades combine a center of very hard steel with outer layers of softer steel, to give the knife both superior edge-holding and toughness. Pattern-welded steel produces the lovely swirled effect you see on many high-grade knife blades. Commonly, but incorrectly, called Damascus (which is entirely different), pattern-welded steel comprises layers of different types of steel, repeatedly heated and folded over to gain a blade that can have hundreds of layers. The original intent of pattern-welded steel was to combine soft iron and brittle carbon steel to combine edge-holding and toughness. With today’s steels this is not necessary; most modern pattern-welded blades are done strictly for effect.
An extreme example of this can be found in ceramic knives—not steel at all of course, but sintered zirconium oxide or zirconium carbide. Ceramic knives, which display a Rockwell hardness of around 75 (compared to the R58 to R60 of an average knife), hold their edges fabulously well, but are relatively fragile: they can chip if torqued when cutting, and can actually break if dropped on a hard floor.
 You can spot three obvious chips in this short section of the Tachi's blade.
Several years ago I decided to give ceramic blades a try. I chose a small Tachi kitchen knife, thinking that if it worked out it would be a good size for the camper.
Right off the bat, I was disappointed in the edge as it came from the factory. Given the hype, I expected scalpel-like cutting; instead, we found that any one of our steel Henckels knives easily exceeded it at such tests as cleanly slicing tomatoes. Okay, so we’d have a sort-of-sharp blade that would last a long time, right? Nope. Even with firm parameters as to how we used the Tachi—essentially as a vegetable knife, period—we soon noticed micro-chips in the edge, followed by several not-so-micro-sized chips. We wondered simultaneously: Where are those little missing chips going? An alarming thought. Since a ceramic knife can only be sharpened with specialized equipment, we were stuck either living with it or sending it back in for the $10 service. Instead, we simply found ourselves using it less and less. Finally, Roseann managed to drop the thing (subconsciously on purpose?), and snap. The partial-tang blade parted ways with its handle.
The technology might improve—one imagines some sort of steel/ceramic hybrid—but for now, I’ll stick with steel knives.
Land Rover's invisible hood
Very rarely am I left open-mouthed by a new automotive invention, but this one left me gobsmacked. Land Rover is experimenting with a system that employs a camera, mounted in the front bumper, which projects its image on a heads-up display in the windshield shaped exactly like the driver's view of the hood, pardon me, bonnet. The effect is of being able to see right through the hood/bonnet, engine, and suspension to the trail as the vehicle drives over it.
Not only would this hugely improve wheel placement, it would also end that stomach-tightening moment as you crest a blind rise.
Watch the video:
Wired has more on the story HERE.
Yes, I checked, and the story was posted April 9th, not April 1st.
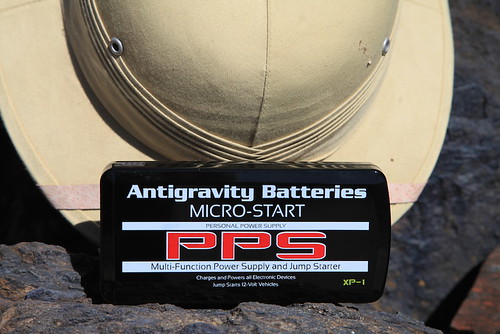
The Micro-Start XP-1
Experienced mechanics don't often sound giddy over the phone, but Dave Anderson sounded giddy when he called me from his Flagstaff, Arizona, shop, the Good Carma Garage (which really should be a radio program).
“I just bought this thing off a tool truck, and you have to get one,” he said, “You’re going to think it should be on every overlander’s equipment list—even before he buys a pith helmet.”
Dave. Such a kidder. As it happens, I own a pith helmet. And not one of those fake ones made from cork or, worse, styrofoam, either (I won’t even mention Graham’s mesh thing)—mine is a genuine pith helmet made in Vietnam from the pith of the Aeschynomene aspera, or sola plant (one of the original names for the helmet, sola topee, was later corrupted to solar topee). While they’re now little more than a Hollywood cliché, pith helmets are eminently practical—the thick fibrous material offers exceptional insulation from the tropical sun when touring one’s tea plantation or stalking a man-eating tiger with a Rigby.
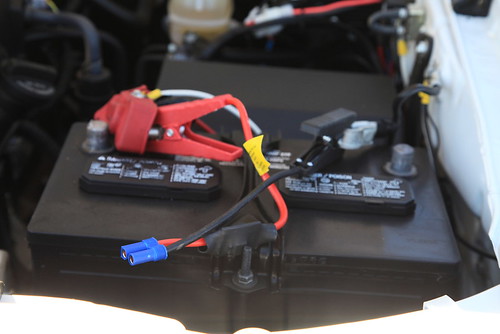
Where was I? Oh, right: At Dave’s insistence I ordered a Micro-Start XP-1 from Antigravity Batteries. The zippered pouch that arrived three days later was no bigger than a calendar/day planner (remember those?). Inside was a bewildering array of adapters for charging various electronic devices from phones to laptops, and an astonishingly lightweight (15 ounces), 225-amp-hour lithium/ion battery, just one by three by six inches, which, incidentally, can also be used to jump-start your truck.
Say what?

It’s true. The pouch includes a set of battery-post clamps, and the company claims the power pack will start a V8-engined truck—not once, but several times.
Could this mean the end of jumper cables? I’ve always hated those things, and especially I hate what happens when I play good Samaritan to jump some poor bloke’s dead Malibu—in trying to help he always wants to grab the cables and hook them up in the wrong sequence—if not to the wrong terminals. I have to come off as a tyrant just to do a good deed. With the Micro-Start I’d be in complete control of the situation. And of course if your own vehicle becomes stranded you are completely removed from the need for a donor vehicle—handy if the nearest candidate might be 40 miles away.
The instructions for jump-starting a vehicle tell you to hook up the terminal clamps to the dead battery first, then plug the siamese fitting into the power pack. The reason for this is that, while the teeth of the clamps are well-surrounded by plastic, it would theoretically be possible to screw up and touch them together, resulting in the same alarming pop and flash you get when you do the same thing with jumper cables. If you were really determined and managed to clamp the teeth together, a puff of smoke would signal the death of your power source. I found it easy to remember to hook up the clamps first and then attach the battery, and virtually impossible to remember to unplug them first and then undo the clamps after use. But I never shorted anything.
 Hook up the terminal clips first, then plug in the power pack.
So how well does the XP-1 work? I disconnected our Tacoma’s battery to give it a try by clamping the leads directly to the battery cables. I wanted to video the process, and while setting up the camera I simply stashed the XP-1 battery in my back Levi’s pocket—it really is that small.
You can find more torturous demonstrations online, but the initial trial on the Tacoma went thusly:
It was impossible to detect a difference between the XP-1 and the way the truck fires with its own battery. I started it three times in a row with no trouble at all, and there were four blue LEDs left out of five on the battery’s charge indicator. Clearly there’s not only sufficient amperage inside that little brick to turn a V6’s starter motor, but to do it multiple times.
As impressive as that demonstration was, it simply confirmed the maker’s claims. Looking around for an unfair test, my eyes alighted on our 1985 Mercedes 300D turbodiesel. To start that the XP-1 would first have to power the glow plugs, then turn the hi-amperage starter necessary to crank a five-cylinder engine with 18:1 compression. After recharging the power pack and removing the cables from the 300D’s massive battery, I hooked up the XP-1, and:
Okay, so that was a bit too much to ask. (Scot Schafer at Antigravity Batteries confirms that they have a model in the works that will be configured for the much tougher task of starting diesel engines.) Rather alarmingly, there were no blue LEDs left on the charge indicator after the Mercedes experiment. Had I killed this thing 15 minutes after first deploying it? I plugged in its 120-volt charger (there’s also a 12-volt car adapter)—and an hour later it was back at full charge. It’s a resilient piece of equipment.
If your vehicle is powered by anything up to a 400-cubic-inch gasoline V8, the XP-1 will provide you with ample starting capability. The battery will retain its charge for many months at a time; if you remember to give it a top-up every half year or so you should be pretty much immune to becoming stranded due to a bad battery. And think of the effect on the owner of the dead Malibu when you start his car with a magic box the size of a paperback. It might be a good idea to keep a few XP-1 kits in the truck to sell at an exorbitant profit . . .
The XP-1 is a bargain at around $140. A basic model, the XP-3, sans the adapters for personal electronic devices, is available for about $30 less. AntiGravity Batteries is HERE.
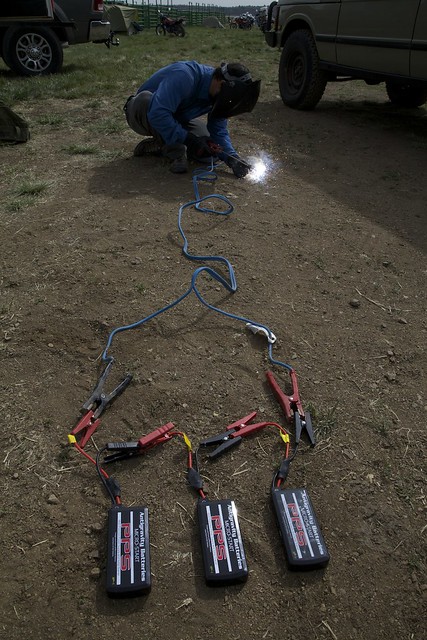
An update: While discussing the Micro-Start as we were setting up the Overland Expo, Graham Jackson, Tim Scully, and I started musing on whether one could weld by hooking up three of them in series. Taking a chance that we'd blow all three units we owned, Tim hooked them up, connected cables and a welding rod—and produced a perfect bead connecting two pieces of 1/4-inch steel. We were gobsmacked. We then hooked up two of the units to my Redi-Welder DC wire-feed unit, and again got a perfect result.
Obviously this is not something endorsed by the maker, and would quite rightly invalidate your warranty. But it showed what would be possible if a weld repair might make the difference between walking and driving out of a remote location.
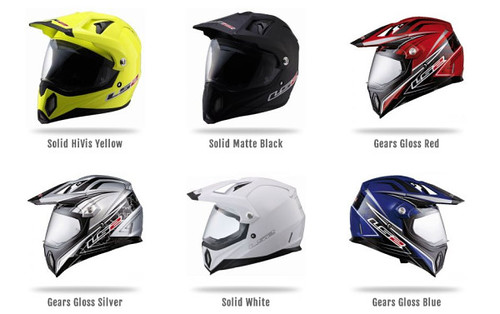
The LS2 MX453 Dual-sport Adventure helmet
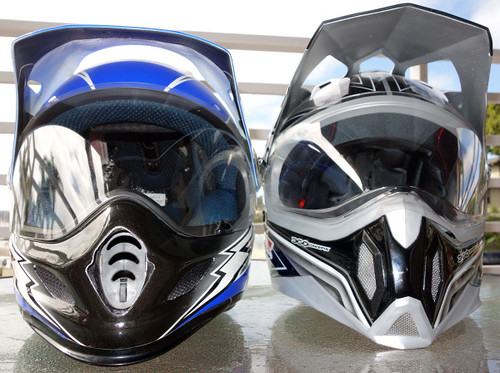 $400 Arai Xd-3, left; $160 MX453, right
(Editor's note: Carla King recently conducted one of her typically thorough tests of a new and very affordable helmet from LS2, on a trip to Baja with Jonathan Ely. Thanks to Carla for the fine review.)
By Carla King
When my friend Reg Kittrelle asked me if I’d like to try an LS2 MX453 Dual-Sport Adventure Motorcycle Helmet I said, "I've never heard of it, but dual-sport adventure? I'm in!" I guess I have been living under a rock because LS2 sponsored 76 riders in the 2013 Dakar rally, including the winner Cyril Despres, and almost 100 riders in the 2014 rally. But the company has operated in stealth mode for quite some time, making helmets for well-known brands (as MHR helmets) before deciding to strike out on their own. They hired a Spanish marketing firm who set to work on design and style, then started selling factory direct to keep prices low. The MX453 Adventure costs only $169.95, undercutting name brands in the dual-sport adventure helmet market by hundreds while vastly surpassing the quality of other helmets in its price range.
The category "dual-sport adventure helmet" is defined by its hybrid components: a dual-sport or motocross style helmet with a large eye port covered by a flip-down shield where you’d normally wear goggles. These helmets also sport a visor to shield your eyes from the sun and an extended chin bar for breathing room and ventilation. All this so you can exercise your right to wrestle your bike through the dirt heading west at sunset. Here's Reg on YouTube explaining the "adventure helmet" concept.
The target market for this variation on helmets is riders like me with our single-cylinder dual-sport enduros like the KLR 650 and KTM 690, and the big-bore adventure motorcyclists with BMW and KTM Adventures and the skills for off-tarmac fun. I see another great market in riders of the smaller dual-sport bikes who set off across the Sahara all the way to Cape Town, never exceeding 40 mph.
Touring helmets, like my Schuberth C3 modular (review HERE), by contrast, are targeted to long-distance tarmac riders attracted to speed and aerodynamics. In short, a visor, despite the sunshade, would only slow us down. But if you do both touring and dual-sport touring, your need for more than one purpose-built helmet is justified—along with a stable of motorcycles to match, of course.
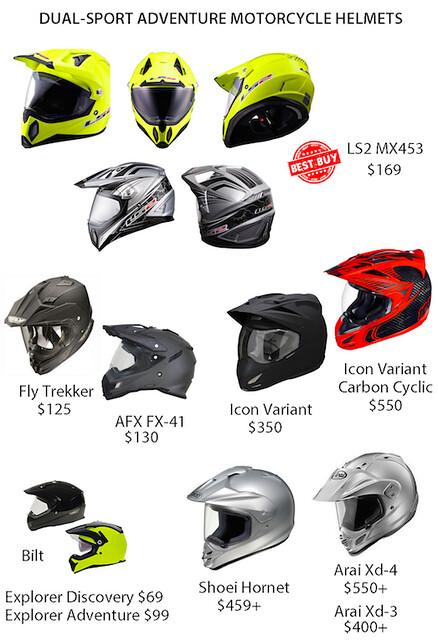
The LS2 MX453 arrived just in time for Jonathan Ely and me to take it along on a trip to Baja, trailering our KTM 350 and 450 EXCs. Jonathan, by the way, owns the pricy Arai XD-3 ($500) which made it easy to compare the Adventure feature-by-feature. (The new Arai XD-4 is available now.) For this review I also researched many other helmets in the dual-sport adventure category, doing some price and feature comparisons on the most popular. The two closest competitors are the Fly Trekker and AFX FX-41 in the $125 range. There really is no “mid-range” product in this category - though it could be argued that the LS2 would sit here if sold at a higher price via an intermediary. I did find the Icon Variant, which looks similar but is more a “hybrid” street helmet than a dual-sport helmet. One Variant is priced at $350 and the lighter carbon fiber model is $550. Then there’s the rock-bottom Bilt brand starting at an unbelievable $69. Finally you’ve got the brands on the highest ends, the Shoei Hornet and Arai Xd-4, both at over $550. There are many more but I just had to stop geeking out on this topic and finish this review.
In Baja, Jonathan and I unloaded the KTM dual-sports to explore backcountry and beaches, taking them for short rides down the tarmac at about 50 mph. We rode long stretches of remote sandy beaches and some scrabbly trails that usually dead-ended in impassible cactus-infested rock faces. Since the KTMs are unfaired I had expected the visor on the Adventure to catch the wind and throw my head back at tarmac speeds, but two very large diamond-shaped cutouts let the air through and prevented liftoff. Though Jonathan loyally defends his Arai, he had to admit that this was a thoughtful feature. Check out the photo comparing the two designs and you’ll see why I have less lift-off when riding at high speeds.
The MX453 Adventure’s fiberglass tricomposite shell also makes the helmet impressively light - not noticeably heavier than Jonathan’s size medium XD-3. My size small fit me perfectly and I found it very comfortable riding all afternoon. I haven’t used it for all-day touring yet but I think four or five hours at a time proves its wearability. The cheek pads are cut from one solid block of foam and other inner padding is smooth and substantial enough to keep my head from rattling around or making contact with any hard parts. There is also not any noticeable noise from the helmet itself, an irritation I’ve found with many lower-priced helmets.
When I took it for the first ride down Baja Highway One I was immediately struck by the view afforded by the ultra-large eye port they branded with the term “360 Concepts.” It actually gave me the startling feeling I wasn’t wearing a helmet at all. It was truly weird to feel as if there was nothing between my face and the road and I kept tapping the shield just to make sure. Soon there were a couple of bugs on it which eased my mind. This would also attest to the quality of the shield, which doesn’t distort the view. I wore my polarized Maui Jim sunglasses under the helmet with no discomfort. (My shield is clear but you can buy tinted shields.) Of course I also appreciated the visor to shade my eyes from the glaring Baja sun.
In the photo of the Arai and the LS2 side-by-side you can also see the large curved area at the bottom of the shield, which makes it easy to flip up no matter where you put your thumb. (But it also distorts your view when looking straight down, which didn’t really bother me.) The shield actuation is incredibly smooth and it stays where you put it. Many other helmets have one small visor-lift tab placed on the left side. The shield actuation on the Arai is on the firm side, and it’s sealed with a substantial gasket. The only irritation I’ve had with the MX453 so far is that the flimsy gray gasket has already started to pull away on the left side where my thumb rubbed when I pushed up the shield. (You can also see that in the photo.) Since I ride in San Diego and Mexico I wonder if that’s a result of the glue drying out in our consistently dry weather conditions. It’s nothing that a new application of glue won’t fix, and I’m not trying to compare it directly to the Arai, which of course is three times the price. That said, you’ll notice that Jonathan’s front vent went missing in Baja, again, possibly due to hot dry conditions drying out the glue. Oh, the sacrifices we make for living in Southern California!
The venting on the Adventure was adequate with a more airy feel than any other motocross helmet or conventional helmet I’ve ever worn. This might be more indicative of this style of helmet than the LS2 specifically, since they’ve all got the motocross helmet style breathing room and a shield instead of goggles pushing against your face. Speaking of goggles, other reviewers have noted that it’s much easier to fit goggles under the shield on the Adventure than other brands. (The shield is also easy to remove if you want to wear googles only.) There’s a lot of room in the chin bar for heavy breathing which is so much appreciated when working hard to get the bike through rocks and sand. A switch inside the chin bar controls the front vents, and two vents on top are also switchable. I could feel airflow through the chin and top of the head all the way to the exhaust vents at the back.
You can buy the LS2 MX453 Adventure helmet at online dealers and even at Amazon, along with replacement padding, shields, and visors. The sizes seem "true" and it was an easy fit with no pressure points - which is the impression other reviewers have had as well.
Jonathan bought his $500 Arai because it’s the quietest dual-sport adventure helmet available and it’s also got very high safety ratings. Comparatively, the $160 Adventure seems quiet enough and in fact one respected reviewer found it quieter than the Shoei Hornet. Nevertheless, I still wear earplugs (which I don’t always wear with my Schuberth C3) because the KTM is louder and buzzier than my other bikes and of course I ride off-pavement at higher RPMs.
The MX453 Adventure is DOT and ECE approved but not Schnell approved, but if it’s good enough for Europe it’s good enough for me. The chinstrap is nicely padded and has a standard D-ring closure system. (But I do wish everyone would go to the European ratchet system that I’ve grown so fond of on my Schuberth C3.)
When you compare the Adventure feature-by-feature with other helmets in this price range it quickly becomes apparent that this is the best buy by far in the low to mid-priced group. This may be a result of the factory-direct distribution which cuts out the intermediary sales channel. The new Arai Xd-4 at over $500 is generally considered as the best in this category, and it is proven the quietest. But of course if you have a Shoei head (and $500), you’d spend your money with them. If you’re super price conscious you might be tempted by the Bilt helmet at an amazingly low $69, or the popular ACX or Fly models at $30 less. But after a few casual try-ons at motorcycle stores, and after researching expert opinions around the web, I’ve come to the conclusion that spending the $160 on the LS2 MX453 Adventure would be the wisest investment.
I’m really glad Reg at LS2 approached me to test out this helmet. It is perfect for my style of riding, which is mainly adventure touring on the KLR and the R100GS, and dual-sporting on the smaller KTM 350 EXC. Heck, I might even try it when riding my big Moto Guzzi cruiser, so that on my rides from Borrego Springs back home to San Diego the visor shelters me from the glare of the setting sun.
LS2 is HERE.
A tale of two owner's manuals

My friend, master mechanic Bill Lee, sent me these photos. Ponder for a moment the difference between the owner's manual for a 1985 Toyota Land Cruiser, 144 pages long, and the suite of manuals for a 2013 Lexus RX 450h, totalling 1,750 pages.
Have you read War and Peace? It's shorter by 300 pages . . .

Hint: When using “Search,” if nothing comes up, reload the page, this usually works. Also, our “Comment” button is on strike thanks to Squarespace, which is proving to be difficult to use! Please email me with comments!
Overland Tech & Travel brings you in-depth overland equipment tests, reviews, news, travel tips, & stories from the best overlanding experts on the planet. Follow or subscribe (below) to keep up to date.
Have a question for Jonathan? Send him an email [click here].
SUBSCRIBE
CLICK HERE to subscribe to Jonathan’s email list; we send once or twice a month, usually Sunday morning for your weekend reading pleasure.


Overland Tech and Travel is curated by Jonathan Hanson, co-founder and former co-owner of the Overland Expo. Jonathan segued from a misspent youth almost directly into a misspent adulthood, cleverly sidestepping any chance of a normal career track or a secure retirement by becoming a freelance writer, working for Outside, National Geographic Adventure, and nearly two dozen other publications. He co-founded Overland Journal in 2007 and was its executive editor until 2011, when he left and sold his shares in the company. His travels encompass explorations on land and sea on six continents, by foot, bicycle, sea kayak, motorcycle, and four-wheel-drive vehicle. He has published a dozen books, several with his wife, Roseann Hanson, gaining several obscure non-cash awards along the way, and is the co-author of the fourth edition of Tom Sheppard's overlanding bible, the Vehicle-dependent Expedition Guide.