
Overland Tech and Travel
Advice from the world's
most experienced overlanders
tests, reviews, opinion, and more
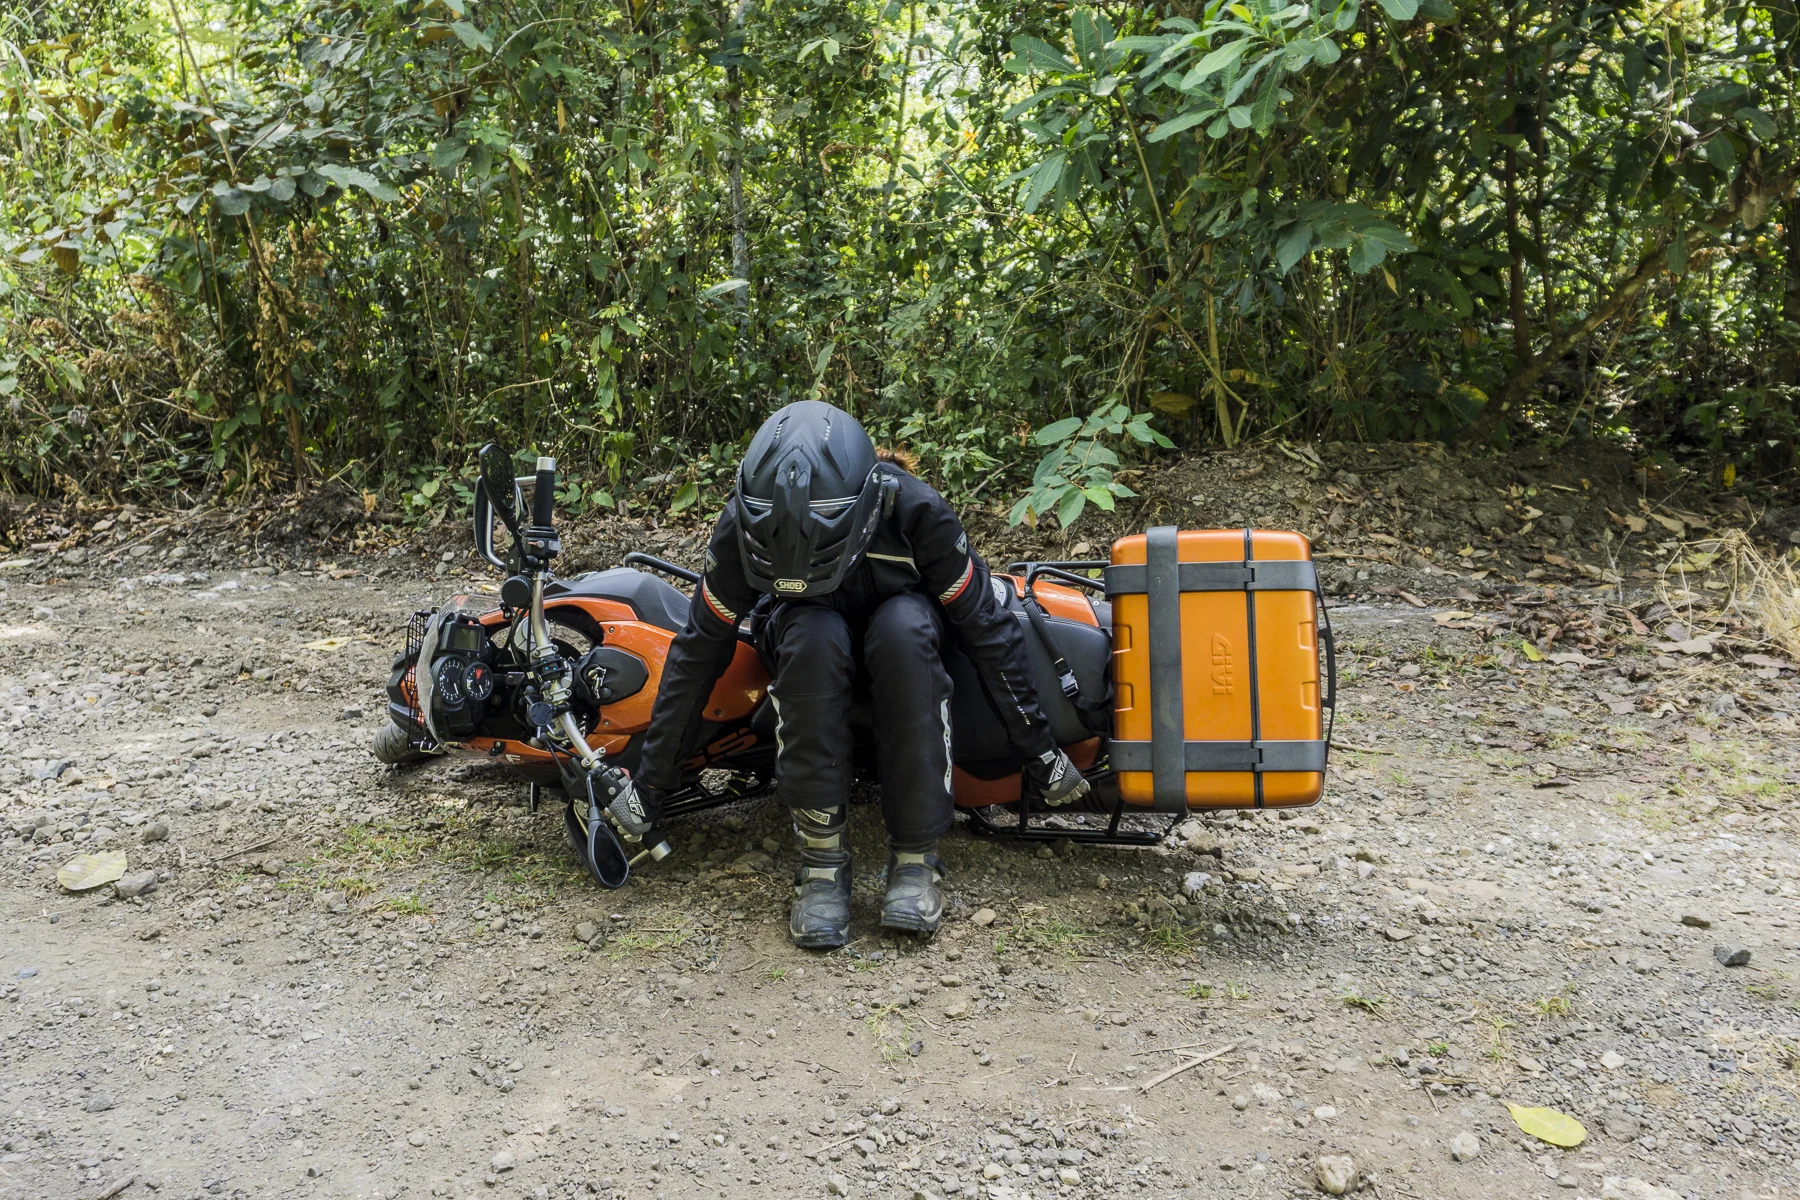
My ride for the next week . . .

Five-liter DOHC V8, variable turbo, 310 hp, 555 lb ft.
Full review will appear in OutdoorX4.
The weakest link

Like all of you, my head turns when I spot a well-equipped four-wheel-drive vehicle. The other afternoon, while Roseann and I were in downtown Tucson waiting for the trolley, I noticed in an adjacent parking lot a spiffy-looking gray Jeep Wrangler Rubicon Unlimited. Since the Rubicon Unlimited is one of my all-time favorites, I wandered over to look.
It was indeed spiffy and gleaming, apparently brand new, and from the looks of it the owner had dropped it off at a full-service four-wheel-drive-overlanding-expedition-equipment shop, along with a Platinum Amex, and said, “Equip me.” Suspension lift (a reasonable one), oversize tires (reasonably so), roof rack, Hi-Lift, etc. etc. Up front was a well-made winch bumper—but it in turn was mounted with an odd combination of an off-brand Chinese winch and proper synthetic line. Since the rest of the truck showed a no-expense-spared attitude, I’m not sure what spurt of economy made the owner decide to scrimp on the winch, unless the entire project is strictly for show, in which case a winch is a winch, right? Or it could be as simple as bad advice from the shop, or a forum. (Actually even the synthetic line could be misleading: Discount synthetic winch lines of questionable provenance are becoming increasingly common.)
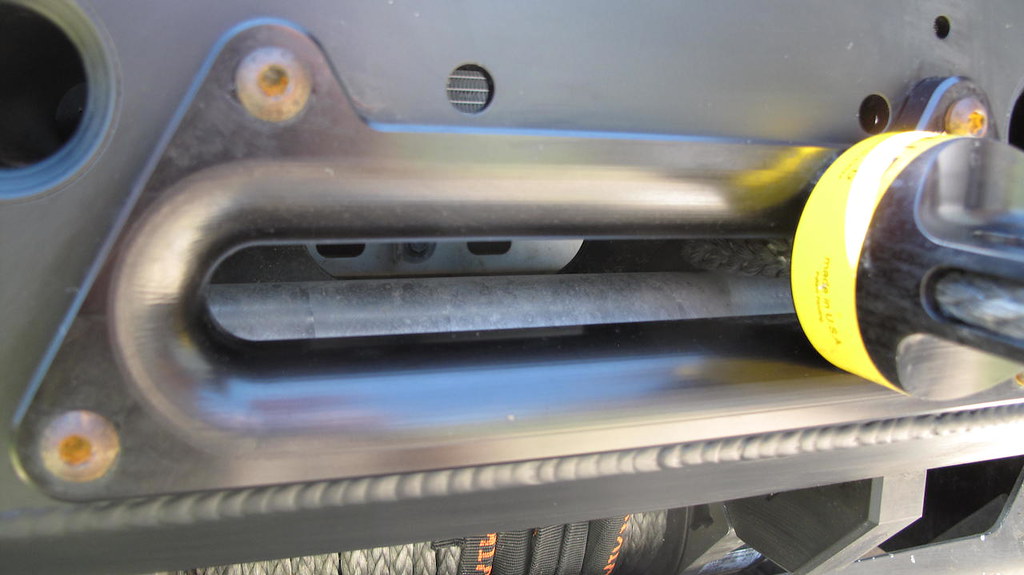
However, what really caught my eye was the fairlead, an aluminum hawse type, which persistent myth still wrongly claims is the only safe configuration to use with synthetic line. That aside, the chamfers of the line guide on this one were by far the worst I’d ever seen. It’s easy to understand instinctively that running a line over a sharp bend while it’s got three or four thousand pounds of tension on it is not a good thing. Ideally the chamfer or roller over which a winch line—whether steel or synthetic—is run under tension should have a radius of six time the radius of the cable. The edge of this fairlead was barely radiused at all, and on any off-center pull would put huge stress on the line. It was clearly manufactured by a company that either had zero expertise in the physics of how a winch system operates, or zero inclination to build a product with any function other than looks. (Incidentally, in terms of installation, note the slapdash job on the cotter pin securing the winch hook.)
Also note the hook drawn under tension into the aluminum of the fairlead, and the visible scratches in the edge of the opening. Those will cause significant damage to the line when it is run over them under tension. (Incidentally, in terms of installation, note the slapdash job on the cotter pin securing the winch hook.)
It bears repeating as often as necessary: If you install a winch for any reason other than pure fashion, every single component of the system should be of the highest quality. A winch system under load is absolutely dependent on the weakest link in that system, and the result of a failure can be ugly.
Here's a much better-designed hawse fairlead:
And, even better, a roller fairlead:

Buy the tire you need, not the one you want
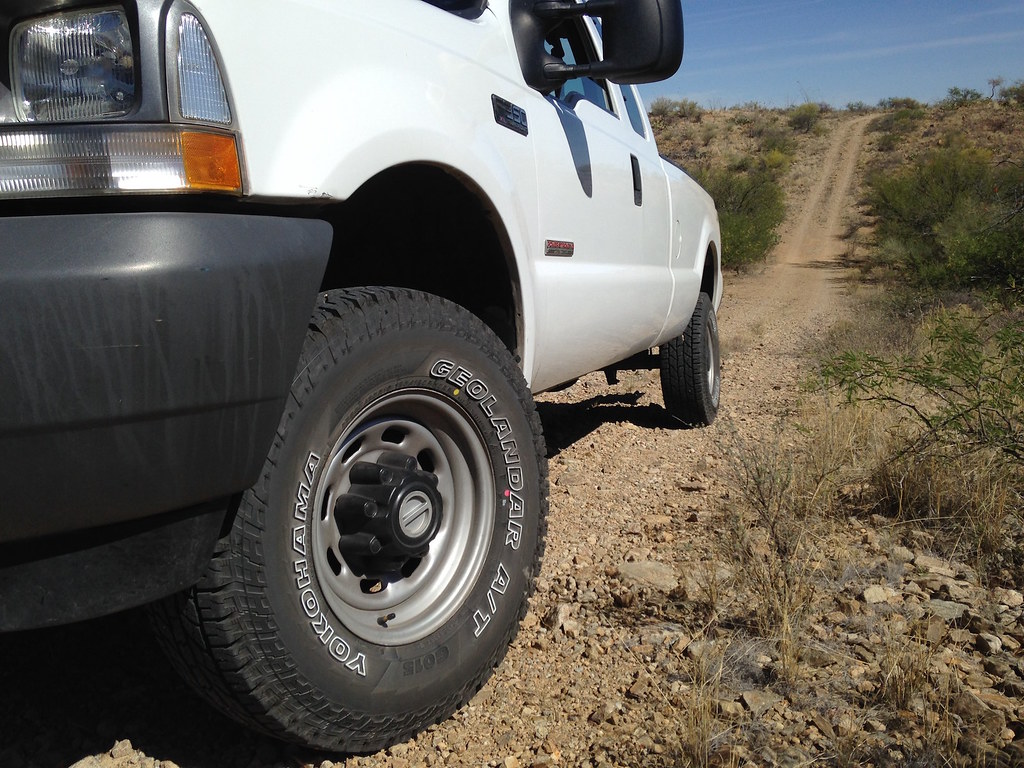
Recently I received a set of the all-new Yokohama Geolandar AT GO15 tires to review for OutdoorX4 magazine. While sold as an “all terrain” tire, the tread on this Geolandar looks mild compared to many similarly marketed tires. And that got me to thinking about overlanders and our tire choices.
It’s natural to gravitate toward an aggressive tread design when buying tires for a four-wheel-drive vehicle. A more aggressive tread means better traction in steep or loose terrain, right?—which is why we have four wheel drive in the first place, right? And besides—let’s be honest—a mud-terrain tire just looks cooler than a more street-oriented “AT” tire. If appearance has never, ever entered into your tire-buying decision you’re a more logical thinker than I am.
Obviously, however, there are logical aspects to tire selection besides traction. The most critical of these—in fact the most critical of all— is safety. A street-biased tire with more closely spaced, shallower tread blocks will exhibit significantly better grip for both handling and braking than one with hyper-aggressive, open-blocked tread. That aspect could quite literally be a lifesaver in the right (wrong) scenario.
Fuel economy is a factor as well. When I switched from BFG All-Terrains to BFG Mud-Terrains on my FJ40 (partially because, yep, they just looked better) my fuel economy dropped by almost exactly one mile per gallon—and one mile per gallon on an FJ40 makes a difference, let me tell you. Then there’s tread life. Those closer tread blocks translate to less squirm, which translates to longer tread life given the same compound. Finally, even with modern computer-designed tread, aggressive tires tend to be louder at high speed, which can be a fatigue factor on long drives.
All these advantages to street-biased tires are obviously mostly advantageous on the street, and that’s where logic butts up against romance. Most of like to think we spend more time off pavement than we actually do. The reality is, if more than ten percent of the miles you put on your overland vehicle are actually off pavement, you are quite an adventurer. I’m not sure Roseann and I hit that, and we cover seven miles of dirt road just to reach our house. Much more frequently a backcountry journey will entail several hundred miles of highway and maybe 40 or 50 miles of trails. Thus, for most of us, for most of our time behind the wheel we would enjoy better handling, braking, fuel economy, and tread life with a less-aggressive tire choice. And we wouldn’t have to crank up the sound system so much to count how many times Terry Gross says “like” or “um” in one interview. Sorry, personal gripe.
Where was I? Right: There’s an additional factor to consider for those of us who own modern vehicles with sophisticated ABS-based traction systems and hill-descent control: We have more and better inherent traction available to us than we did when driving older vehicles with simple part-time four-wheel-drive systems. So we can enjoy just as much off-pavement ability with a less-aggressive tire—as anyone can confirm who’s watched Land Rover’s LR4s on street tires negotiate the Overland Expo driving course.
So the next time you buy tires for your overland vehicle, consider carefully—and logically. Do you really need those BFG Mud-Terrains, or would the All-Terrains perform better most of the time? For that matter, would BFG’s Rugged Trail suit your needs? Get the tire that works best, not the one that looks best. Then you can smile condescendingly at the guy driving by in the jacked up truck riding on those howling Super Swampers.
"World's most powerful mini-ratchet"
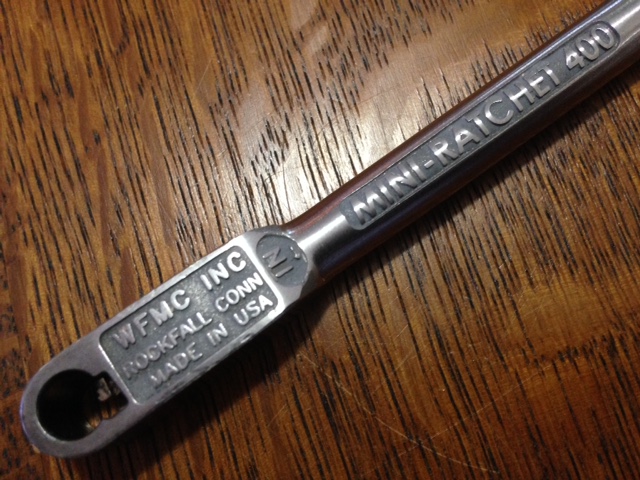
It’s no secret I’m a sucker for good tools—and especially interesting good tools—and every once in a while something comes along that’s extra special. Last month while Graham Jackson and his wife, Connie, were visiting us, Graham handed me a red plastic box, the length and width of an index card and an inch tall. Inside was the most densely packed assortment of bits I’d ever seen, along with a cunning ratchet no bigger than a cigarette. (Does that analogy even work any more? Will OT&T now garner an R rating because I mentioned smoking?).
Where was I? Right: The Wadsworth Falls Manufacturing Company ratchet works by means of a dead-simple, hardened spring-steel tooth inside the bit opening, which clicks past or locks on to the fine splines forged into each bit (engagement arc is only 12 degrees). Moving parts are minimized, and the tiny ratchet is rated to 400 inch-pounds of torque (33 pound-feet), which is probably all you could exert on it with one hand. To reverse you simply pull out the bit and insert it in the other side. Also included is a screwdriver-type handle into which the bits fit, either directly or on the end of the four-inch extension that also works in the ratchet. There are even a couple of little knurled plastic bit holders for very fine or tight work.

And the bits? There are 43 of them, including metric and SAE hex, Phillips and standard screwdrivers, and Torx, plus an adapter to accept 1/4-inch sockets. Add a set of 1/4-inch-drive sockets from 6mm to 13mm or so, and this kit would probably suffice for half the minor repairs you might need to do on a four-wheel-drive vehicle or motorcycle. After sourcing my own, I did a few odd jobs around the house and Ford truck—after cleaning off the black gunk that coats all the bits—and found the kit just handy as hell. The—count ‘em, nine—standard screwdriver bits are so precisely ground I wouldn’t hesitate to use them on my English shotguns.
The bonus is it’s all made in the U.S. (and thus, yes, not cheap at around $80). Available from a variety of outlets, just Google.
Does CO2 leak out of tires?

Some years ago racing bicyclists began carrying tire-repair kits that used common miniature CO2 cartridges to refill a patched tube in seconds, saving the time otherwise wasted using a manual pump. The kits subsequently became popular among recreational cyclists who weren’t necessarily in a hurry, but simply couldn’t stand not having the latest high-performance gear, or felt that the drudgery of working a manual pump was simply . . . hell.
Soon, however, riders began noticing something: The tires they filled with CO2 seemed to lose pressure much more rapidly than when filled with air. Some claimed a tire filled to 90 psi with CO2 would be down to 40 in a few days.
Impossible, said the makers of the CO2 kits. A CO2 molecule is larger than either a nitrogen molecule or an oxygen molecule, which together comprise 99 percent of air. How could CO2 leak out faster? Don’t ask us how, said the bicyclists, we just know it happens.
Finally a few people familiar with chemistry looked for an explanation, beginning with the properties of gas permeation by diffusion. All gasses exhibit a permeation rate through butyl rubber—the material used in most bicycle tires—proportional to the inverse of the square root of their molecular weights. Using this formula, you can show that the rate of permeation of CO2 through a butyl tube compared to air should be . . . uh, well, lower. Hmm . . .
Finally someone got it. The answer has nothing to do with molecular weight, although it is still a chemical phenomenon. It turns out that CO2 is actually soluble in butyl rubber—it essentially melts right through the material without having to wait for permeation.
And that brings up a question: Does the same thing happen with the tires on four-wheel-drive vehicles when owners use the popular CO2 tanks for airing up?
Tubeless automotive tires are obviously different in construction than bicycles tubes. For one thing they’re probably ten times as thick, with various reinforcing belts and cords. One source tells me the inner liner of all tubeless tires is “halobutyl” rubber infused with other compounds to limit permeability. So the phenomenon should be at least substantially slower on an automotive tires than on a bicycle tube. Additionally, most uses of CO2 involve topping up a tire that was only partially deflated for trail driving; thus there is probably a significant percentage of plain old air left in the tire. I decided to see if the CO2 effect was a factor in truck tires, and if so to what extent.
I used the front tires on our Land Rover One Ten, since it was due to be parked for a while and I wanted perfectly stable conditions. I deflated both tires completely, then filled one with a compressor, the other with my CO2 tank, to 40 psi (in the process learning a valuable lesson about tire gauges, see here).
A week later I checked both. The compressor-filled tire remained at 40 psi. The one filled with CO2? Thirty six. Aha. Two weeks later the air-filled tire had dropped about a half pound, while the CO2 tire was a smidgen under 33. That’s about a 20-percent loss in three weeks.
My tentative conclusion is that CO2 does indeed suffuse through automotive tires, albeit at a substantially slower rate than it does from a thin butyl bicycle tube. This means that if you use a CO2 tank for tire repairs and airing up, it would be wise to check the pressure more often than you normally would.
I say “tentative,” because due diligence requires that I repeat the experiment, but swap tires to confirm that my original CO2 tire does not have a slow leak. Since both tires were close in pressure when I began, I doubt this is the case, but I need to confirm it. So right now both tires are filled again, except with the opposite procedure. I’ll report back in a few weeks.
At last an all-weather riding suit that is really all-weather?
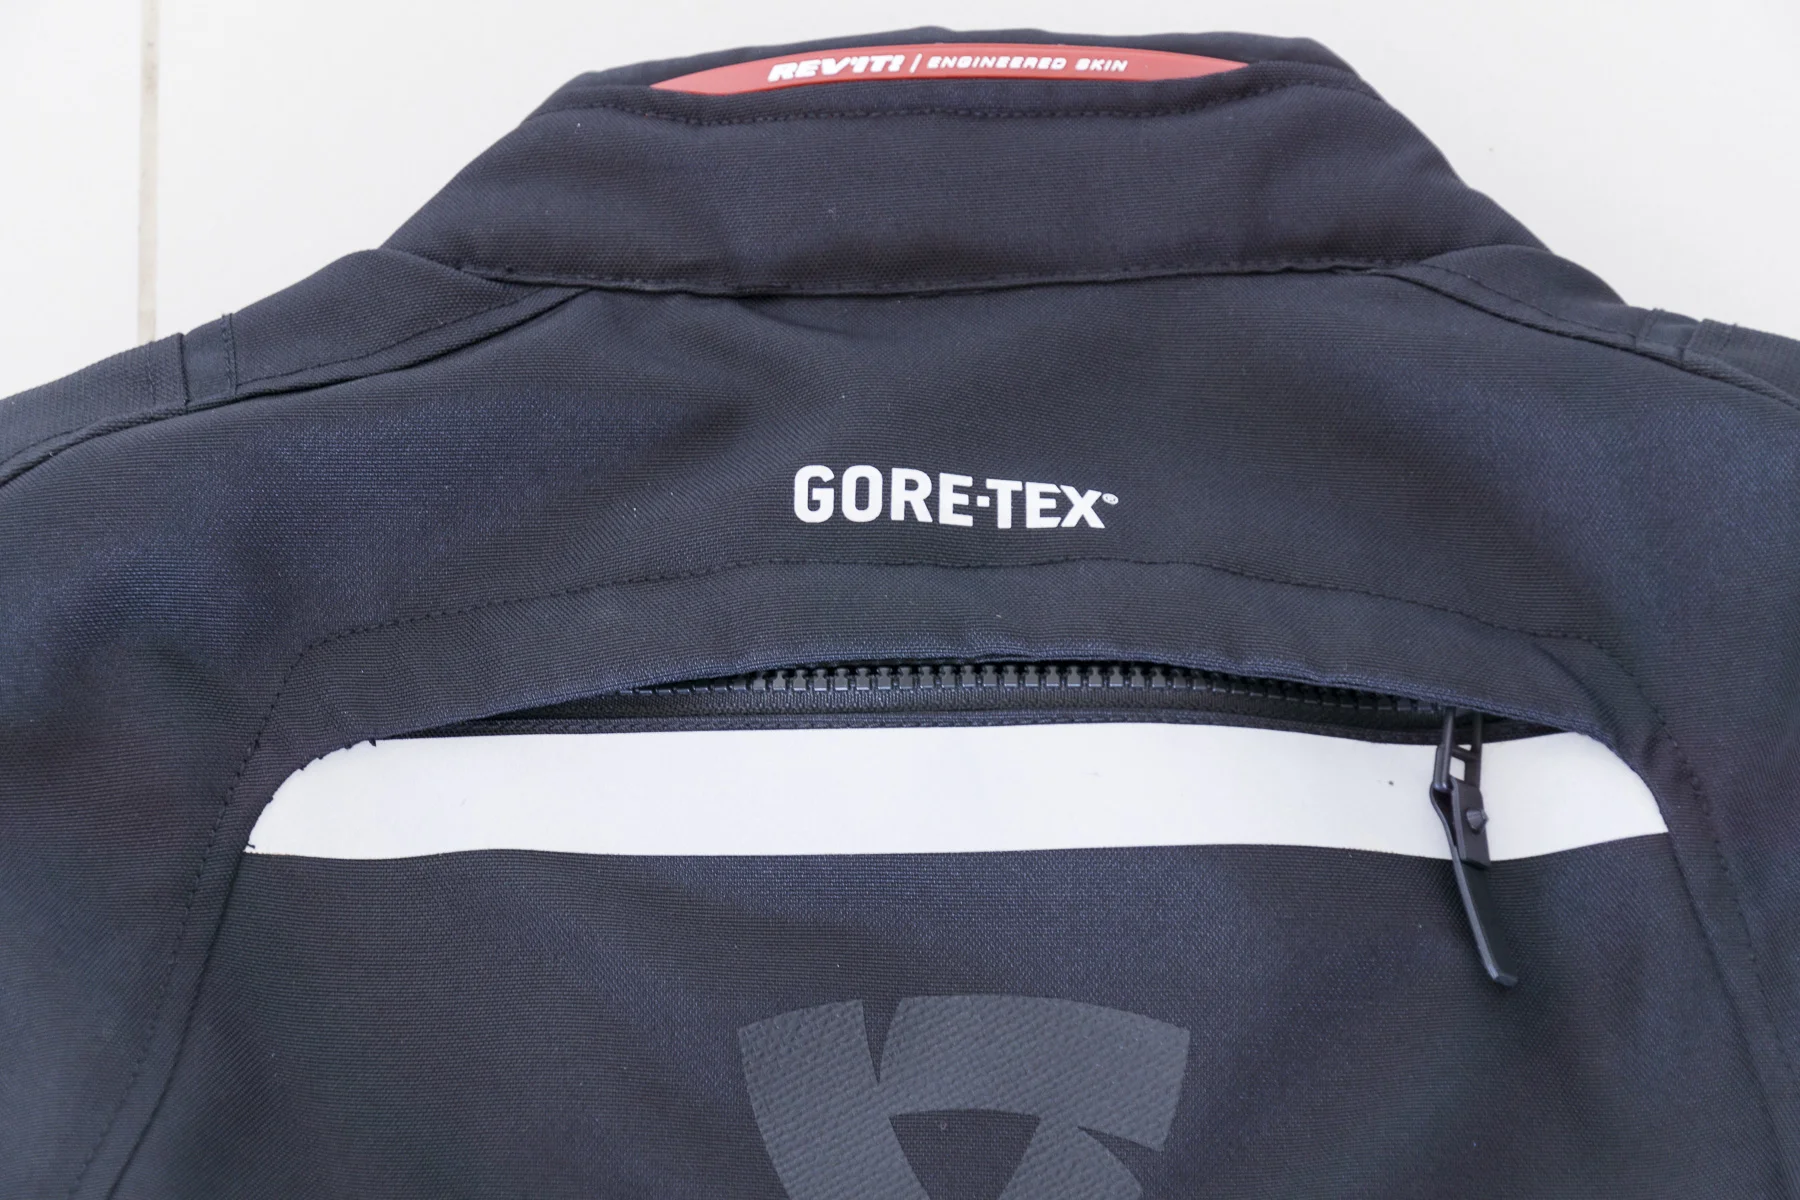
I first saw the REV’IT! Neptune GTX at Overland Expo 2015 WEST, as the REV’IT! team and I were huddled in the tent trying to keep warm during a flash snowfall in the middle of May. They were revealing a women’s version of a popular men’s suit bearing the same name. This suit takes women’s gear to a new level by matching the same tough fabrics and protective armor as the men’s line. While I watched the sleet and wind outside, the inclusion of Gore-Tex was also appealing.
It was a few months later during another rare weather incident—this time a hurricane during Overland Expo EAST—that I took the suit home with me to try. If anything, the weather of 2015 taught me that no matter what’s predicted, you always have to prepare for the worst. The same holds true for riding gear. When traveling, you want something that will work for both ends of the weather spectrum. I was curious if the REV’IT! Neptune GTX jacket and pants would do just that.
The suit boasts a lot of features as well as 4-season wear-ability. When you have the idea of riding the world you need it to be versatile. When you don’t have the luxury of a closet, one suit has to do it all for year-round wear.
The benefits of layers
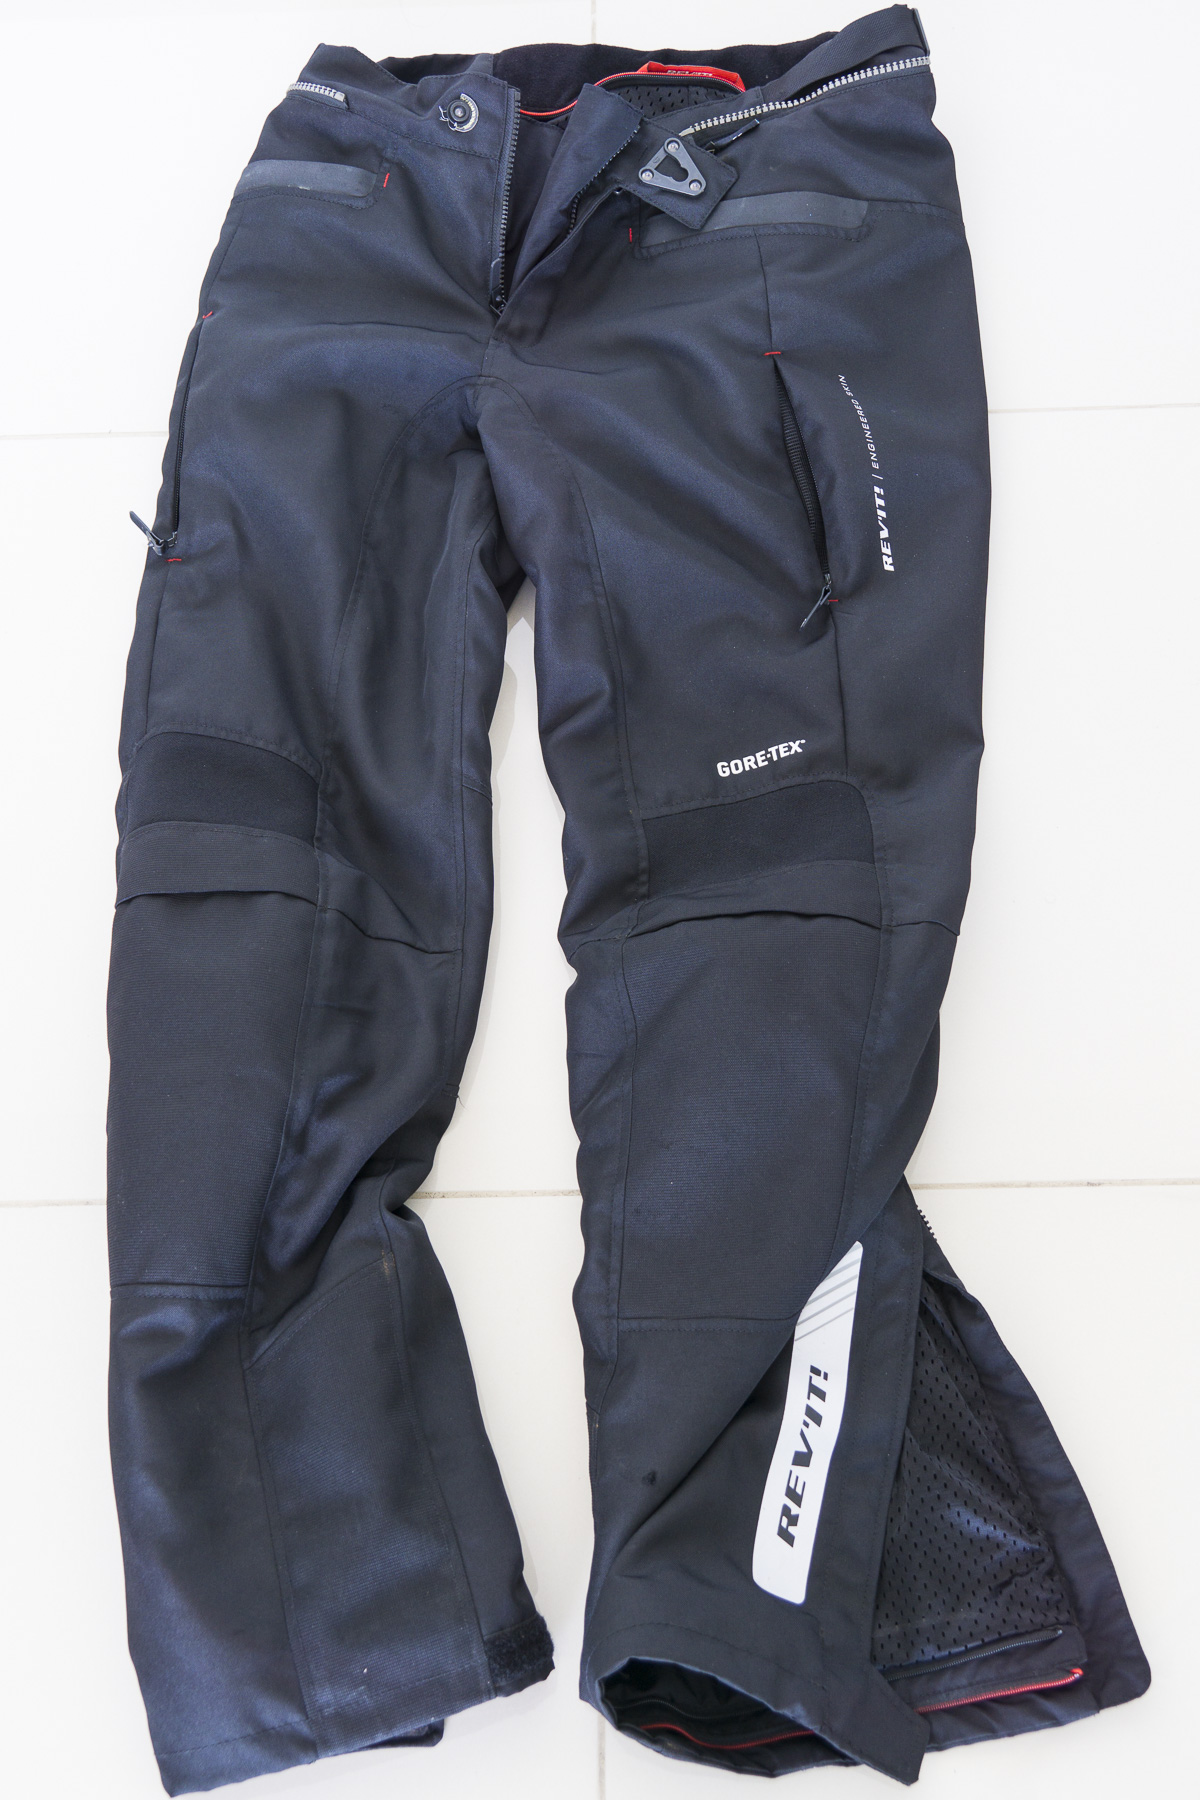
The Neptune GTX comes with three zip-in layers: a protective shell, a waterproof mid-layer, and a thermal liner.

First, let’s look at the shell construction.
REV’IT! uses two durable fabrics. At the high-abrasion zones—the shoulders, elbows, knees, and ankles—is an 880D stretch Cordura, which is twice as durable as standard nylon, yet remains flexible yet protective where it’s needed most. The majority of the jacket is made from a fine but tightly woven high-density 600D polyester thread, which not only protects the rider but also keeps the overall garment light-weight. Both materials are equal to the men’s suit and are a step up from REV’IT!’s Sand series. (Weight of jacket by itself: 4lbs.)
Both materials are coated with Teflon (yes, think non-stick pans). Teflon is known for its slippery nature and when applied as a coating, the same characteristic that makes food not stick to metal pans, makes dirt not stick to the polyester or nylon fabric. Ideal combination for those off-pavement rides. Not to say that dirt won’t dry on it, but it will wash off easier, keeping the suit looking cleaner longer.
With that said, the outer jacket and pants are not waterproof. Last weekend I rode part of the day in the rain, and without stopping to add the waterproof layer, I did get wet but not drenched. The Teflon coating helped the suit not soak up every drop of water and dry quickly when the sun came out. At least REV’IT! includes a waterproof pocket on the outside of the jacket (as noted with a label, but I really wish both were) so my important items stayed dry.
Moving on to the mid-layer.
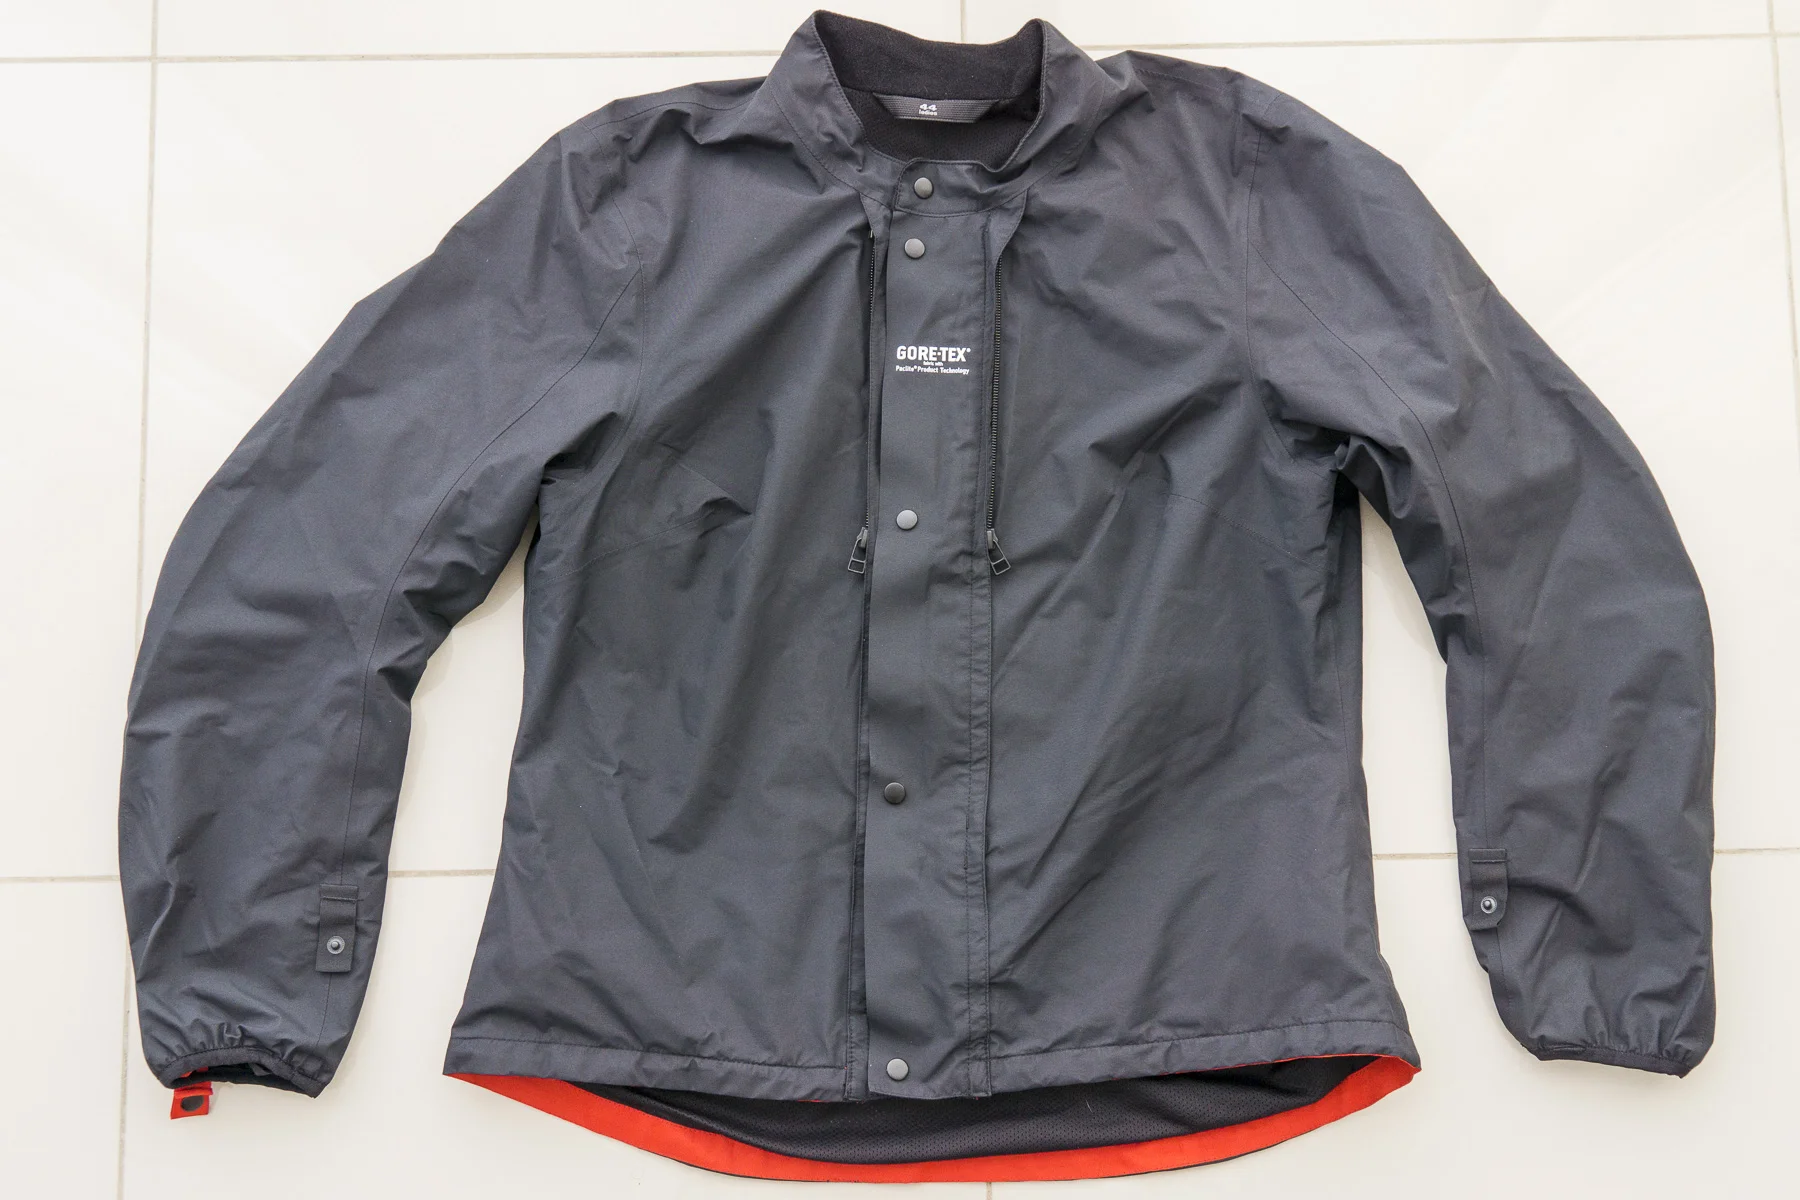
It’s worth a mention that the Gore-Tex lettering on the outside of the jacket and pants does not refer to the jacket or pants. It refers to the rain liner that zips in underneath the shell.
The waterproof jacket liner is fully finished with internal pockets, so once you zip it off the shell, it can be worn around town. The design isn’t bad either. The material is comparable to casual rain jackets and is designed with a soft inner layer to keep it from sticking to your skin. REV’IT! uses Paclite Technology so as that suggests, it packs relatively small. (Weight with the 2 layers: 6lbs)
There has been a popular discussion lately amongst the rider community: is it better to have the waterproofing as a layer or baked into the outer shell?
Having debated this topic myself, here’s my take:
This is the first suit I have owned that is not waterproof on the outside. At first, I was uncertain about the idea that the Gore-tex included in the Neptune GTX was a liner and not part of the shell like with other suits. But that it has its benefits.
Gore-Tex is best known for its waterproof, windproof, but breathable properties. What exactly is Gore-Tex? (We’re about to get technical.)
Both Gore-Tex and Teflon are made of the same polymer: PTFE (polytetrafluoroethylene). It is an excellent insulator, hydrophobic, and weather-durable, which makes it useful as a component of Gore-tex. Gore-tex is a stretched, porous layer of PTFE composite used to laminate another layer of fabric, thus creating a waterproof barrier. At this point water (or sweat) can only pass through in one direction as vapor, creating a “breathable” layer underneath and water resistant surface on the outside.
Although Gore-tex is a breathable membrane, it’s best suited for colder climates, as it needs a pressure imbalance (warm air inside the jacket vs. cooler air outside) for sweat vapors to be pushed outward. When riding in humid and close to body temperature environments, an equilibrium is created and, therefore, no place for sweat to escape to. While you may be ‘dry’ on the outside, the wet stays wet on the inside. This limits the number of seasons or weather conditions you can comfortably use the suit.
When riding in hot and humid weather (think 90ºF /32ºC: summer in the south U.S., Central America, S.E. Asia, many parts in Africa) and not traveling 65mph / 100kph (i.e. in traffic or off-roading) to cool off the sweat, the difference between a Gore-Tex infused jacket and a non-Gore-Tex jacket is noticeable. With the Neptune GTX, the overall weight of the fabric is lighter, it breaths more and I can ride longer without overheating. Ultimately, this makes the day more enjoyable. Hence, having a Gore-Tex layer as a removable liner is a welcomed change.
So why not ride with a thin, independent Gore-tex layer (like a simple rain jacket) on the outside?
Maybe the benefit is best described in an example: what happens when you are riding in the rain, the tires slip on oil or a wet leaf, and you fall and slide for a few feet? Or you are riding off-road and a branch catches your upper arm? The Gore-Tex waterproof layer is not as durable as the polyester or Cordura outer shell and will tear the fabric, leaving the layer rendered useless against keeping water out. Having it as a mid-layer, preserves the protective quality of the Gore-tex. Although the outer shell is not waterproof, the Teflon coating helps the fabric repel dirt and not retain water, meaning it does get wet, but it dries quickly.
And lastly, the zip-out thermal layer.
On every jacket I have owned with a removable thermal layer, I remove the layer and leave it in my closet. Some people like the zip-ins, and to each his own. If I were using this suit year-round from a home base, I would zip them in when I knew what the weather was going to be like during the weekend ride. But for long-term, long-distance travel, especially when packing space is at a premium, I prefer my own clothes to layer underneath. So, forgive me if I skip over the plastic, quilt-like, polyester fill layer. The other two layers are what really make the jacket dependable.
Extreme weather testing
As my riding partner says, if you are wearing a wool base layer, a fleece, a down jacket, a waterproof jacket, and a riding jacket and you are still cold, then it’s time to stop or you are riding in the wrong season.
Unfortunately, I am not in a location where I can test extreme cold or even cold weather. As noted above, you can always add more layers. Yet, taking off layers has its limits. The true test of an all-weather suit is how well it vents.
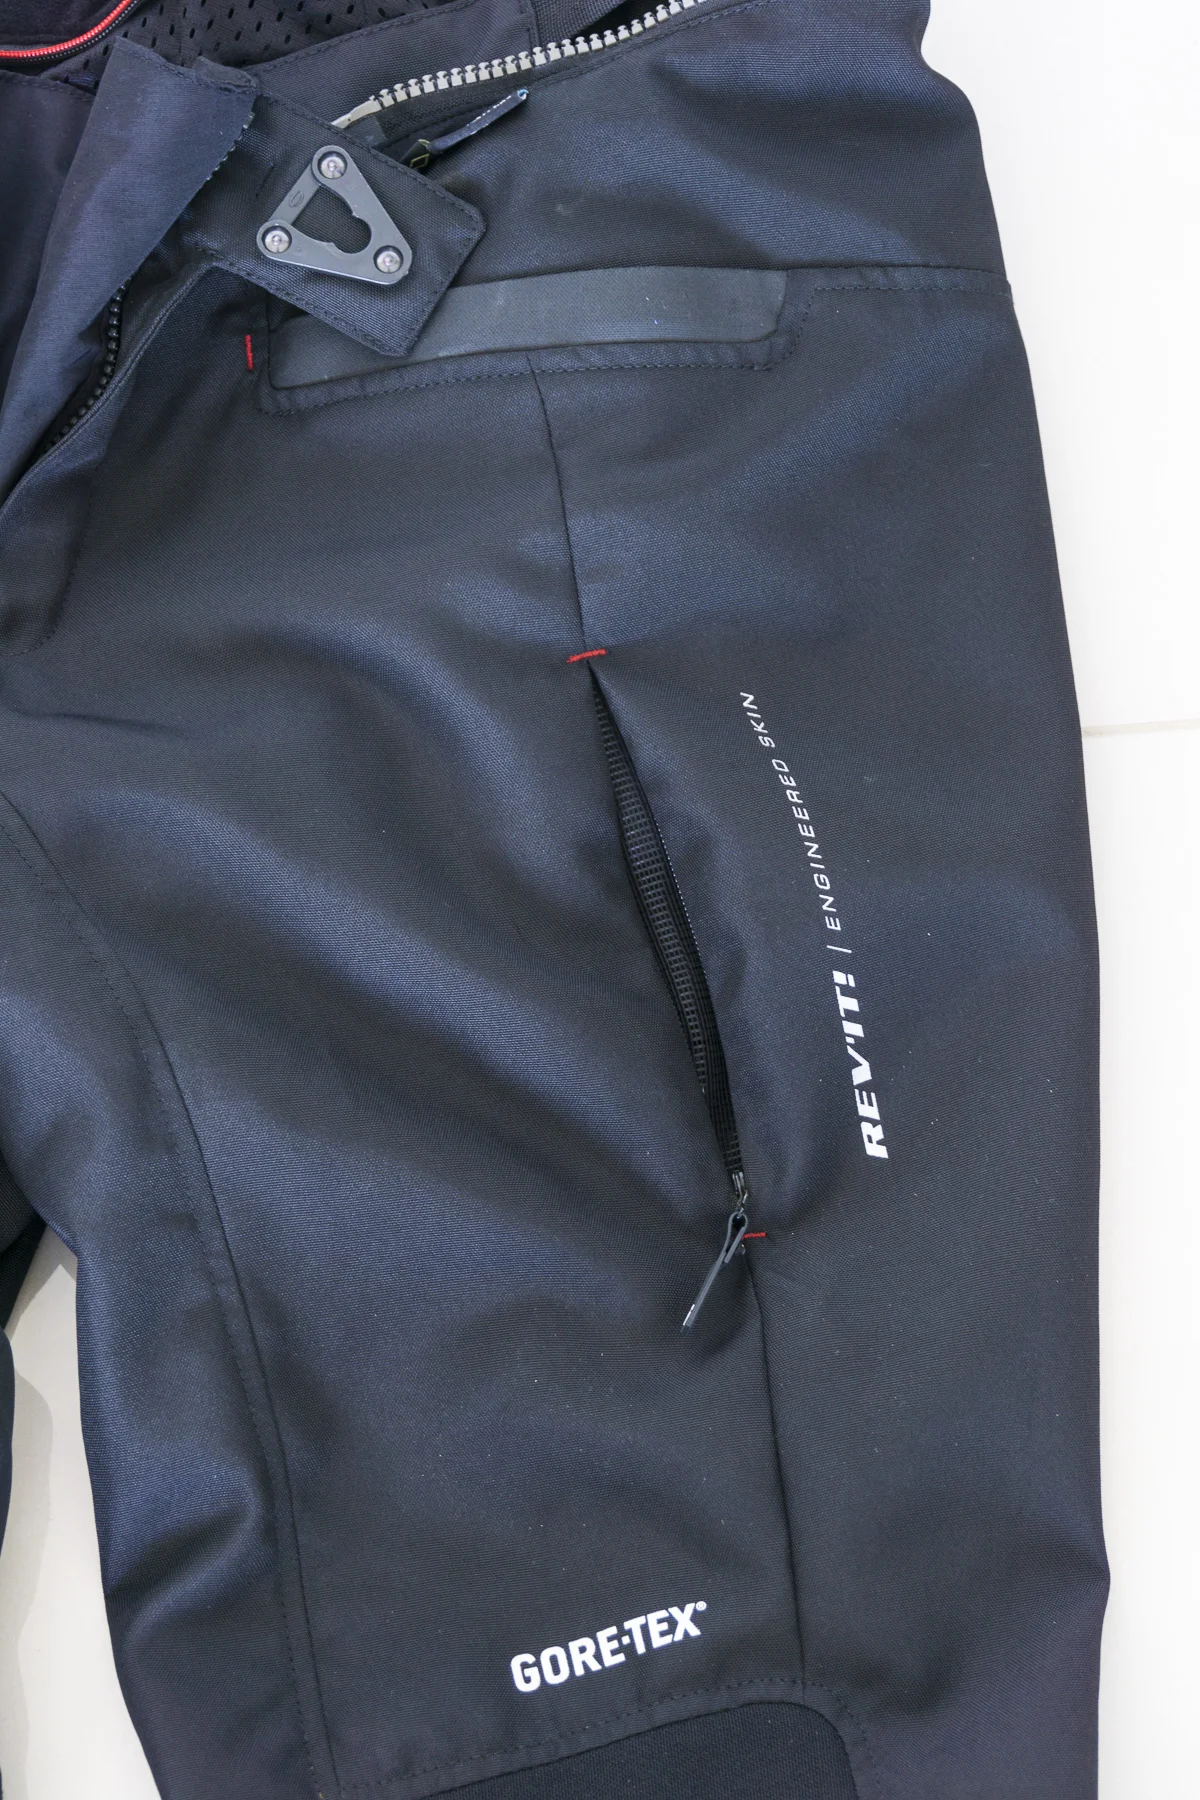
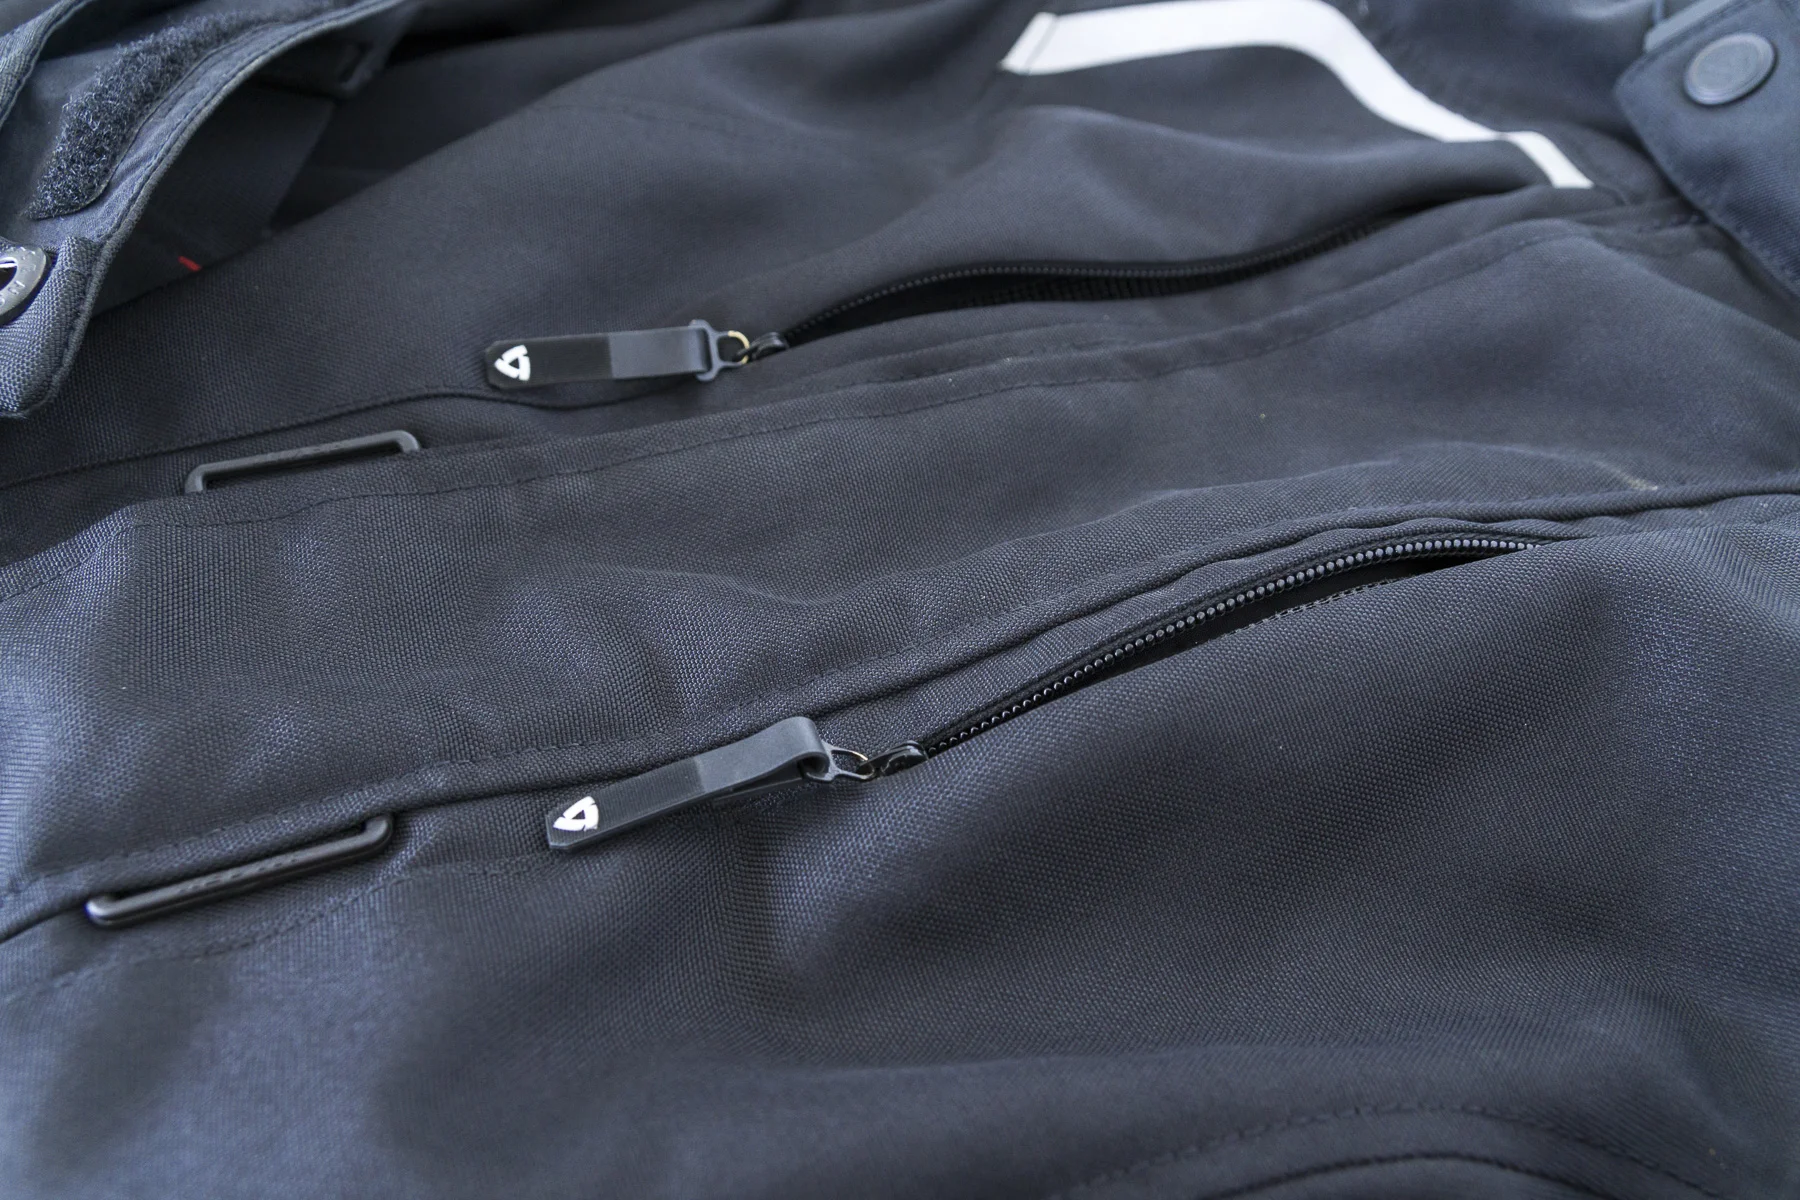
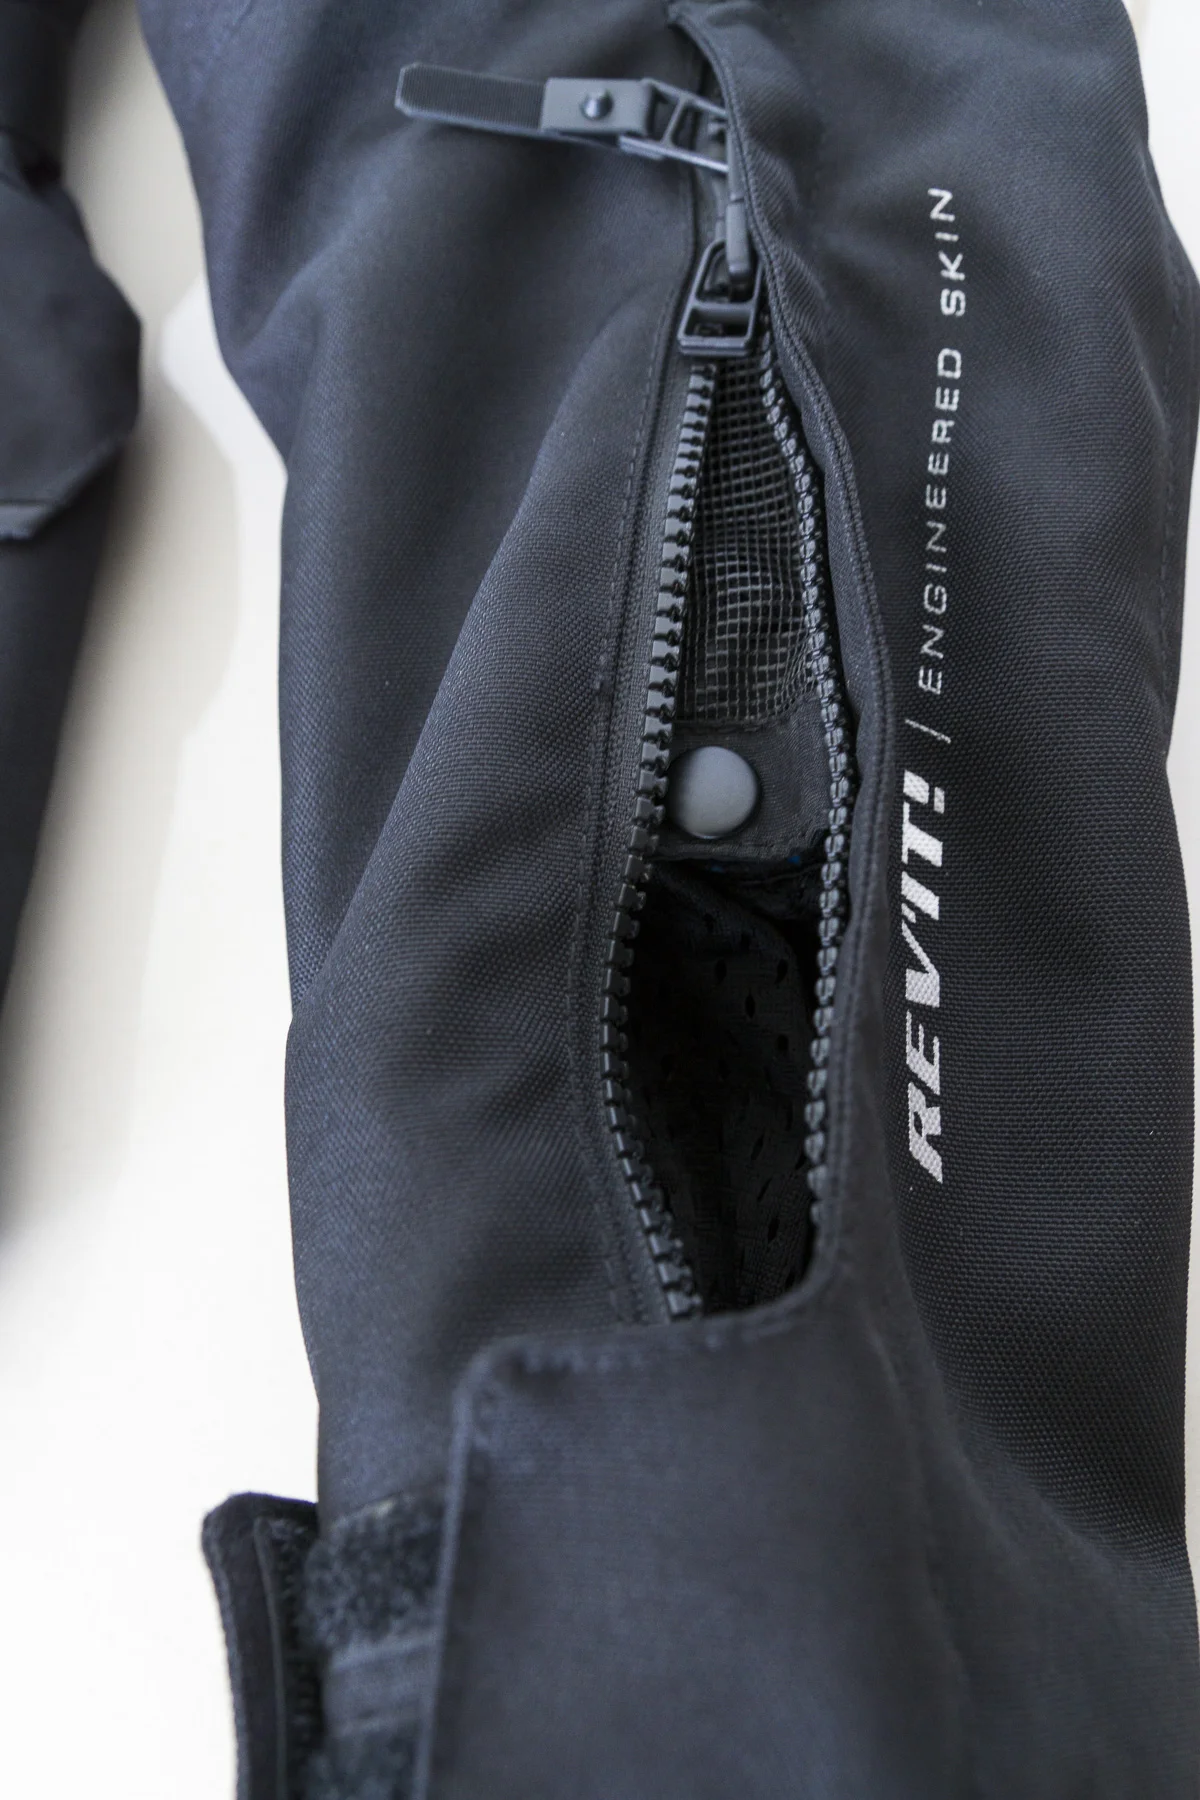
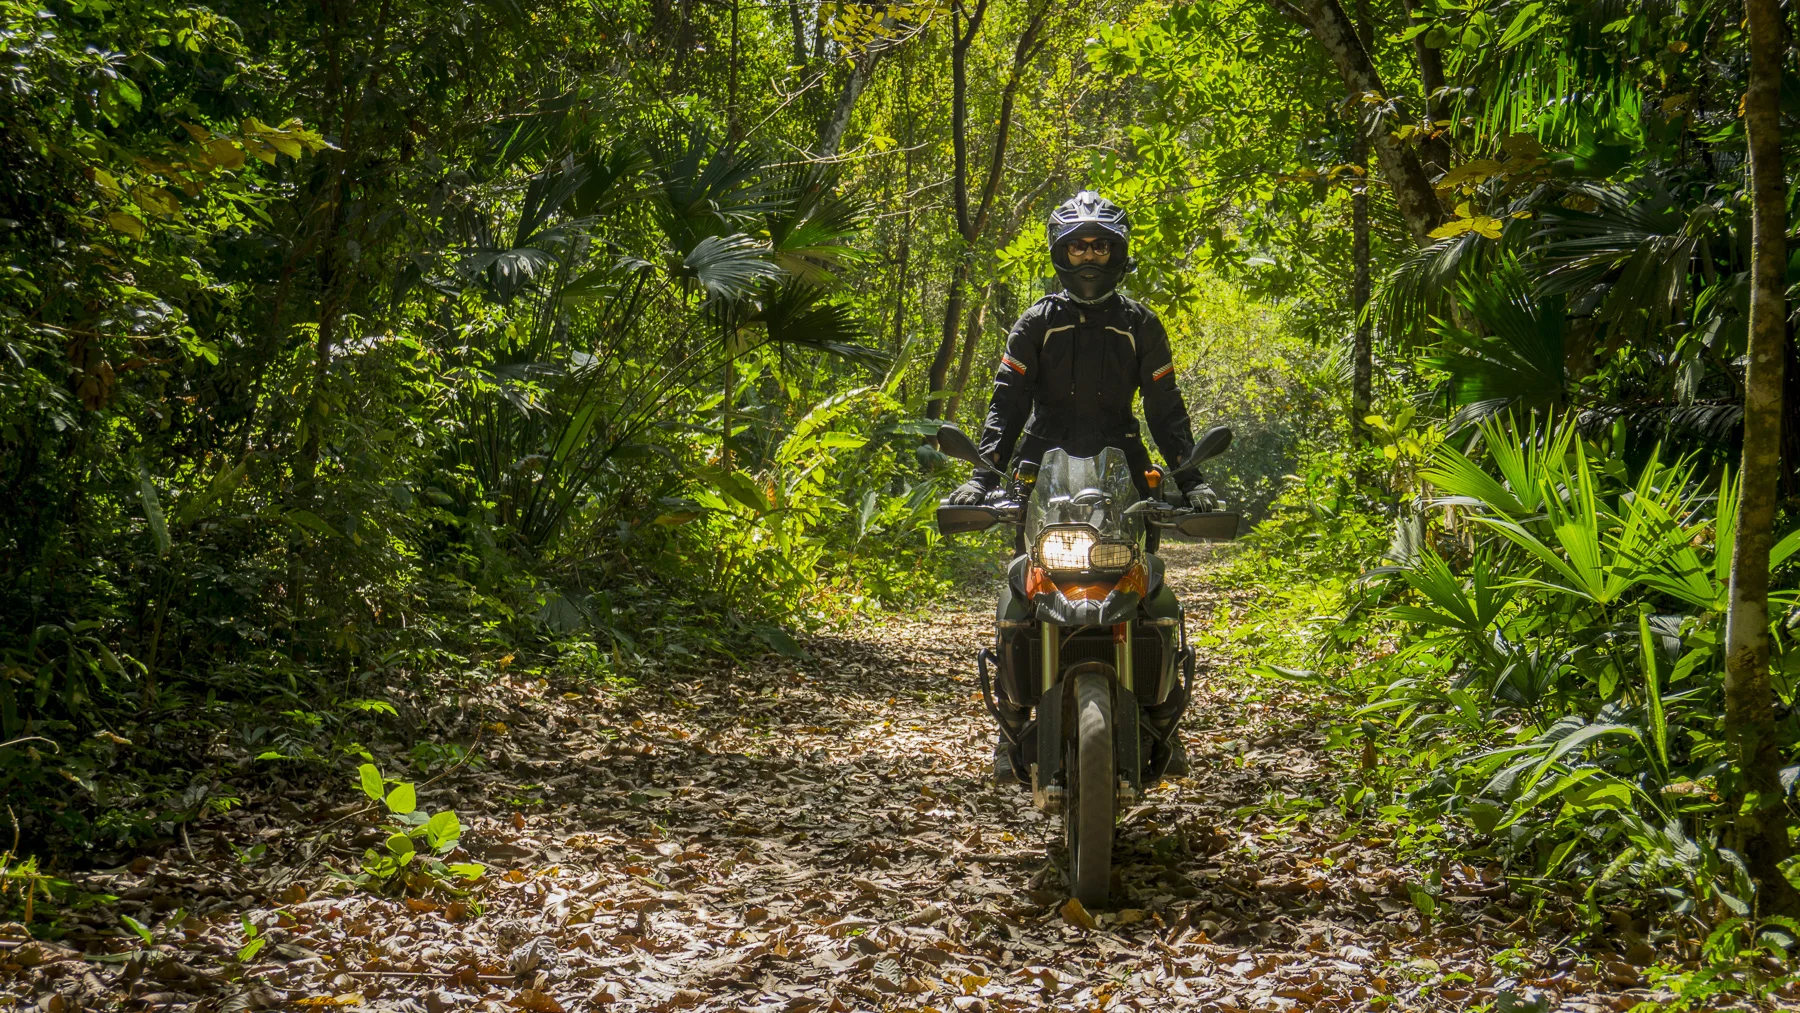
The Neptune GTX has 5 vents on the jacket and two on the pants. The two vertical vents on the upper chest and the two on the upper thighs are only 6” long, but allow a good amount of airflow. The horizontal exit vent across the back does its job and keeps the form of the jacket together rather than having extra fabric flapping in the wind. The drawback is that the jacket vents become obstructed if you wear a backpack, which comes in handy during long days of riding in hot weather. A low belt pack or tucking it into the rabbit pouch is a way around that. On the arms, you can open the zippers from the wrist to the elbow, but I wish the mesh fabric covered the entire area. It leaves a little triangle exposed to the sun if I don’t pay attention. So far, riding in 30-35ºC (86º - 95ºF) weather is comfortable on the bike and off the bike, the lightness of the fabric helps to not overheat.
Crash testing
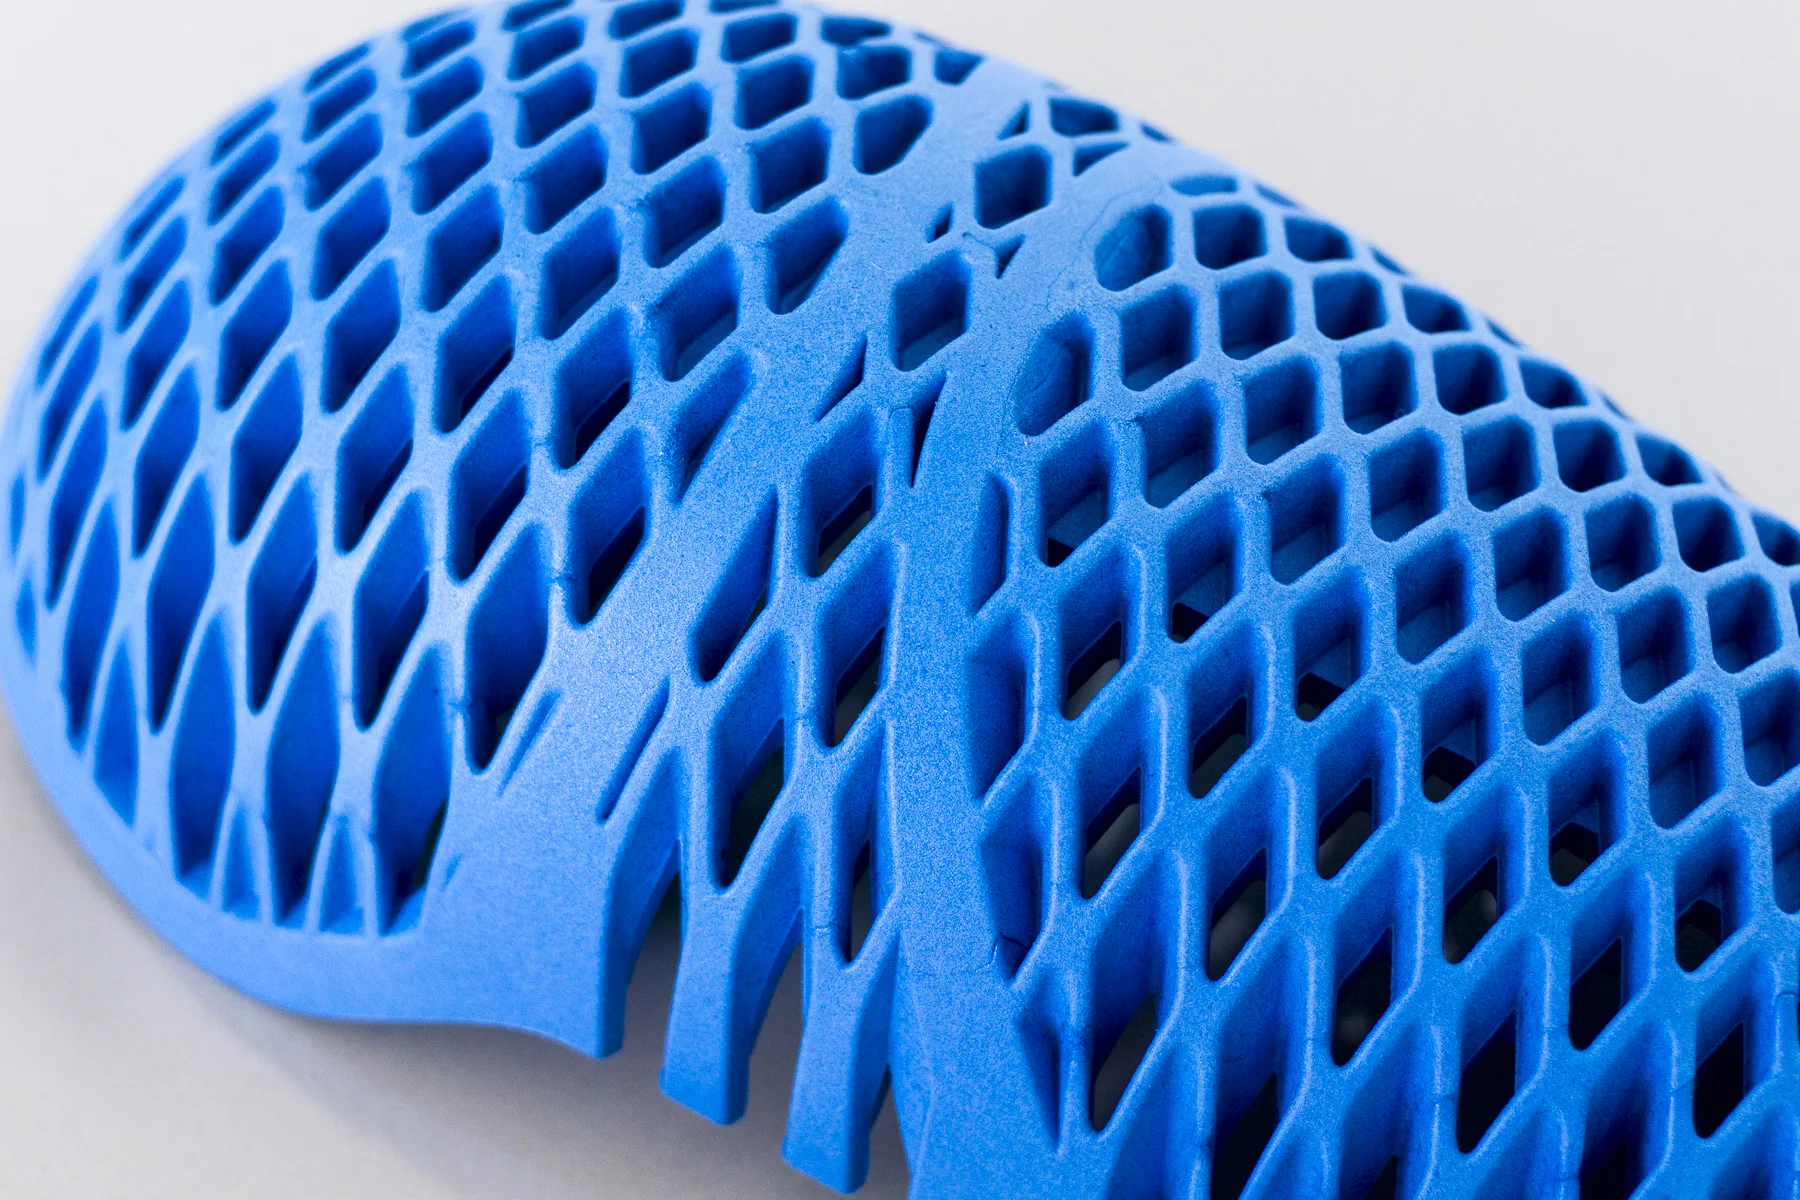
The armor in the Neptune GTX is REV’IT!’s proprietary Seesoft armor, which is rated CE-Level 2 and the highest level of protection available. It’s temperature stable, meaning between 40ºC and -10ºC the quality of protection remains the same, and that covers any weather conditions you may be riding in. The open structure of Seesoft’s design allows for better ventilation during hotter days, while retaining impact protection and comfort while moving around on the bike. This is the first time it is included in a women’s suit and is the standard in most of the REV’IT! men’s line.
Even though it’s a relatively new suit, I have had the benefit of crash testing the materials. Riding a steep decline, my front tire caught a hefty rock and I went somersaulting over the bars. The armor in the suit protected all the necessary areas as I rolled over rocks and back to my feet. If I were to make one suggestion, it would be that when companies make long size pants, they also make long size knee protectors so it protects more of the shin. That was the only area—the two inches exposed between the top of my boot and the end of the protector—that was bruised repeatedly during that day. (Yes, I crash tested it several times.)
Finally, let’s talk about fit.
Between the men’s and women’s version, the style is the only difference. Same materials are used throughout, but women’s gear is designed by and made for women. REV’IT! has one of the largest lines of motorcycle suits for adventurous women. The fit of the Neptune GTX is a bit boxier than other suits in the REV’IT! line, but that is true for most adventure motorcycle gear these days.

Pants
First pleasant surprise was how well they fit. With that said, am above average height for a woman and regular clothes are hard for me to fit. The pants (which I ordered in 40 long - normally I wear an 8/29 long in jeans) were finally long enough. I say finally, because, after 5 years of searching for pants that sat in the correct position when riding, this was a first. It’s not only the length of the pants (long version measures a 33” inseam) but is where the knee pad sits on the knee when riding. Other pants I have tried, even when ordering men’s long length, the knee pad awkwardly rests above the knee cap, and that doesn’t do much for protection. The REV’IT! Neptune sits below the knee when standing up, and right at the knee cap when riding.
Jacket
The jacket is a good fit, but I wish it came in a long version as well. I sized up (I ordered a 44 — normally I wear a 10/12 or large top) to gain length in the arms and the shoulders with all of the layers in were a little tight on the 42. Because I have a larger chest, the waist is much larger than I need and even cinched down it is bulky. Not a perfect fit but the adjustable rails at the waist help. The stretch fabric at the elbow and knees help with articulation and comfort.
Conclusion
Does it pass the test of 4-season, all-weather versatility? Absolutely. If I were looking for one suit to own that is capable of wearing during any time of year, this would be at the top of my list. The ease of adding and subtracting layers makes it viable for any weather you might encounter.
Theft-proof your vehicle—really

We’re lucky enough to own a couple of vehicles that are appreciating in value due to their classic status. This has made us more than usually paranoid about theft, especially given our proximity to the Mexico border, where many stolen vehicles wind up.
For years I relied on standard anti-theft alarms and ignition disablers, which, while not immune to bypass, certainly made an attempt less likely. However, adding in an aftermarket electronic product that could render the vehicle inoperable for its owners if it failed always made me nervous, especially in the vehicles we frequently drive to remote areas. I considered kill switches, but heard too many stories of those being found, no matter how cleverly concealed or disguised. Steering-wheel locks? Thieves simply saw through the steering wheel and pop off the lock. Clever.
Then I found the Ravelco.
Invented in the 70s by a fellow who—you guessed it—had his car stolen, the Ravelco incorporates not a single electronic or even a moving part. The only visible element is a 16-pin female receptacle installed in the dash or anywhere else you like—no need to conceal it; in fact it’s better left visible. Behind the receptacle is an armored cable running into the engine compartment, containing 16 wires, 14 of which are decoys. Only two connect to some vital electrical component—different in every vehicle. A male plug, which rides on your keychain, has the correct live pins to allow the vehicle to start. If a thief tries to randomly jump connections on the dash plug, he has virtually zero chance of getting the right ones, and getting the wrong ones can short another component, further rendering the vehicle inoperable.
Sound too simple? The company claims that, out of four million installations, not one vehicle has been stolen by defeating the device. Impressive. (Tow trucks obviously do not count.)
You can have multiple Ravelcos installed and have them all work off one master key, if you desire. A customer code allows you to buy replacements if necesssary. The chances of the device itself failing are scant; however, the installer can show an owner what components are being connected through the system. That way, if you happen to lose your male plug in the middle of nowhere and haven’t brought a spare, you can bypass the device.
Obviously, the Ravelco will not prevent a thief from breaking into a vehicle and stealing the contents. But with a Ravelco in place, I know the vehicle itself will still be there when I return. Find out more here.
VDEG photo addendum
One of the two questions Tom Sheppard and I get asked most frequently about the contents of the Vehicle-dependent Expedition Guide is, “Why is there no section on photography?” (The other is, “Why nothing on medical kits?”)
Of course a big part of the reason is that either subject could easily take up a book of its own, and we were already at 600 pages with the new, fourth edition of Tom's seminal work. However, he has addressed the former with a nifty 15-page addendum titled Expedition Photo Gear. Within those pages Tom has managed to cram a huge amount of information, from selecting the right format (do you really need a 20-pound DSLR system?) to selecting lenses and tripods to post-capture processing to file storage. Along the way are tips to optimize your shooting. It’s Tom at his usual ex-test-pilot detail-obsessed best, and recommended if you’ve hesitated at all about investing in bringing back serious images from your excursions.
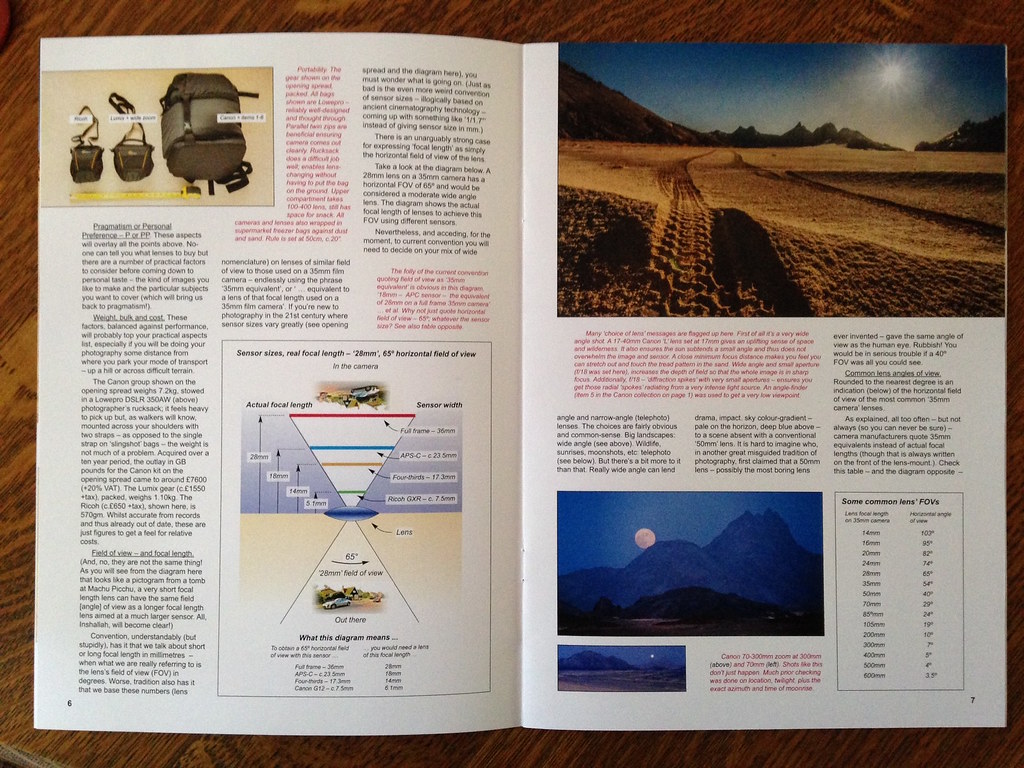
Expedition Photo Gear is available directly from Tom at Desert Winds Publishing in England, for about $13 including postage. A bargain.
Hint: When using “Search,” if nothing comes up, reload the page, this usually works. Also, our “Comment” button is on strike thanks to Squarespace, which is proving to be difficult to use! Please email me with comments!
Overland Tech & Travel brings you in-depth overland equipment tests, reviews, news, travel tips, & stories from the best overlanding experts on the planet. Follow or subscribe (below) to keep up to date.
Have a question for Jonathan? Send him an email [click here].
SUBSCRIBE
CLICK HERE to subscribe to Jonathan’s email list; we send once or twice a month, usually Sunday morning for your weekend reading pleasure.


Overland Tech and Travel is curated by Jonathan Hanson, co-founder and former co-owner of the Overland Expo. Jonathan segued from a misspent youth almost directly into a misspent adulthood, cleverly sidestepping any chance of a normal career track or a secure retirement by becoming a freelance writer, working for Outside, National Geographic Adventure, and nearly two dozen other publications. He co-founded Overland Journal in 2007 and was its executive editor until 2011, when he left and sold his shares in the company. His travels encompass explorations on land and sea on six continents, by foot, bicycle, sea kayak, motorcycle, and four-wheel-drive vehicle. He has published a dozen books, several with his wife, Roseann Hanson, gaining several obscure non-cash awards along the way, and is the co-author of the fourth edition of Tom Sheppard's overlanding bible, the Vehicle-dependent Expedition Guide.