Overland Tech and Travel
Advice from the world's
most experienced overlanders
tests, reviews, opinion, and more
A bad, a really bad, winch mount
As I’m sure many of you do, I like to look at how others have set up their vehicles. I’m always impressed by clean and functional work.
Sometimes I’m impressed by the opposite.
This truck was parked at a hotel in Eagar, Arizona, last winter when I was there hunting. It sported one of the dodgiest looking winch mounts I’ve seen in years. If this thing doesn’t wind up starring in a YouTube video someday featuring large bits of metal taking murderous trajectories across the landscape, I’ll be stunned.
I couldn’t even actually tell how all the bits of the “mount” had been welded together to gain a tennuous foothold on the chassis, but one weld at the back appeared to have pulled free. The winch itself was bolted to a plate welded to a male receiver hitch insert. I’m not sure if the droop was the result of forces incurred while (wince) actually using this thing, or if it just wound up at that angle after all the welding was finished. The steel cable was pulled under the winch and hooked on the back of the plate. Lettering on it read, “HI-TEST.” Yeah, I’ll bet.
Since it was mounted in front, I don’t think I can hope this thing is only used for pulling ATVs up on trailers. I just hope the owner’s survival instincts are better than his fabrication skills.
I don’t make fun of the owner/fabricator whose only sin is being an overenthusiastic beginner. But potentially life-threatening jobs such as this need to be called out.
Bespoke sand ladders
I didn't get a chance to inspect closely—or try—these compact aluminum sand ladders that my friend and 7P/Overland Expo trainer Nick Taylor had welded up and brought to the show, but I like the concept. It's no secret that I'm a fan of Maxtrax (on the left), but in certain situations a rigid aluminum (sorry Nick, aluminium) ladder has advantages, especially for bridging.
This pair is amazingly compact, and Nick had them made slightly different in size so they nest.
Given their abbreviated length, getting out of anything but a short bogging would require repeated deployment, but most boggings (except those in mud) can be overcome with a very short extra bit of traction or flotation. And these would be excellent for bridging a small ditch or climbing a ledge.
I'm thinking about finding an alumin(i)um welder in Tucson and having a pair of my own made.
A new fuel can
Carrying extra fuel, whether for the vehicle or an accessory such a a generator or chainsaw, always requires balancing different requirements. First and most critical is absolutely leakproof storage. Next comes ease of handling, and the speed with which the fuel can be dispensed. Then there must be a way to secure the container so that it will not shift even in the event of a traffic accident or rollover on a trail.
The gold standard as far as I'm concerned—despite its origins in 1937—is still the classic steel NATO-style (ex-Wehrmacht) jerry can, with the original cammed lid. I've found them to be absolutely leakproof, even when stored on their sides in full summer sun. The clamp-on spout incorporates a breather that makes dispensing a very fast process—convenient now but essential when your Kubelwagen was about to be strafed by a Spitfire. Even without the spout attached, dispensing fuel into a funnel is easy thanks to a built-in lip. I have a pair of NATO cans on my FJ40 that I bought at least 15 years ago—and they were surplus then. I've replaced the cap gaskets once; they still function perfectly.
When the U.S. reverse-engineered the Wehrmacht can in WWII to produce the so-called Blitz can, we sadly cut corners. Rather than perimeter-welding the seam, we used a crimped bottom and side seam, and replaced the brilliant cammed lid with a screw-on lid that was too large in diameter, making it virtually impossible to tighten enough to prevent seepage. I've never owned a Blitz can that didn't seep at the crimped base and leak at the lid. Pouring fuel from a Blitz can without a spout is an exercise in annoyance as there is no lip whatsoever and fuel cascades down the can and all over one's boots.
Likewise, my experience with the current plastic U.S. Scepter can has been disappointing, for the same reason: The large-diameter screw-on lid does not develop sufficient clamping force. As proof look at the several styles of double-handed wrenches available to augment one's own muscle power when installing or removing the lid. Not needed with the NATO can's cammed lid.
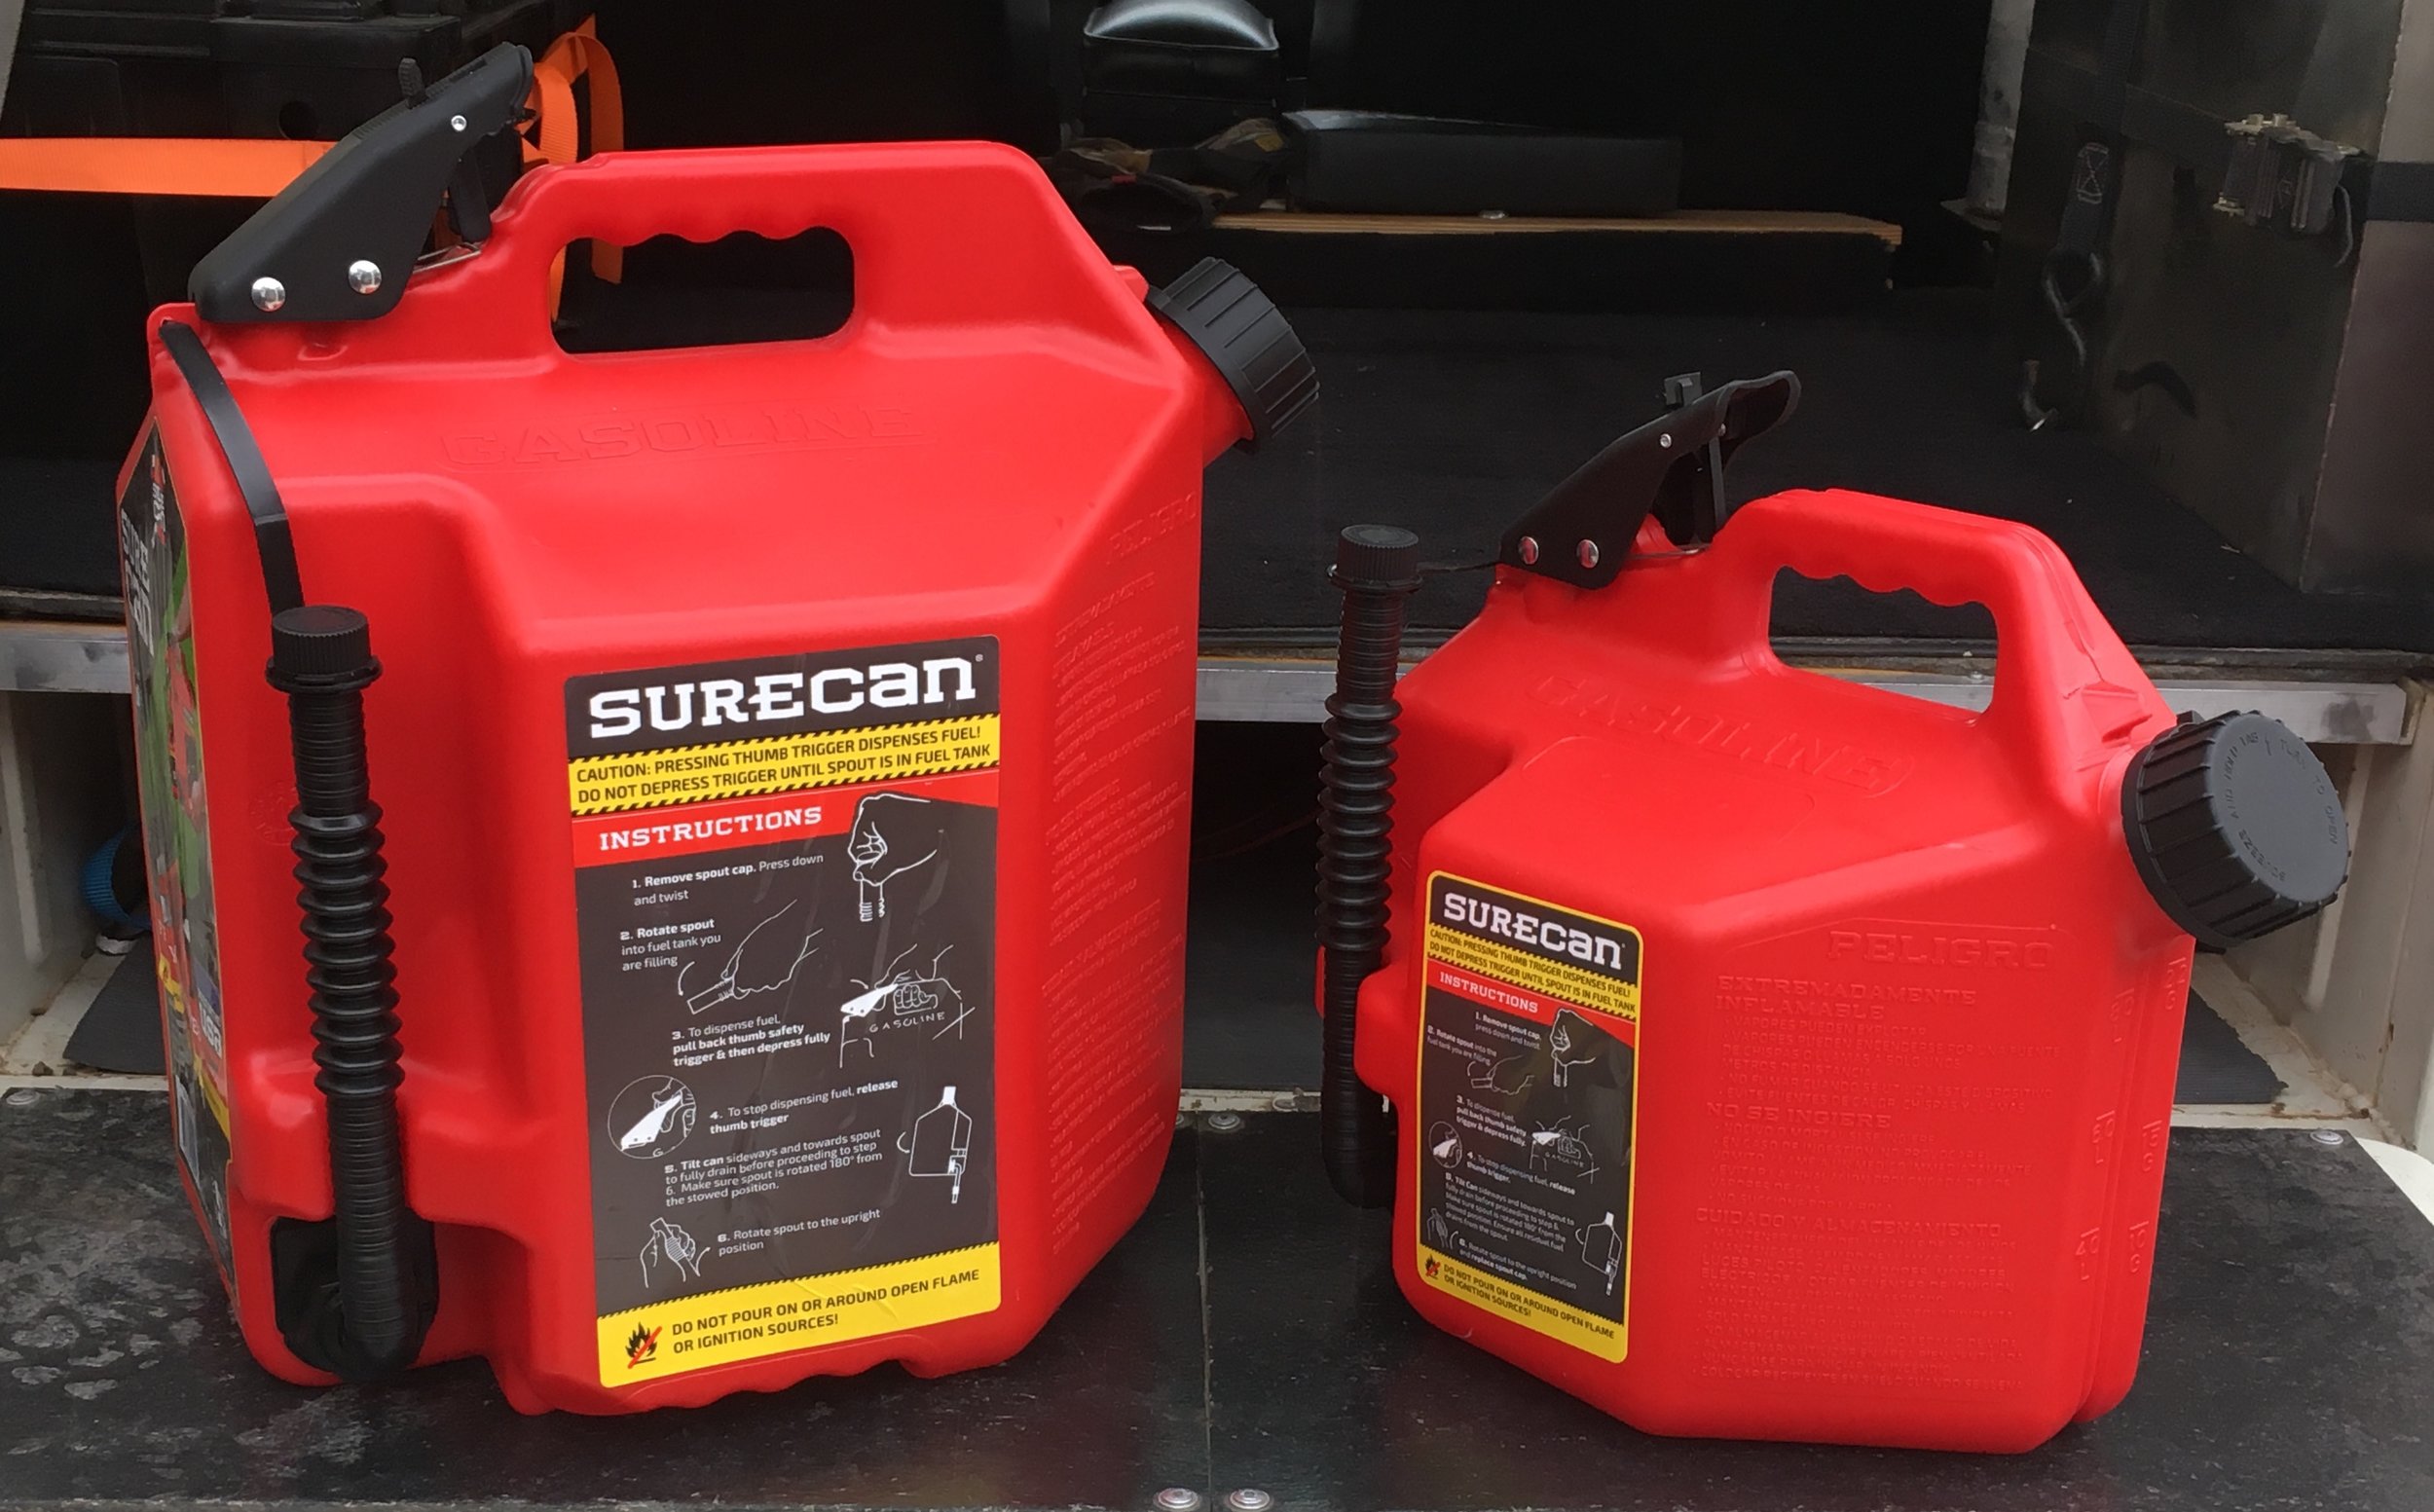
Of course, to dispense fuel from any of the above three styles of fuel container, you must tip them. And that brings us to the two new containers—one 2.2 gallon, one five-gallon—just sent to me from SureCan.
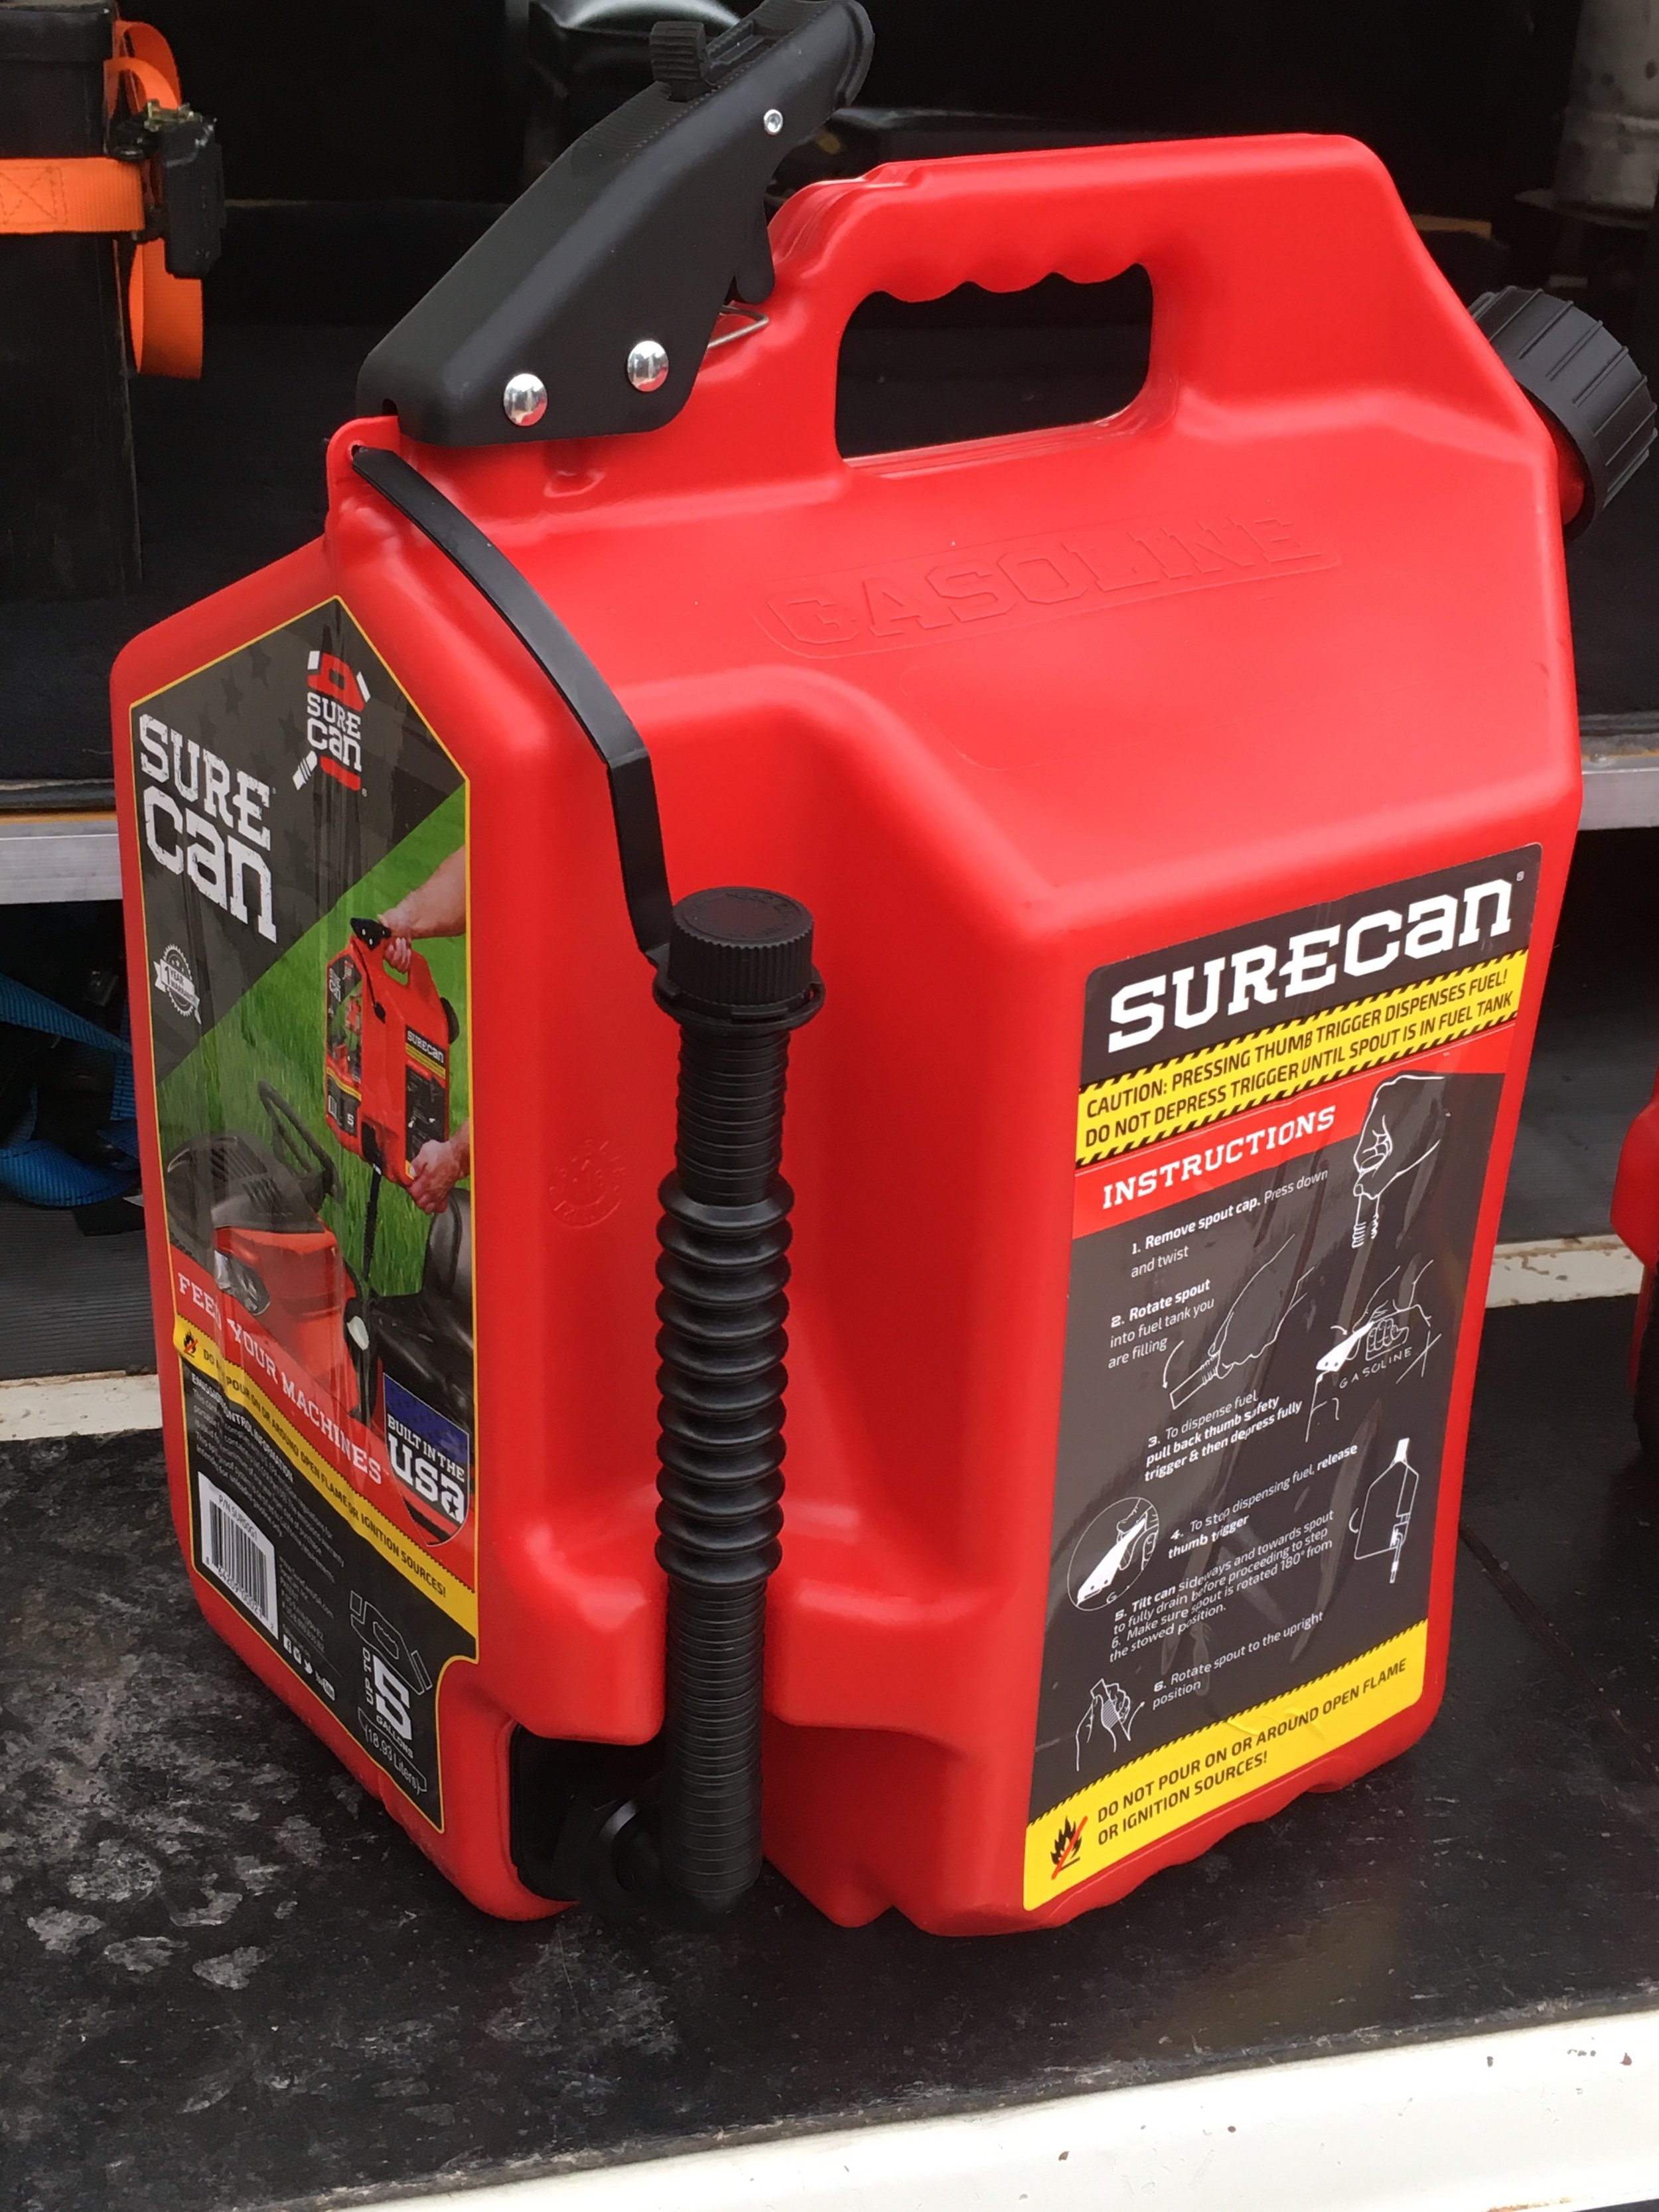
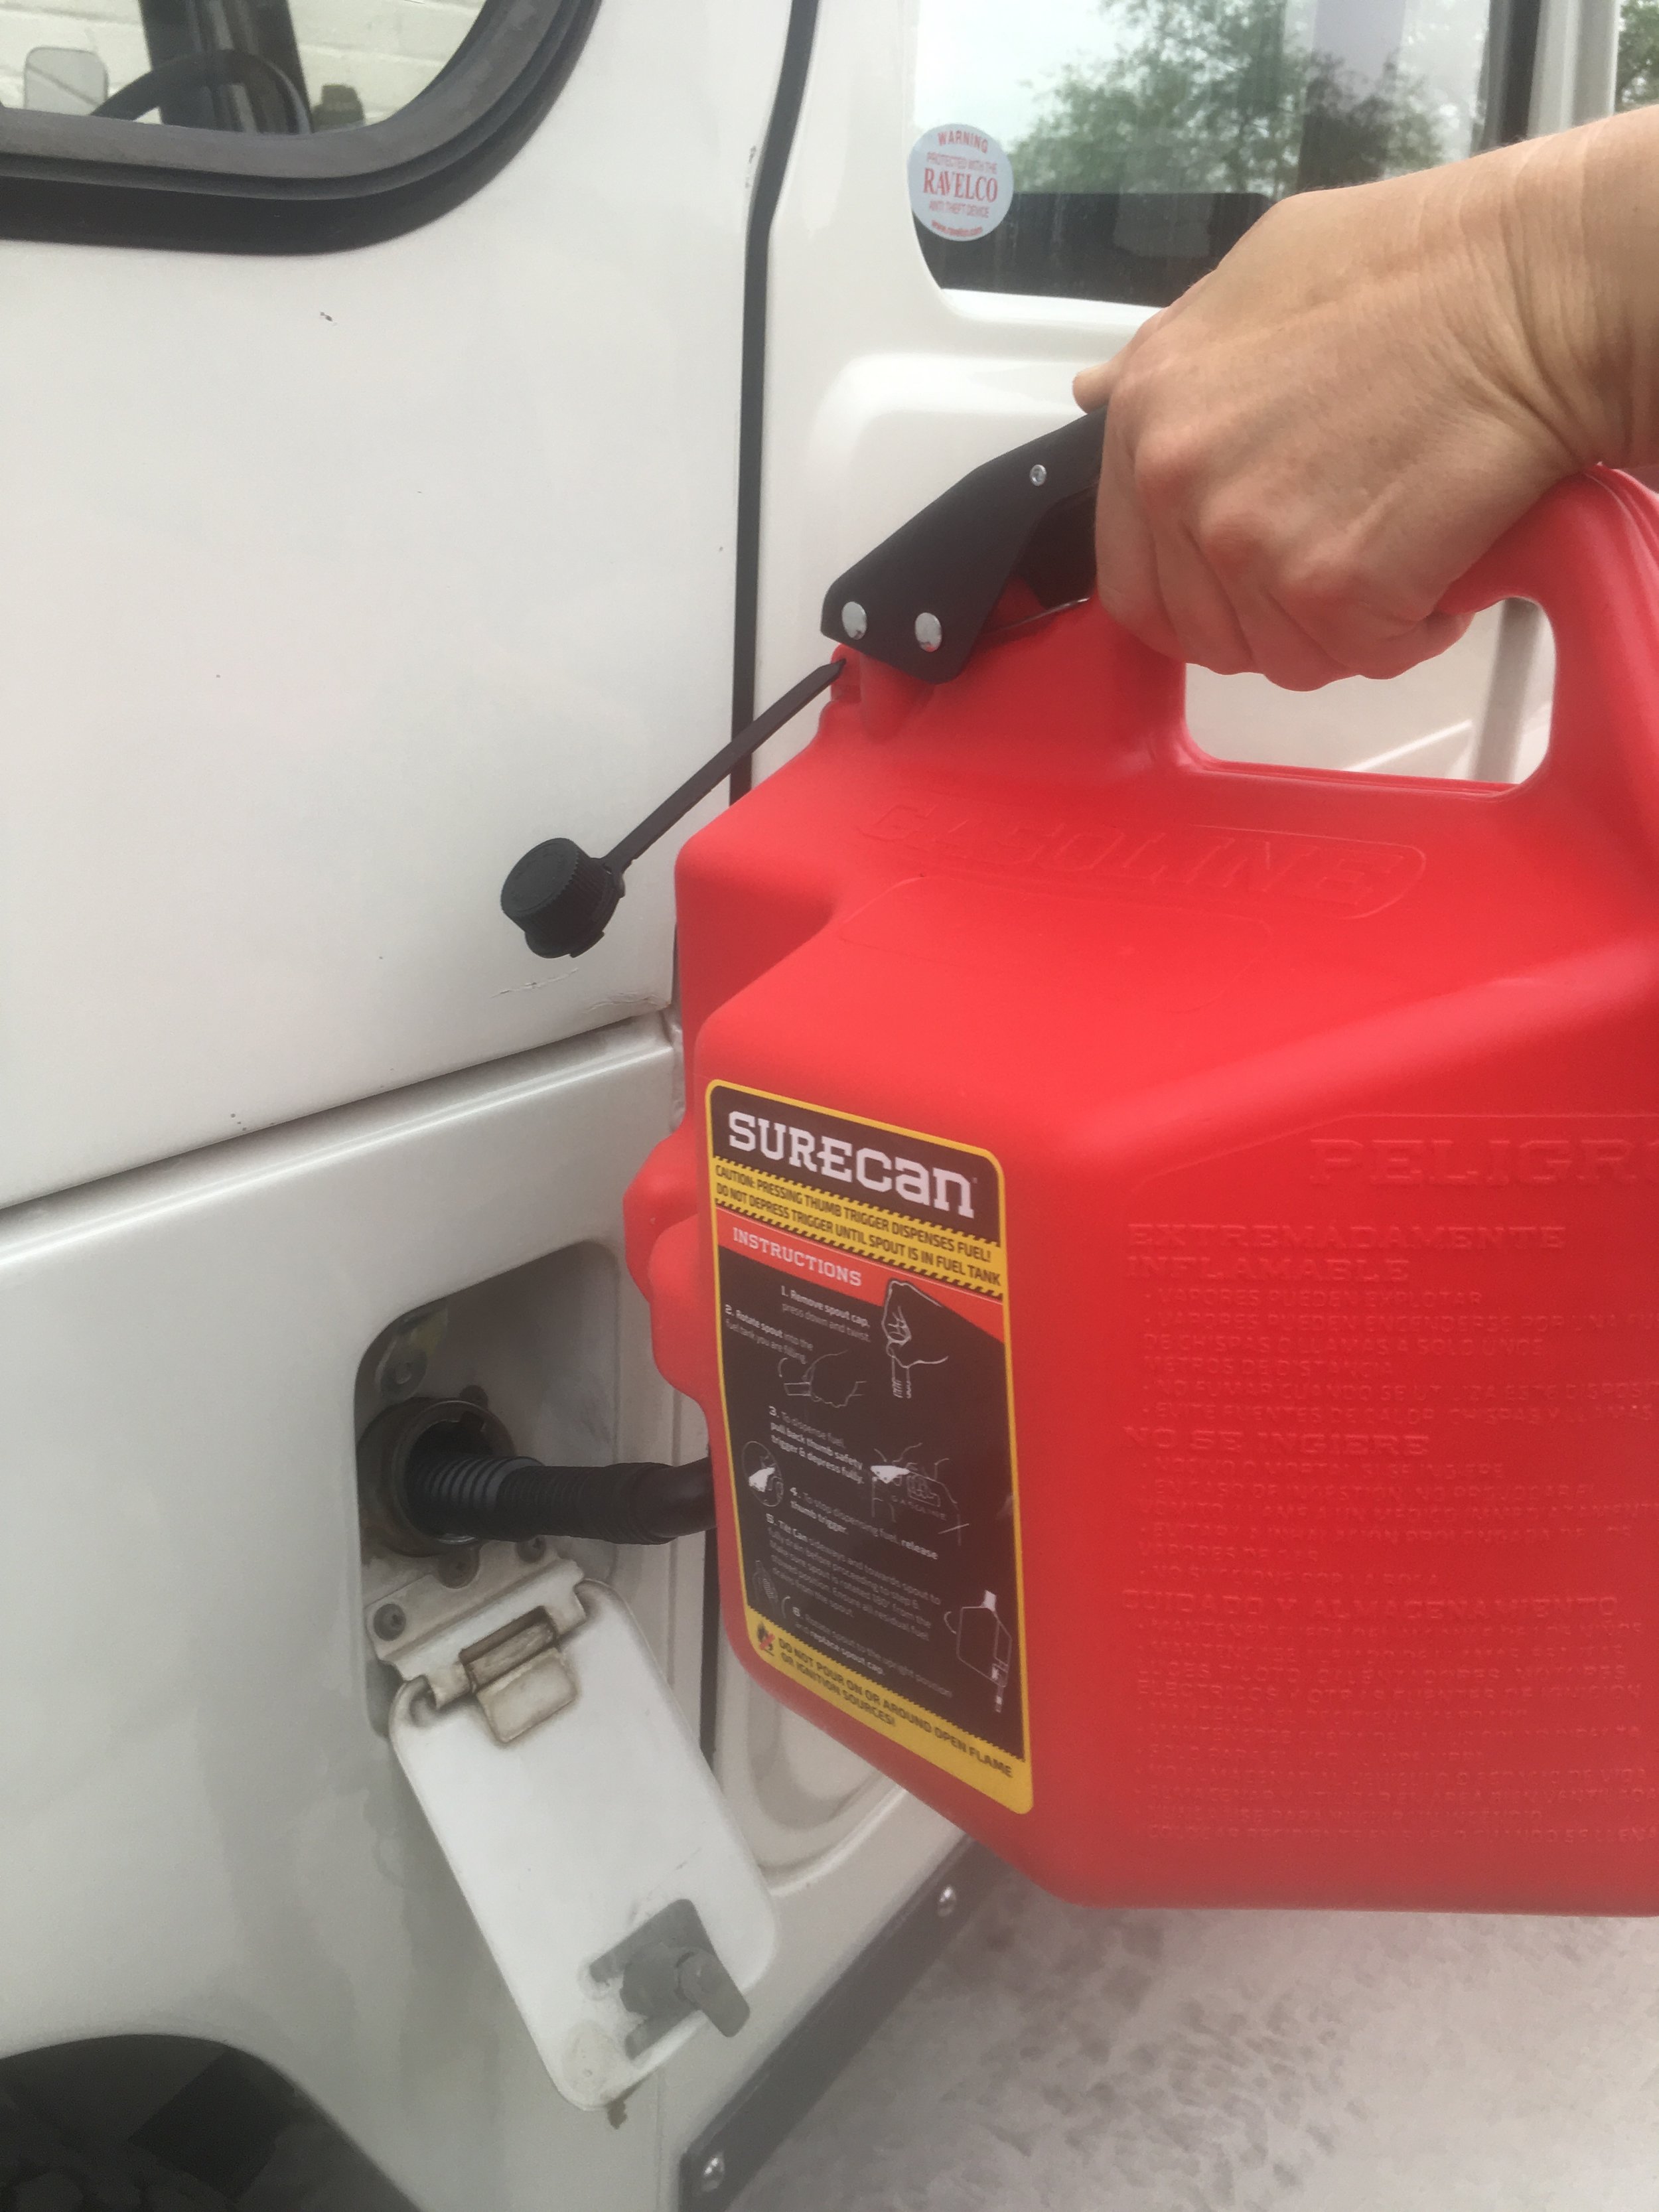
The SureCan incorporates a clever system that makes dispensing fuel something you could do while wearing your dress Afrika Korps uniform. Unscrew the cap from the built-in spout, then rotate the spout downward and insert it into whatever needs fuel. Press the safety catch on the top lever, squeeze the lever, and voila—fuel dispenses at a very rapid pace thanks to a breather mechanism built in to the valve assembly. Let go the lever and the fuel stops, right now. Tip the can sideways a bit to get the last few drops out of the spout, tip it back up to its locked position and secure the cap, and you're finished.
I used the SureCan to fill our generator when I needed to do some welding, and the process was absurdly easy and fast. Dispensing into a vehicle was more difficult, as you need to raise the can above the level of the filler. However, it was still easier than lifting and tipping a standard container.
I don't yet know if the SureCan will function well as an expeditionary fuel container. While it's easy to strap down securely through the handle, it does not fit into a standard can carrier on a rear rack. Also—and this is the big question—I don't yet know if the can will remain tight and leakproof when filled and carried where it will be exposed to high temperatures, full sun, and rough roads. The mechanism is much more complex than a simple lid, and there are more openings, including at the lever and the joint where the spout connects to the can, where leakage or outgassing might occur. I'll report back after trying it.
What I will say is that the SureCan has become my go-to container for around-the-ranch use for filling generators, chainsaws, and the like. A lot of new products seem too clever for their own good, but the SureCan is just clever enough to work.
SureCan is here.
Cosmetics versus function . . . and safety
This morning I was scanning the excellent Silodrome site, and found this BJ40 restored by Legacy Overland, one of the ever-growing crop of companies exploiting the skyrocketing values of classic 4x4s such as the Land Cruiser and Series Land Rovers.
Legacy is headquartered in Greenwich, Connecticut. They don't specify where their restorations are done, but from various photos it appears to me to be in some Latin American country, which would make sense given that competitors such as The FJ Company do theirs there, taking advantage of cheap and plentiful labor. However, I have no hard evidence of this, and in any case it's not the location of the workshop that matters, but the quality.
To that: This BJ40 is done up in fine style, with a matt black finish, nicely stitched leather upholstery (emblazoned with the company's crest), lots of shiny new bits, and a beautiful engine compartment showing off the four-cylinder diesel powerplant. It also boasts a few actual trail modifications, such as the Hi-Lift jack, BFG Mud-Terrains, and what appears to be Old Man Emu suspension.
However. Closer inspection reveals a couple of disturbing details.
The front bumper is equipped with shackle mounts and D-rings for recovery. Generally speaking, D-rings are considered inferior to bow shackles for recovery, as the former are only suitable for straight-line pulls. More importantly here, blowing up one photo revealed the D-ring to be stamped with a working load limit (WLL) of one ton, or 2,000 pounds. This is drastically underspecced for a vehicle weighing close to twice that.
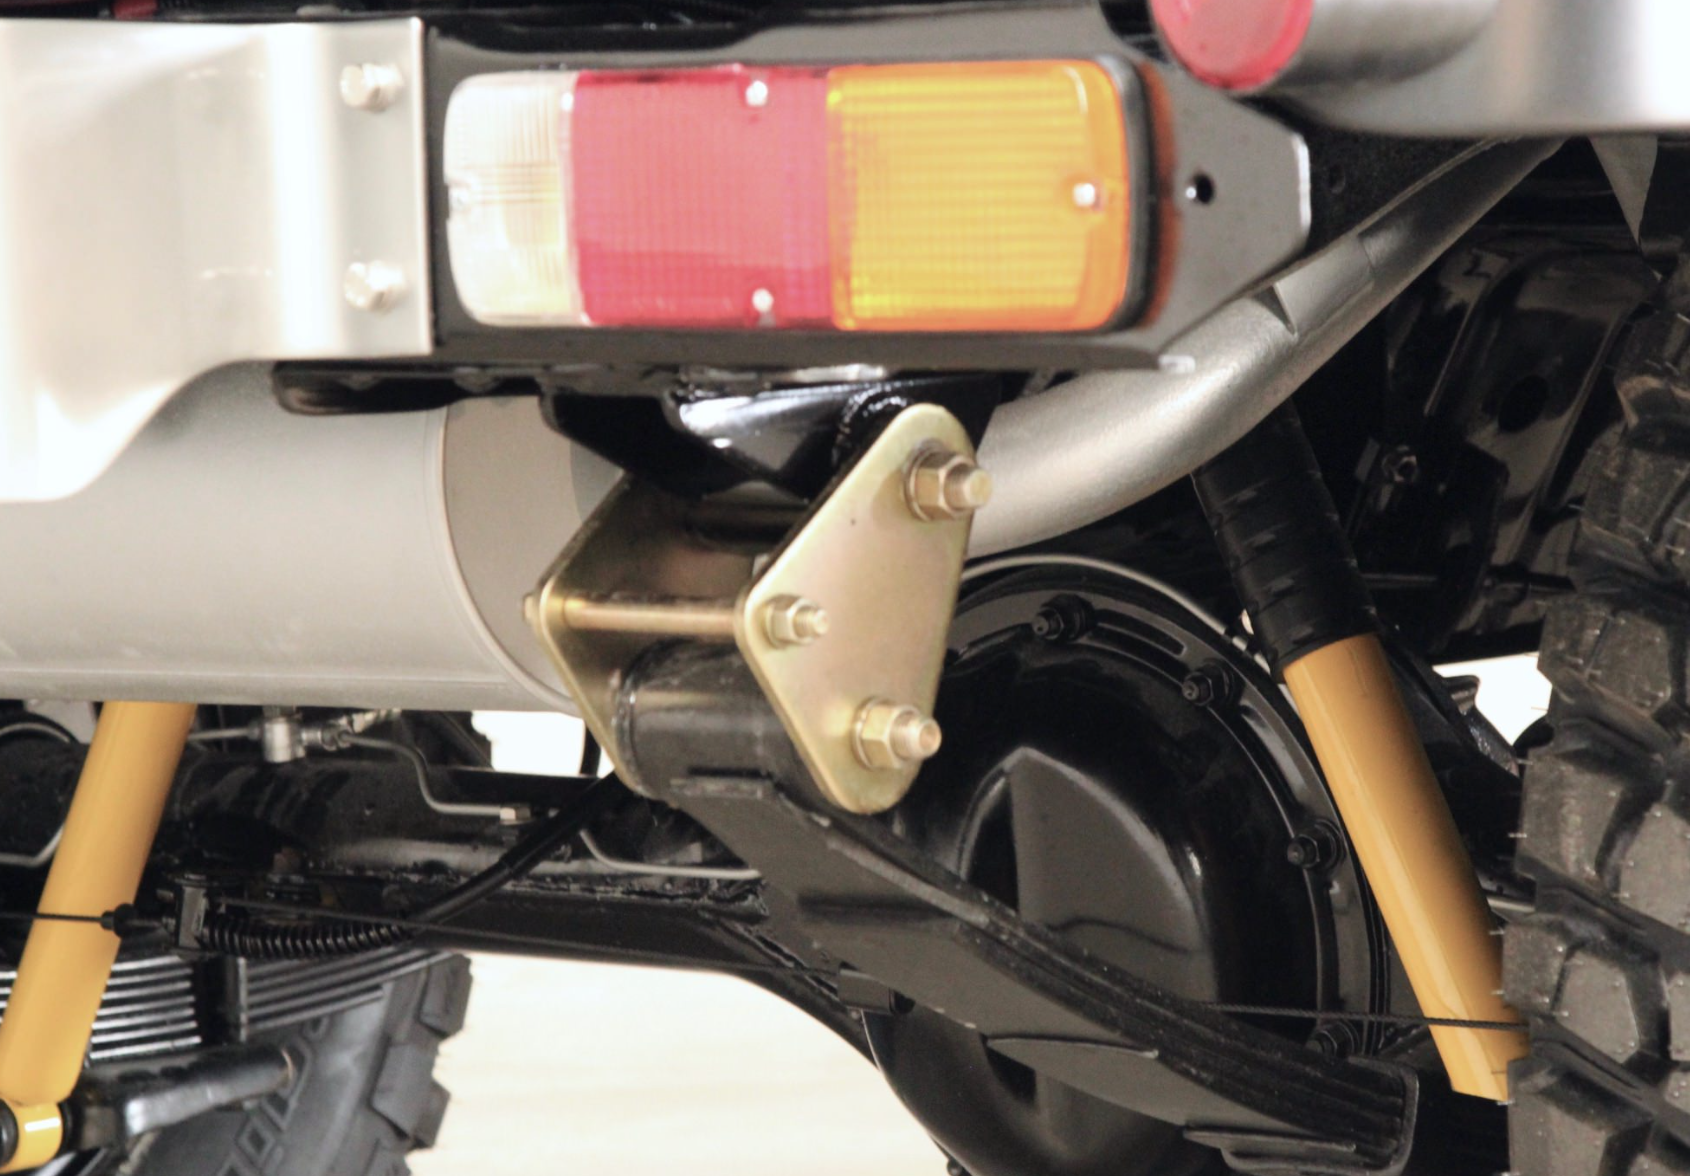
Undersized recovery points are alarming, as some poor rookie buyer might quite logically assume they are adequate for their intended (or implied) task. But take a close look at the suspension, and you'll note that all four anti-inversion shackles are installed backwards and upside down. That's more than alarming, as it calls into question every aspect of the assembly of this truck. If something as simple—and visible—as shackles are installed backwards, what horrors might be hidden in the engine or transmission? Roseann and I have been on the receiving end of such horrors, and fixing them when the company at fault has washed its hands of the situation and tacitly invited you to sue them can get very expensive.
Of course the drivetrain of this Land Cruiser might very well be impeccably assembled, and the shackles and recovery points isolated issues. Then again, looking at another of the underside photos I'm wondering what the visible yellow nylon strap is holding up . . .
It's easy to put a cosmetic gloss on a classic vehicle and sell it for a lot of money (this one went for $87,360). But engineering a reliable and safe restoration takes much more skill. If you are contemplating a professionally refurbished classic 4x4 vehicle, do your homework on the company, and perform a very, very close inspection.
Update: On the advice of a commenter, I sent the company an email notifying them of the problems with this vehicle, and suggesting strongly that they contact the new owner and have them rectified.
I heard nothing back.
Old school and new school . . .
Here's something you don't see every day: a PTO winch spooled with synthetic line.
PTO (Power Take Off) winches were common decades ago on Land Rovers and Land Cruisers. Rather than being powered by electricity, they ran off a driveshaft attached to an auxiliary gearbox on the transfer case. The advantage to them was that as long as the engine was running, the winch would run as well, with zero danger of overheating as is quite possible with the electric version. The disadvantage, of course, was that if the engine was not running, neither was the winch. These days very few vehicles are equipped with the take-off point on the transfer case that accepts the PTO driveshaft.
I had a PTO winch on my FJ40 for some time, but after I swapped transmissions I kept putting off cutting the hole in the new tunnel for the operating linkage, so the winch became nothing but a fashion item. When a Warn 8274 electric winch presented itself as the perk from a review, I swapped that in and sold the PTO for four times what I'd paid for it.
Probably a mistake—one Maggie McDermut did not make with her BJ74 Land Cruiser. At the 2018 Overland Expo West, the lads from 7P Overland spooled 80 feet of 3/8ths-inch Dyneema onto the drum, and spliced in a Factor 55 thimble. She now has the best of old and new.
The drive mechanisms on PTO winches varied from year to year and maker to maker. Maggie's is perhaps ideal, in that the winch can be run in any gear, depending on the speed and power needed. Choose first gear for low speed and high power, or run it in second or even third with more throttle if you're just pulling a small log off the road. The single disadvantage of her setup as it is now is the hawse fairlead, which is inset into the chrome front bumper, and could very well let the line contact the edges of the opening on either a right or left-side off-center pull. She'll need to use caution to arrange a straight pull.
I hope she gets a chance to use it on her journey to Alaska as a Change Your World Fund grantee.
Revolutionary . . .
It's not often I use that word. It certainly applied to the introduction of the MaxTrax, and it absolutely applies to this product (displayed by Kelsey Huber) being debuted at the Overland Expo. More about it soon, but it's going to have a massive impact on the practice of vehicle recovery.
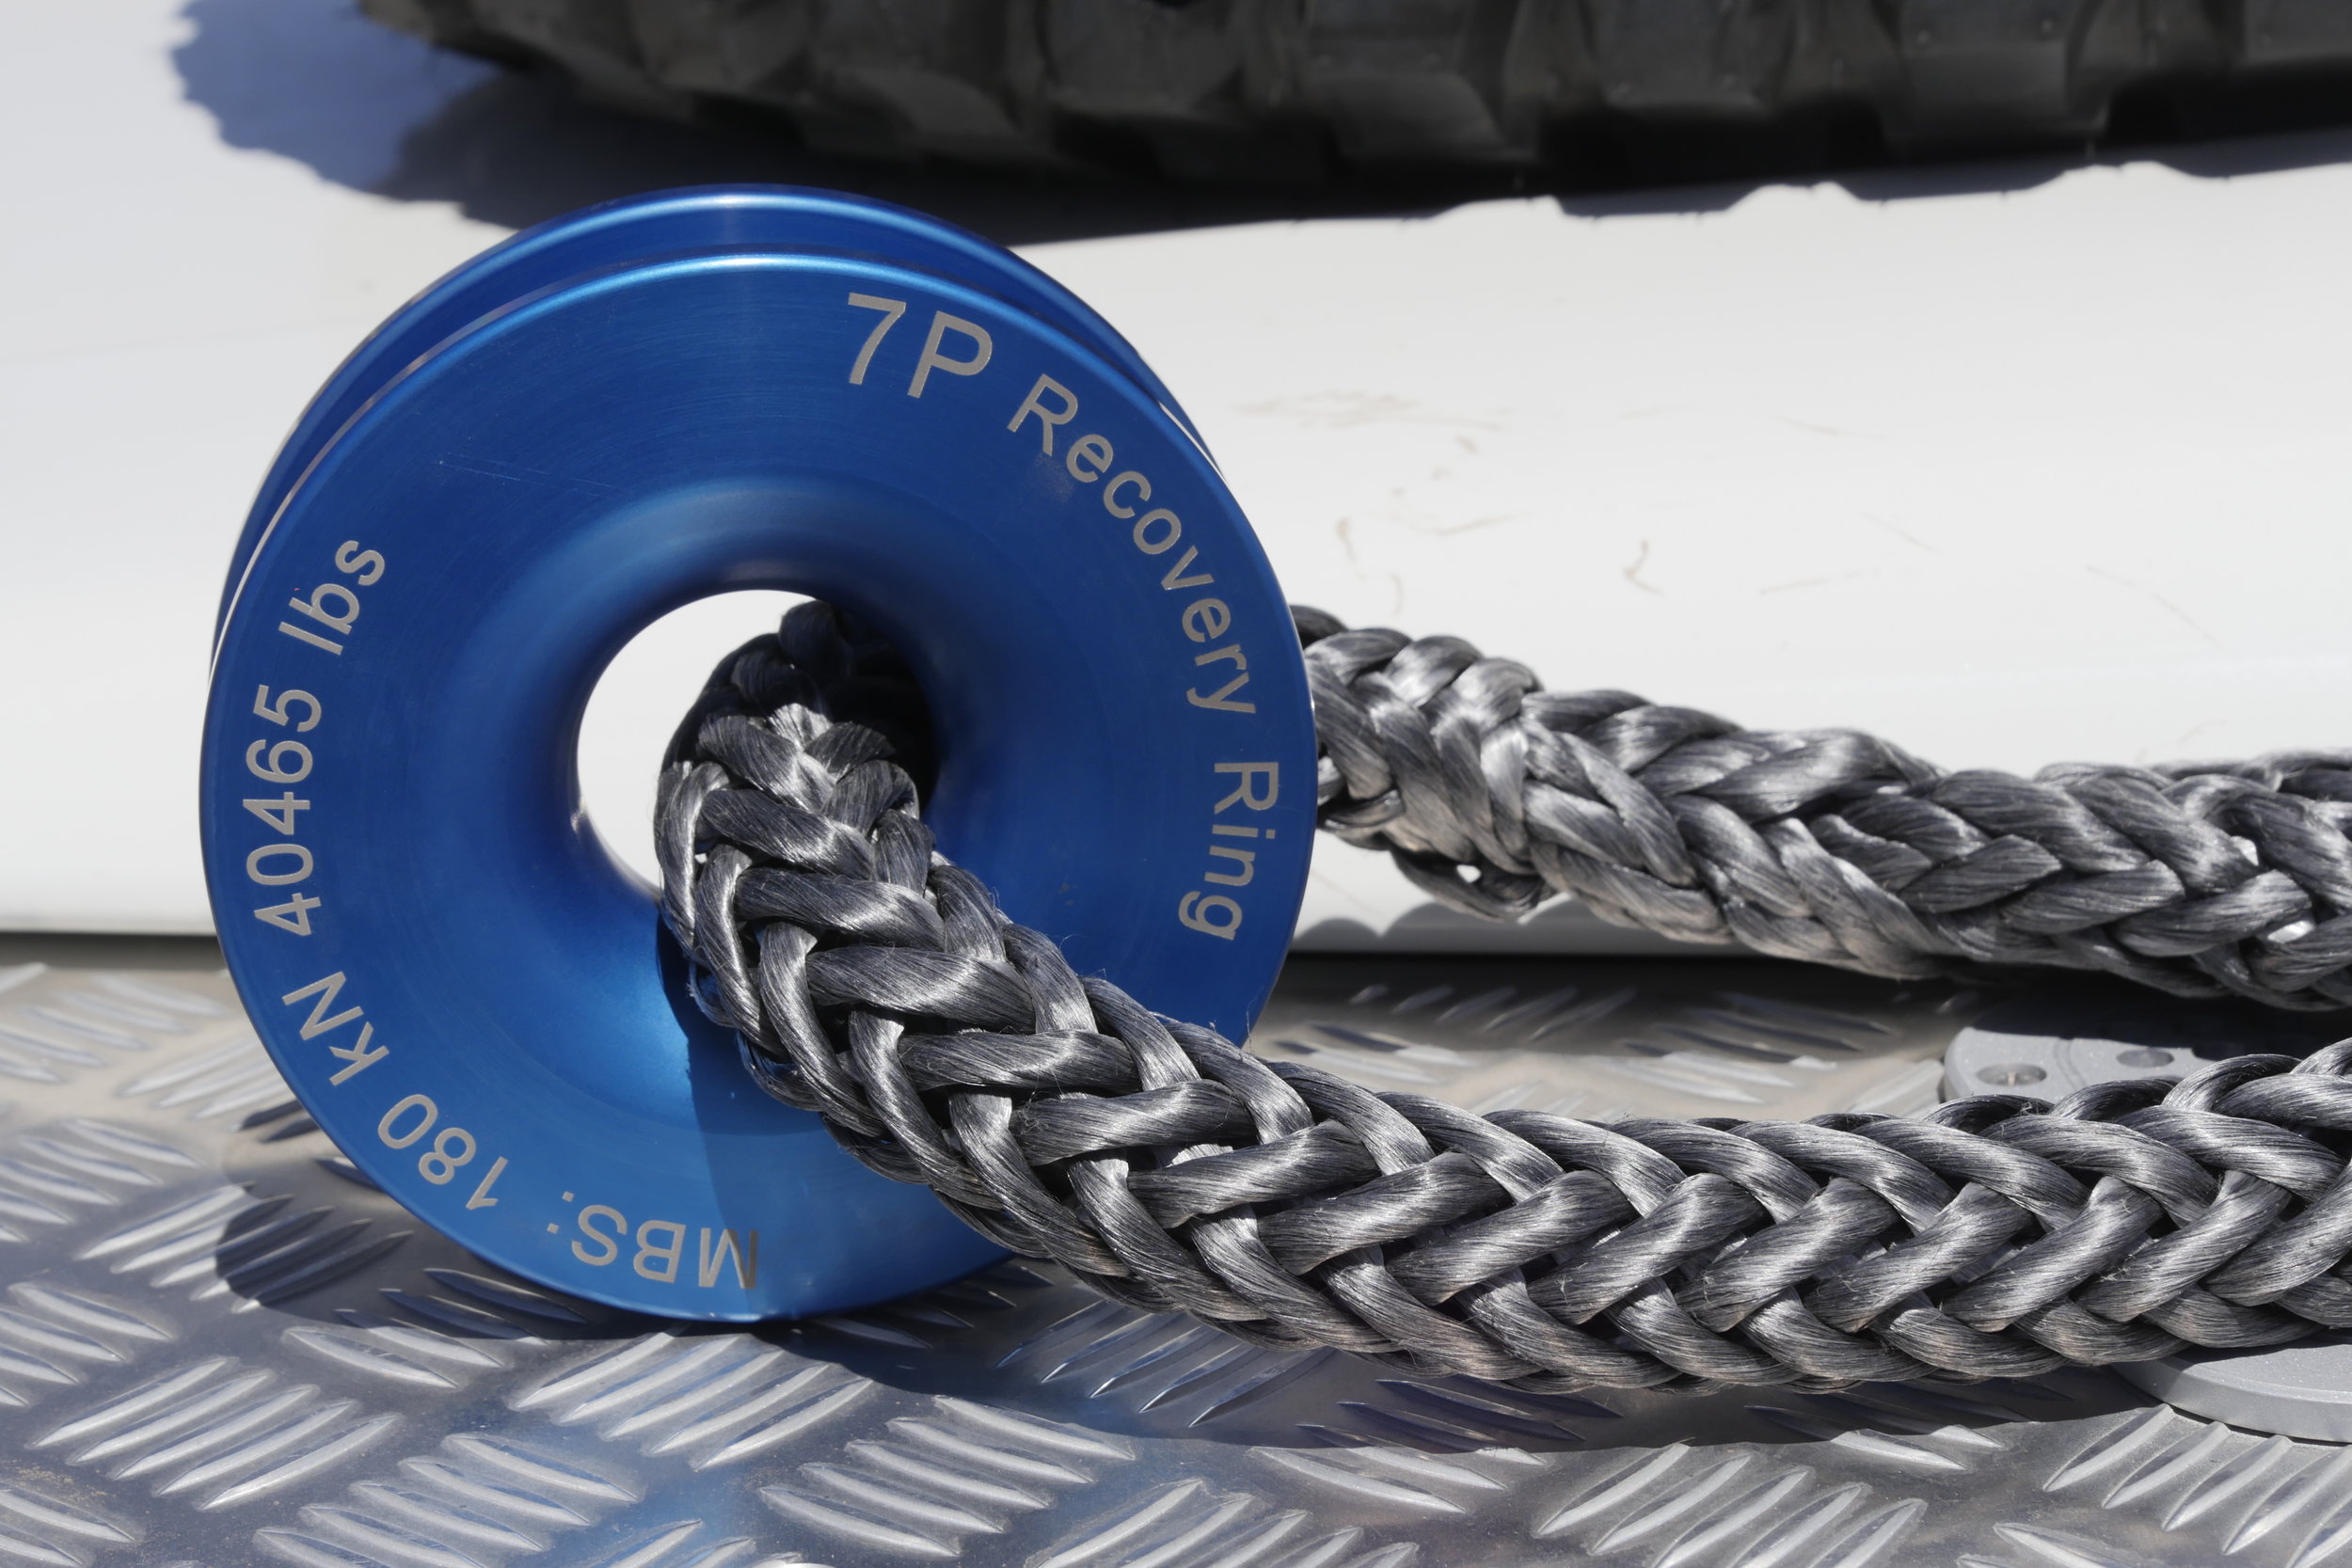
The 7P Recovery Ring is actually a winch pulley (or snatch block) with zero moving parts. The soft shackle simply slides slowly around inside the opening as the winch line is pulled across the pulley. Surprisingly, there is minimal heat buildup—in testing the Recovery Ring successfully extracted seriously stuck military trucks with no issues. Note the MBS (minimum breaking strength), an astounding 40,465 pounds.
Video to follow . . .
Side slopes . . .
I've always loved this image of a Series I Land Rover tilted at 45 degrees, with an advisory for drivers that the "safe operating angle" is 30 degrees. When was the last time you saw a consumer vehicle advertise its side slope capability, complete with a photo to prove it?
Negotiating a significant side slope is without doubt the most nerve-wracking maneuver you can do with a four-wheel-drive vehicle—at least it is for me. I remember not too long after I got my FJ40 sticking one of those liquid-filled angle gauges on the dash (Roseann annoyingly referred to it as the "tilt-o-meter"). I took the 40 out on a local trail and put it on what felt like a pretty steep side slope in a rutted section of the track, then looked at the gauge . . . which read 15 degrees. It was humiliating. I drove farther up the slope until I got to 20 degrees, which seemed seriously tipped. At 25 degrees I surrendered, even though I knew intellectually that was well below the danger point for an FJ40. I turned the engine off, left it in gear with the parking brake on, and got out to see what it looked like from someone else's viewpoint.
Oh. Jeez. Seriously? Drawing an imaginary line from the outside tire straight up it was clear there was all kinds of weight left on the safe side of the line. Back inside it stilled looked scary, but significantly less so.
Side slopes always look steeper from inside the vehicle. Photo courtesy Matt Scott
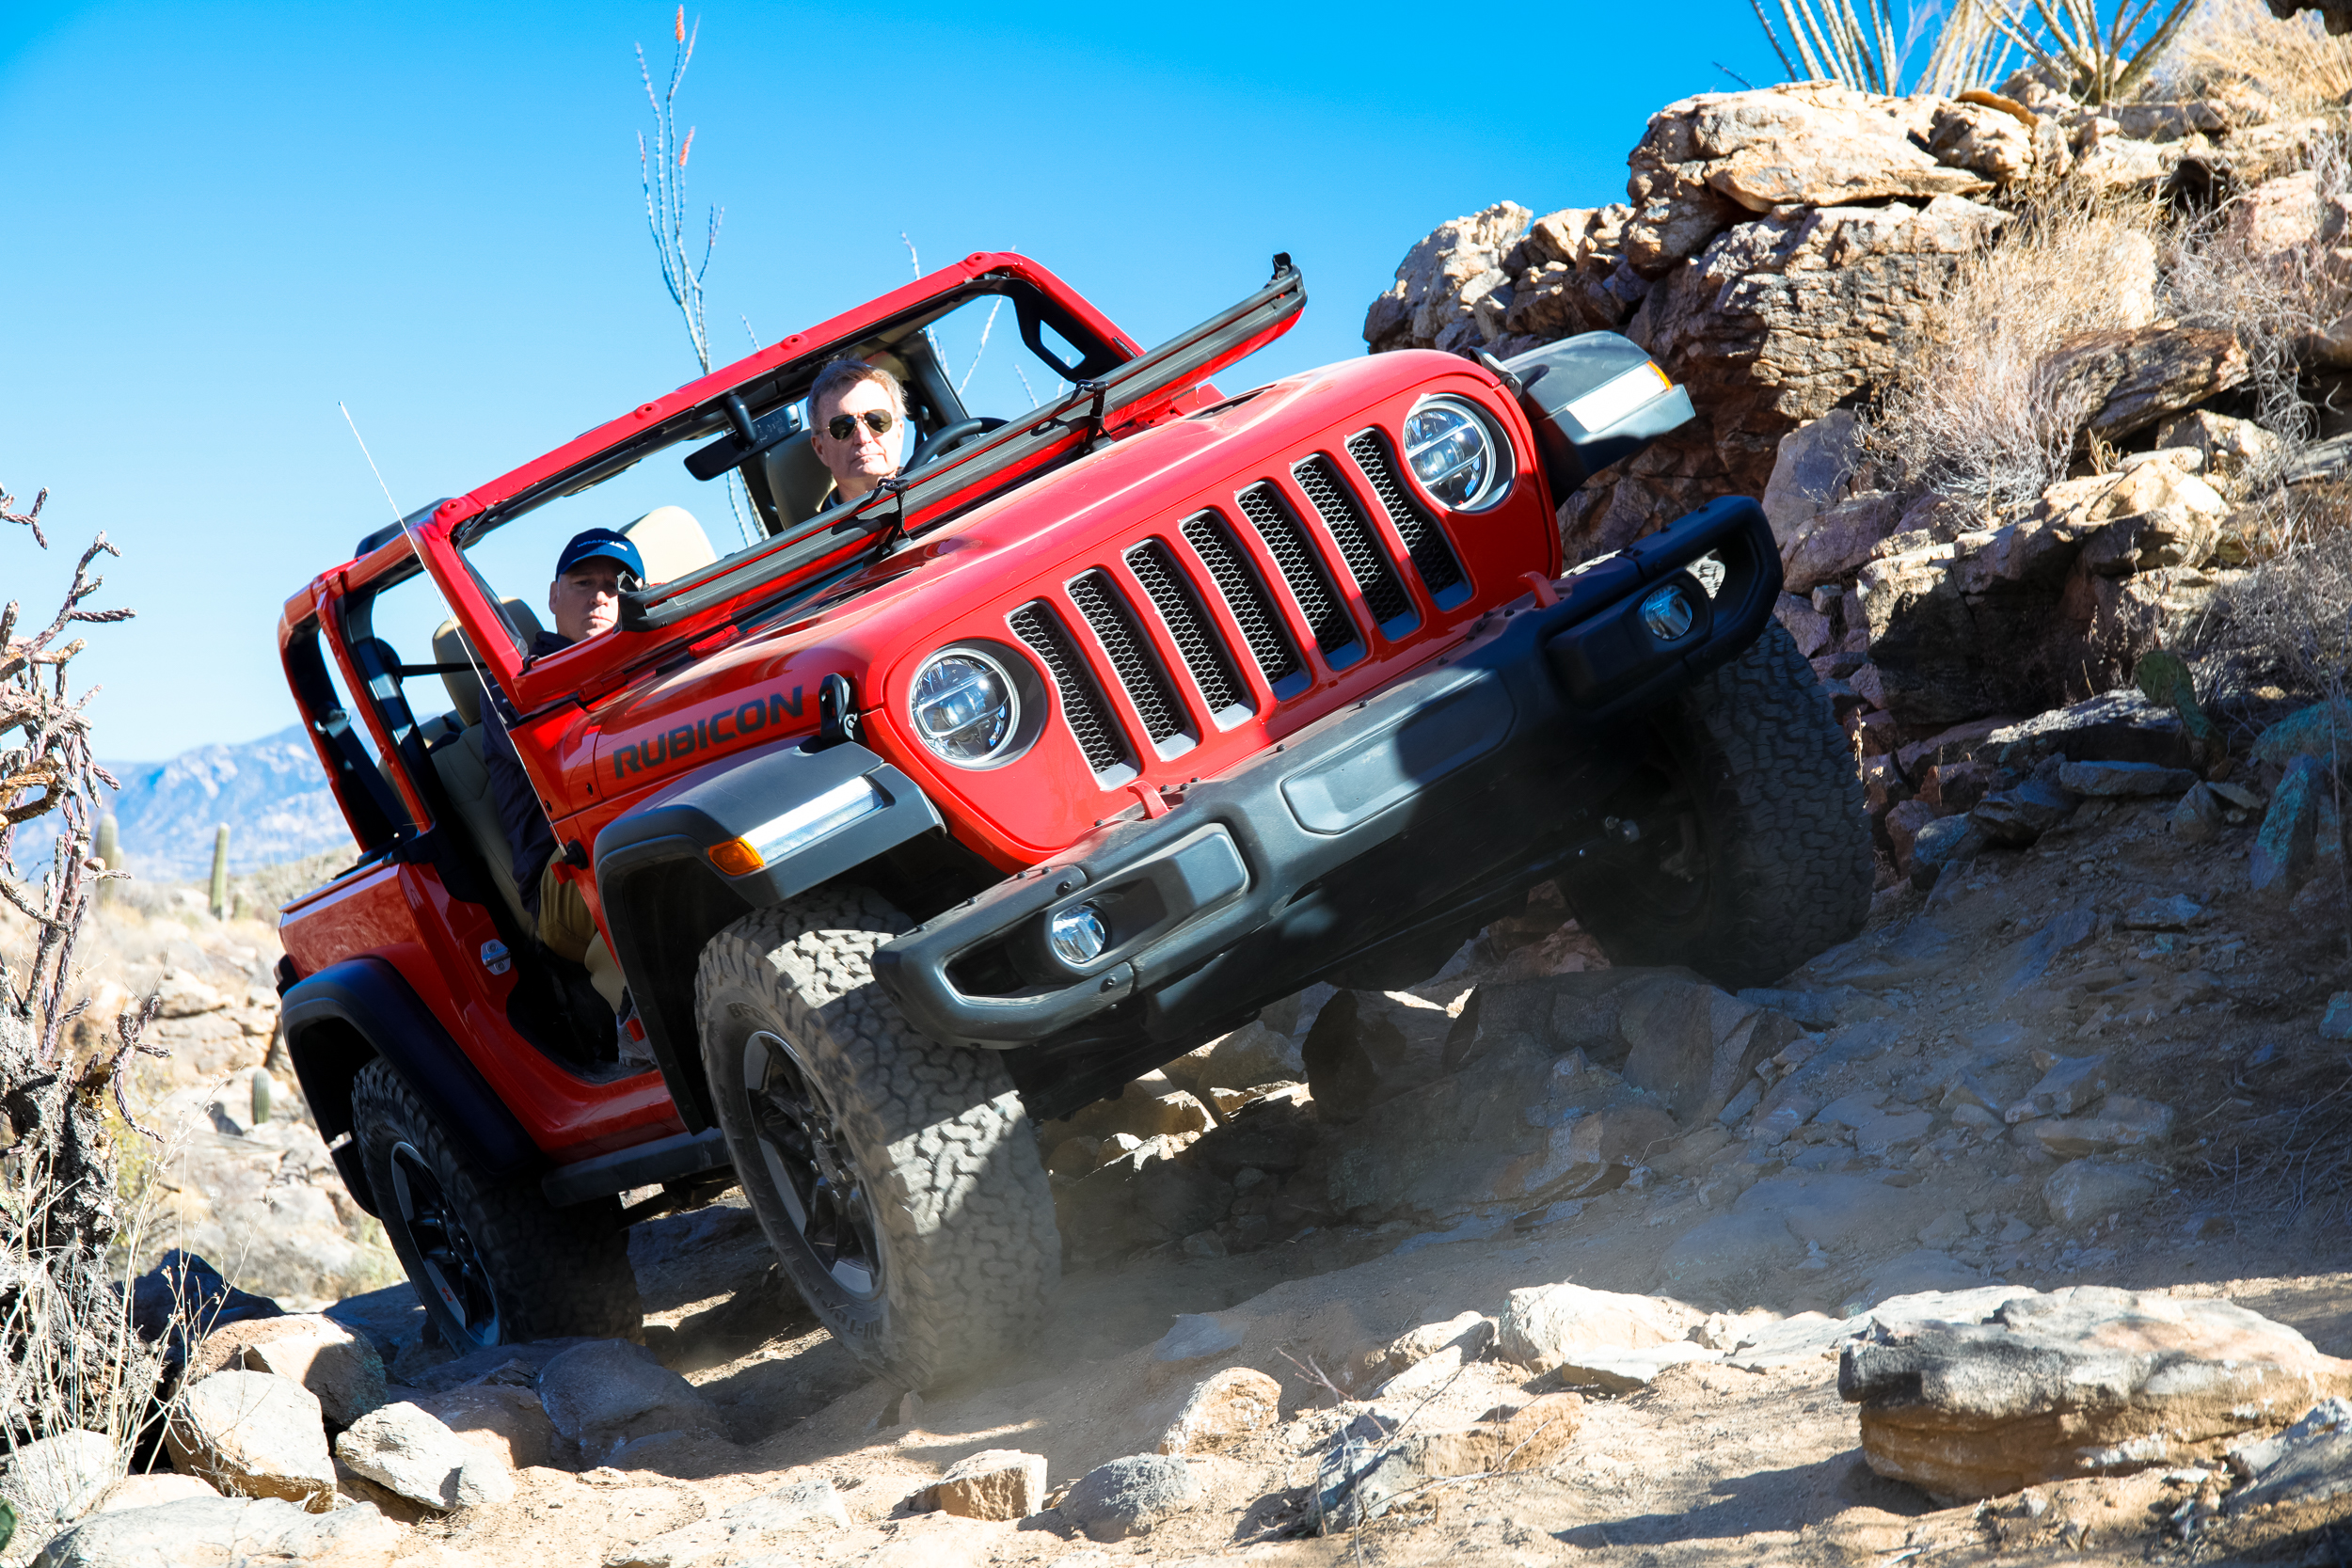
I've since had the FJ40 tipped somewhat beyond 25 degrees (the "tilt-o-meter," however, is long gone, replaced by an iPhone app when needed . . .), and had a Jeep Wrangler Rubicon to significantly beyond that. But those kinds of angles remain wince-inducing for me.
And that's a good thing, because side slopes in the real world aren't like tipping a vehicle up on a table in a garage for a photo. When you are moving across an incline of dirt or mixed substrate or rocks, that safe-but-thrilling 20 or 25-degree angle can transition to a very-possibly-unsafe 30 or 35 degrees or worse in an instant if a downhill tire hits a divot or an uphill tire hits a rock. The movement of the vehicle then adds momentum to that tilt, exacerbating the situation. Also, if traversing a steep and loose slope and the vehicle starts to slide sideways and then catches grip again suddenly, or the downhill tires dig in, it's as if someone on the high side of the vehicle gave it a really good shove.
Negotiating a loose, sandy side slope in Peru above the Pacific. Even a relatively lightweight camper raises the center of gravity significantly.
In the syllabus for the N.P.T.C. (National Proficiency Test Council) certificate in four-wheel-drive proficiency, the guidelines for negotiating side slopes don't mince words: "Avoid if possible" is number one. But what other precautions should you take?
First make sure there is a recognizable track across the slope, to prove others have crossed it successfully. A well-used track also helps ensure there are no surprises in the substrate.
Follow the golden rule of handling any challenging situation in a four-wheel-drive vehicle: "As fast as necessary; as slow as possible."
Watch the placement of your tires to avoid low spots on the low side and high spots on the high side—especially rocks in the latter case, which due to suspension bounce can bump the vehicle farther over than the actual height of the rock.
Prep the vehicle in advance to keep the center of gravity as low as possible, especially if you're carrying gear on a roof rack. If I were forced to traverse a slope I felt was on the edge of safety, I wouldn't hesitate to add some air to the downhill tires and take some out of the uphill pair.
If you're on a side slope and the vehicle begins to slide sideways out of control, or heaven forbid, tip, the escape clause is to immediately turn downhill. Whatever danger you might face driving straight down that slope is nothing compared to barrel-rolling down it.
Just before you do that, though, check the tilt-o-meter so you'll know when to back off next time.
Field testing versus Expo testing
The training area at the Overland Expo is obviously an artificial environment, so one could argue that testing equipment there is inferior to doing so in the field. And indeed I do the latter as often as possible.
But there are advantages to testing under controlled conditions too. First, at the Expo we engineer genuinely demanding scenarios that can be just as hard on equipment as the field—in fact at times it might be harder, since if a student fails at an obstacle he or she is likely to repeat it until successful. Second, we’re always monitoring the proceedings carefully, so when something fails we know exactly when and how it did so, which can be helpful in figuring out why. Was the product overstressed or employed outside the manufacturer’s prescribed use, or did it simply fail due to poor materials or workmanship?
As an example consider the pair of Traction Jacks we’ve been using. I briefly tested these in the field (here), in sand, and they seemed to work well. The folding design had clear advantages for storage, and they seemed stout—in fact they were surprisingly heavy at 28 pounds per pair, compared to, say, MaxTrax at 18 pounds per pair. So I decided to throw them into the mix of recovery gear we use in various classes at the Expo.
They did not last long. The first incident was closely described by instructor Tim Hüber. He was teaching a class in lockers and traction control, for which we use two massive roller assemblies to simulate complete loss of traction. A Dodge pickup was having trouble getting up onto the first roller, and spun the rear tires with the diff locked. So Tim backed the vehicle up, made a ramp with doubled MaxTrax for one front tire, and placed a Traction Jack where the rear tire had spun. Tim estimates there was a depression about an inch deep under device, which he figured it could flex into without harm. Not so—as soon as the tire rolled onto the Traction Jack it snapped in two sharply, without any sign of flexing or bending first.
The second one broke at some point thereafter, right at the hinge, under circumstances I’ve not yet discovered. The other half of that unit is missing completely.
I checked back on my initial review of the Traction Jack. The model we have is rated for 1,900 pounds per tire according to the manufacturer. The weight over the rear tire on a full-size Ram might well be close to that, but not over by much. So it doesn’t seem like the unit should have failed with the minor flexing it would have experienced—unless the composition of the Traction Jack relies on it remaining perfectly flat and supported underneath when weight is on it. I’ve emailed the company for more information but have not yet heard back. Originally the Traction Jack was offered two weight classes, the 1,900-pound version and a heavy-duty alternative rated to 4,500 pounds; however, I no longer see two models listed on the site.
Our experience with the Traction Jack might be limited, but it is in marked contrast to our extensive experience with the two sets of MaxTrax in our kit, both of which have been used and abused for years, up to and including being employed to recover the BFGoodrich semi from mud.
Until I learn more, if someone asked me about the Traction Jacks as a more compact alternative to traditional sand mats, I would strongly recommend restricting their use to lighter vehicles.
Hint: When using “Search,” if nothing comes up, reload the page, this usually works. Also, our “Comment” button is on strike thanks to Squarespace, which is proving to be difficult to use! Please email me with comments!
Overland Tech & Travel brings you in-depth overland equipment tests, reviews, news, travel tips, & stories from the best overlanding experts on the planet. Follow or subscribe (below) to keep up to date.
Have a question for Jonathan? Send him an email [click here].
SUBSCRIBE
CLICK HERE to subscribe to Jonathan’s email list; we send once or twice a month, usually Sunday morning for your weekend reading pleasure.
Overland Tech and Travel is curated by Jonathan Hanson, co-founder and former co-owner of the Overland Expo. Jonathan segued from a misspent youth almost directly into a misspent adulthood, cleverly sidestepping any chance of a normal career track or a secure retirement by becoming a freelance writer, working for Outside, National Geographic Adventure, and nearly two dozen other publications. He co-founded Overland Journal in 2007 and was its executive editor until 2011, when he left and sold his shares in the company. His travels encompass explorations on land and sea on six continents, by foot, bicycle, sea kayak, motorcycle, and four-wheel-drive vehicle. He has published a dozen books, several with his wife, Roseann Hanson, gaining several obscure non-cash awards along the way, and is the co-author of the fourth edition of Tom Sheppard's overlanding bible, the Vehicle-dependent Expedition Guide.


