Overland Tech and Travel
Advice from the world's
most experienced overlanders
tests, reviews, opinion, and more
Is that . . . smoke?
Editor's note: Jim West, a captain in the Sun City Fire Department (and a U.S. team member in the 1992 Camel Trophy), kindly contributed to OT&T this excellent article on fire safety for overland vehicles (or any other vehicle for that matter). Consider the information here critical for your journeys. - J. Hanson
So, departure day is almost here. Your vehicle is kitted out with all manner of overlanding equipment. As it sits in the driveway, you go through your mental checklist: clothes . . . check; recovery gear . . . check; food . . . check; petrol . . . check; spare petrol . . . check; propane . . . check. Then it hits you—Okay, that’s a bunch of fuel; no, I mean a BUNCH. If this thing catches fire, the crew on the International Space Station will wonder what’s burning down there. In a mild panic, you rummage through the truck and, in the back of a cabinet, you find the fire extinguisher. You dust it off and take a quick look at the gauge. Green—good to go, right? Well, throttle back and take a moment to ponder the following:
When driving a vehicle into the outback, whether for a day trip or a year-long adventure overlanding through South America, serious considerations should be taken for general fire safety. The farther afield you’re traveling, the more comprehensive your plan and equipment should be.
If you have a good close look at your particular rig, you’ll find it has all the potential fire hazards of any typical motor vehicle, plus some special ones. Larger fuel tanks and more of them; fuels for cooking, heating, and auxiliary generators. Start with the obvious place—under the hood. Fuel lines should be given a close inspection for cracks, abrasions, and leaking fittings. Repair or replace any suspected problems. Onto the electrics—take a good hard look at the wiring, in general, with special attention to any aftermarket wiring, i.e. additional lighting, batteries, winches, etc. Any cracked, abraded, or melted insulation should be repaired. Also, take a quick look at all tubes and wires to make sure they are not routed too close to any heat source, such as the exhaust.
Are there any fuel or electrical lines running too close to that Borla, or the catalytic converter ahead of it?
Time to get dirty. Get yourself under that vehicle and have a good look around. Better now, in your driveway, than out in the mud. This will be the same as the under-hood inspection: fuel lines, wiring, and brake lines as well (brake fluid can be flammable.) One more thing to think about under there is the catalytic converter. They produc tremendous heat and can quite easily catch tall brush on fire. That would add some excitement to a picnic or campsite. Finally, have a good general look around the outside. If you have additional fuel mounted, make sure it is mounted properly and won’t puncture or leak while traveling down rough trails.
Time for a quick chemistry lesson. (No, we don’t get to blow stuff up, sorry.) Let’s look at the “Petrol versus Diesel” debate. As a general rule, liquids don’t burn, vapors do. If a liquid fuel is not giving off vapors, it won’t burn. Cool, but what does that mean? Petrol starts giving off vapor at any temperature higher than about minus 45ºF (-43ºC). This figure is called its flashpoint. Diesel, on the other hand, has a flashpoint of about 120ºF (52ºC) or higher. This obviously makes Diesel a much safer fuel in general. For instance, you and your best buddy (not for long) are out on a sunny 80-degree day and you need to refuel. No problemo, as it just so happens you brought an approved jerry can full of petrol and the appropriate filler neck. During said filling operation your buddy walks up with a lit sparkler (hey, it’s my story). The petrol is producing enough vapor for things to get very exciting very quickly—i.e. time for new friend, new vehicle, and a trip to the local burn unit. In the same scenario with diesel fuel and a new friend also strangely attracted to sparklers, nothing happens—zip, zilch, nada.
All right—back to that dusty extinguisher. Once a fire starts, you’re going to have to put it out, whether it’s a campfire, your rig, or that guy with the sparkler. What’s burning determines how you put it out. The most common opitons are: remove the fuel; cool the fuel below its ignition temperature; smother the fire (remove its oxygen supply); and, finally stop the chemical reaction. To properly put out a campfire, for example, you simply shovel on some dirt to smother it and then add water to cool it. A grease fire in a pan on the stove can be quickly smothered with a lid over the pan. A fire from spilled fuel might be solved by simply moving vehicles and other combustibles away and letting it burn off. FYI, a one-inch deep puddle of petrol takes about 15 minutes to burn out.
The idea here is you don't always need to use a fire extinguisher. But since you dug it out of that cabinet, let’s talk about it. Fire extinguishers are classified by what they put out: ‘A’ for combustibles, e.g, paper and wood; ‘B’ for flammable liquids, e.g., petroland diesel; ‘C’ for electrical fires; and ‘D’ for metal fires, e.g., magnesium. The most common extinguisher is an ABC type, which will be suitable for most fires you’ll encounter. A five-pound extinguisher is good for most normal-size cars and trucks. As the size of the vehicle goes up, so should the size of the the extinguisher.
What about that ‘D’ extinguisher? A lot of modern vehicles use magnesium parts, and if they do catch fire, an ABC extinguisher won’t put it out. The bad news is, ‘D’ extinguishers are bigger, heavier, and more expensive (about $300.) The (sort of) good news is, magnesium is hard to ignite. So by the time it gets burning and you need that ‘D’ extinguisher, the vehicle would be fully engulfed in flames and a total loss. So you have that going for you.
Some final thought on extinguishers: They should be inspected no less often than annually. This entails checking the pressure gauge to make sure it is in the green. Also, and as importantly, you should shake the extinguisher and feel the dry chemical powder moving up and down. If you can’t feel this movement, the powder has caked into a solid and the extinguisher will not function.
Finally, where does one put the thing? There is a very narrow window of time after a fire starts when an extinguisher is effective. Fire doubles in size every minute. Let’s just ponder that one for a minute . . . okay, the fire just doubled in size. An extinguisher should always be mounted in a readily accessible area for quick access.
Since most vehicle fires ignite in the engine compartment, it makes sense to locate the extinguisher some distance away, but quickly accessible. The mount here ensures it can't be covered by luggage.
Now we have the basics taken care of. We’ve inspected the vehicle, we’re practicing good fire-prevention safety, we have all manner of ways to put out a fire. It’s time for the hero stuff.
You’re driving happily down the trail (remembering to Tread Lightly); you hear a pop under the hood, and see what looks like smoke billowing out of the engine compartment. It could have been a heater or radiator hose. Maybe an AC line. Maybe an engine fire. How do you know? First of all, steam and freon dissipate quickly, smoke doesn’t. Second, fire is hot (rocket science, I know.) If you see the beautiful paint on your hood start turning brown and bubbling up, it’s hero time. The clock just started ticking and you have very little time to make some decisions and start to act on them. Here is a example of how it will play out if you do every thing perfectly:
- Stop the vehicle off the trail/road, preferably in an open space. Dirt, not grass—wildland fires are a bigger problem than car fires. If there’s nothing but grass, leave the vehicle on the trail.
- Turn off the ignition.
- If your hood latch is inside the car, open it immediately (the cable will burn through quickly).
- Get everyone out of the car and well away.
- Grab your extinguisher and, if at all possible, gloves—that hood is going to be hot.
- With the hood popped but not fully open give a quick burst from the extinguisher through the opening between the hood and fender. Never fully open the hood before this step. The fire could travel up the angled hood and burn you.
Displaying a regrettable lack of commitment to authenticity, Jim did not actually light a fire in the engine compartment of his Discovery. But you get the idea.
- Open the hood completely and continue to use extinguisher until fire is out. Short bursts of dry chemical are preferred because you don’t want to waste a very limited resource. The goal is to ‘blanket’ the fuel in order to smother the fire.
- Now comes a very important step: Make sure the fire is completely out and won’t reignite. This should take about ten or fifteen minutes. A good way to judge the time is to take your pulse rate. When it drops below 100 beats per minute, you should be about good.
So now what? You and your passengers should all be standing around the front of your rig, staring at the engine compartment, with that ‘deer in the headlights’ look. The extinguisher is still in your hand. You’ll find it very hard to put it down for the next 24 hours—that’s ok, you'll get over it. The engine compartment itself will be a mess of white dry chemical and melted wires and hoses. Time to break out the water can and tool kit and get to work. During the cleaning and repair process there will probably be some raw fuel leaking or just puddled in there so keep all ignition sources (i.e. sparklers) away.
Here are a few final thoughts to wrap this up:
Ninety two percent of all car fires are preventable with good maintenance (I just made that stat up but I know the percentage is really high.) The old saying ,“An ounce of prevention is worth a pound of cure” is spot on. With regards to extinguishers, if you don’t have one, get one. Actually, get two—a good one and a cheap one to practice with. The directions are right on the label and quite easy. They’re only about $20 and it’s money well spent. If you would like more training most local fire departments have classes and/or demonstrations for fire extinguisher use. And on that note, may your adventures be plentiful and safe.
Cheers,
Jim West
Line Luddites
The automotive world has seen dozens of advances in technology that have added to the cost of each vehicle, but which are so clearly superior that it made little sense to retain the old technology as a cheaper option. No modern carmaker would think of offering front drum brakes instead of discs to save a buyer some money, and no sane buyer would request them. The same goes for carburetors versus fuel injection, bias-ply tires versus radials, lap belts versus air bags—the list goes on.
Yet again and again on overland forum threads discussing winches and winching, a few people persist in recommending steel cable over synthetic rope—and not solely on the basis of cost. One recent commenter actually made the claim: “Steel line is more forgiving than synthetic for the inexperienced off-roader.”
I try to be as diplomatic as possible on such threads. However, whether or not it’s smart, many of those “inexperienced off-roaders” look to forums for advice, and telling them they’re better off using steel winch line brings to mind those old-timers who used to claim things like, “You’re better off not wearing a seat belt because you might be trapped if there’s a fire.” (Presumably this is the fire that breaks out after your head-on collision.)
I’ll be considerate of steel winch cable and grant that it has a couple of advantages. It is considerably cheaper than its synthetic equivalent—in fact, these days if you buy a winch with no cable already installed it should be easy to pick up a steel cable for nothing at all from someone who has switched to synthetic (I have a couple lying around myself somewhere*). Steel cable is also more resistant to being cut when tensioned over a sharp object such as a rock or a poorly fabricated bumper opening, and it is more resistant to internal abrasion damage if frequently immersed in mud or grit (and not subsequently cleaned).
And . . . that’s about it. On virtually every other count, especially the critical question of safety for the winch operator and his assistant, synthetic line is far, far superior. In fact, most competitive four-wheel-drive events have simply outlawed steel winch cable.
Why is synthetic safer? Three reasons: low stretch, low mass, and linear recoil.
Both SK-75 Dyneema—the standard for high-quality synthetic winch lines—and steel cable stretch less than one percent under load. However, a Dyneema line weighs about one-seventh what an equivalent steel line does, so the stored energy released during a break is far, far lower. (100 feet of 5/16ths-inch steel cable = 18 pounds. Equivalent synthetic = 2.7 pounds.) Additionally, the twisted construction of steel cable means that as it breaks (a process that actually takes several microseconds as individual strands snap) it experiences a violent untwisting motion, which can cause it to flail wildly as it recoils. The 12-strand woven construction of Dyneema obviates this. Finally, of course, the sharp frayed end of a broken steel cable can do a lot more damage than the end of a pliable length of Dyneema.
Twelve-strand SK-75 Dyneema—strong, easy-handling, and safe.
I once watched a synthetic winch line part from about 15 feet away. The vehicle involved was being winched up a short but steep and rocky slope as part of a trials competition, so the system was under full tension. It appeared the line was cut over a rock on the crest of the slope because there was no protective sheath over the line, and the operators neglected to lay down a protective mat. Whatever the cause, the result was utterly lacking in drama; there was barely even any sound discernable over the ambient noise. A soft pop, and the two ends simply sprang about five feet apart and fell limply to the ground. (Note here, however, that this lack of drama will occur only if there is no stretch or extra mass anywhere in the system. If you attach a synthetic line to a steel extension cable, you’ve introduced much more potential kinetic energy.)
It’s worth mentioning here that if your steel winch cable does break and manages to not delimb any bystanders, you’re pretty much dead in the water. You've lost whatever length of line is attached to your thimble or hook—five feet if you're lucky, 50 if you're not. You can use wire rope clips to repair the end, but you'll lose up to 20 percent of the rope's original strength—worrying if you've just broken it. If a synthetic line breaks, it can be respliced in the field to virtually full strength and put back in use (in fact you can knot it for a quick repair, although the strength will be reduced). And synthetic line doesn’t develop those nasty single-strand steel burrs, which can punch through a glove.
Other effects of the weight difference are not to be dismissed lightly. The extra mass of that steel cable is all the way out at the end of the vehicle, where its effect on handling and stress on the suspension is magnified. Just pulling 75 feet of synthetic line uphill to an anchor is a joy compared to the same task with a steel cable**.
Respooling (or spooling for the first time) a nicely limp synthetic line is infinitely easier than doing the same with steel, which has a powerful tendency to twist and coil back on itself. Laying down winch line evenly and tightly is critical to subsequent smooth operation, to avoid tensioned line diving down through gaps in the lower layers. Duncan Barbour, ex-manager of the British Camel Trophy team, reports that the biggest drawback he sees with synthetic line is the tendency to not spool it under sufficient tension—its ease of handling can actually encourage improper technique. A new line should be spooled by pulling another vehicle up a slight incline, not by simply leaning back on the line as you feed it in. (Incidentally, there are a few videos floating around suggesting crossing the line over itself as you spool it, rather than laying it on in even, tight layers. Don't believe them.)
Much has been written and said about the temperature sensitivity of Dyneema. Indeed, when heated to around 175 degrees Fahrenheit, it begins to lose tensile strength. However, interestingly, once cooled it actually regains full strength. Not until heated beyond the critical point of around 275 degrees do you suddenly find yourself with a irretrievable blob of molten plastic. That lower mark—possibly even the higher one—can be an issue if your planetary-gear winch has a brake inside the drum. If so, you should freespool when pulling line rather than powering out, and use caution when reversing a vehicle down a slope, to avoid prolonged braking. (Thor Jonsson at Viking Off Road once had a fellow return a broken Dyneema line and demand a refund. Interrogation revealed that the guy had lowered a half-dozen of his buddies’ trucks in succession down a steep ravine using an internally braked winch—and also that the winch itself had burned out.) Many planetary-gear winches now come with external brakes, which eliminate the problem. It’s also not an issue with the spur-drive Warn 8274 or the worm-drive Superwinch Husky. If you already own a winch with an internal brake, you can buy a sheath that will help protect the inside wrap of the line.
Many modern winches, such as the excellent Warn 9.5xp, incorporate brakes outside the drum and will not overheat synthetic line.
Steel-cable Luddites like to frown and speak darkly about the chemical sensitivity of synthetic winch line. I can’t remember the last time I spilled hydrochloric acid on my winch, or dragged line through a pool of trichloroethylene, but this chart (courtesy Marlow Ropes) should ease your mind (HMPE refers to High Molecular-weight PolyEthylene, which is what Dyneema is):
What else? Sun exposure worries some; in fact, Dyneema is extremely resistant to UV degradation. If you park your vehicle in the open in Arizona and fret about it, get a winch cover. And yes—you should periodically maintain your Dyneema line. If you frequently winch in abrasive conditions—sand, mud—it pays to occasionally wash it in a bucket of mild detergent, sqeezing apart the braid to flush out debris (some people simply powerwash it at a commercial car wash, although this is not recommended).
Strands are easy to push apart to flush out debris when washing.
In use, make sure you avoid running the tensioned line over sharp objects. This requires envisioning the entire pull you’re going to make, not just the initial layout—angles change, and a rock safely out of the way when you begin might not be partway through. If you can’t avoid running the line over an edge, use the section of sheathing supplied on most Dyneema lines to protect it—and add a floor mat or something else as well if possible. Avoid standing on the line, as it grinds in abrasives. If you switch from steel line to Dyneema, make sure your fairlead, whether hawse or roller, has no burrs or rough spots (there’s absolutely no reason not to use a roller fairlead with synthetic line, spurious anecdotes to the contrary). The same goes for the winch’s drum and your pulley blocks. As with any line, the radius of a roller, hawse opening, or pulley should if possible be six times the radius of the rope. Avoid, for example, low-profile hawse fairleads that create a tight bend radius on side pulls.
Roller fairleads work perfectly with synthetic winch lines, as long as they're not burred from prior use with steel cable.
If you’ve winched with steel cable and switch to Dyneema, you’ll be amazed at the reduction in effort. If you start out with Dyneema and then have to use a winch equipped with steel cable, you’ll feel like you’ve been transported back to 1960—which you have. It’s time to move winching into the 21st century.
*If, God forbid, you decide on this approach, make damn sure your free steel cable is sized appropriately. You don’t want to spool a line off someone’s ATV winch onto your Warn M12000.
**Depending on whom you’re asking, you might be told that “cable” or “line” or “rope” is the only proper term for the stuff a winch pulls with. Look up definitions for each and it’s clear that any will do. I like to mix them up in the same paragraph so as to annoy everyone at least once.
Wi-fi, anywhere on earth
Iridium has just released the GO! (their way to write it, not mine!), a satellite-based device that can create a 100-foot-radius wi-fi hot spot anywhere within transmitting range of one of the 66 low-earth-orbit Iridium satellites—in other words, just about anywhere on the planet.
Yes, you've guessed what this means: Now a group of people on a remote expedition can get on their smart phones or iPads and ignore each other just as if they were at a downtown restaurant.
Okay—the practical applications of this device are apparent, and, more significantly, it moves us one step closer to universally accessible communication. Whether or not that is a good thing I'll leave you to decide.
For more information, go the the Ocens website here.
A Marv in the palm of your hand
I once knew a mechanic named Marv. (Could there be a better name for a mechanic? Picture him: Brylcreemed black hair combed back in a bit of a pompadour; grey trousers and shirt with “Marv” on a shoulder patch, oil-stained loafers, and perfect white socks. That’s Marv.)
Marv had a shop in which he built hot rods for fun while doing ordinary mechanical work to pay bills. He had the contract to maintain J.C. Penney’s furniture-delivery trucks when I was driving them after high school.
The thing about Marv was, vehicles talked to him. I don’t think I ever saw him have to do more than listen to a truck or car for a few seconds before perfectly diagnosing its issue. “Throwout bearing,” he said into my window when I pulled up in a truck that was making a strange noise during shifts—before I even parked or mentioned the specific complaint. “Front U-joint,” “Water pump,” “Burned exhaust valve”—those are Marv diagnoses off the top of my memory. I once brought in a truck that had started running rough, and he said, “The timing’s slipped.” Did he go fetch his timing light? Nope—he pulled out a half-inch wrench, loosened the nut on the V8’s distributor, turned it with his head cocked to the side, revved it a couple of times, tightened the nut, and said, “There you go.” That time, one of my co-drivers (Vern—could there be a better name for a furniture-delivery man?) was with me. He knew Marv well, but not well enough.
“What’s the timing supposed to be?” Vern asked.
“About seven degrees before top dead center.”
“And how close do you think you got to that?”
Marv said nothing, just fetched his timing light and, well, I bet you can guess the rest by this point. Some time after that I was summarily fired for rapelling off the J.C. Penney warehouse roof (just for fun—a story for another time), and I lost track of Marv and his preternatural skill.
Today? Today any rookie with 20 bucks, an Amazon account, and a smart phone can enjoy a near-Marv-like mind-meld with an OBDII-equipped vehicle two days after clicking “Add to cart.” I know, because I finally ordered a KingMansion ELM 327 wi-fi-enabled OBDII reader that sends all sorts of interesting and useful information to my iPhone, including stuff even Marv couldn’t have determined (although I doubt it could identify a faulty throwout bearing). The only catch is, you’ll also need a compatible app for the phone—cheap if you buy something like the $10 OBD Fusion in the iTunes app store, more expensive if, like me, you don’t pay attention and wind up with one that also synchs with the phone’s accelerometer to record 0-to-60, G-force, and lap times. If I ever decide to try for a new Tacoma/Four-Wheel-Camper lap record at Riverside, I’m all set.
In case you don’t pay attention to such things, OBDII (for On Board Diagnostics) is a standardized system and port (in the U.S.), mandatory on all passenger vehicles since 1996. It allows the vehicle’s CPU (central processing unit) to communicate information about the engine’s emissions (the original intent), instantaneous fuel usage, actual engine temperature, engine load, air intake temperature, and much more, depending on what the vehicle’s manufacturer chooses to make available.
Most useful for owners, however, is the ability to read trouble codes when the dashboard energizes that annoying and oh-so-vague “Check engine” light, which could indicate anything from imminent disaster to something utterly harmless such as a failed reverse lockout switch (this happened on our old Tacoma).
I followed the instructions on the absurdly inconsequential-looking ELM, and within minutes the Tacoma was assuring me all was well fault-code-wise. Other functions such as instantaneous fuel mileage (full throttle in first gear with a camper = 7.142 mpg) also popped up and worked perfectly.
If you do hook up an OBD scanner in response to the check-engine light, don’t expect a little pompadoured Marv to pop up on the screen and tell you what’s wrong and how to fix it. All you’re going to see is an alphanumeric code (or perhaps several). You need a guide to tell you which of a mind-boggling array of faults you are experiencing. It might be, say, code P0812, indicating a reverse switch malfunction, which you can ignore if you’re in the middle of nowhere, or, say, P0304, indicating a misfire in cylinder four, which you would not want to ignore. Codes that begin with a P0, P2, or P3 are universal codes; those that begin with P1 are manufacturer-specific. Many websites have been created solely to list and explain OBDII codes. (Toyota has a professional site here that caters mostly to mechanics, but you can apparently buy a temporary subscription to retrieve current technical bulletins and OBD codes. I write “apparently” because it’s only compatible with PCs—and only using Internet Explorer, for God’s sake. C’mon, Toyota.)
By far the most likely scenario is that even after you look up the code you’ll be presented with some utterly incomprehensible diagnosis, such as P0608, “Control Module VSS output A malfunction.” The reason for this is that, when the people in charge were programming what the standardized OBDII sensor would monitor and flag, they decided they wanted it to be the equivalent of the most hypochondriac human being on the planet—just to be safe, and to give car dealers plenty of work. So—I have no proof of this yet, but I’ll get to the bottom of it—I’m virtually certain they kidnapped my mother, hooked up electrodes to her in a secret research facility in Detroit, and remarked admiringly, “Wow—we need at least 360 potential fault codes.”
Whatever the case, you’ll have to decide whether one of these obscure codes is reason to abandon a trip and head to a mechanic. My own reaction, if the truck were running well with no outward signs of trouble, would probably be to mutter, “Yes, mom, whatever you say,” and keep right on driving.
Land Rover's invisible hood
Very rarely am I left open-mouthed by a new automotive invention, but this one left me gobsmacked. Land Rover is experimenting with a system that employs a camera, mounted in the front bumper, which projects its image on a heads-up display in the windshield shaped exactly like the driver's view of the hood, pardon me, bonnet. The effect is of being able to see right through the hood/bonnet, engine, and suspension to the trail as the vehicle drives over it.
Not only would this hugely improve wheel placement, it would also end that stomach-tightening moment as you crest a blind rise.
Watch the video:
Wired has more on the story HERE.
Yes, I checked, and the story was posted April 9th, not April 1st.
The blue vinyl table is dead!
A few years ago on a long road trip, Roseann and I opted for convenience over our usual preference for solitude, and stopped for the night in a developed campground: picnic tables, barbecues, flat sites, perfectly symmetrical pine trees—actually quite nice as such places go. That evening an enormous motorhome inched carefully into a nearby slot. The driver emerged just long enough to open a side panel and pull out a remarkably colon-like corrugated hose, which he plugged into his deluxe site’s sewage receptacle. Another umbilical fed electricity to the behemoth. The man then scurried back inside, and soon I heard the sound of some TV program on what I assumed had to be at least a 40-inch flatscreen. And that was the last we saw of either him or his wife.
I try not to judge fellow travelers on the size or splendor of their vehicles. After all, to someone in a CJ5 with a Eureka A-frame tent our Four Wheel Camper must seem pretty posh. But, while the camper provides us a cozy, stormproof home away from home, holing up inside is not the goal when we’re traveling—even in Jellystone Park. In good weather we like to be outside as much as possible. With the camper’s excellent Fiamma awning deployed, and a table and chairs set up, we can lay out snacks and drinks, then tackle some weighty biological issue like seeing how many bird species we can document while sitting down. “Nine species in one martini!” Roseann is likely to announce (although identification skills wane somewhat after the second, and we're likely to record birds never seen in this hemisphere . . .).
Where was I? Right: Until recently we relied for our outdoor table on one of those ubiquitous roll-up blue-vinyl-covered things with the screw-in aluminum legs. It was ugly and wobbly, but perversely durable despite my best attempts to “accidentally” destroy it. A Maasai shuka used as a tablecloth improved its looks immeasurably, but I still knew what was underneath . . .
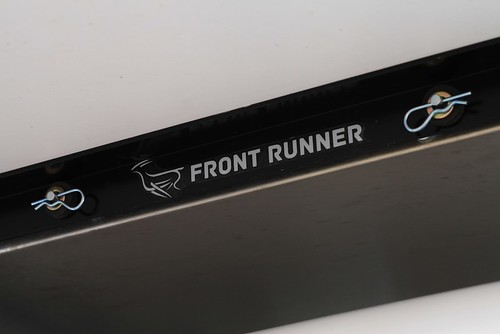
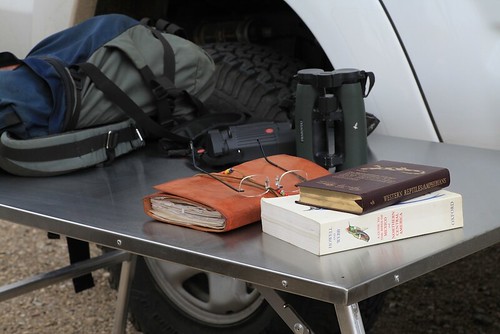
Then, a few months ago, Roseann emailed me (from across the room) a link to the Front Runner camp table, designed to slot under the company’s roof rack. We'd used a version of it in Tanzania and Kenya several times and had been very impressed. Here was a proper outdoor table: welded and braced aluminum legs that folded flat under a top formed and welded from a single sheet of stainless steel. At 29 by 45 inches, the table was large enough for food prep, eating (it seats four snugly), or work, and it weighed a reasonable 23 pounds. She also linked to the Z brackets designed to attach to the Front Runner rack—and then asked, “Could we mount this under the front overhang of the camper?”
I emailed back, “Great idea,” then did some measuring on the camper—plenty of room. Tom at FWC said no problem drilling the composite sheet that forms the bed area of the camper as long as I sealed it well, and certainly no problem with the extra weight: the FWC’s overhang is tested to 1,100 pounds (or, as he and I quipped at the exact same time, “Two average Americans.”).
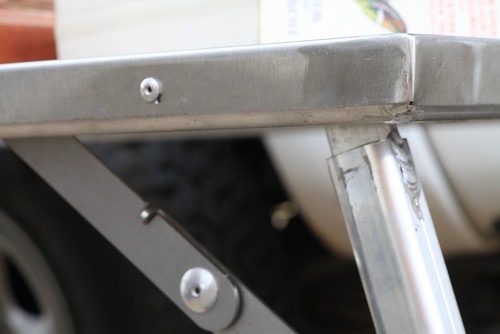 The table's top is formed, welded at the corners, and riveted to the aluminum frame.
When the table arrived it met my expectations and then some. Compared to its cheesy roll-up predecessor it was the Rock of Gibraltar. All the hardware was cadmium-plated and secured with nylocks. The stainless top would be impervious to spills or heat. True, at $285 such features should be taken for granted. Nevertheless it was a relief to consign the blue vinyl table to the Cemetery of Obsolete but Kept Around Forever Camping Gear down in the storeroom.
Exercising due measure-thrice-cut-once caution, I marked and drilled, then veeery carefully countersunk (so the bed’s top section could slide over the bolt heads) three holes for each of the Front Runner Z-brackets from inside the camper. They are designed to hold the table on its narrow ends, but I needed them to hold it on the longer sides, meaning the table would protrude about a half a foot each way.
 The bolt heads are countersunk just enough to allow the bed extender to slide over them.
The latch mechanism included with the brackets wouldn’t work in our application, so I used a 24-inch-long piece of 1.25-inch aluminum angle iron as an end stop on the passenger side of the truck. I drilled two holes sideways through the frame and top of the table, and inserted a pair of two-inch-long 1/4-inch-diameter clevis pins through them. A pair of hairpin clips holds the pins to the table:
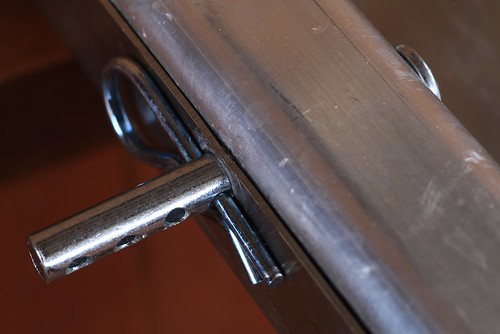
The pins extend through two holes in the end bracket and are secured with two more hairpin clips backed by a rubber washer and a metal washer. I also glued a couple of furniture bumpers on the back of the end bracket, and two flat pieces of rubber gasket on the insides of the Z brackets where the table slides in from the driver’s side of the truck.
The Z brackets came with carpet strips glued along the bottom, so I hoped all the rubber and carpet would minimize any rattling directly over our heads. My last step was to install a backup latch at the other end, using two of the cunning little Expeditionware Transport Loops sold by Expedition Exchange, plus a Quicklink. (My plan is to try to find a small padlock that will fit through these loops.)
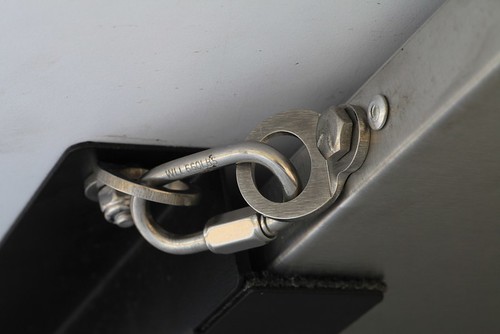
Twelve hours after I finished up, the installation got a good test when we left for a biological survey in the Sierra Aconchi in Mexico, which involved a 230-mile paved approach, then a rough ten-mile climb up a four-wheel-drive trail. On the highway the table created no noise at all. On rough slow pavement with the windows open we could very infrequently hear a barely perceptible oilcan effect over sharp bumps as the table top flexed. On the trail there was zero sound from the table or mount, at least none we could hear over the tire and drivetrain noise.
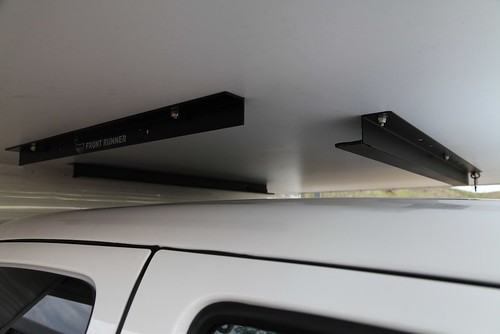 The completed bracket assembly.
Once in camp the table proved just about perfect. There was plenty of room to spread out plant samples, notebooks, bird guides, and binoculars; at a group dinner we covered it with chips and salsa and vegetables, then served the outstanding pizzas Roseann somehow managed to make on the camper’s stove top. One night delivered a torrential rain which bothered the table’s aluminum and stainless steel not at all. Total time to set it up on the first day and stow it on our last morning: about two minutes each.
So, not only did we gain a big upgrade in the quality of our outdoor table, we also gained storage space inside the truck. If you have an overhead camper—or a roof rack—I can recommend the Front Runner approach.
On the other hand, if you have a fondness for blue vinyl, email me.
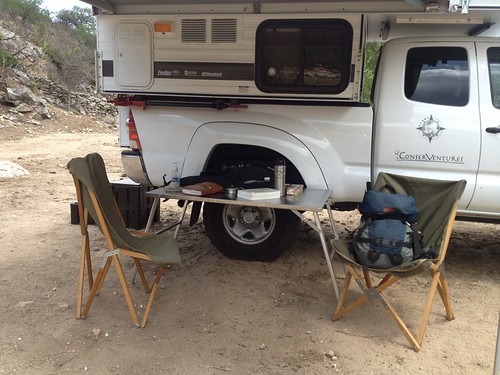
Addendum: A forum member on Wander the West suggested that the Front Runner brackets could be set up to carry a solar panel in the same spot. Brilliant.
Equipt Expedition Outfitters also carries similar tables from K9 racks, in three sizes.
Front Runner Outfitters is here.
The Transport Loops are available here.
iPhone LifeProof Case, part 1
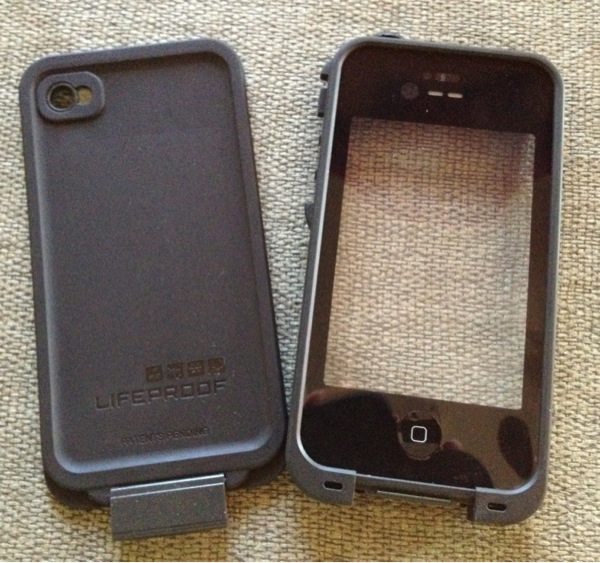
For more and more people, our phones are not just devices with which to phone home, they are also our primary GPS, pocket camera, video recorder, notepad, music player, book reader, dictionary, translation tool, and complete mobile office. In fact, I am writing this review on my iPhone 4S.
With so much at stake, especially while traveling, protection is key. Not only are these pricey electronic gadgets averse to water and fearful of heights (i.e. made from slabs of glass), they are for the most part uninsurable.
At the Outdoor Retailer show in August I selected a few of the newest crop of rugged iPhone cases to test during our trip to the UK and Kenya. Plenty of rain in one place and dust in the other; I figured on some perfect testing conditions.
First up is the LifeProof Case ($80, Lifeproof.com). I found it highly attractive because it is not only fully waterproof to 2 meters, totally dustproof, and shockproof to 2 meters (full MIL-STD-810F-516.5 = 2 meters/6.6ft drop on all surfaces and edges), it is so streamlined it hardly changes the profile of the phone. It adds 1.5mm to each side and weighs less than an ounce (28g).
But wait there's more: the covers for the camera lenses are double AR-coated optical glass and the speaker covers are gas-permeable waterproof membranes (I believe Gore-Tex but I haven't been able to verify that while on the road).
So here are the first impressions.
- Passed the "at-home" wateproof test as specified in the instructions (to seal, sans iPhone, and submerge in water, weighted, for at least an hour)

During (above) and after (below) the dunk test. No water in the case or at the gaskets.
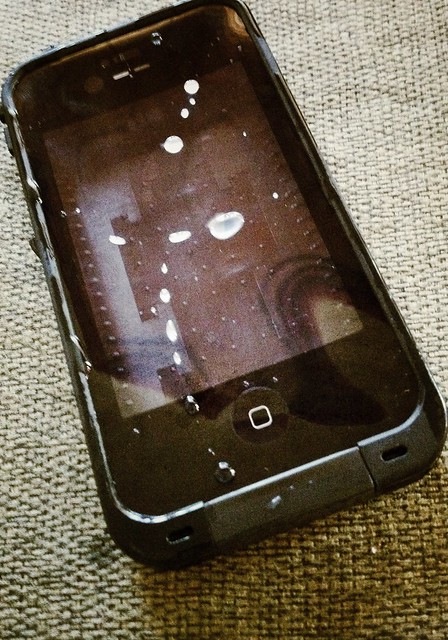
- The fittings snap together very tightly. Unlike the Otterbox case, they actually are very tough to put together and the company includes a long list of "must-do" actions to ensure the case is sealed properly. While fussy at first, you soon realize it's serious protection for an expensive gadget. However, after sealing in my iPhone 4S, the first thing I noticed was that the screen protector was warped and stood proud of the screen by about 1mm or more. This made it nearly impossible to use as anything but just a "hello" phone. Texting or manipulating photos (which I do a lot) was just silly—the fingers don't meet the screen and there is no contact, so nothing happens.
I searched forums and found this to be an intermitent problem, so after a call to the rep the company agreed to send a new one. This one fit very, very snugly and the screen protector very close (if not 100%) to the screen, so I found it easy to use, if not perfect. The Otterbox fits flat to the screen with no warping, but it's not 100% waterproof to 2m.
 Extensive instructions and warnings accompany the LifeProof case.
- The only charger you can use is the factory Apple charger / cord. My spiffy retractable cord won't work with it, nor will it work with my Griffin iTrip.
- To use headphones you must use the adaptor (so it seals) or use Bluetooth.
After 10 days on the road taking photos, posting on Flickr (see Flickr.com/photos/conserventures), Instagram, Facebook, Twitter, and here, I can say I really like this case. However, I admit to an unfair gripe. The replacement test model came in blue rather than the original (and my favorite) black. I hate blue. I just do. There's no logic. So when our friend Duncan in Scotland admired the blue case, and showed me his new black LifeProof case, I jumped at the chance to switch. Interestingly, the black case does not fit as well as that blue one, but it fits better than the first one I had. So lesson is: you might have to try multiple models to get the best fit.
So far the screen has not scratched. I have not dropped it, but I've used it in foggy spitting rain in Scotland, and it sat in a wet pocket for most of a half-day walk round a village. I noticed a little bit of fogging when we went from cold/wet to warm environments but it cleared quickly.
Next up: we're flying to Kenya, where we will fully test the LifeProof in the dusty, dry Rift Valley.
Warn M8000—ultimate overlanding winch!
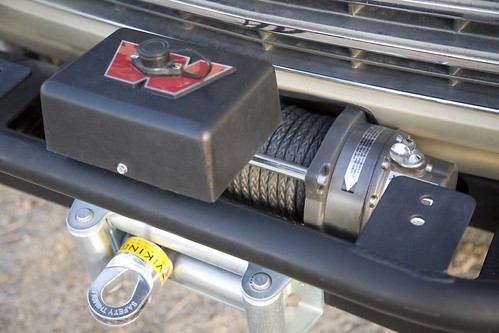
I wrote that title deliberately. One of my eye-rolling pet peeves as a reader and editor is the ubiquity of magazine headlines and cover blurbs that begin with, “Ultimate”—followed by an utterly non-ultimate product—followed by a “!” Firearms periodicals seem especially obsessed with the term. I’ve forgotten how many times I’ve been breathlessly introduced to the “Ultimate Compact .45!” or the “Ultimate Tactical 9mm!” (And don’t get me started on the “tactical” lunacy.)
Of course there is very rarely such a thing as an “ultimate” anything (although Fuller’s 1845 might come close in the bottled beer category). There is only, at best, the ultimate compromise—and this applies universally to the equipment we add to our vehicles. High quality or low price? Strength or light weight? Multi-function operation or ease of use?
If you’re looking at winches for an overlanding vehicle, there’s an additional question to ponder: Do you really need one at all? I addressed this issue some time ago (click here to go to article), but now we’re going to assume you’ve decided that the advantages outweigh the disadvantages, and are planning to install one. (Either that, or you’ve simply succumbed helplessly to winch envy.) In either case, how do you minimize those disadvantages?
Aside from cost, the salient drawback to a winch is weight. Not just the weight of the winch and line and fairlead, but also a properly constructed bumper on which to mount it, and perhaps the dual battery system you’ll install to make sure you don’t run your only source dry during a long, maximum-amperage pull. And that weight is in the worst possible spot, way out in front of the vehicle where it applies leverage on the suspension. Aside from spending yet more money on suspension modifications, an obvious solution is a very light winch, but then we run into a compromise: light weight equals low power.
It’s axiomatic that a winch should be rated at around 1.5 times the loaded weight of the vehicle on which it is mounted. Why 1.5 times? Shouldn’t a 6,000-pound winch be perfectly adequate for a vehicle that weighs 6,000 pounds all up? Theoretically, yes, but several things complicate matters. First is the simple fudge factor inherent in the rating of many products. Second, and more universal, is the fact that all winches are rated with just a single layer of line on the drum. More layers equal less rotational leverage for the winch and less pulling power (roughly ten percent per layer)—and it’s not always possible or practical to arrange a winch recovery so that most of the line is pulled out first. Additionally, substrate makes a difference: For example, deep, sticky mud adds significantly to the effective weight of any stuck vehicle, and a large boulder in the middle of a steep uphill pull can spike the effective weight well past its actual mass. Finally, off-center pulls and other awkward situations add to the load on the winch. So the 1.5 factor is a wise generalization.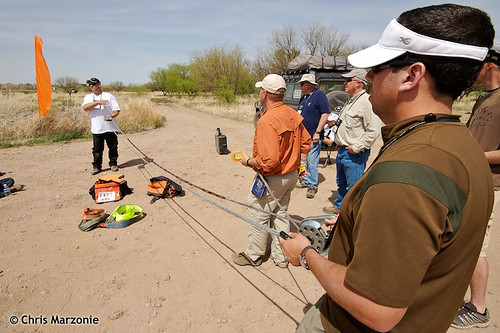 Rigging a winch line with a pulley block at Overland Expo 2010. Photo by Chris Marzonie
On the other hand, technique can optimize the power of a winch. First is making sure you have as much line out as possible, either by backing up the anchor vehicle or picking an anchor tree that’s farther away. You can also use a redirected pull to get more line out, for example by attaching a pulley block to a nearby tree, and running the line though that to another anchor tree back closer to you. You’ll lose a bit to pulley friction, but if you can get a couple of layers of line off the drum it will be worth it.
However, the best way to maximize a winch’s capability is to rig a double-line pull: from the winch of the stuck vehicle through a pulley block on a fixed anchor vehicle or tree, then back to the stuck vehicle (or, if you’re rescuing a stuck vehicle with your winch, to a pulley block attached to the rescuee and then back to your vehicle). This setup halves the line speed of the winch but doubles its power, in addition to getting out more line and reducing the layers on the drum. Obviously, relying on this technique also halves the reach of your winch, but, at least in my experience, in the vast majority of overlanding situations (with the glaring exception of tropical-rainy-season mud), 45 feet of usable line is enough to access a natural anchor or another vehicle—and if not, a winch line extension will give you the reach you need. You can gain even more power by adding another pulley block and rigging a triple-line pull, at the expense of even less reach. (Remember to always leave at least five full wraps of line on the drum if you get down to the first layer.) 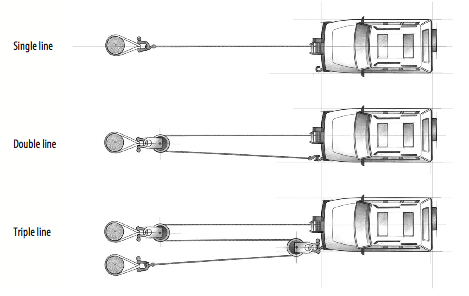
With the limitations of reach accepted, the 1.5 factor becomes somewhat flexible. Which brings us to the Warn M8000 (and its new brother, the M8000-s).
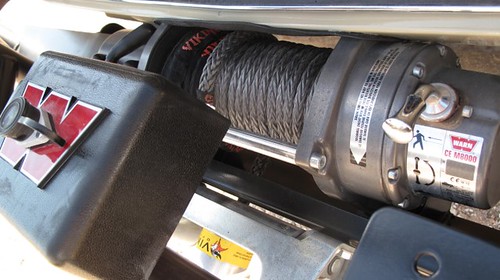
The M8000 is rated at—surprise—8,000 pounds, which, for example, is a bit under the 1.5 factor for our FJ60 when it’s fully loaded with gear, fuel, and two people. A lot of later full-size SUVs would blow past it before a single sleeping bag was tossed inside. On the other hand, it’s right in the ballpark for many compact pickups and small SUVs. And the M8000 is very light. I recently had ours off while the vehicle got a full repaint, and put each component on a scale. The bare winch, with no line or solenoid box, weighs only 35.6 pounds. The solenoid box and 1/0 cables to the battery total 7.2 pounds. The steel roller fairlead is 11 even, and 100 feet of Viking synthetic winch line adds a hardly-worth-measuring 2.8 pounds with a safety thimble (the standard steel cable is 13.2 pounds without a hook or thimble).
That’s a total of just 56.6 pounds—and we could reduce that to under 50 pounds with an aluminum hawse fairlead. Interestingly, the Warn M8000-s comes with synthetic line and an aluminum fairlead, and its advertised weight is 55 pounds. Mount it to an Aluminess bumper—which can be ordered without the bull bar so few of us really need—and you’ve got a complete system for around 125 pounds.
The M8000 might be light, but it’s also built to last. I’ve seen, either in person or in photos, disassembled examples of three “different” discount-brand winches (all of them most likely built in the same factory, the Ningbo Lift Winch Manufacture Company in Ningbo Mingzhou Industrial City, China). All appeared to be virtual clones of the M8000—until you looked inside, where compromises in motors, gear trains, and wiring were apparent.*
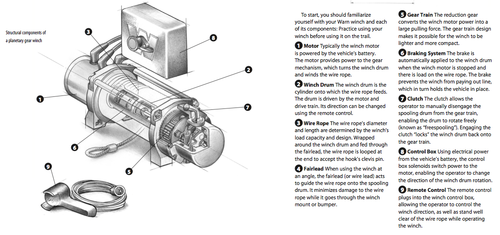
The motor is the heart of the winch, and it consists of two main components: a central set of wire coils wrapped around the shaft, called the rotor (or armature), and an outer assembly called the stator. When current is supplied to the rotor and stator it produces opposing magnetic fields, which cause the rotor and its attached shaft to turn via the attracting and repelling forces of the fields. The rotor is called an electromagnet because it only becomes magnetized when current passes through it. The stator can also comprise a wire coil magnetized by current, in which case the assembly is called a “series-wound” motor. Alternatively the stator can be constructed with standard metallic magnets that are thus always “on,” as it were. This is then known, logically, as a “permanent-magnet” motor.
Permanent-magnet motors are cheaper to make and use slightly less current (since none is needed to magnetize the stator). However, they overheat more easily than series-wound motors, and the magnets can lose their field strength over time (and temporarily in very cold weather). Permanent-magnet motors work very well in light-duty situations, but for high-stress applications series-wound motors—such as that found in the M8000—are superior. However, not all series-wound motors are the same. Hidden differences in wiring, bearings and bushings, and tolerances mean that in a winch (or any other electrical appliance) the standards demanded by the manufacturer still determine the final quality of the assembled product.
 Click on image to open in larger window.
The other major electrical component in a winch assembly is the switch gear that controls power to the motor, typically housed in a plastic box attached to the winch. Traditionally, these have been relays (commonly called solenoids). A relay in our application is essentially a mechanical on-off switch capable of handling large amounts of current, controlled by a smaller-capacity switch elsewhere—the winch’s remote in this case. A relay thus shortens the length of heavy-duty cable that would otherwise be necessary to insure adequate amperage to the winch (the same holds true for other high-draw devices, such as driving lights, that use a relay and a remote switch). Winches usually employ relays in multiples—one or two to handle power-in switching, one or two to handle power-out.
Since relays utilize moving mechanical contacts to transfer current, they are subject to wear and corrosion. Often the result will be that the relay simply stops working, but very rarely a worn relay will stick in the “on” position—with predictable ramifications if you’re operating a powerful electrical device which you need to be able to turn off right now.
In the last few years, solid-state devices known as contactors have begun to replace relays in many winches, including the M8000. A contactor employs a high-capacity semi-conductor to route current; thus there are no moving parts to wear out or corrode. Contactors can still fail, but it’s virtually impossible that they would do so in the “on” position.
The last link in the winch assembly is the gear train by which the motor turns the spool and pulls in (or lets out) the line. Since the motor turns at a high speed, its revolutions per minute must be reduced considerably, both to gain mechanical advantage and to keep the line speed to a manageable level. There are three main types of gear train: worm, spur, and planetary. The latter is the type found the M8000 and most consumer winches these days. Planetary gears are so called because the central gear, driven by the motor, is literally orbited by the secondary gears that drive the spool.
Planetary-gear systems are very compact, inexpensive to manufacture, and reasonably efficient. Their salient drawback is that they have no intrinsic braking capability when the winch is spooling out under power, so an internal brake is required, usually inside the spool. This brake will transfer heat to the drum, and subsequently the inner wraps of the line, if, for example, it’s necessary to lower a vehicle’s weight against the winch on a long downhill recovery. This can be an issue with synthetic winch line, which loses strength if it is heated too much. According to Thór Jónsson at Viking, current Dyneema winch line will begin to lose strength if it reaches 150ºF while under load, and will begin to melt in the high 300º range. While the latter point is unlikely during any normal single-vehicle recovery, the former isn’t. For this reason, planetary-gear winches should always be set to free-spool when you are pulling out line to rig the recovery, and should be powered out under load for no more than 20 seconds at a time, then allowed to cool. No such precaution is necessary when powering in, the normal mode for the vast majority of winch recoveries.
(An interesting characteristic of synthetic winch line is that, even if heated to over 150º, it will regain the strength it lost once it cools. At first glance, the bottom layers of synthetic line might appear to be melted after any load, but they’re really just compressed. However, if you exceed that critical 300º-plus point, you’ll be left with a chunk of melted plastic. Thór once had a customer complain after he melted the Viking line on his M8000. Questioning revealed that he’d been lowering all his friends’ trucks down a steep incline one after the other. Further questioning revealed that he’d also melted the winch’s motor.)
Four-wheel-drive overland travel is different than trail running. My early experiences with the latter involved a friend with a beat-up 1964 Land Cruiser FJ40 equipped with a Ramsey winch and an alarmingly frayed steel cable. We took that vehicle over some ridiculous trails, getting stuck numerous times a day and hooking the winch to whatever was nearby to pull it out. I’m still amazed we both survived with limbs intact, but that Ramsey did yeoman duty time after time.
However, on a long overland journey, it’s vital to minimize stress on the vehicle. The aim is to avoid becoming stuck, to take the easy route when possible. Challenging conditions are tackled only when there is no other way through. Thus, on most overland trips a winch is rarely needed, which leads some to argue, why not buy a cheap winch since you’ll hardly use it anyway? While it’s a valid question, my response is the same one I give people who argue for cheap hand tools: If you need the tools—or the winch—something has already gone wrong. Why risk compounding the situation by relying on substandard equipment? A knock-off winch built with inferior materials might well simply seize up after a long period of non-use. Before I get a raft of responses: I’ve known several people who bought new 8,000-pound Chinese winches for $350 or less and have had absolutely stellar service from them. And I know several others who bought similar winches and had them fail quickly or perform poorly. That crapshoot factor is the scary part, even if you’re unoffended by companies willing to reverse-engineer someone else’s work simply to cheapen it and sell it for less.
The final aspect of installing a winch, of course, is learning how to use it properly. You can take the trial-and-error approach my friend and I did, but a far better (and infinitely safer) way is to get professional instruction. Even a basic course such as that taught at the Overland Expo will increase your knowledge and confidence immensely; full classes can be taken from competent schools such as High Trails Expeditions or Overland Experts. Once you have the basic techniques in hand, it’s vital to practice them until every move is instinctive and firmly planted in your long-term memory.
That way, when your truck goes frame-deep in Tanzanian black cotton soil you’ll handle the situation with—dare I say this?—ultimate proficiency.
* * * * * * * * * *
Diagrams are from an excellent Warn manual, available online as a PDF; click here to download.
* Sadly and ironically, Warn now offers a line of cut-price winches, the VR series, built to lower specs than the M series, to compete with the brands that copied and undercut Warn in the first place. I’m not sure whether I’m more disappointed in Warn, for not simply redoubling their efforts to convince customers that better quality is worth the investment, or with consumers who are blinkered to everything but price. In their defense, I’ll note that Warn furnishes the same warranty with the VR series winches as they do with their high-end lines; nevertheless, my advice is, if you can’t afford a new M8000 or another top-quality winch, buy a used one—you’ll still be better off than compromising on internal quality.
Hint: When using “Search,” if nothing comes up, reload the page, this usually works. Also, our “Comment” button is on strike thanks to Squarespace, which is proving to be difficult to use! Please email me with comments!
Overland Tech & Travel brings you in-depth overland equipment tests, reviews, news, travel tips, & stories from the best overlanding experts on the planet. Follow or subscribe (below) to keep up to date.
Have a question for Jonathan? Send him an email [click here].
SUBSCRIBE
CLICK HERE to subscribe to Jonathan’s email list; we send once or twice a month, usually Sunday morning for your weekend reading pleasure.
Overland Tech and Travel is curated by Jonathan Hanson, co-founder and former co-owner of the Overland Expo. Jonathan segued from a misspent youth almost directly into a misspent adulthood, cleverly sidestepping any chance of a normal career track or a secure retirement by becoming a freelance writer, working for Outside, National Geographic Adventure, and nearly two dozen other publications. He co-founded Overland Journal in 2007 and was its executive editor until 2011, when he left and sold his shares in the company. His travels encompass explorations on land and sea on six continents, by foot, bicycle, sea kayak, motorcycle, and four-wheel-drive vehicle. He has published a dozen books, several with his wife, Roseann Hanson, gaining several obscure non-cash awards along the way, and is the co-author of the fourth edition of Tom Sheppard's overlanding bible, the Vehicle-dependent Expedition Guide.


