Overland Tech and Travel
Advice from the world's
most experienced overlanders
tests, reviews, opinion, and more
4x4 Driving by Tom Sheppard, Edition 4
How do you review a book to which you made a small, but full-disclosure-needed, contribution? One way might be to simply avoid reviewing the bits you contributed, so that’s what I’m going to try here.
Tom Sheppard’s classic and comprehensive book on four-wheel-drive technique had its genesis in 1993 as the hard-bound The Land Rover Experience—a User’s Guide to Four-wheel Driving, sponsored by the manufacturer. I picked up a 1994 second edition, which I still own. Despite its exclusive focus on Land Rover vehicles, as an exhaustive and authoritative guide to four-wheel-drive technique in general it was like nothing I’d seen. By that time I’d owned a Land Cruiser for 15 years, had negotiated some of the most difficult trails in my region, and was using it to lead sea kayak tours to remote beaches in Mexico, yet many of the lessons—especially those dealing with driving in sand—were instantly useful.
Of course 1994 was the Paleolithic in terms of four-wheel-drive technology. Electronic traction control, then a brand new feature on Range Rovers, barely merited a sixty-word paragraph. Axle differential locks weren’t mentioned (not surprising, given that Land Rover has yet—in 2016—to embrace the feature). Hill-descent control? Electronically disconnectible anti-roll bars? Not even invented yet.
Flash forward to 1999, when Tom’s own nascent one-man publishing company, Desert Winds, took over production of the book, and the title was changed to Off-roader Driving and, in 2006, to Four-by-four Driving. Printing was changed to soft cover and monochrome to hold down the price, but each time the contents were thoroughly updated to explain the latest in four-wheel-drive systems and technology, until in the current, fourth edition, it takes up nearly a third of the book.
Why? As Tom puts it on the back cover, “ITDS.” It’s The Driveline, Stupid. Understanding how your vehicle works—how it converts engine power into traction on the ground, or how it can fail to do so—is absolutely critical knowledge if you want to exploit its full potential. Whenever I hand someone a copy of Four-by-four Driving, I say, “Don’t skip the first two chapters!” From explaining how an open differential works to investigating the astonishing traction-control system of the $250,000 Bentley Bentayga, Tom describes each advance and feature with the thoroughness one would expect from a former RAF test pilot—not sparing the criticism where necessary.
The driving sections, too, are set apart from similar books, chiefly by the overarching Golden Rule practiced by someone who has driven thousands of miles completely off-tracks in the Sahara, solo: Mechanical Sympathy. Everything from accelerating to braking is discussed with consideration for the vehicle as the number one priority. Learn the lessons here and you’ll not only be able to drive places you couldn’t before; you’ll do it with a lack of drama that will mark you as an accomplished operator. The analogy I like to use is of a pool player who has become fairly proficient at the game and shows off by slamming balls into pockets, versus the real pro who drops each ball in with a whisper, and sets his cue ball up perfectly for the next shot. Ascending and descending steep slopes, side slopes, water crossings, ice and snow, rocks, ditches—all covered.
Four-by-four Driving then goes on to a discourse in vehicle recovery, and much of this section I’ll let you critique on your own since I contributed the sections on Hi-Lift jack use and winching. Sheppard, you see, mostly eschews such crutches while playing around solo in the Algerian desert.
There is a further, valuable, advanced driving section, a primer on driving with trailers, and a useful introduction to expedition basics.
Criticism? Okay, a small one: In the last edition of the Vehicle-dependent Expedition Guide Tom allowed me to debate his, um, stubborn adherence to tube-type tires for heavy-duty expedition use. There’s no such second opinion in Four-by-four Driving, so I’ll restate here that I believe tubeless tires have surpassed tubed equivalents for virtually all practical use. A significant majority of tire problems in the field—even in remote regions—involves simple punctures, which with a tubed tire require complete breakdown to repair. A tubeless tire can be durably fixed with a plug in a couple of minutes without even removing the wheel from the vehicle, and if more extensive work is needed a Tyreplier and a set of tire irons will facilitate everything up to and including complete removal from the wheel. Any properly equipped expedition vehicle will be carrying a compressor capable of reseating the beads, so the overall time and effort spent on tire repairs is hugely reduced. There, I did my reviewer’s duty.
So—okay, I contributed a tiny section; yes, we sell this book on the Exploring Overland site. But Four-by-four Driving is simply too important to ignore for reasons of vested interest. If you are seriously interested in becoming a better backcountry driver, it’s a worthwhile investment. Now if you’ll excuse me, I have to go, because as I was skimming through the book to review it I found some stuff I, er, need to get caught up on.
$45 well spent. Find it here. Need I add it would make an excellent Christmas Present?
A million miles of faffing about
Whether your vehicle is advanced . . .
Some time ago I decided to tally the miles I’ve driven in my entire life, beginning with my first car, a 1971 Toyota Corolla (116,000), progressing through the two J.C. Penney furniture-delivery trucks on which I put, collectively, over 250,000, on to my FJ40 (316,000 and counting), etc. etc. I was not surprised to find the total well over a million miles.
So you can assume I have my driving environment completely sorted by now, right? Nope. I am always finding myself short something I could really use immediately, or if I have it it’s buried in the back cargo area somewhere. During that million miles there's no telling how much time I've wasted faffing about, as the English say. So I decided to make a list.
. . . or basic, you can optimize your driving convenience.
- High-quality window cleaner: Even if you’re conscientious enough to put window cleaner formula in your vehicle’s washer bottle instead of plain water, it won’t be strong enough to deal with the really impacted bugs you murder at highway speeds. Yet most common household window cleaners contain ammonia, which dries out rubber seals on vehicles and should never be used on windows with aftermarket tint film. Premium cleaners such as Invisible Glass work well and won’t harm tint film. The corollary to this is, keep your wiper blades in good shape. Test them periodically, before you get caught in a downpour and find they chatter uselessly back and forth.
- Blue shop towels: These aren’t actually the best for cleaning windows (some pros insist newspaper is the best, followed by a microfiber towel for drying), but they have so many other uses that the versatility wins.
- Dial-type tire pressure gauge: Eschew the cheap pencil gauges and do it the professional way. Tires have become so reliable that they’re easy to ignore, but maintaining proper—and consistent—pressure reaps benefits in safety and economy. If you spend more money on a gauge you’re more likely to use it. I’ve found the models from Accu-Gauge to be good for the money.
- Flashlight/headlamp: LED of course. I like models that combine a low, 10 or 15-lumen setting for reading or doing repairs with a serious, over 200-lumen high beam. You can go the lithium route and not have to worry about replacing batteries for a very long time, or take the available-anywhere-on-earth-and-cheap AA approach.
- Knife/fork/spoon set: This might seem odd, but I’ve frequently found myself buying some snack on the road better eaten with utensils, and having a set easily accessible is nice. I keep a Snow Peak titanium set in the center console. Steel would be fine, but the titanium saves on GVW and enhances fuel economy. Just seeing if you were paying attention.
- First-aid kit: Keep it in the vehicle and don’t cannibalize it for other uses so you find yourself without the basics when you need them.
- Lens cleaner cloth: A detail, but nice to have and more effective than your shirt. Tucked in a little ziplock in the glasses compartment of fancy overhead consoles, or in the registration pocket of the sun visor.
- Hand cleaner/degreaser towlettes: Not the ubiquitous Wet Wipes; I’m talking about those infused with proper degreaser, such as the Fast Orange or Scrubs wipes. You can get them in a bulk dispenser tube or little packets.
- Nitrile gloves: Degreaser towlettes are all well and good, but it’s better not to get greasy in the first place. I keep a couple pairs in the Land Cruiser, 40 or 50 in the Land Rover ;-)
- Work gloves: The newer fabric mechanic’s gloves are okay, but I still prefer leather.
- Mini binoculars: As a naturalist and birder I of course own a de rigueur set of absurdly expensive German-made binoculars, but I keep an inexpensive compact 8 x 20 set from Pentax in the glove box for impromptu observing. If they’re stolen I won’t be tempted to slit my wrists.
- Flares: Either the traditional fire-and-brimstone type or the battery-operated LED versions. Foldable reflective triangles are also suitable.
- Ground tarp: Years ago I bought a military surplus canvas folding stretcher. It’s incredibly stout, has handles up and down the sides, and folds flat. It’s perfect for working under a vehicle. And, of course, it would serve as a stretcher if needed.
- Insulated water bottle: Leave a steel bottle full of water in your parked vehicle in Arizona in summer and it will soon be hot enough to brew coffee. The insulated versions are far better.
- Notebook/pen: Mileage, fuel purchases, fuel economy, restaurants, birds sighted, road conditions—there’s no end to the stuff crammed into my notebook. The Field Notes brand is a superb source for indestructible products.
- Multitool: Despite that 60-pound tool case in the back, I like to have a multitool to grab for quick non-critical fixes or tasks.
- Ice scraper: Yes, we have these in Arizona.
- Bug-out bag: Actually an article on its own—a day pack stocked with supplies you might want if there is ever a need to precipitously abandon your vehicle. Sign up for Mark Farage’s excellent discourse on this at the Overland Expo.
Any other suggestions? Comment or email me.
Is that . . . smoke?
Editor's note: Jim West, a captain in the Sun City Fire Department (and a U.S. team member in the 1992 Camel Trophy), kindly contributed to OT&T this excellent article on fire safety for overland vehicles (or any other vehicle for that matter). Consider the information here critical for your journeys. - J. Hanson
So, departure day is almost here. Your vehicle is kitted out with all manner of overlanding equipment. As it sits in the driveway, you go through your mental checklist: clothes . . . check; recovery gear . . . check; food . . . check; petrol . . . check; spare petrol . . . check; propane . . . check. Then it hits you—Okay, that’s a bunch of fuel; no, I mean a BUNCH. If this thing catches fire, the crew on the International Space Station will wonder what’s burning down there. In a mild panic, you rummage through the truck and, in the back of a cabinet, you find the fire extinguisher. You dust it off and take a quick look at the gauge. Green—good to go, right? Well, throttle back and take a moment to ponder the following:
When driving a vehicle into the outback, whether for a day trip or a year-long adventure overlanding through South America, serious considerations should be taken for general fire safety. The farther afield you’re traveling, the more comprehensive your plan and equipment should be.
If you have a good close look at your particular rig, you’ll find it has all the potential fire hazards of any typical motor vehicle, plus some special ones. Larger fuel tanks and more of them; fuels for cooking, heating, and auxiliary generators. Start with the obvious place—under the hood. Fuel lines should be given a close inspection for cracks, abrasions, and leaking fittings. Repair or replace any suspected problems. Onto the electrics—take a good hard look at the wiring, in general, with special attention to any aftermarket wiring, i.e. additional lighting, batteries, winches, etc. Any cracked, abraded, or melted insulation should be repaired. Also, take a quick look at all tubes and wires to make sure they are not routed too close to any heat source, such as the exhaust.
Are there any fuel or electrical lines running too close to that Borla, or the catalytic converter ahead of it?
Time to get dirty. Get yourself under that vehicle and have a good look around. Better now, in your driveway, than out in the mud. This will be the same as the under-hood inspection: fuel lines, wiring, and brake lines as well (brake fluid can be flammable.) One more thing to think about under there is the catalytic converter. They produc tremendous heat and can quite easily catch tall brush on fire. That would add some excitement to a picnic or campsite. Finally, have a good general look around the outside. If you have additional fuel mounted, make sure it is mounted properly and won’t puncture or leak while traveling down rough trails.
Time for a quick chemistry lesson. (No, we don’t get to blow stuff up, sorry.) Let’s look at the “Petrol versus Diesel” debate. As a general rule, liquids don’t burn, vapors do. If a liquid fuel is not giving off vapors, it won’t burn. Cool, but what does that mean? Petrol starts giving off vapor at any temperature higher than about minus 45ºF (-43ºC). This figure is called its flashpoint. Diesel, on the other hand, has a flashpoint of about 120ºF (52ºC) or higher. This obviously makes Diesel a much safer fuel in general. For instance, you and your best buddy (not for long) are out on a sunny 80-degree day and you need to refuel. No problemo, as it just so happens you brought an approved jerry can full of petrol and the appropriate filler neck. During said filling operation your buddy walks up with a lit sparkler (hey, it’s my story). The petrol is producing enough vapor for things to get very exciting very quickly—i.e. time for new friend, new vehicle, and a trip to the local burn unit. In the same scenario with diesel fuel and a new friend also strangely attracted to sparklers, nothing happens—zip, zilch, nada.
All right—back to that dusty extinguisher. Once a fire starts, you’re going to have to put it out, whether it’s a campfire, your rig, or that guy with the sparkler. What’s burning determines how you put it out. The most common opitons are: remove the fuel; cool the fuel below its ignition temperature; smother the fire (remove its oxygen supply); and, finally stop the chemical reaction. To properly put out a campfire, for example, you simply shovel on some dirt to smother it and then add water to cool it. A grease fire in a pan on the stove can be quickly smothered with a lid over the pan. A fire from spilled fuel might be solved by simply moving vehicles and other combustibles away and letting it burn off. FYI, a one-inch deep puddle of petrol takes about 15 minutes to burn out.
The idea here is you don't always need to use a fire extinguisher. But since you dug it out of that cabinet, let’s talk about it. Fire extinguishers are classified by what they put out: ‘A’ for combustibles, e.g, paper and wood; ‘B’ for flammable liquids, e.g., petroland diesel; ‘C’ for electrical fires; and ‘D’ for metal fires, e.g., magnesium. The most common extinguisher is an ABC type, which will be suitable for most fires you’ll encounter. A five-pound extinguisher is good for most normal-size cars and trucks. As the size of the vehicle goes up, so should the size of the the extinguisher.
What about that ‘D’ extinguisher? A lot of modern vehicles use magnesium parts, and if they do catch fire, an ABC extinguisher won’t put it out. The bad news is, ‘D’ extinguishers are bigger, heavier, and more expensive (about $300.) The (sort of) good news is, magnesium is hard to ignite. So by the time it gets burning and you need that ‘D’ extinguisher, the vehicle would be fully engulfed in flames and a total loss. So you have that going for you.
Some final thought on extinguishers: They should be inspected no less often than annually. This entails checking the pressure gauge to make sure it is in the green. Also, and as importantly, you should shake the extinguisher and feel the dry chemical powder moving up and down. If you can’t feel this movement, the powder has caked into a solid and the extinguisher will not function.
Finally, where does one put the thing? There is a very narrow window of time after a fire starts when an extinguisher is effective. Fire doubles in size every minute. Let’s just ponder that one for a minute . . . okay, the fire just doubled in size. An extinguisher should always be mounted in a readily accessible area for quick access.
Since most vehicle fires ignite in the engine compartment, it makes sense to locate the extinguisher some distance away, but quickly accessible. The mount here ensures it can't be covered by luggage.
Now we have the basics taken care of. We’ve inspected the vehicle, we’re practicing good fire-prevention safety, we have all manner of ways to put out a fire. It’s time for the hero stuff.
You’re driving happily down the trail (remembering to Tread Lightly); you hear a pop under the hood, and see what looks like smoke billowing out of the engine compartment. It could have been a heater or radiator hose. Maybe an AC line. Maybe an engine fire. How do you know? First of all, steam and freon dissipate quickly, smoke doesn’t. Second, fire is hot (rocket science, I know.) If you see the beautiful paint on your hood start turning brown and bubbling up, it’s hero time. The clock just started ticking and you have very little time to make some decisions and start to act on them. Here is a example of how it will play out if you do every thing perfectly:
- Stop the vehicle off the trail/road, preferably in an open space. Dirt, not grass—wildland fires are a bigger problem than car fires. If there’s nothing but grass, leave the vehicle on the trail.
- Turn off the ignition.
- If your hood latch is inside the car, open it immediately (the cable will burn through quickly).
- Get everyone out of the car and well away.
- Grab your extinguisher and, if at all possible, gloves—that hood is going to be hot.
- With the hood popped but not fully open give a quick burst from the extinguisher through the opening between the hood and fender. Never fully open the hood before this step. The fire could travel up the angled hood and burn you.
Displaying a regrettable lack of commitment to authenticity, Jim did not actually light a fire in the engine compartment of his Discovery. But you get the idea.
- Open the hood completely and continue to use extinguisher until fire is out. Short bursts of dry chemical are preferred because you don’t want to waste a very limited resource. The goal is to ‘blanket’ the fuel in order to smother the fire.
- Now comes a very important step: Make sure the fire is completely out and won’t reignite. This should take about ten or fifteen minutes. A good way to judge the time is to take your pulse rate. When it drops below 100 beats per minute, you should be about good.
So now what? You and your passengers should all be standing around the front of your rig, staring at the engine compartment, with that ‘deer in the headlights’ look. The extinguisher is still in your hand. You’ll find it very hard to put it down for the next 24 hours—that’s ok, you'll get over it. The engine compartment itself will be a mess of white dry chemical and melted wires and hoses. Time to break out the water can and tool kit and get to work. During the cleaning and repair process there will probably be some raw fuel leaking or just puddled in there so keep all ignition sources (i.e. sparklers) away.
Here are a few final thoughts to wrap this up:
Ninety two percent of all car fires are preventable with good maintenance (I just made that stat up but I know the percentage is really high.) The old saying ,“An ounce of prevention is worth a pound of cure” is spot on. With regards to extinguishers, if you don’t have one, get one. Actually, get two—a good one and a cheap one to practice with. The directions are right on the label and quite easy. They’re only about $20 and it’s money well spent. If you would like more training most local fire departments have classes and/or demonstrations for fire extinguisher use. And on that note, may your adventures be plentiful and safe.
Cheers,
Jim West
The amazing ClampTite
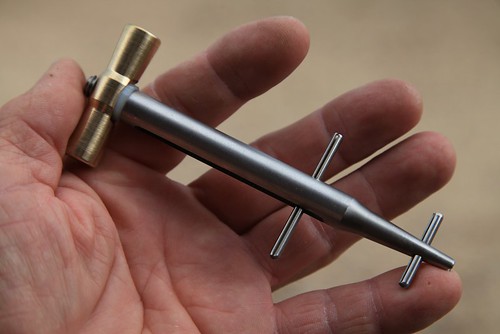
I know, I know—I’m starting to sound like Ron Popeil. But it’s been some time since I used a tool as cunning as this little device, which can do everything from replacing a broken hose clamp on a fuel line or seizing a rope end to repairing a stress-fractured luggage rack on a motorcycle or splinting a broken tie rod on a Land Rover.
But wait, there’s more! The ClampTite uses ordinary safety wire you can buy with the tool, or almost any on-hand substitute in a pinch, including fence wire and even coat hanger wire, to securely wrap just about anything that needs to be fastened or immobilized. And the size range it will handle is essentially limited only by the length of the wire.
You might think you could approximate what the ClampTite does with a pair of pliers and some twisting, but trust me, you wouldn’t be able to apply the amount of tension available through the tool’s threaded collar. Look at this sample of both a single and double wrap on a length of rigid PVC pipe. I tried and failed completely to get that much compression with an ordinary hose clamp.

The ClampTite can make either a single-wire or double-wire clamp (see above). With a single wire you can use as many wraps as necessary, although, depending on the material, friction will start to overcome the ability of the tool to adequately tighten the wire if you overdo it. On a radiator hose like I used for the test, a single wrap of doubled wire is more than stout enough; if you were repairing, say, a split axe handle you could use several wraps of a single wire, then repeat in several places along the split to completely secure it. The same procedure could secure a Hi-Lift jack handle along a broken tie rod, or . . . you name it. The potential applications are endless.
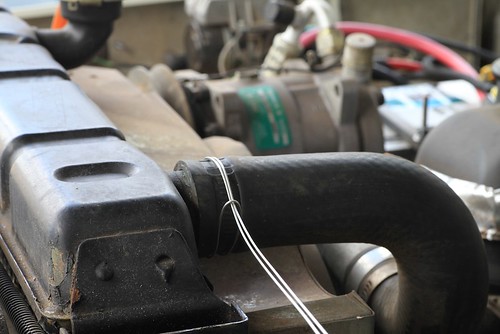 Begin a hose clamp by doubling a length of wire and wrapping it like so.
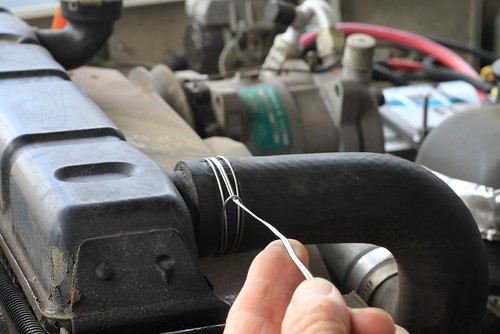 Wrap it again and through the loop.
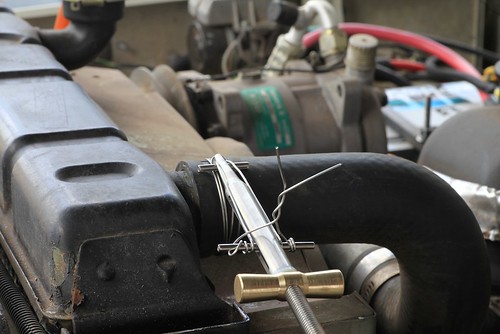 Attach the ClampTite, secure the ends of the wire, and screw in the bronze nut to tension the clamp.
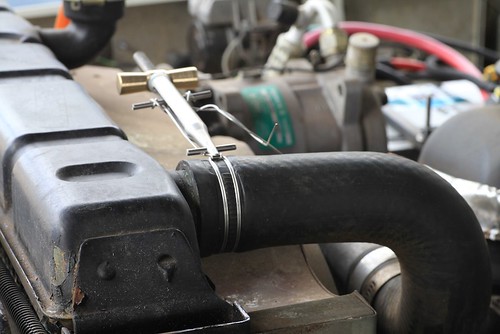 Flip the tool to lock the wire.
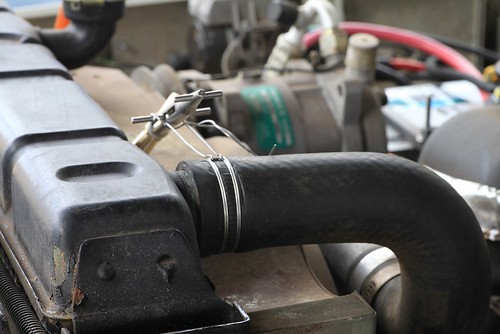 Release the tension on the tool, clip the wires, and . . .
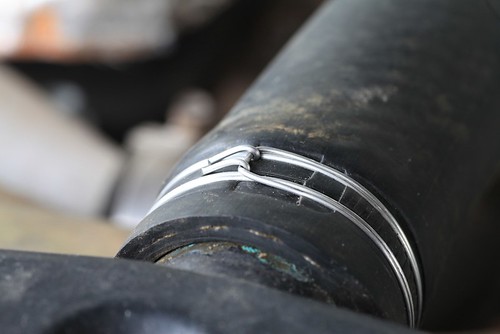 . . . you're finished.
I found the ClampTite easy to use. My biggest challenge was keeping the wire lined up correctly while installing a double-wrap clamp, to keep it from overlapping—although that probably wouldn't affect the seal on a radiator hose.
While it’s impressively compact (a larger model is also available), there will be places you simply can’t use the ClampTite. You need to be able to access the trouble spot to wrap it with wire, attach the tool at the spot, and have room to flip it (double wire) or twist it (single wire) 180 degrees to anchor the clamp once you’ve tightened it. But with ingenuity you can overcome many obstacles. Looking around our vehicles, I found a fuel line fitting on a carburetor that would be inaccessible if its hose clamp broke. However, by removing the fitting from the carburetor first and taking off the other end of the fuel line, one could clamp the line to the fitting, screw the fitting back in with the line attached, then re-attach the other end.
I think the ClampTite would be at least as useful on a motorcycle as in a four-wheeled vehicle, if not more so. I’ve seen many more parts fail on bikes due to the higher intrinsic vibrations and necessarily harsher ride. We had Tiffany Coates’s legendary BMW R80GS, Thelma, parked at our place for nearly a year some time ago. Thelma has seen long (200,000 miles), hard use and it shows. Thinking back, I’m sure I could have used up at least a hundred yards of safety wire reattaching various dangling bits on that bike.
ClampTite tools start at just $30 for a plated steel and aluminum model, which would be ideal for a motorcycle. The stainless and bronze unit I tested is $70.
Final note: Unlike the Ronco 25-piece Six Star knife set, ClampTite tools are made in the U.S. And you won’t get a free Pocket Fisherman with your purchase. Sorry.

ClampTite tools are here. Thanks to Duncan Barbour for the tip!
Easy trip assistance app
 by Roseann Hanson
How many times have you been reading a magazine or book, and come across some place you want to jot down to remember to visit, such as a landmark, a restaurant, a museum, or a trail?
In the past I either scribbled these onto a nearby post-it note or in a file on my computer. Inevitably these got lost in the shuffle of life, or are too difficult to locate when I knew I was going to be in a certain place, or I just plain forgot to bring my file with me.
Recently friends mentioned how interesting Scotty's Castle was on their overland trip through Death Valley. I started to jot it down in a notebook in the truck, but then thought, I wonder if there is an app for that?
Ever the fan (and growing) of organizing my life by iPhone, I searched the AppStore for "record places" or "remember places." One of the first to come up was the very promising My Places by VoyagerApps.com. Using your GoogleMaps account, it promises to let you see and organize your saved "places" in real time. I downloaded the free version to test it out, but unfortunately it was so annoying, I deleted it. The free version won't let you do anything without constant interruptions from pop-up notifications asking if you want to download and try other apps (presumably by VoyagerApps.com)—a different ad popped up every 30 seconds, literally, and you have to stop and click "No, thanks" every time. Then it would not let me save anything or see my Google places unless I bought the app, so I could hardly see if it worked or not. I don't mind buying apps, but this was a real stinker.
Then I tried a cool-sounding app called PintheWorld, which allows you to pin and save places of interest, give them categories (different colored pins, too), and see them when passing through a location. Sounded perfect! But unfortunately the developer uses the new iOS 6 in-house (and yes, totally lame) Apple Maps app and it is so inaccurate and picky, I could not find businesses I knew were there. The trick turned out to be that you have to type the exact, and I do mean exact, address down to the country and zip code. And then you have to manually name it and add details. Too much work. I just knew, with the power of the Internet and Apple, there had to be a solution.
Turns out it was right there all along: Google just released their brilliant Google Maps app for iPhone—pair it with your Google Maps account, and you're good to go.
(For those of you who haven't followed the little cyber drama between Google and Apple, Google was the original driver behind the superb Maps app on the iPhone but last year Apple and Google's relationship melted down, and Apple replaced Google as the data source with TomTom. My own side-by-side comparision between Google Maps and the Apple iOS 6 Maps bore out all the crazy criticism of the incredibly bad app. The famous tech geek David Pogue even called it "the most embarrassing, least usable piece of software Apple has ever unleashed." I could call up Google Maps, looking for the new Wanderlust Brewery in Flagstaff and up it pops . . . on Apple's Maps it fails to find anything, or sends me to Connecticut.)
But back to how to use the Google Maps and your Google account to save cool places to visit (after downloading Google Maps app you need to pair it with your online Maps.Google.com account).
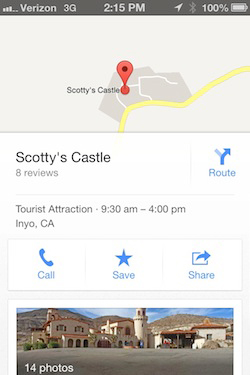 I wanted to save Scotty's Castle as a place of interest, so I just hit the search bar, typed in Scotty's Castle, and up it pops (see screen shot, right). Swipe up on the name Scotty's Castle in the bar at the bottom, and it gives you a menu of buttons—Call, Save, Share. Hit Save, and it puts it into your Google Places.
On this screen you can also browse things like photos, hours, reviews, distance from current location, and other useful information.
Then, next time I'm in Death Valley area, and I want to see if it's nearby, I fire up Google Maps app and any saved Places show up as yellow stars (see below).
I am trying to find out if the star colors can be changed, because the yellow is hard to see against the yellow roads. And they only show up at a certain zoom magnification.
The next screen-shot set below shows all the restaurants and cafes saved for Flagstaff, near Overland Expo. Click on a star and a pin pops up; click on the pin and you get the easy-to-read information popup at the bottom (swipe it up to see the details).
Ideally Google will eventually let us categorize and organize our Places, and edit them from either the app or through the Maps.Google.com. It would be nice to filter for things like restaurant, art gallery, museum, trail, or other category, to help minimize clutter if you have marked a lot of places in one area.
But otherwise it looks like it's going to be a very useful tool for travel anywhere.
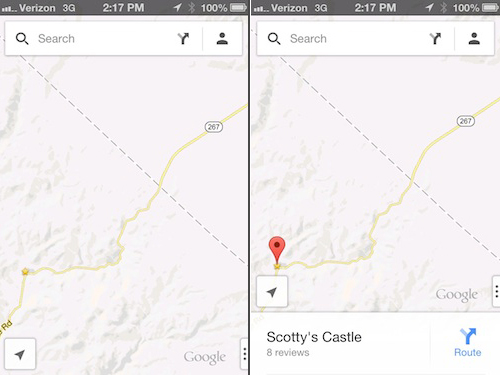
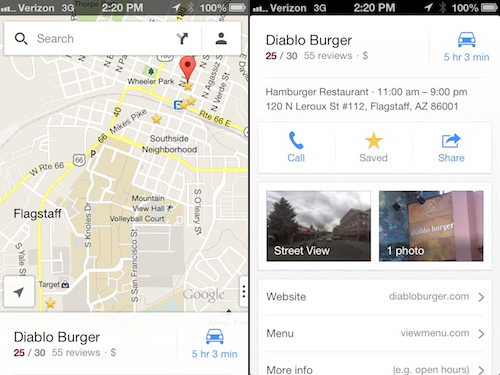 Google Maps app is great for storing places you want to visit, like these restaurants and cafes in Flagstaff, near Overland Expo.
The Cinch to Hang, or Why didn't I think of that?
How many times have you been camping amongst trees and wanted to hang something on one of them—a kitchen utensil roll, a bathroom kit, a shaving mirror, a jacket or hat—and wished there were a nice stub of a branch right . . . there? Just hammering in a nail is considered impolite to the tree these days.
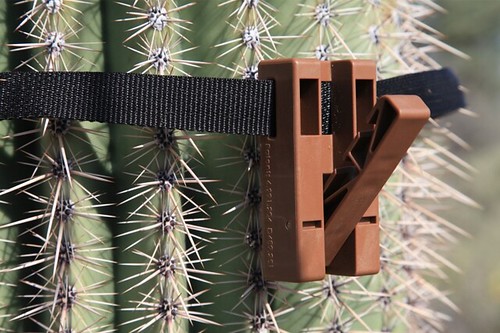
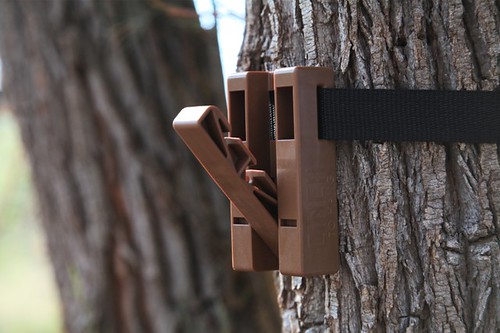
Charles Ay’s solution was clever enough to win two U.S. patents. The Cinch to Hang is a two-ounce plastic device that, when attached to any tree up to three feet in diameter with the included strap, can hold up to 50 pounds on its fold-out hook.
I subjected a sample to a comprehensive evaluation—which took about, oh, five minutes including installing it on the tree. Very simply, it works as advertised. There was no slippage at all with light loads, and the device only migrated down an inch or two even when I grabbed the hook and exerted significant downward force. Hanging something like a full day pack would be no problem. A pair on a pair of trees would comprise a perfect mount for a clothes line. One strapped to a slanting overhead limb would make an ideal lantern hanger.
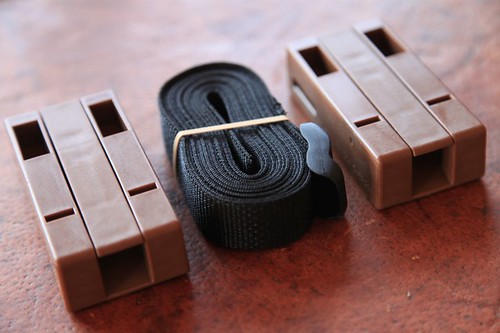
The standard Cinch to Hang kit ($24.95) comes with four hooks and a single strap, but the slot on the hook is one inch wide so it would take any equivalent strap if you want to hang them on different trees. The company’s website is a placeholder (with a photo of the wood prototype) for another week or so, but you can order by email. It’s one of those rare products you’ll truly wonder how you did without. Obviously the Patent Office thought so.
On the worthlessness of door mats for sand recovery

It’s surprising how much flotation you can get out of a 235/85/16 BFG All-Terrain in soft sand—even under the mass of an HJ78 Land Cruiser Troopie—if it’s properly aired down to around one bar (14.7 psi). At that pressure the contact patch elongates significantly, providing vital surface area without the frontal resistance produced by a wider tire.
However, at one bar you’ll also get pretty significant sidewall bulging—not a problem in pure sand, but a very real one if that sand hides the vicious limestone outcroppings the Egyptians call kharafish. In such terrain you have a choice: flotation or sidewall protection?

We faced that choice in Egypt early this year, when we took three Land Cruisers up the Dakhla Escarpment, a 1,000-foot cliff only (sometimes) negotiable by vehicle because the Abu Moharek dune chain—the longest in the world—spills millions of tons of sand over the edge, forming a loose and shifting series of ramps. The climb intersperses sand and limestone with such unpredictable frequency that there’s simply no possibility of airing down, then back up, then down.
Given the very real specter of seriously damaging several tires, we let a few token pounds out of each corner. Then, with 1HZ diesels roaring, we took turns tackling each section of sand ramp, sometimes succeeding, sometimes churning slowly to a halt before backing down to try again. On one section I got off line and slid in ignominious and hilarious slow motion off the crest and into a trough. Only the steepness of the terrain enabled me to back down without assistance to make another attempt.
In a couple of hours we’d gained the top of the escarpment, with the loss of just one tire against a cunningly buried razor edge. Once through another, flatter section of kharafish, the terrain smoothed out into more homogeneous sand flats and dunes. Time to air down properly? Apparently not—Mahmoud and Tarek simply took off at speed, counting on momentum to keep the tires on the surface. I followed, and we enjoyed several minutes of proper LRDG stuff.

However, very soon another local desert term popped up. “Habat” is the word for “soft pools of sand” that merge imperceptibly with the surrounding firmer sand. Mahmoud found one, and in a heartbeat his vehicle was immobile and buried to the axles. Tarek and I circled away and parked, then we all walked over to help.
In general we’d been delighted with the Troopies we’d rented from a local outfitter. They were impeccably maintained and equipped with two spare tires each. However, the sum total of recovery aids comprised a single shovel and a stack of heavy-duty red carpet rectangles, like those you buy at Home Depot as door mats. I’d looked askance at them in Cairo, and now watched with interest as Mahmoud, after we’d excavated around the tires, stuffed one in front of each. He climbed into the driver’s seat, added a bit of throttle, gently released the clutch—and with flawless synchronicity each section of carpet was sucked under its respective tire and spit out the back. Total forward movement of the vehicle: precisely two inches. It was like Land Cruiser moonwalking—the abrupt shifting of four red rugs from the front to the back of the tires gave the visual impression of forward travel. But it was an illusion.
Another trial resulted in another two inches of movement, and some Arabic terms from Mahmoud which I don’t think referred directly to sand conditions. But by this time Tarek had pulled his Land Cruiser to the edge of the firm rhamla (sand); we hooked up the tow rope and slowly eased Mahmoud back to solid footing.
In those conditions, I learned, tire pressure really makes no difference—hit a habat going too slowly and you’re going down. The only defense is momentum and the fact that, blessedly, habats seem to generally be only a few yards across. We successfully made it across dozens more that trip, and got mildly stuck in a few. But we never bothered pulling out the door mats again.

Moral: Those conspicuously shiny perforated aluminum sand mats you see bolted conspicuously to the roof racks of Discos and Land Cruisers parked at Starbucks really do have their place. Effective sand recovery requires a rigid ramp to let the vehicle power its way out of the trough.
Besides, carpet squares bolted in the same spot would look really lame . . .
Aluminum sand mats, or PAP (for perforated aluminum plate)—frequently called sand ladders although not really the same—are available from a number of suppliers such as OKoffroad. A less expensive and very effective substitute (lacking only the stylish Camel Trophy appearance) is the plastic MaxTrax, available from Outback Proven.
For more videos of driving in Egypt, including a completed Egypt Overland promo, go to: https://vimeo.com/conserventures/videos
Ditch the cigarette lighter
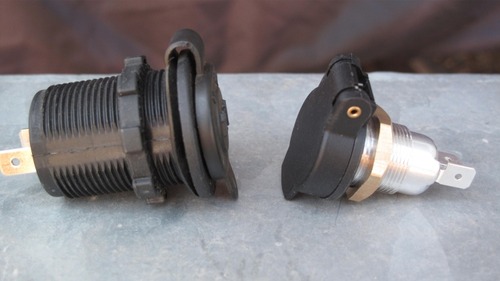 On the left, cigarette-lighter outlet: plastic body and lock ring, guaranteed-to-break rubber cover "hinge," press-fit back plate. On the right, German-made DIN receptacle: metal body, brass lock ring, rigid cover with spring-loaded hinge. The cordless automotive cigarette lighter was patented 90 years ago, and assumed its present configuration in 1956. I know for a fact that by 1960, car campers already had a range of 12-volt appliances from which to choose, such as the Boilmaster Junior Compact Kitchen coffee percolator featured in my old copy of The Ford Treasury of Station Wagon Living.
That means that for five decades those wishing to use their vehicles’ cigarette lighters for anything besides igniting a Pall Mall have put up with the “UL Standard 2089” 12-volt plug to try to get DC power to their portable percolators, tire pumps, GPS units, inverters—even their National Luna 74-liter double-door fridge-freezers.
Are we really that submissive to the dominant paradigm? If GM reintroduced front drum brakes and two-speed automatic transmissions would we all go, “Well . . . okay!” We’re talking the same era here.
Anyone who has ever used a standard auto lighter receptacle as a power outlet knows they’re garbage for that application. It’s impossible to tell when the positive post in the center of the male plug makes contact with the positive tab at the back of the female unit, and—especially if your appliance’s plug doesn’t have a spring-loaded post, or if the spring has seized, as most do after about two months of use—contact can be lost with no warning except when you stop for a cold Coke three hours later and find only tepid Cokes in the fridge. Worse, the most common aftermarket cigarette-lighter-type “power outlets,” which many of us install to run extra equipment, are constructed with a plastic back plate for the positive contact that is a simple press fit into the plastic body. Push too hard on the plug and the whole back end of the receptacle pops off.
There’s a better way, and by this time European readers and a lot of American BMW GS riders will be nodding their heads knowingly. They’ve been happily using the DIN (Deutsches Insitut für Normung) 12-volt plug system for years. The DIN plug, while more compact than the cigarette lighter (11/16-inch mounting hole versus one and a quarter) is significantly more rigid and wobble-free. The dash (female) socket grips the positive post of the plug with spring-loaded fingers—push in the plug and it snaps home with an authoritative click. No risk of pushing too hard, no risk of accidental disconnection, even on the roughest roads.
After years of muttering and cursing, and a brief consulation with my friend Brian DeArmon, I finally made the switch, courtesy of our local BMW motorcycle dealer in Tucson, Iron Horse. It’s easy to do, although if you want to install a DIN outlet in a hole made for a cigarette lighter you’ll need to buy or fab a thin washer to reduce its diameter. On the dash of my FJ40 I decided to leave the old receptacle in place so I wouldn’t have to use an adapter when borrowing or testing appliances equipped with that plug. I had a perfect place just below the old receptacle to install a DIN unit, where my stock dome-light switch was located. Since I use a Hella map light for a dome light now I had no need for the switch, so I simply enlarged the hole and installed the DIN receptacle. For now I just siamesed the wires to both receptacles and use a single fuse, since I never run two heavy-draw appliances from the dash at the same time.
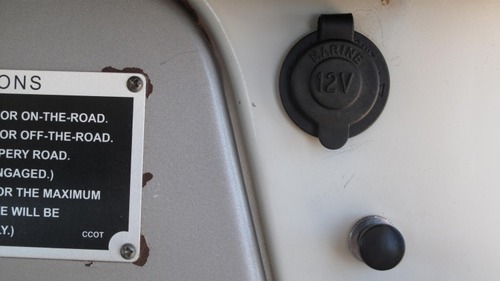 FJ40 dash with cigarette-lighter outlet, stock dome light switch underneath.
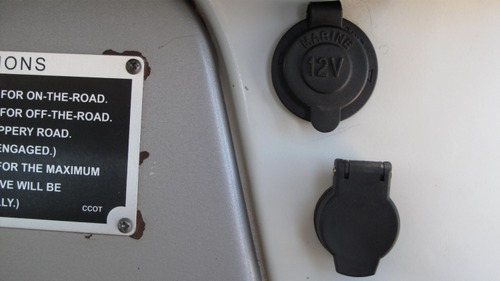 DIN receptacle in place, wired in parallel.
If you don’t have a BMW dealer nearby, you can get DIN plugs and accessories from a company called Powerlet. The standard socket is part #PSO-001, and there is a selection of plugs, including a nifty low-profile right-angle version. They even have a pretty decent-looking cigarette-lighter plug if you’re a fan of two-speed transmissions, or would like to leave one standard socket in the vehicle as I did.
Swapping plugs on your old appliances is easy, too. Some 12V fridges come with convertible plugs; a red spacer allows use with a cigarette lighter; remove the spacer for a DIN receptacle. It works okay, but switching to a DIN-only plug is more compact and stronger.
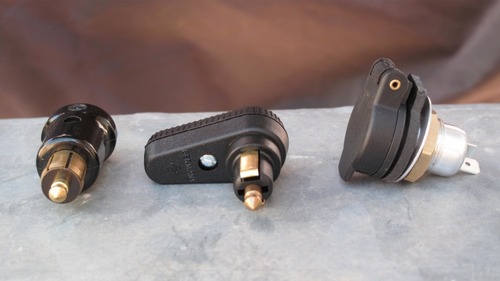 Straight and right-angle DIN plugs are available.As with many such simple and effective modifications, my only regret has been, why did I wait so long?
Hint: When using “Search,” if nothing comes up, reload the page, this usually works. Also, our “Comment” button is on strike thanks to Squarespace, which is proving to be difficult to use! Please email me with comments!
Overland Tech & Travel brings you in-depth overland equipment tests, reviews, news, travel tips, & stories from the best overlanding experts on the planet. Follow or subscribe (below) to keep up to date.
Have a question for Jonathan? Send him an email [click here].
SUBSCRIBE
CLICK HERE to subscribe to Jonathan’s email list; we send once or twice a month, usually Sunday morning for your weekend reading pleasure.
Overland Tech and Travel is curated by Jonathan Hanson, co-founder and former co-owner of the Overland Expo. Jonathan segued from a misspent youth almost directly into a misspent adulthood, cleverly sidestepping any chance of a normal career track or a secure retirement by becoming a freelance writer, working for Outside, National Geographic Adventure, and nearly two dozen other publications. He co-founded Overland Journal in 2007 and was its executive editor until 2011, when he left and sold his shares in the company. His travels encompass explorations on land and sea on six continents, by foot, bicycle, sea kayak, motorcycle, and four-wheel-drive vehicle. He has published a dozen books, several with his wife, Roseann Hanson, gaining several obscure non-cash awards along the way, and is the co-author of the fourth edition of Tom Sheppard's overlanding bible, the Vehicle-dependent Expedition Guide.


