
Overland Tech and Travel
Advice from the world's
most experienced overlanders
tests, reviews, opinion, and more
Equipment review: micro stoves, part 1 of 3
 Let’s be frank here: Adventure motorcyclists are essentially divided into two species—those who ride a BMW R1150GS or R1200GS, and those who ride anything else (including other BMWs). We can argue about whether or not the big GS bikes are the best adventure motorcycles on the planet, but you can’t deny they’re the most prominent, and their fans make the most zealous Sturgis-tattooed Harley rider seem fickle.
To continue the Linnaean angle, the mega-GS riders I know generally separate into two sub-species when considering camping equipment: They either think, I’m riding a zillion-pound motorcycle. What difference does it make what my equipment weighs? Or, I’m riding a zillion-pound motorcycle. I need to save every gram I can on equipment.
If you’re a member of the former group, and you’re in the market for a stove, I can happily recommend a three-burner Partner Steel model, which will strap on your rear luggage rack with room to spare. A 20-pound propane tank should give you plenty of cooking fuel. For the latter group—or any of you who ride mere mortal motorcycles, I offer a review (the first of three, with a final winner to be chosen) of two micro stoves.
We've Come a Long Way
My first backpacking stove was a beautiful little white gas SVEA 123, considered “light” at the time despite being made from solid brass, which has a density not far this side of neutron star core material.
How times have changed. Compare the 18-ounce heft of that SVEA with the 1.9 ounces of a Snow Peak LiteMax Titanium stove. Sure, the LiteMax has no built-in fuel tank, but add a full canister of isobutane/propane mix and you’re only up to 8.5 ounces, less than half the mass of the empty SVEA.
However, as important as weight is to a motorcycle traveler, it’s not the only consideration when choosing a stove. Stability, efficiency, wind resistance, boiling time, and simmering ability all factor in as well.
Furthermore, weight can be deceptive. Canister stoves are virtually always lighter than liquid-fuel stoves even with a canister attached, since they require no pumping mechanism—but for most trips you’ll need more than one canister, and the weight (and bulk) of them adds up quickly.
Then there’s disposal: Recycling spent canisters is an on-again, off-again possibility in many communities. Sometimes they’re just trash. (JetBoil makes an excellent tool for puncturing empty canisters, required for recycling in most areas.)
First in a Series of Stove Duels
I decided to take a highly opinionated, who-made-you-the-expert? stab at pronouncing which is the best lightweight stove on the market. However, rather than review every single one of the dozens of models available, I’m cheating a bit—I’ve chosen what fairly broad experience has led me to believe are:
- Two of the best top-mounted canister stoves
- Two of the best remote-canister stoves, and
- Two of the best liquid-fuel stoves.
The winner of each duel will face off in the final.
I looked at top-mounted canister stoves first. The major advantages and disadvantages of this style can be summarized thusly:
Advantages:
- Extremely lightweight and compact
- Extremely simple to assemble and operate
- Quiet and clean-burning
- Excellent simmering ability
- Most affordable to purchase
Disadvantages:
- Least stable of three stove types
- Marginal cold-weather performance even with mixed fuel
- Canisters are bulky on long trips
- Susceptible to wind (and care must be used with wind deflectors to avoid overheating of the canister)
- Generally slower boil times than liquid-fuel stoves (although speed of assembly and lighting compensates)
- Difficult to quantify remaining fuel
- Fuel costs are higher
- Canisters often not available in developing countries
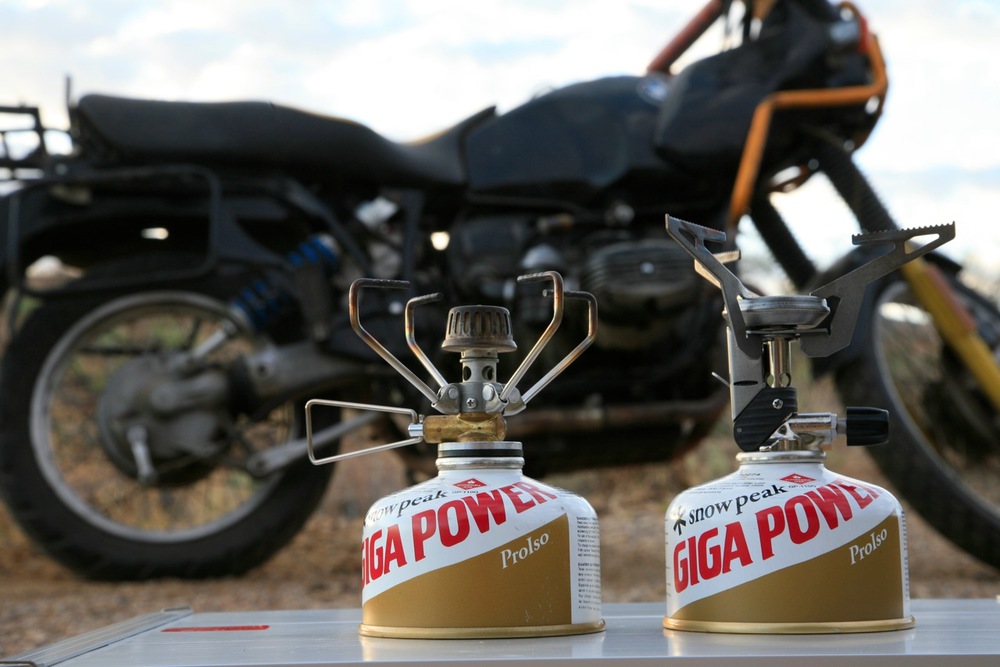
Of all the top-mounted canister stoves I’ve used, I like the Primus Express Stove and the Snow Peak GigaPower the best, for their light weight, simplicity, and affordability.
 Primus Express Stove (on Snow Peak canister), $54
 Snow Peak Gigapower (above right), $40 ($50 w/pietzo)
The Express also comes in a titanium version, but the scant .4 ounce saving (2.5 versus 2.9) isn’t worth the extra $20 to me—that’s a set of titanium utensils which would save more weight. Snow Peak has the fine newer (and slightly lighter) LiteMax, but I prefer the four-trivet stove base on the GigaPower, and it folds more compactly as well.
There are other good stoves out there. The JetBoil is absolutely fabulous at boiling water quickly, but I find the system cumbersome for general cooking duties, and even its titanium versions are fairly heavy. The MSR Pocket Rocket was a contender, only passed over because—just once—I had one of its three trivets fold up on me while I was setting a pot on top, and almost lost the whole thing. Another near miss was the Optimus Crux Lite—an excellent stove that is a champ at simmering, except I’ve occasionally had the flame die unnoticed when on its lowest setting.
So—let’s decide between these two. Both are designed to use standard Lindal-valve canisters, and each company’s proprietary canisters contain an isobutane/propane mix, which enhances low-temperature performance (pure propane would be best as its boiling point is -40ºF versus butane’s +31ºF, but pure propane requires a stout steel canister).
 Primus Express
 Snow Peak Gigapower (above right)Weight difference is negligible: 3.25 ounces for the Snow Peak versus 3 ounces for the Primus. However, my Primus includes a piezo igniter; the equivalent GigaPower is 3.75 ounces. So a slight .75-ounce nod goes to the Primus here.
Both stoves are effortless and speedy to employ. Less than 30 seconds out of the stuff sack for either and you’re cooking.
I timed boiling for each, using 500 ml of water (note my commitment to scientific rigor by using 500 milliliters rather than a crude pint) in my favorite do-it-all solo pot/kettle/bowl, an MSR titanium Titan.
The GigaPower accomplished the task in 3 minutes, 13 seconds; the Primus was slightly quicker at 3 minutes, 7 seconds. Again, a slight nod to the Primus. (I used Snow Peak canisters for both to eliminate differences in fuel. I suppose Primus could protest, but since their stove was faster anyway . . .) Both stoves simmer extremely well, but the burner of the GigaPower spreads the flame over a wider area, so it wins there.
Stability on top-mounted canister stoves is marginal at best. You should always provide a flat, firm surface for this type of stove. (I discovered the Snow Peak Baja Table while I was sea kayaking. It’s a cunning aluminum contraption that’s just high enough to get food prep and cooking off the ground, and which doubles elegantly as a cocktail table for a Kermit Chair.)
The Primus has a wider trivet assembly then the GigaPower, but the latter has four trivets versus three, which I find adds security. More importantly, the Primus, at 14.5 centimeters tall, sits 1.8 cm higher than the Snow Peak—almost three-quarters of an inch. That might not seem like much, but with these tippy stoves every bit helps. Win to Snow Peak.
What else? The wire-loop valve on the Snow Peak sticks out farther than the plastic knob on the Primus, so you don’t have to get your hand so near to the flame to adjust it. Both stoves fold very small, but the GigaPower collapses into a symmetrical shape, while the three trivets on the Optimus protrude somewhat even when folded, creating slightly awkward storage inside a pot.
Since I already knew I liked both these stoves, choosing between them was difficult. I’d happily carry either, and do. But when the time came to pick one, my hand finally strayed to the Snow Peak GigaPower. Its balance of features and performance tipped the scales ever so slightly.
Next time we’ll look at two of the best remote canister stoves on the market.
Overland Review: Sportsmobile, 50 years strong
 Put the words “conversion” and “van” in the same sentence, and you’re likely to induce imagery of smoked bubble windows and orange shag carpeting. You can almost hear strains of KC and the Sunshine Band. A Sportsmobile is a different beast. More a remanufactured overlanding vehicle on a Ford or Chevy platform than a mere “conversion,” the Sportsmobile is not only a seminal product in its field (2011 marks the company’s 50th anniversary), but can be configured as a heavy-duty, four-wheel-drive, self-contained camper capable of extended journeys in the most remote regions on earth.
 Put the words “conversion” and “van” in the same sentence, and you’re likely to induce imagery of smoked bubble windows and orange shag carpeting. You can almost hear strains of KC and the Sunshine Band. A Sportsmobile is a different beast. More a remanufactured overlanding vehicle on a Ford or Chevy platform than a mere “conversion,” the Sportsmobile is not only a seminal product in its field (2011 marks the company’s 50th anniversary), but can be configured as a heavy-duty, four-wheel-drive, self-contained camper capable of extended journeys in the most remote regions on earth.
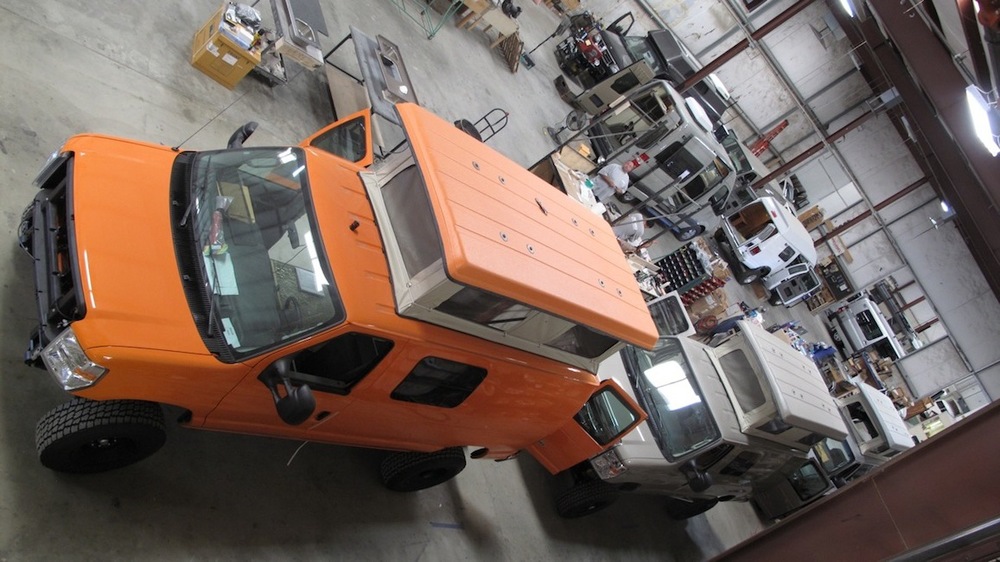
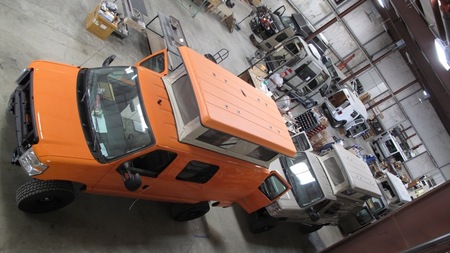
 On a trip through California last month, we visited Alan Feld, the owner of Sportsmobile West (there are two other divisions as well), in his factory in Fresno, to see the entire process of building the vehicles, from stock van to completed Sportsmobile.
Once the minimal factory interior is removed from the van, the vast rectangular box is essentially a blank canvas, open to a number of semi-stock interiors or nearly any custom configuration a customer can dream up. If you want to go beyond the basics of stove, fridge, sink, bed, and toilet, you can add flat-screen TVs, captain’s chairs, furnaces and AC units, a shower—the list goes on. The roof can be permanent full-height or a retractable “penthouse.” Everything from counters to plumbing is of first-rate quality.
I enjoyed looking at the well-thought-out interiors, but it was the four-wheel-drive conversion process that most interested me. I’ve seen them done poorly and seen them done well, but rarely have I seen one done as well as here. So seamless is the installation that, looking at a half-finished chassis on a rack, it was impossible to tell where the Ford factory parts left off and the Sportsmobile parts took over—except that the latter were arguably stronger.
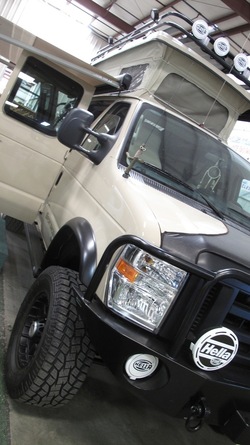
 The heavy-duty front axle, springs, and transfer case are all made in California. Furthermore, Alan has been on a mission to source as many components as possible from the U.S. and even his own state. He uses a stout, all-gear Atlas II transfer case (made in Paso Robles, CA), an equally stout Dynatrac Pro Roc 60 axle assembly, and, as of quite recently, leaf springs manufactured right there in Fresno. The extended-range fuel tanks are also manufactured in California.
The result is a comfortable and surprisingly capable machine—at the 2011 Overland Expo, even the veteran Camel Trophy team members who ran the Land-Rover-sponsored demonstration course were surprised at the Sportsmobile’s tolerance for side-slope angles. And it’s well-built enough that the company provides a 50,000-mile warranty.
 Mercedes Sprinter van camper
 Sprinter with bike bay in rear, camper in front.I should note that Alan is also using the Mercedes Benz Sprinter van as a base for some beautiful camper conversions. Although the four-wheel-drive version of the Sprinter is not (yet) available in the U.S., we do at least get the brilliant BlueTEC V6 turbodiesel, which is capable of 20-plus mpg on the highway. One completely self-contained unit I spent some time in was stickered around $75,000—a bargain considering the combination of Mercedes and Sportsmobile quality, and more so when compared with some far more expensive but troublesome “conversions” I’ve seen. It got me dreaming of that loop up through the Maritime Provinces we’ve always wanted to do. I’m beginning to think a “conversion van” might fit right into place between our Land Cruisers.
Just to be sure: Despite lurking behind stacks of parts and peeking through closed doors at Alan’s factory, nowhere could I find a hidden stash of smoked bubble windows or shag carpet.
Equipment review: Arctic Butterfly sensor-cleaning brush
A few weeks ago I received an unexpected Royal Mail package from Tom Sheppard. Inside was an orange case the right size to contain a pen or a watch.
Hmm . . . Had Tom decided to pass on to me his GMT Master?
Probably not.
A few weeks ago I received an unexpected Royal Mail package from Tom Sheppard. Inside was an orange case the right size to contain a pen or a watch.
Hmm . . . Had Tom decided to pass on to me his GMT Master?
Probably not.
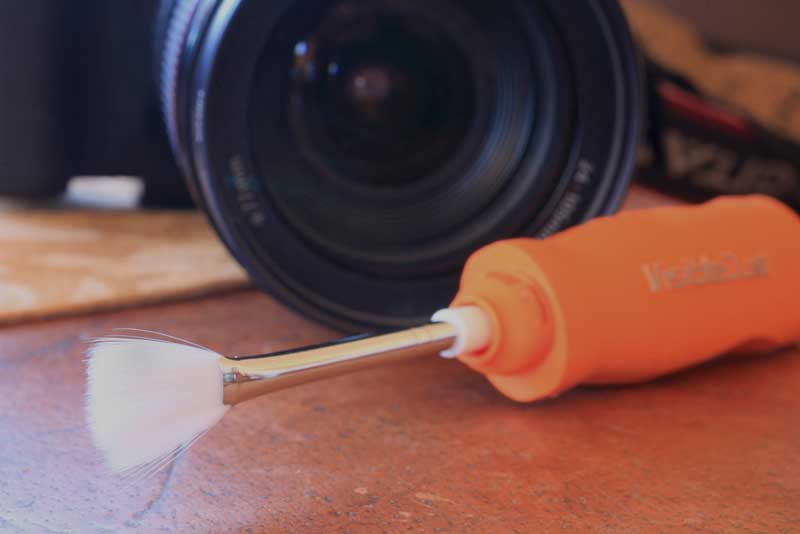
What Tom had sent me was not a Rolex, but something nearly as useful if one were on a trip of a lifetime and interested in bringing home digital images free of those nasty little dark blots caused by dust on the camera’s sensor. The amusingly named Arctic Butterfly sensor brush, from a company called Visible Dust, uses the principles of static charging to enhance the ability of its bristles to lift off minute debris from a digital camera’s sensor (or, more correctly, the filter that covers the actual sensor).
Many cameras these days are equipped with so-called self-cleaning sensors, which use vibration to literally shake dust particles off the surface. But those particles are obviously still in the camera—one can almost imagine a tiny dust dune growing slowly under the sensor on a long off-pavement journey. Unlikely perhaps; nevertheless, while self-cleaning sensors help, they don’t remove dust from the sensor chamber, and they don’t shake off the more stubborn particles.
For those clingy bits, and for all our cameras that don’t have the self-cleaning feature, the standard approach of a filtered bulb blower followed by a sensor swab moistened with cleaning solution works superbly. However, if the blower misses a hard bit which subsequently gets trapped under the edge of the swab, the result can be a scratched sensor. I’ve also used the Delkin Sensor Vac—literally a miniature Hoover—with very good results, but even it usually required followup with a swab for complete cleaning.
Operation of the Arctic Butterfly brush is simple. Set your camera on ‘sensor clean’ to lock up the mirror. Hold the brush away from the camera and hit the power button three times for a few seconds each time. This spins the brush rapidly, ejecting any debris in the bristles and enhancing their static attractiveness. Switch off, then gently swipe the brush just once across the sensor, trying hard not to brush the sensor chamber or other parts of the camera, which could have lubricant residue on them. Do not spin the brush while it’s in contact with the sensor (I wonder how many males who don’t read instructions have assumed the wrong thing here?).
That’s it. You can check the sensor for dust by pointing your camera at a white wall, stopping down the lens all the way, making sure the wall is out of focus, then taking a shot. Camera shake won’t affect the results, since what you’re looking for is moving with the camera. Examine the image in Photoshop or another program. Or use a commercially available optic such as Visible Dust’s ‘Quasar’ sensor loupe, or Delkin’s SensorScope, to examine the sensor directly.
I found the Arctic Butterfly to be very effective, as evidenced by pre- and post-brush inspection, and it’s probably more so in a dry environment such as our southwestern deserts or Tom’s Sahara. In fact, combined with a good, filter-equipped bulb blower, I think this is all one would need to guarantee virtually spot-free images for the duration of most trips. Eliminating the swabs means you don’t have to worry about sourcing sensor-cleaning fluid at your destination (since it’s generally prohibited on airlines). In its padded case the brush weighs just 4.8 ounces; on its own it’s only 2.1 ounces. Cheap, lightweight trip insurance for your images. Thanks to Tom Sheppard for alerting me to a good product I’d somehow missed.
Now, Tom—about that beat-up old watch of yours . . .
Equipment review: Hi-Lift vs. Hydra-Jac

If you’ve never cursed a Hi-Lift jack, you’ve never used one.
For all its awesome capabilities—two-and-a-quarter-ton jacking capacity, plus the ability to winch with it or employ it as a vice, not to mention the endless imaginative bodge fixes for which people have employed the hollow handle or main beam—the Hi-Lift is a recalcitrant, capricious beast, its mechanism prone to jamming solid with trail dirt and its handle prone to catching a careless user’s head with enough force to cause bleeding from the ears. Nevertheless, if you need a tool that can lift one end of an F350 clear of the ground, pull your winchless Land Rover out of a mud hole, or squeeze crushed sheet metal out of the way of steering components to get your rolled vehicle home, for over a century your choice has been a Hi-Lift or . . . a Hi-Lift. Until now?
 In 2008 I chanced upon a reference to the Hydra-Jac, a lightweight (13 pounds versus the Hi-Lift’s 30), hydraulically operated jack with what appeared to be a similar range of lift travel to the Hi-Lift. The Hydra-Jac is manufactured by Radflo, a company already well-known for sophisticated long-travel shock absorbers designed for race vehicles and rock buggies. It seemed a logical step for them to apply this expertise to a long-travel jack. It was clear the Hydra-Jac was not designed as a replacement for the Hi-Lift, given its relatively modest 2,200-pound capacity compared to the Hi-Lift’s nominal 4,660 (although the company’s website refers to “that old-fashioned cast-iron jack you’ve been lugging around”).
But it seemed a fair trade given the handiness and what promised to be much easier and safer operation, via a short lever that didn’t appear capable of doing much damage even if you did manage to get your head between it and the cylinder. A one-ton-plus rating should be enough to lift one end of most medium-sized 4WD vehicles clear of the ground. The price was wincingly high at over $300—three times the price of a Hi-Lift—but if the performance justified it, I thought the Hydra-Jac might represent a viable alternative if used within its design parameters.
Notice I mentioned that was 2008? I spent the next two years trying to actually get a Hydra-Jac to test.
The fault was not with Radflo’s independent public relations rep, who was eager to help. But the first time I requested a unit to review, he told me another publication had been promised “exclusive rights” for the first article, and I couldn’t have one for several months. Um . . .okay.
The next time I checked, I was told the company had agreed to loan a jack to me for testing if I guaranteed it would be returned “in the same condition in which it was shipped.” Say what? It’s a jack—the first time I used it, much less tested it, its condition was bound to change. I said no thanks.
A year later I tried again. This time it was mentioned that the owner of Radlfo “might have apprehensions about loaning the product to journalists he’s never met,” and that I should drop by the booth at SEMA to introduce (i.e. ingratiate?) myself. By now I was beginning to wonder if I was wasting my time, and if there was another reason Radflo didn’t want their jack tested in the real world. I skipped SEMA that year anyway for other reasons (not really into posters signed by Hooter’s girls). But, astonishingly, in another few months the skies parted and a Hydra-Jac appeared at my shipping depot.
On first inspection I couldn’t see what all the hesitation had been about. The Hydra-Jac appears to be very well-made, and adequately specced for its metric-ton rating. The piston is a 22mm chrome-plated rod, sleeved with a 35mm steel tube. The operating handle looks absurdly delicate compared to the blunt-force-trauma club of a Hi-Lift, but it implies easy cranking. The actual travel of the piston (and thus the lifting foot) is 18 inches—not a lot when you realize a Hi-Lift’s foot will climb nearly the full 48 or 60 inches of its main beam—but the Hydra-Jac’s foot can be loosened and repositioned to suit the application, which increases versatility. Complementing the light weight is its compact length—just 37 inches (a 48-inch model is also available).
So let’s do some comparing.
 First off, you won’t be doing any winching or vising with the Hydra-Jac. It’s made for jacking, period. I suppose you might be able to wedge the round base on a chassis member to pry off some bent sheet metal or straighten a tie rod, but essentially this tool is made for lifting things.
I first tried a simple face-off by jacking up the back end of my FJ40 until both wheels were in the air. Using the Hi-Lift, the procedure is to make sure the reversing lever is in its ‘up’ position (it should always be stored thusly), after which it’s possible to pull the mechanism and foot of the jack up the main beam with the operating handle until the foot meets the bottom of the vehicle’s bumper. Making sure the jack is vertical and well-located, one then pumps the operating handle, keeping (gloved!) fingers out of the space between the handle and the main beam, and most definitely keeping one’s head out of said space. Without too much effort the rear wheels were dangling. Moving the reversing lever to ‘down’ (which usually involves a swift bang with a fist), and the procedure is essentially reversed. Once the jack has less than around 150 pounds pressure on it the lifting mechanism will drop to the base (this characteristic has caught more than one new Hi-Lift user by surprise).
With the Hydra-Jac, effort from start (picking up the jack) to finish (lowering the vehicle) was vastly reduced. The movable foot happened to be in the right position to engage the Land Cruiser’s bumper, so I simply tightened the hydraulic lock valve on the jack’s tubular body, and began working the lever. No opportunity without considerable trouble to put oneself in harm’s way—there’s never any recoil potential on the lever. In 15 seconds the tires were in the air, after which it was the work of a second to loosen the lock and lower the vehicle. Control was good enough to bring it down a millimeter at a time, or all the way with a whoosh. First round to the Hydra-Jac.
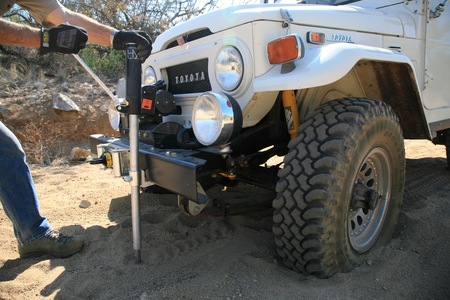
Then it was time for a recovery. I decided to bury the front (heavier) end of the Land Cruiser in sand and use each jack to lift it high enough to place sand mats under the tires. Normally this isn’t my preferred method of sand recovery, since it forces you to lift the body of the vehicle far enough to max out the suspension travel before the wheels begin to rise, whereas if you can get a bottle jack under the axle you only need to lift a fraction of the distance. But I wanted to put the jacks at their most disadvantageous.
I drove down to the wash that feeds our cattle tank. It has a sandy but not treacherously soft surface. As usual, when you want to get a vehicle stuck it’s nearly impossible. In two-wheel-drive with full street pressure, time and time again I revved the engine and popped the clutch, and the FJ40 just pulled on out. Finally I managed to spin a couple of rather pathetic holes, pulled the front wheels into them, and shoveled sand back around the tires.
 Again the Hi-Lift was first. I didn’t bother with the big red plastic ORB jack base, but the Hi-Lift’s base barely sank as I started pumping the handle. It took considerably more effort to raise the front of the 40 with that massive cast-iron six in there, plus the suction of the sand. The ironic thing about the Hi-Lift is that the harder it is to pump, the more difficult it is to keep one’s head out of the Danger Zone arc of the handle, and the more dire the potential consequences if one’s grip slips. But, as usual, the thing does work, and out came the tires.
Now for the Hydra-Jac. This time, the foot was too high on the shaft to get under the front bumper. So I had to get a wrench to loosen and lower it to the correct height, rather than being able to instantly adjust for any starting height as with the Hi-Lift. More interestingly, as soon as I began pumping the operating lever, the Hydra-Jac’s round base headed straight for China through the gravelly sand. It sank at least seven or eight inches before the Land Cruiser started to rise, and I ran out of travel before the tires were high enough to insert sand mats.
Some quick math explained it. The Hydra-Jac’s round base is four inches in diameter, giving it just 12.5 square inches of area. The Hi-Lift’s four by seven-inch rectangular base has well over twice the area—28 square inches.
I retracted the Hydra-Jac’s piston and put the ORB base underneath. Even though not designed for this jack, the ORB gave plenty of support, and the Land Cruiser rose much quicker. Pumping the hydraulic arm required significantly more effort than when raising the back end on firm ground, but was still infinitely easier than working the Hi-Lift. However, I noticed another quirk regarding the Hydra-Jac. Its design means that the hydraulic ram, which is attached to the base, is free to rotate inside the cylinder. The result was that if the vehicle was not perfectly level side to side, the jack tried to swivel on its foot against the bumper. I came close to tipping the vehicle sideways off the jack, as if I were employing the classic “casting jack” technique to move the vehicle sideways out of a rut.
So round two went to the Hi-Lift, which, despite the greater effort and care required, was actually faster and less troublesome than the Hydra-Jac. Since recovery is the most vital—and the most common—use to which either of these jacks is likely to be put, I had to conclude that the Hi-Lift remains the most versatile jacking tool for backcountry travel.
I do think the Hydra-Jac has potential. If the base were enlarged it would solve one major drawback. If some way could be found to prevent the ram from being able to turn inside the cylinder, I believe the jack would gain significantly in control and ease of use. Its light weight, ease of storage, much lighter pumping action, and greater margin of safety are obvious advantages.
The last thing I would have liked to test was the Hydra-Jac’s durability, especially regarding the hydraulic mechanism. Hi-Lifts might get ornery and stiff, but they rarely break. Alas, Radlfo declined to leave the jack with me for a long-term test.
So, for now, at least, I’m back to cursing—and counting on—my well-used Hi-Lift jack.
Equipment review: Viking Off Road Recovery Bag $130
 I wrote a brief review of Thor Jonsson’s stout U.S.-made Recovery Bag when I was with Overland Journal, but since then I’ve had more experience with it in the field. Nothing I’ve seen has altered my initial impressions of its quality and utility.
If your vehicle is equipped with a winch designed for anything but pure poseurship, you need a comprehensive recovery kit to accompany it. A winch doesn’t work in isolation: If you’re winching from a tree you must use a tree saver strap to prevent damage to the trunk that could kill the tree; if you’re attaching to another vehicle you need proper shackles. In many situations you’ll want a pulley block to redirect a pull or increase power. Gloves, a winchline extension, a KERR (kinetic energy recovery rope) or strap, a winchline damper—all should be part of a winch kit.
I wrote a brief review of Thor Jonsson’s stout U.S.-made Recovery Bag when I was with Overland Journal, but since then I’ve had more experience with it in the field. Nothing I’ve seen has altered my initial impressions of its quality and utility.
If your vehicle is equipped with a winch designed for anything but pure poseurship, you need a comprehensive recovery kit to accompany it. A winch doesn’t work in isolation: If you’re winching from a tree you must use a tree saver strap to prevent damage to the trunk that could kill the tree; if you’re attaching to another vehicle you need proper shackles. In many situations you’ll want a pulley block to redirect a pull or increase power. Gloves, a winchline extension, a KERR (kinetic energy recovery rope) or strap, a winchline damper—all should be part of a winch kit.
Furthermore, if you’re winching it’s likely to be at least a somewhat stressful (and certainly potentially dangerous) situation, so you’ll want everything organized to eliminate fumbling and delays. Therefore I consider the recovery kit’s container to be just as important as the contents.
The first thing you’ll notice about the Viking bag is the can’t-miss-me-orange 3M reflective tape, which will prevent you misplacing the bag at night, and will warn anyone driving up on the scene to slow down. Open the bag and you’ll see the sturdy double-layer construction, using an orange liner which keeps the contents easy to see. Actually there’s a third layer: The central rope/chain compartment comes out for easy cleaning after a recovery that renders stuff muddy. The other compartments tidily hold shackles, pulley blocks, gloves, a KERR, a winchline damper (which can be Velcroed to the exterior via straps)—virtually everything associated with a comprehensive recovery kit. The lot is comfortable carried via a fat rubberized handle or a broad shoulder strap.
If you stuff this bag with the full assortment including a choker chain, it will represent a potential 30-pound projectile in the event of an accident or rollover, so it should be secured any time the vehicle is moving. I run a single ratchet strap over mine, but Viking has also thoughtfully included four tie-down rings on the base.
Virtually everything I could have thought of to include in a recovery kit bag is here, thanks to Thor’s extensive experience. It’s a U.S.-made product I highly recommend. Incidentally—I had my own recovery gear to fill this bag, but Viking offers a selection of well-considered kits to suit any overland vehicle from a Subaru to a Unimog.
Equipment review: U.S. military surplus two-quart canteen—up to military standards?
 Over the years I’ve used every water container imaginable for hiking, backpacking, and sea kayaking, from WWII-era metal canteens to Nalgenes (I tried the CamelBak-style bladders exactly once, and simply couldn’t abide the sucky-tube thing). A couple of years ago I found what I thought could be the ideal container for my needs: A U.S. military two-quart soft canteen with a nylon cover insulated with synthetic fleece.
This combination had several advantages. First, in the desert southwest you need two quarts of water for any reasonable hike. One just isn’t sufficient. Second, the fleece insulation did a good job of keeping the contents cool on warm days. Finally, the flexible container let me squeeze out air as I emptied the canteen, which prevented sloshing and significantly reduced noise when birdwatching or hunting. I noted at the time that the canteen’s plastic material seemed quite thin, but I assumed the designers knew what they were doing.
Maybe not.
Over the years I’ve used every water container imaginable for hiking, backpacking, and sea kayaking, from WWII-era metal canteens to Nalgenes (I tried the CamelBak-style bladders exactly once, and simply couldn’t abide the sucky-tube thing). A couple of years ago I found what I thought could be the ideal container for my needs: A U.S. military two-quart soft canteen with a nylon cover insulated with synthetic fleece.
This combination had several advantages. First, in the desert southwest you need two quarts of water for any reasonable hike. One just isn’t sufficient. Second, the fleece insulation did a good job of keeping the contents cool on warm days. Finally, the flexible container let me squeeze out air as I emptied the canteen, which prevented sloshing and significantly reduced noise when birdwatching or hunting. I noted at the time that the canteen’s plastic material seemed quite thin, but I assumed the designers knew what they were doing.
Maybe not.
First, a few months ago the plastic leash holding the cap snapped in two. Annoying, but I didn’t think too much about it. More recently, while teaching wildlife tracking on a ranch in northern Mexico, the group was out on a hike and I felt my backside getting soaked. I took off my day pack and pulled out the canteen, and found a split in the upper corner of the container. Not good at all. Fortunately my camera was in a separate pocket of the pack, or the results could have been disastrous. Not to mention if I’d been relying on that water to stay alive somewhere, and the split had decided to happen at the bottom corner . . .
The date stamp on the canteen is 1993—not that old when you consider the millions of WWII metal canteens still providing fine service seven decades on. Could this one have received some UV exposure that weakened it, is it a rare manufacturing error, or is it truly a design flaw? All I know is, my confidence is shaken, despite the fact that one failure is the scarcest kind of anecdotal evidence. I have another of these units, dated 1997, that I could continue to use, but my inclination, given the vital importance of water in the desert, is that one strike means this kind of container is out for me.
- Jonathan Hanson, Overland Tech & Travel editor
Hint: When using “Search,” if nothing comes up, reload the page, this usually works. Also, our “Comment” button is on strike thanks to Squarespace, which is proving to be difficult to use! Please email me with comments!
Overland Tech & Travel brings you in-depth overland equipment tests, reviews, news, travel tips, & stories from the best overlanding experts on the planet. Follow or subscribe (below) to keep up to date.
Have a question for Jonathan? Send him an email [click here].
SUBSCRIBE
CLICK HERE to subscribe to Jonathan’s email list; we send once or twice a month, usually Sunday morning for your weekend reading pleasure.


Overland Tech and Travel is curated by Jonathan Hanson, co-founder and former co-owner of the Overland Expo. Jonathan segued from a misspent youth almost directly into a misspent adulthood, cleverly sidestepping any chance of a normal career track or a secure retirement by becoming a freelance writer, working for Outside, National Geographic Adventure, and nearly two dozen other publications. He co-founded Overland Journal in 2007 and was its executive editor until 2011, when he left and sold his shares in the company. His travels encompass explorations on land and sea on six continents, by foot, bicycle, sea kayak, motorcycle, and four-wheel-drive vehicle. He has published a dozen books, several with his wife, Roseann Hanson, gaining several obscure non-cash awards along the way, and is the co-author of the fourth edition of Tom Sheppard's overlanding bible, the Vehicle-dependent Expedition Guide.