
Overland Tech and Travel
Advice from the world's
most experienced overlanders
tests, reviews, opinion, and more
The TrekPak divider system
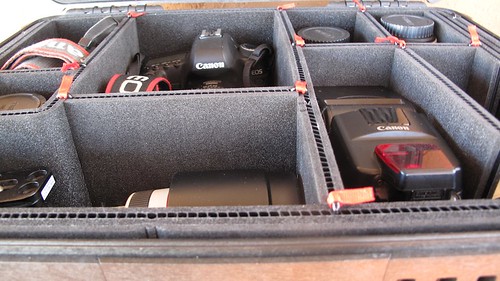
Few experienced travelers, photographers, or scientists would dispute that the ubiquitous Pelican case is the ultimate traveling container when the contents absolutely, positively have to stay protected from impacts, crushing, and dust and moisture incursion. I certainly wouldn’t argue (see here). I know someone who had to move several large Pelican cases full of equipment across an arctic inlet—by sea kayak. He simply rafted the cases behind the boat and towed them across. No problem. If you can deal with the relatively high weight of the empty Pelican, and the just-so-so volumetric efficiency, nothing will give you as much peace of mind when the equipment inside is worth quite literally 40 or 50 times what the case cost. It’s the cheapest kind of insurance.
But you can’t just toss your photography or video equipment inside a big plastic box, however sturdy. You need interior padding and organization. And that presents a bit of a dilemma.
The Pelican can be equipped with either of two options from the factory. The “Pick N Pluck” interior comprises an open-cell foam filler that is partially pre-cut into small square sections. You tear free the sections you want to create pockets to fit camera bodies, lenses, or other items. The result is snug and secure; however, once done you can’t re-organize to accommodate new or replacement equipment, and you must leave at least two cube-widths of the soft foam between items or the structural integrity collapses. That reduces available room significantly. Also, with constant use the open-cell foam degrades rather quickly. I’ve found the Pick N Pluck interior best when a case is devoted to one very expensive or fragile item, such as a monster 600mm F4 telephoto, where the tight fit and thick cushioning provide excellent impact resistance.
The other Pelican option is a set of padded, nylon-covered dividers, which rearrange and connect via hook-and-loop strips. This interior can adapt to new contents, but it’s quite limited in configuration and thus tends to waste space, and the hook-and-loop material is fiendishly efficient at collecting and holding on tightly to all sorts of debris, which eventually reduces its grip on itself.
Aftermarket options have been around for a long time, but every one I’ve used—such as the otherwise superb Lowepro Omni Pro in the link above—wastes a lot of volume due to redundant lids and straps, and dividers that are actually over-padded. How often I’ve wished for a thinly but densely padded divider system that wouldn’t rely on Velcro, had more structural integrity than open-cell foam, and could be re-organized easily to “suit the mission.”
Thanks to, of all things, Kickstarter, I may have gotten my wish. A new company called TrekPak has (rather spectacularly) defied recent odds on the crowd-sourced funding site and made it into full production with a modular divider system designed to match several sizes of Pelican cases, as well as a couple of high-quality daypacks from Deuter.
Georgia Hoyer, the president of TrekPak, sent me a kit for a Pelican 1550, one of the most versatile mid-sized cases in Pelican’s lineup.
At first glance the pile of foam slabs in the box doesn’t seem very impressive. It’s not until you start assembling the unit using its clever U-shaped steel clips (with bright red pull tabs) that it gains form and, it turns out, superb function. The secret to the TrekPak system is the corrugated plastic core sandwiched between the layers of closed-cell foam. That core adds structural rigidity as well as the means to configure the kit to suit your equipment. The TrekPak kit contains enough sections of varying length to accommodate most needs, but, unlike the hook-and-loop-style dividers, if you need a shorter bit to create a suitable compartment, you can easily trim one with a straight edge and razor.
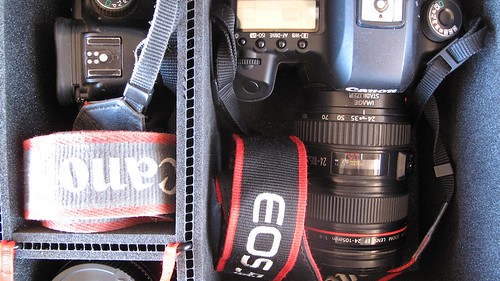
I laid out the camera gear I wanted to fit in the Pelican 1550, and began experimenting with the provided TrekPak sections. Eventually, after some trial and error, I fit the following into individually padded compartments: A Canon 5D MkII body with attached 24-105 F4L lens, a 5D body, further lenses comprising a 70-210 F4, a 15mm fisheye, a 100mm macro, a 300mm F4, and a 17-35mm F4, a 1.4 converter, and two EX550 flash units. Not bad at all, and there was room left over for batteries and CF card wallets. The dividers are easy to align and connect with the clips. It’s up to the user to attach or leave off the little red flags on each clip—they add a festive note and make it much easier to remove the clips, but aren’t necessary.
I could have used one extra full-length divider—the kit comes with two—and I had a few short sections left over. I’m hoping the company will eventually offer individual sections for sale to allow complete individual customization. Some customers might whinge at à la carte pricing for extra pieces, but many won’t need them, and the versatility would be worth the cost for those who do. My 70-210 lens, on its side, left enough room above it for another skinny lens; it would be nice if TrekPak offered thin foam without the plastic core for the user to fabricate bi-level compartments (not that I can’t easily find such material on my own; it’s just nice to have it all available from one source). With a little more configuring and a bit more material, I could have constructed a T-shaped compartment for the camera and attached lens, which would have been slightly more space-efficient than the square I wound up with. However, all in all I was extremely impressed with how much gear fit in the case, thanks to the just-right thickness of the TrekPak dividers. And the ease of reconfiguring to suit changing equipment is a bonus.
So how does the Pelican case/TrekPak combination work in the field? As a transport case it’s brilliant. You don’t need any more padding than this system provides as long as your equipment fits reasonably snugly inside. And, as we already know, one’s confidence in the waterproof/dustproof security of all that expensive gear is unmatched. (There aren’t many other camera cases I’m willing to stand on to gain a little height for a photo with all my gear inside.)
As a user case—that is, to be at hand for a shoot when you need to access lenses, cards, and batteries—the Pelican/TrekPak is far, far better than my old Pelican/Lowepro Omni Pro combination, since there is no internal lid to get in the way. However, it’s obviously a vehicle-dependent setup—you wouldn’t want to go on a walking safari with this thing (look at those Deuter day packs if you carry a lot of equipment on hikes). And you’ll need an entire seat to accommodate the 1550 if that’s the model you choose. I’m planning to try a kit for the (smaller) Pelican 1510 rolling carry-on case I want to use for managing photo equipment on international flights.
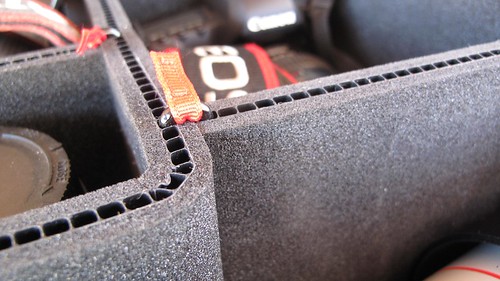
While I suspect the vast majority of TrekPak kits will be used for photography or video gear, the system would be equally versatile for many types of delicate equipment used by those working in the field: spotting scopes, satellite communication devices, radio-tracking receivers—you name it. I’m planning to devote an entire Pelican case to all the impedimenta one accumulates when using the Canon 5D MkII and III as a video camera: external microphone, follow-focus unit, suction mount for exterior vehicle shots, stabilizer for hand-held tracking, LCD viewfinder—a ridiculous amount of stuff.
Let’s see—1550 camera case, 1550 video equipment case, 1510 carry-on, all with TrekPak divider systems.
I guess I’m a convert.
TrekPak kits start at $65: TrekPak
BGAN review turns into a real-life test
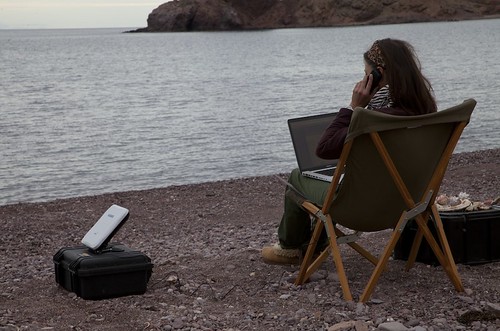
When we took the OCENS BGAN satellite communications kit to a remote beach in Mexico where we planned to celebrate the New Year with friends, we expected to have fun testing it by checking email and news, and maybe making a few phone calls to friends to evaluate the ease of use and reception.
As it turned out, the unit had to prove its value in much more tragic circumstances.
If you’re not yet familiar with the concept, BGAN (Broadband Global Area Network; just say “beegan”) allows both data and telephone communication from virtually anywhere on earth, via a compact portable antenna that links with one of four geosynchronous equatorial-orbit satellites. Roseann and I wanted a system that would allow us to send and receive email, post images and articles on the Web, and make critical telephone calls anywhere we parked the camper. BGAN technology now makes doing so easy and efficient (if not yet exactly cheap) using one’s laptop computer, which communicates with and through the antenna via either a cable or wi-fi connection to access and send data at up to 464 kbps. A separate telephone receiver can be used with the antenna on its own if you don’t need data service (although it will send and receive SMS messages).
We’ve been working with OCENS (“oceans,” for Ocean and Coastal Environmental Sensing) for over a year now—they sponsored the communications area at the 2012 Overland Expo. The company is a comprehensive resource for satellite communication systems, and can equip travelers, explorers, and scientists with BGAN kits, satellite telephones, and other types of equipment and software, either on a purchase or rental basis. Matt at OCENS sent us the latest Hughes 9202 terminal—the smallest Class 2 terminal on the market at barely over eight inches square—along with a Thrane and Thrane Explorer handset. The kit, with a rechargeable lithium-ion battery pack, comes tidily packaged in a Pelican 1450 case. A complete set of instructions for connecting to the Inmarsat satellite system comprises a single laminated card.
Our first morning on the beach in Mexico we made coffee and wandered about catching up with people we hadn’t seen in a long time. There was the usual round of campsite tours as we checked out who’d done what to their Four Wheel Campers or Volkswagen Westfalias or OzTents or FlipPacs. I took some video with the Canon 5D MkII, then moved down to the water’s edge to get some background footage of tidepools and birds. The water was glassy silver; barely a swell tumbled home on the gravel. Brown pelicans skimmed past just millimeters from the surface, defying physics. I heard the sound of an outboard motor, and saw two fishermen heading into the cove, so I set up the camera and got a shot of them traversing the frame. As the camera rolled I looked askance at the boat—a 12-foot, outboard-powered aluminum craft, painted camouflage, that would have been fine on a bass lake but seemed marginal for the Sea of Cortez even in calm weather. The men were obviously weekend sport fishermen; they carried what appeared to be light spinning gear. The two made a few casts in the cove, then motored off to the north.
The afternoon turned windy, as it usually does in winter in the Sea of Cortez, and by dusk a sizable surf was pounding the gravel beach in front of our truck, and whitecaps showed out in the open water. But early the next morning it was calm again when we heard another outboard, and saw three men dressed in foul-weather gear motor up to our beach in a panga—the sturdy and seaworthy fiberglass boat used for decades by Mexican fishermen. Behind the panga they towed a camouflage-painted aluminum boat, which, it developed as we talked with them, they’d found capsized, barely afloat—and empty except for an outboard motor and two fishing rods.
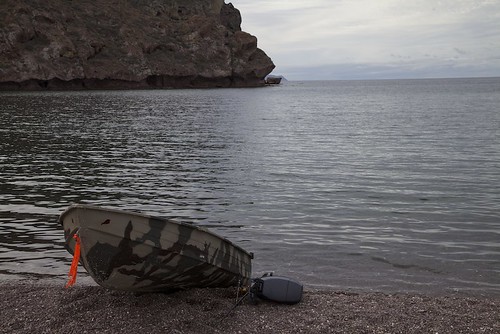
The men pulled the sad little boat up the beach and laid the rods and motor next to it. Meanwhile, I got out the BGAN kit, folded open the square white antenna, and pointed it skyward in the slight southeasterly direction of the Inmarsat equatorial satellite at 98ºW, used by the system in the Americas. Using the signal-strength indicator on the antenna’s LCD screen, it took just a few seconds of nudging to attain a reading over 50, the recommended minimum. As I was adjusting the antenna, Roseann opened her MacBook Pro, which instantly displayed the antenna’s status via a wi-fi connection. In a few more seconds, she was connected to the Web and looking up the phone number for the San Carlos Marina, 40 miles to the south. I plugged in the phone receiver and dialed the number—and within 15 minutes of when the panga landed we had relayed the information to the marina, who contacted the Mexican Coast Guard. Less than an hour later a fixed-wing spotter aircraft and two rigid-hulled inflatable boats (RIBs) were running a grid over the area.
I’d love to report the search found the two men alive and well. Sadly, the RIBs instead recovered the body of Edgar Osantes Loya from the sea, and in the meantime we learned that the two men we first saw in the aluminum boat had in fact picked up a third at their camp north of us. So the situation now involved one dead fisherman and two missing fishermen. The single dim ray of comfort was that the immediate search had at least recovered one body, to offer some closure to the man’s family.
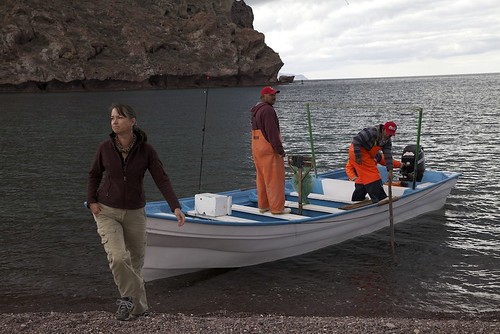
Word got out quickly. By that evening, friends and relatives of the missing men (who were residents of Hermosillo) had stopped by our camp and were driving up and down the coast. The next morning another panga stopped by, and the men reported they’d found a flotation device on a beach several kilometers south of us, along with two sets of footprints. By this time a helicopter had joined the search but was still circling over the sea—standard procedure since if the men were alive they’d be in much worse danger if still in the water. Once more Roseann and I fired up the OCENS unit. This time we had difficulty contacting the marina, and instead called friends in Tucson to have them try directly (which they were able to do).
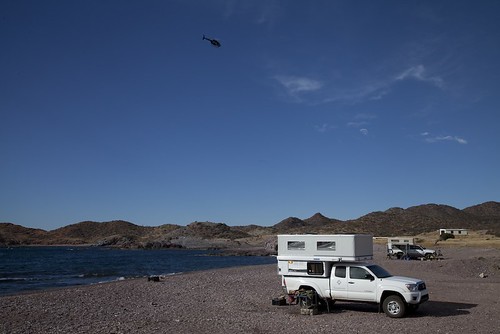
Several people in our group, along with a friend of the missing men, drove south on an inland track and found the footprints. Chuck Hathcock, a biologist and experienced tracker, followed them for a couple of miles until they disappeared completely in a rocky canyon. Meanwhile I hiked north along the cliff-interrupted coast with binoculars, but saw nothing that day or the next. Nor did other areas of the inland search prove fruitful.
Reviewing what we know of the timeline, it seems likely the boat capsized sometime in the afternoon or evening of the day before it was found. That meant a minimum 12 to 15-hour delay before the search was initiated. According to NOAA data, the water temperature in that region of the Sea of Cortez was around 64 degrees Fahrenheit. Confusion and loss of motor control from hypothermia at that temperature can occur in as little as an hour, with death following in as little as another hour. Thus, unless the other two men made it to shore very quickly, they would have shared the fate of their unfortunate companion.
The day after we returned home, we learned from El Imparcial that the official search had been called off, although relatives were still looking, and there remained hope that the two missing men, Daniel Romero Loya and Noé Loya, were still walking toward San Carlos. We’re continuing to seek news. In the meantime, thanks to the OCENS BGAN unit, at least one family will be able to lay a loved one to rest.
Find out more about satellite communications equipment at OCENS. The complete Hughes 9202 BGAN kit we used costs $2,895; the Thrane handset adds $199. A wide selection of air time plans is available, as well as rental options.
Transform your Hi-Lift jack

It isn’t very often I test a product that defies criticism even when subjected to the harshest analysis. But I’ve just been using a brand new accessory for the Hi-Lift jack, and I find myself at a loss to write anything that would approach even the level of nitpicking.
Anyone who has used a Hi-Lift jack knows it will do things no other jack will do. Anyone who has used one also knows the thing is a widow-maker if not handled with the same circumspection one would employ with a pissed-off rattlesnake. The operating handle continuously lies in wait for the head of a careless user to stray within its arc of movement. (Lose your grip then and a broken nose would be light punishment.) The lift mechanism is prone to jamming until doused with WD-40, and the selector lever frequently requires a stomp with a boot rather than a push with a finger to switch from “raise” to “lower.”
Then there’s stability. Now and then you want an unstable Hi-Lift, when using it as a “casting jack” to raise one end of a vehicle and then tip it sideways out of a rut. Far more often, the thing tips on its own when you don’t want it to. Woe to anyone trying to insert sand mats under the tires at that point—much less anyone attempting to change a tire. And human body parts are not all that are at risk: The Hi-Lift’s main beam will crease truck-body sheet metal effortlessly if the vehicle tips away from the baseplate.
Until now we just put up with these hazards to exploit the inarguable versatility of Bloomfield Manufacturing’s century-old invention. Now Richard Bogert of Bogert Manufacturing has solved one of the Hi-Lift’s salient drawbacks with a product of palm-to-forehead simplicity.
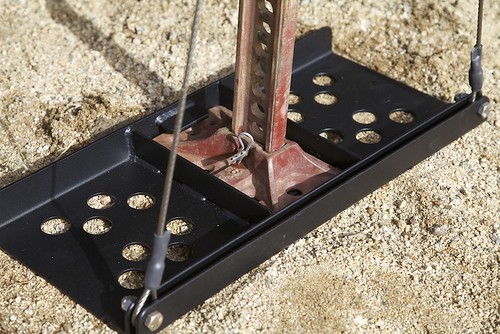
The Safe Jack comprises a sturdy, powdercoated steel baseplate into which the base of the Hi-Lift slots snugly. The plate offers exactly the increase in area (144 square inches total) as the ubiquitous orange plastic ORB jack base, to enhance flotation in soft sand or mud.
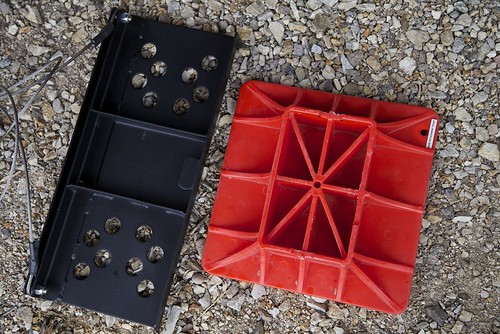 The Safe Jack base (left) offers the same flotation as the plastic base
But the brilliance of the Safe Jack lies in the two swaged steel cables bolted to each corner of the base, which triangulate the jack’s structure by connecting to the top of the main beam with a quick-connect clevis pin. The user tensions the cables by simply screwing in an eyebolt snug against the main beam, and . . . shazam: Suddenly that tippy Hi-Lift is the Rock of Gibraltar. I raised the front of my FJ40 with the Hi-Lift a foot off-center—normally a recipe for a drunken sideways flop as soon as the weight comes off the tires—hung both wheels in the air, then shoved sideways on the vehicle. Nothing—it rocked an inch or two and settled back comfortably. The total extra time to set up the Safe Jack system was maybe 30 seconds.
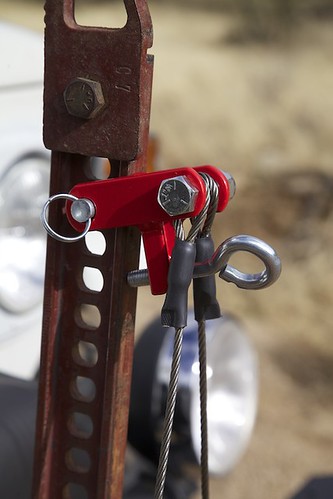 The Safe Jack's cables attach with a pin and tension with a simple eyebolt.
In the end, I found one small thing I thought would improve the Safe Jack, although it’s far from a criticism: I plan to replace the bolts securing the bottom ends of the cables with clevis pins and J-clips. That way if I want just the base I can quickly remove the cables to keep them out of the way.
The Safe Jack provides all the flotation benefits of an expanded baseplate, then adds a different universe of stability and safety. I’m finding myself viewing my 20-year-old Hi-Lift as an entirely new tool. If you’re a Hi-Lift jack owner—or have avoided buying one because of all the horror stories you’ve heard—trust me, this accessory will change the way you view your jack too. For 69 bucks it’s a steal.
The Safe Jack is available direct from Bogert Manufacturing: Go here. They also make some intriguing accessories for bottle jacks which I hope to test soon.
An update, if you missed it elsewhere. Bogert has improved an already excellent product by modifying the top piece. See the review here. It's available as a very affordable upgrade if you bought the original version.
The King of Luggage

How many of us have gazed enviously at photos of Edwardian-era travelers as their steamer trunks and leather suitcases were hauled off the ship in Mombasa by befezzed stevedores groaning under the load? No excess baggage fees for them. Do you suppose Teddy Roosevelt was told sternly, “Sir, we’ll have to charge you extra for that second suitcase. And the third and fourth. And the gun case . . .” when he set off on his African safari? Unlikely.
Sadly, times have changed for travelers in the world of airlines struggling to stay in business. Even first-class passengers are now subject to luggage restrictions and extra fees. Of course, some of this is our own damn fault: Airlines have had to revise calculated passenger weight, and thus fuel usage, upward thanks to the additional, um, personal baggage now carried by the majority of Americans. I’ve long advocated a simple calculator based on height: If you’re, say, five-foot-nine like me, you get a total allowance of 300 pounds for yourself and your luggage. If you weigh 150 pounds, you’re allowed 150 pounds of luggage. If you weigh 290 pounds . . . pack lightly. I suspect this system will never be implemented.
Where was I? Right—luggage. Another issue for the modern traveler is the laissez faire attitude airlines have toward the care of luggage entrusted to them. According to a recent study, on an internal U.S. flight you stand a one in 137 chance of having an item of luggage lost, significantly damaged, or pilfered. That might not sound like a big risk, but it means that on virtually every flight one or two people have luggage issues. In Europe the odds are worse: one in 60. And these are the developed areas of the world, with sophisticated, computerized baggage-handling systems. (Hmm . . . could that be the problem? Heathrow has eleven miles of automated baggage conveyor belts, in one terminal.) To be fair, the frequency of complaints on domestic flights has actually been dropping the last few years. Nevertheless, if you haven’t experienced lost or damaged luggage yourself, I’ll bet you know someone who has.
Considering these facts of life, the perfect piece of luggage must combine maximum volumetric efficiency with extreme resistance to abuse. Given the propensity of most people reading this to be headed to destinations other than Disney World or the Bellagio, that resistance to abuse should extend to unavoidable exigencies such as being lashed down on a roof rack three vehicles back in a dusty convoy, or packed at the bottom of a stack of bags in the back of a Land Cruiser Troopie. Plus, dare we hope that it might complement one’s kit with the right amount of style as well?
Ladies and gentlemen, I give you . . . the duffel.
 A nearly new Filson duffel and a well-worn Filson field bag.
Not what you were expecting? Something in aluminum from Zero Halliburton, perhaps? Or a wheeled Pelican case? Stout options both, and indubitably stylish in the case of the Halliburton (although Pelicans have their own functional chic). But the Halliburton is frighteningly expensive, and its aluminum is surprisingly susceptible to dents from hard edges and blunt objects. Subjecting one to the abuse of an overland trip would be silly unless you bring a personal porter. Meanwhile, the Pelican, while unequalled at protecting fragile contents such as photo equipment, is not only awkward as a suitcase but heavy for its volume—you don’t want a quarter of your baggage limit taken up by the bag itself just to keep your khaki shirts and underwear from being squished.
No—soft luggage is the way to go for bush travel. And while it might be tempting to choose a bag with multiple outside pockets and flaps and zippers for easy organization, every one of those extra openings and fasteners is a failure point just waiting for the most unfortunate time to happen. And the more external impedimenta, the more chances for the bag to catch on the corner of a luggage-conveyor chute and be ripped asunder by the 240 Samsonite suitcases piling up behind it.
Thus, the simple, rugged duffel*. Not the easiest thing to load or organize, it’s surely the best at insuring your clothes and sundries survive the trip. With careful packing, and a bit of just-one-more-thing stuffing, I’ve fit everything I needed for a month-long trip to Africa (except for camera equipment) into a single medium Filson duffel. I guarantee that showing up with one piece of luggage will win you instant credibility among guides and bush pilots. (Tip: Look at Eagle Creek’s line of packing accessories, especially the brilliant Pack-It folder for shirts, which miraculously compacts seven or eight crisply folded shirts to the thickness of one or two.)
Over several years I’ve used and reviewed a dozen or more duffels from various manufacturers. Here are three that stood out.
Filson Medium Canvas Duffel $295
One of my favorite product-promotion photos of all time is Filson’s image of one of their duffel bags dangling by its leather carrying straps from an engine hoist. Inside the bag is, indeed, an engine—an entire air-cooled Volkswagen Beetle powerplant. Not much more needs to be said about the burly 22-ounce cotton twill fabric of the Filson, its thick bridle-leather carrying handles and shoulder strap, or the heavy stitching, all done in the U.S. My own Filson has shrugged off the abuse of 12 trips to Africa, plus a bunch of North American and European explorations.
The fabric of Filson’s twill comprises two-ply thread running one direction, and three-ply running the other. This, combined with the one-warp-over-two-weft weave that defines twill, lends the finished fabric a characteristic ribbed texture, and unbelievable durability—my bag shows absolutely no signs of deterioration, even on the heavily punished bottom corners. The 1 1/2-inch-wide leather carrying straps run all the way around the bag to fully support the load.
A single massive brass zipper secures the contents of the Filson. Unfortunately the opening is straight rather than U-shaped, so loading the bag is akin to stuffing packages through a mail slot. But that straight zipper is the simplest and thus most fail-safe opening possible, and would be the least likely to spill contents if it did fail, so the trade-off is fair. A buttoned flap helps keep dust out, but provides only minimal backup closure (the carrying straps would help as well). A leather shoulder strap is included, the shoulder patch of which could use some padding.
The paraffin water-repellent treatment on the Filson duffel seems to attract dirt at first, but after a while the smudges and smears merge into an even patina that somehow simultaneously gives the bag an air of vast experience while rendering it less conspicuous to potential baggage thieves. Sighting it always gives me two concurrent thoughts—one, fond memories of our travels together, and two, relief that it made it to Arusha with me and isn’t circling endlessly on an airport carousel halfway across the globe. filson.com

BAD Bags #4 $104
Malcolm Vetterlein is the man behind BAD (Best American Duffel) Bags, and he’s the one likely to pick up the phone when you call. His philosophy and goals are encapsulated in the business name: He wanted to produce the best duffel around, and do so in America. Fifteen years of success—and a stellar reputation among hard-core travelers—has proven that it’s still possible to run an outdoor-equipment business the old-fashioned way.
Not that the bag itself is old-fashioned. Malcolm takes the opposite approach to Filson: The BAD is constructed of thoroughly modern, urethane-coated 1,000-denier Cordura nylon. The carrying straps are 6,000-pound-test seatbelt webbing; the main zipper is a virtually burst-proof #10 YKK; the hardware is nickel-plated. Grab handles on each end are so overbuilt you could probably use the bag as a short winchline extension. (Even more significant: My BAD bag successfully resisted all afforts at destruction by a young cheetah named Tommy T, a member of the Cincinnati Zoo’s Cat Ambassador Program and a recent star in National Geographic Magazine.)

The result is a duffel that, while perhaps lacking the earthy character of the Filson, is no less rugged. A huge horseshoe-shaped opening makes loading easy. The zipper is uncovered, so theoretically some dust could infiltrate there, although I have yet to notice it. The downside of the big opening is that in the (very unlikely) event the zipper does fail you’re left with a gaping hole in the top of your bag. Two one-inch cinch straps that wrap all the way around the bag would help corral the contents if that happened. I carry several industrial-sized safety pins in my repair kit for such a situation.
Two long, zippered inside pockets are perfect for underwear and socks on one side, odds and ends on the other. However, I have yet to figure out much use for the long, flat exterior pockets except to hold the carrying strap. One dislike: The rings that hold that (very comfortable) strap attach on the lower corners, so you carry the bag on its side with the bottom against you. It’s less awkward than the usual arrangement—except the bottom of a duffel is inevitably dirty and/or greasy, which means your trousers soon are as well. A final nice touch: The ID holder is stitched flat to the bag, so there’s no chance of it getting ripped off in transit. Clearly this duffel was meant to go places. badbags.com
Military A10 $30
Depending on your background, this could bring back really good or really bad memories (or, of course, none at all). For around 30 bucks, any number of military supply companies will sell you the same duffel currently issued to U.S. military personnel—and, fittingly if a bit surprisingly, still made in the U.S. (although beware of numerous offshore copies).
If you’re on a budget and are willing to put up with the hassle of unloading everything in the bag every time you need something (because universal law states that the thing you need will always be at the bottom), a classic end-loading military duffel will hold all you’re likely to need for a two-month deployment, I mean vacation. Current issue duffels are now heavy Cordura nylon instead of cotton canvas, but other details have changed little if at all. To close the bag you fold the top flaps and thread a toggle through three grommets, then secure with a spring clip (which could be replaced with any number of substitutes if it happened to break). However, that clip or its substitute is the only thing keeping the contents from spilling out. Doubling up wouldn’t be a bad idea—a padlock would be perfect.
The issue duffel is well-made, but don’t expect fine detailing. There are plenty of raw nylon edges to fray, most notably on the dust flap under the top, which came pre-frayed on my sample and didn’t appear to have been hot-knife cut in its manufacture. A quick treatment with a lighter helped. At least all the major seams are double-stitched, and the handle and dual padded shoulder straps are closely cross-stitched. It’s not likely to come apart on you.
My only caveat—and it could be significant—is to avoid taking this bag to countries that have, or think they have, reason to be suspicious of people carrying military-type equipment across their borders. I probably wouldn’t try to get into Zimbabwe or Libya at the moment with a U.S. government-issue Bag, Duffel, Nylon slung over my shoulder. Available from many sources, including armynavysales.com
*No one knows the exact history of the duffel—it developed gradually from earlier bags. We do know the origin of the name, a town in Belgium where much of the original heavy fabric was made—which tells us that the correct spelling is duffel, not duffle.
Reader Jeff sent this delightful note:
Jonathan, I noticed your comment about the VW engine in the Filson duffel bag. In the mid 1990s, I was managing Bry's Auto Wrecking, in Seattle, when the Filson retail store manager, a regular customer of ours, came up with the idea for the photo. We had tons of the air-cooled engines, so we wrapped a complete engine up in the bag, lifted it with a forklift, and got a few photos. We let it hang from the forklift for a long weekend, to see if the bag would fail, it never did. It is fun for me to see that photo still used.
Power for the JATAC

“ . . . and nine—nine rings were given to the race of Men, who above all else . . . desire power.” J.R.R. Tolkein
In our case, a pair of 100-watt photovoltaic panels should be enough to give us all the power we desire.
One of our major goals with the JATAC was self-sufficiency in terms of 12-volt DC and 120-volt AC electricity. We wanted to be able to spend a week or two—or more—in one spot and produce sufficient power to operate the fridge, water pump, LED interior lights, and our computers and camera-battery rechargers without the need to run the truck’s engine and alternator to recharge the camper’s batteries (idling results in very slow charge at best, besides using fuel, producing pollutants, and destroying the peace and quiet of your camp). A few minutes with an amperage chart led me to believe that about 125 watts of theoretical photovoltaic (PV) power generation should be enough to stay permanently ahead of all our consumption in reasonably sunny conditions, even with the fridge working hard.
 Hyper-efficient LED interior lights use minimal power.
A few months ago, Walter Stoss and Urs Schoop of Global Solar—fortuitously based in Tucson—showed us their semi-rigid PV panels, designed to be cemented directly to the roof via a pressure-sensitive adhesive backing. This eliminates drilling or through-holes, reduces the maximum wind profile to about an inch—essentially invisible aerodynamically—also reduces overhead clearance for branches and carports, etc., and renders the panels unnoticeable to passing potential thieves and makes the job of stealing them vastly more difficult anyway.
The Global Solar panels utilize the most efficient Copper Indium Gallium DiSelenide (CIGS) thin-film technology, which maximizes gain at low sun angles and overcast conditions. Partial shading also has only minimal effect on the CIGS material (some types of PV panels shut down nearly completely if a branch or other object shades a small section).
We decided to err on the side of more power rather than less, and installed two GS PowerFLEX modules. Each of the 81.5 by 21.5-inch modules weighs about 22 pounds and is rated at 100 watts. The cylindrical MC4 connectors leading from the panels are themselves hooked to waterproof SAE fittings; thus the entire system required only two holes through the roof.
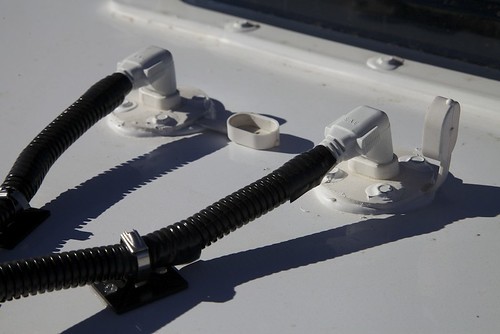 Waterproof SAE fittings connect the modules to the interior wiring.A Global Solar charge controller prevents overcharging, and eliminates the slight bleedback of power into the atmosphere that occurs at night with an uncontrolled PV panel. The controller’s display can read either voltage or incoming amperage, and can be selected for lead-acid or AGM batteries. Tom Hanagan at Four Wheel Campers recommended Exide AGM (Absorbed Glass Mat) batteries given his recent experiences, so, to ensure we had plenty of capacity to exploit the incoming amperage, we had him install two of the company’s group 24 batteries in the camper’s well-secured compartment. The charge controller mounted neatly above the camper’s other electrical panels.

So far we’ve subjected the system to a single easy test: a long weekend in the Dragoon Mountains east of Tucson (where Cochise and his Apaches made fools of the U.S. army in the 1860s). The weather was cool, which both maximized charge (PV panels work better in the cold) and reduced the load on the fridge. Nevertheless, by an hour after sunrise each day the charge controller was floating the batteries at a full 13.5 volts. Meanwhile, our friends Brian and Marisa, who’ve yet to install solar power on their Dodge/FWC combination, had to run their (VERY LOUD CUMMINS TURBODIESEL!) engine on the second day to top up their single camper battery. Just joshing, Brian.
 Two Exide FPAGM-24DP batteries store power.
If we lived in town, I could literally hook this system up to the grid and sell power back to Tucson Electric. Instead, I’m considering adding an exterior plug and offering 12V power to fellow campers . . . for a small fee or a good beer.
Global Solar offers one- and two-panel RV kits, and many other solar products, here.
Leveling the JATAC
 The Tacoma and Four Wheel Camper sitting—level—in camp in the Kofa National Wildlife Refuge.
(Note: When we announced that our new expedition vehicle was to be a Toyota Tacoma, a forum member obviously expecting something more exotic and expensive posted, "Oh—it's just a Tacoma." And that immediately became the nickname for the new vehicle: Just A Tacoma and Camper. More images of the setup are on our Flickr pages.)
As I mentioned in this piece, the suspension on our 2012 Tacoma was ridiculously stiff from the factory. Nevertheless, adding a 750-pound-plus camper called for some sort of modifications to maintain a level ride height and provide adequate roll control while retaining as much compliance as possible. There are really only two ways to do this properly—substituting heavier rear leaf springs, or augmenting the stock springs with adjustable air bags, in effect adding an auxiliary spring. (I’ll discuss shock absorbers in another article.)
A third approach is to insert an “add-a-leaf”—a single extra spring leaf designed to increase the rate of the spring and raise the ride height. But our experience with these—and the experiences of several people we know—has been unfailingly poor. The problem is that the extra leaf is rarely matched properly in rate and shape to the existing spring pack, and ends up exerting and experiencing excess pressure. (This is particularly true when an add-a-leaf is used in an attempt to rejuvenate a tired spring pack.) We’ve broken two add-a-leafs (slow learners), and know of at least a half-dozen others.
A properly designed complete replacement spring pack works very well to accomplish the task, and in fact Tom Hanagan, the owner of Four Wheel Campers, took this approach with his own Tacoma. However, in both the previous trucks on which we mounted our first FWC, we left the stock springs in place and installed adjustable air bags to carry the extra load. This worked extremely well for us, with the notable exception of a faulty spring bracket on an Air Lift kit we used on the 2000 Tacoma, which walked free of its mount.
To my mind, advantages of the air bags are several. First and most obvious is the adjustability. The weight of the camper can vary by several hundred pounds depending on whether it’s empty or loaded for a month-long trip. With the air bags you can compensate perfectly. Also, the bags essentially comprise an entire backup spring in the event of trouble with the main pack. If you break a leaf on the stock spring somewhere far from home, you can simply remove the leaf and add more air to the bag on that side.
Although it’s a secondary consideration for me, an air bag kit is less expensive than a set of custom springs, and easier to install as well. Finally, if the air bag kit is equipped with a compressor and independent in-cab control for each side, you can use the bags to level the vehicle when camping—both front to rear and side to side.
Although we never had trouble with the actual bags of the Air Lift kit, I wanted something a little more heavy duty for this truck—and fortuitously got an email at exactly the right time from Reece Tasker of Canadian Suspension Importers. CSI handles the Boss system from Australia, and a brief look at the specs convinced me this was the kit to try. The Boss air bag, with a working range of around 15 to 150 psi, is tested to seven hundred fifty psi. That seems like reasonable safety margin to me.
Reece moved a couple of mountains to have a kit delivered to the FWC factory in time for me to install the kit before we left with the new camper. I was impressed with the bags, and just as impressed with the high-quality compressor and in-cab control kit/gauge combination. All the air line and every fitting I needed was included.

This configuration requires drilling two holes in the frame above each axle, which I was able to do with a sidewinder drill by jacking up the truck until the rear wheels were just loaded enough to keep the axle in place while I marked and bored the upper holes, then loosened the U-bolts to each spring and inserted the lower mounting bracket. (Reece plans a bolt-on kit requiring no drilling, but I didn’t find it a chore.) I didn’t have time to install the compressor and control kit, and simply connected both air lines to the manual-fill valves also in the kit.
The Firestone air bag kit I had been considering mounts in such a way as to preclude the fitting of larger-diameter rear shock absorbers. I was pleased to see that the Boss kit introduced no such restriction, so the Icon shocks we'll be adding should slot right into position.
With the camper in place, a quick jet of shop air into each bag raised the truck to a perfectly level stance. On the leisurely 900-mile drive home (two camps and, er, one hot shower each in the FWC’s cunning shower stall) I didn’t have to add air once. The only change I’ll make so far is to add a right-angle air line fitting at the bag—currently the line has to curve down almost below the axle to avoid crimping before traveling up through the frame.
I’ll report further after installing the control kit, and a trip into the Sierra Madre in Mexico to retrieve some trail cameras we have set up there to survey the mammal population (an assistance project of our charity, ConserVentures, for the southwestern conservation organization Sky Island Alliance).
 The Boss kit includes a stout compressor and a high-quality in-cab control gauge and switches.
The JATAC: A self-contained, solar-powered expedition vehicle
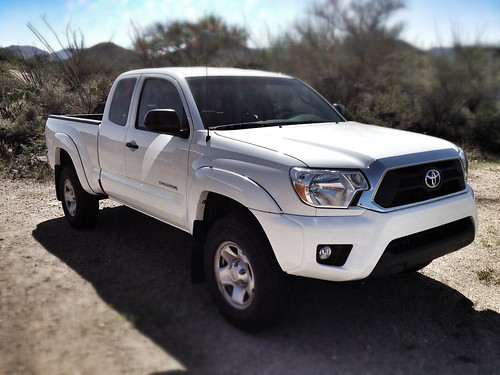 It's just a Tacoma—affordable, capable, reliable.There’s absolutely nothing exotic about our new Toyota Tacoma and Four Wheel Camper—that’s exactly why we chose the combination.
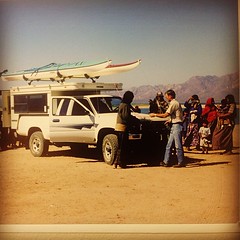 Our 1993 FWC Eagle and Toyota truck in Mexico.Our first Tacoma/FWC proved to be very nearly our ideal traveling arrangement, combining a capable, comfortable, and reliable truck with a compact home-away-from-home camper that deployed in 60 seconds, subtracted almost nothing from the off-pavement ability of the Tacoma, and provided everything we needed for long journeys away from civilization.
As I said to Roseann, the new combination is familiar, but feels like our old rig had won a spot on Xtreme Truck and Camper Makeover. The 2012 Tacoma is bigger and more powerful than the 2000 model, yet looks on track to deliver equivalent fuel economy, thanks to modern computer engineering. The camper is larger as well, and has been upgraded extensively since our 1993 version. Pressure water (totalling 26 gallons including the, heh, water heater), a cunning interior shower arrangement, a vastly more efficient compressor-driven fridge, and a front-mounted dinette that leaves the entire galley free for the cook are just a few benefits. It retains the gargantuo bed, sink, two-burner stove, and a tucked-away porta-potti for occasional use in crowded campsites or villages.
However, our needs and plans have evolved somewhat in the last decade, so we have several projects in mind or in process to suit our requirements:
- Since we work in electronic media now (laptop computers, cameras, video), we wanted an electrical system that would be essentially self-sufficient, able to handle the demands of the fridge and lights in the camper, power the laptops with 120-volt AC, and also do recharging duty for the cameras.
- Since we often travel as a solo vehicle, we wanted a truck that was not only capable in four-wheel-drive terrain, but completely self-sufficient in terms of recovery equipment and accessories.
- Lastly, we frequently combine camping with work, which can mean meetings in cities. We expect to be able to present ourselves properly—dressed well and not trailing an odor like, well, people who’ve been camping for a week.
 Just a Tacoma . . . and a camper. Newly installed Fleet at Four Wheel Campers.The solution to the first challenge will involve designing and installing a comprehensive solar-power system, a suitable battery bank and charge controller, and a reliable inverter to provide 120V AC when needed. It also entails ensuring the electrical systems in the camper (lights, etc.) are as efficient as possible.
Addressing the second issue will include adding traction control in the form of a rear locker, ensuring the suspension retains compliance while carrying the extra load properly, and adding a winch and recovery points, along with the tools and accessories needed to augment the winch and allow for such needs as tire repair.
The third issue has been resolved—the shower and hot water system are brilliant for such a small unit.
We will be debuting the JATAC at Overland Expo 2013, and in the meantime I'll be posting updates on the modest modifications we have planned, including suspension from BOSS and ICON, new tires, front and rear bumpers, and mounting points for Hi-Lift and other tools.
[Special thanks goes to project co-sponsors Findlay Toyota of Flagstaff and Four Wheel Campers; we will be naming other sponsors as they join our project.]
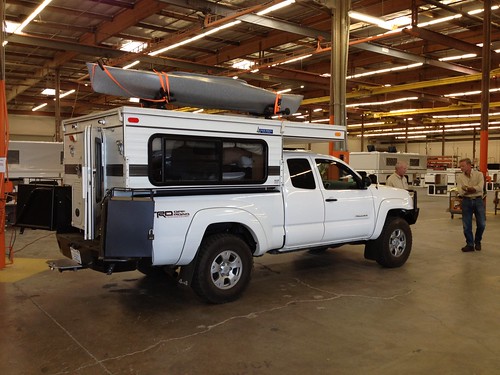 The inspiration for the new project: Tom Hanagan's 2012 Tacoma and earlier Fleet model. Ours has a newer configuration.
THAT coffee . . .
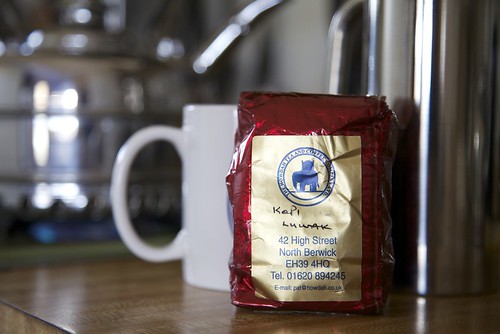
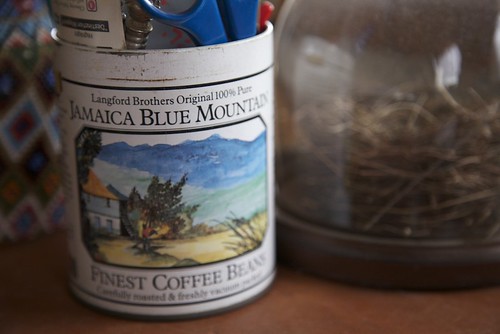
I can claim with unimpeachable documentation to have been a fan of good coffee since before Starbucks made it out of Seattle: On our first Christmas together in 1984, as penurious college students, Roseann’s gift to me was a tin of Langford Brothers Jamaica Blue Mountain beans. It was exquisite stuff, and the tin still serves as my pen holder.
Since then I’ve maintained a taste for a high-quality morning cup, while scorning what I see as the silly end of the coffee connoisseur world. I don’t need to know the name of the guy who picked the beans, and I don’t own a multi-story glass laboratory apparatus to brew them. I buy freshly roasted beans from fair-trade sources, grind them the day I use them if it’s possible and don’t worry about it if it’s not, and then employ a simple Melitta filter holder and a (gasp) paper filter to brew one cup at a time. It works as well while traveling as at home.
And one of the joys of travel is sampling coffee from different regions. Since we spend a lot of time in East Africa, where coffee originated, there are endless opportunities to explore. The local Kenyan coffee chain, Dorman’s, has been around 20 years longer than Starbucks and utterly demolishes them in terms of quality. A couple of years ago while exploring southwestern Tanzania we stumbled across the oldest operating coffee plantation in the country, had a cup of just about the freshest coffee it’s possible to obtain, and took home several kilos of Tanzanian Peaberry for friends. And Roseann, dammit, has experienced the full-on Ethiopian coffee ritual in Addis Ababa, about as close as one can get to where the mythical herd boy first noticed his goats gamboling after chewing the berries of a certain shrub, and decided to try them himself.
 However, I recently had by a significant margin my most exotic coffee experience, and its genesis was about as far from coffee-growing country as it’s possible to get: North Berwick, Scotland, just down the Firth of Forth from Edinburgh.
We were staying with our friend Duncan Barbour, ex-Camel-Trophy manager for the British teams and four-wheel-drive trainer extraordinaire. (His house is a gallery of framed photographs and articles from the Camel Trophy and other events, and letters from various celebrities, including one from Uma Thurman positively gushing about what a wonderful time she had when he taught her how to handle a stick shift. I’ll leave that one alone.)
As Duncan was still in Morocco when we arrived, we took the opportunity to explore the beautiful little seaside old town of Berwick—and there stumbled across a magical little store, the Howdah Tea and Coffee Co. Ltd. Inside was cramped, dimly lit, and redolent of the mix of teas and coffees stacked on shelves. It was easy to convince yourself that the inventory was still delivered by three-masted clippers anchoring in the bay outside after a downwind run around Cape Horn.
Roseann bought some aromatic tea blends, but as we were headed to Kenya and Dorman’s I resisted the redundancy of buying East African coffee. When Duncan returned home we mentioned the store, and he assured us he knew the owner, Pat, well and frequented the place. Then he looked at me with a twinkle in his eye and said, “That reminds me—I have a wee something for you.” He went into the kitchen and came back with a little 125-gram foil bag of ground coffee. I looked at the Howdah label, on which was hand-written: Kopi Luwak.
Okay. If you’re not familiar with it, Kopi Luwak coffee hit the news a few years ago as “the world’s most expensive coffee” (as though that in itself were somehow reason to buy it). More to the point was the source of the beans. An adorable little Indonesian mammal of the Viverridae family, called the Asian palm civet (Paradoxurus hermaphroditus), has an appetite for ripe coffee berries (specifically the pulpy red pericarp surrounding the bean). Once the civet has digested the fruit, the bean passes through its gut and is defecated undamaged.
 Paradoxurus hermaphroditus (courtesy Wikipedia) But not, apparently, unchanged. Proteolytic enzymes in the digestive system permeate the beans, reportedly increasing free amino acids and creating shorter peptides. What this means is that, if you locate and wash those defecated berries and roast them, the result is a coffee exceptionally free of bitterness—and, obviously, a coffee exceptionally, er, exclusive.
I remember reading about Kopi Luwak for the first time and thinking, Oh. My. God. This, I was instantly convinced, represented the absolute nadir of the lunacy that gripped those pathetic yuppie coffee snobs who had done their best to spoil what had been an enjoyable pastime: brewing and drinking decent coffee. The perverse one-upmanship represented by this “world’s most expensive coffee” put in the shade—so to speak—any previous obsessions like estate-specific beans or the latest $3,000 Miele brewing system.
And here I was holding a bag of it.
Duncan grinned as though he was reading my mind. Couldn’t he just have given me a bottle of Balvenie Double Cask and been done with it? Nope, not Dunc.
I tucked the little bag in my luggage, half-hoping a Kenyan customs official would stumble on it and tell me importing coffee was illegal. But it made it all the way through Kenya, back through England while we visited other friends, and back home.
All right—nothing for it but to try some. Refusing to treat the stuff differently than my usual choice of beans, I used my standard equipment to make a pretty strong cup (let’s see if that no-bitterness bit is real), poured it into a mug, and took a sip (while Roseann, who had snickeringly refused any, snickered).
If you’re expecting me to quip, “It tasted like sh*t,” you clearly underestimate my finesse with humor. It tasted . . . good. Excellent, in fact—medium-bodied, some nice complex caramelly undertones if you want me to get fancy. And there was definitely no trace of bitterness. Did angels sing? No. It was merely a damn good cup of coffee, right up there, I’d allow, with Kona or Ethiopian Harrar.
The real surprise came later, when I did some research into Kopi Luwak. It turns out the brew predates the coffee-snob movement by about two centuries—and has its origin in much more humble circumstances. It seems the Dutch built a thriving coffee-plantation empire in Java and Sumatra in the eighteenth century, and employed—to use the term generously—natives to tend the bushes and pick the ripe berries. Rather ungenerously, the Dutch decided that one way to maximize profits would be to prohibit the natives using any coffee for themselves. The caffeine-starved locals noticed the beans left in palm civet droppings, washed and roasted them, and were delighted to find the resulting brew better than what they’d been banned from drinking. The plantation owners inevitably heard about this phenomenon and got in on the back end (sorry). But the market for the unique coffee only got off the ground (sorry!) during the recent surge in the mania for high-end coffee products.
Now, controversy has arisen (doesn’t it always anytime anything proves profitable?), because some producers are raising captive civets to produce the beans, in countries where little government attention is paid to ensuring humane conditions. Hopefully this will result in a drive for “free-range civet coffee,” which would at least be one positive thing those snobs could do.
In the meantime, I’ve been ruminating over that profit angle. You see, we have grey foxes in abundance around our remote house in the Sonoran Desert. And grey foxes, which are omnivores and eat lots of seeds and such things, commonly return to the same place to defecate in obvious spots on top of rocks. Supposing I was to leave out a few piles of ripe coffee berries, then wait and . . .
Eh, maybe not.
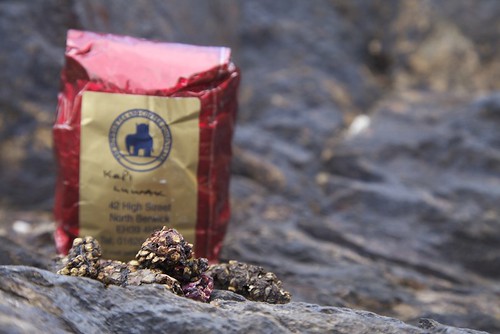 Civet coffee . . . why not Fox coffee?
Hint: When using “Search,” if nothing comes up, reload the page, this usually works. Also, our “Comment” button is on strike thanks to Squarespace, which is proving to be difficult to use! Please email me with comments!
Overland Tech & Travel brings you in-depth overland equipment tests, reviews, news, travel tips, & stories from the best overlanding experts on the planet. Follow or subscribe (below) to keep up to date.
Have a question for Jonathan? Send him an email [click here].
SUBSCRIBE
CLICK HERE to subscribe to Jonathan’s email list; we send once or twice a month, usually Sunday morning for your weekend reading pleasure.
Overland Tech and Travel is curated by Jonathan Hanson, co-founder and former co-owner of the Overland Expo. Jonathan segued from a misspent youth almost directly into a misspent adulthood, cleverly sidestepping any chance of a normal career track or a secure retirement by becoming a freelance writer, working for Outside, National Geographic Adventure, and nearly two dozen other publications. He co-founded Overland Journal in 2007 and was its executive editor until 2011, when he left and sold his shares in the company. His travels encompass explorations on land and sea on six continents, by foot, bicycle, sea kayak, motorcycle, and four-wheel-drive vehicle. He has published a dozen books, several with his wife, Roseann Hanson, gaining several obscure non-cash awards along the way, and is the co-author of the fourth edition of Tom Sheppard's overlanding bible, the Vehicle-dependent Expedition Guide.


