
Overland Tech and Travel
Advice from the world's
most experienced overlanders
tests, reviews, opinion, and more
The TrekPak divider system
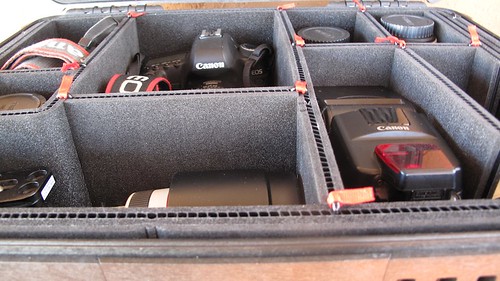
Few experienced travelers, photographers, or scientists would dispute that the ubiquitous Pelican case is the ultimate traveling container when the contents absolutely, positively have to stay protected from impacts, crushing, and dust and moisture incursion. I certainly wouldn’t argue (see here). I know someone who had to move several large Pelican cases full of equipment across an arctic inlet—by sea kayak. He simply rafted the cases behind the boat and towed them across. No problem. If you can deal with the relatively high weight of the empty Pelican, and the just-so-so volumetric efficiency, nothing will give you as much peace of mind when the equipment inside is worth quite literally 40 or 50 times what the case cost. It’s the cheapest kind of insurance.
But you can’t just toss your photography or video equipment inside a big plastic box, however sturdy. You need interior padding and organization. And that presents a bit of a dilemma.
The Pelican can be equipped with either of two options from the factory. The “Pick N Pluck” interior comprises an open-cell foam filler that is partially pre-cut into small square sections. You tear free the sections you want to create pockets to fit camera bodies, lenses, or other items. The result is snug and secure; however, once done you can’t re-organize to accommodate new or replacement equipment, and you must leave at least two cube-widths of the soft foam between items or the structural integrity collapses. That reduces available room significantly. Also, with constant use the open-cell foam degrades rather quickly. I’ve found the Pick N Pluck interior best when a case is devoted to one very expensive or fragile item, such as a monster 600mm F4 telephoto, where the tight fit and thick cushioning provide excellent impact resistance.
The other Pelican option is a set of padded, nylon-covered dividers, which rearrange and connect via hook-and-loop strips. This interior can adapt to new contents, but it’s quite limited in configuration and thus tends to waste space, and the hook-and-loop material is fiendishly efficient at collecting and holding on tightly to all sorts of debris, which eventually reduces its grip on itself.
Aftermarket options have been around for a long time, but every one I’ve used—such as the otherwise superb Lowepro Omni Pro in the link above—wastes a lot of volume due to redundant lids and straps, and dividers that are actually over-padded. How often I’ve wished for a thinly but densely padded divider system that wouldn’t rely on Velcro, had more structural integrity than open-cell foam, and could be re-organized easily to “suit the mission.”
Thanks to, of all things, Kickstarter, I may have gotten my wish. A new company called TrekPak has (rather spectacularly) defied recent odds on the crowd-sourced funding site and made it into full production with a modular divider system designed to match several sizes of Pelican cases, as well as a couple of high-quality daypacks from Deuter.
Georgia Hoyer, the president of TrekPak, sent me a kit for a Pelican 1550, one of the most versatile mid-sized cases in Pelican’s lineup.
At first glance the pile of foam slabs in the box doesn’t seem very impressive. It’s not until you start assembling the unit using its clever U-shaped steel clips (with bright red pull tabs) that it gains form and, it turns out, superb function. The secret to the TrekPak system is the corrugated plastic core sandwiched between the layers of closed-cell foam. That core adds structural rigidity as well as the means to configure the kit to suit your equipment. The TrekPak kit contains enough sections of varying length to accommodate most needs, but, unlike the hook-and-loop-style dividers, if you need a shorter bit to create a suitable compartment, you can easily trim one with a straight edge and razor.
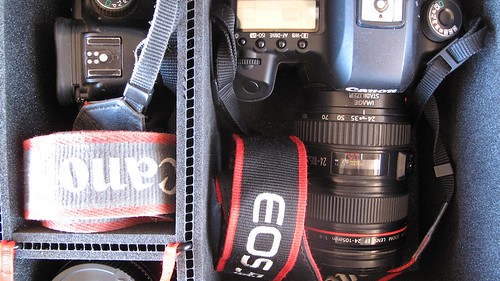
I laid out the camera gear I wanted to fit in the Pelican 1550, and began experimenting with the provided TrekPak sections. Eventually, after some trial and error, I fit the following into individually padded compartments: A Canon 5D MkII body with attached 24-105 F4L lens, a 5D body, further lenses comprising a 70-210 F4, a 15mm fisheye, a 100mm macro, a 300mm F4, and a 17-35mm F4, a 1.4 converter, and two EX550 flash units. Not bad at all, and there was room left over for batteries and CF card wallets. The dividers are easy to align and connect with the clips. It’s up to the user to attach or leave off the little red flags on each clip—they add a festive note and make it much easier to remove the clips, but aren’t necessary.
I could have used one extra full-length divider—the kit comes with two—and I had a few short sections left over. I’m hoping the company will eventually offer individual sections for sale to allow complete individual customization. Some customers might whinge at à la carte pricing for extra pieces, but many won’t need them, and the versatility would be worth the cost for those who do. My 70-210 lens, on its side, left enough room above it for another skinny lens; it would be nice if TrekPak offered thin foam without the plastic core for the user to fabricate bi-level compartments (not that I can’t easily find such material on my own; it’s just nice to have it all available from one source). With a little more configuring and a bit more material, I could have constructed a T-shaped compartment for the camera and attached lens, which would have been slightly more space-efficient than the square I wound up with. However, all in all I was extremely impressed with how much gear fit in the case, thanks to the just-right thickness of the TrekPak dividers. And the ease of reconfiguring to suit changing equipment is a bonus.
So how does the Pelican case/TrekPak combination work in the field? As a transport case it’s brilliant. You don’t need any more padding than this system provides as long as your equipment fits reasonably snugly inside. And, as we already know, one’s confidence in the waterproof/dustproof security of all that expensive gear is unmatched. (There aren’t many other camera cases I’m willing to stand on to gain a little height for a photo with all my gear inside.)
As a user case—that is, to be at hand for a shoot when you need to access lenses, cards, and batteries—the Pelican/TrekPak is far, far better than my old Pelican/Lowepro Omni Pro combination, since there is no internal lid to get in the way. However, it’s obviously a vehicle-dependent setup—you wouldn’t want to go on a walking safari with this thing (look at those Deuter day packs if you carry a lot of equipment on hikes). And you’ll need an entire seat to accommodate the 1550 if that’s the model you choose. I’m planning to try a kit for the (smaller) Pelican 1510 rolling carry-on case I want to use for managing photo equipment on international flights.
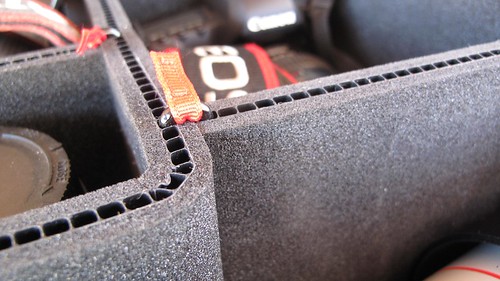
While I suspect the vast majority of TrekPak kits will be used for photography or video gear, the system would be equally versatile for many types of delicate equipment used by those working in the field: spotting scopes, satellite communication devices, radio-tracking receivers—you name it. I’m planning to devote an entire Pelican case to all the impedimenta one accumulates when using the Canon 5D MkII and III as a video camera: external microphone, follow-focus unit, suction mount for exterior vehicle shots, stabilizer for hand-held tracking, LCD viewfinder—a ridiculous amount of stuff.
Let’s see—1550 camera case, 1550 video equipment case, 1510 carry-on, all with TrekPak divider systems.
I guess I’m a convert.
TrekPak kits start at $65: TrekPak
iPhone LifeProof Case, part 1
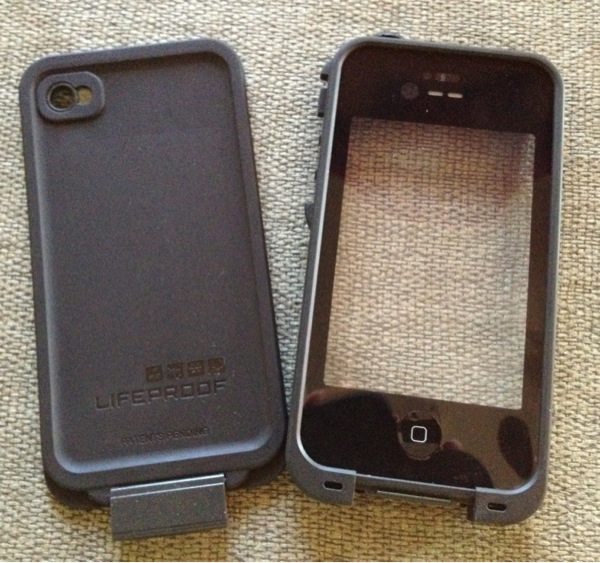
For more and more people, our phones are not just devices with which to phone home, they are also our primary GPS, pocket camera, video recorder, notepad, music player, book reader, dictionary, translation tool, and complete mobile office. In fact, I am writing this review on my iPhone 4S.
With so much at stake, especially while traveling, protection is key. Not only are these pricey electronic gadgets averse to water and fearful of heights (i.e. made from slabs of glass), they are for the most part uninsurable.
At the Outdoor Retailer show in August I selected a few of the newest crop of rugged iPhone cases to test during our trip to the UK and Kenya. Plenty of rain in one place and dust in the other; I figured on some perfect testing conditions.
First up is the LifeProof Case ($80, Lifeproof.com). I found it highly attractive because it is not only fully waterproof to 2 meters, totally dustproof, and shockproof to 2 meters (full MIL-STD-810F-516.5 = 2 meters/6.6ft drop on all surfaces and edges), it is so streamlined it hardly changes the profile of the phone. It adds 1.5mm to each side and weighs less than an ounce (28g).
But wait there's more: the covers for the camera lenses are double AR-coated optical glass and the speaker covers are gas-permeable waterproof membranes (I believe Gore-Tex but I haven't been able to verify that while on the road).
So here are the first impressions.
- Passed the "at-home" wateproof test as specified in the instructions (to seal, sans iPhone, and submerge in water, weighted, for at least an hour)
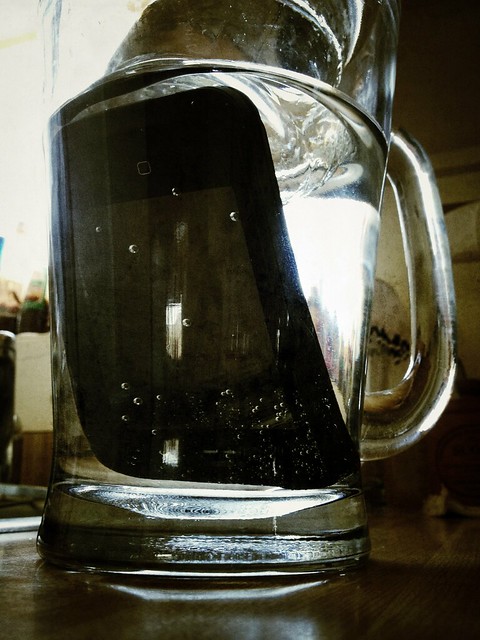
During (above) and after (below) the dunk test. No water in the case or at the gaskets.
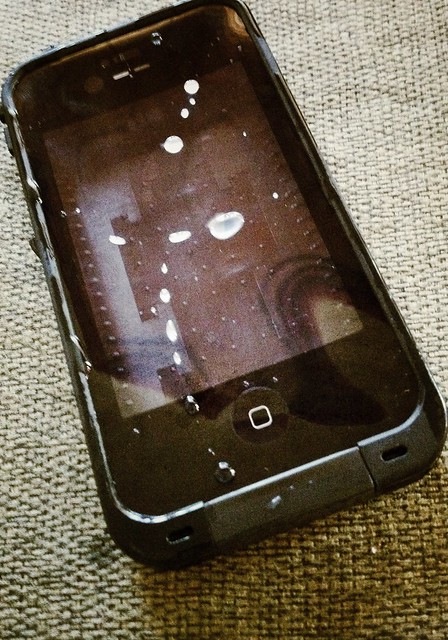
- The fittings snap together very tightly. Unlike the Otterbox case, they actually are very tough to put together and the company includes a long list of "must-do" actions to ensure the case is sealed properly. While fussy at first, you soon realize it's serious protection for an expensive gadget. However, after sealing in my iPhone 4S, the first thing I noticed was that the screen protector was warped and stood proud of the screen by about 1mm or more. This made it nearly impossible to use as anything but just a "hello" phone. Texting or manipulating photos (which I do a lot) was just silly—the fingers don't meet the screen and there is no contact, so nothing happens.
I searched forums and found this to be an intermitent problem, so after a call to the rep the company agreed to send a new one. This one fit very, very snugly and the screen protector very close (if not 100%) to the screen, so I found it easy to use, if not perfect. The Otterbox fits flat to the screen with no warping, but it's not 100% waterproof to 2m.
 Extensive instructions and warnings accompany the LifeProof case.
- The only charger you can use is the factory Apple charger / cord. My spiffy retractable cord won't work with it, nor will it work with my Griffin iTrip.
- To use headphones you must use the adaptor (so it seals) or use Bluetooth.
After 10 days on the road taking photos, posting on Flickr (see Flickr.com/photos/conserventures), Instagram, Facebook, Twitter, and here, I can say I really like this case. However, I admit to an unfair gripe. The replacement test model came in blue rather than the original (and my favorite) black. I hate blue. I just do. There's no logic. So when our friend Duncan in Scotland admired the blue case, and showed me his new black LifeProof case, I jumped at the chance to switch. Interestingly, the black case does not fit as well as that blue one, but it fits better than the first one I had. So lesson is: you might have to try multiple models to get the best fit.
So far the screen has not scratched. I have not dropped it, but I've used it in foggy spitting rain in Scotland, and it sat in a wet pocket for most of a half-day walk round a village. I noticed a little bit of fogging when we went from cold/wet to warm environments but it cleared quickly.
Next up: we're flying to Kenya, where we will fully test the LifeProof in the dusty, dry Rift Valley.
Irreducible imperfection: The flimsy
At the beginning of the North Africa Campaign in WWII, the British faced a logistics problem on a scale they’d never imagined. In this, the first totally mechanized war, the need for fuel staggered existing supply lines—and existing supply containers. For several decades the British military had made do with a squarish four-gallon soldered-tin can known officially as a POW can—for Petrol, Oil, and Water—to move the bulk of its petrol supplies. The four-gallon size was light enough to be handled by one man (unlike the common 55-gallon drum), and small enough to be transported by light truck or even motorcycle.
But as General Wavell in Cairo mustered his tanks, trucks, and airplanes to counter the forces of the Italians and Germans massing in Tripolitania and Cyrenaica (now Libya), the deficiencies of the POW can quickly became all too clear. Stacked in pallets on cargo ships, the weight of the top layers simply crushed those below, resulting in fuel losses of up to 40 percent, and making unloading the intact containers extremely hazardous with thousands of gallons of petrol sloshing around in the bilges and the fumes powerful enough to render seamen unconscious, not to mention the danger of fire or explosion.
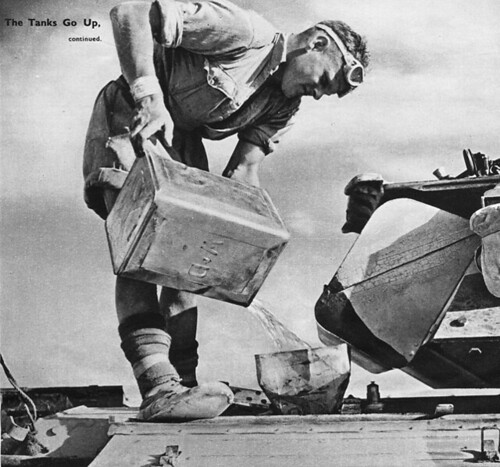 A British soldier refuels a Crusader tank from a flimsy. The funnel appears to have been made from another flimsy.
Even in smaller shipments the can proved absurdly fragile. Truck transport over 100 miles of desert track frequently left 20 to 30 percent of the contents cascading out the tailgate. In his book The Desert War, Alan Moorehead wrote, “The great bulk of the British Army was forced to stick to the old flimsy four gallon container, the majority were only used once. We could put a couple of petrol cans in the back of a truck, two hours of bumping over desert rocks usually produced a suspicious smell. Sure enough we would find both cans had leaked.”
That adjective, “flimsy,” quickly became a noun, and the POW can became universally known as the flimsy, reviled by troops and brass alike. To get an idea of the numbers used, consider that a single Wellington bomber flying a single nine-hour sortie needed 270 flimsies to fill its tanks. Piles of empty containers 30 feet high stood outside every airbase, and littered the Western Desert wherever British vehicles ranged.
Fortunately, an alternative presented itself when the retreating German Army began abandoning its own 20-liter containers. These were of embarrassingly brilliant design—perimeter-welded of stout steel for strength, with a three-handle configuration that allowed one man to carry two empty cans with one hand (or two full cans if he was strong), and which facilitated effortless hand-off of full cans down a line of men. The leak-proof cap was secured with a fast and foolproof lever, a breather allowed fast pouring, and a clever air trap at the top meant that a full can of petrol would float in water. The British scrounged all the “jerry cans” they could, and in England the design was unashamedly copied to the last detail—two million of them would be sent to North Africa before the end of the campaign. (The U.S. copied the design as well, but substituted cost-saving—and inferior—rolled seams and a screw top that was difficult to seal.)
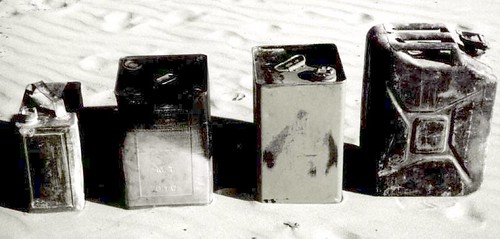 A British two-gallon container, early and later "improved" four-gallon flimsies, and the vastly superior German 20-liter fuel can. Note the thin and awkward handle of the flimsy.In the meantime, the flimsy proved happily more useful as a makeshift device than it did in its primary role. Filled with sand, it became an impromptu building block for gun emplacements and buildings. Cut in half and filled with petrol-soaked sand, it was used as a stove for boiling water (in another half-flimsy), and known as a Benghazi burner or Benghazi boiler (the latter term was subsequently applied to the Thermette, an early volcano kettle supplied to troops from New Zealand).
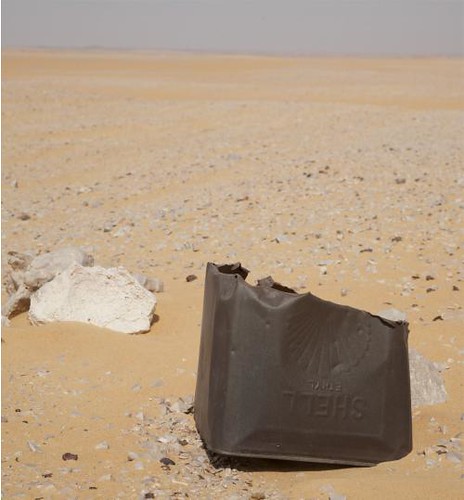
The Benghazi burner was also effective for illuminating rough landing strips at night—and that was quite possibly the role played by the crudely bisected Shell example we found in Egypt’s Western Desert this February (top photo). It speaks to the extreme aridity of this eastern edge of the Sahara that after 70 years even something as thin as a flimsy was still in recognizable shape.
Can't fit the Weber? Bring a SlatGrill
There’s rich irony in the fact that many of us cook on five-foot-wide, $1,500 stainless-steel propane grills in our back yards, where our only view over the wall is the top of the neighbor’s head as he cooks on his own six-foot-wide, $2,000 grill (with counterbalanced rotisserie)—but when we have a brai out in Mother Nature’s beautiful scenery it’s usually on a flat wire grid balanced on rocks, or a theft-proof Forest Service grill with slats spaced 1.5 hot-dog widths apart. Yet short of something like a Belson Porta-Grill:
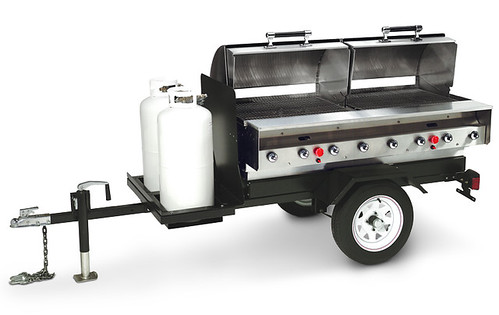
. . . it’s impractical to bring along a proper grill on a wilderness outing. Even a compact Weber charcoal grill takes up a lot of cubic storage space—and it only does one thing.
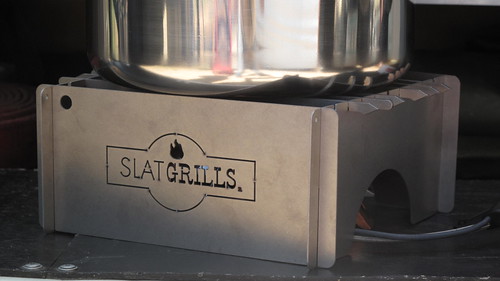
That’s why Chris Weyandt developed the SlatGrill, a collapsible barbecue that cooks with charcoal or can double as a sturdy pot or griddle support and windscreen for a compact stove.
The SlatGrill comes in sizes ranging from a one-pound titanium model nine inches square to a 75-pound carbon-steel monster with a two-foot by three-foot cooking area. Every one disassembles and stores flat to travel, taking up but a fraction of its assembled volume. Four laser-cut sheets—anodized aluminum, steel, or titanium depending on the model—assemble via corner slots into a square or rectangle. Individual slats then drop into slots in the top; you can space them widely if you want to set a large pot or griddle on top, or close together for grilling.
At the 2012 Overland Expo, Chris handed me one of the compact titanium SlatGrills to try. With the standard three slats, it weighed just under a pound not including the sturdy canvas case. With the addition of three optional slats (highly recommended for versatility) it weighs just ounces more. The assembled grill immediately struck me as a potentially ideal companion to an ultralight remote-canister stove. Such stoves put out heat to rival any full-size propane or white gas stove, but their weak point remains stability and security for large pots—and sometimes, ironically, for very small things such as a two-cup Moka pot, which can fall though the prong spacing. Also, the windscreens for such stoves are often sub-par. It appeared the SlatGrill could solve all these issues.

Indeed it did. I assembled the grill over a JetBoil Helios. The assembly supported with absolute security our largest, four-liter Snow Peak pot full of water, as well as a diminutive Moka pot. And while the clever snap-on windscreen of the Helios is actually pretty effective, it was easily eclipsed by the SlatGrill’s taller walls in an early morning breeze.
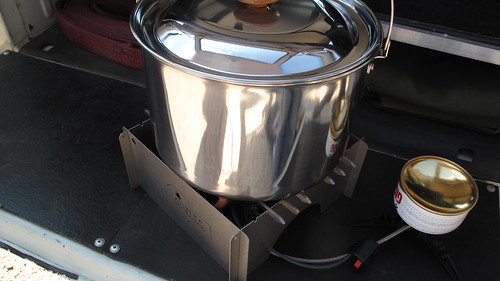
The combination of an ultralight stove and the ultralight SlatGrill creates a versatile cooking system, as at home on a motorcycle with a solo rider as it would be in a full-size four-wheeled vehicle with a small family. If you want two burners, the standard (aluminum) SlatGrill has a 12 by 18-inch surface that would accommodate two compact stoves.
Downsides? The compact titanium model is wincingly expensive at $189. However, a stainless-steel version is available for $69 (and two extra pounds). The mid-size aluminum model is $120; it weighs 3.5 pounds with case. All versions are made in the U.S.
My next step will be to see how the compact SlatGrill works over a little bed of mesquite coals. More soon . . .
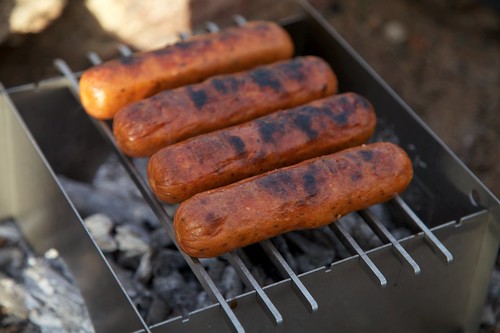
Update: Last night I built a compact mesquite fire and let it burn to coals, then dropped the SlatGrill over it and cooked some Andouille sausage. The sides of the grill seemed to concentrate the heat extremely well, and the vent openings on two sides fed the coals the right amount of oxygen to keep them going.
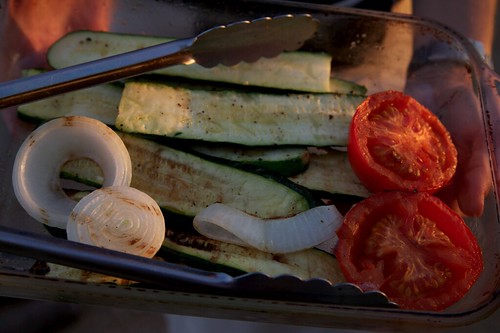
In fact, once the sausages were done there was still enough heat to grill some vegetables.
Two issues arose. First, the grill slats are flush with the top of the grill, so there is nothing to prevent a round hot dog rolling off if it's not level or you bump it with the tongs ( you could set hot dogs lengthwise on the slats but it would halve the number that would fit on the grill since they need to be separated by one slat). Also, the lightweight individual slats are easy to knock out of their notches, and can stick to certain foods. I think the latter problem could be solved if I (or the company . . .) drilled holes crosswise in the ends of the slats, then threaded a wire skewer through all of them, one on each side, creating more of a unified platform. The skewer could of course double as a . . . skewer. The rolling-off issue could be mitigated if the slots for the slats were deeper, so the sides made a bit of a lip.
I also decided the six-slat set is the absolute minimum for grilling, to keep the food securely on top, and three more to fill the entire space would have been even better. Of course those little titanium buggers add to the cost quickly; the stainless versions wouldn't hurt so much.
It would be interesting to try a motorcycle or bicycle journey in an area with abundant firewood, using only a SlatGrill for cooking and leaving all the impedimenta associated with a stove at home. Even as a companion to a stove, the compact SlatGrill adds versatility for large pots and the option of open-fire cooking. Well done, SlatGrill.
(Note to self: Avoid punning before coffee.)
Irreducible perfection: The Klean Kanteen insulated bottle
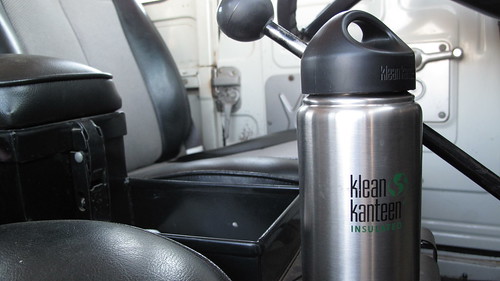
My first canteen was a canteen—a WWII surplus aluminum one-quart M1910 with a chained bakelite cap sealed with a cork gasket. I was seven years old, my family had just moved out to the edge of the desert, and I thought that canteen was the coolest thing on earth (well, except for the sheath knife my stepfather had given me in a bizarre fit of generosity). The canteen and several similar examples served well for countless desert hikes and early backpacking trips into the Catalina Mountains, until replaced with stylish and lighter Olicamp polyethylene bottles, which in their turn were replaced with Nalgene bottles—my resulting antipathy to which is well documented (see here).
In the early 2000s, my search for a better bottle led me to try one of the new stainless-steel Klean Kanteens, despite the fact that that I found the brand name wincingly Kute. The KK, as we’ll call it, seemed to be a vast improvement over the degradation-prone Nalgene. But the “Klean” part of the name was soon called into question when I found that the rolled lip of the bottle, while comfortable to drink from, had a miniscule gap underneath, which after prolonged use resulted in a funky odor that was difficult to exorcise—annoying in a $20 water container. That led to yet more searching, which resulted in an obsession with the even more expensive but indestructible Osprey NATO canteen (more about this in a future article).
However, for some time Roseann has been urging me to try one of Klean Kanteen’s double-walled, vacuum-insulated bottles. A different lip design eliminates the bacteria trap of the original, and the benefit of insulation seems obvious in a desert (although privately I thought the vacuum space pretty thin to be of much value). So, one recent morning when I needed to spend the day in town in the un-air-conditioned FJ40 with a trailer, collecting building materials, and the predicted high was 105º, I filled a 20-ounce insulated KK bottle with water from the fridge and headed in.
Six hours later I hadn’t touched the bottle. All my stops had been places with water fountains, so I’d stayed hydrated. Now, heading west toward home on Highway 86, I was thirsty. The bottle had been in the center console all day, and was now sitting in full sun. The exterior was uncomfortably hot to hold. Okay, now we’ll see, I thought. I opened the lid and took a sip.
The water was . . . cold. Not just nice and cool, but decidedly cold. It was awesome, and I drained most of it in one go.
Suddenly I found myself examining the bottle with new eyes (after I got home, that is). The “Responsibly made in China” label on the bottom made me roll my eyes; however, after reading up on the (still family-owned) company’s site, it does appear they take more care than most to ensure good working conditions in the factory (KK also belongs to the 1% For The Planet project).
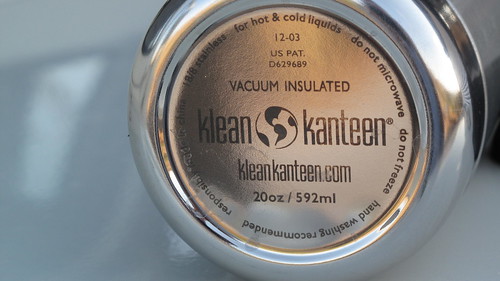
There’s certainly no issue with quality: The bottle is made from 18/8 stainless steel, thick enough that it takes most of my thumb strength to even slightly deflect it. The brushed finish is as even inside as out, and the cap, while obviously not vacuum insulated, does have an air space to help keep contents cold or hot. Sure, I’d be happy if it held more—the 20-ounce size is the largest of KK’s double-walled bottles—but if the bottle were fatter it would be difficult to hold with one hand, and if it were taller it would be unwieldy and unstable. Besides, 20 ounces of cold water feels way more refreshing than a liter of 105º water from my NATO canteen. Titanium option? Well, okay, but titanium, while saving a few ounces, would add hugely to cost, so that’s a tradeoff rather than a failing. I note that the company makes a bicycle cage for the double-walled bottle, which could easily be adapted to suit a motorcycle—nice to have all-day cold water available on a warm ride.
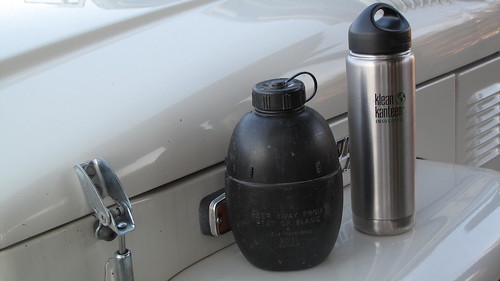 Not as cool as a NATO canteen - but much colder
Every once in a while I come across a product that defies my best attempts at criticism—when function, style, durability, price, and social responsibility (40 million water bottles go into the trash in the U.S. every day) come together to create what I refer to as irreducible perfection. I have to add the KK double-walled bottle to that short list.
As long as I don’t have to write out the name. Hey, if they made a Kup I could call it the . . . never mind.
A legendary camp chair, resurrected
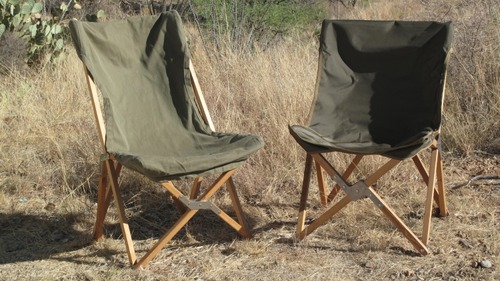 The legendary South African camp chair, left. Its offspring, right.About 20 years ago the owners of a well-known gun shop called Jensen’s, in Tucson, tried to branch out with a line of South African camping equipment: heavy canvas tents, folding sinks, cots, the works—in fact most of the stuff you can easily find today from importers such as Bundu Gear or Equipt. Sadly, Jensen’s was probably 15 years ahead of the curve. Cotton canvas was then considered hopelessly old-fashioned in the U.S., rather than being rightly regarded as a fabric that had stood the test of time and in fact retained several decided advantages over its more modern synthetic substitutes.
The store held a close-out sale, at which I noticed a folding wood-framed chair with a ripstop canvas cover. It reminded me of some old and very comfortable steel-framed butterfly chairs my mother had on her patio. I plopped down in one of the South African items, and . . . well, to claim that angels sang might be pushing it, but it was without doubt the most blissful experience I’d ever had in folding camp furniture. (Hmm—reading back over that makes me wonder if I should specify, “ . . . folding camp furniture designed for an upright posture.”). The chair was marked down to $9.95, and there were just four left. I bought all of them.
That lucky find begat something of a legend. Wherever Roseann and I camped, our chairs gathered acolytes faster than a television ministry in Mississippi. Frequently those who sat down “just to try it” could only be removed by threats of violence, including actual displays of edged weaponry. Multiple quests to find similar chairs proved futile, as did multiple quests to find substitutes anywhere near as comfortable. (In the course of searching I learned such chairs were generically called tripolinas and had been designed by an Englishman named Joseph Fenby in 1877.) The closest I came was a spring, 2009 review for Overland Journal, in which I included an outrageous version of the tripolina from safari outfitters Lewis Drake. The Lewis Drake Martin Chair was an exquisite concoction of rosewood, solid brass, and cotton canvas with buffalo-leather trim, and it retailed for $600—a figure that begat its own legend among both connoisseurs and disparagers of safari bling. It was certainly clear that the Lewis Drake chair failed as a remotely affordable alternative to our (admittedly close-out) $9.95 originals—and to be perfectly frank it wasn’t quite as comfortable, being slightly shorter in the seat and lacking their deep, seductive pocket shape.
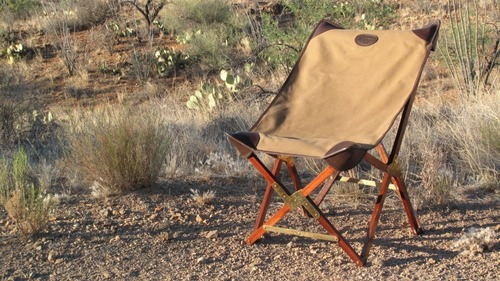 The infamous $600 camp chair. Undeniably a paragon of style.
In the meantime, Mike Spies, the U.S. distributor of AutoHome roof tents (AutoHome), had visited Roseann and me out in our Sonoran Desert camp-cum-home, and experienced first-hand the soaring notes of a heavenly choir while, from the comfort of a South African tripolina, he watched his English setter chase quail around our yard. On being told the tale, he asked, “Can I borrow one? I’d like to replicate it and put them back into production.” We entrusted one of our irreplaceable chairs to his keeping, and for a full two years received only occasional fractional cryptic updates along the lines of, “Sourcing Sitka spruce from piano industry,” “Searching for U.S. stainless steel fabricator,” and, “Looking into Forest Stewardship Council certification.” A couple of promising prototypes showed up at the 2011 Overland Expo, and this year, finally, I secured a “pre-production” but obviously fully developed example of Mike’s take on the South African tripolina.
It was worth the wait.
Mike clearly was not interested in producing a mere clone. That became obvious before I even saw the chair, when I pulled its 6 by 40-inch carrying case out of the UPS box. It’s sewn from fantastically heavy nylon ballistic cloth, has a handle made from 1.75-inch-wide webbing, and closes with a loop and eyelet system just like the bombproof arrangement of a military duffel bag—and the securing snap on Mike’s bag is solid brass, secured with a leash to the bag to prevent loss. The case is a huge step up from the cheap nylon drawstring sack our old chairs came in.
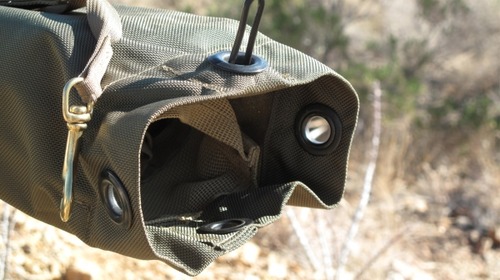 Hook the three grommets over the loop, secure with the brass snap. Bombproof. An internal pocket holds the rolled-up seat cover.
The chair itself lived up to the advance billing of its container. While the line of descent from our South African originals is unmistakable, upgrades are easily seen. The frame pieces—indeed made from Sitka spruce left over from piano manufacturing—are a bit thicker, .87 versus .82 inches, and are just as clear and straight. They appear to have a light oil finish. The folding hardware pieces are stainless steel, the same thickness as the originals (.064”) but much wider, secured similarly with fat rivets. The seat material is the same ballistic nylon as the case, sewn in two pieces to form a perfect pocket, in contrast to the single piece of ripstop cotton canvas used in the old chairs. The edges of both covers are fully bound.
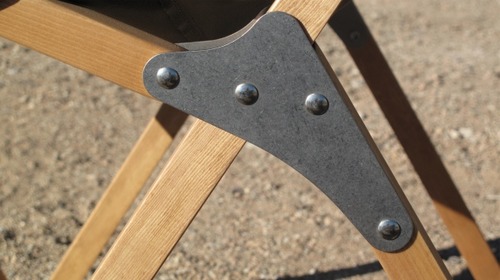 Hardware is stainless steel, broader than the original.
 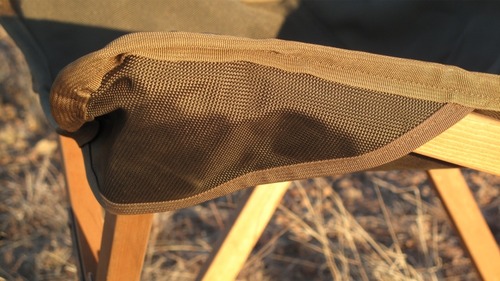 Ballistic nylon seat cover. Edges are fully bound for durability.
The more heavy-duty construction showed when I compared weights of just the frames (6.6 versus 5.6 pounds), the chairs with covers (7.4 versus 6.6), and the complete chairs in their cases (8.0 versus 6.8).
But what about actual comfort, the main point of the thing?
Roseann—who has remained faithful to those South African tripolinas for 20 years, no matter what potential rivals I brought home during gear tests—tried one of our veteran examples, then sat in the new one. She went back to the old one, then back to the new one. Finally she took a deep breath and said, “The new one’s better.” I did the same, and said, “Yep. Better.”
Note we said “better,” not “more comfortable.” The reason has to do with the frames. The structure of our South African chairs allows the front of the frame to spread out flat when you erect it. With the cover in place, you first sit down and then draw in the legs to form that deep pocket. Once that’s done, good luck convincing yourself there are camp chores that really need attention. For years I’ve intended to swage and attach a thin steel limiting cable that would tie the front legs together to eliminate the spread (which, to be fair, has undoubtedly worsened as the canvas fabric has stretched slightly over the years).
In Mike’s version, the frame and connecting pieces are constructed in such a way that the legs don’t spread flat, but lock to maintain the proper distance so that the cover automatically assumes the correct, blissful shape. So the two chairs are equally comfortable; the new one simply makes it easier to get there. The back of the new chair is slightly shorter, but neither offers head support for anyone but children, so that’s a wash. In other areas—seat height, back angle, etc.—the two seem interchangeable. Both are better for reclining than sitting upright, but both work just fine for eating or writing at a table as long as the top isn’t too high.
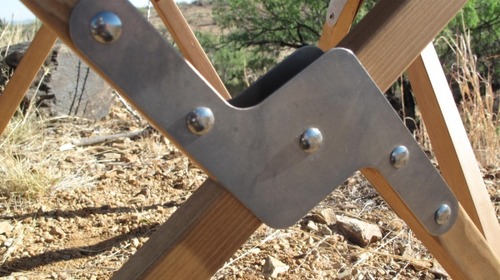 Front hinge plate holds legs in proper position for comfort.In fact I have only one significant gripe: The nylon seat material of the new chair is noticeably less breathable on a warm day than the canvas of the old. The nylon may well prove more durable (although given 20 years and counting on the canvas covers even that might be questionable), but I’d like to see Mike at least offer a cotton option for hot-weather use. He informed me of a couple of other tweaks that will be incorporated in the production chairs: a snap loop or two to prevent the cover being blown off an empty chair, and D-rings for a shoulder strap on the carrying case. Bravo to both.
Ah, yes—you’ve noted the future tense regarding production chairs. Mine is, as noted, a pre-production model. Mike already has suppliers contracted for the wood, carrying case, seat cover, and metal parts. He’s currently finalizing arrangements to have the wood pieces cut, shaped, drilled, and finished. Once that’s wrapped up he’ll be able to announce prices and availability.
I hope he hurries. There are a lot of people out there still annoyed at me for pulling knives on them.
10 Great Last-minute Christmas Suggestions
Whether your preferred mode is motorcycle, truck, bicycle, or foot, Overland Tech & Travel editor Jonathan Hanson offers up great last-minute gift suggestions for the overlanders on your list—or a treat for yourself.
 Fenix E11 LED microlight ($27)
I remember when I thought a halogen flashlight that produced 70 lumens from two expensive lithium batteries (for one hour) was hot stuff. The E11 puts out 105 lumens for almost two hours from a single AA battery—or a walking/reading-level 32 lumens for eight hours on low. Astonishing. Headed to the developing world? Take several—they make genuinely useful trade items or gifts. Fenix
Whether your preferred mode is motorcycle, truck, bicycle, or foot, Overland Tech & Travel editor Jonathan Hanson offers up great last-minute gift suggestions for the overlanders on your list—or a treat for yourself.
 Fenix E11 LED microlight ($27)
I remember when I thought a halogen flashlight that produced 70 lumens from two expensive lithium batteries (for one hour) was hot stuff. The E11 puts out 105 lumens for almost two hours from a single AA battery—or a walking/reading-level 32 lumens for eight hours on low. Astonishing. Headed to the developing world? Take several—they make genuinely useful trade items or gifts. Fenix
 Hasyun merino wool underwear (from $43)
I just tried out this very affordable base layer system in 5º Fahrenheit blizzard conditions on a strenuous elk hunt. Verdict: Scrumptious. Wait, I didn’t mean to write that. What I meant was, “Excellent.” Hasyun underwear—made in Turkey since 1952—uses Woolmark accredited extra-fine merino wool from New Zealand. It’s sensuously soft and warm for its weight, machine-washable, and won’t retain odors like that nasty polyester stuff. The small/medium size in both top and bottom fit my 150-pound, 5’9” frame perfectly. Available in both men’s and women’s, imported by a little company that also sells, um, kid’s bicycles. Go figure. Hasyun
 MSR Titan titanium pot ($60)
Pot, kettle, bowl, mug, scoop—MSR’s brilliant 4.2-ounce Titan pot does it all. It’s the only cook kit you need for a solo motorcycle tour, or a compact coffee-making system for your 4x4. An MSR Pocket Rocket stove and fuel canister ride neatly inside. I’d like to have one of these stashed in every vehicle we own. It should be the official MoMA ultralight cooking pot. Simply perfect.MSR Titan
 Vintage pocket compass ($60-$140)
You can employ a vintage pocket compass two ways. Produce it with a flourish from a vest pocket, leashed on a leather cord or—better—a silver chain, and flip open the lid to consult it as Selous might have on his way to the Rufiji River. Or, glance at it surreptitiously, then point to the horizon and say sagely, “That should be north.” Either way your companions will be impressed. I carry my WWII-era Wittnauer version everywhere—it’s especially handy for remaining oriented south of the Equator, where the sun always seems to be in the wrong place. This young woman (Kornelia Takacs, who also wrote the book Compass Chronicles), has a wonderful selection: Vintage compasses
 Helle Temagami ($170)
Everyone should own at least one really good sheath knife—and if it happens to be beautiful as well, all the better. The Temagami (say teh-mah-gah-mee) from Norway is both. A hand-filling, oiled curly birch handle surrounds a superb laminated steel blade—two resilient 18-8 stainless outer layers sandwiching a high-carbon cutting edge. Like all Helle knives, the Temagami comes razor sharp, in a leather sheath that works equally well for right- or left-handers. I’ve included two suppliers: Feathered Friends, who also make some of the best down sleeping bags in the world, and the delightful Ragweed Forge, which you should visit anyway. Feathered Friends Ragweed Forge
 Overland Expo 2012 Gift Certificate ($265)
Okay, it’s our own event, but after all, think of what you get: Three days of classes & programs (over 80 to choose from); driving instruction from Camel Trophy team members in your own vehicle or a new Land Rover; an all-new Camel Trophy Overland Skills Area where you might, say, learn how to build a bridge to get your 110 across a washed-out ravine; motorcycle instruction from RawHyde Adventures, the official BMW training partner; over 120 vendors & exhibitors of high-quality overlanding products & services; the Adventure Travel Film Festival; happy hours; and a barbecue to wrap it all up. We’ll do up a custom e-Card or printed card. Find out why people come again and again. Overland Expo
 Cerberus (from $499)
The era of one-way “I’m okay” or “Help!” global messaging is over. The Cerberus device twins with your smartphone to allow two-way text messaging from anywhere on earth. If a cell network is not available, Cerberus automatically switches to the Iridium satellite network. You can send up to 160-character messages, and receive up to 1600-character messages. In an emergency it allows detailed two-way communication with a 24/7 command center. You can also drop breadcrumbs, and receive customized regional weather and geo-political alerts. We’ll be testing a unit in the Egyptian desert early next year, so that last feature might come in handy. Cerberus
 ARB CKMTA12 air compressor ($540)
For years, owners of vehicles equipped with ARB’s legendary diff locks have been abusing the tiny little compressors usually supplied to activate them, by adding a connector for filling tires. Surprisingly, they seem to hold up to this quite well, but the process is glacial and the compressors can reach glow-in-the-dark temperatures. The company’s new twin-cylinder compressor will still activate lockers, but its tire-filling and air-tool-operating capacity is in a different universe. It’s fully up to the job of serving as a hard-mounted vehicle-wide air-supply system, with a stout 100-percent duty cycle. (But, really, couldn’t they have just called it the ARB Twin-cylinder Compressor?) ARB
 Goal Zero Sherpa 120 Adventure Kit ($670)
Never run out of power again for your laptop, tablet, or phone, with Goal Zero’s 120-watt-hour power pack (AKA lithium iron phosphate battery) and 27-watt folding solar panel—small enough to pack into your panniers. You can also charge the power pack from a wall outlet or cigarette lighter. What impresses me most about Goal Zero is the foolproof plug-and-play nature of their systems, any of which can be effortlessly augmented with additional panels and batteries (or a 120-volt AC inverter). Goal Zero

La Peregrina Natural Pearl Necklace ($3,000,000)
Just seeing if Jonathan is paying attention. (Elizabeth Taylor’s jewelry collection is up for auction at Christie’s; a nice little trinket, this, though not suitable for overlanding in all countries). Christie’s
Why I hate Nalgene bottles
 Few outdoor product manufacturers have attained the market dominance enjoyed by the Nalge Company, once an obscure maker of laboratory storage containers, after company president Marsh Hyman discovered his son’s Boy Scout troop was using their one-liter bottles as canteens early in the 1970s. The subsequent rebranding of Nalgene Outdoor Products was successful beyond the wildest dreams of marketing people who had previously relied on guys wearing lab coats and pocket protectors as customers. So successful, in fact, that I seriously doubt anyone reading this has not at some point had a drink of water from a Nalgene.
I drank the water, and the Kool-Aid, early on. The original one-liter white HDPE bottles with the wide cap were light, tough, and fit perfectly in the side pockets of my Camp Trails frame pack. They were easy to fill from a stream or bucket, and didn’t leak. You could chill the contents with ice cubes, or freeze the whole bottle with impunity. The Austrian Olicamp bottles I’d been using were leakproof and tough, too, but had a tiny opening and a fiddly two-piece top, so—despite years of yeoman service, including a backpacking trip spanning southern Arizona and three mountain ranges—I shelved them and shamelessly embraced their replacements.
 When Nalgenes go bad . . .Few outdoor product manufacturers have attained the market dominance enjoyed by the Nalge Company, once an obscure maker of laboratory storage containers, after company president Marsh Hyman discovered his son’s Boy Scout troop was using their one-liter bottles as canteens early in the 1970s. The subsequent rebranding of Nalgene Outdoor Products was successful beyond the wildest dreams of marketing people who had previously relied on guys wearing lab coats and pocket protectors as customers. So successful, in fact, that I seriously doubt anyone reading this has not at some point had a drink of water from a Nalgene.
I drank the water, and the Kool-Aid, early on. The original one-liter white HDPE bottles with the wide cap were light, tough, and fit perfectly in the side pockets of my Camp Trails frame pack. They were easy to fill from a stream or bucket, and didn’t leak. You could chill the contents with ice cubes, or freeze the whole bottle with impunity. The Austrian Olicamp bottles I’d been using were leakproof and tough, too, but had a tiny opening and a fiddly two-piece top, so—despite years of yeoman service, including a backpacking trip spanning southern Arizona and three mountain ranges—I shelved them and shamelessly embraced their replacements.
Smaller Nalgene bottles that soon followed were ideal for toiletries, spices, and first-aid supplies. In fact, so enamored was I of Nalgene products that I spent an absurd sum special-ordering some of the first Nalgene 20-liter jerry cans then available in the U.S. I strapped two of them into my FJ40 and thought it was a pretty stylish setup.
The facade began to crack—literally—a few years later. Previously I’d noticed that the odd small bottle I used for toiletries or other incidentals had degraded. The translucent plastic would turn dull and opaque, then tiny stress cracks would appear. Forceful pressure with a finger would punch right through the material. At first I blamed this on the stuff I was putting in them (although an internal voice chided me that the containers were originally intended for lab use, and thus presumably should stand up to contents a lot more caustic than Suave Green Apple shampoo). But then one morning on a remote beach in Mexico I reached into the back of the Land Cruiser to pull out one of those stylish jerry cans, and the side split open right under the handle, spewing half my water supply into the sand.
Still I doubted my own doubts. UV exposure certainly could have been at fault in the jerry cans’ demise (inspection had shown the second one to be compromised as well)—although I’d had previous plastic water containers last longer. Regardless, my confidence was now shaken. I switched to Nalgene’s harder Lexan water bottles, but wondered why I should have to. The more oxidized white bottles I found in my pile of assorted Nalgenes, the more annoyed I became. (I have no idea if “oxidation” is the correct term for the problem, but that’s what I called it.) Once I narrowly avoided disaster when a camera bouncing around in my center console punched a small hole in an old six-ounce Nalgene bottle of window cleaner I kept there. Fortunately the hole was above the level of the liquid and I discovered it before it tipped over onto the camera.
Whatever the mechanism might be—UV degradation, shampoo corrosion, planned obsolescence (just kidding, Nalgene)—I’ve concluded that white HDPE Nalgene bottles seem to have a finite, potentially annoying or even hazardous, life expectancy. I can’t be sure what it is—given the hodgepodge of examples I’ve purchased over the years, there’s no way to determine the age of a compromised bottle. The apparent capriciousness of it is odd too—one two-liter square bottle I know I’ve had for ten years is still in fine, pliable shape. But the situation has reached the point where I look at every Nalgene not purchased the week before with suspicion—and that’s no way to have to view one’s outdoor equipment. I still use the small bottles for toiletries, having as yet found no leakproof substitute made in as wide a variety of sizes, but, like any disillusioned disciple, my former accolades have turned to acrimony, and I now spurn every Nalgene product for which I can find a reasonable substitute. Steel Wedco or plastic Scepter jerry cans hold bulk water; and an indestructible NATO canteen carries drinking water on hikes.
 30-year-old Olicamp bottles - still good . . .Then again, I just might go back to those Austrian-made Olicamp bottles. You see, out of curiosity, while writing this I dug them out of the recesses of my gear storage—they were right there next to the SVEA stove and Sigg Tourist cook kit. Thirty years after I carried them across southern Arizona, they’re still perfectly usable.
Anyone at Nalgene listening?
Hint: When using “Search,” if nothing comes up, reload the page, this usually works. Also, our “Comment” button is on strike thanks to Squarespace, which is proving to be difficult to use! Please email me with comments!
Overland Tech & Travel brings you in-depth overland equipment tests, reviews, news, travel tips, & stories from the best overlanding experts on the planet. Follow or subscribe (below) to keep up to date.
Have a question for Jonathan? Send him an email [click here].
SUBSCRIBE
CLICK HERE to subscribe to Jonathan’s email list; we send once or twice a month, usually Sunday morning for your weekend reading pleasure.
Overland Tech and Travel is curated by Jonathan Hanson, co-founder and former co-owner of the Overland Expo. Jonathan segued from a misspent youth almost directly into a misspent adulthood, cleverly sidestepping any chance of a normal career track or a secure retirement by becoming a freelance writer, working for Outside, National Geographic Adventure, and nearly two dozen other publications. He co-founded Overland Journal in 2007 and was its executive editor until 2011, when he left and sold his shares in the company. His travels encompass explorations on land and sea on six continents, by foot, bicycle, sea kayak, motorcycle, and four-wheel-drive vehicle. He has published a dozen books, several with his wife, Roseann Hanson, gaining several obscure non-cash awards along the way, and is the co-author of the fourth edition of Tom Sheppard's overlanding bible, the Vehicle-dependent Expedition Guide.


