Overland Tech and Travel
Advice from the world's
most experienced overlanders
tests, reviews, opinion, and more
Accu-Gage customer service
For many years my go-to tire gauge has been the Accu-Gage from G.H. Meiser & Co. (even though, yes, the “Gage” bit makes the editor in me wince). They come in different ranges and configurations, and I’ve always found them to be absolutely consistent and reliable. I must have at least five or six; I’m not even sure.
A few months back I managed to crack the plastic face of the one on the left here. It sat in my desk for weeks before I finally emailed the company to ask if I could either purchase a new face, or send it in for repair. I wasn’t expecting much given such things these days, but I got back an immediate reply saying simply, “What’s your address?”
A week lated a new face showed up. No charge. Nice.
G.H. Meiser is here. Needless to say, highly recommended.
Hack your tire plug kit for more versatility
There are two tire plug kits I recommend above all others I’ve tried: The Extreme Outback Ultimate Puncture Repair Kit, and ARB’s Speedy Seal kit.
Each has its advantages. The ARB kit comes in a snap-in, well-organized blow-molded case, so everything you need is easy to access and nothing you don’t need is in the way. The reamer and plug insertion tool are stoutly made with solid aluminum handles—critical for working on tough all-terrain tires. (Never, ever buy plastic-handled plug tools.) Included are pliers for pulling out whatever has holed your tire, a razor for trimming the inserted plug, lube to ease insertion (no wise cracks please!), a tire gauge, and a kit containing spare valves and valve cores, valve caps, and a valve tool. Finally, 40 plugs are included, which should suffice for a very long time—except see below.
The Extreme Outback Ultimate Puncture Repair Kit is the one you want if you are heading out to drive around the world, or you are a professional leading self-drive tours, or if you just want to guarantee that you can repair any tire issue short of a carcass-shredding blowout. In addition to everything in the ARB kit (except the pliers), the EO kit includes an exhaustive selection of patches and rubber cement to repair seriously large punctures or even sidewall tears from the inside out, once you have broken the bead and removed one side of the tire from the rim. There are even thread and needles to sew up sidewall tears before patching them, and such thoughtful additions as a piece of chalk to mark where your tire and rim meet, so when you remount the tire your balance will not be lost, and packets of hand wipes. The one downside not shared by the ARB kit is that all this stuff is crammed into a heavy-duty zippered nylon case. It’s amazingly compact, but you need to pull just about everything out to accomplish even the simplest plug job.
Also included are plenty of plugs—but, as with the ARB, there is a problem.
I’ve always maintained that the plugs in the ARB kit, which are about 8mm in diameter, are far too large for the average nail or screw hole. They are extremely difficult to insert in such a hole in any tire with a tough carcass, especially a stout E-rated AT, even after a vigorous reaming.
Up until recently, the Extreme Outback kit included two sizes of plugs, about 6mm and 4mm. The 4mm plugs were perfect for most small holes—in fact, when teaching tire repair and actually drilling 3/16th-inch holes in tires for students to practice on, the thin plugs were all I used. Only when demonstrating more challenging situations did I need the larger sizes.
Now, however, the EO kit only comes with 6mm plugs, which, while easier to insert than the ARB’s, are still problematic for many repairs. Case in point: At the last Expo I was having students plug tires after I drilled holes in them. The first volunteer was a woman, and she simply could not get a plug from the EO kit inserted, even with plenty of lube and while putting virtually all her body weight on it. Finally Mark Kellgren, who was teaching with me, took over—and had nearly as hard a time getting the thing in there. Finally I realized I had unwittingly run out of the 4mm plugs and had substituted one of the thicker ones, which was clearly too large for such a hole.
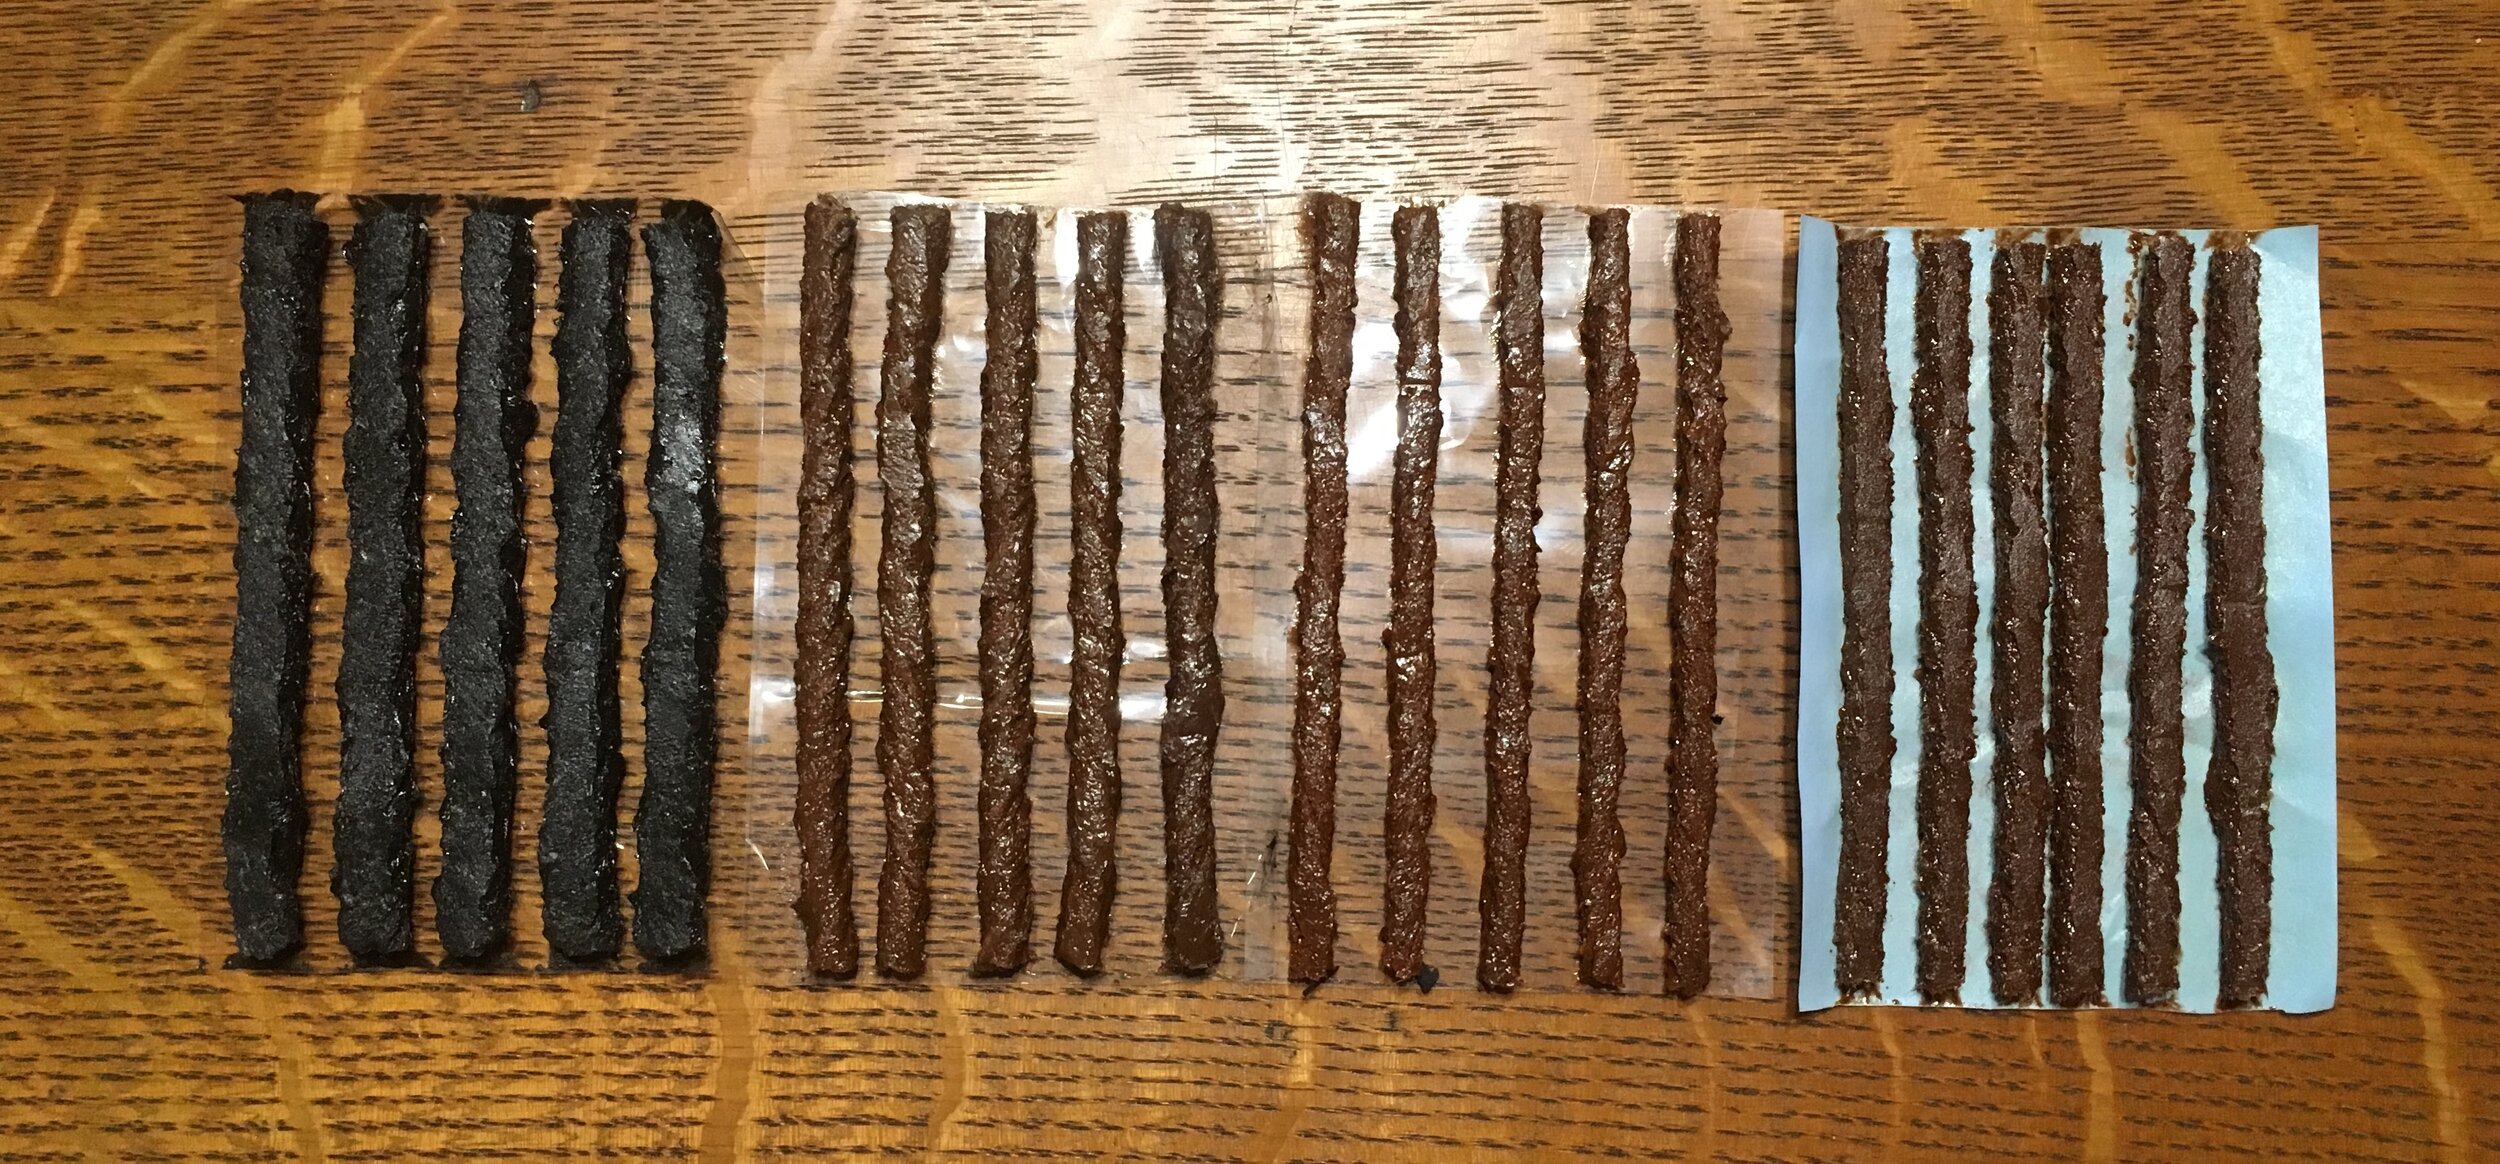
Left to right: ARB, Extreme Outback thick and thin, and Safety Seal Slim tire plugs. (The Safety Seal plugs are slightly flattened and look thicker than they are.)
I called George Carousos, who owns Extreme Outback, and he told me the kits were no longer available with the thinner plugs. So I decided it was time to hack all our ARB and EO kits. I looked up Safety Seal, a company that has been making tire repair products for half a century, and ordered a box of their slim plugs. At a listed 3.2mm these should be smaller than the old thin EO plugs, but if anything they look a tiny bit thicker. Nevertheless they should suffice for those smaller holes. So I’ve replaced half the thicker plugs in all our kits with thinner versions, which should make each kit far more versatile.
Four-by-four Driving Edition Five is sold out
Tom Sheppard of Desert Winds Publishing and Jonathan Hanson are working on updating Edition 6. Publication estimate is early spring 2020. When the shipment of new editions arrives in North America, we’ll inform our readers by email. Please let us know if you would like to be added to this list to receive this notification.
ARB's revised Series II fridge
The 37-quart size is big enough for a couple and a week’s worth of food, and fits in smaller vehicles.
As so often happens with any consumer product, 12V fridges—the item many overland travelers put on their shopping list before any other accessory—have blossomed in sophistication, features, size, and of course price. It’s now easy to spend close to $2,000 on a dual-compartment, dual-lid, dual-control, 110-liter fridge/freezer.
But what if you just want a reliable, moderately sized fridge from a trusted brand, with easy-to-use controls, a digital temperature readout, and perhaps remote monitoring capability, but none of the polished stainless-steel bling?
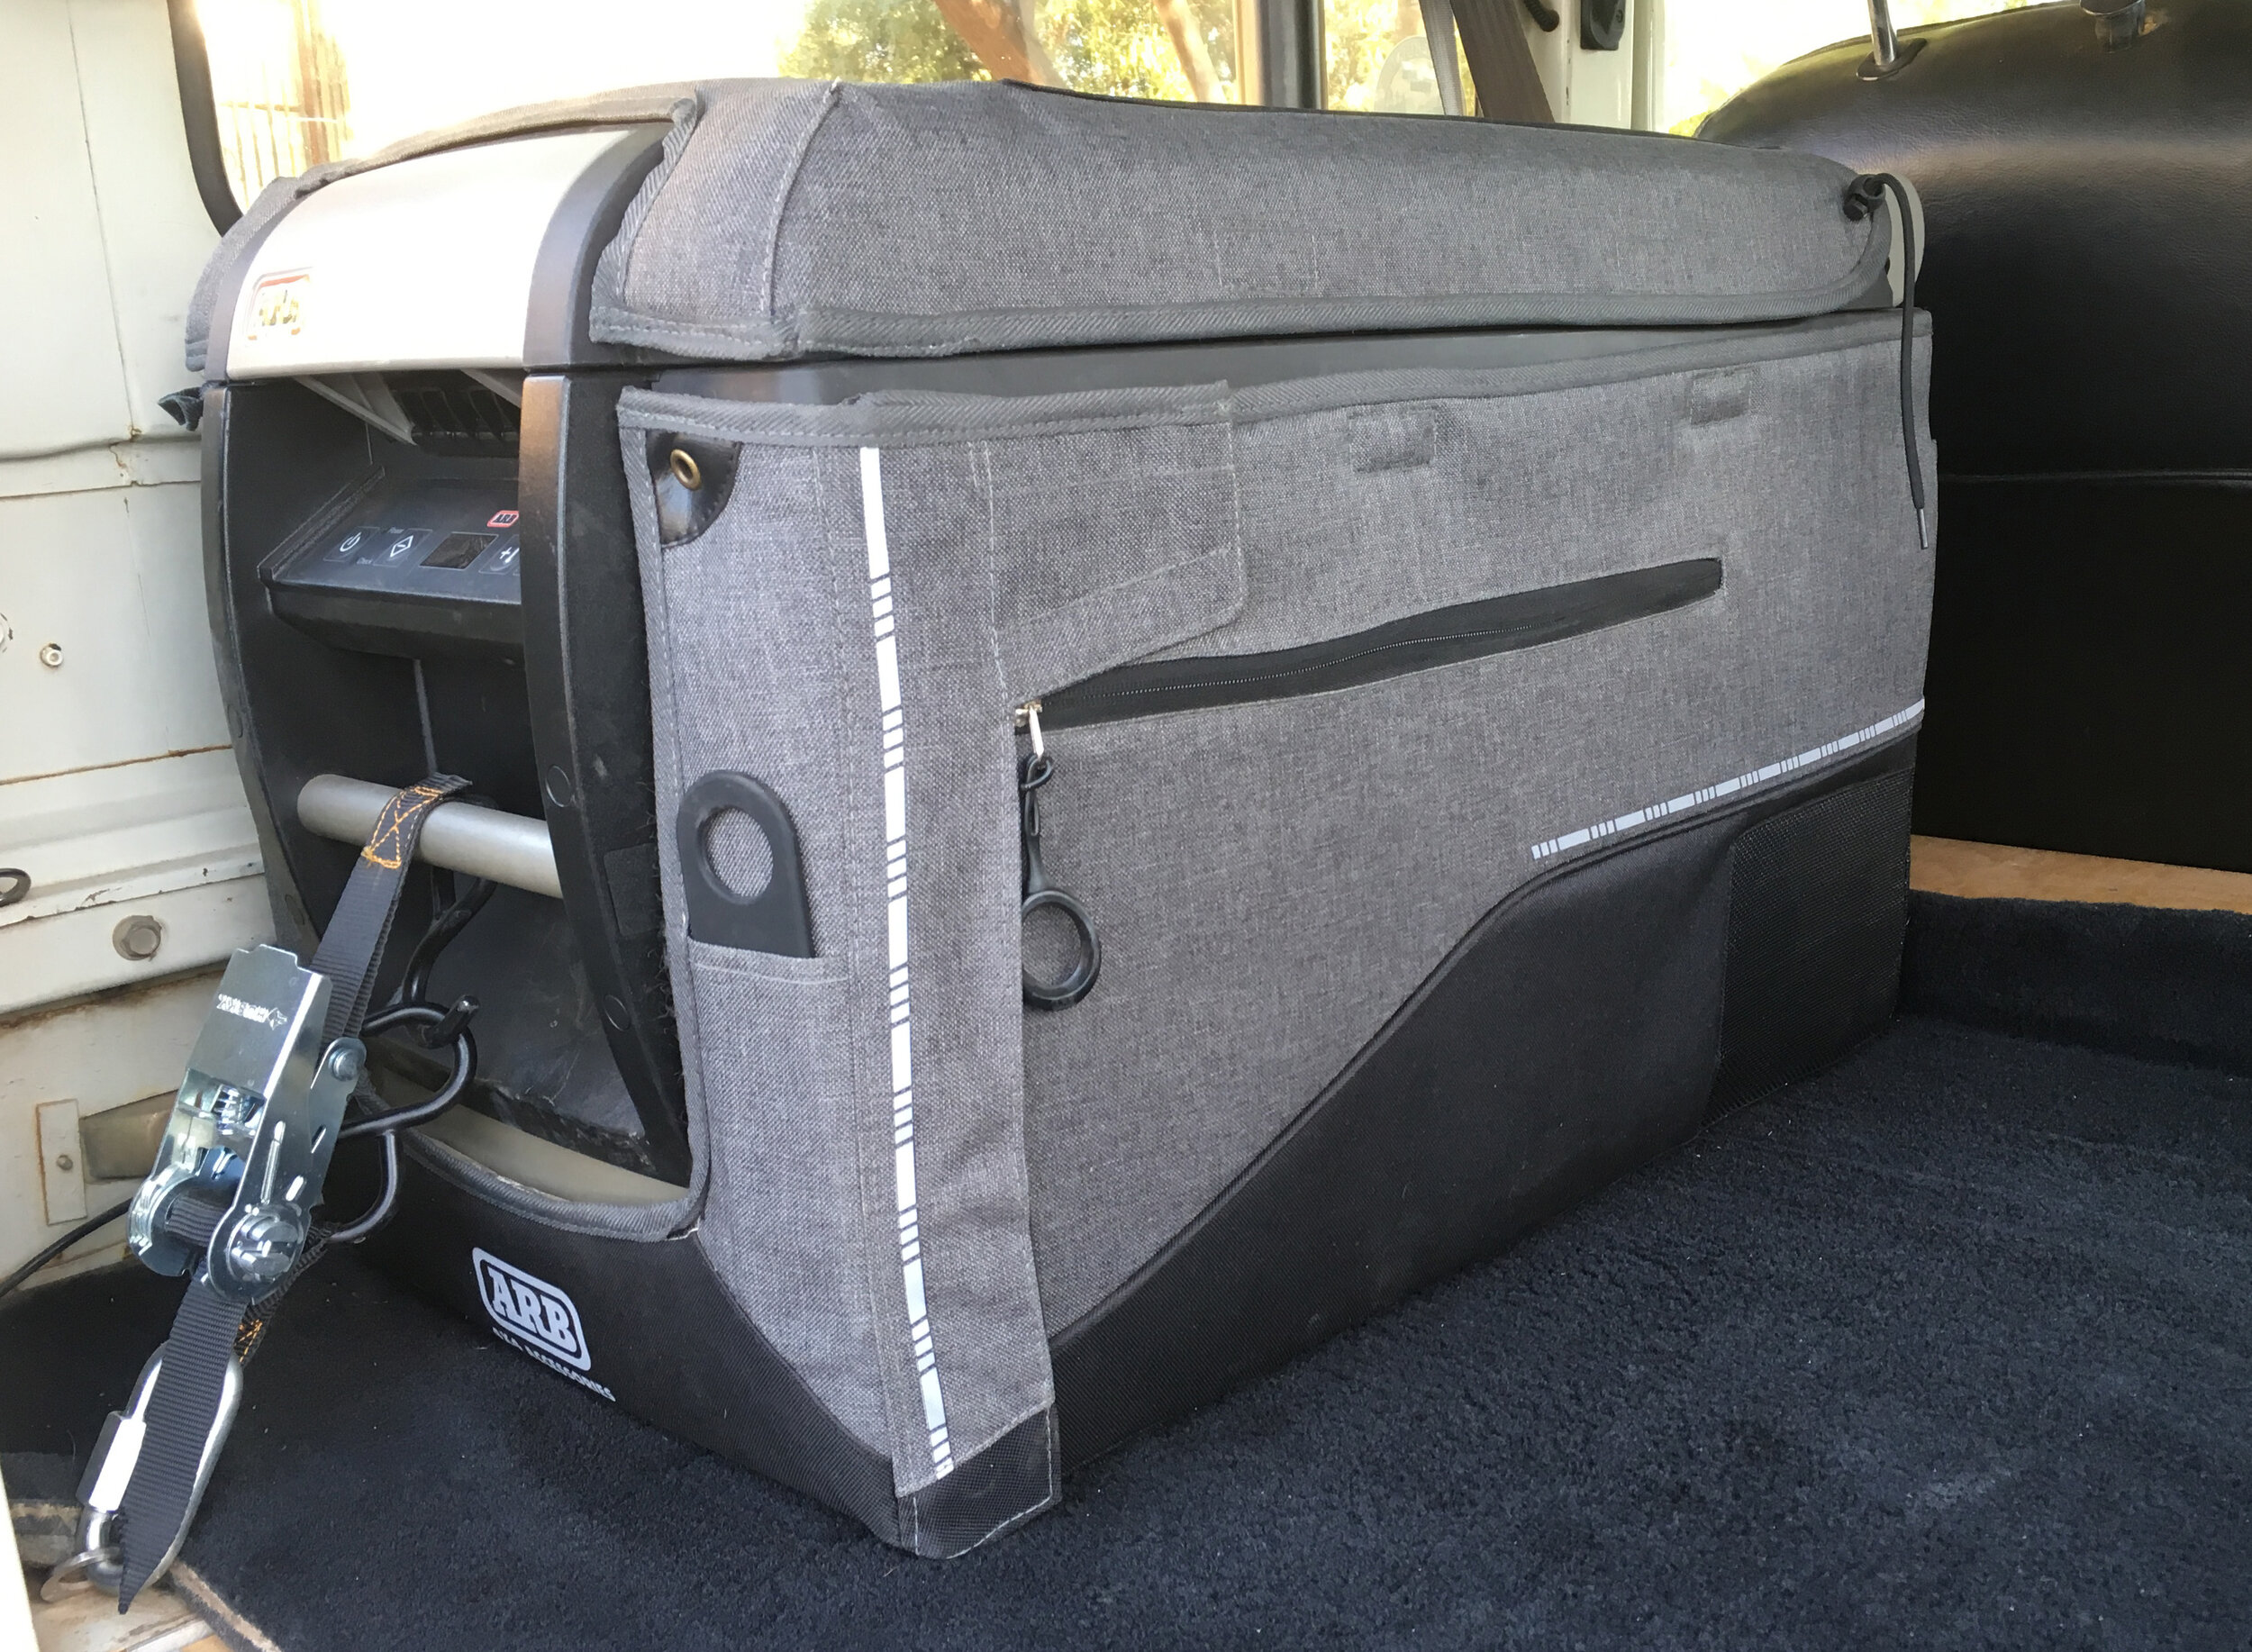
ARB, after introducing their own top-end unit, the superb, weatherproof Elements (see here), has slightly revised their tried-and-true basic fridge, now called the Classic Series II. I have one of the first ARB fridges made (after they stopped rebranding Engel fridges), and it has worked perfectly for ten years. So I expect the new one to be just as reliable and durable.
As with my original, I specified the smallest, 37-quart size for the new one. Why? First, because it fits in my FJ40 and many other compact 4x4 vehicles. And second, because the beauty of a fridge in contrast to an ice chest is that you don’t have to load everything you want chilled at the begining of the trip. You can keep just a day’s worth of drinks in the fridge and reload every evening or even in the morning; the fridge will easily cool them by lunch. If you use UHT milk cartons, as we do, you can do the same with that. Thus there’s plenty of room for a good week’s worth of food.
In tweaking the Series I into the II, ARB wisely retained the reliable Secop (formerly Danfoss) compressor. The dimensions and shapes of all the different capacities are the same, as are the faired-in handles that double as stout and versatile tie-down bars. The cabinet is still durable, powder-coated steel. So what’s new? The control panel buttons are now backlit, making them easier to read, and a 12V input display has been added to help monitor battery condition. There is a new, gunmetal gray color scheme, and while this might not sound like a big deal, I think it makes the fridge look hundreds of dollars more expensive than the previous blue scheme. The optional and desirable insulated transit cover carries the same handsome tones. Very stylish.
The big news, however, is the Bluetooth transmitter that allows remote monitoring and control via a free app. While personally this has limited appeal (I can count the apps I have on my iPhone on one hand), if you’re a fan the app will do everything for you short of loading the fridge—including sending you a notice if your friend leaves the lid open after stealing a beer.
In use there’s not much different to report compared to my old ARB fridge—and that’s a good thing. I like the reversible basket, which can either separate the top “crisper” shelf from the rest of the cavity, or provide a really long area on top for . . . a leg of lamb, maybe?. The center divider also helps keep cartons and bottles upright. An LED lamp illuminates the contents well.
Crisper shelf at upper right is good for vegetables or other things you don’t want as cold as the rest of the contents.
To be picky, I would have wished for a hold-open strut of some sort. I’d complain that the latch feels just as brittle as the one on mine always has, but then mine has never broken, so I’ll refrain.
The ARB Classic Series II is $950, and I think its quality and reliability justifies the price. The fridge carries a generous three-year warranty. ARB USA is here.
MyQuest Adventures
My good friend Jim West was a member of the 1992 U.S. Camel Trophy team, for which he and his team mate, Dan Amon, won the Team Spirit Award—if anything more coveted than the Camel Trophy itself. Knowing Jim for the last decade I could have predicted it would be a foregone conclusion for him to snag that honor.
Jim went on to do much work with Land Rover, and to be a member of the Overland Expo training team for many years. Now a retired firefighter, he has started to do private training and consulting, and is writing a blog that will surely be a font of solid information—that is, if Jim can stand to sit in front of a computer for that long. Normally he’s red-shifting in various directions to burn off what appears to be a small internal nuclear reactor’s worth of fuel.
Please take a look and bookmark the site, here.
The (more) versatile ARB jack base
Nearly everyone I know who owns a Hi-Lift jack also owns one of the ubiquitous red plastic base plates, which hugely enhance flotation in soft sand or mud. Recently ARB introduced their own base plate, which is of course designed to accept the rounded base of the ARB hydraulic jack. However, ARB cleverly molded the recess so it will also accept a Hi-Lift, and furthermore I found it fits many bottle jacks as well, which the red Hi-Lift base plate will not. So if you have a Hi-Lift but haven’t yet bought a base for it, consider the more versatile ARB version. Bonus: If you ever decide to spring for that pricey but superb ARB Jack, you’ll be ahead of the game.
A first hands-on-the-wheel look at the new Defender
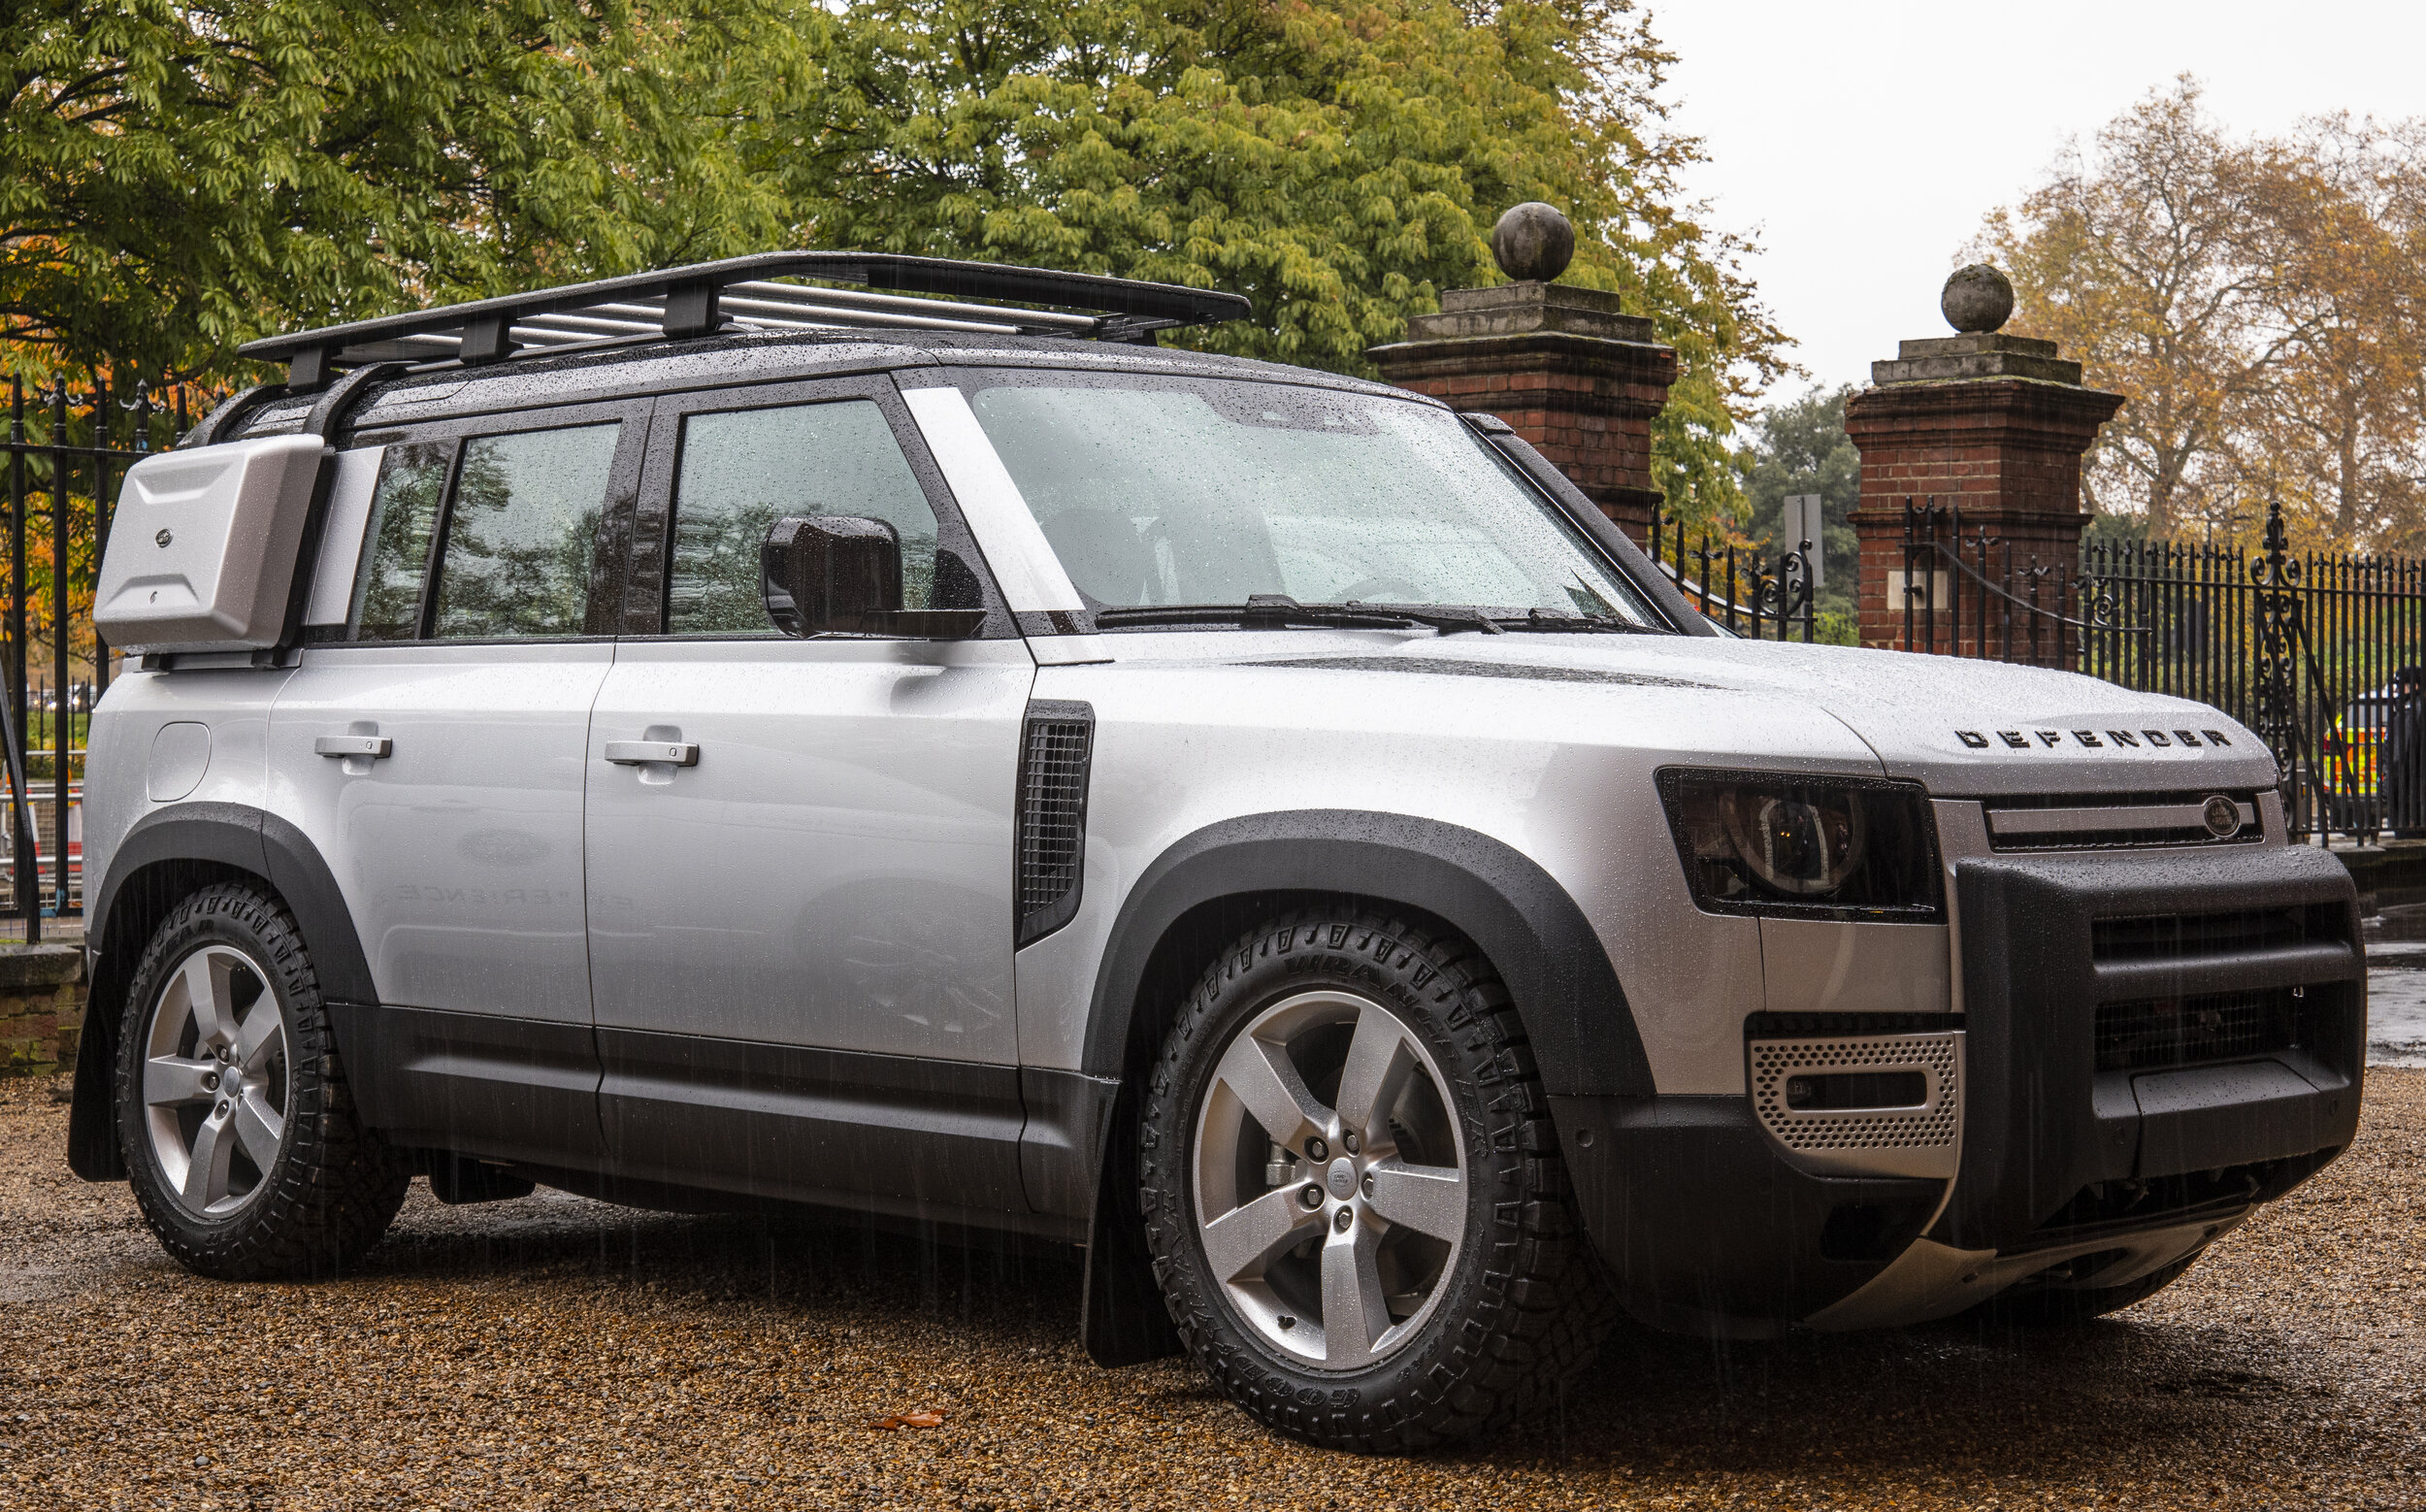
The new Defender 110, snoozing at the bottom of its air-suspension travel.
I’m slowly—ever so slowly—creeping toward an actual driving session in the new Land Rover Defender. The latest step occurred in London, where Roseann and I were presenters at the Royal Geographical Society’s Explore event. Thanks to Land Rover’s Stephen Purvis, a still-not-quite-production 110 sat in the forecourt, accessible to us for photographing and sitting in except during the brief period it was strip-searched by a security detail looking for possible explosives prior to a scheduled passage of the Queen’s motorcade. (Any vehicle parked adjacent to that route for several days—even if it’s a new Defender at the RGS—is viewed with suspicion.)
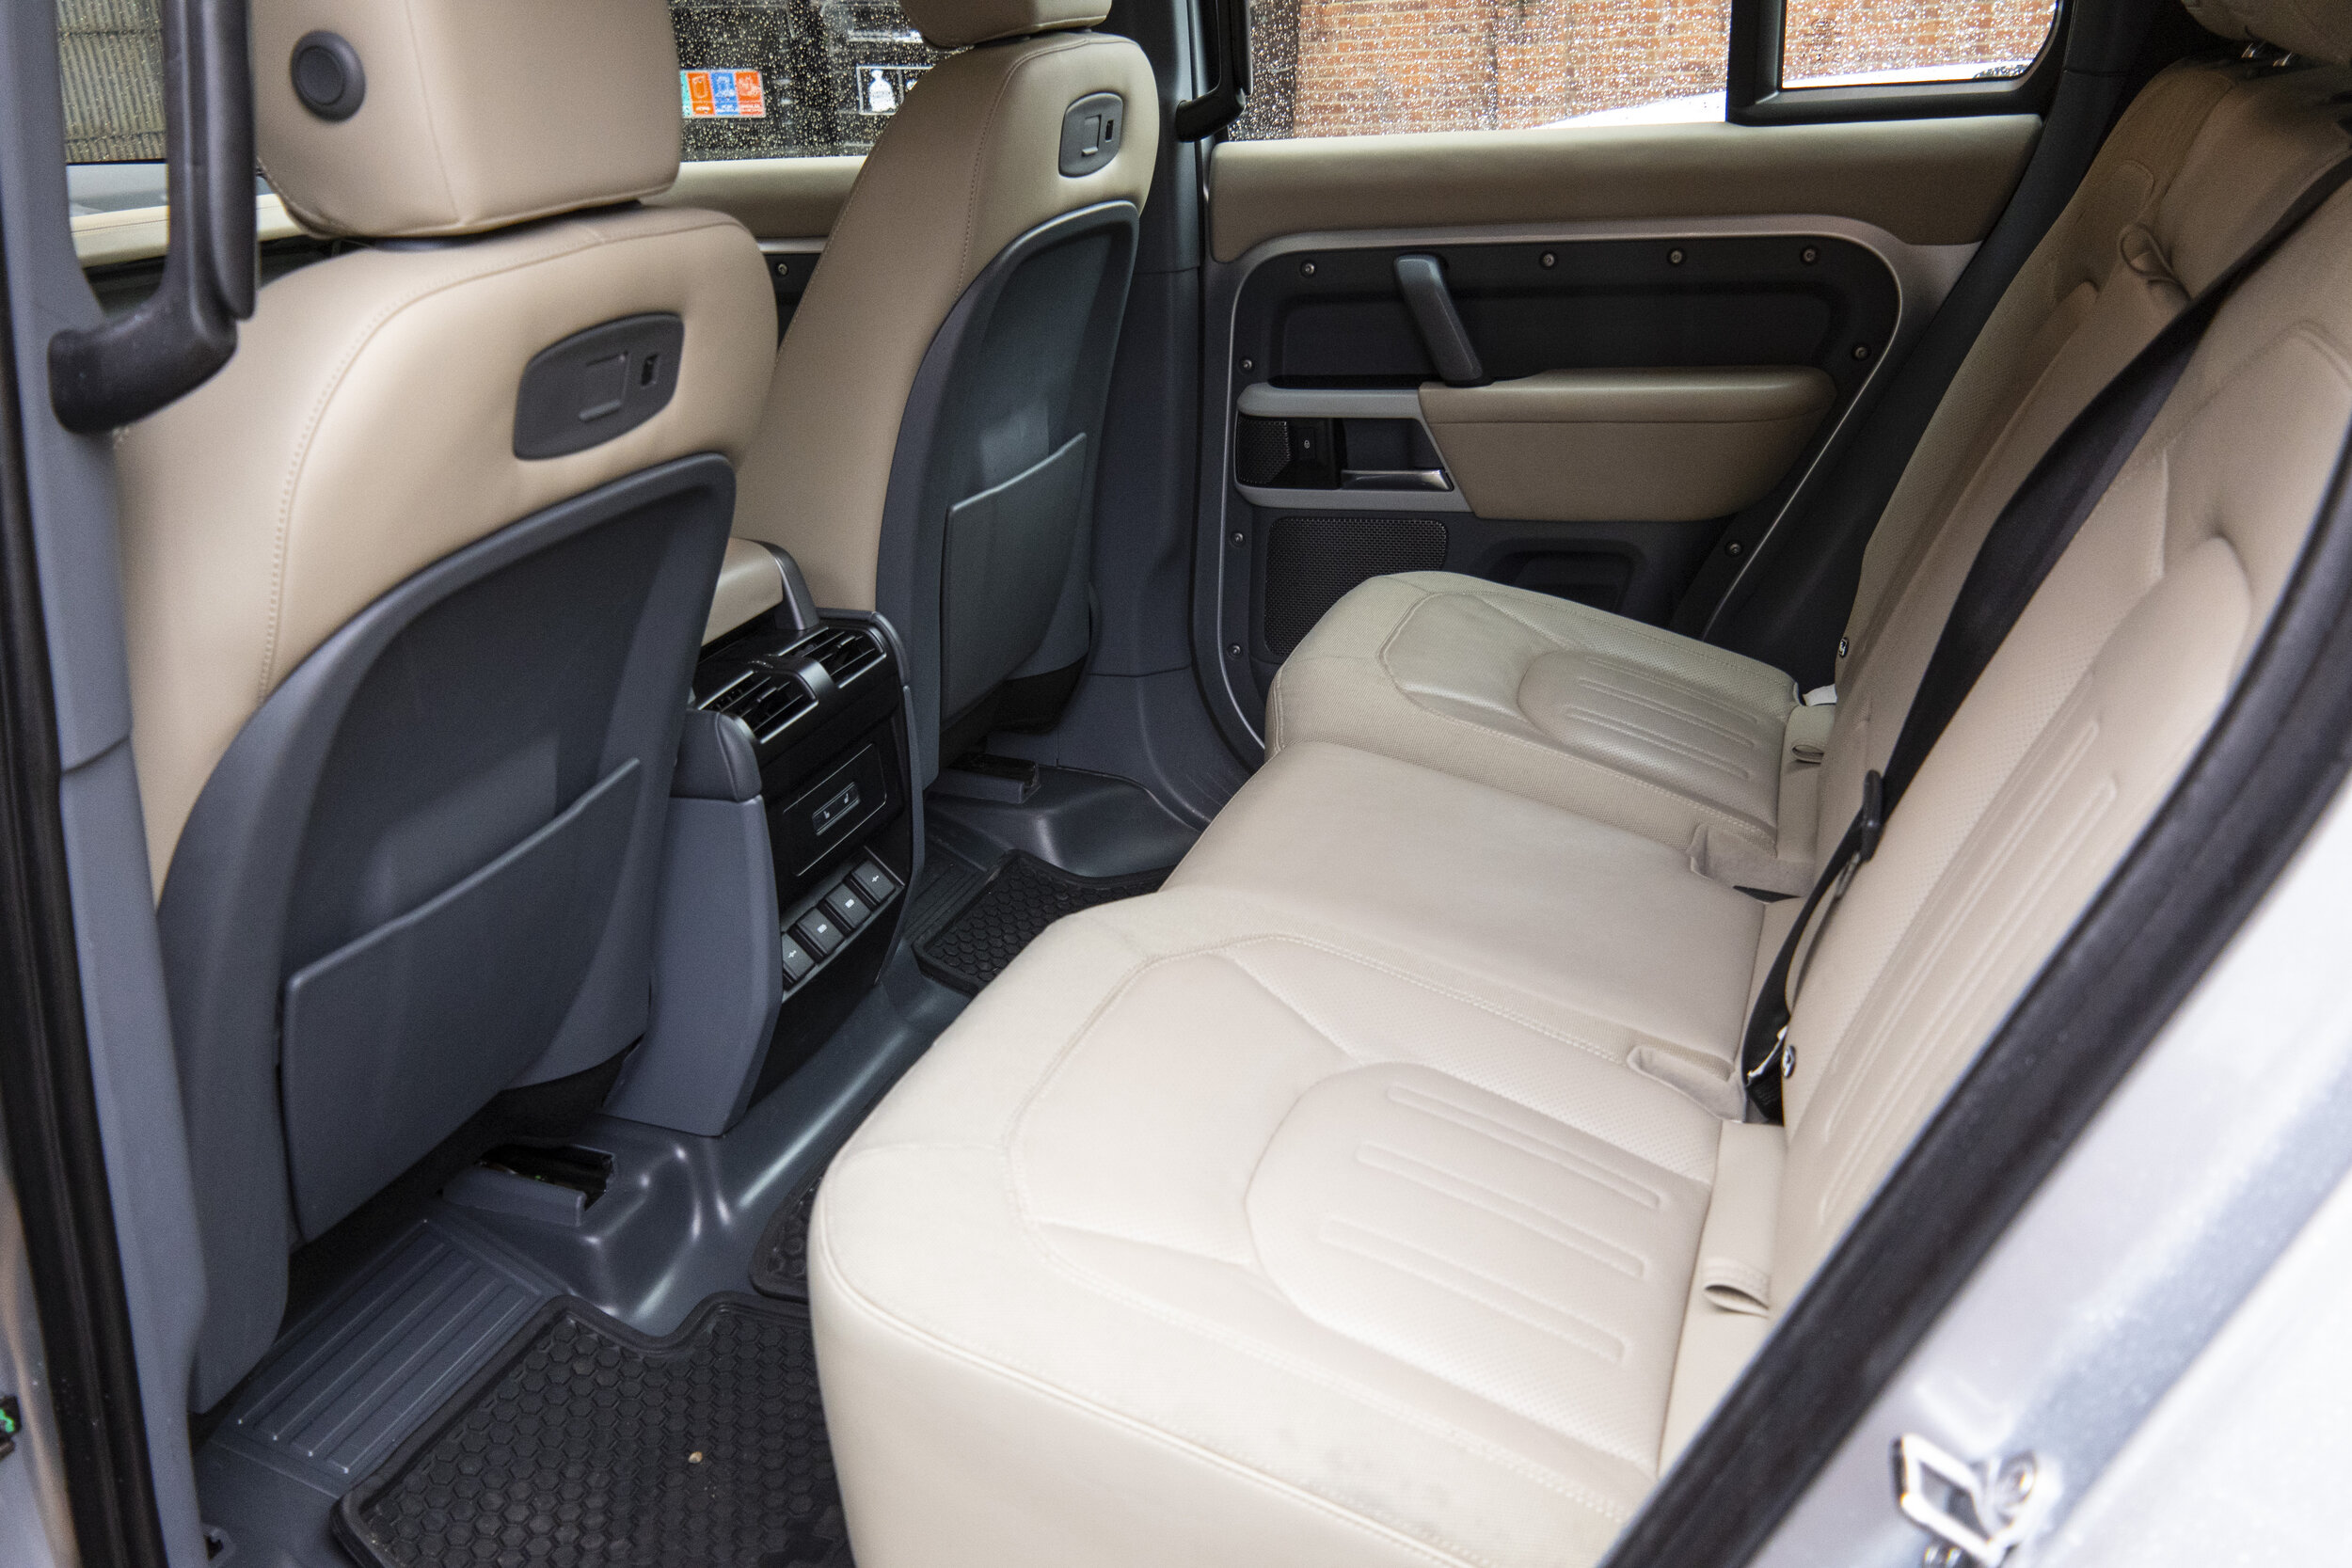
While this one was still unavailable for driving, for the first time I was able to climb around in one, sit in the front and back seats, and get an eyes-on feel for the cargo area. Not to mention an eyes-on feel for the styling. More on that in a bit.
One’s first overwhelming visual impression of the new Defender 110 is of how much smaller it is than the “old” 110.
Except, it isn’t.
In every dimension except height the new model is larger than the old one—especially in length. Compare (dimensions in inches):
Overall length
Old: 184
New: 197
Wheelbase
Old: 110
New: 119
Width
Old: 78
New: 79
Height
Old: 80
New: 77 (Variable with air suspension)
If you’re familiar with the old Defender’s infamous and frequently painful lack of elbow room you might be concerned about the nearly identical width figures. However, the old Defender was widest at the mirrors; the new one is widest in the body. After sitting in the new one I can assure you that “Land Rover Elbow” will be an affliction of the past. There’s much more room—enough so that I simply didn’t notice the driver’s space; it just fit me comfortably with room to spare. In the old Defender—as comfortable as the seat itself was—I was always conscious of having to fit myself in between door, center console, steering wheel, and pedals. Not so in the new one. Legroom was generous for my 5’9”, and since I have no sympathy for tall people I didn’t check beyond that (it’s actually grown by several inches).
Note, too, the significantly longer wheelbase, despite the holdover wheelbase-oriented model designations. I guess JLR figured it would be too confusing to refer to the new models as the 119 and 101 (and the latter could be confused with the old Forward Control 101). I’ve not yet been able to find the length of the new 110’s rear cargo area with the seat down (it folds flat, hurrah!), but it’s long enough to lie down in, and, just as importantly, the layout is wonderfully rectangular, with none of the intrusions that mar the Wrangler Unlimited’s cargo bay. One of the huge strengths of the old 110 was the rectangular cargo area that made it so easy to slot in Wolf Packs or Pelican cases or even jerry cans if needed—or to fabricate custom cabinetry if desired. The new one looks close in this regard. Additionally, the floor is covered with a stout rubber matting, and the sill is level with the back gate opening for easy sweeping out of debris. There are four tie-downs, and a cargo rail is optional.
With the rear seats deployed, there is really good room for two or even three people behind front occupants with their seats adjusted comfortably. It’s an infinitely better arrangement than the old 110’s perch, which put an average person’s head level with the sheet metal above the doors. There is also an optional two-place third-row seat.
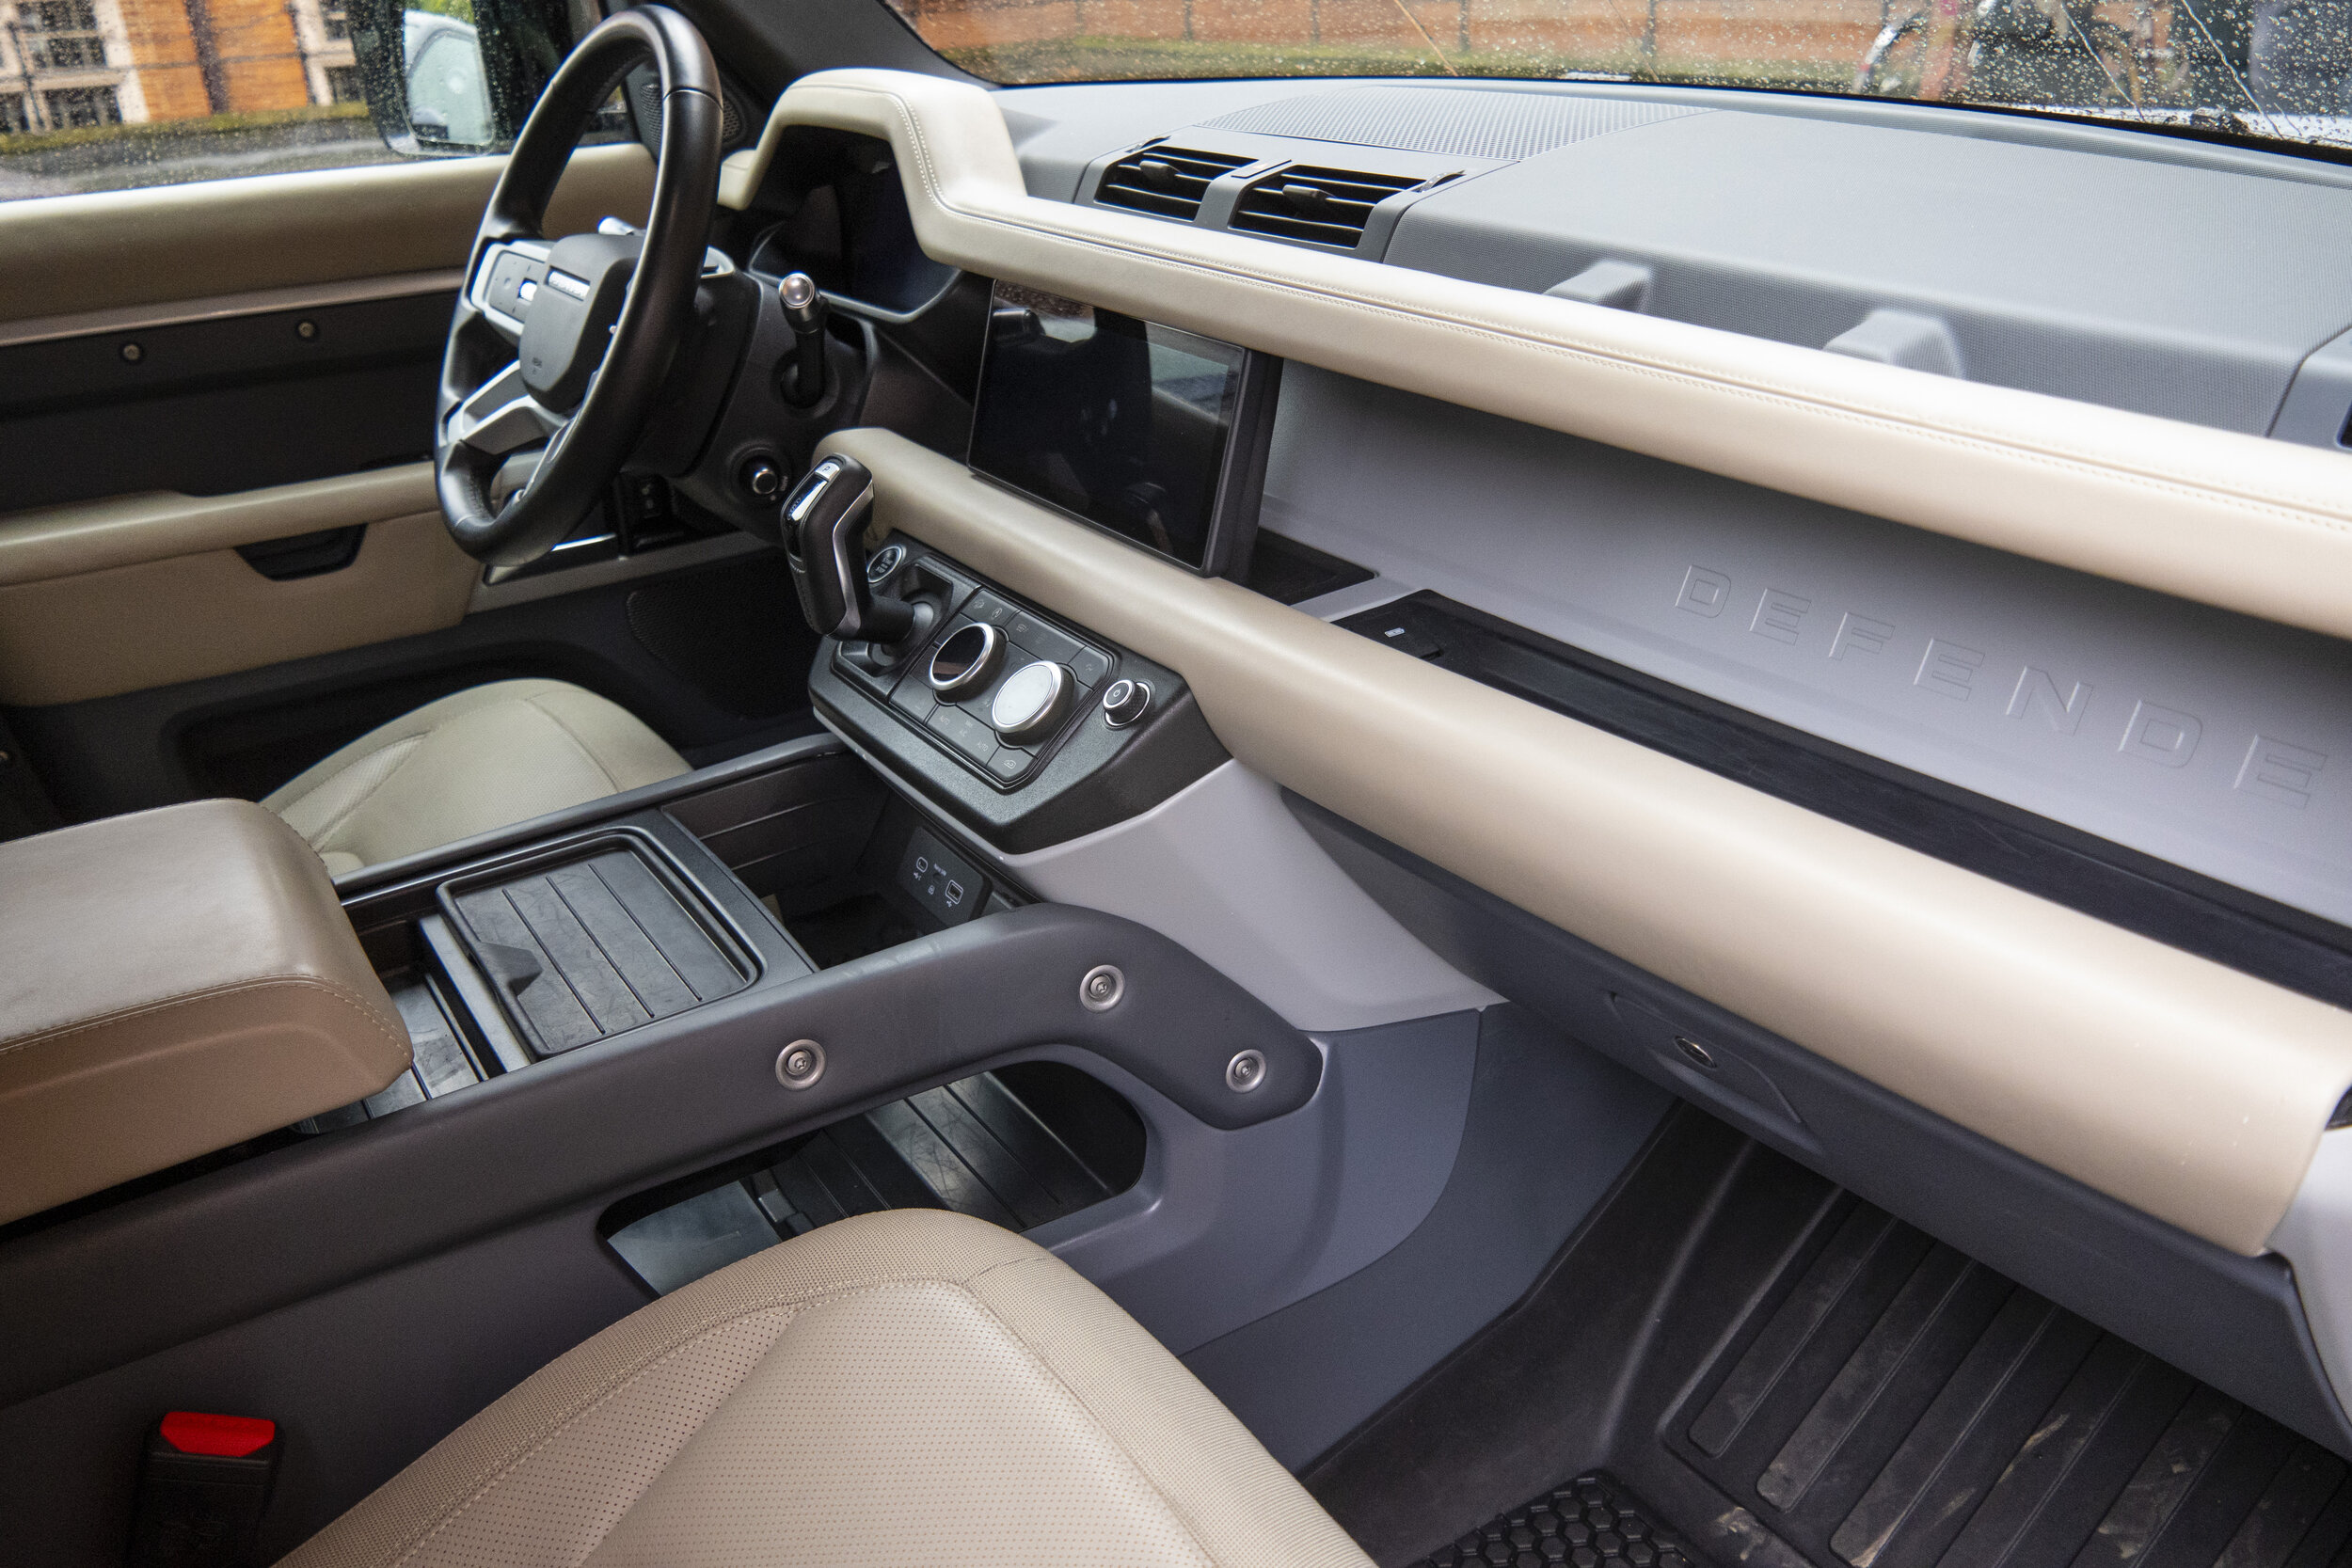
Back up to the front seat, and that dashboard—a coarse term for a work of art. Anchored by a crosswise beam structure of magnesium alloy, it incorporates two electronic displays—one in front of the steering wheel and one in the center of the dash. The presentation reminds me of nothing so much as a Series II dash brought into the 21st century. If that was the goal, the (American) designer succeeded brilliantly.
The center screen might be the first touch-screen display I’ve ever seen in any vehicle that actually looks like it belongs there, rather than resembling an iPad velcroed to the dash. Below the center screen is an abbreviated console containing the equally abbreviated shift lever, two blessedly manual dials for climate control, and several related buttons—along with a tiny button that is your entry to the low range of the Defender’s eight-speed automatic transmission, the only one offered. Now that you’ve choked on the idea of a Land Rover Defender without a manual transmission option, note too that those climate-control dials also operate the seat heaters . . . this truly is a new Land Rover Defender.
The driver’s electroluminescent display pops up a tachometer and speedometer when the engine is started, and—three, no four cheers for Land Rover—they are simple, round dials with white lettering on a black background. Perfect. The steering wheel incorporates too many buttons for my taste—hands-free phone controls, plus cruise control and, heh, the button for the steering-wheel heater. (One interesting observation from my press materials: The tachometer shows a redline of 6,800 rpm. Seriously? If that’s genuine I assume it is associated with the P400 straight-six, turbocharged mild-hybrid petrol engine, which boasts 395 hp. Wowsers.)
When Steve Purvis finally dragged me out of the driver’s seat so Roseann could have a look too, I went back to examining the exterior it terms of its promise as a legitimate overland machine.
Comparing approach, departure, and breakover angles, the old 110 is notably superior in approach angle but the new one wins in departure angle. Since the overall minimum on the new one (40º rear) is superior to the overall minimum on the old one (35º rear), I’d give the advantage to the new one. Breakover angle on the old vehicle is slightly superior. This is a function of the new 110’s longer wheelbase—which of course helps that departure angle.
Approach angle
Old: 49º
New: 38º
Departure angle
Old: 35º
New: 40º
Breakover angle
Old: 30º
New: 28º
While the Defender’s basic architecture is the D7 monocoque used in the Range Rover and Discovery, Land Rover claims it is 95 percent new and gives it its own designation, D7x (for, yes, “Extreme,” sigh . . . ). Among other advantages, the revised platform allows the body to be raised by 20mm to increase ground clearance. It is an exceptionally strong structure—torsional rigidity is 30,000 Nm/degree. No body-on-frame design can touch that. The downside, of course, is that the new Defender no longer has that Meccano Set construction suitable for complete disassembly with hand tools under a mango tree in Zambia.
I already knew about the Defender’s superb 900 mm (35.5-inch) fording depth, and the associated wizardry of the Wade Program, which adjusts the air suspension to its highest setting, locks the traction controls, switches ventilation to recirculating, indicates water depth on the center screen, and, finally, drags the brakes lightly for a few yards once clear of the water. This combined with the configurable Terrain Response will certainly help bolster Land Rover’s claim that the new Defender will be significantly more capable than the original.
So: What about that styling? In person the effect of any vehicle is different than it can ever be in photos or even video. Your eye simply takes in more in person than it ever can on a screen.
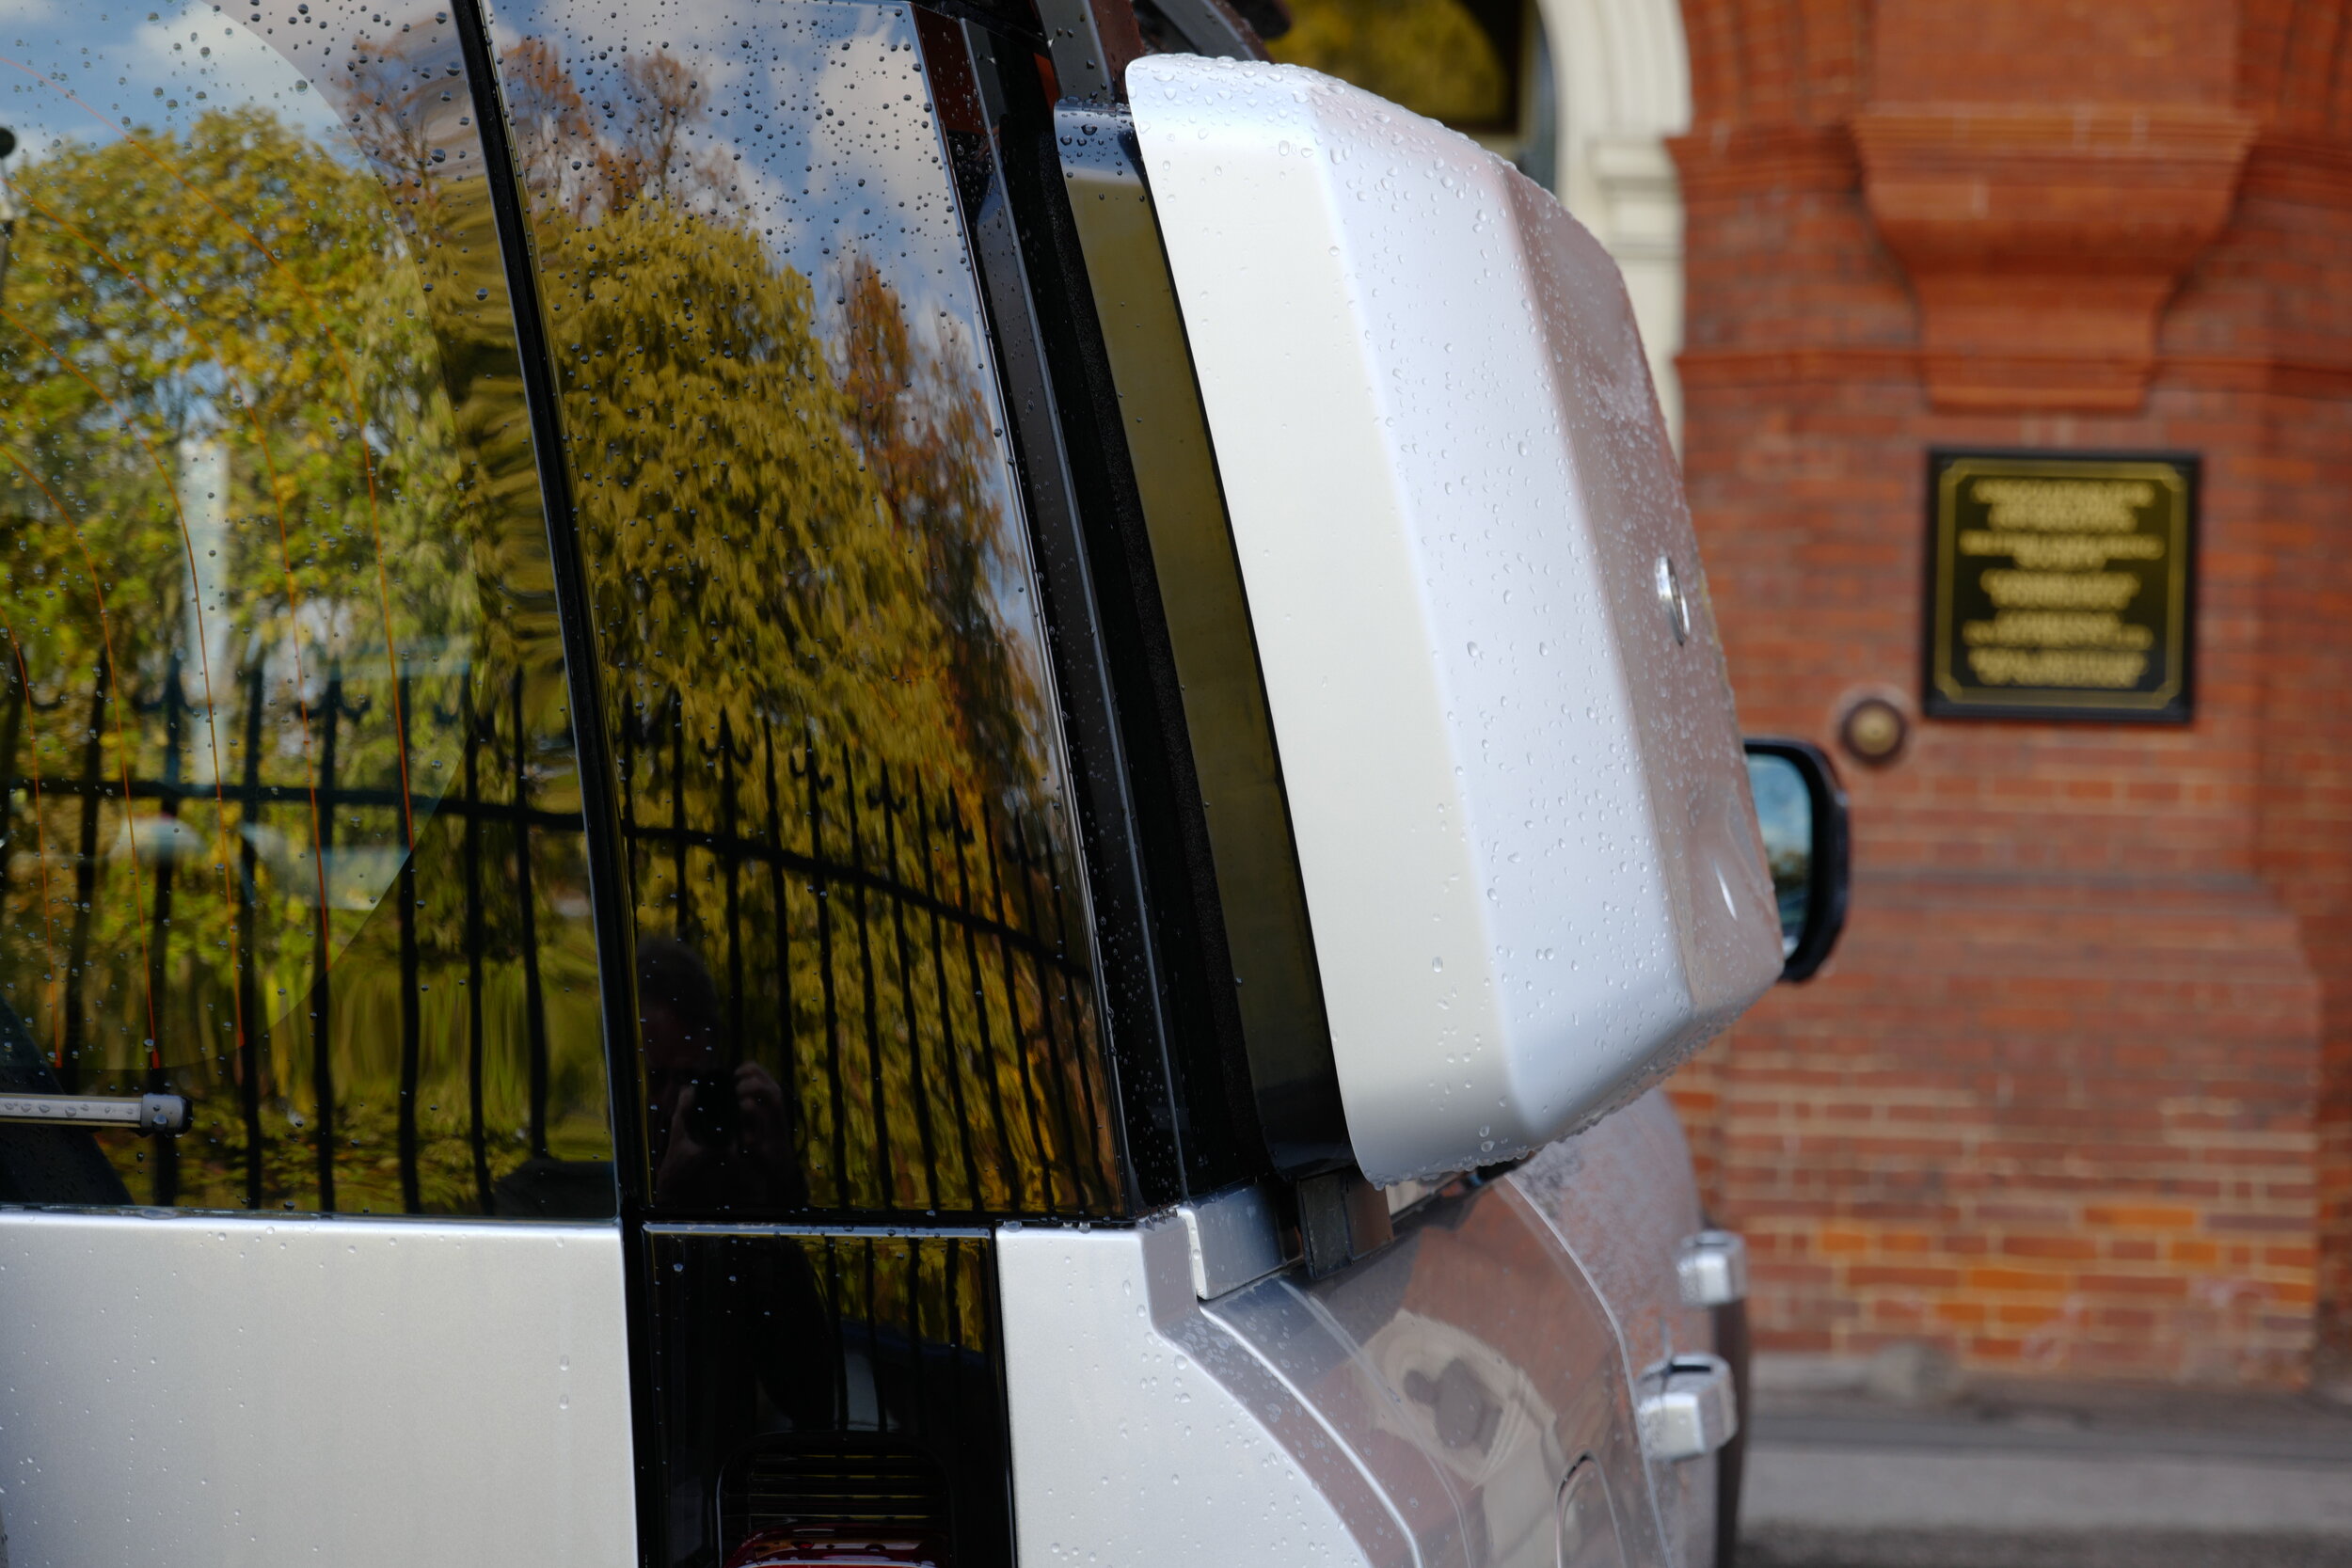
From the side I like the new Defender a lot—except for the incomprehensible body-color panel stuck in the middle of the greenhouse which, I pray, will be a deletable option. It garishly destroys the linear simplicity of the design, and I cannot imagine why it ever made it past a drunken sketch on a cocktail napkin, quickly rejected the next morning. “What was I thinking?” Of course, if the body-color panel hurts the lines, imagine what the body-colored Flintstones lunch box—sorry, “Gear Carrier”— stuck in the same spot does.
A component of both the “Adventure Pack” and the “Explorer Pack,” the box functions well to raise the drag coefficient while simultaneously lowering visibility out of one side mirror. Whether the trade-off is worth it to carry picnic supplies or (Graham?) a volcano kettle and tea-brewing kit will be decided by consumers, I guess. Here’s hoping some of the more useful components of the “Packs”—such as a built-in air compressor, a portable rinse system for muddy boots or dogs, a full-height cargo barrier, and an exquisitely integrated raised air intake—can be ordered a la carte.
Side view of the “commercial” version shows elegant simplicity . . . and more than a bit of evocation.
As to the front of the new Defender: I laugh every time I pass a Jeep Wrangler equipped with those scowling Angry Birds headlamp covers—and now Land Rover has gone and made the look standard. Urk. As to the rest, my chief befuddlement comes from the apparent lack of any really substantial change from the late and unlamented DC100 concept vehicle, which appeared in 2011 and was universally panned, and which Land Rover “disappeared” as quickly and brutally as Saudi Arabia does an embarrassing journalist. But, to me at least, the front of the new Defender resembles nothing so much as a DC100 Version 1.1. It could be mistaken for any number of Korean cute-utes, and—unlike the ascetic side profile—pays exactly zero homage to the old Defender. The version at the RGS had a large black rubber schnozzle which, in combination with the headlamps, my brain is still struggling mightily not to view as distinctly guppy-ish. ((Go back up and look at your peril.) From the driver’s seat (an important component of front-end “styling” in my book) visibility seemed quite good, although the rounded edges conceal the front corners more than the old Defender’s squared edges, which allowed one to gauge vehicle placement within centimeters. Inevitable to achieve the Defender’s astonishingly low .39 drag coefficient. (By comparison, the drag coefficient on my old Porsche 911SC was .40.)
I found myself with no strong opinions one way or the other on the rear styling, except for wishing that the spare tire had been mounted slightly to one side, as on its predecessor. I’m also not sure about the Mini Me pair of lamps in the fender beside each main cluster. At least one can see a bit of the old Defender’s profile in the “shoulder” just underneath the greenhouse, and from the side its flat back profile is familiar. (If chief design officer Gerry McGovern had used the term “verticality” one more time during his Frankfurt Motor Show intro talk I would have screamed.)
While I’m still ambivalent about some aspects of the Defender’s styling, I’m becoming more intrigued by the vehicle itself. I wasn’t among the poor souls who hoped futilely for a magically renewed old Defender with a 1948 frame design and solid axles; I figured from the start it would be a thoroughly modern, unibody, all-independent-suspension vehicle. Thus I was never disappointed in that regard. There are plenty of fans of the original who wish the company had let the name die rather than sully it on a “poseur” replacement. They’re the ones referring to the new vehicle as the “Pretender” or the “Offender.”
I understand nostalgia, and I certainly understand the loyalty commanded by the original Defender and the Series vehicles that preceded it. But you can stamp your feet and throw your toys out of the crib, or you can accept the reality that the current owners of JLR would have been stupid to consign the name Defender to a trophy case out of some honorable sense of history. Not going to happen. Likewise, given the vicissitudes of the marketplace and Land Rover’s up and down fortunes, the company was never going to go to the massive expense of engineering a ground-up replacement with a separate chassis and beam axles when they have monocoque architecture and plug-and-play all-independent suspension already available.
Is the new Defender going to be a competitor for Toyota’s mighty, body-on-frame, solid axle 70-Series Land Cruiser, or the stripped versions of the equally mighty Mercedes G-Wagen? No. Land Rover has ceded that market, possibly forever. We need to modify our expectations.
What I hoped for was a Defender that, while brought up to date with 21st century design and technology, would retain its suitability as a vehicle for long-distance exploration and rugged use—and, I’d might as well say this, would also be brought up to date with regards to the reliability of its competition. In the U.S., in terms of those in the market for an overlanding vehicle, I think that competition is going to be the 4Runner, the Pathfinder, the Jeep Rubicon Unlimited—even quad-cab versions of the Colorado, Tacoma, and Frontier.
I suspect a new Defender 110 will cost more than any of them, so that competition will be interesting to watch. The Defender, on paper at least, should be superior off-pavement to the 4Runner, the Pathfinder, and the pickups, and more sophisticated than the Wrangler (with a far higher payload). The big remaining question will be reliability—a question that will only be answered after users have put a few million miles under the wheels of the new “Pretender.”
And at that it was time to head back inside the august halls of the RGS.
The value of prepared driving courses—pro or homemade
A perfectly safe (for a Wrangler) 28-degree side slope is enough to thrill most new owners.
I’ve overheard a lot of people scoff at prepared driving courses, especially in reference to those we’ve built for the Overland Expo over the years.
Usually, these are people who have not been on those courses.
The fact is, a carefully engineered driving course can be, in some ways, better than a random trail to demonstrate the capabilities of a vehicle. Side slopes, ascents, and descents can be built to simultaneously amaze and instruct new drivers while remaining safe as houses. Elephant footsteps, as we call alternating tire-swallowing craters, are perfect for demonstrating different traction-control devices, finding the limits of suspension travel on a student’s vehicle, and teaching throttle control and left-foot braking. Even simple perpendicular or angled ridges or logs, while effortless to cross, make perfect teaching points.
A breakover ridge is excellent for demonstrating suspension compliance, and for learning throttle control.
Over the years I’ve ridden in the right seat with a wide variety of drivers. There’ve been burly guys in Wrangler Rubicons who professed extensive experience and then nearly fainted at a 25-degree side slope; diffident women who professed no experience whatsoever and then sailed through the course effortlessly, and everything in between.
My favorite participant at the last show was the archetypal burly guy in a Wrangler—except as soon as I climbed in he told me it was his wife’s Jeep and he had no idea what he was doing. He then proceeded to be guilelessly amazed at every challenge and obstacle. “I can’t believe we just drove through that!” “We’re going up that?” “You’re sure we’re not going to tip over?” “That was incredible!” It was the most fun I had the entire weekend because there was zero ego involved.
At the other end of the scale was the fellow who assured me of his vast experience. His wife was in the back seat; earlier she had driven the course with another instructor—excellently, as I found out later—but he was going to show her how to actually do it correctly. He then proceeded to do nearly everything incorrectly, actually, while I simply sat and let wheels spin and vehicle bounce needlessly. It would have been pointless to intervene. I was secretly hoping we’d get stuck, but he managed to bash through the entire course.
Lest this sound superior, I’ve found that I nearly always learn something new with each track we construct, and at the very least I find it valuable to hone my own skills while prerunning and tamping down the course, and hugely instructive to watch how different vehicles and different drivetrains/traction systems perform.
Graham Jackson had an in-depth look at one vehicle—a fully optioned new Toyota 4Runner—during the “Braking with the wrong foot” class, in which instructors shepherd a driver through increasingly deep elephant footsteps while coaching the him or her on how to use left-foot braking to both control the speed of the vehicle at a snail’s pace, and increase traction as well. This 4Runner was loaded with all of Toyota’s current tricks: Crawl Control, etc. After several runs through the course Graham and the owner hit upon the absolute most effective setup: locked center diff, locked rear diff. That’s it. Sometimes the simplest solutions are the best.
If you’ve attended an Expo but skipped the driving course (or other driving classes) because you thought the experience would be too formulaic, consider reconsidering. You might be pleasantly surprised.
But what about the rest of the year? Why not design your own course? You don’t need a backhoe. Find a trail you know and can access easily and frequently, and practice running it on weekdays or any time not many other people are around. Then, rather than simply driving the trail end to end, go back and forth over sections that either concern you or on which you are not as smooth as you feel you should be. Try different lines, different speeds, different combinations of traction control systems. If you own an über-competent vehicle such as a Wrangler Rubicon, try negotiating difficult passages without disconnecting the front anti-roll bar and engaging both diff locks. Practice driving rather than simply dialing in the right program and steering. I think you’ll find your competence and confidence soar.
Hint: When using “Search,” if nothing comes up, reload the page, this usually works. Also, our “Comment” button is on strike thanks to Squarespace, which is proving to be difficult to use! Please email me with comments!
Overland Tech & Travel brings you in-depth overland equipment tests, reviews, news, travel tips, & stories from the best overlanding experts on the planet. Follow or subscribe (below) to keep up to date.
Have a question for Jonathan? Send him an email [click here].
SUBSCRIBE
CLICK HERE to subscribe to Jonathan’s email list; we send once or twice a month, usually Sunday morning for your weekend reading pleasure.
Overland Tech and Travel is curated by Jonathan Hanson, co-founder and former co-owner of the Overland Expo. Jonathan segued from a misspent youth almost directly into a misspent adulthood, cleverly sidestepping any chance of a normal career track or a secure retirement by becoming a freelance writer, working for Outside, National Geographic Adventure, and nearly two dozen other publications. He co-founded Overland Journal in 2007 and was its executive editor until 2011, when he left and sold his shares in the company. His travels encompass explorations on land and sea on six continents, by foot, bicycle, sea kayak, motorcycle, and four-wheel-drive vehicle. He has published a dozen books, several with his wife, Roseann Hanson, gaining several obscure non-cash awards along the way, and is the co-author of the fourth edition of Tom Sheppard's overlanding bible, the Vehicle-dependent Expedition Guide.


