Overland Tech and Travel
Advice from the world's
most experienced overlanders
tests, reviews, opinion, and more
Essential overland kit? The Suri sustainable sonic toothbrush.
Okay, okay. I know oral hygiene is on the “lite” side of subjects for an overlanding column, but bear with me.
For years and years I resisted electric toothbrushes. My only experience with them was an early model that did nothing but wiggle back and forth, which I felt perfectly capable of doing on my own. But a few years back, a friend gave me a modern unit (he had got two on a deal), and I realized that the newer technology really did seem to clean better than a manual brush (several independent studies bear this out). I was more or less sold.
Why more or less? I still didn’t like all the extra plastic and electrics, and to my horror, when the battery died on that first one I discovered it wasn’t replaceable. A kit on Amazon promised a fix, but after disassembling the unit and trying some extremely precise de- and re-soldering, I gave up. The hygiene angle kept me a customer, but reluctantly.
The other issue involved taking the thing camping. The electric brush was bulky, and of course was yet another item that needed recharging off an inverter. And I was reluctant to use the thing when we were camped too near others, expecting snickering.
That’s changed with, of all things, a link on Instagram, a pitch for a “sustainable sonic toothbrush” called Suri. The website showed an extremely compact brush with an aluminum body, and, more importantly, a factory-replaceable battery. How about those disposable brush heads, of which, the company says, over four billion are discarded worldwide each year? The Suri’s plant-based plastic heads are not only recyclable, the company includes a postage-paid envelope to send them back (suggesting that you save up three or four at a time to save them shipping costs). Finally, the Suri’s recharger is tiny, and uses a USB connector, making recharging much, much easier on the road.
Done. Ordered.
I wondered if the Suri’s compact design would mean its smaller motor wouldn’t clean as well as our regular brush, but to my (our) surprise found it at least as good if not better. I’d originally thought it might be just a traveling brush (it claims a 40-day battery life; if it’s half that I’d still be impressed), but it’s taken over as our main unit. I’m planning to buy another for our place in Fairbanks. (The unit comes with a clever stick-on magnetic holder that adheres to the inside of your medicine cabinet.)
So there you have it: my slavish endorsement of . . . a toothbrush. I’m happy to support a company that seems genuinely to be trying to reduce its impact on the planet.
Suri is here.
Parabolic springs: What exactly are they?
ARB/Old Man Emu recently announced, with great fanfare, a rear suspension kit for the 70-Series Land Cruisers that includes a two-leaf parabolic spring for each side, plus adjustable air bags to compensate for overload conditions. It can replace a standard semi-eliptic spring pack that might require 12 or more leaves to support an equivalent load.
Other manufacturers, such as Terrain Tamer, have also introduced parabolic springs kits for 70-Series Land Cruisers, as well as Series II and III Land Rovers.
But what exactly is a parabolic spring? And is it really better than a standard leaf spring?
The individual leaves of a standard, semi-eliptic, multi-leaf spring pack are stamped and then bent from strips of heat-treated, medium- to high-carbon steel, more or less rectangular in cross section, and of consistent thickness and width the length of the leaf (except for, in some cases, when the ends are rounded or have the corners relieved). When attached to a simple pivot at one end, with the other free to rotate a movable shackle, a single leaf resists bending in a fairly uniform fashion throughout its travel. To increase strength—that is, load-carrying ability—and add progressive resistance, progressively shorter leaves are added beneath the top leaf, held loosely in place with floating brackets that do not restrict movement. As the spring pack is compressed, each leaf slides against the adjacent leaves. This inter-leaf friction results in a self-dampening effect—unlike, for example, a coil spring, which has little internal resistance and relies almost entirely on a shock absorber (damper) to control oscillations.
However, that inter-leaf friction also degrades the ride quality of a leaf spring as well as its compliance—the ability to compress or extend fully. And this effect worsens as the spring gets dirty and/or rusty. Some manufacturers (such as OME) install replaceable anti-friction pads at the leaf tips, which help noticeably but do not eliminate the problem.
Years ago a few manufacturers—among them Nissan—attempted to create a progressive-rate leaf spring by making the leaves thicker in the middle, tapering in a linear fashion to the tips, as in the (very) simple schematic below. This involved a relatively easy manufacturing process. However, these “taper-leaf” springs proved less than ideal as bending stresses were not evenly distributed through the length of the leaf, resulting in weak points and failures.
Enter the parabolic spring.
While it’s difficult to discern looking at it from the side, the thickness taper of a parabolic spring follows a complex mathematical formula. Rather than simply tapering straight from the center of the leaf to the end, a parabolic spring looks like an extremely stretched-out version of the illustration below. As you might imagine, it’s significantly more difficult—i.e. expensive—to design and manufacture than simply stamping out flat lengths of steel and piling up enough of them to support a load.
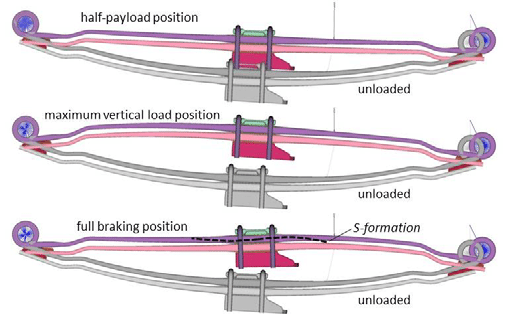
The results, however, are worth it. Not only is a parabolic leaf progressive in its operation, it is also nearly as compliant as a coil spring due to the lack of internal friction and stress. Theoretically a single parabolic leaf would be sufficient to function as a spring; however, due to the ramifications if the leaf did break, most parabolic spring kits for vehicles comprise at least two leaves, and the lower leaf will have a full military wrap on each eye, to contain the upper spring should it break. These leaves touch only at the spring seat in the middle, and at the ends, so there is virtually no interleaf friction. Most kits also include a free-floating overload leaf that only engages under high load or compression. The illustrations below are from a (densely technical) Researchgate-published paper on leaf spring design, available to read or download here.
There’s more: A parabolic spring equivalent in load-carrying capacity to a standard multi-leaf spring weighs at least 30 percent less, drastically reducing unsprung weight and further improving ride and handling. Convert an all-leaf-sprung vehicle to parabolics and you could take 80 pounds off its total mass.
The conversion job is straightforward, no more complex than changing out standard springs, although the vehicle will almost certainly require new, firmer shocks to compensate for the loss of inter-leaf friction. Series Land Rover owners I know who’ve converted describe it as “transformative.” This diagram shows the magnitude of travel possible with a parabolic spring system, as well as the longitudinal “S” deformation any leaf spring undergoes during severe braking.
While it’s easy to find parabolic spring kits for Series Land Rovers and the 70-Series Land Cruisers, diligent searching revealed no such kits for my FJ40, although I heard that one company did offer them for a while years ago. Damn.
Incidentally, there is no relation between the terms “semi-elliptic” and “parabolic” in leaf spring terms. Semi-elliptic refers to the shape the entire spring pack assumes from the side; if one were to draw this shape out into a connected oval, it would be roughly elliptical. A parabolic vehicle spring pack assumes this same profile and is thus also semi-elliptical.
OME MT64: OME's answer to Bilstein?
My FJ40 has sat atop ARB’s Old Man Emu suspension for over 20 years, and our HZJ75 Troop Carrier is equipped with it as well. OME leaf springs—selectable for varying permanent loads from stock to heavy-duty—improve on the ride offered by factory springs while offering more load-carrying ability. And OME’s twin-tube, low-pressure nitrogen-charged Nitrocharger shock absorbers—or dampers to use the technically correct term (not “dampener”)—have never failed us or shown signs of fade, even on day-after-day-long stretches of Australian corrugations.
So I am understandably an OME fan, and I pay attention to new developments. I wasn’t surprised when the company introduced their ultra-premium, internal-bypass, BP51 shock—it made sense to go head to head with such brands as Fox and Icon, with a shock that incorporated high-performance technology to better the Nitrocharger’s ride at low to moderate speeds while also bettering its high-amplitude damping. If the BP51 were available for our Troopy I would seriously consider spending the cash to upgrade.
I was surprised, however, to learn about OME’s new shock, the MT64 (MT64 referes to monotube construction and the shock’s stout 64mm diameter piston). I’ve watched in the past as companies diluted their product lines with so many choices that consumers simply gave up trying to understand the differences and switched to another brand. ARB descibes the MT64 as sitting between the Nitrocharger and BP51 in performance and price.
Hmm. I looked at the specs. Indeed the MT64 splits the difference in price. But is there really a need for a shock that is “halfway” between the two in performance? I looked at the construction, which is neither the twin-tube, low-pressure design of the Nitrocharger nor the internal-bypass (or any bypass at all) of the BP51, but a monotube, high-pressure gas-charged format. In its front strut configuration it offers adjustable ride height.
Then it hit me: The MT64 is OME’s alternative to Bilstein.
Bilstein shocks have long been a popular upgrade to factory shocks—they’re reasonably priced, offer definite performance gains, and carry a storied name to boot. The Bilstein 5100 is a common swap; more recently, the beefier 6112 front strut assembly has become the go-to shock for those with typically overloaded overland rigs.
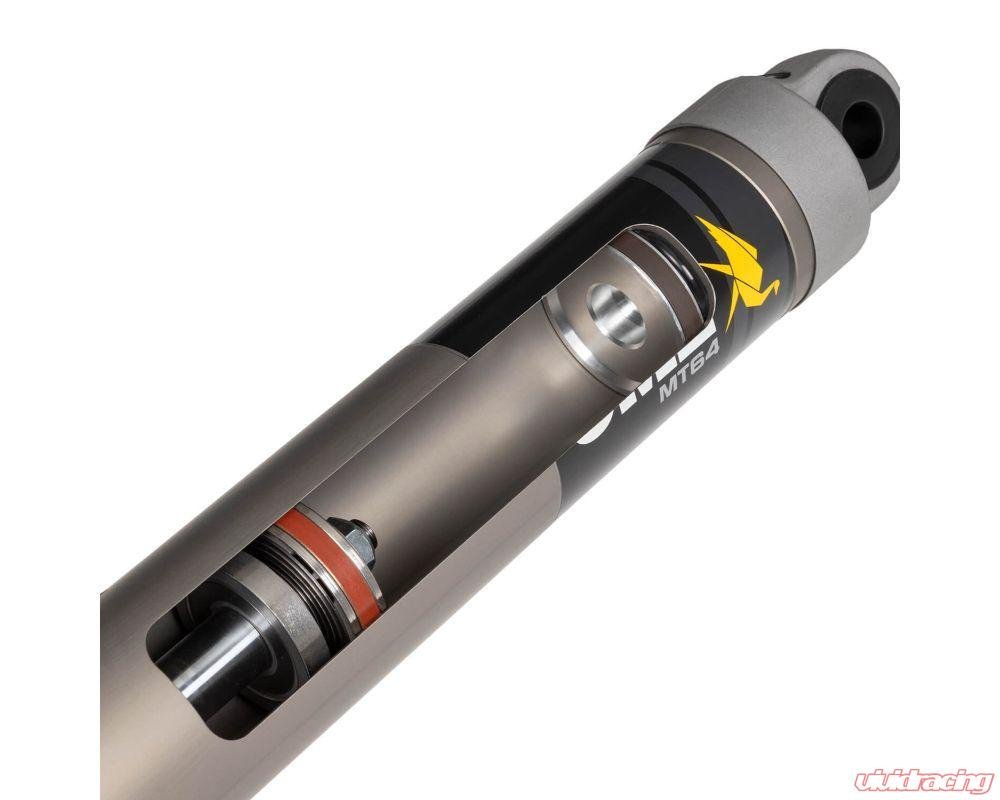
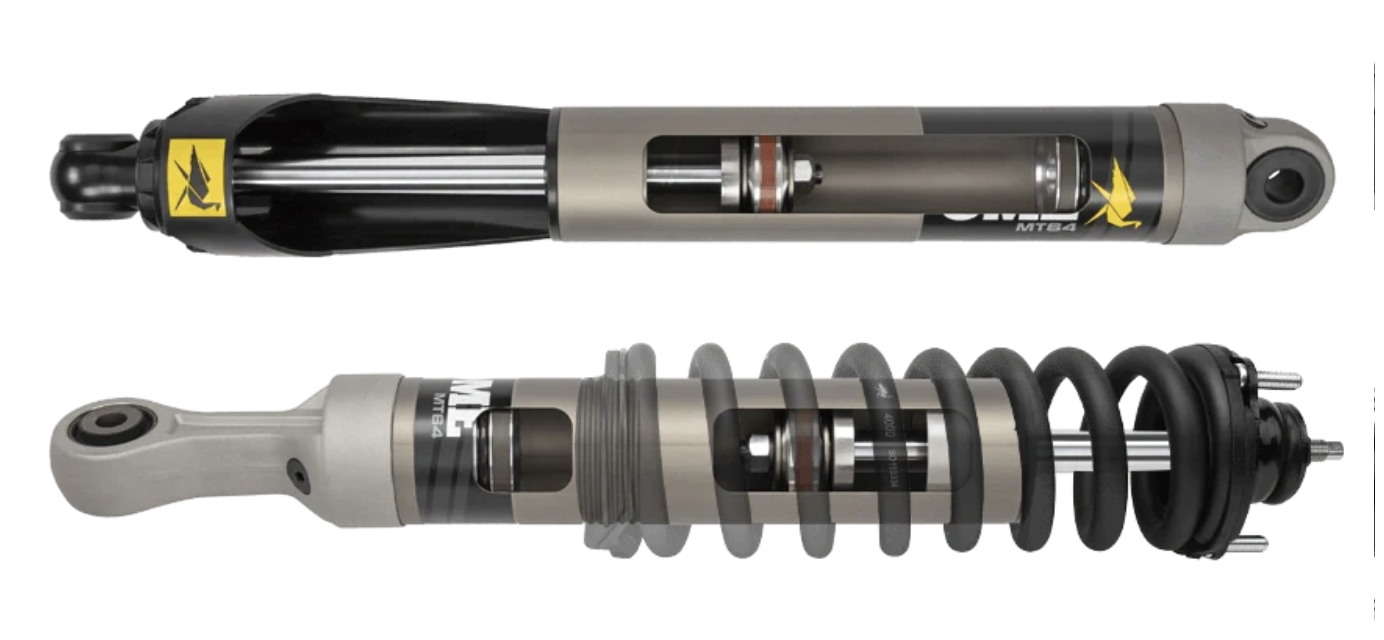
Consider the MT64 front strut assembly alongside the 6112: Both are monotube, high-pressure gas-charged units with enlarged oil/gas capacity, a floating piston to contain the nitrogen gas, and adjustable ride height. For fans of high-pressure gas-charged shocks, the MT64 offers an obvious alternative to Bilstein. So how do they compare in terms of specifications?
The MT64’s piston is 64mm in diameter (it’s actually 63.5 but that’s not very catchy); the shaft is 22.2mm in diameter. The (monotube, remember) aluminum body is 71mm across.
The Bilstein 6112 has a 60mm piston and an 18mm shaft, in a steel body 67.3mm in diameter.
I see what you did there, OME. The MT64 is just a bit beefier in every dimension, a contrast that will play well in comparison tests—and likely on the trail as well. Visually, the MT64’s forged aluminum body caps also appear sturdier than those on the 6112. I liked the plastic guard over the shaft, which should help protect it from grit blasting (although not as well as the full cover on the Nitrocharger), and the natural rubber bushings rather than wear-prone heim joints.
There’s one other important difference: The MT64 is fully rebuildable; the Bilstein 6112 is not.
The MT64 is offered in both strut and standard configurations, so you can run the same basic shock on strut or conventional front suspensions, and the rear as well. The Bilstein 6112 is only offered as a strut assembly for front suspensions; for rear shocks most will choose either Bilstein’s B8 5100, a significantly smaller unit with a 14mm shaft and a 46mm piston, or the B8 5160, essentially the 5100 with the advantage of a remote reservoir.
Perhaps what is more important than the differences between these two shocks is what they share in common: their target audience.
High-pressure gas-charged shocks such as these and similar models are marketed toward those who want more of a sporting—i.e. firmer—initial response in ride and handling, compared to a typical twin-tube, low-pressure design. Advertising descriptions usually include references to “spirited” driving, and promo videos rarely fail to show at least a few scenes with two if not all four wheels in the air. It is, sadly, a typical approach: Manufacturers make lots of noise about “treading lightly” while overtly encouraging just the opposite.
Not too long ago I watched a (very well-filmed) video about a group of guys playing Ivan Stewart with several overland-kitted vehicles on a (public) dirt road in Baja—a route I know well. Lots of whooping and flying gravel, and inset frames boasting their current speed. One of them finally managed to stuff his friend’s Jeep Gladiator into the desert and fold the chassis into a notable inverted V. Incredibly, rather than slinking home and considering a different approach to traveling in a foreign country, they went right on partying as if this were an unfortunate but completely normal contingency for a bro excursion. Sadly, this video—and the attitude—is far from unique.
Sorry, where was I? Right: If you travel like I do, with mechanical sympathy for your vehicle uppermost in your mind, enjoyment of your surroundings second, and preservation of the environment and the trail a close third, you don’t need shocks that can shrug off repeated jumps. If you prefer the slightly sharper on-road handling high-pressure gas shocks provide, that’s great. But for comfortable, reliable, long-distance travel, a well-built twin-tube shock such as the OME Nitrocharger, properly specced to your constant load, will serve you well. If you want a more sophisticated ride, as well as the ability to adjust both compression and rebound damping—and you have the funds—then by all means spring for the superb BP51.
Artificial rain gutters from Lkonwee
I needed to mount our Yakima rack to the fiberglass A.R.E. shell on our Alaska Tundra, and since our Yakima towers have standard rain-gutter clamps, I needed artificial rain gutters. After some searching, I decided on a set from the oddly named Lkonwee on Amazon. They weren't cheap at $52, but after installing them, I'm convinced I actually got an excellent buy.
The brackets can be mounted vertically on the side of the shell, or horizontally on the roof. I chose side mounting to keep the overall height of truck and boats as low as possible.
The brackets came with full-size backing plates for strength, and were nicely powder-coated, with matching black-anodized hardware. The square-shouldered carriage bolts fit through square holes in the brackets, meaning installation is a one-person job since you don't need anyone on the the outside holding a wrench on the head of the bolt. It also makes for a much cleaner appearance.
The gaskets, too, were excellent, with a double ring around the bolt holes and a nice raised perimeter.
The gutter itself is deep and secure, and two small raised bits on the bottom would help prevent the rack sliding if you got hit by a big gust of wind or had to panic brake. Well-recommended.
One installation note: Our shell is lined with an ozite-type material, which wasn't completely glued down where I drilled the first hole, with the result that it bunched up and twisted around the drill bit, leaving a fat wrinkle no matter what I did to push it back into shape. For the remainder of the holes I was careful to barely drill through the fiberglass, then poke a hole in the carpet with an awl.
Lkonwee brackets are on Amazon here.
Get one while you can: The REI Trailgate
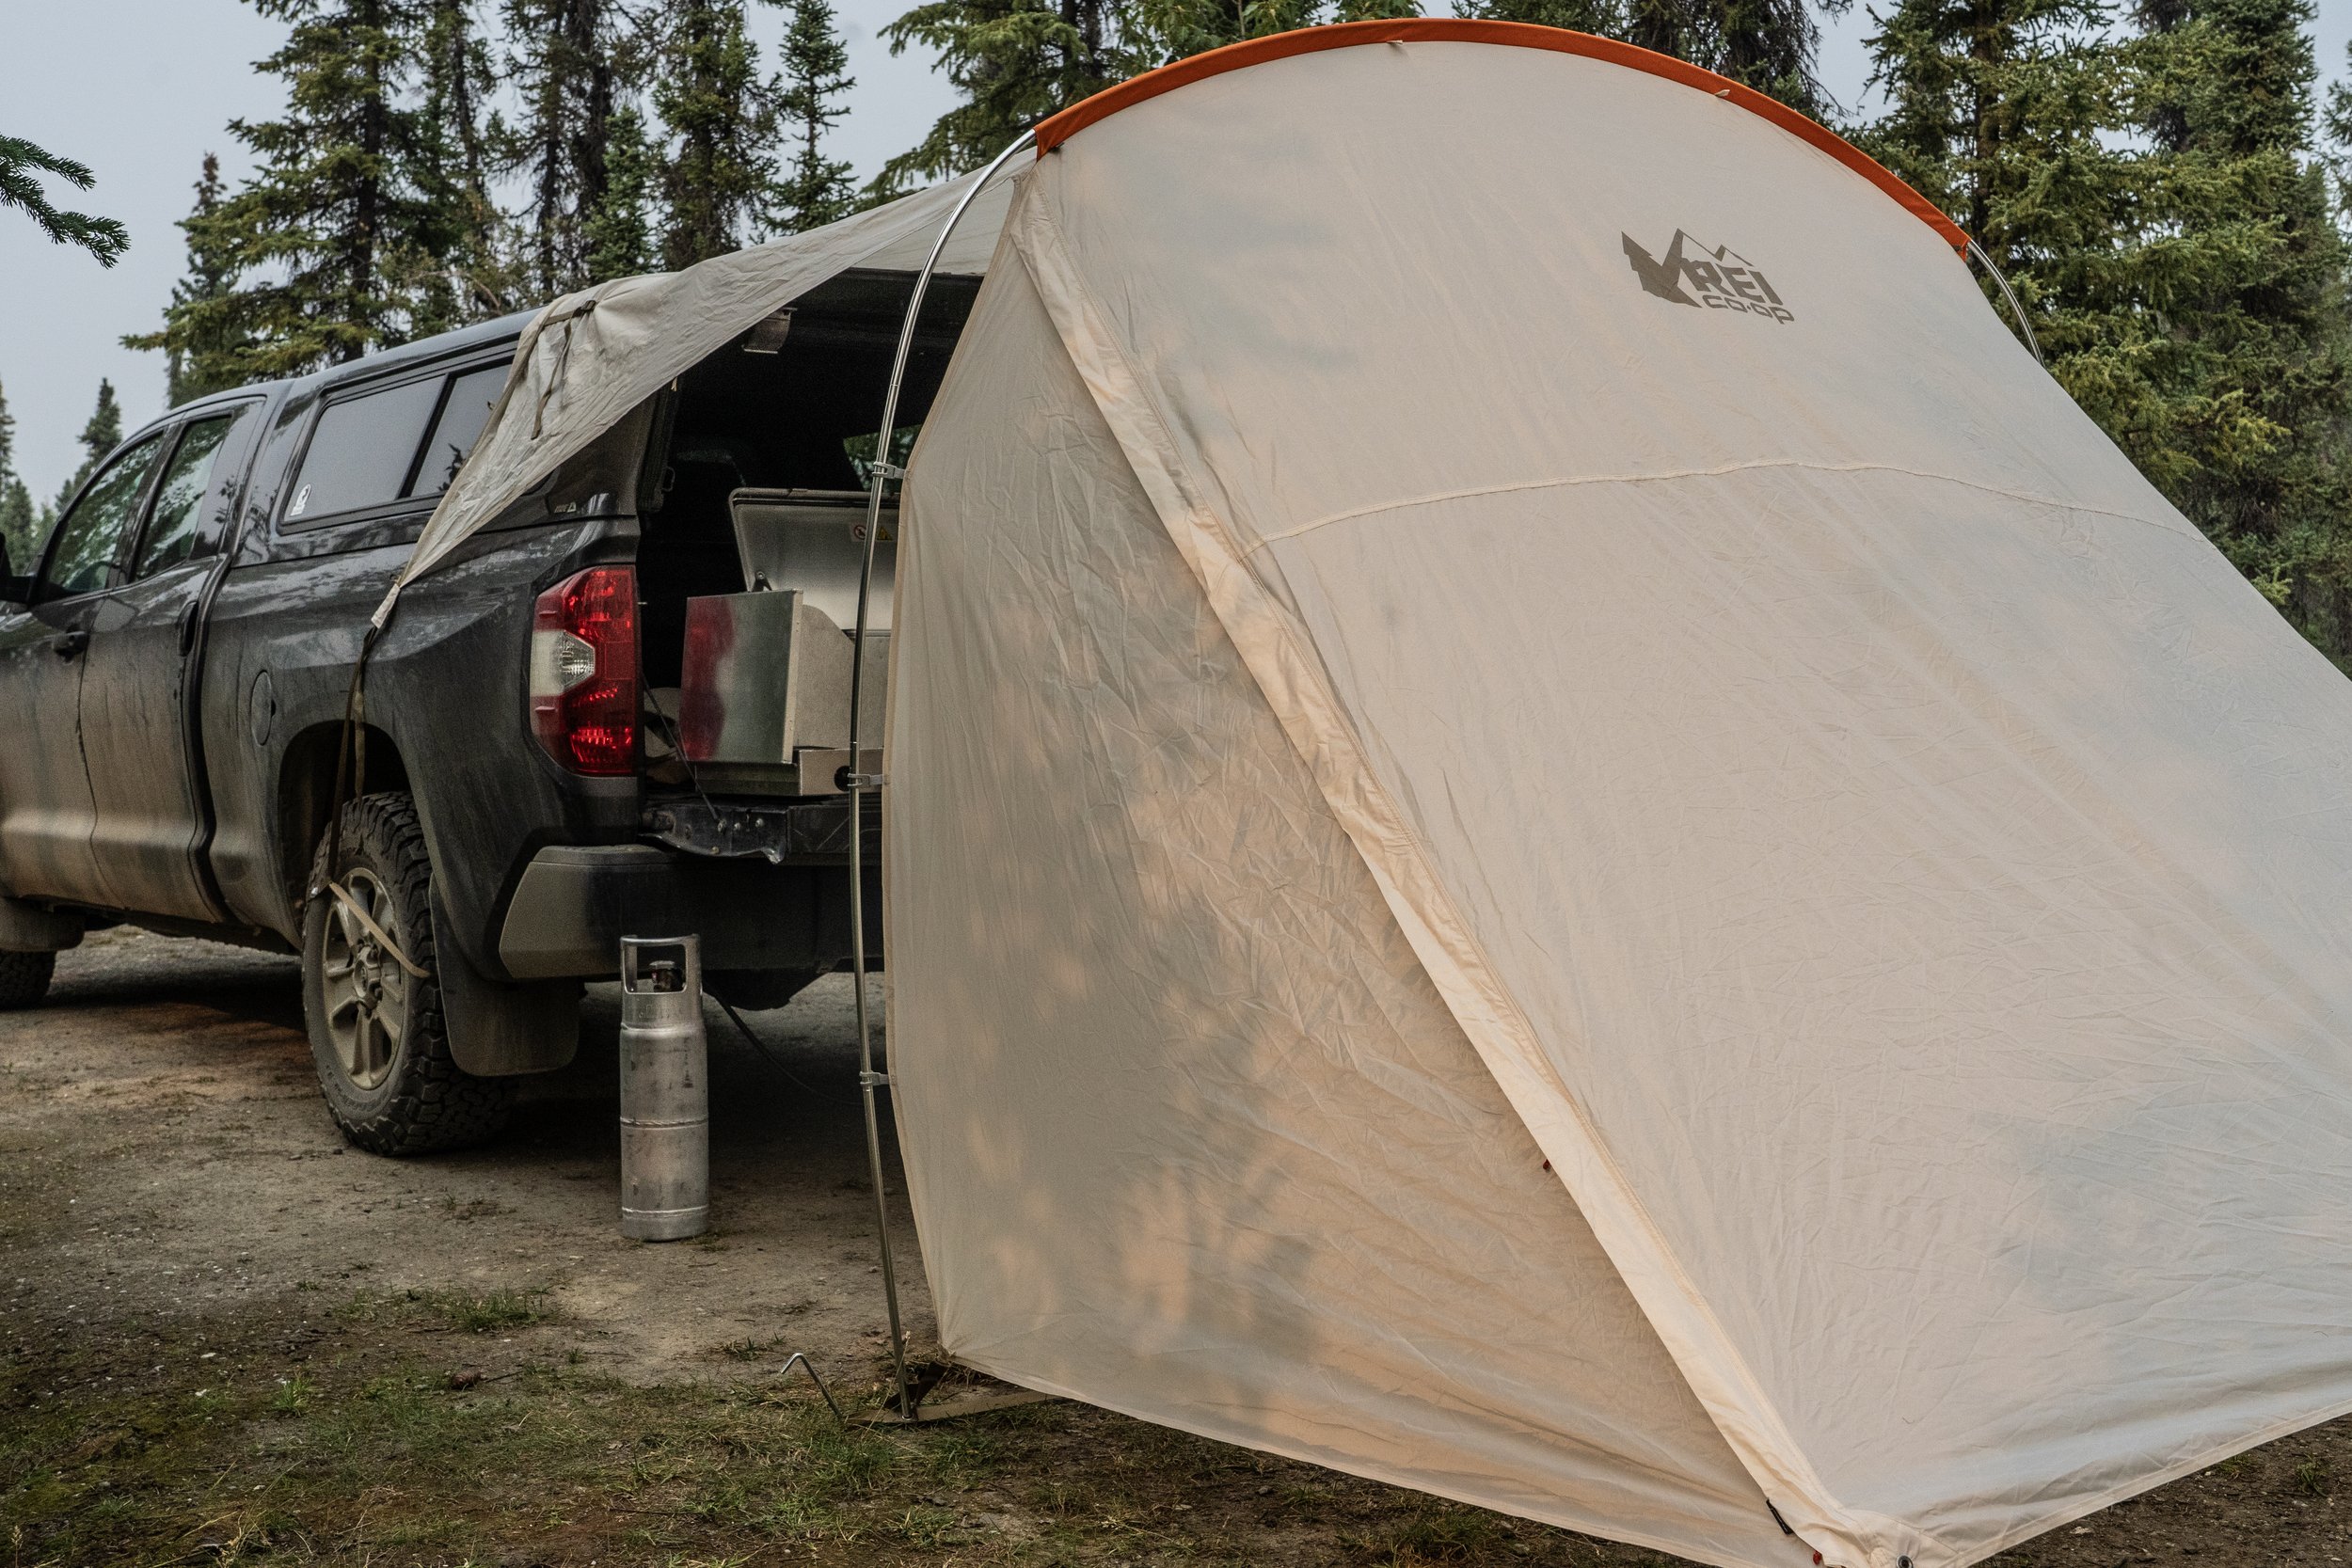
Last year Roseann drove our inherited RAV4 up through Idaho and into Montana and Wyoming to speak at the Northern Rockies Nature Journaling Conference and then run one of her field arts classes at the historic Spear-O-Wigwam guest ranch in the Bighorn Mountains. To provide shelter from sun and rain while camping she bought a “Trailgate” vehicle shelter from REI. Not only did it serve her well, it survived a direct hit from a very large section of a tree during a windstorm, winding up only slightly cock-eyed. She came back completely sold on the product, and we brought a second one to Alaska to use with our Tundra. After two trips with it up here, I’m sold as well—and I just read it is being discontinued and is on sale at REI for a pittance: $104.
The Trailgate uses a single tensioned aluminum pole of substantial 12.8mm diameter. It can be anchored in calm donditions with just two takes at the back, in addition to the straps that connect it to the vehicle via the wheels—either wrapped around the rear tires or threaded through the wheels. (You could also simply stake the ends to the ground alongside the vehicle.) The fabric is UV-resistant polyester, and the total covered area is about 100 square feet. With a tailgate kitchen and chairs placed under the arch of the canopy, we had plenty of room to cook, eat, and relax while staying out of a drizzle camped next to the Klutina River. The canopy drained perfectly. If you don’t need full coverage, the back panel can be unzipped and rolled up.
We found that the Trailgate fit the full-size Tundra better than it did the RAV4, although it was perfectly functional on the smaller vehicle. If you’re in the market for a shelter of this type, grab one while you can.
REI is here.
White Duck's Regatta bell tent—affordable, roomy, and stylish too
Although I have tested and used—and enjoyed—many models and styles of roof tent, I strongly prefer ground tents for overland travel.
Why? Several reasons. First is roominess. Even the biggest roof tent is no more spacious than a large backpacking tent, while the ground tents I like have standing headroom and space for full-size cots (which allow luggage to be stored underneath) plus a table and, depending on the floor size, chairs. You can cook inside if needed, so if inclement weather—say blowing rain—keeps you cooped up for a day or more, you can still function, and even enjoy yourself. Sure, a roof tent can be augmented with a “mullet,” as a friend refers to them—a ground extension with standing room—but they’re still cramped for anything but changing clothes.
Second is weight. The lightest roof tent we ever owned was a clamshell carbon-fiber model from Autohome. At the time (2008) it cost almost $4,000 dollars; it was a . . . cozy . . . fit for two, and yet it still weighed 90 pounds—in addition, of course to the weight of the roof rack needed to support it. Most roof tents weigh far more. Yet the heaviest ground tent I’ve owned, a ten-foot by ten-foot Springbar Traveler, weighed 72 pounds total, and the tent in question today weighs 51 pounds.
Ah, you say, but one doesn’t have to deal with the weight of the roof tent each time it’s deployed. Quite true and a fair argument, but it brings up my next point: weight placement. A roof tent’s weight is carried in the worst possible place, atop the vehicle, where it (and its roof rack support) significantly affects the vehicle’s center of gravity. The total can effortlessly exceed 200 pounds, even if you don’t add the de rigueur jerry cans. I remember on a trip Roseann and I helped lead along the Continental Divide, one very newly restored FJ60 was equipped with a roof tent, and a rack that proved to have seriously flawed gutter-mounted brackets, which began self-destructing on the first day. Eventually it got so bad we removed the entire rack and tent and strapped it down to the massive contractor’s rack atop our support truck. At the end of the first day without the rack and tent, the owner came up to me and said, “Wow, it sure handles better without that weight up there.” And this is not to mention the significant aerodynamic drag added by a rack and tent. Again, a roof-tent fan can legitimately argue for the space saved inside the vehicle, but the cost is steep.
Finally there’s the actual price. The most expensive ground tent we’ve owned was that U.S.-made Springbar, which currently retails for $1,400. A high-quality roof tent is easily double that or more. The savings is more than enough to add cots and very nice sleeping bags—probably the table and chairs as well.
I could mention other issues with roof tents—the hassle of midnight pee breaks, the boat-in-a-storm feel rocking back and forth in a high wind atop a base equipped with springs. But for now I’ll rest my case.
Favorite ground tents in the past include that classic, canvas Springbar Traveler, a clever, stable, and roomy design now so shamelessly copied by Chinese-made pretenders that the company had to introduce its own imported line to compete. (Springbar’s owners endeared themselves to me forever years ago after they sent me a demo unit to review and, when I called to arrange shipping it back, asked me to donate it to a local Scout group instead.) I also like the Black Pine Turbo Tent with its integrated, jointed poles that allow pitching of the frame and canopy in a couple of minutes (although the fly is separate). And I have a soft spot for the Australian OzTent and its 30-second deployment, although the stowed tent is too long to fit inside most vehicles.
I’ve just added a new one to that favorites list: the White Duck Regatta bell tent.
I’ve long been intrigued by the bell tent design—as contrasted to a square wall tent—for a few reasons. The shape is more naturally aerodynamic than a flat-sided tent, and it doesn’t matter if the wind changes direction. The central pole is under nothing but compression stress, which renders it virtually immune to bending or breakage. The conical roof effectively sheds rain and snow. And with proper peak venting condensation should be minimal.
So when Matt Glass, a longtime industry representative, contacted me with the offer of the White Duck Regatta, I jumped at the chance. Since Roseann and I were planning a recce trip up Alaska’s Dalton highway, we’d have a perfect opportunity to put it to use. We chose the ten-foot model as a reasonable compromise between space and weight/bulk. Total weight of the ten-foot version is 51 pounds in its canvas duffel, but removing the pole bag and stake bag first makes it much easier to handle. The Regatta is also available in 8, 13, 16, and 20-foot diameters.
First trial pitch took 20 minutes. Note flap over stove jack, and peak vents.
The Regatta tents are all made from single-walled 8.5-ounce cotton duck, UV-treated canvas, in your choice of three earth-toned colors. This material sheds moisture the old-fashioned way: The fibers swell when wet and effectively block water penetrating. Thus no fly is needed, reducing weight and complexity. Cotton canvas, being heavier per unit area than nylon or polyester, is also more naturally resistant to flapping, yet without the fly it also creates a brighter interior. The Regatta incorporates a heat-proof stove jack for winter camping. The floor is sewn-in polyethylene—tough, completely waterproof, and easily cleanable with a sponge.
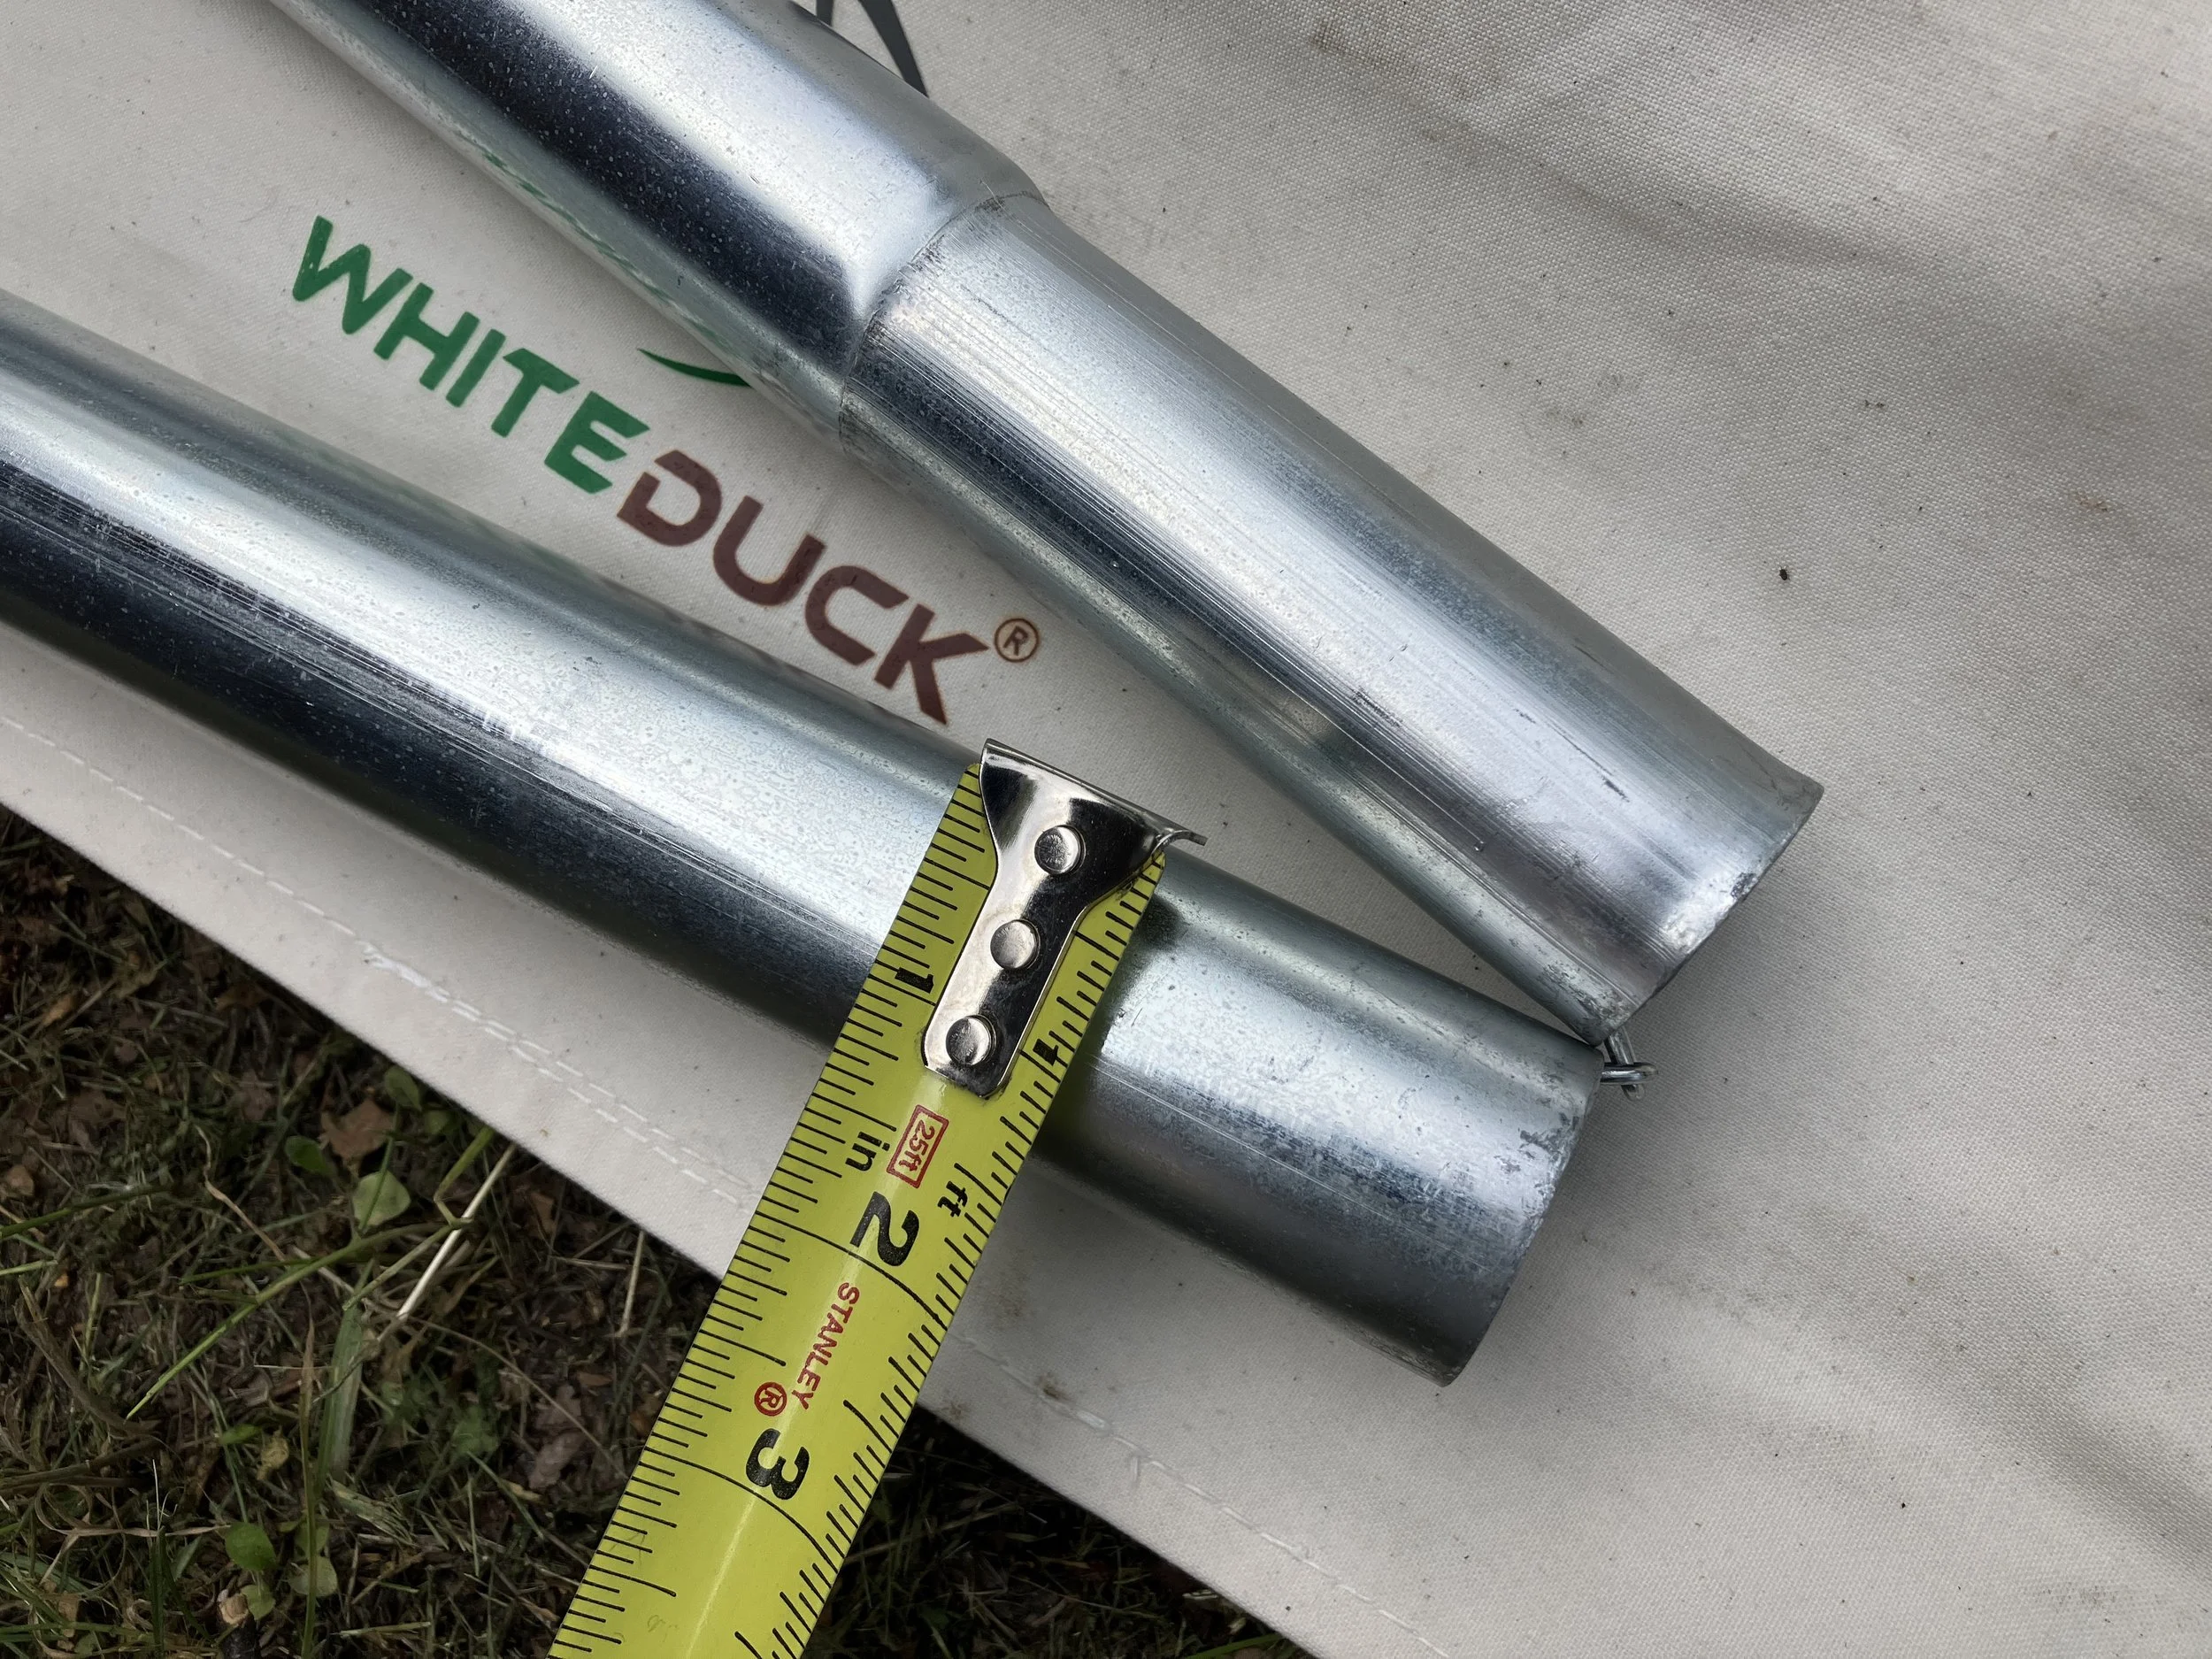
The center pole of the Regatta is a massive 1.5 inches in diameter—neither you nor the weather gods will bend this thing. It incorporates a steel loop near the top for hanging a lantern. The single door pole is an inch in diameter. I was overjoyed to see the tent’s outside perimeter stakes were J-shaped rebar—heavy but indestructible. The floor perimeter stakes, which aren’t under significant tension, were lighter round steel pegs which I nevertheless replaced with hardware-store 8-inch nails. The kit even includes a soft-faced no-bounce mallet. (I replaced this too, with a two-pound sledge, partially because the nail heads would have destroyed the face of the included hammer.)
Center pole is 1.5 inches in diameter. The sections are joined by elastic cord, connected by chain at the joints to prevent chafe.
Pitching is simple. Lay out the tent (door closed) and push in the floor’s perimeter pegs, stretching the floor to shape. Open the door, locate from the outside the cone-shaped receptacle in the canopy for the center pole, insert the top of the pole from the outside, then walk in the bottom and set in place. Insert the door pole, then stake out and tension the outside perimeter stakes. My first attempt took no more than 20 minutes; I soon had it down to a bit over 10 without rushing.
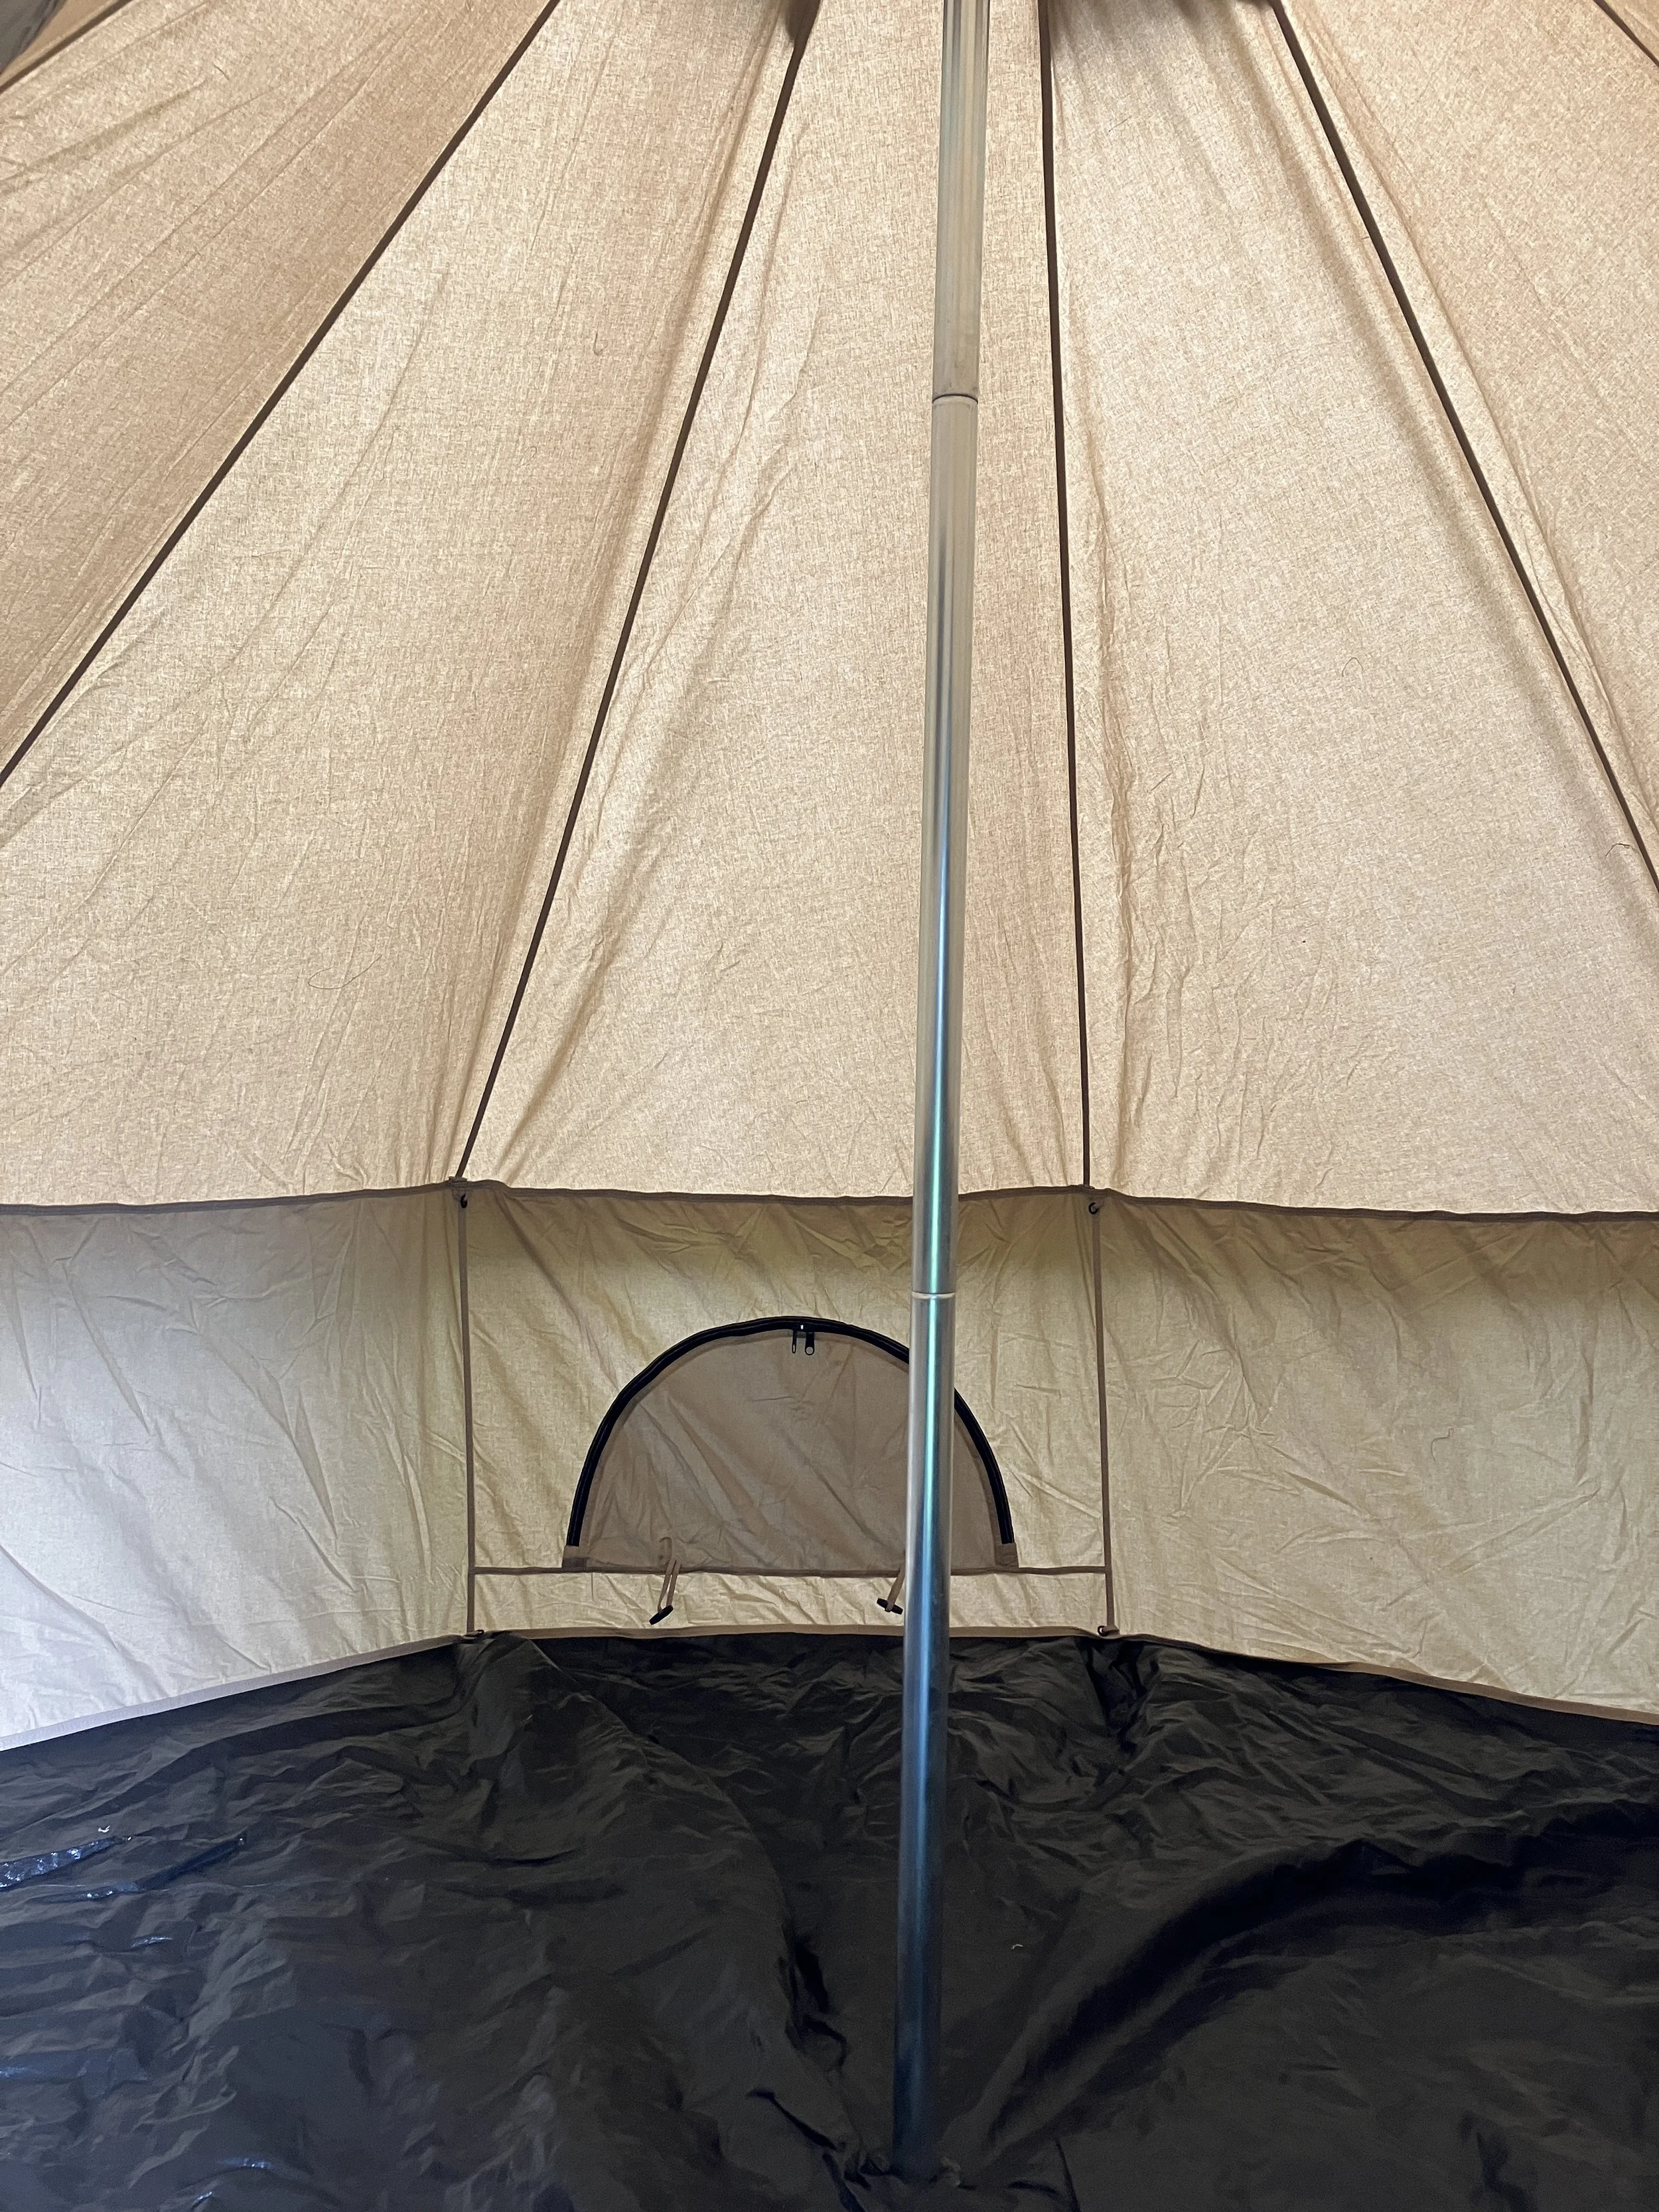
Three arched screen windows, the screen door, and three peak vents allow good ventilation and should minimize condensation. There is over seven feet of headroom around the center pole; the walls are 2’7” tall in the ten-foot model.
Single-wall design creates a bright interior. Floor is impermeable polyethylene.
One downside of the nonagonal shape of the Regatta is that cots won’t snug up tight against the interior walls, as they do in a wall tent. There’s a space left behind them—which of course you can use for storage. I found the best way to arrange two cots was to angle them in an inverted V toward the back of the tent, heads together. This left plenty of room around the pole and in front. Of course depending on your cots you could fold them away during the day. Or if, God forbid, you are sleeping on the floor like savages, just roll up your bag and pad.
Another downside to the bell tent is that you need about a 20-foot diameter circle to pitch the ten-foot model, to ensure the perimeter stakes are out far enough to pull the walls erect. I’ve mused on hacking this by fabricating individual poles for the wall guy-out points, which would enable staking the perimeter lines much closer. But so far I haven’t had trouble finding a large enough pitching area.
The Regatta performed perfectly on our Dalton excursion. Warm weather meant there were still a few late-season mosquitoes around, but the tent was impregnable. The zippers operate smoothly and more quietly than many other tent zippers of my experience. The canvas door can be tied back for extra ventilation. The optional canvas awning would provide a generous front porch; it’s on my list to obtain, although you could also rig many different tarps to perform the same function, anchored in the middle on the top of the door pole.
The ten-foot Regatta is $700, and I consider it an excellent buy. It’s made in Pakistan.
A last note: This tent just looks right at home in the Alaska bush. We stayed at one BLM camp, and I saw two different passers-by walking their dogs point it out to their companions. Nothing wrong with a little style in addition to function.
White Duck offers free shipping to the lower 48 states. They are part of the Better Cotton Initiative (BCI), a global effort to ensure sustainable cotton production. White Duck is here.
Redarc's new Alpha150 lithium battery—potent and pricey.
So, you’ve become used to the concept of a $1,000 battery. How about a $2,300 battery?
It makes perfect sense that Redarc, the premier Australian maker of battery-management systems, would produce their own lithium battery. It also makes sense that it would debut at the very top of the heap in both performance and price.
In addition to its impressive 150Ah storage capacity, the Alpha150 boasts a continuous discharge capability of 200 amps, allowing it to power a 2,000-watt inverter. Even more impressive is its massive 135-amp charge rate, which allows a full recharge (if your system has that much input capability) in 1.1 hours.
The Alpha150 incorporates a cell heater, which helps expand its operating range to between -4ºF and 140ºF (-20ºC to 60ºC) for discharging, and between -22ºF to 113ºF (-30ºC to 45ºC) for charging. Note, however, that last figure, which still precludes placement in an engine compartment.
Redarc claims a cycle life of 5,000 discharges at 100 percent DoD, which is by some distance the highest cycle life of which I’m aware in a Lithium battery, and should go a long way toward amortizing that painful initial outlay.
Despite that capacity (and keep in mind the much higher energy density of lithium cells compared to AGM batteries) the Alpha150 weighs just 34.2 pounds (15.5 kg).
Note, however, that the warranty on the Alpha150 is just five years. By comparison, for example, an X2Power Group 31M 100Ah AGM battery from Batteries Plus, with a list price of $550, includes a four-year free replacement warranty. By now we’re all aware of the advantages of lithium technology—even at a theoretical 200Ah, two of those X2Power units wouldn’t match the capacity of a single Alpha150, wouldn’t charge a fifth as quickly, and would weigh a hundred and fifteen pounds more.
Nevertheless, it’s my opinion that if lithium battery manufacturers are going to boast about lifespans ten times longer than AGM batteries, and charge a premium price for it, they need to start offering commensurate warranties. I would not want to spend $2,300 (or $1,000 for that matter) on a deep-cycle battery, have something go wrong six years later, and have the manufacturer shrug and say, “Sorry,” when I complain.
I’m waiting eagerly for the day when the makers of lithium batteries become confident enough in their own products to offer consumers warranty protection as durable as they assure us those products are.
Ineos Grenadier Quartermaster announced for the U.S.
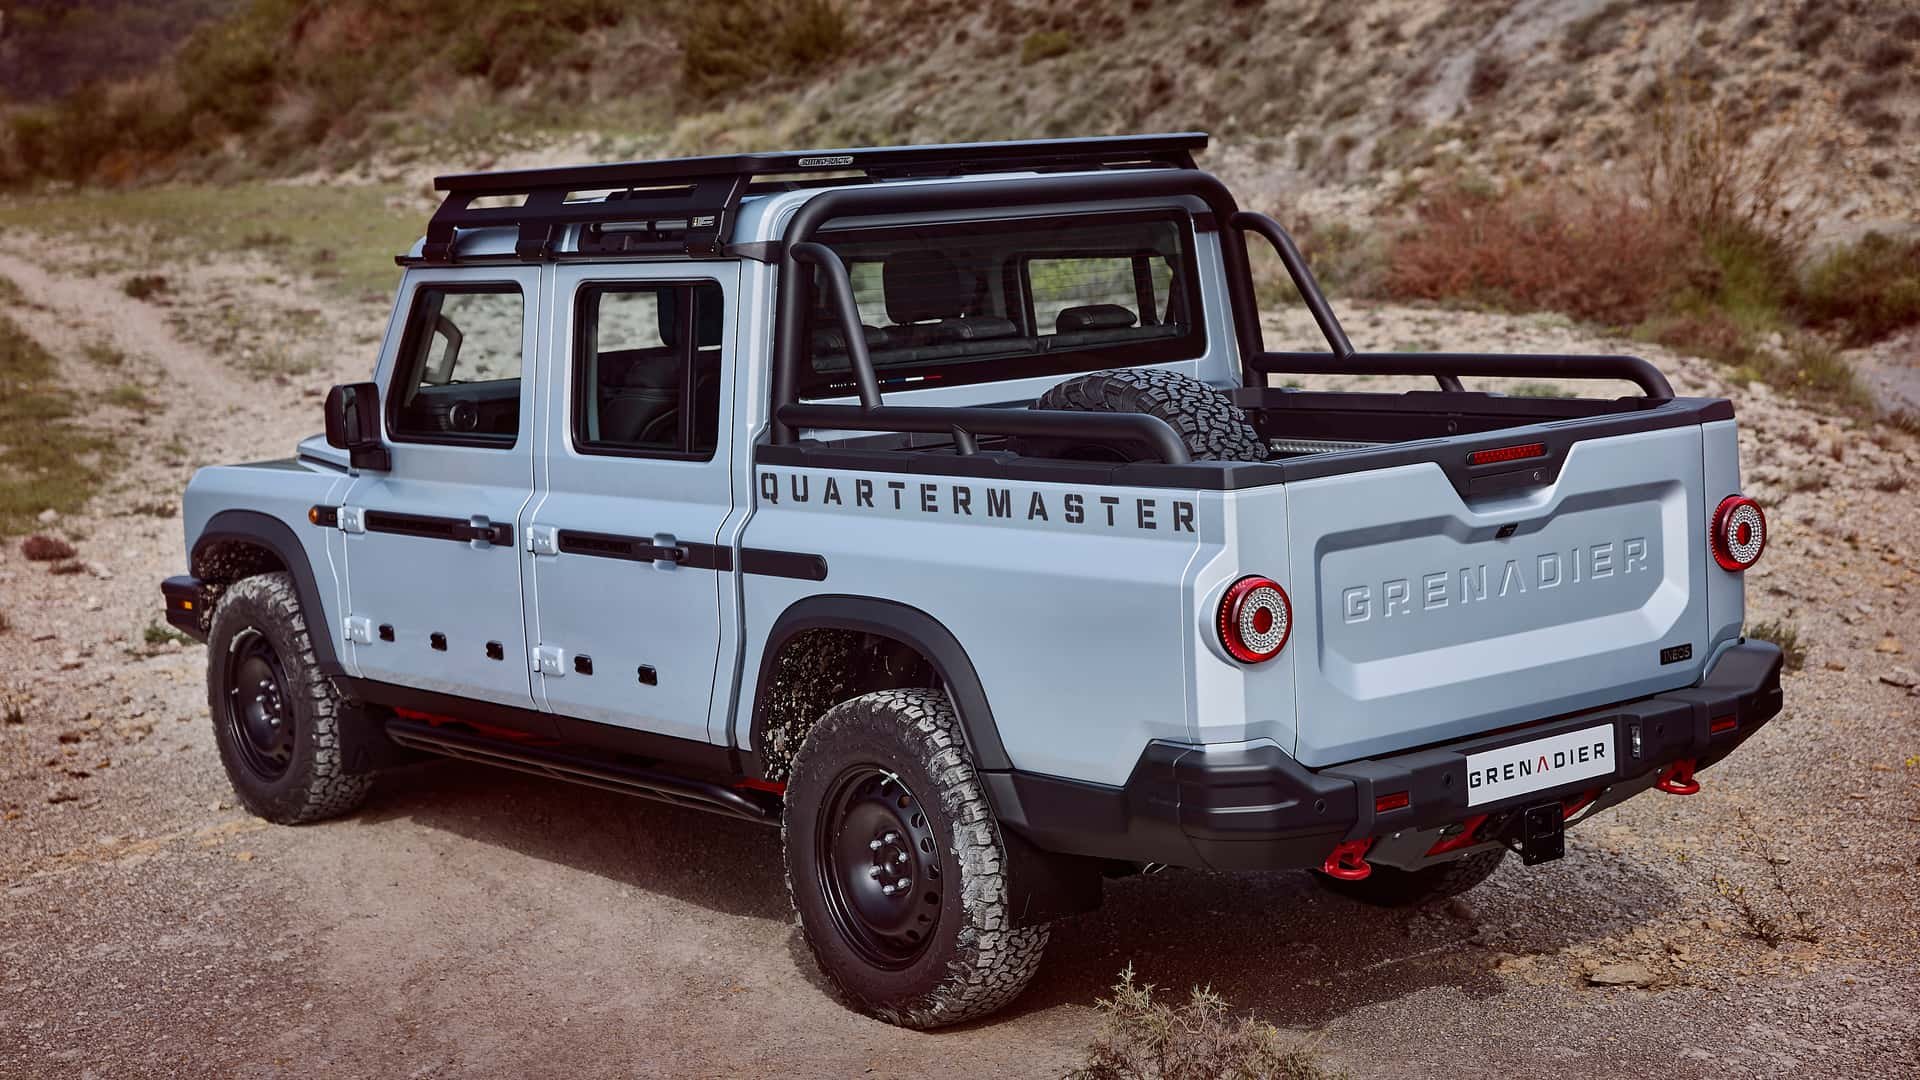
In a not-too-surprising move, Ineos has announced that its dual-cab pickup version of the Grenadier, the Quartermaster, will be imported to the U.S.* I waited a week before writing this, trying to find figures on wheelbase, but I haven’t yet been successful. It appears to have virtually the same wheelbase as the SUV version, but with a significantly longer rear overhang. If true, this will obviously reduce the Quartermaster’s departure angle while not affecting its breakover angle.
Surprisingly, cargo capacity remains virtually identical at a reasonable but not outstanding 1,675 pounds.
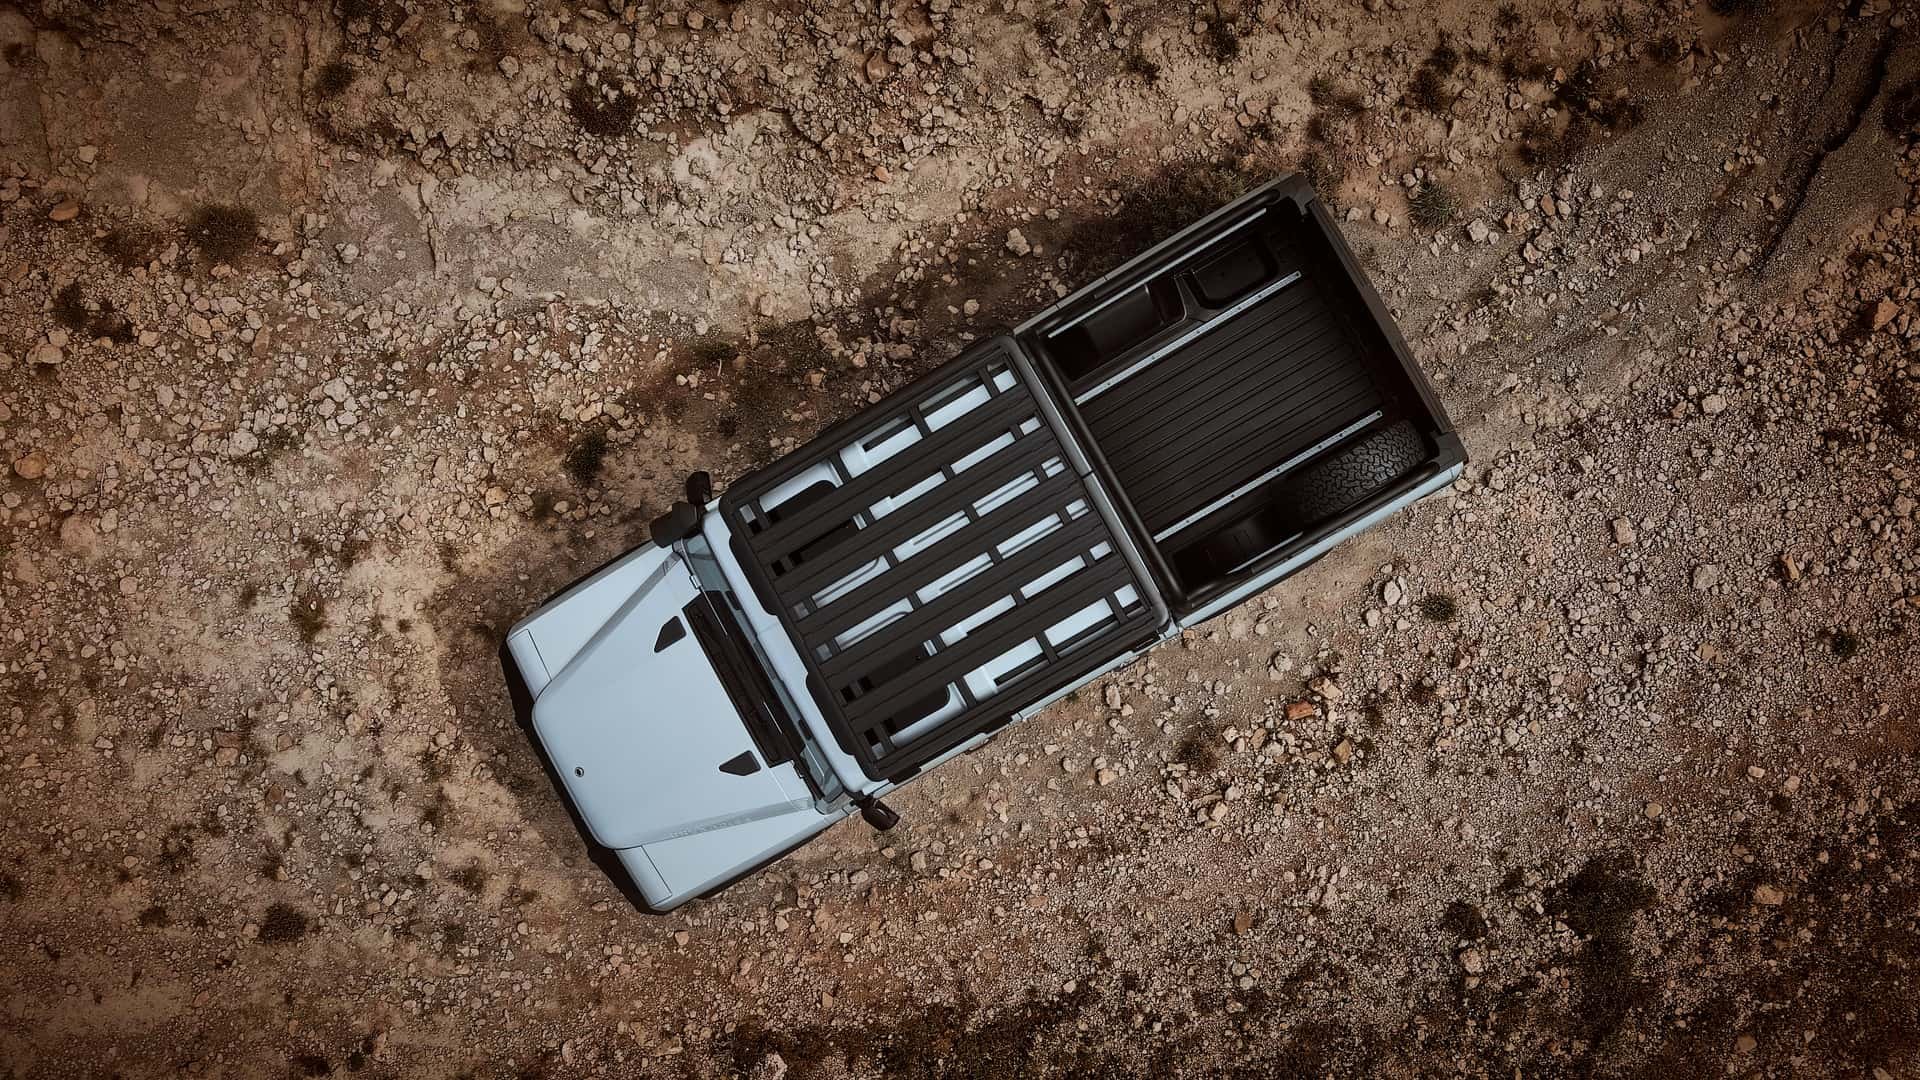
Bed dimensions are reportedly designed to fit a standard European pallet, which is meaningless to U.S. overlanders. Dimensionally it’s 61.6 inches long and 63.7 inches wide. Not many of us will be sleeping in the bed with the tailgate up. And there’s the matter of the spare tire, taking up a considerable amount of interior room, as it did in the original Range Rover. Notwithstanding the Quartermaster’s fine stock rear bumper, I’m sure the aftermarket will produce a swing-away carrier soon after the truck is introduced in 2024.
Despite the short bed, with an Alu-Cab-style clamshell camper one could build up a very livable, if compact, interior, or perhaps install a lightweight Four wheel Camper with an interior such as this one on a Jeep Gladiator. Of course you’d be flirting with the GVWR limit quite soon.
More details and thoughts as I learn and come up with them . . .
*The Ineos Grenadier SUV is built in France. Logically the pickup would be too, but if so Ineos would run head-on into the U.S. 25-percent tax on imported pickups, which the Japanese have been avoiding for decades by building their trucks here. Time will tell how the company will handle the issue, although Sir James Ratcliffe has enough cash to do some very heavy lobbying in the U.S. to have that silly bit of legislation—enacted purely for the profit of domestic truck makers—rescinded.
Hint: When using “Search,” if nothing comes up, reload the page, this usually works. Also, our “Comment” button is on strike thanks to Squarespace, which is proving to be difficult to use! Please email me with comments!
Overland Tech & Travel brings you in-depth overland equipment tests, reviews, news, travel tips, & stories from the best overlanding experts on the planet. Follow or subscribe (below) to keep up to date.
Have a question for Jonathan? Send him an email [click here].
SUBSCRIBE
CLICK HERE to subscribe to Jonathan’s email list; we send once or twice a month, usually Sunday morning for your weekend reading pleasure.
Overland Tech and Travel is curated by Jonathan Hanson, co-founder and former co-owner of the Overland Expo. Jonathan segued from a misspent youth almost directly into a misspent adulthood, cleverly sidestepping any chance of a normal career track or a secure retirement by becoming a freelance writer, working for Outside, National Geographic Adventure, and nearly two dozen other publications. He co-founded Overland Journal in 2007 and was its executive editor until 2011, when he left and sold his shares in the company. His travels encompass explorations on land and sea on six continents, by foot, bicycle, sea kayak, motorcycle, and four-wheel-drive vehicle. He has published a dozen books, several with his wife, Roseann Hanson, gaining several obscure non-cash awards along the way, and is the co-author of the fourth edition of Tom Sheppard's overlanding bible, the Vehicle-dependent Expedition Guide.


