
Overland Tech and Travel
Advice from the world's
most experienced overlanders
tests, reviews, opinion, and more
Outdoor Retailer, day 3—security
Securing our gear (or your wallet and passport) is always top on our mind, whether locking up to go on a hike at Grand Canyon or shopping for produce in Congo. Here are few security accessories we spotted at the show:
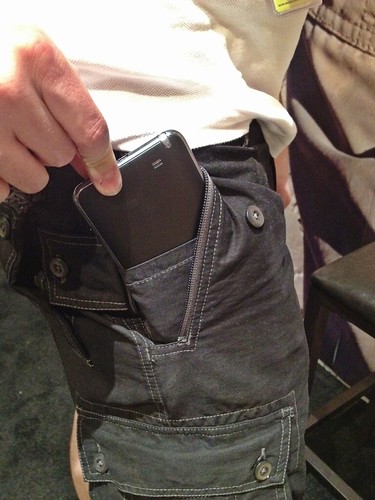 P^cubed pants (pickpocket-proof) have multiple layers of security, from super tough fabric and thread to triple layer pocket openings. From Clothing Arts.
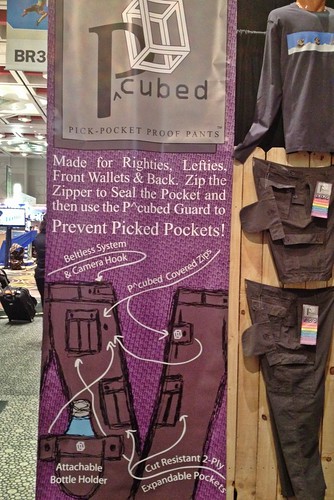 Banner at the Clothing Arts booth explaining the P^cubed pants.
 TravelOn's security purses look like a good alternative if you need to carry a shoulder bag. Each has a steel-wire net incorporated, and slash-proof strap. A cross-body carry is recommended to avoid snatch-and-run, obviously.
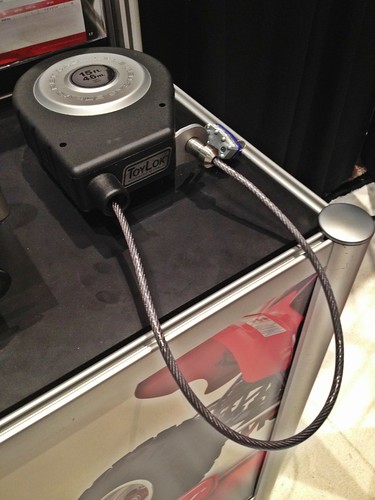 ToyLok's retractable-cable steel lock can be secured to your vehicle and easily deployed to lock bikes or boats. They are considering a smaller version for motorcycles.
Outdoor Retailer 2012, day 2 - ultralight tents
At last count I owned 14 tents, and I might have missed a couple tucked away somewhere or loaned out. Clearly there's a bit of an obsession there, and I'm finding enough to keep it stoked at the OR show. Most fascinating are the ultralightweight one and two-person tents employing high-strength canopy materials that look like they'd be blown apart by an errant sneeze. Don't be fooled - they're astonishingly rugged.
It's not new, but the incredible Terra Nova Laser Ultra 1 exemplifies the genre. The "1" refers to its weight - a staggering one pound, five ounces - with titanium stakes. Or are they toothpicks?
 Scott Christoffel of Terra Nova with the Laser Ultra 1The Laser is designed primarily for adventure racers, and it will sleep two of them, probably violating laws in at least 27 states. But other Terra Nova models only slightly less radical could serve bicyclists or anyone with a 600-pound GS1200 needing to save every last ounce elsewhere. And the company's budget Wild Country line, which employs polyester fabrics with polyurethane coatings rather than the premium silicone-impregnated fabrics used in most of the Terra Nova line, looks to represent a solid value.
Here's another ultralight model from Easton, two pounds nine ounces with carbon fiber poles:

And another from Sea to Summit, the Specialist Duo:

There was plenty to see in family-sized tents as well, including this Big Agnes Flying Diamond 8, with 112 square feet of floor space and six feet of headroom.

More tomorrow . . .
Outdoor Retailer, day 1
Overland Tech and Travel arrived at Outdoor Retailer in sunny Salt Lake City this afternoon. We managed to visit a couple dozen booths before the happy hours began. Over the next three days we will be reporting on new gear as well as just cool stuff. Follow our Flickr Outdoor Retailer set as well (http://www.flickr.com/photos/conserventures/sets/72157630877676310/with/7701752420/).
Here's a preview:
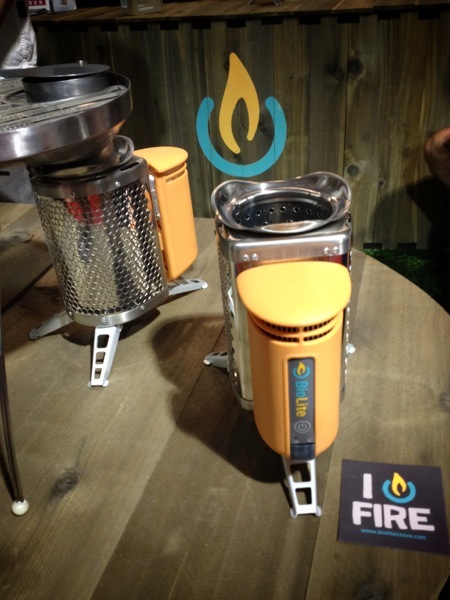
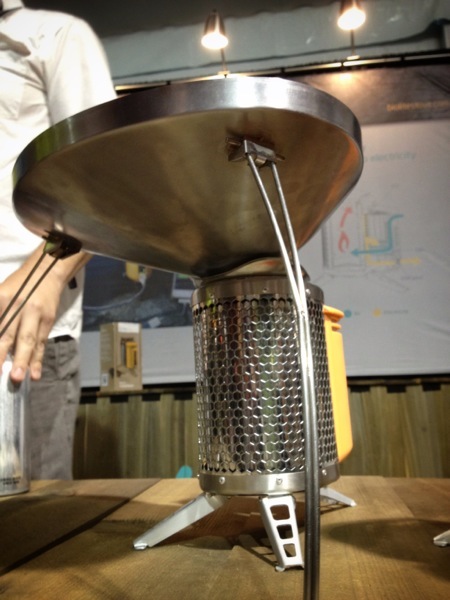
BioLite stove: burns wood (think Kelly kettle on steroids) and generates electricity for charging phones and laptops. Brilliant. A prototype heat-concentrating cooktop, below, was also on display. BioLite.com
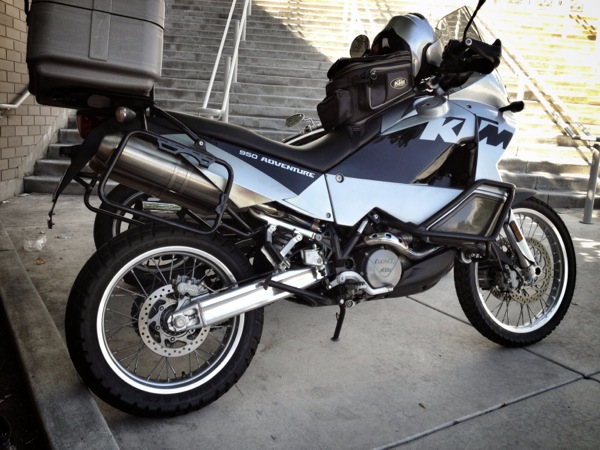
Stealth gray KTM 950 Adventure parked in the shade outside the south entrance.
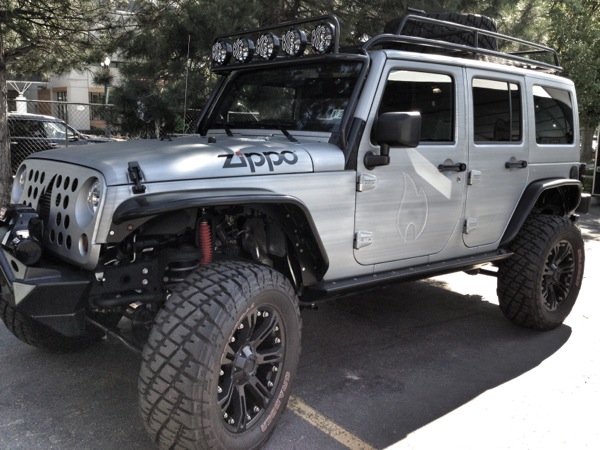
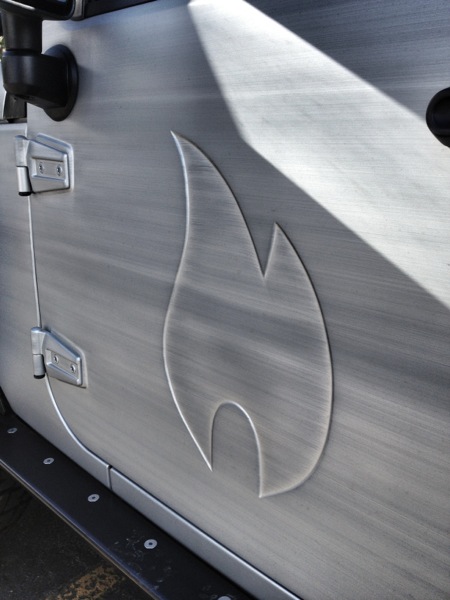
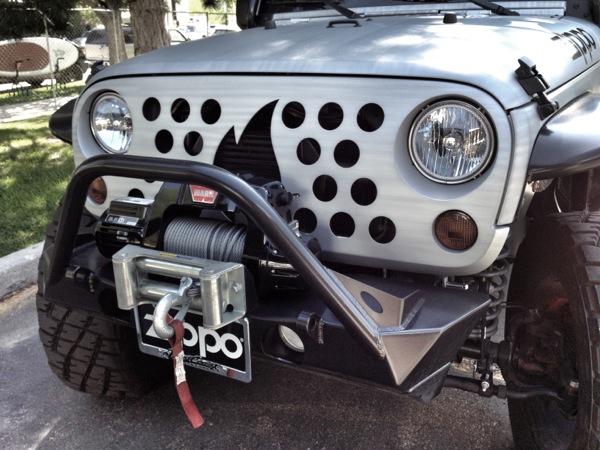
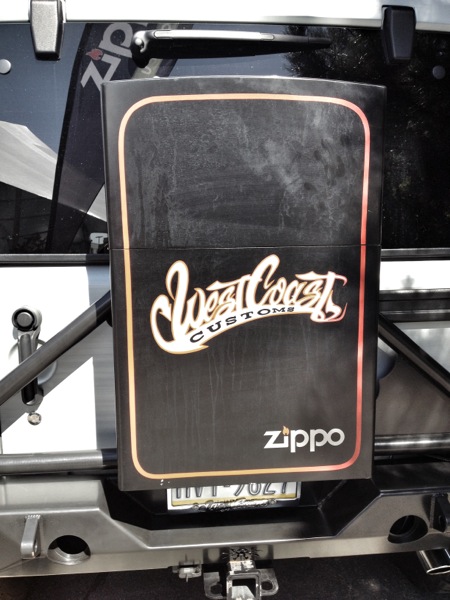
Zippo's beautifully crafted brushed "aluminum" Jeep JK Wrangler, with embossed doors, flame grille, and lighter rear rack box.
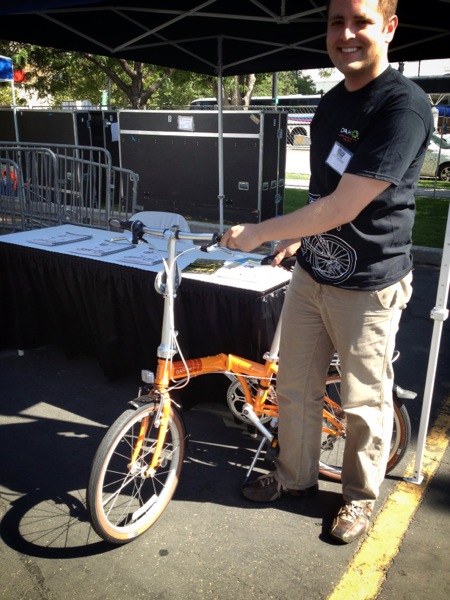
Dahon bicycles fold up into small packages, perfect for overlanding around the globe.
Lifeproof's incredibly slender iPhone case is nevertheless shock-resistant (two-meter drop), dustproof, and waterproof to a depth of six feet - which means your phone will now easily survive being dropped in the toilet.

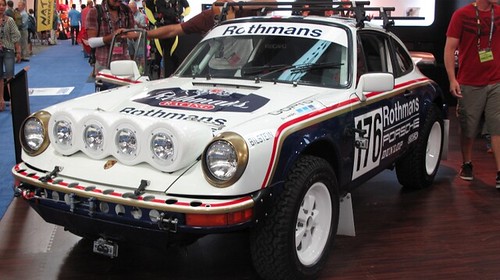
GoPro's display featured this spectacular replica of a legendary Rothmans Paris-Dakar Porsche 911 SC RS.
Warn M8000—ultimate overlanding winch!
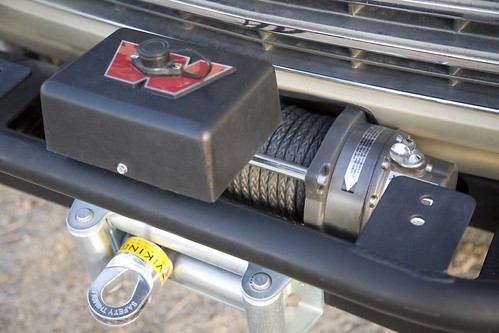
I wrote that title deliberately. One of my eye-rolling pet peeves as a reader and editor is the ubiquity of magazine headlines and cover blurbs that begin with, “Ultimate”—followed by an utterly non-ultimate product—followed by a “!” Firearms periodicals seem especially obsessed with the term. I’ve forgotten how many times I’ve been breathlessly introduced to the “Ultimate Compact .45!” or the “Ultimate Tactical 9mm!” (And don’t get me started on the “tactical” lunacy.)
Of course there is very rarely such a thing as an “ultimate” anything (although Fuller’s 1845 might come close in the bottled beer category). There is only, at best, the ultimate compromise—and this applies universally to the equipment we add to our vehicles. High quality or low price? Strength or light weight? Multi-function operation or ease of use?
If you’re looking at winches for an overlanding vehicle, there’s an additional question to ponder: Do you really need one at all? I addressed this issue some time ago (click here to go to article), but now we’re going to assume you’ve decided that the advantages outweigh the disadvantages, and are planning to install one. (Either that, or you’ve simply succumbed helplessly to winch envy.) In either case, how do you minimize those disadvantages?
Aside from cost, the salient drawback to a winch is weight. Not just the weight of the winch and line and fairlead, but also a properly constructed bumper on which to mount it, and perhaps the dual battery system you’ll install to make sure you don’t run your only source dry during a long, maximum-amperage pull. And that weight is in the worst possible spot, way out in front of the vehicle where it applies leverage on the suspension. Aside from spending yet more money on suspension modifications, an obvious solution is a very light winch, but then we run into a compromise: light weight equals low power.
It’s axiomatic that a winch should be rated at around 1.5 times the loaded weight of the vehicle on which it is mounted. Why 1.5 times? Shouldn’t a 6,000-pound winch be perfectly adequate for a vehicle that weighs 6,000 pounds all up? Theoretically, yes, but several things complicate matters. First is the simple fudge factor inherent in the rating of many products. Second, and more universal, is the fact that all winches are rated with just a single layer of line on the drum. More layers equal less rotational leverage for the winch and less pulling power (roughly ten percent per layer)—and it’s not always possible or practical to arrange a winch recovery so that most of the line is pulled out first. Additionally, substrate makes a difference: For example, deep, sticky mud adds significantly to the effective weight of any stuck vehicle, and a large boulder in the middle of a steep uphill pull can spike the effective weight well past its actual mass. Finally, off-center pulls and other awkward situations add to the load on the winch. So the 1.5 factor is a wise generalization.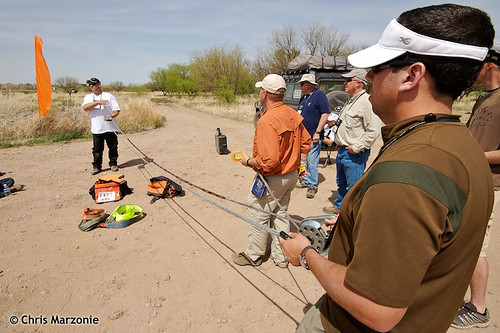 Rigging a winch line with a pulley block at Overland Expo 2010. Photo by Chris Marzonie
On the other hand, technique can optimize the power of a winch. First is making sure you have as much line out as possible, either by backing up the anchor vehicle or picking an anchor tree that’s farther away. You can also use a redirected pull to get more line out, for example by attaching a pulley block to a nearby tree, and running the line though that to another anchor tree back closer to you. You’ll lose a bit to pulley friction, but if you can get a couple of layers of line off the drum it will be worth it.
However, the best way to maximize a winch’s capability is to rig a double-line pull: from the winch of the stuck vehicle through a pulley block on a fixed anchor vehicle or tree, then back to the stuck vehicle (or, if you’re rescuing a stuck vehicle with your winch, to a pulley block attached to the rescuee and then back to your vehicle). This setup halves the line speed of the winch but doubles its power, in addition to getting out more line and reducing the layers on the drum. Obviously, relying on this technique also halves the reach of your winch, but, at least in my experience, in the vast majority of overlanding situations (with the glaring exception of tropical-rainy-season mud), 45 feet of usable line is enough to access a natural anchor or another vehicle—and if not, a winch line extension will give you the reach you need. You can gain even more power by adding another pulley block and rigging a triple-line pull, at the expense of even less reach. (Remember to always leave at least five full wraps of line on the drum if you get down to the first layer.) 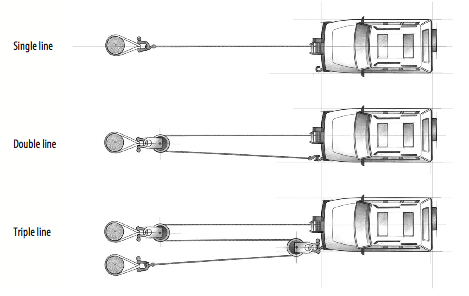
With the limitations of reach accepted, the 1.5 factor becomes somewhat flexible. Which brings us to the Warn M8000 (and its new brother, the M8000-s).
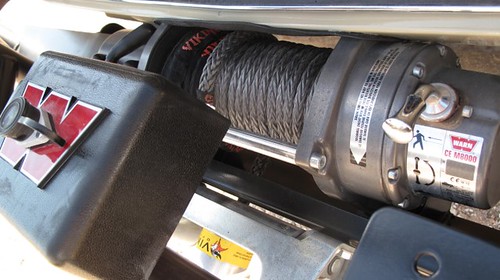
The M8000 is rated at—surprise—8,000 pounds, which, for example, is a bit under the 1.5 factor for our FJ60 when it’s fully loaded with gear, fuel, and two people. A lot of later full-size SUVs would blow past it before a single sleeping bag was tossed inside. On the other hand, it’s right in the ballpark for many compact pickups and small SUVs. And the M8000 is very light. I recently had ours off while the vehicle got a full repaint, and put each component on a scale. The bare winch, with no line or solenoid box, weighs only 35.6 pounds. The solenoid box and 1/0 cables to the battery total 7.2 pounds. The steel roller fairlead is 11 even, and 100 feet of Viking synthetic winch line adds a hardly-worth-measuring 2.8 pounds with a safety thimble (the standard steel cable is 13.2 pounds without a hook or thimble).
That’s a total of just 56.6 pounds—and we could reduce that to under 50 pounds with an aluminum hawse fairlead. Interestingly, the Warn M8000-s comes with synthetic line and an aluminum fairlead, and its advertised weight is 55 pounds. Mount it to an Aluminess bumper—which can be ordered without the bull bar so few of us really need—and you’ve got a complete system for around 125 pounds.
The M8000 might be light, but it’s also built to last. I’ve seen, either in person or in photos, disassembled examples of three “different” discount-brand winches (all of them most likely built in the same factory, the Ningbo Lift Winch Manufacture Company in Ningbo Mingzhou Industrial City, China). All appeared to be virtual clones of the M8000—until you looked inside, where compromises in motors, gear trains, and wiring were apparent.*
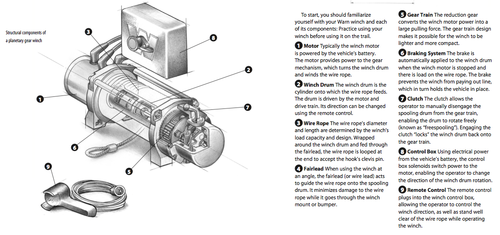
The motor is the heart of the winch, and it consists of two main components: a central set of wire coils wrapped around the shaft, called the rotor (or armature), and an outer assembly called the stator. When current is supplied to the rotor and stator it produces opposing magnetic fields, which cause the rotor and its attached shaft to turn via the attracting and repelling forces of the fields. The rotor is called an electromagnet because it only becomes magnetized when current passes through it. The stator can also comprise a wire coil magnetized by current, in which case the assembly is called a “series-wound” motor. Alternatively the stator can be constructed with standard metallic magnets that are thus always “on,” as it were. This is then known, logically, as a “permanent-magnet” motor.
Permanent-magnet motors are cheaper to make and use slightly less current (since none is needed to magnetize the stator). However, they overheat more easily than series-wound motors, and the magnets can lose their field strength over time (and temporarily in very cold weather). Permanent-magnet motors work very well in light-duty situations, but for high-stress applications series-wound motors—such as that found in the M8000—are superior. However, not all series-wound motors are the same. Hidden differences in wiring, bearings and bushings, and tolerances mean that in a winch (or any other electrical appliance) the standards demanded by the manufacturer still determine the final quality of the assembled product.
 Click on image to open in larger window.
The other major electrical component in a winch assembly is the switch gear that controls power to the motor, typically housed in a plastic box attached to the winch. Traditionally, these have been relays (commonly called solenoids). A relay in our application is essentially a mechanical on-off switch capable of handling large amounts of current, controlled by a smaller-capacity switch elsewhere—the winch’s remote in this case. A relay thus shortens the length of heavy-duty cable that would otherwise be necessary to insure adequate amperage to the winch (the same holds true for other high-draw devices, such as driving lights, that use a relay and a remote switch). Winches usually employ relays in multiples—one or two to handle power-in switching, one or two to handle power-out.
Since relays utilize moving mechanical contacts to transfer current, they are subject to wear and corrosion. Often the result will be that the relay simply stops working, but very rarely a worn relay will stick in the “on” position—with predictable ramifications if you’re operating a powerful electrical device which you need to be able to turn off right now.
In the last few years, solid-state devices known as contactors have begun to replace relays in many winches, including the M8000. A contactor employs a high-capacity semi-conductor to route current; thus there are no moving parts to wear out or corrode. Contactors can still fail, but it’s virtually impossible that they would do so in the “on” position.
The last link in the winch assembly is the gear train by which the motor turns the spool and pulls in (or lets out) the line. Since the motor turns at a high speed, its revolutions per minute must be reduced considerably, both to gain mechanical advantage and to keep the line speed to a manageable level. There are three main types of gear train: worm, spur, and planetary. The latter is the type found the M8000 and most consumer winches these days. Planetary gears are so called because the central gear, driven by the motor, is literally orbited by the secondary gears that drive the spool.
Planetary-gear systems are very compact, inexpensive to manufacture, and reasonably efficient. Their salient drawback is that they have no intrinsic braking capability when the winch is spooling out under power, so an internal brake is required, usually inside the spool. This brake will transfer heat to the drum, and subsequently the inner wraps of the line, if, for example, it’s necessary to lower a vehicle’s weight against the winch on a long downhill recovery. This can be an issue with synthetic winch line, which loses strength if it is heated too much. According to Thór Jónsson at Viking, current Dyneema winch line will begin to lose strength if it reaches 150ºF while under load, and will begin to melt in the high 300º range. While the latter point is unlikely during any normal single-vehicle recovery, the former isn’t. For this reason, planetary-gear winches should always be set to free-spool when you are pulling out line to rig the recovery, and should be powered out under load for no more than 20 seconds at a time, then allowed to cool. No such precaution is necessary when powering in, the normal mode for the vast majority of winch recoveries.
(An interesting characteristic of synthetic winch line is that, even if heated to over 150º, it will regain the strength it lost once it cools. At first glance, the bottom layers of synthetic line might appear to be melted after any load, but they’re really just compressed. However, if you exceed that critical 300º-plus point, you’ll be left with a chunk of melted plastic. Thór once had a customer complain after he melted the Viking line on his M8000. Questioning revealed that he’d been lowering all his friends’ trucks down a steep incline one after the other. Further questioning revealed that he’d also melted the winch’s motor.)
Four-wheel-drive overland travel is different than trail running. My early experiences with the latter involved a friend with a beat-up 1964 Land Cruiser FJ40 equipped with a Ramsey winch and an alarmingly frayed steel cable. We took that vehicle over some ridiculous trails, getting stuck numerous times a day and hooking the winch to whatever was nearby to pull it out. I’m still amazed we both survived with limbs intact, but that Ramsey did yeoman duty time after time.
However, on a long overland journey, it’s vital to minimize stress on the vehicle. The aim is to avoid becoming stuck, to take the easy route when possible. Challenging conditions are tackled only when there is no other way through. Thus, on most overland trips a winch is rarely needed, which leads some to argue, why not buy a cheap winch since you’ll hardly use it anyway? While it’s a valid question, my response is the same one I give people who argue for cheap hand tools: If you need the tools—or the winch—something has already gone wrong. Why risk compounding the situation by relying on substandard equipment? A knock-off winch built with inferior materials might well simply seize up after a long period of non-use. Before I get a raft of responses: I’ve known several people who bought new 8,000-pound Chinese winches for $350 or less and have had absolutely stellar service from them. And I know several others who bought similar winches and had them fail quickly or perform poorly. That crapshoot factor is the scary part, even if you’re unoffended by companies willing to reverse-engineer someone else’s work simply to cheapen it and sell it for less.
The final aspect of installing a winch, of course, is learning how to use it properly. You can take the trial-and-error approach my friend and I did, but a far better (and infinitely safer) way is to get professional instruction. Even a basic course such as that taught at the Overland Expo will increase your knowledge and confidence immensely; full classes can be taken from competent schools such as High Trails Expeditions or Overland Experts. Once you have the basic techniques in hand, it’s vital to practice them until every move is instinctive and firmly planted in your long-term memory.
That way, when your truck goes frame-deep in Tanzanian black cotton soil you’ll handle the situation with—dare I say this?—ultimate proficiency.
* * * * * * * * * *
Diagrams are from an excellent Warn manual, available online as a PDF; click here to download.
* Sadly and ironically, Warn now offers a line of cut-price winches, the VR series, built to lower specs than the M series, to compete with the brands that copied and undercut Warn in the first place. I’m not sure whether I’m more disappointed in Warn, for not simply redoubling their efforts to convince customers that better quality is worth the investment, or with consumers who are blinkered to everything but price. In their defense, I’ll note that Warn furnishes the same warranty with the VR series winches as they do with their high-end lines; nevertheless, my advice is, if you can’t afford a new M8000 or another top-quality winch, buy a used one—you’ll still be better off than compromising on internal quality.
Can't fit the Weber? Bring a SlatGrill
There’s rich irony in the fact that many of us cook on five-foot-wide, $1,500 stainless-steel propane grills in our back yards, where our only view over the wall is the top of the neighbor’s head as he cooks on his own six-foot-wide, $2,000 grill (with counterbalanced rotisserie)—but when we have a brai out in Mother Nature’s beautiful scenery it’s usually on a flat wire grid balanced on rocks, or a theft-proof Forest Service grill with slats spaced 1.5 hot-dog widths apart. Yet short of something like a Belson Porta-Grill:
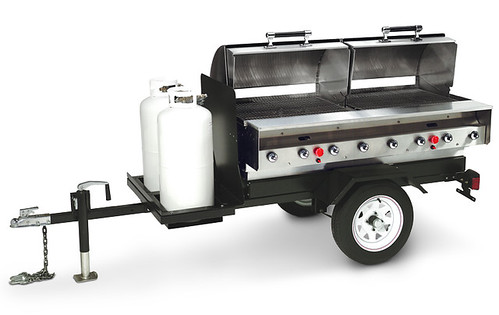
. . . it’s impractical to bring along a proper grill on a wilderness outing. Even a compact Weber charcoal grill takes up a lot of cubic storage space—and it only does one thing.
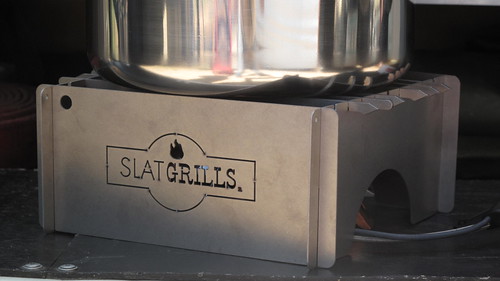
That’s why Chris Weyandt developed the SlatGrill, a collapsible barbecue that cooks with charcoal or can double as a sturdy pot or griddle support and windscreen for a compact stove.
The SlatGrill comes in sizes ranging from a one-pound titanium model nine inches square to a 75-pound carbon-steel monster with a two-foot by three-foot cooking area. Every one disassembles and stores flat to travel, taking up but a fraction of its assembled volume. Four laser-cut sheets—anodized aluminum, steel, or titanium depending on the model—assemble via corner slots into a square or rectangle. Individual slats then drop into slots in the top; you can space them widely if you want to set a large pot or griddle on top, or close together for grilling.
At the 2012 Overland Expo, Chris handed me one of the compact titanium SlatGrills to try. With the standard three slats, it weighed just under a pound not including the sturdy canvas case. With the addition of three optional slats (highly recommended for versatility) it weighs just ounces more. The assembled grill immediately struck me as a potentially ideal companion to an ultralight remote-canister stove. Such stoves put out heat to rival any full-size propane or white gas stove, but their weak point remains stability and security for large pots—and sometimes, ironically, for very small things such as a two-cup Moka pot, which can fall though the prong spacing. Also, the windscreens for such stoves are often sub-par. It appeared the SlatGrill could solve all these issues.

Indeed it did. I assembled the grill over a JetBoil Helios. The assembly supported with absolute security our largest, four-liter Snow Peak pot full of water, as well as a diminutive Moka pot. And while the clever snap-on windscreen of the Helios is actually pretty effective, it was easily eclipsed by the SlatGrill’s taller walls in an early morning breeze.
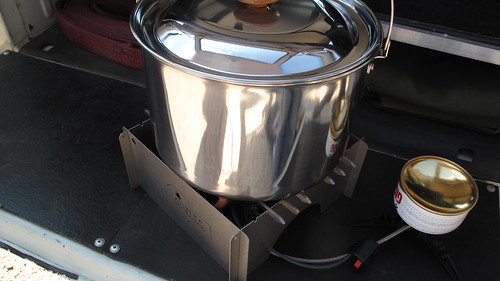
The combination of an ultralight stove and the ultralight SlatGrill creates a versatile cooking system, as at home on a motorcycle with a solo rider as it would be in a full-size four-wheeled vehicle with a small family. If you want two burners, the standard (aluminum) SlatGrill has a 12 by 18-inch surface that would accommodate two compact stoves.
Downsides? The compact titanium model is wincingly expensive at $189. However, a stainless-steel version is available for $69 (and two extra pounds). The mid-size aluminum model is $120; it weighs 3.5 pounds with case. All versions are made in the U.S.
My next step will be to see how the compact SlatGrill works over a little bed of mesquite coals. More soon . . .
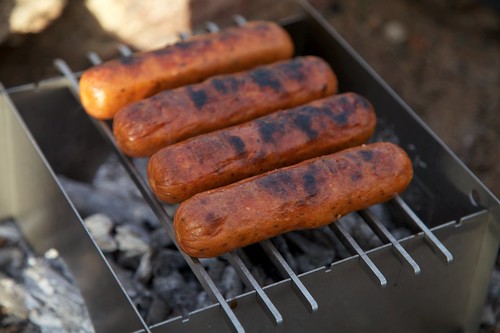
Update: Last night I built a compact mesquite fire and let it burn to coals, then dropped the SlatGrill over it and cooked some Andouille sausage. The sides of the grill seemed to concentrate the heat extremely well, and the vent openings on two sides fed the coals the right amount of oxygen to keep them going.
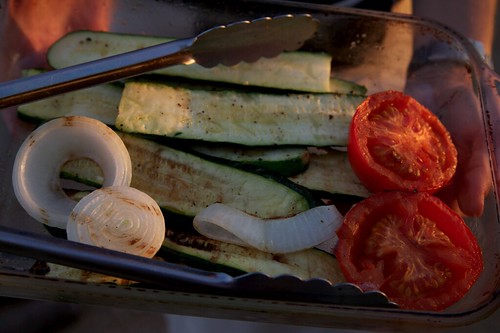
In fact, once the sausages were done there was still enough heat to grill some vegetables.
Two issues arose. First, the grill slats are flush with the top of the grill, so there is nothing to prevent a round hot dog rolling off if it's not level or you bump it with the tongs ( you could set hot dogs lengthwise on the slats but it would halve the number that would fit on the grill since they need to be separated by one slat). Also, the lightweight individual slats are easy to knock out of their notches, and can stick to certain foods. I think the latter problem could be solved if I (or the company . . .) drilled holes crosswise in the ends of the slats, then threaded a wire skewer through all of them, one on each side, creating more of a unified platform. The skewer could of course double as a . . . skewer. The rolling-off issue could be mitigated if the slots for the slats were deeper, so the sides made a bit of a lip.
I also decided the six-slat set is the absolute minimum for grilling, to keep the food securely on top, and three more to fill the entire space would have been even better. Of course those little titanium buggers add to the cost quickly; the stainless versions wouldn't hurt so much.
It would be interesting to try a motorcycle or bicycle journey in an area with abundant firewood, using only a SlatGrill for cooking and leaving all the impedimenta associated with a stove at home. Even as a companion to a stove, the compact SlatGrill adds versatility for large pots and the option of open-fire cooking. Well done, SlatGrill.
(Note to self: Avoid punning before coffee.)
Do you want it hard or soft? (your motorcycle luggage, that is)
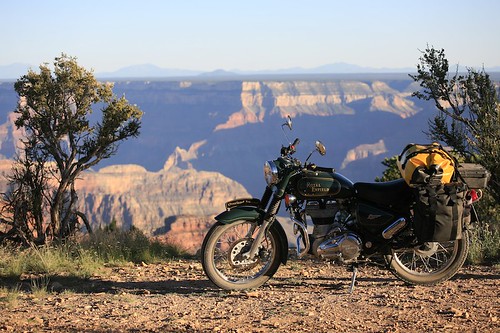 I equipped this test Royal Enfield with a combination of AndyStrapz canvas panniers, a Wolfman duffel, and a Pelican case rack trunk for a traverse of the Grand Canyon's North Rim
Just as our instinctive mental image of an expedition vehicle is more than likely a Land Rover 110 or Land Cruiser Troopie equipped with a roof rack loaded down with jerry cans and sand mats, so our image of an adventure motorcycle is likely to involve a giant BMW GS bulging with several square meters of aluminum sheet artfully folded and welded into rugged panniers and trunks covered with flag stickers from far-off places.
Thousands of the owners of these bikes have actually been to those far-off places. But how many riders chose those aluminum cases based solely on Long Way Round videos and magazine articles? How many remained satisfied with the approach after several thousand miles of travel? How many riders switch to soft luggage later on—and by the same token, how many riders start out with soft luggage and later switch to hard cases? Is there an overwhelming argument in favor of either, or is the choice simply a matter of trade-offs and priorities?
The debate has been the subject of endless forum threads begun by curious and innocent new riders. Replies generally fall into one of two categories: 1) “USE THE SEARCH FUNCTION!” or 2) Fifteen pages of opinions backed by rock-solid logic (and sometimes rock-solid experience) but little nuance. It’s either hard-luggage-is-the-only-way-to-go or soft-luggage-is-the-only-way-to-go.
The basic arguments for each are easily summarized. Soft luggage is less expensive, significantly lighter (with the equally important resultant benefit of a lower center of gravity), and not as likely to injure a foot or leg caught between luggage and ground during a spill or when working though rock gardens or sand. Soft luggage rarely requires special brackets to mount, generally results in a narrower bike profile, and can be compressed even further for shorter trips. If a soft pannier clips a rock or other obstacle during slow-speed maneuvering, it’s less likely to catch and throw the bike off balance.
Hard cases provide much better security from both outright theft and slash-and-grab attacks, are sometimes (but not always) more weatherproof, they sometimes can protect both rider and bike in a spill (as long as the situation described above doesn’t happen, and the luggage or its bracketing doesn’t damage the bike’s frame), and if easily removable can serve as seats or tables. Hard cases are easier to pack, provide better protection for fragile equipment, and can be modified easily with brackets for extra fuel canisters, etc.
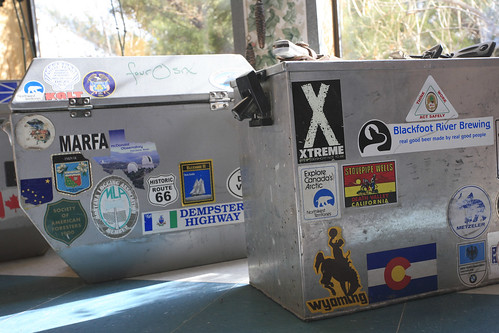 Doug Mote's hard cases, ready for "easy going."
Summarizing arguments is easy, but it doesn’t make a choice any easier. What I wondered, and had never seen in any luggage threads except as vague hints, was if there might be a formula that would use easily quantifiable variables specific to the rider to point him or her in the right direction.
My own motorcycle luggage expertise (not counting long ago rides wearing a Camp Trails frame pack, which provided spectacular windage) is limited to the excellent canvas luggage from Andy Strapz, combined with an equally excellent Wolfman duffel, and a Pelican case pressed into service as a security trunk. The combination suited me perfectly, but I wanted to get input from those with far more extensive riding history. So I sent out a poll asking the question: hard or soft, and why? I hoped the results might coalesce into a logical hierarchy that would lead to a simple formula.
Those who shared their experience included Carla King, Tiffany Coates, Lois Pryce, Austin Vince, Doug Mote, Kevan Harder, Nicole Espinosa, Brian DeArmon, and Bruce Douglas. The result comprised what I considered to be a useful cross-section of the long-distance riding community—both sexes, and a mix of body sizes, travel styles, and motorcycle choices (from 250 to 1200 cc).
Indeed, as I began going through the responses from this vast pool of experience, definite trends became apparent. In the end I was able to come up with an algorithm accurate enough that I could plug in variables from almost any of the experienced riders I polled and correctly predict what kind of luggage he or she used in what situation.
Essentially (aside from your budget), I decided only three variables are necessary to determine which type of luggage will best suit you. While there is some gray area, in general I think most people will find themselves trending one way or the other. The variables are:
- Size of motorcycle
- Size of rider
- Difficulty of terrain
No earth-shaking revelations there, but the relationship between the three can shift things one way or another. The chart shows how the recommended choice shifts from hard (red) to soft (blue), with purple as the could-go-either-way middle ground.
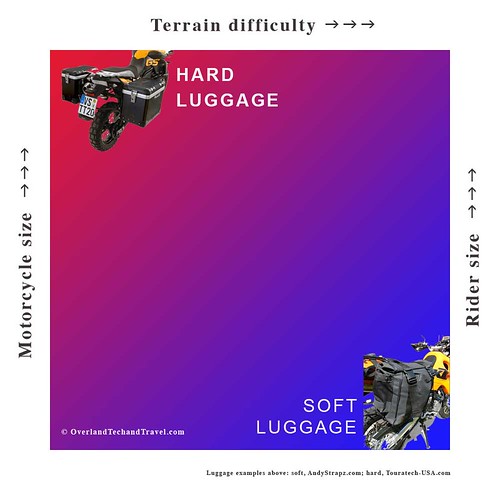
Simply explained, if you’re a big rider on a big bike and stick to asphalt or fairly well-maintained dirt roads, the advantages of hard luggage will most likely outweigh its disadvantages. Conversely, a small rider on a small bike who frequently challenges technically difficult routes would almost certainly be better off with soft luggage.
Some ambiguity arises if we start mixing and matching variables, but the observations of our experts still tilt the smart choice one way or the other. For example, small bikes—say under 650 cc—have a harder time coping with the weight and windage of hard luggage, regardless of terrain. Similarly, a big rider on a big bike who finds himself in central Africa during the rains, or deep in Egypt’s sand seas, or even on three-plus-rated 4x4 trails in the American West, will still benefit from the lighter weight, lower CG, and forgiving impact absorption of soft luggage.
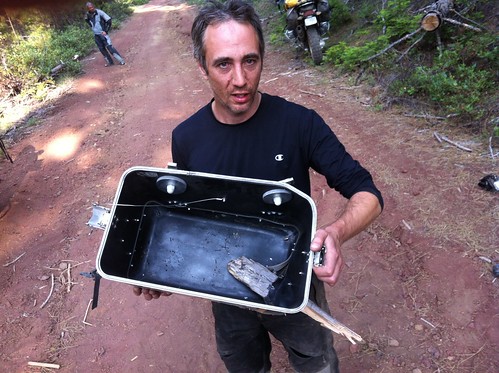 As filmmaker Sterling Noren recently found out, even anodized aluminum cases aren't impregnable
There’s also one more option to be considered regarding hard cases: While the Ewan-endorsed, steamer-trunk-sized aluminum cases represent the paradigm of hard luggage, lighter and smaller plastic cases, such as those offered by BMW for the F 650 GS, represent a viable middle ground in price, weight, and windage (and security). Another increasingly popular approach is to mount a small hard case such as a Pelican as a rack trunk, to provide security for cameras, laptops, and such, and go with soft cases for the rest of the luggage.
Here are some of the comments from our panel of experts, who collectively total a couple of million miles of motorcycle travel, including four circumnavigations.
Carla King’s motorcycle adventures began in 1995 with a 10,000-mile circumnavigation of the U.S. on a Ural with a sidecar, and haven’t stopped since. You can order the delightful book documenting the trip, along with her other published works, from her website here. Carla wrote, “Right now I’m setting up a new-to-me KLR, for which farkle options are famously infinite. After much research into cost, durability, security, convenience, and safety, I chose the Giant Loop soft luggage. Seems I can throw it on any bike, stuff almost any size and shape of thing into it, check it as luggage, and perhaps most importantly it’s not going to crunch my bones when I ride beyond my skill level and fall on (insert hard object here).”
Tiffany Coates set off on her first motorcycle trip, from the U.K. to India, with two months of riding experience. She has a bit more now—over 200,000 miles worth and counting, including the riding she did while filming a BMW unscripted commercial on Thelma, her much loved and well-used BMW R80GS. Tiffany still nurses the factory plastic cases that came on the bike, the latches of one of which long ago gave up trying to hold in the contents (small wonder - see photo below). According to her, “For me, the BMW plastic cases are ideal. Perfect size, with the ‘suitcase compression’ system which means I cram everything in and then sit on it (or two of us if we’re two up). Apparently we get more in these cases than the large metal ones due to the compression. Cheaper and lighter than metal cases and smaller—no risk of getting a leg caught under them if there is a fall. Also ultra-easy to unlock and whisk off the rack ready to carry into a hostel, or for emergency unloading in a river fall! As they are hard cases they are secure as well. I’m not anti-soft luggage, I have just never used it as the BMW panniers were on Thelma when I got her and so I never had a decision to make about what luggage to use.” Find out where Tiffany is now here.
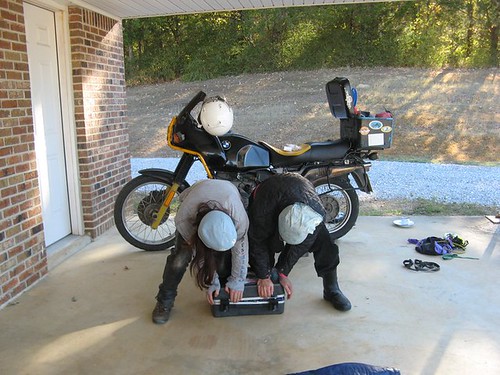 Tiffany and a friend do a little cargo compacting
Lois Pryce couldn’t seem to exorcise the motorcycle travel bug by riding a 225 cc Suzuki from Alaska to Tierra del Fuego. So she traded up to a much bigger bike (250 cc) and rode from her home in England to Cape Town (two excellent books here). As she was on tour in the Netherlands with her bluegrass band, the Jolenes, when I emailed her, her reply was short but thorough: “I prefer soft luggage: lighter, less ostentatious, no need for a rack, easy to lift on and off, easy to repair, and cheaper to buy. AndyStrapz panniers are the best.” (Want to hear the Jolenes? Go here. Lois is the banjo player.)
Austin Vince’s main claim to fame is that he’s married to Lois Pryce. Oh, well . . . he’s also ridden a Suzuki DR350 around the world. Twice. And made a rousing film of each trip. Austin is the antidote to anyone who tells you you need a $20,000 motorcycle and a further $5,000 in kit to do any serious adventuring. His riding suit is a pair of mechanics’ coveralls. His goggles appear to be Audrey Hepburn’s castoff sunglasses from Breakfast at Tiffany’s. Tent? A surplus shelter half. Luggage? I’ll let Austin explain.
“Soft. Here’s why:
1) Looks cooler and less aggressive compared with armoured-car-ish aluminum boxes. I really do think this is important when travelling amongst poorer societies.
2) Easily personalized and created from government surplus stores, etc. If your luggage is improvised then you are richer in terms of investment in your project. My current ALICE pack system has two major bags of 40 litres each, and 12 separate mini pouchlets of varying smaller volumes, all super-useful: Oil, rags, toilet paper, sun cream, water, etc. is all instantly accessible without undoing a single flap. Total cost, $35 U.S. No manufacturer can match this.
3) Safety. No one has broken a leg on a soft pannier.
4) Luggage is easily repaired and conversely, if it gets damaged, it only cost $35 so who cares?
5) All my DIY luggage is zero waterproof so I simply put my gear in a $5 waterproof liner therein—it’s so simple I want to cry.
6) Hard luggage makes the bike physically massive and far too unwieldy.
7) Jonathan, I love you (call me—like the old times).”
(Editor’s note: I take no responsibility for number 7. Just passing it on in the interest of full disclosure.)
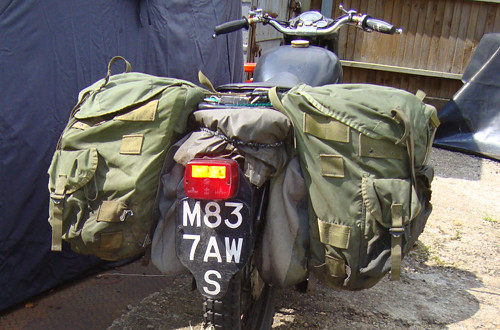 Austin Vince's $35 pannier system (courtesy U.S. government surplus)
Brian DeArmon is the thinking rider’s rider. Every equipment choice he makes is the result of not just long experience as a motorcyclist, but extensive research into pros and cons, competing brands, and above all, quality. Generally when Brian adds something to one of his bikes, that’s the last you hear about it, because it works. Given all that, it was no surprise that his detailed response more or less summarized my conclusions before I even reached any.
“Short version: Bigger bikes that are being used on easy to moderate terrain, with predictable weather conditions, I tend to favor hard bags (primarily for the security and ease of access). For small bikes, or any bike going where trail conditions are unknown, I prefer soft bags.
Long version:
Suspension: It’s too easy to overload a small bike already. Add in 15 or 20 pounds for the hard panniers and mounting brackets, you eat into valuable capacity. The big bikes are better able to handle those loads. Unfortunately, hard panniers also make it real easy to strap even more crap on the bike since they typically create a nice big surface area & include those nice tie down points.
Power: Smaller bikes typically don't have the power to push big loads down the road at the speeds required in the west. I've ridden the DR200 on the freeway with no load, and it’s kinda scary, even in the slow lane. I couldn't imagine doing it with an extra 40 pounds of pannier/gear/food/water (state highways and back roads, sure, just not freeways where traffic is moving 70 to 80 mph). Put that load on a GSA or big KTM and you don't have the same problem.
Trail conditions: On relatively tame roads, in known weather conditions, hard panniers are not much of a liability, IMO. The risk of crashing isn't that high. But once conditions become unknown, or weather conditions make a turn towards the wet side (mud), hard panniers become a huge liability. There is the obvious danger of tib/fib breaks, but also damage to the bike itself. My GS has a bent subframe caused by smacking a pannier on a rock. That is hardly a concern with soft bags.
Security and Convenience: Hard bags have a hands-down advantage for security and ease of use. Dump in your gear, close the lid, lock the latch, and you’re done. They’re typically easy to dismount and move into a hotel room, etc. Soft bags often have a convoluted mess of straps that makes it more difficult to access gear and install or remove. Soft bags also need to be checked regularly as loads change and straps loosen. Of course there is also the problem of having nothing between your gear and a thief but a knife.
Basically, I see soft bags as the default luggage system, with hard bags being a legitimate option if certain conditions are met.”
Nicole Espinosa didn’t like the racks available for the Suzukis she rides, so she made her own. Now she runs a business, Rugged Rider, which specializes in high-quality accessories for the reliable and overachieving small DRZs. Nicole wrote: “I feel the DRZ400 is the perfect bike to set up for adventure. It has a strong enough engine to maintain a comfortable 70 MPH on the highway, and is a nimble enough size to have fun on tight single-track fully loaded. That said, I prefer soft luggage for a tighter profile on highway against wind, and on trails for width. I only keep my clothes and rain gear in my Ortleib dry side bags, and have only traveled in North America as of yet, so I haven’t put the security of soft bags to the test internationally. I keep my expensive gear in my tank bag that I can carry with me or ratchet down on my locking combo luggage rack.”
All you need to know about Doug Mote as a rider is summed up below in his reference to “easy going.” Anything else I’d add would be superfluous, except to say he’s one of the nicest guys I know (despite his comment about kicking KTM ass). As a lumberjack and body double for Paul Bunyan, Doug was at the far end of my bell curve for big riders with big bikes. He sent: “I have hard and soft luggage, and use both. My preference depends on itinerary. For easy going, like say a run to Prudhoe Bay on a schedule, hard bags offer several advantages, not the least of which is better weather protection. On this type of good road trip in wide open spaces, there is little risk of leg or foot injury such as I have witnessed friends incurring when trapped between bag and earth. For tough going, where lightness and flexibility are key, soft luggage is superior. Spills are not so risky, and my entire kit weighs less than empty hard bags with mounting racks. I use only soft bags on the 650, either soft or hard with the 1150 depending on the route and how much KTM ass there is to kick. For extended travel with diverse route conditions, soft luggage is my clear choice."
I won’t claim that Bruce Douglas sometimes uncovers a motorcycle in his yard he’s forgotten he owns, but he does own a lot of them, and has based his transportation on motorcycles since his very first vehicle, a two-stroke Yamaha 360. His main backroad bike is a thoughtfully modified Suzuki DR650. Bruce wrote: “I’d say hard cases for security, appearance, and good mounting surface for other stuff. I think they’d be fine if I knew I wouldn’t be riding through any difficult terrain, but if there was a chance I might go down I’d have to go with soft bags. A few times when I’ve put my foot down while moving on the TransAlp I had it get caught under the hard case. It was clear how easily you could break something—and it wouldn’t be the case. I think I’m sold on soft bags now after the Baja trip. I like their versatility; I can use different bags with my mounts, since the main function of most mounts is to keep the bags away from the rear wheel. I’m happy with what I have, they’re simple and straight forward. The Wolfman Gen 2 mounts are interesting: a little complicated but they add more mounting points, and a means to carry extra fuel. Also knowing I can repair them with a sail needle and thread is nice. In a spill they flex, rather than dent. If the mounting straps tear off you can come up with a repair, or just tie it on with cord. The chance of the mounts coming out of hard cases is slim, but if they did, a field repair would be difficult. Soft bags aren’t as secure, but after undoing a few straps you can pull them off as saddle bags and carry them over your shoulder (a la John Wayne). In Baja I was able to carry all my gear in one trip: saddle bags on my shoulder, the tail bag in one hand, and whatever in the other hand. Soft bags also make you think about packing and not be tempted to just dump stuff into metal boxes.”
And finally, from Kevan Harder, a California police and SWAT officer who also works for RawHyde Adventures, where it often seems motorcycles are defined as BMW or . . . everything else . . . comes a firm vote for the red corner of the chart: “I strongly recommend hard bags for durability, protection of gear, and versatility (bike service stand, chair, table, etc).”
So there you have it, courtesy of some of the most experienced riders on the planet: an easy way to determine what type of motorcycle luggage will best suit you, your bike, and your riding.
Think this will end all those forum debates?
Irreducible perfection: The Klean Kanteen insulated bottle
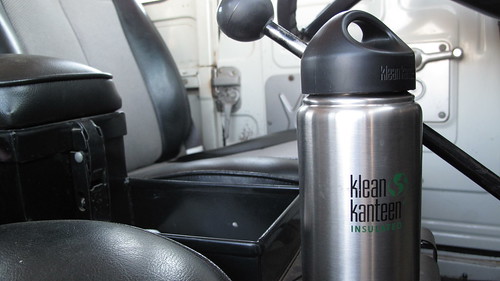
My first canteen was a canteen—a WWII surplus aluminum one-quart M1910 with a chained bakelite cap sealed with a cork gasket. I was seven years old, my family had just moved out to the edge of the desert, and I thought that canteen was the coolest thing on earth (well, except for the sheath knife my stepfather had given me in a bizarre fit of generosity). The canteen and several similar examples served well for countless desert hikes and early backpacking trips into the Catalina Mountains, until replaced with stylish and lighter Olicamp polyethylene bottles, which in their turn were replaced with Nalgene bottles—my resulting antipathy to which is well documented (see here).
In the early 2000s, my search for a better bottle led me to try one of the new stainless-steel Klean Kanteens, despite the fact that that I found the brand name wincingly Kute. The KK, as we’ll call it, seemed to be a vast improvement over the degradation-prone Nalgene. But the “Klean” part of the name was soon called into question when I found that the rolled lip of the bottle, while comfortable to drink from, had a miniscule gap underneath, which after prolonged use resulted in a funky odor that was difficult to exorcise—annoying in a $20 water container. That led to yet more searching, which resulted in an obsession with the even more expensive but indestructible Osprey NATO canteen (more about this in a future article).
However, for some time Roseann has been urging me to try one of Klean Kanteen’s double-walled, vacuum-insulated bottles. A different lip design eliminates the bacteria trap of the original, and the benefit of insulation seems obvious in a desert (although privately I thought the vacuum space pretty thin to be of much value). So, one recent morning when I needed to spend the day in town in the un-air-conditioned FJ40 with a trailer, collecting building materials, and the predicted high was 105º, I filled a 20-ounce insulated KK bottle with water from the fridge and headed in.
Six hours later I hadn’t touched the bottle. All my stops had been places with water fountains, so I’d stayed hydrated. Now, heading west toward home on Highway 86, I was thirsty. The bottle had been in the center console all day, and was now sitting in full sun. The exterior was uncomfortably hot to hold. Okay, now we’ll see, I thought. I opened the lid and took a sip.
The water was . . . cold. Not just nice and cool, but decidedly cold. It was awesome, and I drained most of it in one go.
Suddenly I found myself examining the bottle with new eyes (after I got home, that is). The “Responsibly made in China” label on the bottom made me roll my eyes; however, after reading up on the (still family-owned) company’s site, it does appear they take more care than most to ensure good working conditions in the factory (KK also belongs to the 1% For The Planet project).
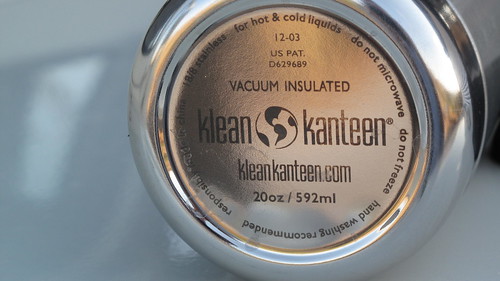
There’s certainly no issue with quality: The bottle is made from 18/8 stainless steel, thick enough that it takes most of my thumb strength to even slightly deflect it. The brushed finish is as even inside as out, and the cap, while obviously not vacuum insulated, does have an air space to help keep contents cold or hot. Sure, I’d be happy if it held more—the 20-ounce size is the largest of KK’s double-walled bottles—but if the bottle were fatter it would be difficult to hold with one hand, and if it were taller it would be unwieldy and unstable. Besides, 20 ounces of cold water feels way more refreshing than a liter of 105º water from my NATO canteen. Titanium option? Well, okay, but titanium, while saving a few ounces, would add hugely to cost, so that’s a tradeoff rather than a failing. I note that the company makes a bicycle cage for the double-walled bottle, which could easily be adapted to suit a motorcycle—nice to have all-day cold water available on a warm ride.
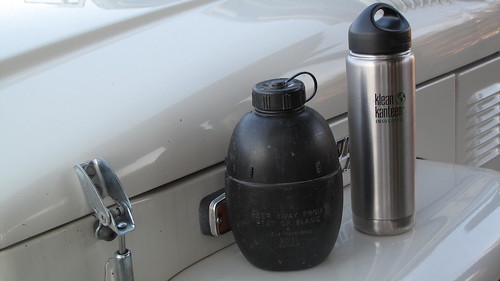 Not as cool as a NATO canteen - but much colder
Every once in a while I come across a product that defies my best attempts at criticism—when function, style, durability, price, and social responsibility (40 million water bottles go into the trash in the U.S. every day) come together to create what I refer to as irreducible perfection. I have to add the KK double-walled bottle to that short list.
As long as I don’t have to write out the name. Hey, if they made a Kup I could call it the . . . never mind.
On the worthlessness of door mats for sand recovery

It’s surprising how much flotation you can get out of a 235/85/16 BFG All-Terrain in soft sand—even under the mass of an HJ78 Land Cruiser Troopie—if it’s properly aired down to around one bar (14.7 psi). At that pressure the contact patch elongates significantly, providing vital surface area without the frontal resistance produced by a wider tire.
However, at one bar you’ll also get pretty significant sidewall bulging—not a problem in pure sand, but a very real one if that sand hides the vicious limestone outcroppings the Egyptians call kharafish. In such terrain you have a choice: flotation or sidewall protection?

We faced that choice in Egypt early this year, when we took three Land Cruisers up the Dakhla Escarpment, a 1,000-foot cliff only (sometimes) negotiable by vehicle because the Abu Moharek dune chain—the longest in the world—spills millions of tons of sand over the edge, forming a loose and shifting series of ramps. The climb intersperses sand and limestone with such unpredictable frequency that there’s simply no possibility of airing down, then back up, then down.
Given the very real specter of seriously damaging several tires, we let a few token pounds out of each corner. Then, with 1HZ diesels roaring, we took turns tackling each section of sand ramp, sometimes succeeding, sometimes churning slowly to a halt before backing down to try again. On one section I got off line and slid in ignominious and hilarious slow motion off the crest and into a trough. Only the steepness of the terrain enabled me to back down without assistance to make another attempt.
In a couple of hours we’d gained the top of the escarpment, with the loss of just one tire against a cunningly buried razor edge. Once through another, flatter section of kharafish, the terrain smoothed out into more homogeneous sand flats and dunes. Time to air down properly? Apparently not—Mahmoud and Tarek simply took off at speed, counting on momentum to keep the tires on the surface. I followed, and we enjoyed several minutes of proper LRDG stuff.

However, very soon another local desert term popped up. “Habat” is the word for “soft pools of sand” that merge imperceptibly with the surrounding firmer sand. Mahmoud found one, and in a heartbeat his vehicle was immobile and buried to the axles. Tarek and I circled away and parked, then we all walked over to help.
In general we’d been delighted with the Troopies we’d rented from a local outfitter. They were impeccably maintained and equipped with two spare tires each. However, the sum total of recovery aids comprised a single shovel and a stack of heavy-duty red carpet rectangles, like those you buy at Home Depot as door mats. I’d looked askance at them in Cairo, and now watched with interest as Mahmoud, after we’d excavated around the tires, stuffed one in front of each. He climbed into the driver’s seat, added a bit of throttle, gently released the clutch—and with flawless synchronicity each section of carpet was sucked under its respective tire and spit out the back. Total forward movement of the vehicle: precisely two inches. It was like Land Cruiser moonwalking—the abrupt shifting of four red rugs from the front to the back of the tires gave the visual impression of forward travel. But it was an illusion.
Another trial resulted in another two inches of movement, and some Arabic terms from Mahmoud which I don’t think referred directly to sand conditions. But by this time Tarek had pulled his Land Cruiser to the edge of the firm rhamla (sand); we hooked up the tow rope and slowly eased Mahmoud back to solid footing.
In those conditions, I learned, tire pressure really makes no difference—hit a habat going too slowly and you’re going down. The only defense is momentum and the fact that, blessedly, habats seem to generally be only a few yards across. We successfully made it across dozens more that trip, and got mildly stuck in a few. But we never bothered pulling out the door mats again.

Moral: Those conspicuously shiny perforated aluminum sand mats you see bolted conspicuously to the roof racks of Discos and Land Cruisers parked at Starbucks really do have their place. Effective sand recovery requires a rigid ramp to let the vehicle power its way out of the trough.
Besides, carpet squares bolted in the same spot would look really lame . . .
Aluminum sand mats, or PAP (for perforated aluminum plate)—frequently called sand ladders although not really the same—are available from a number of suppliers such as OKoffroad. A less expensive and very effective substitute (lacking only the stylish Camel Trophy appearance) is the plastic MaxTrax, available from Outback Proven.
For more videos of driving in Egypt, including a completed Egypt Overland promo, go to: https://vimeo.com/conserventures/videos
Hint: When using “Search,” if nothing comes up, reload the page, this usually works. Also, our “Comment” button is on strike thanks to Squarespace, which is proving to be difficult to use! Please email me with comments!
Overland Tech & Travel brings you in-depth overland equipment tests, reviews, news, travel tips, & stories from the best overlanding experts on the planet. Follow or subscribe (below) to keep up to date.
Have a question for Jonathan? Send him an email [click here].
SUBSCRIBE
CLICK HERE to subscribe to Jonathan’s email list; we send once or twice a month, usually Sunday morning for your weekend reading pleasure.
Overland Tech and Travel is curated by Jonathan Hanson, co-founder and former co-owner of the Overland Expo. Jonathan segued from a misspent youth almost directly into a misspent adulthood, cleverly sidestepping any chance of a normal career track or a secure retirement by becoming a freelance writer, working for Outside, National Geographic Adventure, and nearly two dozen other publications. He co-founded Overland Journal in 2007 and was its executive editor until 2011, when he left and sold his shares in the company. His travels encompass explorations on land and sea on six continents, by foot, bicycle, sea kayak, motorcycle, and four-wheel-drive vehicle. He has published a dozen books, several with his wife, Roseann Hanson, gaining several obscure non-cash awards along the way, and is the co-author of the fourth edition of Tom Sheppard's overlanding bible, the Vehicle-dependent Expedition Guide.


