
Overland Tech and Travel
Advice from the world's
most experienced overlanders
tests, reviews, opinion, and more
Proper backup lights for the JATAC - with remote control
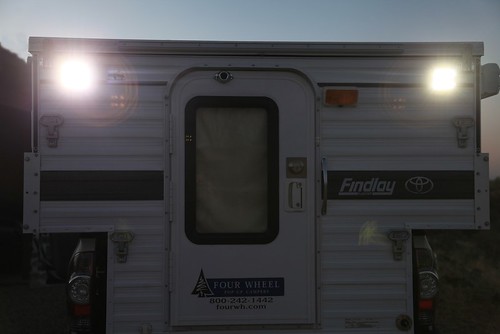 Brilliant 19-watt Grote LED floodlamps are optional on the Four Wheel Camper. Could they serve a dual purpose?
The sealed-beam automotive headlamp was introduced in the U.S. in 1939. In 1940, the government embraced the technology and required every car sold in this country to be equipped with identical 7-inch diameter incandescent headlamps—and for the next four decades, time essentially stood still. Not until 1978 did the U.S. legalize the superior halogen design (which had been used in Europe since the 1960s). Only in the last 15 years have further real advances been made in automotive headlamp technology, first with HID units and now, increasingly, with LED designs.
Rather peculiarly, though, our reversing lamps still appear to be stuck in 1940.
While a few manufacturers have begun installing LED backup bulbs, most remain incandescent. None that I’ve seen of either type matches the output of an average cheap single-AA LED flashlight—and this is with an entire automotive electrical system available to power it.
The situation is bad enough when you’re in a sedan trying to back out of a dark driveway without running over a pedestrian. It’s much, much worse if you find yourself too far down a narrow, rough four-wheel-drive route at night and need to turn around without going into the cactus or, somewhat worse, over the 50-foot cliff on the other side. I’m convinced not one Toyota, Land Rover, Jeep, or Mercedes engineer has ever been out testing a vehicle in the dark and found the need to engage reverse. Time after time in such a situation I’ve found myself trying to ride the brakes while doing so, because the brake lights are significantly brighter than the lights that are supposed to be showing me the way.
On my 1973 FJ40 I addressed the deficiency by installing a 50-watt Cibiè halogen fog lamp on the rear swing-away. Bam—problem solved. I can now reverse confidently out of a dicey situation without fear of making things worse.
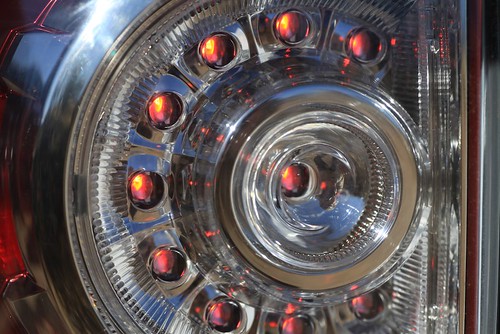 Nice LED brake lights on the Tacoma . . .
Our 2012 Tacoma’s running light and brake bulbs are all efficient, durable, and bright LEDs. (The brake lights add a safety factor: LED’s activate about two-tenths of a second faster than incandescent bulbs. If that doesn’t seem like much, consider that at 40 mph the car following you will travel 12 feet in that time, which could easily mean the difference between a non-event or a neck brace.)
Where was I? Right: The Tacoma’s reversing lights. I knew from experience they were . . . adequate, but didn’t work any better than the ones on our 2000 Tacoma. I couldn’t see what type they were by looking through the faceted lens, so I pulled the lamp assembly and the bulb, and, yep . . . 1940. What gives, Toyota?
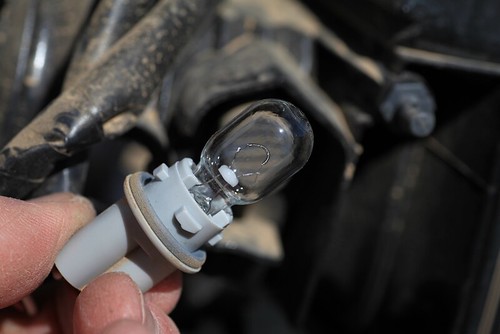 But what's with the cheap reversing bulb?
Ordinarily I would have gone online to look for upgraded bulbs, either a higher-wattage halogen replacement or an an LED conversion, although even this approach is somewhat limited by the stock reflector and lens. Other options include LED strips that mount on the license-plate frame (there are even compact HID reversing-bulb kits available with the potential to melt the plastic housing of the tail-lamp assembly).
However, since we have a Four Wheel Camper on our truck, and since on that camper we ticked the option box for a pair of high-mounted Grote 19-watt LED flood lamps that light up an area behind us most easily measured in acres, an obvious solution presented itself. Thanks to a tip from another FWC owner, Michael Doyle, I ordered a Cyron RC2-12 remote switch kit off Amazon for $25. The kit includes two key-chain remotes and a control box just a couple inches on a side, and advertises a 100-foot range.
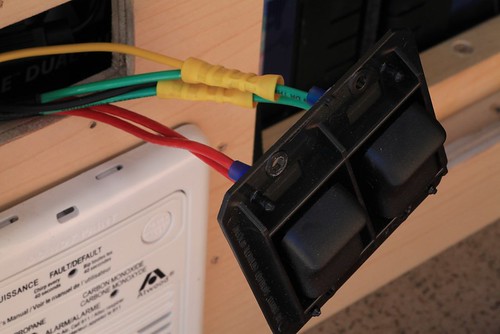 Given the low draw of the LED floodlamps and the protected location, I simply crimped the connections rather than soldering them.
I pulled the switch assembly for the floodlamps and simply Siamesed the power and delivery-side wires of the remote into the existing wires to and from the manual switch. Another wire from the control unit went to an existing ground screw in the battery compartment behind the switches, and the unit itself attached to another existing screw. Voilà—we can now create reversing daylight from the driver’s seat anytime we need it.
(I know what you’re thinking, and yes: This would be a formidable weapon against tailgaters. In fact I fear it would be too formidable. The sudden appearance of lights this blinding could very well send said tailgater off the road—or into oncoming traffic. Tempting though . . .)
The Cyron remote can be used to switch any number of things, and can, for example, obviate the need to run switch wiring into the cab for driving lights. However, for high-amp loads you’d want to connect it through a relay rather than directly.*
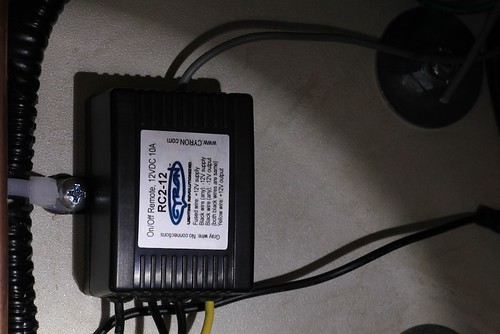 The compact control unit attached to an existing screw inside the camper's battery compartment. Grey wire on top is the antenna.
I’m still envisioning the perfect reversing lamp setup for a four-wheel-drive vehicle. Imagine a two-way system, with a properly bright light for urban driving and a switch that would activate extra-bright LED bulbs for use in the field. Sort of like the old city/country horn switch on the Jensen Interceptor of the 1970s, which activated a polite “toot” for urban use and an “out of my way” air blast for the country.
Of course, it’s unknown whether anyone actually bothered to ever switch to the city horn mode. So c’mon, someone just give us some good stock reversing lamps . . .
*This year at the Overland Expo, Baja Designs will conduct a demonstration on current lighting systems, covering the latest advances in HID and LED technology.
The Red Oxx Lil Roy
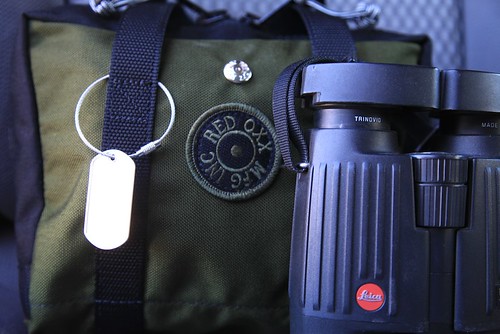
Recently Jim Markel, the CEO of Red Oxx (and son of the founder), contacted me to ask if I’d like to review something from his company’s line of heavy-duty luggage.
I was already familiar with their fine, U.S.-made Sherpa duffels, which, unlike many competitors, employ a rectangular box design that maximizes every cubic inch of space in the back of a vehicle or the cargo compartment of a bush plane. I asked what he might have that I hadn’t seen, and he mentioned a small tote called the Lil Roy. It sounded useful, so I asked him to send one.
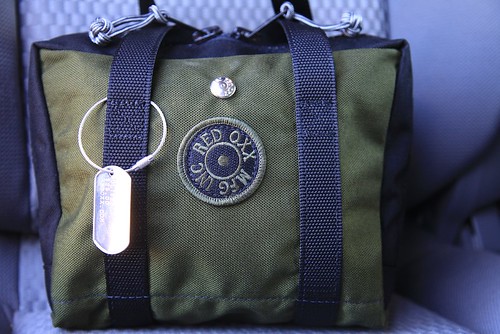
He sent five. And after casting about to find uses for them, I’m glad he did.
Think of all the small items you typically carry in a vehicle that could use extra protection, organization, or just visibility. A quick glance around our FJ60 before a recent trip to Mexico’s Sierra Madre, where we’re surveying mammal populations using automatic trail cameras, revealed a bunch of potential applications. There was a pair of handheld two-meter radios we use to stay in touch on the area’s mountainous trails; Roseann’s Swarovski and my Leica binoculars—both armored and tough, but worth about a zillion dollars each and thus nice to keep cased when possible—several field guides; the remote for the winch (kept in the center console and always tangling in other stuff); the trail cameras themselves, and several other odds and ends.
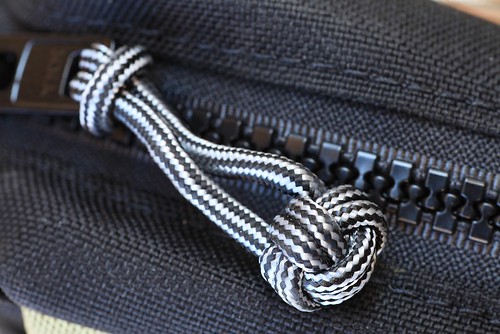
Like all Red Oxx products, the Lil Roy is made in Billings, Montana. You won’t find any fatuous tags reading, “Designed with pride in America.” (Translation: “Assembled by small children in an Asian sweatshop.”) The only items the company has made outside the U.S. are the clever little “monkey fist” zipper pulls, which are tied in a small village in Guatemala, where Red Oxx built a workshop with a bathroom, shower, and cooking facilities, and recently granted a microloan to build a corn-grinding mill. Fair enough.
Although the Lil Roy is a compact nine by three by six inches (175 cubic inches), it’s sewn from the same 1,000-denier Cordura as their largest duffels. The #10 YKK toothed zipper looks comically large on a bag this small, but it’s stronger than an equivalently sized coil zipper, and more resistant to jamming from debris. Inside, there’s not an exposed fabric edge in sight—everything is taped and double-stitched. Flat mesh pockets on each side are useful for incidentals. For example, we have a 911SC with a compact spare you have to inflate in the event of a flat; I’m using one Lil Roy to hold the small compressor I carry for the purpose, plus the non-marring socket designed to prevent scratching the black paint on the Porsche’s fancy aluminum lug nuts. (Aluminum? Yes, really.)
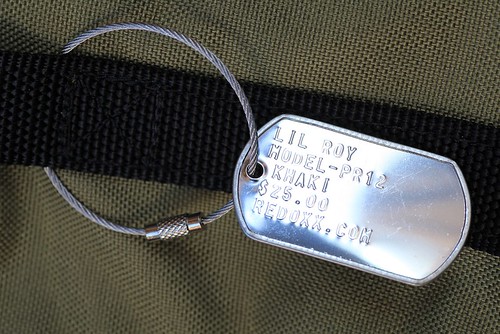
Outside, the Lil Roy’s web handles wrap under the bag and, given the modest volume of this thing, would probably support it filled with material from the core of a neutron star. The self-locking zipper pulls are unlikely to come undone accidentally, but just in case, Red Oxx supplies a little steel cable with a screw fastener to keep them together. The metal dog tag on it, stamped with the company name and product information, could easily be replaced with another tag stamped with personal information. If not needed to lock the zippers it simply hangs off one of the handles.
Criticisms? Frankly, none that I could come up with. I don’t think the bag gains anything by having the zipper wrap so far down the sides, but that’s inconsequential. It’s not remotely waterproof, but it wasn’t intended to be. I’d like to see the Lil Roy offered in an additional version (Big Roy?) the same length and height, but twice the width—I’m thinking tire chains, jumper cables, like that.
The biggest surprise of the Lil Roy is its $25 price. I don’t know how they can produce something of this quality in the U.S. for so little. The Lil Roy is available in 12 colors; I think most of us could find a use for every one.
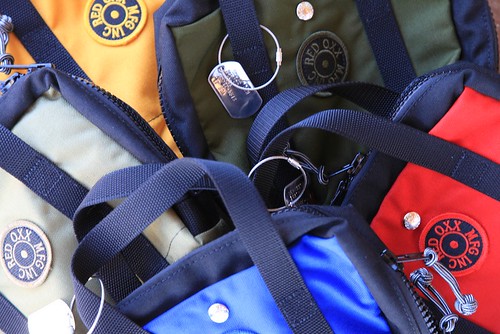
The Red Oxx website is here.
The one-case tool kit, part 3
 (Part 1 is here, and part 2 is here)
It’s been drilled into us from the first time we picked up a toy hammer to tap a square block into a square hole: Use the right tool for the job.
The tool that most frequently falls afoul of this axiom is without doubt the slotted screwdriver. It’s been drafted into double duty as a paint-can opener, a scraper, a chisel, a punch, a pry bar, and worse by, I’m willing to bet, every single person reading this. Millions of them have been blunted into uselessness for their primary function after years of abuse in secondary roles.
So the hard and fast rule for field repairs is never to risk the function of one’s screwdrivers by employing them for non-approved secondary tasks. The tool kit should incorporate cold chisels for chiseling, punches for punching, and a scraper for scraping.
However—frequently one will come across screws that have seized into place, and which no amount of torque on a standard screwdriver will budge. The normal procedure in a home shop would be to break out the impact driver—a fat grip with an angled anvil inside which, when provided with a bit to fit the stuck screw and given a sharp whack with a hammer, imparts a sharp loosening impact and twist to the fastener. My impact driver has saved me much time and grief when working on older vehicles.
The problem is that an impact driver is a heavy and bulky thing for its single purpose, making it troublesome for a traveling tool kit. But there’s a little-known fact regarding impact drivers: the vertical impact on the fastener has as much to do with freeing it as the twist the driver provides. Therefore, if you simply hold a standard screwdriver against a stuck screw and give it a whack, the odds are good it will be sufficient to do the job.
But there we are abusing the screwdriver again. Furthermore, most screwdrivers have plastic handles, which are not only likely to shatter when struck, they also absorb enough of the hammer’s impact to blunt its effect on the screw.

Enter the Facom Protwist “Shock” screwdriver. Here’s a screwdriver with a specially hardened steel shank that extends all the way through the handle to a cap on its end. The company says the tool is designed to “withstand gentle impact to free stuck fasteners.” That’s right: You’re actually invited to whack this screwdriver with a hammer (within reason, obviously).
Neat feature, but after all the need for it rarely occurs, especially if the average age of the vehicles in your fleet is younger than the three-decade average of ours. Fortunately the Protwist screwdrivers are excellent at normal screwdriving tasks as well. Each one has a fat, ergonomically secure and grippy handle—unlike the frightfully expensive set of Snap-on screwdrivers I invested in 20 years ago, which had miserable, slick, hard plastic handles and wound up relegated to duty as spares within months. The Facom AWCK.J5 set (don’t ask me how they come up with these designations) comprises the five most-used configurations—a number 1 and 2 Phillips and three slotted heads, 8, 6.5, and 4mm. All but the 4mm driver have hex fittings so you can apply a wrench for greater torque, another good method for tackling a recalcitrant screw (as long as the screwdriver fits the screw head properly). The Phillips and slotted tools are differentiated by yellow and red caps and the appropriate icon for easy identification when stored handle-out in a tool roll (and each has a little “wear your safety glasses” silhouette as well—pay attention).

Unfortunately I couldn’t find a U.S. source for the Protwist “Shock” screwdrivers. But a supplier in England, Primetools.co.uk, carries them and has good prices plus fast trans-Atlantic shipping.
Alternatives? If you don’t need the hammerable feature, the standard Sears Craftsman sets such as this one are hard to beat for 20 bucks, although they also lack the wrench-compatible hex fitting, which leaves you no way to augment the torque you can apply to the screw short of clamping a pair of pliers to the handle, which is kinda rude. Better is this Kobalt 12-piece set I found at Lowe’s. These do have the wrench fitting, and the set includes two offset screwdrivers—wretched little tools that will nevertheless sometimes winkle out a screw no other driver can get to.
While we’re on the subject of removing stubborn stuff . . . I consider a hacksaw to be a must-have item in a comprehensive tool kit. And in case you’re thinking by this point I’m a helpless sucker for obscure and expensive tools, the best traveling hacksaw I’ve found cost me $6.99 at Ace Hardware.
I started out with a fancy aluminum-framed item that caught my eye when I was first musing on the idea of a one-case tool kit. Hey, aluminum—lightweight. Perfect, right? Not so much, at least not this one. First, it was bulky and took up way more room than its expected frequency of use justified. It also only accepted a 12-inch blade. Worse, use revealed a serious design flaw I should have noticed at first glance.
 Which is better, the $30 hacksaw or the $6.99 hacksaw?
Any framed hacksaw will only let you cut things as thick as the clearance between the blade and the spine of the saw, unless you can move the saw around and cut from the other side. My aluminum-framed saw had a fine four inches of clearance—but only in one spot thanks to the arched spine. So when cutting through, say, a 3.5-inch-thick tube, by the time I got near the other side my cutting stroke was reduced to about one inch. Stupid.
 Grooves on the left accommodate different blade sizes, and by filing the groove on the right . . .
Then, while browsing at the Ace I found a simple, steel-framed hacksaw, which proved to weigh less than the aluminum one and was far more compact. Grooves on the adjustable half of the spine engage a through-pin on the fixed part to allow the use of different-length blades; furthermore, by filing a third groove near the front of the solid section I can now remove the blade and make the saw collapse to just 13 inches in length, so it fits along the short side of the Pelican case and takes up scant space. I store the blades in the tool roll that holds screwdrivers. It’s single downside is that the blade can only be attached vertically; the aluminum model can also hold the blade at 45 degrees for cutting when overhead clearance is reduced.
 . . . the saw collapses to fit almost unnoticed along the side of the Pelican case.Now—back to obscure and expensive tools.
If you’re ever faced with a major repair in the field—replacing a clutch, halfshaft, differential, or birfield for example—you’ll also be faced with the manufacturer’s torque specifications when it’s time to put everything back together. Sure, you can guess and bodge it, and I’ve done so many times without catastrophic consequences when home and the torque wrench weren’t more than a few hundred miles away. But if you’re in the middle of a major trip you don’t want to risk the repair and perhaps the trip by over- or under-torquing a fastener on a critical component (such as, say, the main bearing caps on a crankshaft . . .).

The problem is, a torque wrench is a long and bulky thing that performs exactly one function—you do not want to use it as a standard ratchet or breaker bar. So how about a palm-sized tool that turns any 1/2-inch ratchet into a torque wrench? That describes the Facom torque adapter—but wait, there’s more. The Facom unit also functions as an angle indicator. Many newer vehicles (Land Rover especially comes to mind as an early adopter) employ “angle-controlled” fasteners, designed to be tightened a certain number of degrees beyond snug. The Facom torque/angle adapter will do both tasks. It comes in a number of ranges; mine functions to 200NM (150 pound-feet, selectable on the readout) of torque, and is accurate to within three percent.
I have to say I found much less expensive torque adapters via a quick Google search, but none that were as compact, or that were capable of both torque and angle measurements. When Roseann asked, “Well, how much did it cost?” I answered:
“What lovely weather we’re having.”
 Next: The rest of the kit: Will it fit? Read part 4 HERE.
The trusty Motorola 9500
 Shortly after we published the story of our BGAN review in Mexico (here), which became a real-life test of the technology, I got an email from our friend John Knights, a senior Land Rover Experience instructor in the UK who’s also been on and led many major expeditions in Africa. John bought one of the very first Motorola 9500 satellite telephones in 2001, and has been using it since.
The 9500 was a bellweather in the development of satellite telephones. When I made my first sat phone call in 1999, from a camp in Zambia, the device I used required a bulky tri-fold antenna which had to be precisely aligned, and which came with dire warnings not to stand within three meters of the front of it. Just two years later, when the financially troubled Iridium network finally got up and running for the final time, you could make the same call with a one-piece handheld 9500 and stand anywhere you wanted (as long as it was outside).
Since then, John has used his 9500 on more than one occasion to manage emergencies in the bush—some of them mere inconveniences, some of them more serious. Here are a few of his recollections.
Zimbabwe 2001 (chasing a total solar eclipse in the north of the country): The Defender 130 we had hired blew out two tire sidewalls. Although it was equipped with two spares, once both were used we would have been stranded had we suffered another blowout—highly likely on remote African dirt roads. A quick call to the hire company office had two spare tyres and inner tubes on a light aircraft to a nearby safari lodge, who dropped them off in a powerboat to where we were camped on the shores of Lake Kariba.
Death Valley 2002 (touring the scenic Wild West in a rented SUV): We had journeyed off the beaten track to see the famous moving rocks. Returning down the rough dirt track, we were passed at speed by another SUV. They shot off into the distance, and I commented, “He must have much better suspension to travel at that speed on this road.” A few corners later we found the SUV, wrecked—he had lost control and hit an embankment, launching the car airborne, going end over end twice before landing back onto its wheels. Thankfully the occupants where unharmed, but had no supplies or recovery gear with them and were surprised their mobiles did not work. I produced my trusty Motorola, rang the ranger station number off the park map, gave them our exact position from my GPS, and waited until the rangers arrived. In the meantime we found out the family concerned were also in a rented SUV and were due to fly home that evening. I’d love to know what he told the hire company!
Australia’s Blue Mountains 2003: Touring in a hired car we came across a 4x4 on its side. The driver had gotten into a skid on the loose gravel road, and aimed for the embankment rather than the drop off. Again everyone safe but no mobile coverage, but a swift call from the Iridium had a rescue on the way.

Namibia 2003: We set a new record on this trip for number of days without a puncture (seven I think), but that meant we were in the middle of nowhere when the first one happened. The puncture itself was not a problem, but when the locking wheel nut key split while reinstalling the wheel, it did create a problem when we had a second puncture and could not remove the locking nut. Again an Iridium phone call to the hire office had a man with a hammer and chisel on the way, although we did have to spend an unexpected extra night out on route. Our journey was not actually saved by the man with the chisel, but buy the sister vehicle to ours from the hire fleet. The guests driving it rolled it over a couple of miles from where we were. Armed with their wheel nut key we were able to remove our flat tyre, and we then took normal wheel nuts and spare tyres from the wrecked 110 to allow us to continue.*
Whilst I would love to have an all-singing-all-dancing satellite communication set up that gave me calls, high-speed internet, and a wifi hotspot, at the end of the day the ability to raise any help is a blessing and I’m sure my trusty 9500 will see a few more adventures yet.
Ocens (here) carries the full line of Motorola satellite telephones, including the current 9555.
* An easy trick (no doubt discovered by wheel thieves) is to find a 12-point 1/2-inch drive socket that's just too small to fit over the locking lug nut, hammer it over the nut, then use a breaker bar to remove it. I've used the technique a half-dozen times and have yet to fail. JH

Home-away-from-home tour (JATAC update)

Everyone—everyone—who sits for the first time in the dinette of our Four Wheel Camper and looks around, says exactly the same thing: “I can’t believe I’m in the bed of a Toyota pickup.”
It’s understandable. We had the same reaction when we sat in our first FWC in 1994, and that one fit our compact 1992 Toyota pickup. The new, wider Fleet model on the new, wider Tacoma displays even more of a fifth-dimension sort of spatial trickery. There’s a bed the size of a couple of barroom pool tables over the truck's cab, comfortable eating (or laptop working) room for two at that front-mounted dinette—underneath which is the grate for the hot shower. The galley (a term that seems more nautically jaunty than kitchen) incorporates a two-burner stove, a sink with pressure water fed from a 20-gallon tank, and a proper, compressor-driven fridge with freezer compartment. There’s storage everywhere, and a Porta Potti tucked under a back cabinet, across from two deep-cycle batteries. Overhead, LED lighting renders the interior as bright as you want when natural light isn’t flooding in through the four huge screened windows in the canopy.
Our first FWC seemed luxurious at the time. The new one, as I mentioned to Roseann, seems like the old one after it won a spot on Xtreme Kamper Makeover. Here's what it looks like inside.
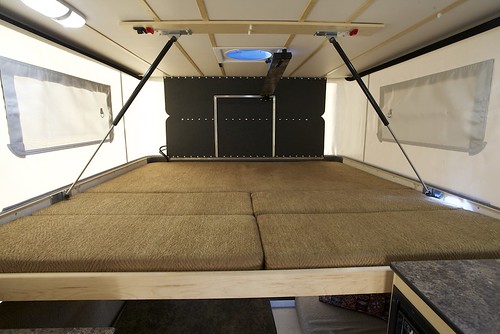 Looking forward over the truck's cab. The bed in its extended position is . . . big (a bit over six feet wide and seven long), and the cushions are thicker than on our first FWC. Since both of us are under six feet (I'm 5'9"), we can sleep sideways even on this mid-size model, which allows us to leave two of the near cushions at home to save space (they won't fit on top of the main cushion when the camper's roof is closed). We worried that the gas lift-assist struts would be in the way, but that hasn't been the case—there's plenty of room behind them for both of us.
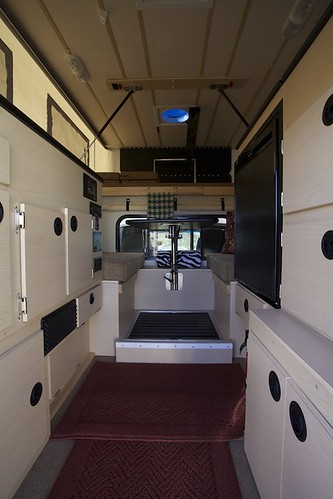 Looking in from the door. Lots of storage in the cabinets on either side. A Porta Potti fits in the near-right-side bottom cabinet. Cabinet materials and hardware are much improved over early models. The black door is the Dometic two-way fridge (12VDC and 120VAC). The grate for the shower is visible under the dinette table; the curtain tucks underneath it and clips to hooks on the ceiling. Controls and plug-in for the shower hose and wand are behind a hatch around the corner of the left cabinet (visible in top photo). The wand has a button that stops flow to conserve water. Duplicate shower controls are outside for remote/fair-weather bathing.
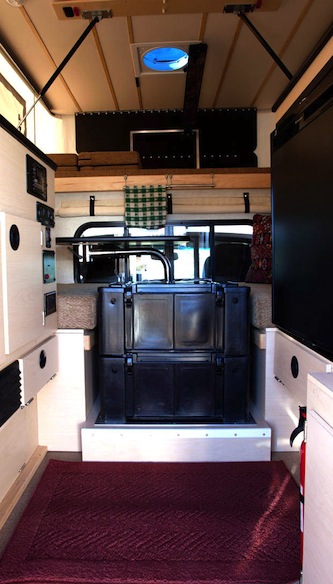 We discovered that two low-profile Bundu boxes from BunduGear.com fit perfectly onto the slightly recessed shower grate; we added a strap across the top and we have excellent storage for tools, boots, firewood, etc.
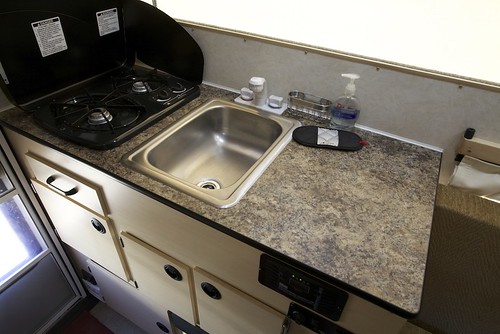 Hot and cold pressure water; water heater adds six gallons to the total water capacity (main tank is 20 gallons). Standard two-burner stove; a recessed stove with smoked-glass cover is optional, with a matching sink (also covered with smoked glass). Good working room on the right and also on the cabinet top above the fridge opposite. Silverware drawer could be bigger.
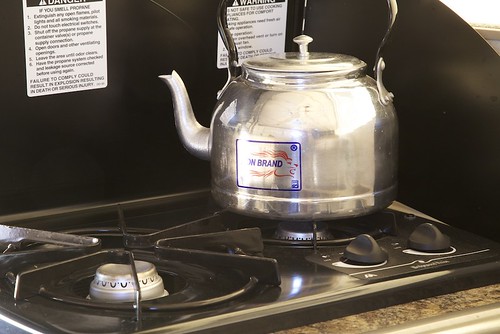 Stove has room for one big pot and a smaller one (or kettle). This stove has no pietzo ignition, and the rear burner is tricky to light with a match, especially if the front burner is already on. A gas match helps a lot. However, it's clear from the warning labels that if you actually use this stove YOU WILL DIE.
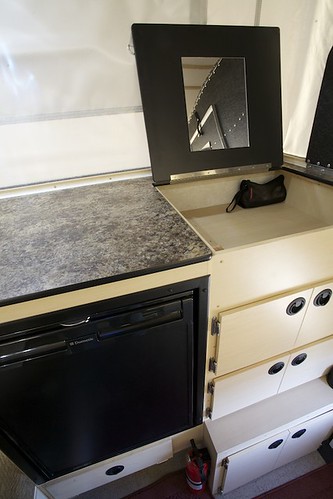 Vanity with mirror and storage has proven perfect for toiletries, clean towels, and small clothes. The Dometic fridge has a venting latch that holds the door slightly open when not in use.
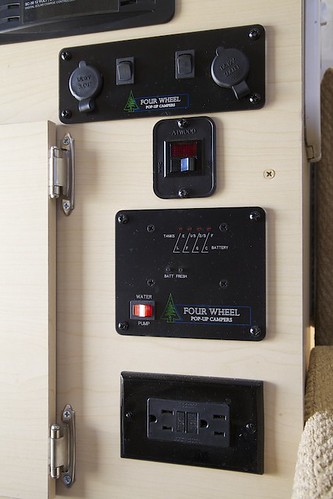 Control panel. Cut off at top is the Global Solar charge controller and monitor. Underneath are two switched 12V outlets. Beneath them is the switch for the water heater; beneath that is a dual monitor for battery level and water level, with a switch to power the water pump for the sink and shower. 120V outlet is active when hooked up to shore power.
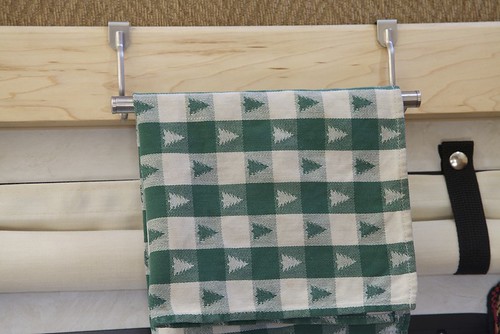 Inexpensive custom touches: Roseann found these towel bars at Target.
 More customizing, courtesy Target: An inexpensive yoga mat was cut up to fit every cabinet bottom to reduce sliding and scuffing; a compact dish holder/drainer; folding fabric bins; spring-loaded curtain rod keeps items secure on shelf.
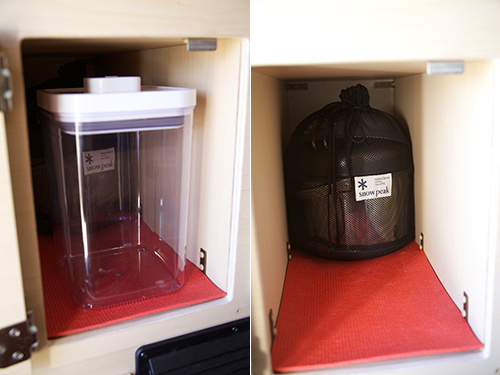 To the right of the under-sink storage is a deep, tall cabinet in which perfectly fits a 4L airtight OXO canister that we use for "wet" (i.e.: stinky) garbage like onion cuttings or coffee grounds; and behind it, a Snow Peak Multi-Purpose Cook-Set 3 (nesting 2 stainless pots, strainer, lids, and cast iron fry pan).
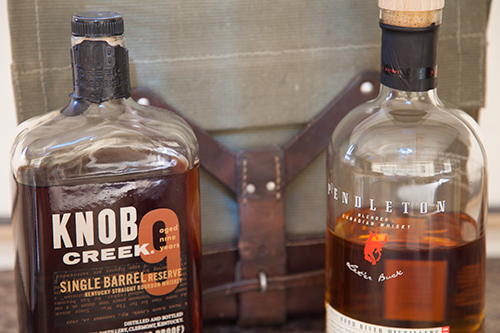
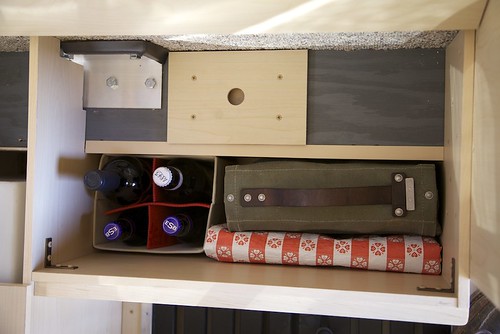 And . . . the bar is open. Under the right dinette seat was this spot perfect for safe storage of vital liquids. Swiss ammunition case holds larger bottles of more serious stuff. Hatch with finger hole is access to turnbuckles that secure the camper to the truck's bed.
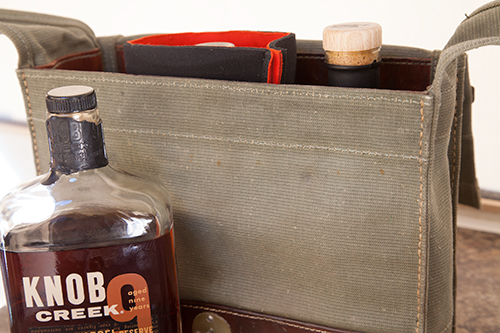 Detail of the Swiss ammo bag converted to travelling bar. A very good friend gave us this as a camper-warming present. Shorter bourbon and whisky bottles fit perfectly.
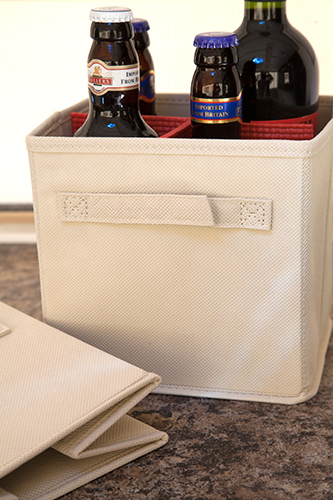 Detail of the Closet Maid mini fabric cubes (7.5 x 5 x 5) from Target, which fold flat when not needed. Roseann cut leftover pieces of the yoga-mat padding to make bottle protectors (could there possibly be a better use for a yoga mat?). These cubes fit perfectly in the narrow spaces under the seats and three-across in the pantry storage (under the vanity).
Sources:
Bundu boxes - BunduGear.com
Global Solar panels and charge controller - GlobalSolar.com
Snow Peak cookset - SnowPeak.com
OXO canister, dish drainer, towel bars - Target.com
ClosetMaid Mini Fabric Drawers - Target.com
Swiss ammunition bags - try your local military surplus store, eBay, or here
Good friend who gives you three bottles of best whisky and bourbon as a camper-warming - find your own
Easy trip assistance app
 by Roseann Hanson
How many times have you been reading a magazine or book, and come across some place you want to jot down to remember to visit, such as a landmark, a restaurant, a museum, or a trail?
In the past I either scribbled these onto a nearby post-it note or in a file on my computer. Inevitably these got lost in the shuffle of life, or are too difficult to locate when I knew I was going to be in a certain place, or I just plain forgot to bring my file with me.
Recently friends mentioned how interesting Scotty's Castle was on their overland trip through Death Valley. I started to jot it down in a notebook in the truck, but then thought, I wonder if there is an app for that?
Ever the fan (and growing) of organizing my life by iPhone, I searched the AppStore for "record places" or "remember places." One of the first to come up was the very promising My Places by VoyagerApps.com. Using your GoogleMaps account, it promises to let you see and organize your saved "places" in real time. I downloaded the free version to test it out, but unfortunately it was so annoying, I deleted it. The free version won't let you do anything without constant interruptions from pop-up notifications asking if you want to download and try other apps (presumably by VoyagerApps.com)—a different ad popped up every 30 seconds, literally, and you have to stop and click "No, thanks" every time. Then it would not let me save anything or see my Google places unless I bought the app, so I could hardly see if it worked or not. I don't mind buying apps, but this was a real stinker.
Then I tried a cool-sounding app called PintheWorld, which allows you to pin and save places of interest, give them categories (different colored pins, too), and see them when passing through a location. Sounded perfect! But unfortunately the developer uses the new iOS 6 in-house (and yes, totally lame) Apple Maps app and it is so inaccurate and picky, I could not find businesses I knew were there. The trick turned out to be that you have to type the exact, and I do mean exact, address down to the country and zip code. And then you have to manually name it and add details. Too much work. I just knew, with the power of the Internet and Apple, there had to be a solution.
Turns out it was right there all along: Google just released their brilliant Google Maps app for iPhone—pair it with your Google Maps account, and you're good to go.
(For those of you who haven't followed the little cyber drama between Google and Apple, Google was the original driver behind the superb Maps app on the iPhone but last year Apple and Google's relationship melted down, and Apple replaced Google as the data source with TomTom. My own side-by-side comparision between Google Maps and the Apple iOS 6 Maps bore out all the crazy criticism of the incredibly bad app. The famous tech geek David Pogue even called it "the most embarrassing, least usable piece of software Apple has ever unleashed." I could call up Google Maps, looking for the new Wanderlust Brewery in Flagstaff and up it pops . . . on Apple's Maps it fails to find anything, or sends me to Connecticut.)
But back to how to use the Google Maps and your Google account to save cool places to visit (after downloading Google Maps app you need to pair it with your online Maps.Google.com account).
 I wanted to save Scotty's Castle as a place of interest, so I just hit the search bar, typed in Scotty's Castle, and up it pops (see screen shot, right). Swipe up on the name Scotty's Castle in the bar at the bottom, and it gives you a menu of buttons—Call, Save, Share. Hit Save, and it puts it into your Google Places.
On this screen you can also browse things like photos, hours, reviews, distance from current location, and other useful information.
Then, next time I'm in Death Valley area, and I want to see if it's nearby, I fire up Google Maps app and any saved Places show up as yellow stars (see below).
I am trying to find out if the star colors can be changed, because the yellow is hard to see against the yellow roads. And they only show up at a certain zoom magnification.
The next screen-shot set below shows all the restaurants and cafes saved for Flagstaff, near Overland Expo. Click on a star and a pin pops up; click on the pin and you get the easy-to-read information popup at the bottom (swipe it up to see the details).
Ideally Google will eventually let us categorize and organize our Places, and edit them from either the app or through the Maps.Google.com. It would be nice to filter for things like restaurant, art gallery, museum, trail, or other category, to help minimize clutter if you have marked a lot of places in one area.
But otherwise it looks like it's going to be a very useful tool for travel anywhere.
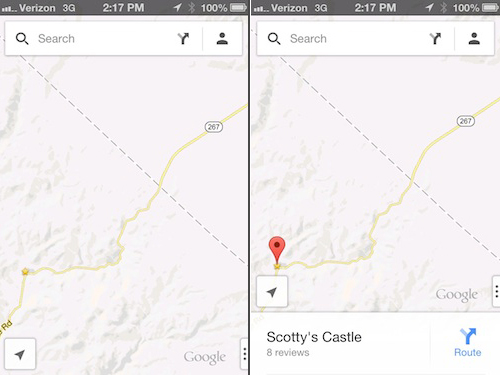
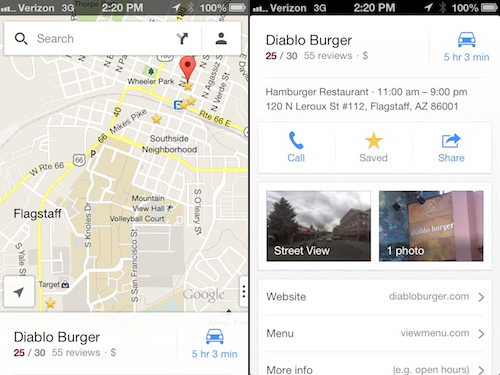 Google Maps app is great for storing places you want to visit, like these restaurants and cafes in Flagstaff, near Overland Expo.
The one-case tool kit, part 2

(Read part 1 HERE.)
By their nature, field repairs lend themselves to chaos: Something unexpected has happened in an unexpected place—often, given the capriciousness of the overlanding gods, at an inconvenient time in inconvenient conditions. Thus, organization is nearly as vital to a traveling tool kit as comprehensiveness and quality.
Since I’m disorganized and absent-minded to begin with this takes on triple importance. If I don’t have a specific spot for every single item in my tool kit so that the hole is obvious as I’m packing up, I won’t just leave a socket in the dirt—I’m also likely to forget a wrench on a chassis rail, an extension balanced on top of a tire, and a screwdriver or two on the inside fender. I need my tools laid out like a surgeon doing a kidney transplant just to change a windshield wiper.
I started thinking seriously about tool organization when we had three four-wheel-drive vehicles in use at the same time—two of our own and a Jeep on loan from Chrysler. Despite my best efforts, tools wound up scattered among all three trucks, so when I needed the wrench set in the FJ40, it was in the FJ60. Socket to tighten the perpetually loosening battery hold-down on the Jeep? Sorry, the sockets are in the 40. Eventually I was able to equip each vehicle with basic stuff, but I decided I wanted a comprehensive kit that would fit in one case, never be separated, and could be tossed (or, um, as it turned out, heaved) into whichever vehicle was leaving on a major trip.
Rather arbitrarily I decided on a Pelican 1550 case. It’s 18 by 14 by 7.6-inch interior dimensions seemed to be about right to accommodate the selection of tools I hoped to fit inside—which, as detailed in the previous article, I wanted to make comprehensive enough to handle virtually any field repair up to and including transmission removal, differential or axle replacement, and major suspension work.
The first thing in was a 3/8ths-inch-drive socket and ratchet set—the most commonly needed tool set for most minor repairs. I looked everywhere for one that had the quality I wanted, the compactness I needed, and the selection of sockets I felt was essential, without blowing the budget. I could have gained the compactness by simply dumping a bunch of sockets in a pouch or fitting them to socket rails and storing the ratchets and extensions separately, but I’ve come to appreciate the organization intrinsic to socket sets that come in lidded, compartmented cases. Not only is everything in the set always together, neatly laid out, and instantly accessible; any missing piece is easily noticed when packing up.
 Quality and supreme organization: Britool 748267Everything—quality, selection, and compactness—came together in a set from Britool, the venerable British manufacturer that supplied tools to Spitfire mechanics in 1940. The Britool 748267 set is a miraculously packaged assortment that includes SAE sockets from 1/4 to 1-inch, metric sockets from 6 to 24mm (not skipping any, like many sets do maddeningly), deep sockets from 5/16 to 3/4-inch and 6 to 19mm, a nice 72-tooth ratchet handle, a sliding T-handle (good backup if the ratchet fails), three different extensions, each with knurled finger grip and a hex fitting on top so one can apply a wrench if needed, a universal joint, and two adapters—plus several spline-drive sockets and a complete selection of slotted, Phillips, Torx, and hex bits with bit adapter. The lot is laid out cunningly in a plastic case just 10 by 15 by 3 inches. Amazing, and the quality is first-rate: All the tools have an even satin finish, the sockets employ the “Flank Drive” system, the short extension has a wobble end if you need to access a slightly off-center nut, and the ratchet head is user-serviceable. (Incidentally, the sockets are all 6-point rather than 12. At home I prefer the ease of use of 12-point sockets—which you don’t have to turn as far to fit over a nut or bolt—but for ultimate strength in a field kit the 6-point design makes sense.)
Before you stop reading and Google “Britool 748267,” I have to tell you that, apparently about 15 minutes after I bought my set, the company not only stopped production, but re-designed their entire tool line into something called Britool Expert, which, if my evaluation of a sample 1/2-inch socket set is any indication, is a step down in quality. If I’d known it at the time I would have taken out a loan, bought 50 of the 748267 sets, and would now be offering them at some usurious markup.
In the last two years, I’ve tried and failed to find a 3/8ths-inch socket set that comes close to the Britool 748267 paradigm. I discovered plenty of compact pot-metal sets from Far-East importers, and high-quality sets that took up too much room—never the right combination. A set from Sears came close, but the metric sockets ended infuriatingly at the relatively useless 18mm without including the frequently-required 19mm.
 Craftsman "Max Axess" - nice, but what's with the microscopic sockets?
Right now I’m evaluating another Craftsman set that employs the “Max Axess” design, meaning the sockets, ratchet head, and even extensions are all hollow-centered, thus obviating the need for deep sockets—you can slide a ratchet and socket over a nut even if the stud to which it’s attached sticks out ten inches. It combines a large and small ratchet, two short extensions, and metric and SAE sockets from 3.5 to (thank you!) 19mm, and 5/32 to 7/8-inch. (Not sure about the need for the microscopic 3.5mm and 5/32 sockets, but . . .) Sears says the 72-tooth ratchet is 45 percent stronger than their most popular ratchet, and the splined socket/ratchet interface appears to be at least as strong as the standard square drive, although I worry a bit about the strength of the hollow extensions—and the complete lack of longer extensions. The set is very well-organized, and very space-efficient in its case, although it still doesn’t match the tool density of the Britool 748267. (In a moment of helpless tool geekiness I figured out the tool/volume ratios for several cases. The Craftsman case encloses 7.6 cubic inches per item inside; the Britool case only 7.1 cubic inches—and I didn’t count the bit assortment.) The biggest problem I’m having with the Craftsman kit at the moment is that it sometimes feels backwards: The smaller end of the extension fits into the ratchet, and the larger end goes over the back of the socket. If you’re interested, it was here as of this writing, for a bargain $60.*
Next up was the critical 1/2-inch-drive socket set. As I wrote in part one, I always figure that if I break out the 1/2-inch set on the road, it’s because something major needs repair—something quite likely to have stopped the vehicle or at least seriously affected it. So, more than any other component of the entire tool kit, I wanted to insure I had the highest quality 1/2-inch sockets and ratchet . . . yet I still wanted it to be compact, and preferably in its own case that would fit into the 1550. I had just put together a comprehensive eBay-sourced loose set of 1/2-inch-drive Snap-on sockets, but they’d pretty much been integrated into my rolling cabinet at home; plus, they were all 12-point sockets, and I wanted six-point for field use.
 Britool "Expert." Not bad, but . . .
I tried a Britool Expert set, in the new blue-case-and-handle color scheme. It was compact and comprehensive—but I just wasn’t comfortable with the looks or feel of it. The chrome was thick, but orange-peeled in spots, and several features of the earlier Britool products had been eliminated. The ratchet mechanism didn’t feel perfectly consistent. Strangely, the word “Britool” appears nowhere—is the company afraid to have those old Spitfire mechanics associate the name with this stuff? It wasn’t really bad, just . . . Anyway, I kept looking.
Sears—nothing. Harbor Freight—just kidding. Then I discovered France.
Say what? Actually I’m referring to Facom ("Fahcomb"), a 90-year-old French tool maker that’s been called “the Snap-on of Europe.” Even though now owned by Stanley, and now basing production of some components in Taiwan, Facom seems to have retained its high standards; in fact I’ve seen a few web comments claiming the finish on the Taiwan pieces is a step up from the later France-sourced products. The Facom 1/2-inch-drive S.200DP metric set nearly matched the Britool Expert case in volume efficiency, had noticeably better finish, and included sockets from 10mm all the way up to a crankshaft-pulley-sized 32mm (the S.6BP is very similar, lacking only the shorter extension). I’m not fond of the palm-control directional switch on the ratchet—I prefer a lever—but it has a smooth and even 72-tooth action and is easily serviceable. Combined with the exquisite Snap-on 18-inch flex ratchet I detailed last time, I now feel I’ve got a nearly perfect 1/2-inch socket array.
Did I go off the deep end just to find good socket sets that happened to come in compact, compartmented cases? I can hear some of you (including Roseann) saying, “Uh, yeah . . .” and perhaps you’re right. Okay, you’re almost certainly right. For me that compartmentalization adds a sense of order that I find incredibly valuable when I’m lying on my back in the dirt under a dangling part of a vehicle that shouldn’t be dangling. The downsides are price—I paid significantly more for these neatly-packaged tools than I would have buying, say, open-stock Craftsman tools and finding my own boxes—and warranty coverage: I’m pretty sure there are more Sears stores in the U.S. than Facom dealers (not to mention the no-longer-made Britool kit)—but then again I have very little fear of these breaking. The cases add some weight to the whole tool kit—and despite my obsession with volumetric efficiency, they take up more space than a socket rail and a small tool roll. However, I’ve been using the evolving core of this kit in the field for two years now, and I’ve yet to regret the trouble it took to put together. Most telling: I have yet to leave a single socket in the dirt.
Next: Screwdrivers you can hammer on, a cheap hacksaw that beats out an expensive one, and a fitting that converts your ratchet into a torque wrench. Read part 3 HERE..
The main U.S. Facom distributor is Ultimate Garage.
*Addendum: The jury is in on the Max Axess kit, and it's thumbs down. The biggest problem is the bulk of the extensions, which as mentioned fit over the socket. Twice in the brief time I was evaluating the set that bulk posed problems getting "axess" to nuts close to other parts. Also, the lack of a longer extension has proven to be a very real drawback. Sorry Sears.
 Note the extra diameter of the Max Axess extension on the bottom. Each extension has a 14mm socket attached. (Note here too the nice knurling and wrench-compatible hex end of the Britool extension.)
Chris Scott's Adventure Motorcycling Handbook, 6th edition

I can think of no higher compliment to give Chris Scott’s Adventure Motorcycling Handbook than to say it is without doubt motorcycling’s equivalent to the Vehicle Dependent Expedition Guide, Tom Sheppard’s seminal and authoritative bible for four-wheeled expedition travel. The Adventure Motorcycling Handbook has just been released in a well-deserved sixth edition, and has once again been thoroughly revised and updated to include the most up-to-date information possible regarding planning, motorcycle selection, ancillary equipment, route possibilities, shipping, political situations—essentially about 90 percent of what you’d need to embark from scratch on a major motorcycling excursion, short of actual riding instruction (which you could get at the 2013 Overland Expo after buying the book directly from Chris).
The Adventure Motorcycling Handbook is a lively read, whether you’ve committed to a cover-to-cover marathon prior to buying a Ténéré and departing for Tamanrasset, or are just flipping and browsing for amusement. In addition to in-depth articles there are maps, many short, handy charts, and a good hundred text boxes: a complete Cyrillic alphabet, a primer on GPS, a section on black markets and bargaining, a brilliant two-page motorcycle troubleshooting guide, and, of course, a for-and-against chart comparing hard and soft luggage. Lois Pryce contributed a delightful and informative section on women riders titled “Adventure motorcycling—the bird’s-eye view,” which you’ll get if you know British slang. Grant Johnson penned the chapter on shipping—it would be difficult to find someone more knowledgeable on the subject. And Gaurav Jani, the solo traveler and filmmaker, discusses touring India and the Himalayas on a Royal Enfield—surely the only really stylish way to do so. There are a good two dozen other contributors as well.
The first half of AMH deals with preparation, equipment, and life on the road; the second half comprises route guides to Asia, Africa, and Latin America respectively. The route guides rightly concentrate on practicalities of money, border crossing formalities, customs, and so forth, and only briefly touch on main routes and sights. (I suggest augmenting the AMH with a Rough Guide once you’ve decided where you’re riding.) Finally, the last chapter, “Tales from the Saddle,” is worth the price of the book on its own.
No such work is perfect, but I had to look closely to find flaws in the Adventure Motorcycling Handbook. Many sections were simply beyond my areas of expertise so I wouldn’t even attempt to critique them, but in other areas I noticed a few glitches, and one ancillary section contains misinformation I’d classify as potentially dangerous.
Some of the details on country information appear to be outdated or cursory. I imagine this is somewhat inevitable even in a regularly revised book; it’s just not possible to maintain perfect accuracy without a Fodor’s-sized staff. For example, the section on Kenya describes the equatorial town of Nanyuki as lacking anything but basic groceries; in fact there’s been a giant full-service Nakumatt there for at least a couple of years (along with a Dorman’s, perhaps the finest coffee chain on the planet, and a chemist stocking what is definitely the highest-priced sunscreen on the planet). The Namanga border-crossing section lists the price for a Tanzania visa at $50; but for some years it’s been $100 for U.S. (and, peculiarly, Irish) citizens, and U.S. bills must be dated later than 2006—two missing pieces of information that could cause significant hassle.
There’s a single page in AMH titled “Survival,” the information in which is so scant it would have been better left out altogether. Another section on (or rather, against) weapons clearly betrays an editorial viewpoint rather than objective information. Of course it’s Chris’s book and editorial stance, but knowing of several instances in which travelers saved their money and vehicle if not their skins by analyzing the threat and meeting it with aggressive resistance, I think readers would have been better served by a fair look at both sides of the issue.
Oh, and . . . the dangerous bit? All I’ll say here is, Chris, for God’s sake talk to me before you print the venomous snakes section in the seventh edition. The rest of you, ignore the entry (except for the perfectly true advisory that bites from such snakes are extremely rare) and consult a current source of information if you plan travel where venomous reptiles might be present - this particularly refers to the suggestion to wrap the bitten limb, which is contraindicated for many species. Rather surprisingly, Wikipedia has an excellent page on the subject in general, and good first-aid advice, here.
Aside from the snake-bite treatment suggestions, the Adventure Motorcycling Handbook remains the standard by which all its imitators will be judged—that is, if anyone ever works up the nerve to imitate it. Most highly recommended.
$23.95 Available direct from—well, through—the book’s website here.
Hint: When using “Search,” if nothing comes up, reload the page, this usually works. Also, our “Comment” button is on strike thanks to Squarespace, which is proving to be difficult to use! Please email me with comments!
Overland Tech & Travel brings you in-depth overland equipment tests, reviews, news, travel tips, & stories from the best overlanding experts on the planet. Follow or subscribe (below) to keep up to date.
Have a question for Jonathan? Send him an email [click here].
SUBSCRIBE
CLICK HERE to subscribe to Jonathan’s email list; we send once or twice a month, usually Sunday morning for your weekend reading pleasure.
Overland Tech and Travel is curated by Jonathan Hanson, co-founder and former co-owner of the Overland Expo. Jonathan segued from a misspent youth almost directly into a misspent adulthood, cleverly sidestepping any chance of a normal career track or a secure retirement by becoming a freelance writer, working for Outside, National Geographic Adventure, and nearly two dozen other publications. He co-founded Overland Journal in 2007 and was its executive editor until 2011, when he left and sold his shares in the company. His travels encompass explorations on land and sea on six continents, by foot, bicycle, sea kayak, motorcycle, and four-wheel-drive vehicle. He has published a dozen books, several with his wife, Roseann Hanson, gaining several obscure non-cash awards along the way, and is the co-author of the fourth edition of Tom Sheppard's overlanding bible, the Vehicle-dependent Expedition Guide.


