Overland Tech and Travel
Advice from the world's
most experienced overlanders
tests, reviews, opinion, and more
Outdoor Retailer 2013
 This was tucked in a far back corner of the main hall. I didn't ask.
For anyone remotely interested in outdoor gear, the annual Outdoor Retailer show in Salt Lake City, Utah, is an exciting event, overwhelming in the scope and sheer volume of products. If you’re as fascinated by equipment as I am, you’re likely to find yourself humming the tune to Babes in Toyland as you enter the main hall and inhale the scents of Gore-Tex, carbon fiber, nylon, and titanium. Okay, none of those materials really has a scent, but you get my meaning.
I’ve been attending OR since the early 1990s, when it was still held in Reno, Nevada. (Persistent legend holds that the show was simply not invited back there one year when Reno officials belatedly realized that the attendees weren’t gambling or buying tickets to Englebert Humperdinck concerts.) Over the years, the show has had its minor ups and downs, but the 2009 and 2010 SLC post-Great-Recession ORs were scary in their dearth of both exhibitors and new products. Like the automotive industry after WWII, most companies simply recycled products with new colors rather than invest in development, while they waited to see in which direction the economy would go.
In 2012 the tide seemed to have turned. The Salt Palace Convention Center was packed with both exhibitors and attendees, the mood was buoyant, and I fully expected the 2013 show to be full speed ahead.
What I found was, to sum up a complex situation in one word . . . ennui. What can I say about a show in which one of the most interesting products I noticed was a tent stake?
The main hall of the center is where all the big guns in the outdoor equipment world hold court: Patagonia, Cascade Designs, Arc-teryx, The North Face, Marmot, etc. While there were a few highlights here (to be highlighted in a bit), the overall impression was of an industry either dangerously complacent or suffering from renewed pessimism. A worse prognosis came from a cynical friend in the community who dismissed the entire event with, “It used to be about people getting out and doing cool things. Now it’s about the lifestyle—people looking like they get out and do cool things.”
That might be too harsh, but not much I saw belied the viewpoint. For years the centerpiece of the south hall area was some form of climbing wall, open to anyone who cared to give it a try and always busy. Gone. Move north along the main aisle and you’d hit the big indoor pool where kayak manufacturers demonstrated their new models. Gone. Versions of both have been banished to the “Pavilions”—county-fair-sized tents north of the convention center, where new and/or underfunded companies hope to strike gold. The only “outdoor sport” in evidence in the main building was a slackline manufacturer’s demonstration area. Indoors and 12 inches off the floor, a slackline (basically a tightrope employing a strap rather than a rope) strikes me as something pinched from a county fair booth where you might win a stuffed animal if you can stay on it for ten feet (those who practice it over 2,000-foot chasms are, of course, in a different league). Yet, indeed, there seemed to be no shortage of clothing manufacturers—even Carhartt, traditionally a blue-collar supplier to construction workers and cowboys, was getting in on the craze, and touting their seniority to effete upstarts such as Mountain Khakis. Is this clothing/lifestyle thing really a trend, or did I employ motivated reasoning to reinforce unfair first impressions? Perhaps next year will tell.
Anyway, enough expostulating. Three days at OR were enough to ferret out a few products of note. Some were brand new and intriguing, some I had dismissed previously as unlikely to survive, but re-evaluated on their second or third appearance.
 A traveling coffee pot one inch high . . .
Coffee being uppermost in my mind each morning, I should start with the brew-in-bag product from Nature’s Coffee Kettle. It comprises a two-compartment foil pouch, in the top of which is a hermetically sealed packet of ground coffee of various flavors. You zip off the top, slowly pour in 32 ounces of boiling water, and the brewed coffee collects in the bottom section, from where it can be poured out through a screw cap. The sealed packet can be folded to take up a space no larger than six by eight inches by an inch thick. Although the product has been around a while, I never paid attention since the bag appeared to be a one-time-use-then-it’s-trash product. However, this time I stopped and spoke to the inventor, Matt Hustedt, who assured me the packet of grounds can be replaced, so the foil “kettle” could be used a half-dozen times or more.
I brought a couple samples home and tried the organic Columbian. After opening the top and eyeing the packet of coffee, I cut the amount of water I poured in to 24 ounces, and in addition, as Matt had suggested to enhance the boldness, upended the kettle several times to recycle the water through the grounds (be sure to rezip the top if you do this!). The verdict from this fan of strong, high-quality coffee, was . . . bravo. The flavor and strength were surprisingly good, although I’m glad I cut the water. I suspect the brew would have been even better if I’d poured in the water more slowly at the start.
While some (especially motorcyclists) might use the Nature’s Coffee Kettle as a primary travel brewing device; given its sealed nature (Matt claims to have brewed good coffee with two-year-old pouches) and nearly flat dimensions, I’m thinking one or two of them would be good backups to keep stashed somewhere in case you ran out of your Tanzanian Peaberry beans in the backcountry, or your hand-cranked burr grinder explodes and you can’t find a metate.
While on the subject of beverages, let’s move later in the day and talk about freeze-dried beer.
 Backcountry soda and . . . beer?
No, I’m not kidding, although “freeze-dried” is a deliberate misnomer. Like many of us, Patrick Tatera often wished for a way to enjoy good beer far in the backcountry, without the exertion of carrying it there. Rather than try to brew beer and then dehydrate it, he invented a method of brewing the “beer” parts of beer—i.e. the malt, hops, alcohol, etc.—into a concentrate. He then invented a bottle called a carbonator, which infuses that concentrate into the ice-cold mountain spring water you’ve collected 15 miles into your backpacking trip, and carbonates the lot. The result? Well, I’m not sure what the result is, as I haven’t yet tasted the finished product. But Patrick claims to be a devotee of high-quality beer, and none of the available brews claims to replicate PBR, so I plan to follow up and report. Pat’s Backcountry Beverages, as the company is known, also produces concentrates for soft drinks. I’ll try those too.
About that tent stake: It’s from UCO, a division of Industrial Revolution. It looks like an ordinary V-shaped aluminum tent stake, except for the cunning little LED light that slips over the top once you’ve pounded in the stake. Powered by a single AAA cell, it can be set to a 17-lumen constant glow, or a strobe. Besides obviating those headlong trips over tent stakes we’ve all accomplished, it will locate your tent for after-hours hikes. Neither the 10-hour burn time on constant nor the 24-hour life on strobe strike me as particularly efficient; I think they could halve the lumens and still effectively light the stake.
 No more nighttime faceplants over tent stakes
At the Industrial Revolution booth I also picked up some of their stormproof matches. These aren’t your ordinary stormproof matches: Strike one, and when its orange secondary material is burning fiercely, dunk it in a glass of water. Pull it out, give it a shake—and it will keep right on burning. Impressive. To go with them in my survival kit I added some Flame Sticks from Ace Camp. These green plastic sticks look like flashing from some molded product; you’d toss them in the trash if you didn’t know better. But once lit they’re reported to burn powerfully for five minutes, which is exactly what I got out of one in a light breeze. The sticks are too long to fit in the waterproof case the matches came in, so I clipped the ends off a half-dozen. There should be few circumstances in which I couldn’t get a fire going with this combination, except at the bottom of a pond.
 If you can't light a fire with these, turn in your merit badge.
Over the years I’ve tried several brands of cargo nets to secure those awkward loads in the cargo bay of Land Cruiser wagons, Wranglers, and Defenders, or on roof racks. I’ve hated all of them. It’s nothing to do with the products, really, it’s just that to wrap a variety of objects in a variety of vehicles, they wind up being huge, tangle-prone, and awkward, and more often than not snug nicely around half the contents while leaving the rest bouncing. But frequently ratchet straps just can’t encompass everything that should be secured. So I’m cautiously excited by the Lynxhooks interlocking tiedown system, a completely modular and infinitely expandable product comprising individual straps with adjustable buckles, a short length of natural rubber bungee, and a pair of hooks. The hooks are the clever part, as they can either connect to a tiedown point or snap to another hook—or five or ten other hooks—to create a custom-sized and custom-shaped spider of straps (or, of course, each strap can be used as . . . a strap). I got a sample, but plan to ask for more to create a net for the back of my FJ40. I’ll report in full then, but I don’t see how they wouldn’t work as advertised.
 The Lynxhooks snap together to form custom cargo nets.
Finally, on to more advanced equipment. I walked past a booth in one of the pavilion tents and spotted a bunch of little square bricks perched here and there, each proclaiming “Text Anywhere.” I thought they were just cute displays, but it turns out they’re the actual device: Connected by wi-fi to any smart phone, they utilize the worldwide Iridium satellite system to allow two-way text messaging from pretty much anywhere on the planet. The device is $399, a subscription including 100 texts is $30 per month, you can idle the account for $5 per month, and it’s compatible with Apple, Microsoft, Android, Linux, or Blackberry operating systems. I wheedled the sales manager, Garry Harder, into sending one home with me then and there. I’ll review it soon, then we plan to take it to Kenya this fall where we’ll be working on another project with the Maasai and will be in the proper area for a real test. If it works as promised, it will be a huge step up from the typical one-way SPOT-type device.
 TextAnywhere plus a smartphone = global texting.
More as I sift through 20 pounds of dealer catalogs, scribbled notes, and iPhone photos.
See our Flickr set Outdoor Retailer 2013 for more images of interesting products not covered here.
Nature's Coffee Kettle is here.
Pat's Backcountry Beverages is here.
Industrial Revolution is here.
Lynxhooks is here.
TextAnywhere is here.
Schuberth C3 helmet: 12 months and 10,000 miles review
by Carla King, CarlaKing.com
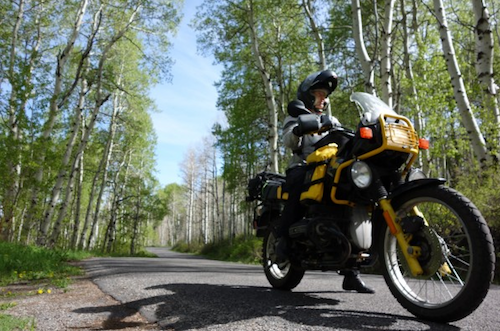
My last helmet squeezed my jawbone, giving me a headache after about an hour. The previous one pressed on my left temple. Another rattled, another fell forward over my eyebrows, and yet another let a constant stream of air up the back of my neck. Helmets have made me itchy and sweaty, the visors have popped off, and the air flow controls have never quite worked properly. I've worn half-helmets, full helmets, modular helmets, dual-sport helmets, other people’s helmets, cheap helmets, medium-priced helmets, and expensive helmets. But in Spring of 2012 I started wearing a Schuberth C3, and since then I have stopped to look at a view, to ask directions, to fill up my gas tank, to buy snacks at a convenience store, to make phone calls and to take photos, all with my helmet still strapped on.
 WHY MODULAR?
I’ve always liked the idea of a modular helmet. I travel a lot and interact with people on the road, and it’s nice to be able to slide up the chin bar so people can see my face when I’m talking with them, especially when attempting a foreign language. But helmets have always been so uncomfortable that I've removed them every opportunity, sighing "aaahhhh" in relief from pressure-points, itching, and sweating. The Schuberth C3 is the first helmet I've owned that I don’t rip off my head as soon as the wheels stop turning, and that’s saying something, because I have been riding since I was a teenager.
Continue reading the full review here.
We will be running more motorcycle and equipment reviews from Carla, a longtime Overland Expo instructor and one of the most accomplished riders we know. Carla's been riding motorcycles since she was 14, and has ridden every kind of bike on most continents.
The amazing ClampTite
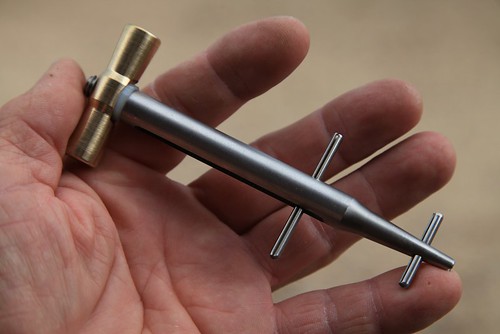
I know, I know—I’m starting to sound like Ron Popeil. But it’s been some time since I used a tool as cunning as this little device, which can do everything from replacing a broken hose clamp on a fuel line or seizing a rope end to repairing a stress-fractured luggage rack on a motorcycle or splinting a broken tie rod on a Land Rover.
But wait, there’s more! The ClampTite uses ordinary safety wire you can buy with the tool, or almost any on-hand substitute in a pinch, including fence wire and even coat hanger wire, to securely wrap just about anything that needs to be fastened or immobilized. And the size range it will handle is essentially limited only by the length of the wire.
You might think you could approximate what the ClampTite does with a pair of pliers and some twisting, but trust me, you wouldn’t be able to apply the amount of tension available through the tool’s threaded collar. Look at this sample of both a single and double wrap on a length of rigid PVC pipe. I tried and failed completely to get that much compression with an ordinary hose clamp.

The ClampTite can make either a single-wire or double-wire clamp (see above). With a single wire you can use as many wraps as necessary, although, depending on the material, friction will start to overcome the ability of the tool to adequately tighten the wire if you overdo it. On a radiator hose like I used for the test, a single wrap of doubled wire is more than stout enough; if you were repairing, say, a split axe handle you could use several wraps of a single wire, then repeat in several places along the split to completely secure it. The same procedure could secure a Hi-Lift jack handle along a broken tie rod, or . . . you name it. The potential applications are endless.
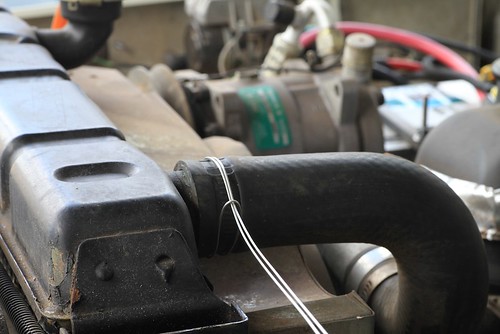 Begin a hose clamp by doubling a length of wire and wrapping it like so.
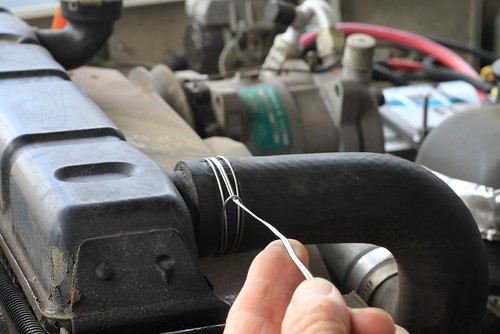 Wrap it again and through the loop.
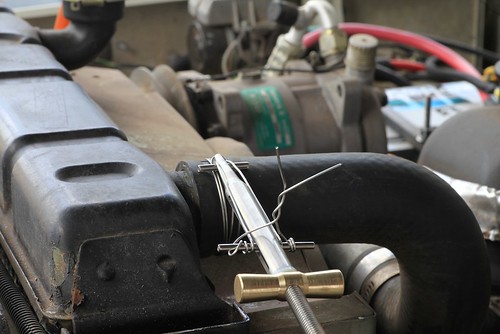 Attach the ClampTite, secure the ends of the wire, and screw in the bronze nut to tension the clamp.
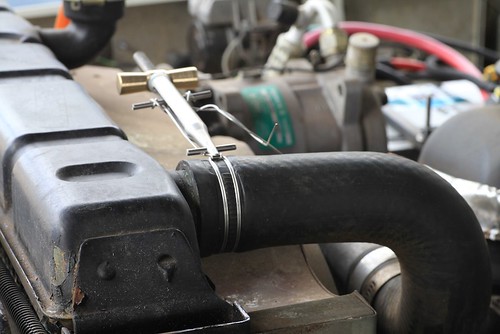 Flip the tool to lock the wire.
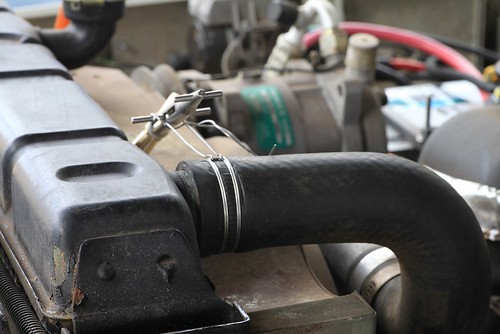 Release the tension on the tool, clip the wires, and . . .
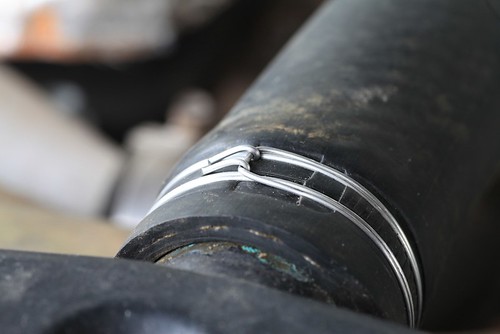 . . . you're finished.
I found the ClampTite easy to use. My biggest challenge was keeping the wire lined up correctly while installing a double-wrap clamp, to keep it from overlapping—although that probably wouldn't affect the seal on a radiator hose.
While it’s impressively compact (a larger model is also available), there will be places you simply can’t use the ClampTite. You need to be able to access the trouble spot to wrap it with wire, attach the tool at the spot, and have room to flip it (double wire) or twist it (single wire) 180 degrees to anchor the clamp once you’ve tightened it. But with ingenuity you can overcome many obstacles. Looking around our vehicles, I found a fuel line fitting on a carburetor that would be inaccessible if its hose clamp broke. However, by removing the fitting from the carburetor first and taking off the other end of the fuel line, one could clamp the line to the fitting, screw the fitting back in with the line attached, then re-attach the other end.
I think the ClampTite would be at least as useful on a motorcycle as in a four-wheeled vehicle, if not more so. I’ve seen many more parts fail on bikes due to the higher intrinsic vibrations and necessarily harsher ride. We had Tiffany Coates’s legendary BMW R80GS, Thelma, parked at our place for nearly a year some time ago. Thelma has seen long (200,000 miles), hard use and it shows. Thinking back, I’m sure I could have used up at least a hundred yards of safety wire reattaching various dangling bits on that bike.
ClampTite tools start at just $30 for a plated steel and aluminum model, which would be ideal for a motorcycle. The stainless and bronze unit I tested is $70.
Final note: Unlike the Ronco 25-piece Six Star knife set, ClampTite tools are made in the U.S. And you won’t get a free Pocket Fisherman with your purchase. Sorry.

ClampTite tools are here. Thanks to Duncan Barbour for the tip!
Friction . . .
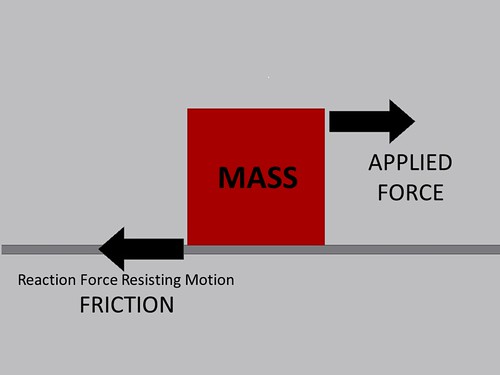
Have you ever tried to slide a cardboard box full of books or other weighty contents across a floor? Did you notice that the box was difficult to get moving, but that once sliding it became easier to push?
If so, you’ve experienced the difference between static and kinetic friction.
While it might seem counterintuitive, friction between two surfaces is greater when there is no movement between them. Once that initial bond is broken with an applied force, friction is reduced. That force can be a push or pull, as when you moved the box of books, or another force such as gravity. Put that same box of books on one end of a table and lift that end. The box will stay put until gravity overcomes the static friction, at which point it will slide right off the other end.

What does this have to do with us? The differences between static and kinetic friction explain many of the interactions between a vehicle’s tires and the road. Again counterintuitively, when your tires are rolling along in a straight line there is essentially no movement between the contact patch and the road aside from slight hysteresis in the tread. When you apply force to the tire, during acceleration, braking, or cornering, you’re still dealing mostly with static friction—right up to the point when the tire loses traction and begins slipping, when kinetic friction takes over. That’s why locking up the tires during a panic stop increases braking distance, why an early Porsche 911 whose rookie owner lifts off the gas pedal in a decreasing-radius turn is likely to wind up backwards in the bushes, and why a four-wheel-drive vehicle or motorcycle climbing a steep slope suddenly stops climbing when the wheels start spinning.
Rubber generates friction essentially three ways: though adhesion, deformation, and wear. Adhesion refers to the simple stickiness of the material. Adhesion friction is thought to be created by transient molecular bonding between the adjacent materials. Deformation occurs when the rubber in the tire molds to minute imperfections in the surface and creates a momentary mechanical bond (also called keying). Tearing is just that: if the tire’s tread material is stressed beyond its tensile strength, it sheds microscopic particles of material, and that process absorbs energy, which increases friction.

These principles apply to a tire turning on a loose surface as well, but in varying degrees. Frequently when a tire loses traction, it has not lost traction against the substrate directly under it; rather that layer of substrate directly against the tire is shearing against the material beneath it. You get an exaggerated example of this when a tire fills with mud and spins. A whole bunch of mud is sticking to the tire quite happily, but it’s slipping against the mud below.
Awareness of that frequently thin line between static and kinetic friction can help make you a better driver or rider. The trick is to balance the throttle (when climbing) or brakes (when stopping or descending) to keep the tires just this side of that edge. Of course, most modern four-wheel-drive vehicles incorporate computer-controlled devices that do some or all of it for you. I recently experienced Jeep’s Hill Descent Control (HDC) on a steep, bouldery downhill trail. Even though I was aware of the capabilities of the sytem, it was unnerving in an automatic-transmission vehicle to simply select low, push a button on the dash, and then head over the edge, foot off the brake pedal. I could hear the ABS engage the brakes on individual wheels to keep the speed down to a comfortable crawl. In my FJ40, even though it has a manual transmission and a very low first gear in low range, engine braking would not have been sufficient to control the speed on a descent this steep, and I would have been actively cadence-braking—intermittently pumping the brake pedal until the wheels almost locked—to approximate what the Jeep did on its own (except, of course, I could not have engaged the brakes individually). It was an impressive performance, if completely reliant on software.
Anti-lock braking systems are becoming prevalent on motorcyles as well—in fact the EU has mandated ABS on all bikes larger than 125cc beginning in 2016.
Likewise, modern traction-control systems such as Land Rover’s Terrain Response can detect when the static/kinetic line has been crossed, using speed sensors at each wheel, and will reduce torque to or brake a wheel that has lost traction on a climb or cross-axle ditch, sending power to the opposite wheel. I had equivalent terrain-conquering capability in the long-term 2008 (pre HDC) Jeep Wrangler Rubicon I drove for two years, but the software part of the equation was in my head, as I chose when to disengage the Jeep’s front sway bar to increase suspension compliance, and when to engage the front and rear differential lockers to prevent wheelspin. The single real-world advantage there was the fact that, unlike Terrain Response, I could tell when a difficult section was coming up several feet before I actually reached it, and take the appropriate actions proactively. Terrain Response (and its cousins) can only respond when its sensors detect that a wheel has lost traction, a second or two after the static/kinetic line has been crossed. Nevertheless, these automatic systems make child’s play of situations that used to require considerable finesse and experience.
Is that a good thing or a bad thing? You decide—but, just as when navigating with GPS versus map and compass, it’s a wise thing to have backup skills. If someone with a new Range Rover were to ask me the best way to become proficient at off-pavement driving, I’d say, “Buy a Series III 88 and start with that.” If you can master a manual-transmission, straight-axle, leaf-sprung, open-diff Land Rover—and the concept of static versus kinetic friction—you’ll be able to climb back in the Range Rover and soon have that computerized wizardry doing your bidding, instead of just being along for the ride.
Tire review: Big Block Adventure
by Bret Tkacs, for Adventure Motorcycle Magazine
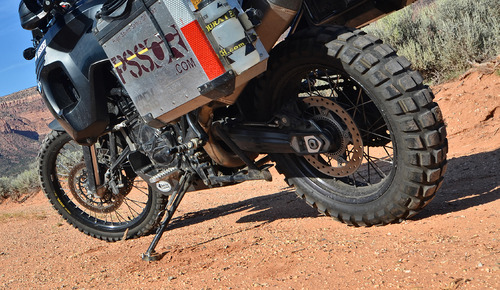
In early 2012, Kenda released the Big Block Adventure tire to compete in the emerging big-bike knobby market. ADVMoto put a set of Big Blocks to the test on the back trails of Baja, Mexico, and then continued north up the west coast to Washington state. Back then, the Big Blocks were good performers, and on par with the competition, but lacked mileage and shed their skins faster than other big-bike knobbies we’re accustomed to, such as the TKC80 and Metzler Karroo. Kenda took note of this and their engineers worked over the Big Block with a revised tread pattern and new compound.
The casual eye won’t see the difference, as the tread pattern looks very similar. The only way we could tell they were the new tires was by measuring the space between the tread blocks. The newer tires have a block pattern slightly tighter, which puts more rubber to the road/trail.
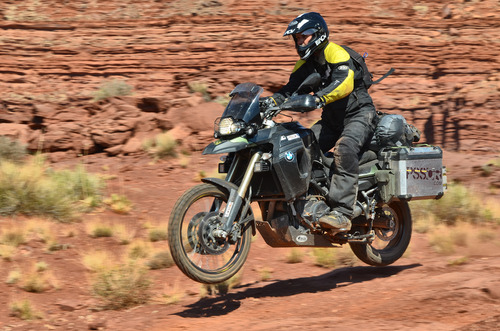
We recently mounted up our fresh set of tires and headed off to Moab to put them to the test. After riding 800 miles of jeep trails and gravel roads, as well as over 2,000 miles of pavement on our loaded test bike, the Big Blocks were still holding out.
The bottom line is that Kenda has a winner with good off-road performance, good street manners, and mileage that equals the competition. Highly recommended.
Pros:
- Still a top performer off-road
- Performs well for a knobby on the street
- Improved mileage over earlier version
- Price point winner
Cons:
- Less prestige than big name brands (ego)
- Like all big bike knobbies it has a short life span (equal to other knobbies, though)
Bret Tkacs works for PSSOR Training
The blue vinyl table is dead!
A few years ago on a long road trip, Roseann and I opted for convenience over our usual preference for solitude, and stopped for the night in a developed campground: picnic tables, barbecues, flat sites, perfectly symmetrical pine trees—actually quite nice as such places go. That evening an enormous motorhome inched carefully into a nearby slot. The driver emerged just long enough to open a side panel and pull out a remarkably colon-like corrugated hose, which he plugged into his deluxe site’s sewage receptacle. Another umbilical fed electricity to the behemoth. The man then scurried back inside, and soon I heard the sound of some TV program on what I assumed had to be at least a 40-inch flatscreen. And that was the last we saw of either him or his wife.
I try not to judge fellow travelers on the size or splendor of their vehicles. After all, to someone in a CJ5 with a Eureka A-frame tent our Four Wheel Camper must seem pretty posh. But, while the camper provides us a cozy, stormproof home away from home, holing up inside is not the goal when we’re traveling—even in Jellystone Park. In good weather we like to be outside as much as possible. With the camper’s excellent Fiamma awning deployed, and a table and chairs set up, we can lay out snacks and drinks, then tackle some weighty biological issue like seeing how many bird species we can document while sitting down. “Nine species in one martini!” Roseann is likely to announce (although identification skills wane somewhat after the second, and we're likely to record birds never seen in this hemisphere . . .).
Where was I? Right: Until recently we relied for our outdoor table on one of those ubiquitous roll-up blue-vinyl-covered things with the screw-in aluminum legs. It was ugly and wobbly, but perversely durable despite my best attempts to “accidentally” destroy it. A Maasai shuka used as a tablecloth improved its looks immeasurably, but I still knew what was underneath . . .
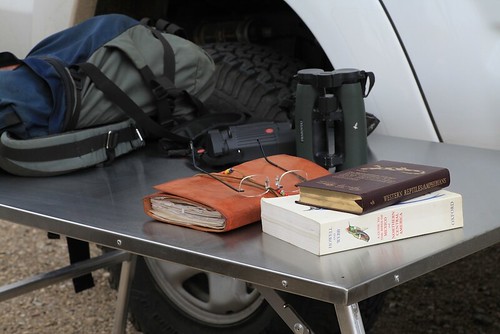
Then, a few months ago, Roseann emailed me (from across the room) a link to the Front Runner camp table, designed to slot under the company’s roof rack. We'd used a version of it in Tanzania and Kenya several times and had been very impressed. Here was a proper outdoor table: welded and braced aluminum legs that folded flat under a top formed and welded from a single sheet of stainless steel. At 29 by 45 inches, the table was large enough for food prep, eating (it seats four snugly), or work, and it weighed a reasonable 23 pounds. She also linked to the Z brackets designed to attach to the Front Runner rack—and then asked, “Could we mount this under the front overhang of the camper?”
I emailed back, “Great idea,” then did some measuring on the camper—plenty of room. Tom at FWC said no problem drilling the composite sheet that forms the bed area of the camper as long as I sealed it well, and certainly no problem with the extra weight: the FWC’s overhang is tested to 1,100 pounds (or, as he and I quipped at the exact same time, “Two average Americans.”).
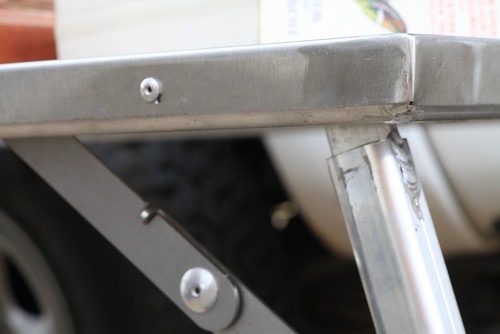 The table's top is formed, welded at the corners, and riveted to the aluminum frame.
When the table arrived it met my expectations and then some. Compared to its cheesy roll-up predecessor it was the Rock of Gibraltar. All the hardware was cadmium-plated and secured with nylocks. The stainless top would be impervious to spills or heat. True, at $285 such features should be taken for granted. Nevertheless it was a relief to consign the blue vinyl table to the Cemetery of Obsolete but Kept Around Forever Camping Gear down in the storeroom.
Exercising due measure-thrice-cut-once caution, I marked and drilled, then veeery carefully countersunk (so the bed’s top section could slide over the bolt heads) three holes for each of the Front Runner Z-brackets from inside the camper. They are designed to hold the table on its narrow ends, but I needed them to hold it on the longer sides, meaning the table would protrude about a half a foot each way.
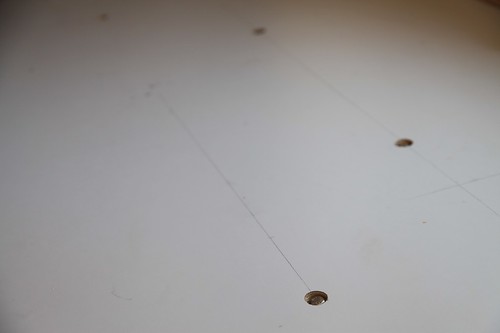 The bolt heads are countersunk just enough to allow the bed extender to slide over them.
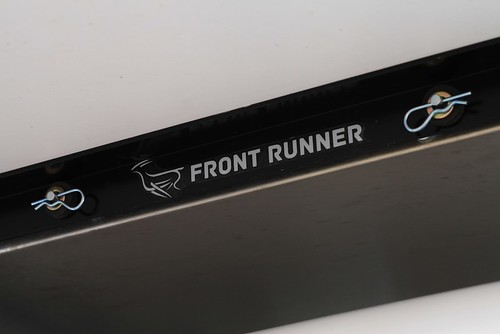
The latch mechanism included with the brackets wouldn’t work in our application, so I used a 24-inch-long piece of 1.25-inch aluminum angle iron as an end stop on the passenger side of the truck. I drilled two holes sideways through the frame and top of the table, and inserted a pair of two-inch-long 1/4-inch-diameter clevis pins through them. A pair of hairpin clips holds the pins to the table:
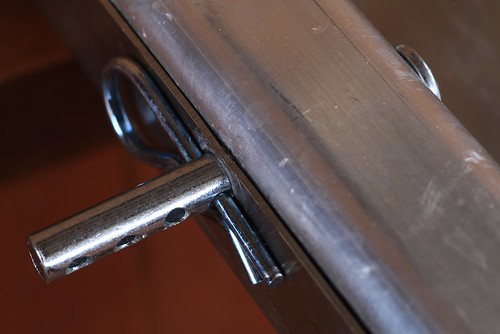
The pins extend through two holes in the end bracket and are secured with two more hairpin clips backed by a rubber washer and a metal washer. I also glued a couple of furniture bumpers on the back of the end bracket, and two flat pieces of rubber gasket on the insides of the Z brackets where the table slides in from the driver’s side of the truck.
The Z brackets came with carpet strips glued along the bottom, so I hoped all the rubber and carpet would minimize any rattling directly over our heads. My last step was to install a backup latch at the other end, using two of the cunning little Expeditionware Transport Loops sold by Expedition Exchange, plus a Quicklink. (My plan is to try to find a small padlock that will fit through these loops.)
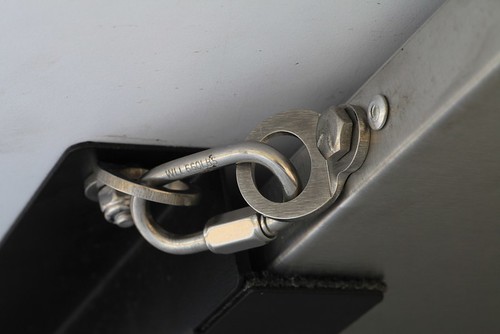
Twelve hours after I finished up, the installation got a good test when we left for a biological survey in the Sierra Aconchi in Mexico, which involved a 230-mile paved approach, then a rough ten-mile climb up a four-wheel-drive trail. On the highway the table created no noise at all. On rough slow pavement with the windows open we could very infrequently hear a barely perceptible oilcan effect over sharp bumps as the table top flexed. On the trail there was zero sound from the table or mount, at least none we could hear over the tire and drivetrain noise.
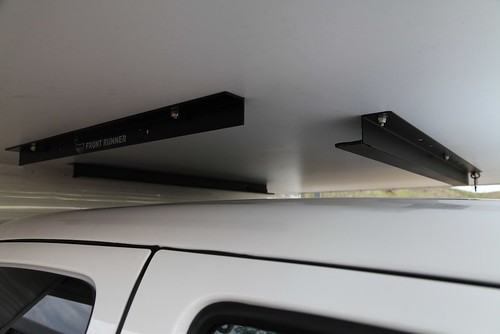 The completed bracket assembly.
Once in camp the table proved just about perfect. There was plenty of room to spread out plant samples, notebooks, bird guides, and binoculars; at a group dinner we covered it with chips and salsa and vegetables, then served the outstanding pizzas Roseann somehow managed to make on the camper’s stove top. One night delivered a torrential rain which bothered the table’s aluminum and stainless steel not at all. Total time to set it up on the first day and stow it on our last morning: about two minutes each.
So, not only did we gain a big upgrade in the quality of our outdoor table, we also gained storage space inside the truck. If you have an overhead camper—or a roof rack—I can recommend the Front Runner approach.
On the other hand, if you have a fondness for blue vinyl, email me.
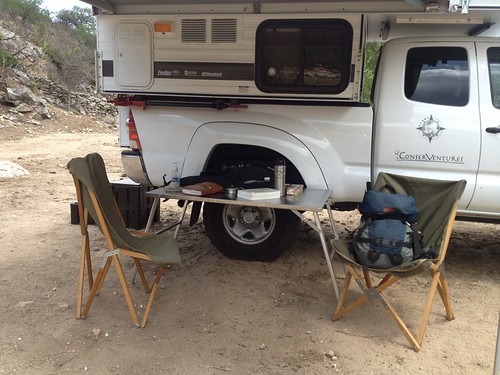
Addendum: A forum member on Wander the West suggested that the Front Runner brackets could be set up to carry a solar panel in the same spot. Brilliant.
Equipt Expedition Outfitters also carries similar tables from K9 racks, in three sizes.
Front Runner Outfitters is here.
The Transport Loops are available here.
Accessible wonders

Many years ago, while on an assignment for Outside magazine, I was graced with the incomparable experience of viewing Victoria Falls for the first time by walking up to the edge of the drop on Livingstone Island, right in the middle of the mile-wide cascade, after arriving by canoe, just as David Livingstone had almost exactly 150 years before. The breath literally left me; I gasped and very nearly wept at the sight. Only the terror of totally losing my cool in front of my guide kept me halfway composed.
Much more recently—last week in fact—I was graced with another first: driving out of the tunnel on California State Highway 41, the Wawona Road, and seeing Yosemite Valley spread out before me below sweeping clouds and mist. El Capitan rose on the left in an impossible vertical wall; Bridalveil Fall plunged in a gossamer thread on the right.
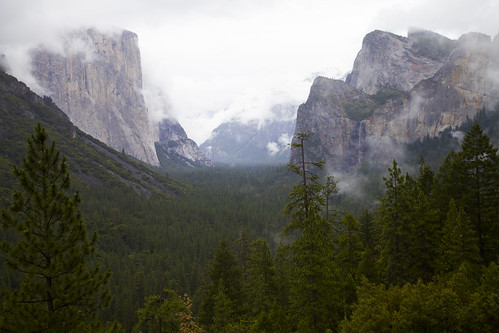
To paraphrase: The breath literally left me; I gasped and very nearly wept at the sight. Only the terror of totally losing my cool in front of my wife kept me halfway composed.
It was a good lesson in something many of us tend to forget: You don’t necessarily need to travel to Zambia (or fill in the blank) to have a once-in-a-lifetime experience. We were two easy day’s drive from home, and the sum total of our off-pavement excursions to that point had been about 500 yards of dirt road to reach a Forest Service dispersed campsite. Yet that view of Yosemite Valley will forever live in my memory directly alongside that first vertiginous peek over Victoria Falls.
The two natural wonders share more than you might think. Both were “discovered”—i.e. sighted for the first time by a person of European stock—in the mid-1800s, after of course being well-known to the locals for ages. In both cases, the “discoverers” were on profit-driven missions: Joseph Walker was looking for furs when he stumbled on Yosemite Valley, and Livingstone hoped to find a water route into the heart of the African continent. Both sites are now overrun with tourists pursuing, at times, tangent activities that seem utterly superfluous to me: I’ve said frequently that if you view Victoria Falls for the first time and think, Okay, cool—now I need to go bungee jumping off the bridge, then there’s something seriously wrong with your sense of wonder.
Yet the grandeur of both places effortlessly transcends the swarms of humans buzzing around them. Even at Yosemite, we found a trail along the Merced River, under El Capitan, on which in four miles we met two other people. And at Victoria Falls I spent a night camped on Livingstone Island (alone except for an askari), and got up at midnight to see the “moonbow”—a rainbow caused by moonlight shining through the mist of the falling water. Later I was awakened by the sound of foraging elephants, which wade to the island at night to feed.
So maybe I shouldn’t complain that everyone else was off bungee jumping.
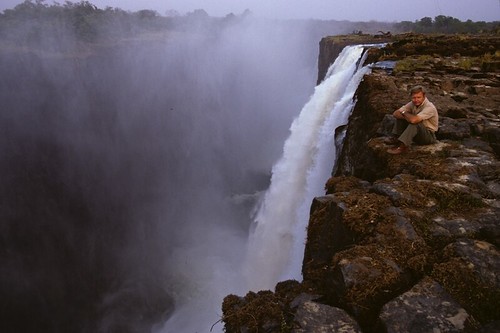 The author, alone at dusk on Livingstone Island. The bungee jumpers are off toasting their adventure somewhere.
New VDEG imminent . . .
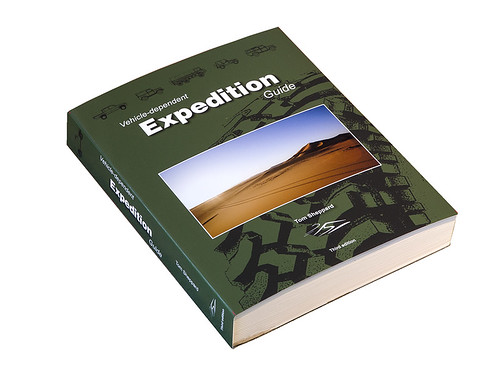
I just received this cryptic note from an unnamed source somewhere in the U.K.:
"Desert Winds Publishing (i.e. Tom Sheppard) is pleased (relieved) to announce to its patient, faithful customers and enquirers – some of whom started the list last July – that VDEG3 (otherwise known as the new, third edition of the 500-page Vehicle-dependent Expedition Guide), has been proofed and should soon be available. At the same price as before (36 GB pounds) – and not through Amazon, or ‘used’ at four times that figure. (Postage: UK £5.85; EU £9.50, elsewhere, inc US, £16.00)
‘Relieved’ because the techno-gremlins chose the 11th hour to attack the layout software, calling on the true spirit, tenacity and ingenuity of overlanders to get things back on track. Desert Winds Customer Service Department (i.e. Tom Sheppard) quotes their Chief Proof Checker (i.e. Tom Sheppard) as saying, ‘Yes, quite a few of the pictures are now the right way up and most of the text has been back-translated from the Indo-Iranian zabani-tadjik calligraphy’.
On stage, smartly dressed in a black turtle-neck, Desert Winds’ CEO (yes … ) thanked the small distinguished army of back-order e-mailers for their patience and asked them to keep an eye on the www.desertwinds.co.uk website which Desert Winds Webmaster (you guessed it … ) will be updating very soon."
 A Desert Winds spokesman, questioned by a lady with a clip-board, said, "No, the actual book won't be as large as the sheets on the table in the foreground."Just in case you've been living under a rock in the Sahara (or are new to the overlanding world, in which case you're forgiven), Tom's Vehicle Dependent Expedition Guide is the bible of overlanding, and a copy should be in the library of anyone remotely interested in vehicle-dependent travel. It is, quite simply, superb in its authority, scope, and humor (i.e. humour), and is the standard by which all other books on the subject are and always will be judged. The fact that it can (and can only) be purchased directly from the writer/publisher/proof checker/customer-service representative is a lovely bonus in this day of Amazon.com facelessness. Of all the high-quality and/or indispensable items I try to discover and recommend on OT&T, you'll thank me for none more than this one. In case you missed the link in the text, it's available HERE.
Hint: When using “Search,” if nothing comes up, reload the page, this usually works. Also, our “Comment” button is on strike thanks to Squarespace, which is proving to be difficult to use! Please email me with comments!
Overland Tech & Travel brings you in-depth overland equipment tests, reviews, news, travel tips, & stories from the best overlanding experts on the planet. Follow or subscribe (below) to keep up to date.
Have a question for Jonathan? Send him an email [click here].
SUBSCRIBE
CLICK HERE to subscribe to Jonathan’s email list; we send once or twice a month, usually Sunday morning for your weekend reading pleasure.
Overland Tech and Travel is curated by Jonathan Hanson, co-founder and former co-owner of the Overland Expo. Jonathan segued from a misspent youth almost directly into a misspent adulthood, cleverly sidestepping any chance of a normal career track or a secure retirement by becoming a freelance writer, working for Outside, National Geographic Adventure, and nearly two dozen other publications. He co-founded Overland Journal in 2007 and was its executive editor until 2011, when he left and sold his shares in the company. His travels encompass explorations on land and sea on six continents, by foot, bicycle, sea kayak, motorcycle, and four-wheel-drive vehicle. He has published a dozen books, several with his wife, Roseann Hanson, gaining several obscure non-cash awards along the way, and is the co-author of the fourth edition of Tom Sheppard's overlanding bible, the Vehicle-dependent Expedition Guide.

